

phil&teds espresso buggy User Manual
TM
Warranty registration
Return your warranty response
form to qualify for your 12
month warranty.
If your Kiwi Espresso Buggy
has a problem or you are
concerned about any aspect of
its performance then please
contact your Most Excellent
Dealer or Phil & Teds Most
Excellent Buggy Co Ltd.
We keep your warranty record
on file. Registration on the form
provided allows us to contact
you if needed. So please return
the warranty card ASAP!
Instructions
.
TM
Kiwi Espresso Buggy™
Dear Kiwi Espresso Buggy Owner
Congratulations and thank you for purchasing the fabulous Kiwi
Espresso Buggy
We really value customer feedback so, if you have any comments,
please contact us.
Don’t forget to complete your warranty form and mail it to us. We respect
your privacy so will not give this information to others - it is confidential.
.
TM
These instructions are
important…
Read these instructions
carefully before use and keep
them for future reference. Your
child’s safety may be affected if
you do not follow these
instructions. Our product is safe
if used safely. Safe operation
depends on careful adherence
to the instructions outlined in
this manual. Please study them
and contact us if you are unsure.
Read carefully the WARNINGS
detailed inside and on the buggy.
We trust you’ll get a great deal of enjoyment and use from your Kiwi
Espresso Buggy
The Most Excellent Team
. Do not allow a
TM
before folding, erecting or
TM
They are for your safety and
information.
Please follow these instructions.
Kiwi Espresso Buggy™ Warranty
The warranty protects the original purchaser against faulty workmanship and faulty
items. If it breaks when it shouldn’t have, we’ll put it right. This does not cover normal
wear and tear, the tyres, the hand grip or punctures. This warranty is for 1 year from
date of purchase. Your buggy must be used at all times in normal conditions,
satisfactorily maintained and with these instructions being followed, otherwise this
warranty is invalid. The customer is responsible for any inwards freight charge to the
manufacturer for warranty claims. This warranty is only for the benefit of the original
purchaser of a new buggy from an authorised dealer. Proof of purchase may be
required. Any consequential loss or damage directly or indirectly as a result of using
your buggy is expressly excluded from this warranty.
For any warranty issue contact your retailer or the maker - Phil & Teds Most Excellent
Buggy Co Ltd, 102-112 Daniell Street, Newtown, Wellington, New Zealand
Tel +64 4 380 0833 Fax +64 4 380 0137 www.babybuggy.co.nz
Injury may result if you do not follow these safety precautions.
Warnings and Safety Notices
the buggy.
Injury may result from improper use.
! WARNING: Never leave children unattended. Take extra care with any child asleep in
! WARNING: Ensure that all locking devices are engaged before use.
! WARNING: Any load attached to the handle affects the stability of the vehicle.
! Do not hang luggage or carry extra children on Kiwi Espresso Buggy
or use accessories not designed for Kiwi
TM
They may be unsafe. Please contact your retailer if you are unsure.
TM
child to stand on the seat. Do not carry extra children or bags over that allowed by
these instructions.
Always use the crotch strap through the plastic rectangular patch and in combination
with the waist belt and shoulder straps. Use the safety harness at all times. Ensure the
! WARNING: Avoid serious injury from falling or sliding out. Always use safety harness.
adjusting the buggy.
safety harness is correctly fitted and adjusted.
! Make sure children are clear of the Kiwi Espresso Buggy
park the buggy. Apply wheel brakes when loading or unloading children.
bacpac.
! Do not use the buggy near an open fire or exposed flame.
! WARNING: Apply wheel brakes when parking the buggy. Apply both brakes when you
! Do not place more than 3kg/7lbs in the parcel tray or more than 5kg/12lbs in the
! The buggy is intended for children up to 5 years or maximum weight of 23kg/50lbs.
Espresso Buggy.
! This vehicle shall only be used for a single child.
! Do not modify Kiwi Espresso Buggy
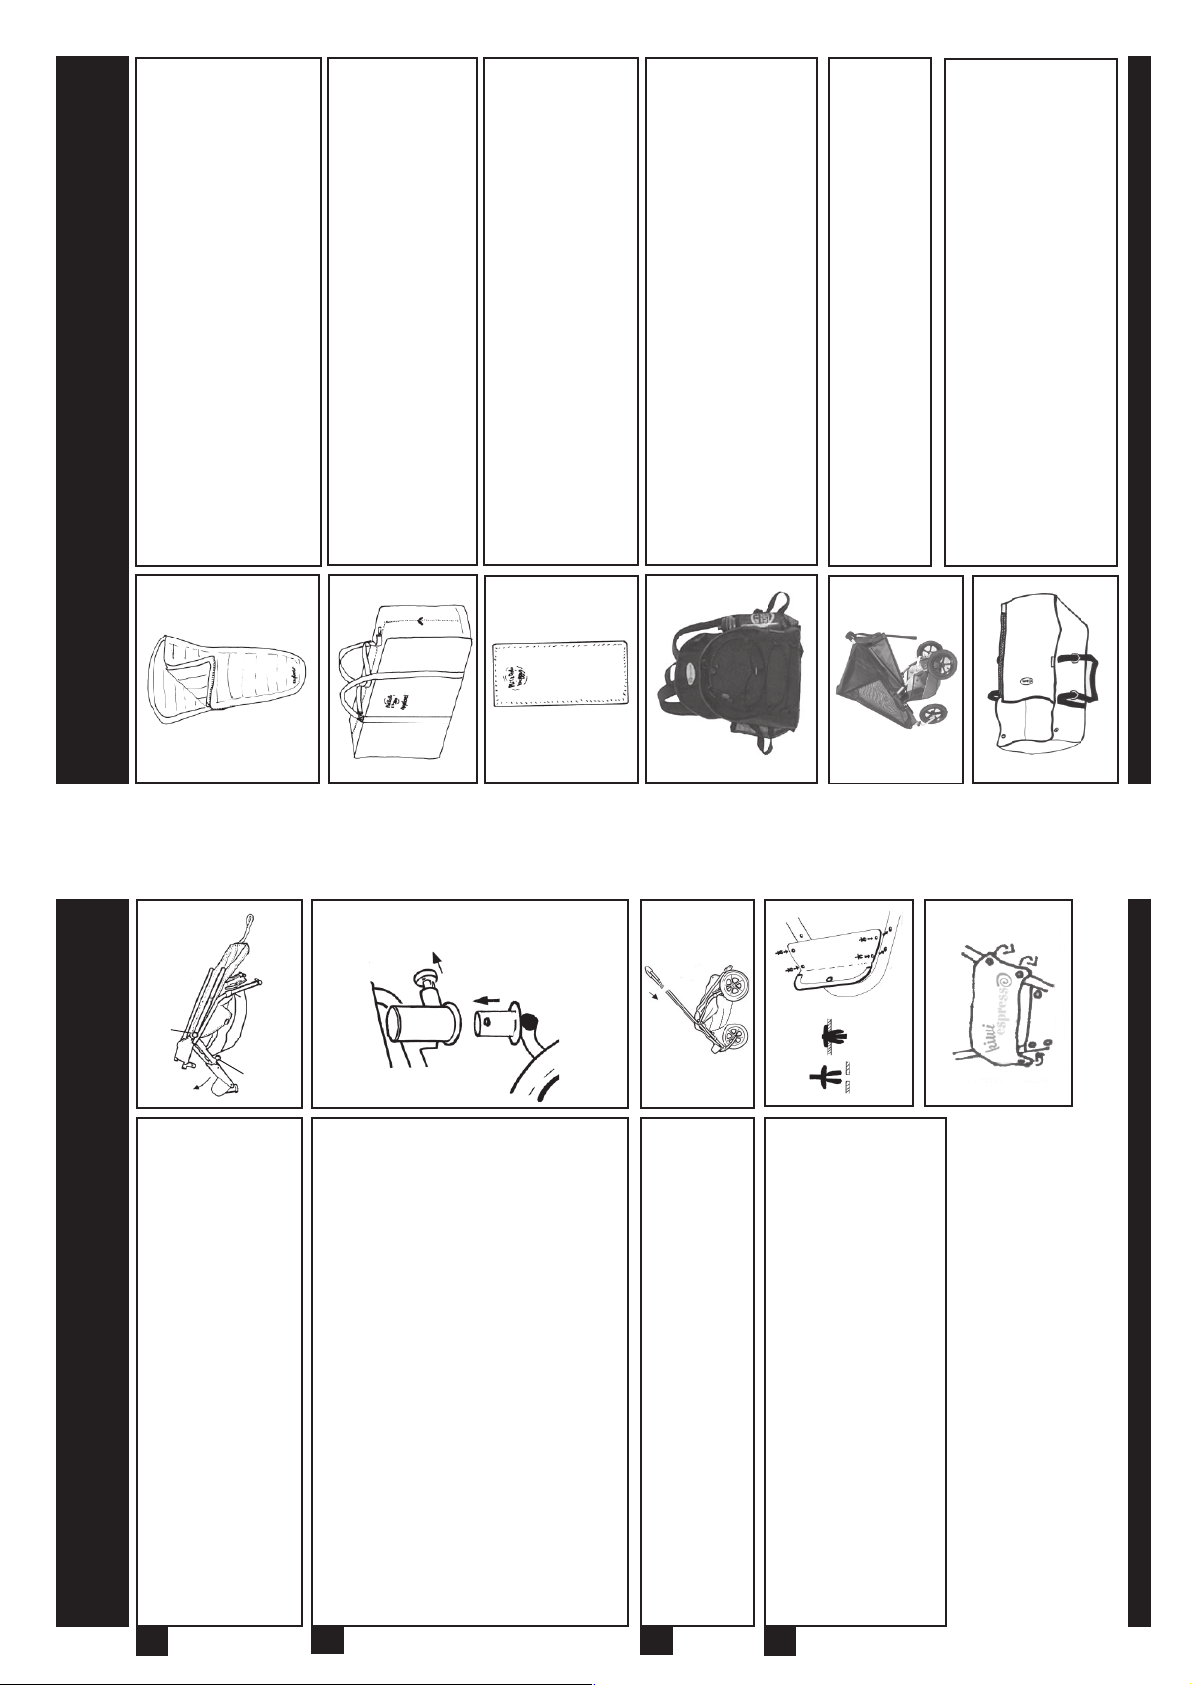
Explorer sleeping bag
Un-clip the breastplate. Thread the safety harness through the 5 slots
in the back of the sleeping bag. Attach the safety harness to the
breastplate. Fold down the front of the sleeping bag as required.
The sleeping bag top can be removed completely and the base used
as a buggy liner in warmer weather.
Remove the liners for separate washing. Follow fabric care label for
washing sleeping bag. Colours: Black or Blue
Accessories
. Remove the rear
TM
for long periods may result in
TM
in the travel bag and zip up bag. Carry with the shoulder or
TM
Travel bag
These bags help protect Kiwi Explorer Buggy
wheels and place (axle-to-axle) together. Place Kiwi Explorer
Buggy
hand straps. Because the fabric has a waterproof layer, storage of a
damp/wet Kiwi Explorer Buggy
fabric mildew. Air dry. Colours: Black
Kiwi mattress
Made from the same fabric as the buggy, the mattress fits the base of
the newborn fitting. Guide the safety harness around the mattress.
Use the safety harness in the usual way.
The mattress can be used in the sitting position for extra back support
and comfort. Remove the mattress for cleaning. Fabric care as with
Bacpac
buggy fabric.
Made from the same durable fabric as the buggy, great for extra
Sun-insect mesh and storm cover
Mesh protects from insects, wind and sun (SPF 6.5). Storm protects
from wind and rain.
storage and security. Attaches to the buggy (upper handle and lower
frame) with quick-release clips. Internal PVC compartment for soiled
items. Shoulder straps allow you to carry goods separate from the
buggy.
Removed easily for cleaning. Fabric care as with buggy fabric.
Fits on handle and snap fastens onto footplate.
Child Lifter
Sits in newborn position of buggy. Has a firm base and attaches
using snap fasteners. Attach 5-point safety harness around child
lifter.
Sleeping baby can be lifted from the buggy using two handles. Also
comes with a shoulder strap for easier carrying.
Made from the same durable fabric as the buggy and comes in
matching colours.
Call your Most Excellent Dealer for Accessories and Prices
swivel
wheel
autolock on
pipe out
J Bar
A
B
box is not damaged.
footplate, fabric items & handle.
Unpacking your Buggy
On arrival and setting up for the first time
• Your buggy (frame and fabric items) will arrive in a box. Check the
• The initial setup involves installing: wheels, front wheel J-Bar,
Don’t worry - it’s easy - no tools needed.
Put the wheels on
Lie box on floor (TOP up). Carefully cut tape and lift off top. Check that
all components purchased are in the box. Check no components appear
damaged. Carefully lift out wheels (2 rear and one front), and frame.
(There may also be accessories purchased in the box.) Place frame on
floor, clicking auto-locks (A & B) in place. Refer diagram above.
Attach the rear wheels by sliding each axle through the axle tubes.
Depress the ‘nib spring’ on each axle. Ensure nib pops out once
through axle. These hold the wheels in place. Remove wheels as
required.
1
2
Put the footplate on
Position footplate over front of buggy frame. Insert 4 plastic rivets
through holes in footplate; match to holes in frame. Rivet must rest
on footplate. DO NOT push stalk until rivet rests on footplate. Push
(or tap) rivet centre stalk, until flush.
Put footplate cover on. Snap fasten footplate cover to frame with
Attach front wheel: Pull swivel wheel lock on pipe out (refer diagram);
aim J-bar to the side not front; depress nib spring and insert J-bar into
pipe; ensure nib spring pops at top and J-bar is flush with plastic bush;
push cap over pipe top. Reverse procedure as required.
Put the handle on
Slide the handle onto the frame until nibs “pop”. Ensure the holes
in the handle face down. Depress the nib springs on undersides
of frame.
3
4
logo facing correctly up.
 Loading...