


IT Istruzioni d’uso
EN Instructions for use FR Notice d’emploi
DE Gebrauchsanleitung ES Instrucciones de uso PT Instruções para uso NL Gebruiksaanwijzing DK Brugsanvisning
FI Käyttöohjeet
CZ Návod na použití SK Návod na použitie HU Használati útmutató SL Navodila za uporab
RU Инструкции по пользованию TR Kullanim klavuzu
EL Οδηγίες χρήσεως
sí
1 |
A |
B |
C |
|
|
|
OK |
2 |
A |
|
B |
3
A |
B |
A
C
B

4 |
A |
 1
1
5 |
A |
1 |
2
6 |
A |
B
2
B

 1
1
2
B |
C |
7 |
A |
1 |
1 |
|
|
|
|
|
|
|
2 |
|
|
2 |
|
8 |
|
|
|
|
A |
|
|
|
|
D |
D |
|
B |
B |
|
|
|
|
C |
9 |
|
|
|
|
A |
|
B |

10
3
1 2
11 |
|
|
|
|
|
|
|
C |
D |
|
|
|
|
|
|
|
|
|
F |
|
A |
B |
|
E |
12 |
A |
|
|
B |
|
|
|
1 |
|
|
|
|
2 |
|
13
2
1
14 |
A |
|
B
4
 3
3
15 |
A |
B
16
A
B
C 
 D
D
17 |
E |
F |
G |
18 |
|
A |
B |
2
1
19 |
C |
|
2 |
|
1 |
|
4 |
20 |
|
|
|
|
|
|
|
|
|
21 |
A |
|
|
|
|
|
|
22 |
A |
|
B
Sí
1 |
2 |
3 |
4 |
|
|
10 |
11 |
|
12
7 |
9 |
8
|
|
|
1) BCAPSZ• |
7) MUCI5P22N |
|
|
|
||
|
|
|
2) BSAPSZ• |
8) BSASPSZ• |
|
|
|
3) IRBELV0007 |
9) MUCI0129N |
|
|
|
4) BCOPSI• |
10) SAPI6837NGR |
|
|
|
5) ERSHSI00-NY01RE01M |
11) SPST6692SN |
|
|
|
6) SAPI6430NGR |
12) ITPASD00NL65 |
IT• |
Ricambi disponibili in piú colori da specificare nella richiesta. |
|
||
EN• Spare parts available in different colours to be specified when ordering. |
||||
FR• |
Pièces de rechange disponibles en plusieurs couleurs à spécifier dans la demande. |
|||
DE• Ersatzteile in mehr Farben vorhanden, die in der Anfrage spezifiziert werden müssen. |
||||
ES• |
Repuestos disponibles en otros colores que se especificarán en el pedido. |
|||
PT• |
Peças de reposição disponíveis em cores alternativas a serem especificadas no pedido. |
|||
NL• |
Reserveonderdelen verkrijgbaar in meerdere kleuren, bij bestelling te specificeren. |
|||
DK• Reservedele kan leveres i flere farver som bør specificeres ved bestillingen. |
||||
FI• |
Varaosia saatavana eri värisinä: ilmoita väri tilauksessa. |
|
||
CZ• |
U náhradních dílů, které jsou k dispozici ve více barvách, je nutné na objednávce specifikovat příslušnou barvu. |
|||
SK• |
Pri náhradných dieloch, ktoré sú k dispozícii vo viacerých farbách, je potrebné pri objednávke špecifikovať želanú farbu. |
|||
HU• A tartalék alkatrészek különböző színekben elérhetők, melyeket rendeléskor kell kiválasztani. |
||||
SL• |
Rezervni deli so na voljo v več barvah, ki jih je treba navesti pri naročilu. |
|||
RU• Запчасти имеются различных цветов, необходимый указать в запросе. |
||||
TR• |
Siparişte belirtilen değişik renklerdeki yedek parçalari mevcuttur. |
|||
EL• |
Ανταλλακτικά διαθέσιμα σε διάφορα χρώματα. Προσδιορίστε όταν παραγγείλετε. |
|||
- 10 -
IT_Italiano
Grazie per aver acquistato un prodotto Peg-Pérego.
 ATTENZIONE
_ IMPORTANTE: leggere attentamente queste istruzioni e conservarle per un futuro utilizzo. La sicurezza del bambino potrebbe essere messa a rischio se non si eseguono queste istruzioni.
_Questo articolo è stato progettato per il trasporto di 1 bambino nella seduta.
_Non utilizzare questo articolo per un numero di occupanti superiori a quanto previsto dal costruttore.
_ Questo articolo è omologato per bambini dalla nascita, fino a 15 kg di peso nella seduta.
_ Potrebbe essere pericoloso lasciare il vostro bambino incustodito.
_Utilizzare sempre la cintura di sicurezza a cinque punti, agganciare sempre il cinturino girovita al cinturino spartigambe.
_ Utilizzare il frontalino sempre istallato sul passeggino.
_Prestare attenzione alla presenza del bambino quando si effettuano operazioni di regolazione dei meccanismi
(maniglione, schienale).
_Azionare sempre il freno quando si è fermi e durante le operazioni di carico e scarico del bambino.
_Le operazioni di assemblaggio, preparazione dell’articolo, di pulizia e manutenzione devono essere effettuate solo da adulti.
_Non utilizzate questo articolo se presenta parti mancanti o rotture.
_ Prima dell’ uso assicurarsi che tutti i meccanismi di aggancio siano inseriti correttamente.
_ Evitare di introdurre le dita nei meccanismi.
_ Ogni carico appeso al maniglione o alle maniglie può rendere instabile l'articolo; seguire le indicazioni del costruttore riguardo ai massimi carichi utilizzabili.
_ Non introdurre nel cestello carichi per un peso superiore a 5 kg. Non inserire nei portabibite pesi superiori a quanto specificato nel portabibite stesso e mai bevande calde. Non inserire nelle tasche delle capotte (se presenti) pesi superiori a 0.2 Kg.
_ Non utilizzare l'articolo in vicinanza di scale o gradini; non utilizzare vicino a fonti di calore, fiamme libere od oggetti pericolosi a portata delle braccia del bambino.
_ Potrebbe essere pericoloso utilizzare accessori non approvati dal costruttore.
_ Questo articolo non e' adatto per il jogging o la corsa coi pattini.
_ Non utilizzare il parapioggia (se presente) in ambienti chiusi e controllare sempre che il bambino non sia accaldato; non collocare mai vicino a fonti di calore e fare attenzione alle sigarette. Assicurarsi che il parapioggia non interferisca con nessun meccanismo in movimento del carrello o passeggino; togliere sempre il parapioggia prima di chiudere il vostro carrello o passeggino.
_ ATTENZIONE: con passeggino aperto e durante l'impiego usare il frontalino solo nella posizione 1
(sollevato), ed usare la posizione 2 (abbassato) solo col passeggino chiuso.
_ AVVERTENZA: Non aggiungere materassini.
COMPONENTI DELL' ARTICOLO
Verificare il contenuto presente nell'imballo e in caso di reclamo prego contattare il Servizio Assistenza.
_Passeggino Sì COMPLETO è composto da: 2 ruote anteriori piroettanti o bloccabili, 2 ruote posteriori, cestello, portabibite, capottina, copertina, parapioggia, 2 spallacci per i cinturini e 1 spartigambe, 2 cinturini adattatori per aggancio Car Seat.
_Passeggino Sì CLASSICO è composto da: 2 ruote anteriori piroettanti o bloccabili, 2 ruote posteriori, cestello, portabibite, capottina, 2 spallacci per i cinturini e 1 spartigambe, 2 cinturini adattatori per aggancio Car Seat.
ISTRUZIONI D'USO
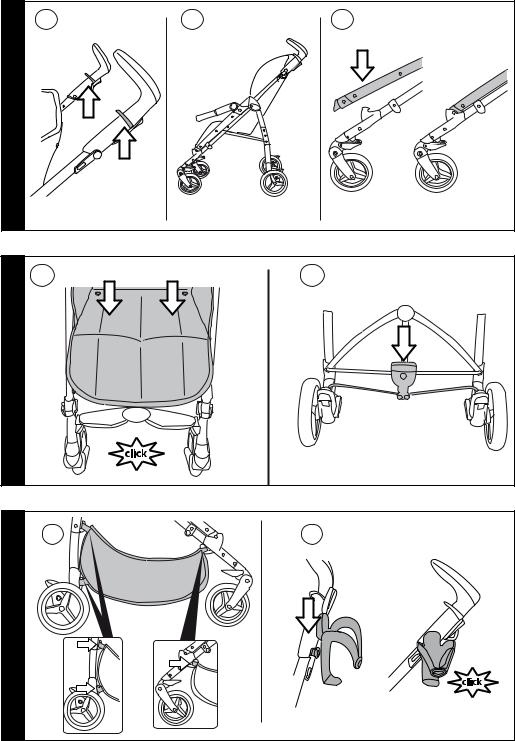
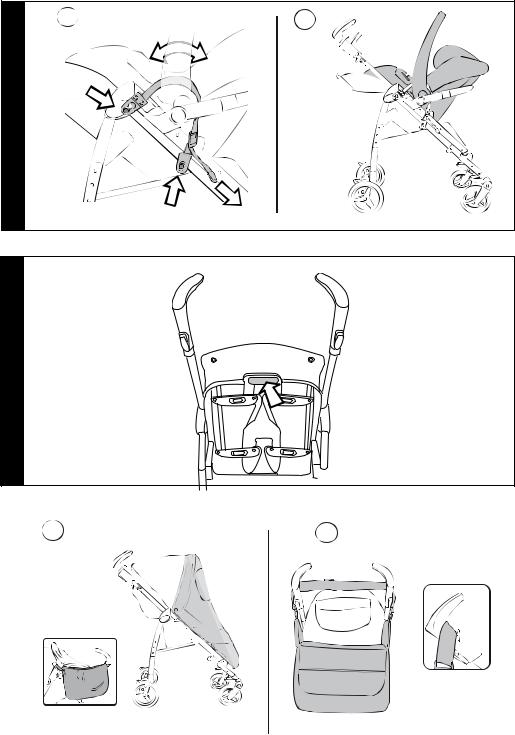
1• Per aprire il carrello, occorre tirare verso l’alto le due leve sui manici (Fig.a); contemporaneamente sollevare il carrello che si aprirà automaticamente (Fig.b).
Per verificare che il passeggino sia correttamente aperto, controllare i due ganci laterali (Fig.c).
2• Se i ganci non si fossero agganciati correttamente, fare pressione sulla seduta (fig_a) fino al click di aggancio. Infine premere verso il basso col piede su PUSH (fig_b)
e alzare il frontalino di una posizione (paragrafo 5b).
3• CESTELLO: per montare il cestello, infilare le asole ai ganci posteriori A e B e al gancio anteriore C, (fig_a).
PORTABIBITE: é applicabile solamente sul lato destro del passeggino, grazie al gancio già presente sul telaio. Per applicare il portabibite, agganciarlo fino al click (fig_b).
4• REGOLAZIONE MANICI: i manici sono regolabili in 3 differenti altezze. Per regolarli nella posizione desiderata, premere il pulsante e
contemporaneamente tirare il manico verso l’alto. Per abbassarli agire in senso contrario (fig_a).
FRENO: per frenare il passeggino abbassare col piede la leva freno posizionata sul gruppo ruote posteriori.
Per sbloccare il freno, agire in senso opposto (fig_b). Da fermi, azionare sempre il freno.
5• RUOTE PIROETTANTI: le ruote sono già agganciate al passeggino.
Per rendere le ruote anteriori piroettanti, occorre abbassare la leva (freccia 1). Per renderle fisse, agire sulla leva in senso contrario (freccia 2). Le ruote posteriori sono fisse.
ATTENZIONE: utilizzare il frontalino sempre istallato sul passeggino.
FRONTALINO: è già agganciato al passeggino.
E' regolabile in 2 posizioni: POSIZIONE 1:d'uso POSIZIONE 2: di chiusura.
Per regolarlo, premere il pulsante laterale su entrambi i lati contemporaneamente (fig_b).
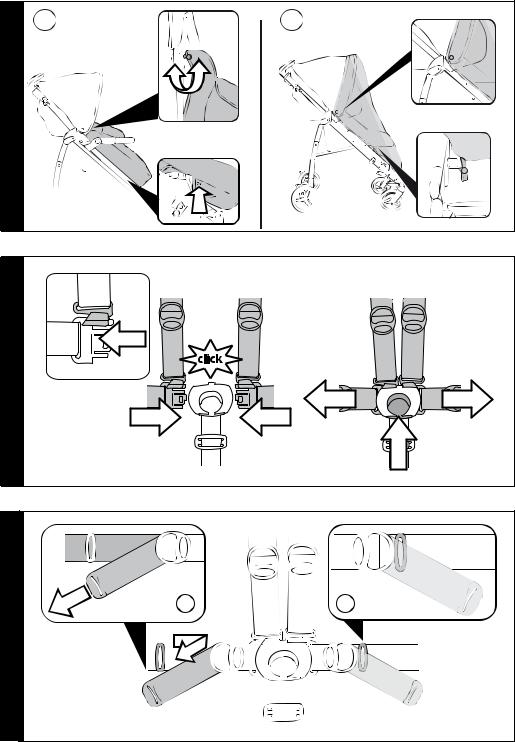
6• CAPOTTINA: per applicare la capottina, inserire gli attacchi nelle apposite sedi fino al click e abbottonare la capottina sul retro dello schienale del passeggino (fig_a).
La capottina è regolabile in 3 posizioni (fig_b) semplicemente tirandola in avanti o in dietro.
E' possibile tirar fuori lo spicchio di rete dalla capotta per proteggere il bambino dal sole (fig_c) e con un semplice gesto riposizionarla all'interno della capottina
quando non serve più.
7• COPERTINA: per applicare correttamente la copertina
(fig_a) agganciare i bottoni nella parte interna del passeggino (fig_1), calzarla sotto la seduta
comprendendo il poggiagambe e infine agganciare i
- 11 -
bottoni (fig_2).
PARAPIOGGIA: per montare il parapioggia calzarlo sul passeggino (fig_b), abbottonarlo ai lati della capottina
(fig_1) e abbottonare gli elastici comprendendo il telaio nella parte bassa del passeggino (fig_2) .
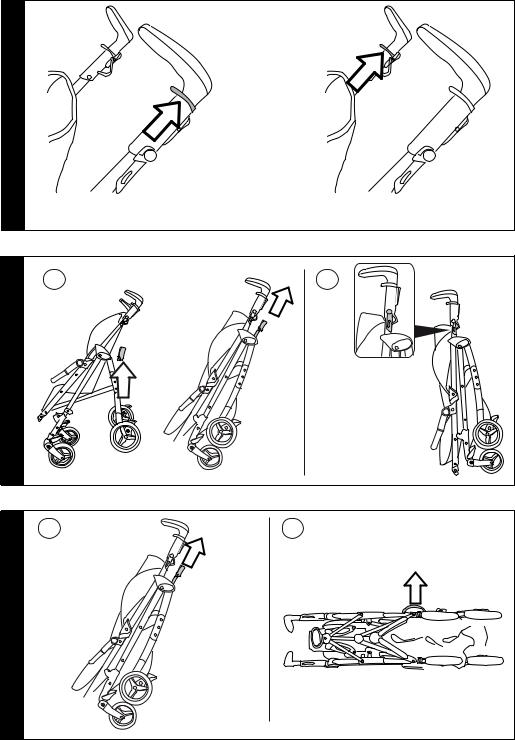
8• CINTURA DI SICUREZZA 5 PUNTI: per agganciarle, inserire le due fibbie del cinturino girovita (con bretelle agganciate freccia a) nel cinturino spartigambe fino al click (freccia b). Per sganciarle, spingere verso l'alto il pulsante tondo posto centralmente alla fibbia (freccia c) e tirare verso l’esterno il cinturino girovita (freccia d).
9• Per stringere il cinturino girovita tirare, da entrambi i lati, nel senso della freccia (Fig.a), per allentarlo agire in senso contrario. Il cinturino girovita può essere stretto fino al fermo di sicurezza (Fig.b).
10• E' possibile regolare le cinture di sicurezza in 3 altezze in base all'altezza del bambino. E' necessario passare alla posizione più alta, quando il bambino è più grande.
11• Per regolare l'altezza delle cinture di sicurezza è necessario sganciare sul retro dello schienale le due fibbie. Tirare verso di se le bretelle (freccia a) fino a sganciare la fibbie
e infilarle nelle asole dello schienale (freccia b). Sfilare le bretelle dalla sacca (freccia c) e infilarle nell'asola più
idonea (freccia d), infine riagganciare le due fibbie dietro lo schienale (freccia e). Il corretto aggancio delle fibbie è
determinato dal click (fig f).
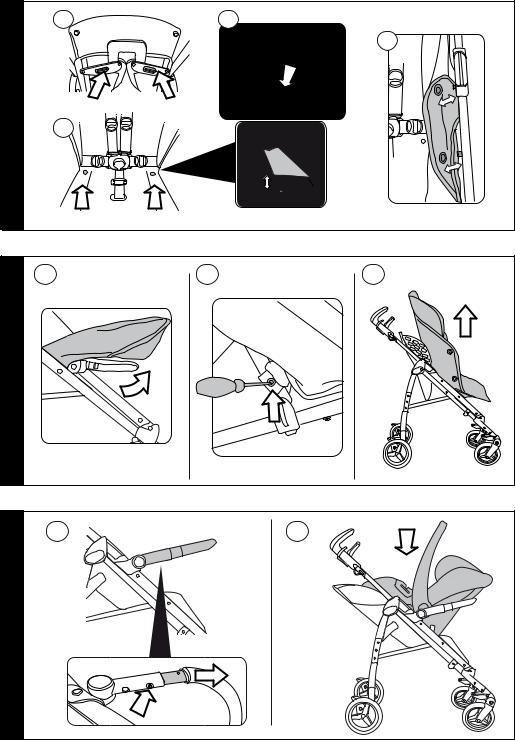
12• REGOLAZIONE POGGIAGAMBE: Il poggiagambe é regolabile in 2 posizioni. Per abbassare il poggiagambe, tirare le due levette laterali verso il
basso e contemporaneamente abbassarlo. Per alzare il poggiagambe, spingerlo verso l’alto fino al click.
REGOLAZIONE SCHIENALE: Lo schienale é reclinabile in 3 posizioni. Per abbassare lo schienale, sollevare la levetta laterale contemporaneamente su entrambi i lati e abbassare lo schienale, bloccandolo nella posizione
desiderata. Per alzarlo, spingere lo schienale verso l’alto.
13• CHIUSURA: per chiudere il passeggino, è preferibile prima abbassare il frontalino, nella posizione 2, di chiusura. É possibile chiudere il passeggino con una sola mano: tirare verso l’alto prima una leva e poi l’altra fino allo scatto.
14• Impugnare la maniglia centrale e tirarla verso l’alto fino alla chiusura (fig_a). Verificare la corretta chiusura del carrello dal gancio di sicurezza. Il carrello chiuso
rimane in piedi da solo (fig_b).
15• TRASPORTO: Il passeggino si può trasportare comodamente (tenendo le ruote anteriori fisse) impugnando la maniglia centrale (fig_a). E' possibile trasportarlo anche grazie alla maniglia laterale (fig_b).
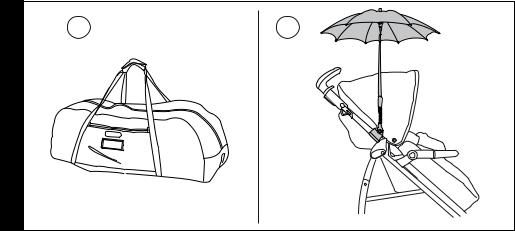
16• SFODERABILITA': per sfoderare il passeggino: sganciare sul retro dello schienale le due fibbie (fig_a). Sganciare i due bottoni nella seduta (fig_b).
Sfilare da sotto, la fibbia dello spartigambe (fig_c).
Sganciare i bottoni dalla sacca laterale (fig_d). 17• Sfilare la sacca dalla pedanetta (fig_e).
Per togliere il cinturino di sicurezza, svitare (da entrambi i lati) le due viti utilizzando un cacciavire ed una pinza per tenere fermo il dado (fig_f).
Tirare la sacca verso l'alto (fig_g).
AGGANCIO PRIMO VIAGGIO TRI-FIX
E' necessario frenare il passeggino.
Agganciare il seggiolino auto al passeggino senza il bambino all'interno.
Agganciare il seggiolino auto sempre e solo verso la mamma.
E' possibile per comodità, togliere la capottina del passeggino perchè presente sul seggiolino auto.
Posizionare lo schienale del passeggino nella 2° posizione centrale (paragrafo 12).
Posizionare il maniglione del Car Seat nella posizione di trasporto, per facilitare l'aggancio dei cinturini.
18•Allungare il frontalino premendo il pulsante sotto il bracciolo e contemporanemente tiralo verso l'esterno, da entrambi i lati (fig. a).
ATTENZIONE: allungare il frontalino solo quando si vuole agganciare il Car Seat.
Appoggiare e incastrare il seggiolino auto sulla seduta del passeggino (fig. b).
19• Agganciare prima l'asola del cinturino al funghetto del passeggino (freccia 1) e far passare il cinturino dietro al maniglione del seggiolino auto (freccia 2) .
Agganciare poi asola del cinturino al funghetto nella parte bassa del telaio del passeggino (freccia 3) e infine tendere il cinturino fino a far aderire al massimo il Car Seat al passeggino (freccia 4). Fare lo stesso procedimento nell'altro lato del passeggino (fig.c).
Car seat agganciato correttamente sul passeggino (fig. d)
Per sganciare il seggiolino auto dal passeggino: allentare le cinture;
sganciare l'asola del cinturino nella parte bassa del telaio del passeggino;
sfilarlo da dietro il maniglione del seggiolino auto; infine sganciare l'asola del cinturino al funghetto del
passeggino.
NUMERI DI SERIE
20• Passeggino Si, riporta dietro lo schienale, informazioni relative: nome del prodotto, data di produzione e numerazione seriale dello stesso.
Queste informazioni sono indispensabili in caso di reclamo.
ACCESSORI
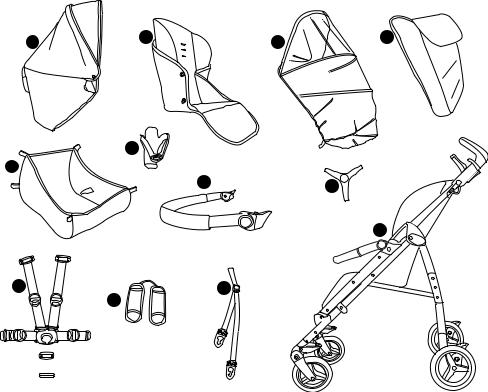
21• ZANZARIERA: applicabile alla capottina (fig_a).
BORSA: borsa con materassino per il cambio del bebè, applicabile al passeggino (fig_b).
22• BORSA VIAGGIO: Pratica borsa per il trasporto aereo del passeggino (fig_a).
OMBRELLINO: pratico ombrellino coordinato (fig_b).
PULIZIA E MANUTENZIONE
MANUTENZIONE DELL'ARTICOLO: proteggere da agenti atmosferici: acqua, pioggia o neve; l’esposizione continua e prolungata al sole potrebbe causare cambiamenti di colore in molti materiali; conservare questo articolo in un posto asciutto.
PULIZIA DEL TELAIO: periodicamente pulire le parti in plastica con un panno umido senza utilizzare solventi o altri prodotti simili; mantenere asciutte tutte le parti in metallo per prevenire la ruggine; mantenere pulite tutte le parti in movimento (meccanismi di regolazione, meccanismi di aggancio, ruote...) da polvere o sabbia e se occorre, lubrificarle con olio leggero.
PULIZIA DEL PARAPIOGGIA: lavare con una spugna e
- 12 -
dell'acqua saponata, senza utilizzare detersivi.
PULIZIA DELLE PARTI IN TESSUTO: spazzolare le parti in tessuto per allontanare la polvere e lavare a mano a una temperatura massima di 30° non torcere; non candeggiare al cloro; non stirare; non lavare a secco; non smacchiare con solventi e non asciugare a mezzo
di asciugabiancheria a tamburo rotativo.
PEG-PÉREGO S.p.A.
Peg-Pérego S.p.A. è certificata ISO 9001. La certificazione offre ai clienti e ai consumatori la garanzia di una
trasparenza e fiducia nel modo di

 lavorare dell'impresa. Peg Pérego potrà apportare in qualunque momento modifiche ai modelli descritti in questa pubblicazione, per ragioni di natura tecnica o commerciale. Peg Pérego è a disposizione dei suoi Consumatori per soddisfare al meglio ogni loro esigenza. Per questo, conoscere il parere dei ns. Clienti, è per noi estremamente importante e prezioso. Le saremo quindi molto grati se, dopo aver utilizzato un ns. prodotto, vorrà compilare il QUESTIONARIO SODDISFAZIONE CONSUMATORE, segnalando eventuali osservazioni o suggerimenti, che troverà nel nostro sito internet:
www.pegperego.com
SERVIZIO ASSISTENZA PEG-PÉREGO
Se fortuitamente parti del modello vengono perse o danneggiate, usare solo pezzi di ricambio originali Peg Pérego. Per eventuali riparazioni, sostituzioni, informazioni sui prodotti, vendita di ricambi originali
e accessori, contatta il Servizio Assistenza Peg Pérego indicando, qualora fosse presente, il numero seriale del prodotto.
tel. 0039/039/60.88.213
numero verde: 800/147.414 (contattabile da rete fissa) fax 0039/039/33.09.992
e-mail assistenza@pegperego.it sito internet www.pegperego.com
EN_English
Thank you for choosing a Peg-Pérego product.
 WARNING
_ IMPORTANT: read the instructions carefully before use and keep them for future reference. The child may be hurt if you do not follow these instructions.
_ This item was designed for the transport of 1 child in the seat.
_ Do not use this item for a number of occupants greater than that intended by the manufacturer.
_ This item is approved for children from birth up to a weight of 15 kg in the seat.
_ It may be dangerous to leave your child unattended.
_Always use the 5-point harness and attach the waist strap to the leg divider strap.
_ Always keep the front bar fitted to the stroller.
_ Be careful not to hurt the child when adjusting the mechanisms (handlebar, backrest).
_Always apply the brake when stopped and when positioning the child in the seat or when removing the child from the seat.
_Assembly and preparation of the product, plus cleaning and maintenance operations, must be carried out exclusively by adults.
_ Do not use this item if there are parts missing or signs of breakage.
_ Before use check that all the attachment mechanisms are correctly insert.
_ Do not insert fingers into the mechanisms.
_Any load hanging on the handlebar or the handles can make the stroller/carriage unstable; follow the manufacturer’s instructions for max load capacity.
_ Do not place loads over 5 kilos in the basket. Do not place in the bottle holder weights heavier than stated or hot drinks. Do not place in the hood pockets (if applicable) weights over 0.2 Kg.
_ Donotusetheitemneartostairsorsteps,heatsources, naked flames or dangerous objects within reach of the child.
_ The use of accessories not approved by the manufacturer could be dangerous.
_ This item is not suitable for jogging or roller skating.
_ Do not use the rain canopy (if present) indoors and regularly check to ensure the child is not too warm; do not park the stroller close to heat sources and keep well away from lighted cigarettes. Ensure the rain canopy is not interfering with any moving parts of the carriage or stroller; always remove the rain canopy before folding your carriage or stroller.
_ WARNING: The front bar must always be in position
1 (raised) when the stroller is open and during use. It should only be in position 2 (lowered) when the stroller is folded up.
_ WARNING: Do not add a mattress.
PRODUCT PARTS
Check the package contents and contact our Customer Service for any claim.
- 13 -
_ Stroller Sì COMPLETO version is made up of the following parts: 2 swivel/lockable front wheels, 2 rear wheels, basket, cup holder, hood, cover, rain canopy, 2 shoulder straps and 1 leg divider, 2 car seat strap adaptors.
_ The Sì CLASSICO stroller comprises: 2 swivel or locking front wheels, 2 rear wheels, a basket, a drink holder, a hood, 2 shoulder padding sections for the harness and 1 leg divider strap, 2 adaptor straps for attaching the Car Seat.
8• 5-POINT SAFETY HARNESS: to fasten, insert the two buckles of the waist strap (with attached shoulder straps, arrow a) into the leg divider strap until they click into place (arrow b). To unfasten, push the round button placed in center of the buckle upwards (arrow_ c) and pull the waist strap outwards (arrow d).
9• To tighten the waist strap, pull on both sides in the direction of the arrow (Fig. a). To loosen it do the opposite. The waist strap can be tightened as far as the safety lock (Fig. b).
INSTRUCTIONS
1• To open the chassis, pull the two levers on the handlebars upwards (Fig.a); at the same time, lift the chassis and it will open automatically (Fig.b). To make sure that the stroller is correctly open, check the two side hooks (Fig.c).
2• If the straps are not fasten correctly, press onto the seat (fig_a) until it clicks into place.
Then push down into PUSH (fig. b) with your foot and lift the front bar by one position (section 5b).
3• BASKET: To fit the basket, pull the loops over rear hooks A and B and front hook C (fig_a).
CUP HOLDER: It can only be fitted to the right hand side of the stroller, using the clip which is already present on the chassis. To fit the cup holder, push until it clicks into place (fig_b).
4• HANDLE ADJUSTMENT: The handles can be set at 3 different heights. To move them into the required
position, press the button and simultaneously pull the handle upwards. To lower them, press the button and push the handle down (fig_a).
BRAKE: To set the brake on the stroller, lower the lever on the rear wheel unit with your foot. To release the brake, lift the lever (fig_b). When stationary, always apply the brake.
5• SWIVEL WHEELS: the wheels are already fixed into the stroller.
In order to make the wheels swivel, the lever (arrow 1) must be lowered. To secure the wheels, move the lever to the opposite direction (arrow 2). The rear wheels are fixed.
WARNING: Always keep the front bar fitted to the stroller.
FRONT BAR: It is already attached to the stroller. It can be put in 2 positions:
POSITION 1: Use. POSITION 2: Folding.
To adjust it, press the two side buttons at the same time (fig_b).
6• HOOD: To fit the hood, click the fasteners onto the appropriate points and button down the hood on the rear of the stroller’s backrest (fig_a).
The hood can be set in 3 different positions (fig_b) by simply pulling it forwards or backwards.
The section of netting can be pulled out from the hood to protect the child from the sun (fig_c) and easily replaced back inside when it is no longer needed.
7• COVER: in order to use the cover correctly (fig. a), fasten the buttons in the inner part of the stroller (fig.
1) and lay it beneath the seat covering the footrest, then fasten the buttons (fig. 2).
RAIN CANOPY: To fit the rain canopy, slip it onto the stroller (fig_b), button it down on the sides of the hood (fig_1) and attach the elastic loops, taking in the chassis in the lower part of the stroller (fig_2).
- 14 -
10• It is possible to set the safety harness at 3 different heights, depending on how tall the child is. As the child gets bigger, the harness must be moved to a higher position.
11• To adjust the height of the safety harnesses, release the two buckles on the rear of the backrest.
Pull the shoulder straps towards you (arrow a) until the buckles are released and insert them in the backrest loops (arrow b). Remove the shoulder straps from the sack (arrow c) and insert them in the most appropriate buckle (arrow d), then reattach the two buckles behind the backrest (arrow e). The buckles are securely attached when a click is heard (fig f).
12• LEG REST ADJUSTMENT: The leg rest can be set in 2 different positions. To lower the leg rest, pull the two side levers downwards and at the same time lower the leg rest. To raise the leg rest, push it upwards until it clicks into position.
BACKREST ADJUSTMENT: The backrest can be set in 3 positions: To lower the backrest, lift the levers on both sides at the same time and lower it, locking it in the position required. To lift the backrest, push it upwards.
13• FOLDING UP: Before folding up the stroller, it is best to lower the front bar to position 2.
The stroller can be folded up using one hand only: pull first one lever upwards and then the other, until they click.
14• Hold the central handlebar and pull it upwards until the stroller folds up (fig_a). Check the correct closure of the chassis from the safety hook. When folded, the chassis will stand upright (fig_b).
15• TRANSPORT: The stroller can be moved with ease (with the front wheels fixed) using the central handle (fig_a). It can also be carried using the side handle (fig_b).
16• REMOVABLE COVERS:To remove the cover of the stroller:
Release the two buckles on the rear of the backrest (fig_a).
Release the two buttons on the seat (fig_b).
Pull the buckle of the crotch strap out from underneath (fig_c).
Release the buttons from the side of the sack (fig_d). 17• Pull the sack off the footrest (fig_e).
To remove the safety harness, release the screws on both sides, using a screwdriver and pliers to hold the nut still (fig_f).
Pull the sack upwards (fig_g).
ATTACHING PRIMO VIAGGIO TRI-FIX
You must first set the brakes on the stroller.
Lock the car seat onto the stroller without the baby.
The car seat must be fastened facing the mother at all times.
If necessary, take off the stroller hood since it is

already fitted on the car seat.
Position the backrest of the stroller into the 2nd central position (section 12).
Position the car seat handlebar into transport position so that the straps can be easily fastened.
18•Push the button beneath the armrest and extend the front bar, then simultaneously pull it out from both sides (fig. a).
WARNING: Only extend the front bar when attaching the Car Seat.
Lean and fit-in the car seat into the seat of the stroller (fig. b).
19•First lock the strap buttonhole into the button of the stroller (arrow 1), then pass through the strap behind the handlebar of the car seat (arrow 2).
Lock the strap buttonhole into the button on the lower part of the stroller frame (arrow 3) and then tighten the strap until the car seat is completely fastened into the stroller (arrow 4).
Follow the same procedures on the other side of the stroller (fig. c).
Car seat locked correctly into the stroller (fig. d).
Releasing the car seat from the stroller: loosen the belts;
unlock the strap buttonhole from the lower part of the stroller frame; slip it off from behind the handlebar of the car seat; then, unlock the strap buttonhole from the stroller button.
SERIAL NUMBERS
20•The Stroller Si has all the following relevant information behind the backrest: product name, date of manufacture and serial number.
This information is required for any complaints.
ACCESSORIES
21• MOSQUITO NETTING: can be fastened to the hood (fig_a).
BAG: diaper-changing bag with pad for changing baby’s diaper. Attaches to the stroller (fig_b).
22• TRAVEL BAG: practical duffle bag for transporting the stroller by plane (fig_a).
UMBRELLA: practical umbrella to match (fig_b).
CLEANING AND MAINTENANCE
PRODUCT MAINTENANCE: protect from the weather: water, rain, or snow; prolonged and continuous exposure to bright sunlight may give rise to colour changes of various different materials; store this product in a dry place.
CLEANING THE CHASSIS: periodically clean all plastic parts with a damp cloth. Do not use solvent or similar cleaning products; keep all metal parts dry to prevent rusting; keep moving parts clean (adjustment mechanisms, locking mechanisms, wheels, ...) and free of dust and sand and, if necessary, lubricate with light machine oil.
CLEANING THE RAIN CANOPY: wash with a sponge and soapy water; do not use detergents.
CLEANING FABRIC PARTS: brush fabric parts to remove dust and wash by hand at a maximum temperature of
30°C; do not wring; do not use chlorine bleach, do not iron; do not dry clean; do not apply solvent-based stain removers and do not dry in a tumble dryer.
PEG-PÉREGO S.p.A.
Peg-Pérego S.p.A. is an ISO 9001 certified company. This certification is a guarantee for customers and consumers of the transparency and
trustworthiness of the company's procedures and working methods. Peg
Pérego can make changes at any time to the models described in this publication for technical or commercial reasons. Peg Pérego is at the disposal of its customers and consumers to ensure that all their demands and queries are fully satisfied. It is a key part of our policy to ensure we are always aware of our customers' views and requirements. We would therefore be very grateful if, after using a Peg Pérego product, you take the time to fill in our CUSTOMER SATISFACTION QUESTIONNAIRE, making a note of any comments or suggestions you might have. You can find the questionnaire on the Peg Pérego website:
www.pegperego.com
PEG-PÉREGO AFTER-SALES SERVICE
If any parts of the item get lost or damaged, only use genuine Peg Pérego spare parts. For any repairs, replacements, information on the products and sales of genuine spare parts and accessories, contact the Peg Pérego Assistance Service and state the serial number of the product, if present.
tel. 0039/039/60.88.213 fax 0039/039/33.09.992
e-mail assistenza@pegperego.it website www.pegperego.com
- 15 -
FR_Français
Merci d’avoir choisi un produit Peg-Pérego.
 AVERTISSEMENT
_ IMPORTANT : lire ces instructions avec attention et les conserver pour toute référence future. La sécurité de l’enfant pourrait être menacée si ces instructions ne sont pas suivies.
_Cet article a été conçu pour transporter 1 enfant dans le siège.
_Ne pas utiliser lorsque le nombre d’occupants est supérieur aux prescriptions du fabricant.
_ Cet article est homologué pour des enfants dans le siège de la naissance jusqu’à un poids de 15 kg.
_ Il peut être dangereux de laisser l’enfant sans surveillance.
_Toujours utiliser la ceinture de sécurité à cinq points; toujours accrocher la sangle ventrale à la sangle d’entrejambes.
_ Toujours utiliser le garde corps installé sur la poussette.
_ Prêterattentionàlapositiondel’enfantlorsdesopérations deréglagedesélémentsmobiles(poignée,dossier).
_Toujours actionner le frein lorsque l’article est à l’arrêt et pendant l’installation ou la sortie de l’enfant.
_Les opérations d’assemblage, de préparation de l’article, de nettoyage et d’entretien doivent être réalisées uniquement par des adultes.
_Ne pas utiliser cet article si des pièces sont manquantes ou cassées.
_Avant l’utilisation, s’assurer que tous les mécanismes de fixation sont correctement enclenchés.
_ Éviter de mettre les doigts dans les mécanismes.
_Toute charge suspendue aux poignées peut déstabiliser le produit, suivre les recommandations du fabrication sur les charges maximales admises.
_ Ne pas utiliser le panier pour transporter des charges dont le poids dépasse 5 kg. Ne pas introduire dans le porte-boisson des charges supérieures à celles indiquées sur le porte-boisson lui-même et ne jamais
introduire de boissons chaudes. Ne pas introduire dans les poches de la capote (lorsqu'elles sont présentes) des objets dont le poids dépasse 0.2 kg.
_Ne pas utiliser l’article à proximité d’escaliers ou de marches; ne pas l’utiliser à proximité de sources de chaleur, de flammes directes ou d’objets dangereux se trouvant à la portée de l’enfant.
_L’utilisation d’accessoires n’ayant pas été approuvés par le fabricant peut se révéler dangereuse.
_ Ne pas utiliser ce produit lors d’un jogging ou avec des patins à roulettes.
_Ne pas utiliser l’habillage pluie (lorsqu’il est présent sur l’article) dans des milieux clos et toujours contrôler que l’enfant n’ait pas trop chaud; ne jamais placer à proximité de sources de chaleur et prendre garde aux cigarettes. S’assurer que l’habillage pluie n’interfère avec aucun mécanisme en mouvement du châssis ou de la poussette; toujours retirer l’habillage pluie avant de refermer le châssis ou la poussette.
_AVERTISSEMENT : quand la poussette est ouverte ou pendant l’utilisation avec l’enfant, utiliser la main courante seulement dans la position 1 (relevée) et
utiliser la position 2 (abaissée) seulement pour plier la
poussette ou la ranger.
_ Ne jamais utiliser la poussette sans la main-courante
_ AVVERTISSEMENT: Ne pas ajouter de matelas.
_ Conforme aux exigences de sécurité.
COMPOSANTS DE L'ARTICLE
Vérifier le contenu du carton et en cas de réclamation, contacter votre magasin revendeur ou le service assistance.
_La poussette Sì COMPLETO est composée de : 2 roues avant pivotantes ou avec blocage, 2 roues arrière, panier, porte-boissons, capote, tablier, habillage pluie, 2 bretelles pour les ceintures et 1 sangle d’entrejambes, 2 ceintures adaptables pour fixation du siège auto.
_La poussette Sì CLASSICO est composée de : 2 roues avant pivotantes ou avec blocage, 2 roues arrière, panier, porte-boissons, capote, 2 bretelles pour les ceintures et 1 sangle d’entrejambes, 2 ceintures adaptables pour fixation du siège auto.
INSTRUCTIONS D’UTILISATION
1• Pour ouvrir le châssis, il faut tirer vers le haut les deux leviers sur les poignées (Fig.a); soulever, en même temps, le châssis qui s’ouvrira automatiquement (Fig.b). Pour vérifier que la poussette est correctement ouverte, contrôler les deux crochets latéraux (Fig.c).
2• Si les crochets ne sont pas fixés correctement, faire pression sur l’assise (fig_a) jusqu’au déclic d’accrochage.
Enfin, appuyer vers le bas avec le pied sur PUSH
(fig_b) et soulever la main courante d’une position (paragraphe 5b).
3• PANIER : pour monter le panier, accrocher ses boucles aux crochets arrière A et B et au crochet avant C (fig_a).
PORTE-BOISSONS : il se fixe du côté droit de la poussette grâce au crochet près de la poignée.
Pour fixer le porte-boissons, l’insérer jusqu’au déclic
(fig_b).
4• RÉGLAGE DES POIGNÉES : les poignées sont réglables en 3 hauteurs différentes. Pour régler les poignées à la position désirée, appuyer sur le bouton tout en tirant la poignée vers le haut. Pour l’abaisser, procéder à l’opération inverse (fig_a).
FREIN : pour immobiliser la poussette, abaisser à l’aide du pied le levier de frein situé sur le bloc roues arrière. Pour débloquer le frein, procéder à l’opération inverse (fig_b). Toujours actionner le frein lorsque la poussette est à l’arrêt.
5• ROUES PIVOTANTES : les roues sont déjà fixées à la poussette.
Pour rendre les roues avant pivotantes, il faut baisser le levier (flèche 1). Pour les rendre fixes, agir sur le levier dans le sens opposé (flèche 2). Les roues arrière sont fixes.
IMPORTANT :toujours utiliser le garde corps installé sur la poussette
MAIN COURANTE: elle est déjà fixée à la poussette. Réglable en 2 positions: POSITION 1: avec l'enfant dans la poussette. POSITION 2: position de pliage. Pour la régler, appuyer simultanément sur les 2 boutons latéraux (Fig B)
6• CAPOTE : pour fixer la capote, enclencher ses fixations dans les emplacements prévus à cet effet et la boutonner à l’arrière du dossier (fig_a).
- 16 -
 Loading...