


Istruzioni dʼuso IT Instructions for use EN Notice dʼemploi FR Gebrauchsanleitung DE Instrucciones de uso ES Instruções para uso PT Gebruiksaanwijzing NL Használati útmutató HU Navodila za uporab SL
Инструкции по пользованию RU Kullanim klavuzu TR
ΟΔΗΓΙΕΣ ΧΡΗΣΕΩΣ EL
Prima Pappa
Dondolino
FI000601I47

1
NO OK
3 |
5 |
DX
SX
2
OK NO
4 |
6 |

7
9 |
11 |
8 |
10
12 

B |
A |
A |
13 |
1 |
2 |
15 |
A |
A |
B |
17 |
A
B |
14 |
A |
B |
16 |
B
A
18
A |
B |
19 |
B |
A |
21 |
23 |
20
22 |
24 |

|
A |
|
B |
25 |
26 |
|
B |
A |
|
27 |
28 |
293 |
30 |

31 |
33
4 kg
35
32 |
34 |
10 |
kg |
36 |

37 38
38
39 |
40 |
Prima Pappa Dondolino
|
|
37 |
|
|
1 |
|
35 |
|
|
|
|
|
|
|
|
|
|
|
|
|
|
|
|
|
|
|
2 |
|
|
|
|
|
|
3 |
|
|
32 |
|
|
|
|
|
|
|
|
|
|
4 |
|
|
|
33 |
34 |
|
|
|
|
|
|
|
5 |
|
31 |
|
|
6 |
30 |
|
|
|
|
|
|
|
||
|
|
|
|
|
|
|
|
|
|
|
7 |
|
|
|
|
|
9 |
8 |
|
29 |
|
|
|
|
|
|
|
|
|
|
|
|
|
10 |
|
|
28 |
|
36 |
|
11 |
|
|
|
|
|
|
|
|
|
|
|
|
|
13 |
|
|
|
|
|
|
12 |
|
|
|
16 |
|
|
|
27 |
|
|
|
|
17 |
14 |
|
|
|
|
|
||
|
|
|
|
|
|
|
|
26 |
|
|
23 |
|
|
|
|
|
|
|
|
|
|
|
|
|
18 |
|
19 |
|
|
|
|
|
|
|
25 |
|
|
|
|
|
15 |
|
|
|
|
|
|
|
|
|
|
22 |
|
20 |
|
24 |
|
|
|
21 |
|
|
|
|
|
|
|
|

Prima Pappa Dondolino
1 |
EMDOPP• |
19 |
SAPU5441S• |
2 |
ARPI0229• |
20 |
SPST5506• |
3 |
SPST5025JD• |
21 |
SPST5519• |
4 |
SPST5025JS• |
22 |
MMVI0672 |
SPST5024D• |
23 |
SPST5447J |
|
5 |
SPST5024S• |
24 |
SPST4253• |
ASPI0055• |
25 |
SPST5446J• |
|
6 |
SPST5459• |
26 |
SPST5444• |
7 |
SPST5458• |
27 |
SPST5447K |
8 |
SPST5686• |
28 |
SAPU5441D• |
9 |
SPST5457• |
29 |
SPST4725• |
10 |
SAPU5449• |
30 |
SPST4645• |
11 |
SPST5516• |
31 |
SAPU5536• |
12 |
MMVI0658 |
32 |
SAPU5529• |
13 |
SPST5445• |
33 |
SPST5172• |
14 |
SPST5446K• |
34 |
SPST5171• |
15 |
SPST4253T• |
35 |
MUCI5P11• |
16 |
SOTF0130• |
36 |
ARPI0300• |
17 |
ASPI0056 |
37 |
ERIDPD• |
18 |
SPST5515 |
|
|
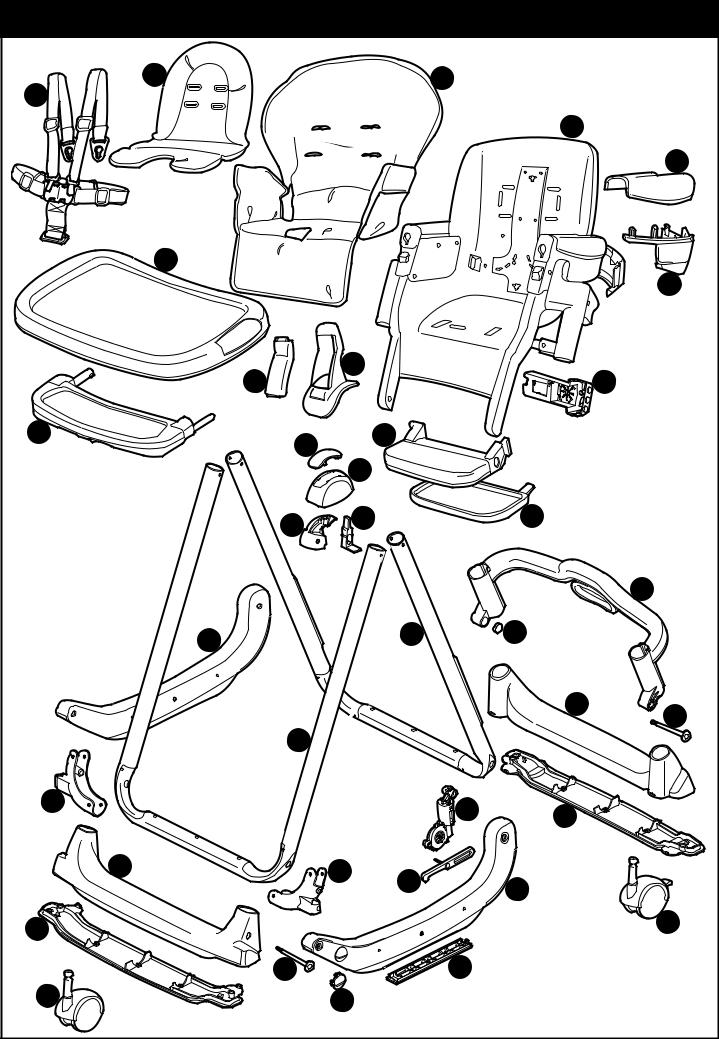
IT• Ricambi disponibili in piú colori da specificare nella richiesta.
EN• Spare parts available in different colours to be specified when ordering.
FR• Pièces de rechange disponibles en plusieurs couleurs à spécifier dans la demande. DE• Ersatzteile in mehr Farben vorhanden, die in der Anfrage spezifiziert werden müssen. ES• Repuestos disponibles en otros colores que se especificarán en el pedido.
PT• Peças de reposição disponíveis em cores alternativas a serem especificadas no pedido. NL• Reserveonderdelen verkrijgbaar in meerdere kleuren, bij bestelling te specificeren.
HU• A tartalék alkatrészek különböző színekben elérhetők, melyeket rendeléskor kell kiválasztani. SL• Rezervni deli so na voljo v več barvah, ki jih je treba navesti pri naročilu.
RU• Запчасти имеются различных цветов, необходимый указать в запросе. TR• Siparişte belirtilen değişik renklerdeki yedek parçalari mevcuttur.
EL• Ανταλλακτικά διαθέσιμα σε διάψορα χρώματα. Προσδιορίστε όταν παραγγείλετε.
IT•ITALIANO
•IMPORTANTE: leggere attentamente le istruzioni prima dellʼuso e conservarle per riutilizzarle in futuro.
•Peg Perego potrà apportare in qualunque momento modifiche ai modelli descritti in questa pubblicazione, per ragioni di natura tecnica o commerciale.
Peg Perego S.p.A. è certificata ISO 9001. La certificazione offre ai clienti e
ai consumatori la garanzia di una trasparenza e fiducia nel modo di lavorare dell'impresa.
SERVIZIO ASSISTENZA
Se fortuitamente parti del modello vengono perse o danneggiate, usare solo pezzi di ricambio originali Peg Perego. Per eventuali riparazioni, sostituzioni, informazioni sui prodotti, la vendita di ricambi originali e accessori, contatta il Servizio Assistenza Peg-Perego:
tel.:0039-039-60.88.213, fax: 0039-039-33.09.992,
e-mail: assistenza@pegperego.it, www.pegperego.com
La Peg Perego è a disposizione dei suoi Consumatori per soddisfare al meglio ogni loro esigenza. Per questo, conoscere il parere dei ns. Clienti, è per noi estremamente importante e prezioso. Le saremo quindi molto grati se, dopo aver utilizzato un
ns. prodotto, vorrà compilare il QUESTIONARIO SODDISFAZIONE CONSUMATORE che troverà in internet al seguente indirizzo: www.pegperego.com/ SSCo.html.it,
segnalando eventuali osservazioni o suggerimenti.
ISTRUZIONI DʼUSO
PER ASSEMBLARE IL SEGGIOLONE
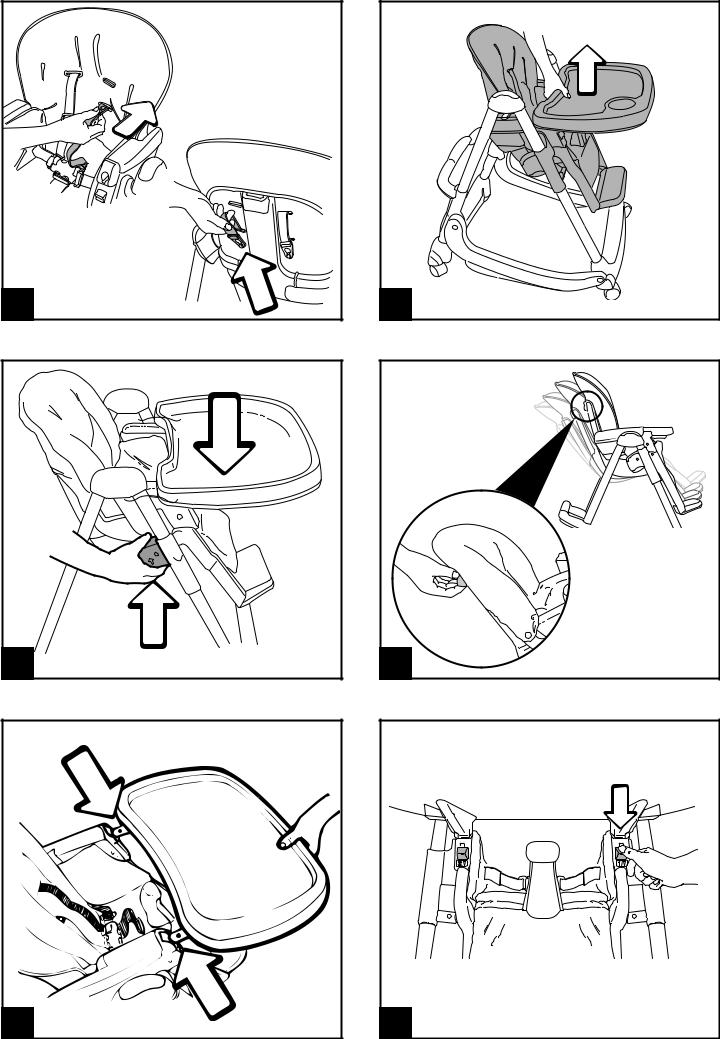
1• Per montare le gondole al seggiolone, occorre fare attenzione al verso della gondola destro e a quello sinistro lasciando il lato esterno allʼesterno. Il lato esterno della gondola presenta nei suoi estremi, le sedi per la testa delle viti.
2• La figura mostra la posizione corretta delle gondole sul seggiolone.
3• Montare la parte stretta della gondola in basso al seggiolone come in figura, spingendo nel foro la vite lunga con la bussola corta. Avvitare con lʼattrezzo in dotazione.
4• Montare la parte larga della gondola in alto al seggiolone come in figura, spingendo nel foro la vite corta con la bussola lunga. Avvitare con lʼattrezzo in dotazione.
5• Applicare a pressione le ruote facendo attenzione ad inserire quelle senza freni nella parte anteriore del seggiolone.
6• Applicare a pressione le due ruote posteriori con freni.
7• Tagliare la fascetta.
PER APRIRE IL SEGGIOLONE
8• Per aprire il seggiolone spingere verso il basso le levette rosse laterali come in figura, facendo leva sui montanti posteriori.
9• Accompagnare lʼapertura, abbassando la traversa posteriore fino al click.
10• Abbassare la pedanetta-poggiapiedi, come in figura.
11• Quando viene tolto dallʼimballo, il seggiolino
del seggiolone é in una posizione non corretta per lʼutilizzo (posizione imballo). Per lʼutilizzo, sollevare il seggiolino portandolo in una delle sette altezze utilizzabili del seggiolone come in figura. Per riportare il seggiolino nella posizione da utilizzare esclusivamente nellʼimballo, vedi più avanti.
FRENO
12• Il seggiolone ha quattro ruote piroettanti di cui 2 bloccabili con freni. Per frenare, abbassare le levette freno delle ruote posteriori; per sbloccare i freni, agire in senso contrario. Per comodità, prima di compiere qualsiasi operazione, assicurarsi che il seggiolone sia frenato.
VASSOI
Dondolino é dotato di 2 vassoi: uno piccolo, per il dondolo e uno grande, per la pappa.
13• Per applicare il vassoio-dondolo, posizionarlo come in fig.A. Ruotando contemporaneamente la manopola che si trova sotto di esso (fig.B), inserirlo fino a termine corsa. Per rimuoverlo, agire in senso contrario.
14• Per applicare il vassoio-pappa, agganciarlo posteriormente come in fig.A. Premendo il tasto rosso sottostante, tirare la leva e procedere allʼaggancio anteriormente (fig.B). Per rimuoverlo, agire in senso contrario.
15• Entrambi i vassoi sono regolabili in due posizioni (1-2) tramite la rotazione in senso antiorario della manopola sottostante. La terza posizione non é utilizzabile, serve a richiudere i vassoi.
CINTURA DI SICUREZZA
16• Assicurarsi che la bretella sia correttamente inserita spingendo come in figura A. Agganciare la cintura girovita agendo come in figura B.
17• Per sganciare la cintura, premere ai lati della fibbia (fig.A) e contemporaneamente tirare verso lʼesterno il cinturino girovita (fig.B).
18• Le bretelle del cinturino possono essere regolate in altezza in due posizioni; sganciare il cinturino da dietro lo schienale, spingendo la fibbia verso il basso (fig.A). Sfilare il cinturino dalla sacca (fig.B).
19• Infilare poi la fibbia del cinturino nell'altra fessura dello schienale (fig.A) e agganciare la fibbia al piolo, tirando il cinturino fino al click di aggancio (fig.B).
7 ALTEZZE
Il seggiolino è regolabile in altezza in 7 posizioni. 20• Per alzare il seggiolino prendere da sotto il
vassoio e tirare verso lʼalto.
21• Per abbassare il seggiolino, premere contemporaneamente i due pulsanti laterali, fermandosi nella posizione desiderata.
Queste operazioni possono essere eseguite anche con il bambino nel seggiolone.
SEGGIOLINO RECLINABILE
22• Il seggiolino é reclinabile fino a quattro posizioni: per la pappa, il gioco, il relax o la nanna. Per regolarlo alzare la maniglia posta dietro lo schienale e bloccarlo nella posizione desiderata. Questa operazione puó essere eseguita anche con il bambino nel seggiolone.
CHIUSURA
23• Per chiudere il vassoio, ruotare in senso antiorario la manopola collocata sotto lo stesso ed estrarre il vassoio fino ai riferimenti rossi indicati dalle frecce in figura.
24• Abbassare il pulsante numero 1. 25• Abbassare il pulsante numero 2 e
contemporaneamente alzare il vassoio (fig.A). Nella fig B il vassoio è chiuso.
26• Posizionare la seduta al livello più basso

premendo i pulsanti laterali, sollevare lo schienalino fino alla posizione eretta e chiudere la pedanetta-poggiapiedi.
27• Sollevare il maniglione di chiusura (fig.A) fino al completo svolgimento dellʼoperazione (seggiolone chiuso). Il seggiolone quando é chiuso rimane in piedi da solo (fig.B).
APERTURA
•Per aprire il seggiolone spingere verso il basso le levette rosse laterali facendo leva sui
montanti posteriori, come mostrato in figura 8. Accompagnare lʼapertura fino al click.
28• Per aprire il vassoio premere solo il tasto 2 e abbassare il vassoio come in figura.
SFODERABILITÁ
29• Per sfoderare il seggiolone, sfilare la cintura da sotto la seduta e dallo schienale.
30• Reclinare completamente il seggiolino per sbottonare la sacca dai lati dello schienale e sfilare la sacca dallʼalto.
PER RIPORTARE IL SEGGIOLONE NELLA “POSIZIONE IMBALLO”
•Per riportare il seggiolone nella “posizione imballo” (per esigenze di trasporto o per riporlo nella scatola), occorre:
-Rimuovere il vassoio.
-Portare lo schienale nella posizione eretta.
-Abbassare il seggiolino nellʼultima posizione.
-Richiudere la pedanetta-poggiapiedi.
31• Attrezzarsi con un piccolo cacciavite. Premere il pulsante laterale e contemporaneamente infilare il cacciavite nella fessura spingendo verso destra.
32• Ripetere la stessa operazione, spingendo il cacciavite verso sinistra e abbassare fino in fondo il seggiolino (nella posizione non utilizzabile).
•Quindi, richiudere il seggiolone e inserirlo nella sua scatola.
INSERIMENTO BATTERIE
Le batterie NON sono incluse nella confezione.
DONDOLO ELETTRICO
Per attivare la funzione dondolo elettrico sono necessarie 4 pile mezza-torcia tipo “C” da 1,5 Volt MN 1400-LR14.
33• Con un cacciavite svitare la parte inferiore della gondola ed inserire le pile. Una volta e ettuata lʼoperazione, riavvitare il coperchio del vano.
MUSICA
Per attivare la funzione musica sono necessarie 2 pile stilo tipo “AA” da 1,5 Volt MN 1500-LR6
34• Con un cacciavite svitare il coperchio del vano pile posizionato sotto il poggiagambe ed inserire le pile. Una volta e ettuata lʼoperazione, riavvitare il coperchio del vano.
FUNZIONAMENTO DONDOLO
AVVERTENZE: Per il funzionamento del dondolo elettrico utilizzare il seggiolone con il vassoiodondolo (rimuovere il vassoio-pappa) e con lo schienale completamente reclinato. Dondolino funziona elettricamente fino ai 10 kg di peso del bambino; occorre peraltro regolare lʼaltezza della seduta in funzione del peso del bambino.
35• La figura mostra la corretta altezza di seduta del dondolo per ospitare un bambino di 4 kg di peso.
36• La figura mostra la corretta altezza di seduta del dondolo per ospitare un bambino di 10 kg di peso.
37• Per attivare il funzionamento del dondolo,
azionare il maniglione posteriore spingendo la traversa verso il basso. Questa operazione puó essere eseguita anche con il bambino accomodato.
38• Fissare la traversa accompagnandola con entrambe le mani fino al click. In questa posizione il dondolo é MANUALE. Questa operazione
puó essere eseguita anche con il bambino accomodato.
39• Per azionare il dondolo elettrico premere il pulsante situato in basso sulla gondola.
•La funzione dondolo elettrico é temporizzata e la durata é di 5 minuti circa. Al termine del
movimento riattivare il dondolo premendo 2 volte il pulsante.
•Nel caso in cui si voglia interrompere lʼattività anticipatamente, premere 1 volta lo stesso pulsante.
Dondolino potrebbe funzionare in modo IRREGOLARE se:
•lʼaltezza della seduta non é stata regolata correttamente in funzione del peso del bambino: verificarne la corretta regolazione;
•il bambino non é completamente appoggiato allo schienale o si muove in maniera eccessiva;
•le batterie potrebbero essere scariche.
FUNZIONAMENTO MUSICA
40• Per attivare la musica, premere 1 volta il tasto rosso situato sulla console di comando (vedi figura). Lo stesso tasto permette di selezionare le 6 melodie disponibili. La melodia scelta verrà ripetuta per 5 minuti circa. Per disattivare la musica tenere premuto il tasto rosso per almeno un secondo. I restanti tasti regolano il volume della musica.
PULIZIA E MANUTENZIONE
Il vostro prodotto necessita un minimo di manutenzione. Le operazioni di pulizia e manutenzione devono essere effettuate solo da adulti.
•Si raccomanda di tenere pulite tutte le parti in movimento e se occorre, lubrificarle con olio leggero.
•Asciugare le parti in metallo del prodotto per prevenire la ruggine.
•Periodicamente pulire le parti in plastica con un panno umido, non usare solventi o altri prodotti simili.
•Tenere pulite le ruote da polvere e sabbia.
•Proteggere il prodotto da agenti atmosferici, acqua, pioggia o neve; lʼesposizione continua e prolungata al sole potrebbe causare cambiamenti di colore in molti materiali.
•Conservare il prodotto in un luogo asciutto.
•Se la sacca è in PVC non immergerla in acqua, ma pulirla con un panno umido e detersivo neutro
•Per il lavaggio della sacca, seguire le suguenti indicazioni.
SICUREZZA DELLE PARTI ELETTRICHE
•LE OPERAZIONI DI ACCENSIONE E SPEGNIMENTO DEL DONDOLO E DELLA MUSICA DEVONO ESSERE EFFETTUATE DA UN ADULTO.
•SE DONDOLINO VIENE LASCIATO INATTIVO PER UN PERIODO LUNGO, SI RACCOMANDA DI RIMUOVERE LE BATTERIE DAL GRUPPO DONDOLO E DAL GRUPPO MUSICA.
•DEVONO ESSERE UTILIZZATE SOLO BATTERIE DELLO STESSO TIPO O EQUIVALENTI A QUELLE RACCOMANDATE.
•LE BATTERIE DEVONO ESSERE INSERITE RISPETTANDO LA CORRETTA POLARITAʼ.
•NON UTILIZZARE BATTERIE NUOVE ED USATE CONTEMPORANEAMENTE.
•LE BATTERIE SCARICHE DEVONO ESSERE RIMOSSE DAL PRODOTTO.
•NON CORTOCIRCUITARE I MORSETTI DI ALIMENTAZIONE.
•LE BATTERIE RICARICABILI DEVONO ESSERE RIMOSSE DAL PRODOTTO PER ESSERE RICARICATE.
•LE BATTERIE RICARICABILI DEVONO ESSERE RICARICATE SOLO SOTTO LA SUPERVISIONE DI UN ADULTO.
•DURANTE LA PULIZIA, PRESTARE ATTENZIONE A NON BAGNARE LE ZONE DI RICOVERO DELLE BATTERIE, SIA DEL DONDOLO (GONDOLA) CHE DELLA FUNZIONE MUSICA (CONSOLE DI COMANDO).
 ATTENZIONE
•LE OPERAZIONI DI MONTAGGIO E DI REGOLAZIONE DEL PRODOTTO DEVONO ESSERE EFFETTUATE DA UN ADULTO; NON UTILIZZARE IL PRODOTTO SE IL MONTAGGIO NON Eʼ CORRETTAMENTE COMPLETATO E SE IL PRODOTTO PRESENTA ROTTURE O PEZZI MANCANTI.
•PREVENITE LA CADUTA DEL BAMBINO O IL SUO SCIVOLAMENTO; UTILIZZATE SEMPRE LE CINTURE DI SICUREZZA A CINQUE PUNTI; UTILIZZATE LE CINTURE SIA IN POSIZIONE RECLINATA CHE IN POSIZIONE ERETTA.
•NON LASCIATE MAI INCUSTODITO IL VOSTRO BAMBINO; TENETE SEMPRE DI VISTA IL BAMBINO.
•NON USARE IL PRODOTTO FINCHÈ IL BAMBINO NON È IN GRADO DI RESTARE SEDUTO DA SOLO.
•IL VASSOIO E I SUOI ACCESSORI NON SONO PROGETTATI PER REGGERE IL PESO DEL BAMBINO; IL VASSOIO NON È DISEGNATO PER MANTENERE IL BAMBINO NELLA SEDUTA E NON SOSTITUISCE IL CINTURINO DI SICUREZZA.
•ASSICURARSI CHE IL PRODOTTO SIA SU UNA SUPERFICIE ORIZZONTALE.
•POSIZIONARE IL PRODOTTO IN MODO DA TENERE IL BAMBINO LONTANO DA PERICOLI COME CAVI ELETTRICI, SORGENTI DI CALORE O FIAMME.
•NON INTRODURRE LE DITA NEI MECCANISMI E PRESTARE ATTENZIONE ALLA POSIZIONE DEGLI ARTI DEL BAMBINO DURANTE LE OPERAZIONI DI REGOLAZIONE.
•POTREBBE ESSERE PERICOLOSO UTILIZZARE ACCESSORI NON APPROVATI DAL COSTRUTTORE.
•NON UTILIZZARE IL PRODOTTO IN VICINANZA DI SCALE O GRADINI.
•PRESTARE ATTENZIONE A NON POSIZIONARE IL PRODOTTO VICINO A SORGENTI DI CALORE O FUOCO COME FORNELLI A GAS, STUFE ELETTRICHE, ECC….
EN•ENGLISH
•IMPORTANT: read the instructions carefully before use. Save the instructions for future reference.
•PEG PEREGO reserves the right to make any necessary changes or improvements to the products shown at any time without notice.
Peg Perego S.p.A. is an ISO 9001 certified company.
The fact that we are certified provides a guarantee of our honesty for our customers, and fosters trust in the companyʼs way of working.
CUSTOMER SERVICE
If parts of the model are accidentally lost or damaged, use only original Peg Perego spare parts. Contact
the Peg Perego Customer Service for all repair work, replacements, information about products, and sale of original spare parts and accessories, at the following: tel.: 0039-039-60.88.213
fax: 0039-039-33.09.992 e-mail: assistenza@pegperego.it, www.pegperego.com
Peg Perego is at the consumer's service, meeting every need in the best way possible. This is why our customers' opinions are so important and valuable to us. We would be very grateful if you would kindly fill in the CUSTOMER SATISFACTION QUESTIONNAIRE after using one of our products. You will find the questionnaire on the Internet at "www.pegperego. com/SSCo.html.en-UK".
Please note any observations or suggestions you may have on the questionnaire.
INSTRUCTIONS FOR USE
ASSEMBLING THE HIGH CHAIR
1• When mounting the rockers on the high chair, take care to position the right and the left rocker correctly, placing the exterior side of the rocker on the outside. The exterior side of the rocker has holes on the ends for the screw heads.
2• The figure shows the correct position for the rockers on the high chair.
3• Mount the narrow part at the bottom of the rocker on the high chair as shown in the figure, pushing the long screw with the short bushing through the hole. Use the tool that comes with the high chair to tighten the screw.
4• Mount the wide part at the top of the rocker on the high chair as shown in the figure, pushing the short screw with the long bushing through the hole. Use the tool that comes with the high chair to tighten the screw.
5• Mount the wheels on the high chair, pressing until they snap into place and taking care to insert the ones without brakes on the front of the high chair.
6• Mount the rear wheels, pressing until they snap into place.
7• Cut the band.
OPENING THE HIGH CHAIR
8• To open the high chair push the red side levers down, pressing on the rear frame, as shown in the figure.
9• Open the high chair, lowering the rear cross bar until it clicks into place.
10• Lower the footrest, as shown in the figure. 11• The high chair is not in the correct position for
use when it is removed from the packing. To use
the high chair, lift it to adjust it to one of the seven di erent heights, as shown in the figure. To put the high chair back into the packing position, see the instructions below.
BRAKE
12• The high chair has four swivel wheels, with brakes on two of them. To brake the high chair, lower the little brake levers on the rear wheels. To release the brakes, lift the levers. For your convenience, always make sure the brakes are set before carrying out any other operation on the high chair.
TRAYS
Dondolino comes with 2 trays: a small tray for the rocking-chair, and a large tray for mealtimes.
13• To attach the rocking-chair tray, place it in the position shown in fig. A. Push the tray all the way in, turning the knob under the tray at the same time (fig. B). To remove the tray, carry out the instructions in the reverse order.
14• To attach the mealtime tray, hook the back part of the tray onto the high chair first, as shown in fig. A. Press the red button under the tray and pull the lever, while fastening the front part of the tray (fig. B). To remove the tray from the high chair, follow the instructions in the reverse order.
15• Both trays can be adjusted to two different positions (1 & 2) by turning the knob under the tray counterclockwise. Position 3 is used only to fold the trays up.
SAFETY BELT
16• Make sure that the shoulder strap is correctly inserted, by pressing on it, as shown in figure A. Fasten the lap belt as shown in figure B.
17• To unfasten the safety belt, press the sides of the buckle (fig. A) while pulling the lap belt outwards (fig. B).
18• The shoulder straps can be adjusted to two different heights. Unfasten the safety belt from behind the backrest by pushing the buckle downwards (fig. A). Slip the safety belt out of the sack (fig. B).
19• Next, slip the safety belt buckle through the other opening in the backrest (fig. A), and fasten the buckle to the peg, pulling the safety belt until it clicks into place (fig. B).
7 HEIGHTS
The high chair adjusts to 7 different heights. 20• To lift the high chair, hold it under the tray and
pull upwards.
21• To lower the high chair, simultaneously press the two side buttons, stopping at the desired height. These operations can be carried out with the child in the high chair.
RECLINING HIGH CHAIR
22• The high chair reclines, and adjusts to four different positions: for mealtime, playtime, relaxing, or napping. To adjust it, lift the handle behind the backrest and set the high chair to the desired position. This operation can be carried out with the child in the high chair.
TO FOLD THE HIGH CHAIR
23• To close the tray, turn the knob under the tray counterclockwise, and pull the tray out as far as the red markers shown with the arrows in the figure.
24• Press button nr. 1.
25• Lower button number 2 while lifting the tray (fig. A). Figure B shows the tray in the closed position.
26• Move the high chair seat to the lowest position by pressing the side buttons. Lift the backrest to the upright position, and close the footrest.
27• Lift the handle on the back of the high chair (fig. A) to completely fold the chair up. The high chair
stands upright when closed (fig. B).
TO OPEN THE HIGH CHAIR
•To open the high chair, push the red side levers downwards, pressing on the rear frame as shown in figure 8. Press until the high chair clicks open.
28• To open the tray, press only button 2. Lower the tray as shown in the figure.
REMOVING THE HIGH CHAIR COVER
29• To remove the high chair cover, remove the safety belt from under the chair and the backrest.
30• Lower the high chair completely, and unbutton the cover from the sides of the backrest. Slip the cover o the top of the high chair.
FOLDING THE HIGH CHAIR BACK UP INTO ITS PACKING POSITION
•To fold the high chair back up into its “packing position” (for transporting it or storing it in its box):
-Remove the tray.
-Return the backrest to the upright position.
-Lower the high chair to the lowest position.
-Close the footrest.
31• A small screwdriver is necessary for this step. Press the side button while slipping the screwdriver into the slit. Push to the right.
32• Repeat the same operation, pushing the screwdriver to the left and lowering the high chair to the lowest position (the position in which it cannot be used).
• Fold the high chair up and place it in its box.
INSERTING THE BATTERIES
Batteries ARE NOT SUPPLIED with the high chair.
ELECTRIC ROCKING-CHAIR
To activate the electric rocking-chair option, you will need four MN 1400-LR14 1.5-Volt, type "C" flashlight batteries.
33• Using a screwdriver, open the lower part of the rocker and insert the batteries. Screw the cover back onto the battery compartment.
MUSIC
To play the high chair melodies, you will need two MN 1500-LR6 1.5-Volt, type "AA" batteries.
34• Using a screwdriver, open the cover on the battery compartment located under the footrest, and insert the batteries. Screw the cover back onto the battery compartment.
ROCKING - CHAIR OPTION
CAUTION: For the electric rocking-chair option, attach the rocking-chair tray to the high chair (remove the mealtime tray), and place the backrest in the completely lowered position. Dondolino will work in the electric mode for children weighing up to 10 kg. It is necessary to adjust the height of the seat according to the child's weight.
35• The figure shows the correct seat height for a child weighing 4 kg.
36• The figure shows the correct seat height for a child weighing 10 kg.
37• To turn on the rocking-chair option, use the rear handle and push the crossbar downwards. This operation can be also carried out with the child in the seat.
38• Set the crossbar by pressing on it with both hands until it clicks into place. The rocking-chair works MANUALLY in this position. This operation can also be carried out with the child in the seat.
39• To turn on the electric rocking-chair, press the
 Loading...