


2 Polaris
4 RANGER RZR
VOLT |
cod. IGOD0513 |
|
made in italy
USO E MANUTENZIONE |
IT |
USE AND CARE |
EN |
UTILISATION ET ENTRETIEN |
FR |
GEBRAUCH UND WARTUNG |
DE |
EMPLEO Y MANUTENCION |
ES |
USO E MANUTENÇÃO |
PT |
UPORABA IN VZDRŽEVANJE |
SL |
BRUGSANVISNING |
|
KÄYTTÖOHJE |
|
BRUKSANVISNING |
|
BRUKSANVISNING |
|
KULLANIM VE BAKIM |
|
ЭКСПЛУАТАЦИЯ И УХОД |
|
MSGQG G |
|
|
AR |
FI000806G124
1 |
4
 1
1 
 2
2
7
10 |
13 |
2 |
5 |
8 |
11 |
14 |
3
6 |
9 |
12 |
15 |

16
19 |
|
D |
|
22 |
D |
|
|
|
D |
A |
A |
B |
E B |
|
|
25 |
C |
C |
28 |
1 |
2 |
|
|
17 |
|
|
D |
A |
A |
B |
B |
20 |
C |
|
|
23 |
|
B |
A |
26 |
29 |
|
1 |
|
2 |
18 |
|
|
C |
|
B |
21 |
A |
24 |
D 
27
30 |
E |

31 |
32 |
34 |
37 |
40 |
43 |
35
38 |
41 |
44
33 |
36 |
39
42
45

46 |
|
2 |
1 |
|
49
52
 D
D
E
A
55
A |
47 |
48 |
50 |
|
D |
E |
|
A |
|
C |
|
B |
53 |
|
56 |
51
 C
C
B
A
54
57
58 |
59 |
60 |

61 |
62 |
63 |
64 |
65 |
66 |
|
|
|
|
|
|
|
|
|
|
|
|
|
|
|
|
|
|
|
|
|
|
|
|
|
|
|
|
|
|
|
|
|
|
|
|
|
|
|
|
|
|
|
|
|
|
|
|
|
|
|
|
|
|
|
|
|
|
|
|
|
|
|
|
|
|
|
|
|
|
|
|
|
|
|
67 |
|
|
68 |
|
|
|
|
69 |
|
|
|
|
|
|
70 |
71 |
72 |
73 |
74 |
75 |

76
79 |
|
|
|
A |
B |
C |
H |
E |
|
|
|
F |
|
|
|
G |
|
|
D |
|
|
|
|
82 |
|
|
|
A |
B |
85 |
|
88
77 |
80 |
83 |
86 |
89 |
78 |
|
|
|
F |
|
|
|
D |
A |
B |
E |
81 |
|
C |
STOP


 LOW
LOW 


 HIGH
HIGH
84
 R
R
87
90

1
2
91
94 |
97 |
|
C |
|
1 |
|
C |
2 |
A |
|
100 |
|
103 |
92 |
95 |
98 |
|
C |
|
1 |
|
C |
2 |
101 |
|
93 |
96 |
A |
B |
99 |
A |
102 |

|
|
|
|
|
|
|
|
|
|
|
|
Polaris RANGER RZR |
cod.IGOD0513 |
||
|
|
DASHBOARD WITH LED |
|
|
|
|
|
|
|
|
b |
|
|
|
|
|
|
SAGI8996N |
|
|
|
|
|
|
|
|
|
|
|
||
|
|
|
r |
6 |
|
5 |
|
|
|
|
|
|
|
||
|
|
|
|
|
|
|
|
|
|
|
|
|
|||
|
|
|
|
|
|
|
|
|
|
|
|
|
|
||
|
|
|
|
|
b |
8 |
|
r |
r |
|
|
r |
|
|
|
|
|
|
|
|
|
|
7 |
|
|
|
|
|
LEFT |
|
|
|
|
|
|
|
|
|
|
|
|
|
|
MOTOR |
|
||
|
|
|
|
|
|
|
|
|
|
|
|
|
|
|
|
|
|
|
|
|
b |
10 |
|
9 |
|
|
|
|
|
SAGI9988 |
|
|
|
|
|
|
|
|
|
|
|
|
|
|
|||
|
|
|
|
|
b |
REVERSE |
|
|
|
|
|
|
POLYSWITCH |
|
|
|
MEIE0826 |
|
|
|
MEIE0828 |
|
|
|
|
|
|||||
|
|
|
|
PUSH BUTTON |
|
|
|
|
RUEF800 |
|
|||||
|
|
|
|
MEPU0003 |
|
|
|
|
|
|
|||||
|
|
|
|
|
|
|
|
|
|
|
|
|
|
||
|
|
|
|
|
|
|
|
|
|
|
|
|
|
r |
|
|
|
|
THERMO PROTECTOR |
|
|
|
|
|
|
|
|
MEIE0829 |
|
||
|
|
|
|
|
|
|
|
|
|
|
|
|
|
||
|
b |
|
|
|
bk |
|
|
|
|
|
|
|
|
|
|
|
|
|
r |
|
|
|
|
|
|
|
|
|
|
|
|
|
|
|
|
|
r |
|
b |
bk |
w |
|
|
|
|
bk |
|
|
|
|
|
|
|
|
|
|
|
|
|
|
|
|
|
|
|
|
w |
|
|
|
|
|
|
|
|
|
|
|
|
|
|
|
|
|
|
|
|
|
|
|
|
|
|
POLYSWITCH |
|
|
|
|
|
|
|
|
|
|
|
|
|
|
|
RUEF800 |
|
|
|
|
|
|
|
|
MASTER |
|
|
|
|
bk |
|
|
|
|
|
|
|
|
|
|
ELECTRONIC BOARD |
|
|
|
|
|
|
||
|
|
|
|
|
|
|
|
|
|
|
|
w |
|
|
|
|
|
|
|
|
b |
|
|
|
|
|
|
|
|
|
|
|
|
|
|
|
|
|
MEVA0054 |
|
|
REVERSE |
|
|
RIGHT |
|
|
|
|
|
|
|
|
|
|
|
|
|
PUSH BUTTON |
|
MOTOR |
|
|
|
|
|
|
|
|
|
|
|
|
|
CONNECTOR |
|
SAGI9988 |
|
|
|
|
|
|
|
ACCELERATOR |
|
|
|
b |
5 |
6 |
r/r |
|
|
|
|
|
|
|
|
HOUSING |
|
|
|
|
|
|
|
|
|
|
|
|
|
|
SAGI8960JNGL |
|
|
r |
|
7 |
8 |
b/b |
|
|
||
|
|
|
|
|
|
|
|
|
|
|
|
||||
|
|
|
b |
|
|
|
|
|
r/r |
9 |
10 |
b/b |
|
|
|
|
|
|
|
|
|
|
|
|
|
|
|||||
b = blu |
b = blue |
b = bleu |
b = blau |
b = azul |
b = azul |
b = moder |
b = blå |
b = sininen |
b = blå |
b = blå |
b = mavi |
b = синий |
b = Lpke |
b–•«VR |
|
bk = nero |
bk = black |
bk = noir |
bk = schwarz |
bk = negro |
bk = preto |
bk = črn |
bk = sort |
bk = musta |
bk = svart |
bk = svart |
bk = siyah |
bk = черньій |
bk = La |
kb–•s‘¬ |
|
r = rosso |
r = red |
r = rouge |
r = rot |
r = rojo |
r = vermelho |
r = rdeč |
r = rød |
r = punainen |
r = rød |
r = röd |
r = kirmizi |
r = красньій |
r = jji |
r–•PlV |
|
w = bianco |
w = white |
w = blanc |
w = weiß |
w = blanco |
w = branco |
w = bel |
w = hvid |
w = valkoinen |
w = hvit |
w = vit |
w = beyaz |
w = бепьій |
w = |
w–•f¢Q |
|

|
|
|
|
|
|
|
Polaris RANGER RZR |
cod.IGOD0513 |
|
1 |
SAGI0132N |
51 |
SPST8903 |
|
|
|
9 |
|
|
2 |
SPMV8896DN |
52 |
SOTF0253L30 |
|
3 |
|
10 |
|
|
3 |
SPMV8896SN |
53 dx SPST8882DN |
|
|
|
|
|
||
4 |
SPST8917N |
53 sx SPST8882SN |
1 |
|
|
|
|
|
|
5 |
ASGI0203N |
54 |
SPST8879N |
|
5 |
11 |
|
|
|
6 |
SPMV8898DN |
55 |
SPST8904N |
|
|
|
|
||
7 |
SPMV8898SN |
56 |
SPST8925N |
|
|
|
|
|
|
8 |
SPMV8899DN |
57 |
ASGI0207N |
|
7 |
8 |
|
|
|
9 |
SPMV8899SN |
58 |
SPST8766KGL |
|
|
|
|
||
2 |
4 |
|
|
|
|
||||
10 |
ASGI0204N |
59 |
SAGI8960JNGL |
|
|
|
|
|
|
11 |
SPRP8890N |
60 |
SPMV8916N |
|
|
13 |
|
|
|
12 |
SPRP8889N |
61 |
SAGI8999N |
|
|
|
64 |
|
|
|
|
|
|
|
|||||
13 |
SPST8892N |
62 |
SAGI8996N |
4 |
6 |
|
|
64 |
|
14 |
SAGI8891N |
63 |
ASGI0208NR |
|
|
|
|||
|
|
|
|
|
|||||
15 |
SPST8918SN |
64 |
ASGI0209N |
|
|
|
|
|
|
16 |
SPST8887SR |
65 |
IAKB0018 |
|
|
15 |
|
|
|
17 |
SPST8885N |
66 |
IKCB0110 |
sx |
|
62 |
63 |
|
|
|
|
|
|||||||
18 |
SOTF0254L30 |
67 |
SPST8880R |
|
|
|
|
|
|
22 |
|
|
14 |
|
|
||||
19 |
SPST8918DN |
68 |
MMEV0481 |
|
|
|
|
||
|
|
16 |
|
|
|
||||
20 |
SPST8887DR |
|
|
dx |
|
|
|
|
|
21 dx SPST8888DN |
|
|
|
|
|
67 |
|
||
21 sx SPST8888SN |
|
|
|
|
|
|
|
||
22 |
ASGI0205N |
|
|
|
18 |
58 |
60 |
|
|
23 dx SPST8920DRF |
|
|
|
|
|
||||
|
|
|
|
|
|
||||
23 sx SPST8920SRF |
|
|
|
19 |
|
|
|
|
|
24 |
SPMV8930N |
|
|
|
|
|
|
|
|
|
|
24 |
|
|
|
|
|
||
25 |
SPST9060GR |
|
|
|
57 |
40 |
|
|
|
26 dx SAGI8405KDNGR |
|
|
|
|
|
|
|||
|
|
|
|
|
|
|
|||
26 sx SAGI8405KSNGR |
|
|
|
|
59 |
|
|
|
|
27 |
SAGI8910NGR |
|
|
|
|
53dx |
|
52 |
|
28 |
SOFF0247L30 |
|
|
21dx |
|
56 |
|
||
29 |
SAGI8972XWTN |
|
|
|
|
|
|
||
30 |
SPST8927N |
|
|
|
|
|
|
|
|
31 |
SPST8931N |
|
|
|
|
|
|
|
|
32 |
SARP9024NGR |
|
|
66 |
|
|
|
47sx |
|
33 |
SPST8998GR |
|
|
|
|
|
|
||
|
|
25 |
|
|
|
|
|
||
34 |
SPST8932N |
|
|
|
|
|
|
|
|
35 |
SOTF0256Z |
|
|
|
|
|
|
|
50 |
36 dx SPST8905GR |
|
|
|
|
|
|
|
||
36 sx SPST8906GR |
|
|
|
|
|
|
|
51 |
|
|
|
28 |
|
|
|
|
|
||
37 |
SPST8934N |
|
|
|
|
|
|
|
|
38 dx SPST8884DN |
|
|
|
|
|
|
47 |
|
|
38 sx SPST8884SN |
|
|
|
|
|
|
|
||
|
|
|
36dx |
43 |
44 |
|
|
||
39 |
SPST8922N |
|
|
|
|
|
|||
40 |
SPST8921N |
|
|
30 |
38dx |
|
46 |
|
|
41 |
SOFF0248Z |
|
|
|
|
|
|||
42 |
SARP8997NGR |
|
|
31 |
37 |
41 |
|
|
|
43 |
SPST9056R |
|
|
|
|
|
|||
|
|
|
|
|
|
|
|||
44 |
SPMV8893N |
|
|
|
|
|
|
|
|
45 dx SPST8924DGR |
|
|
|
|
|
45dx |
|
|
|
45 sx SPST8924SGR |
|
|
|
|
|
68 |
|
||
|
|
32 |
|
42 |
|
|
|||
46 |
SAGI8928N |
|
|
|
|
|
|
||
47 dx SPST8919D |
|
|
|
|
|
|
|
|
|
47 sx SPST8919S |
|
34 |
|
|
|
|
|
|
|
48 |
ASGI0206N |
|
|
|
|
|
|
|
|
49 |
SAGI8901N |
|
|
|
|
|
|
|
|
50 |
SPST8902N |
|
|
|
34 |
|
|
|
|
ITALIANO |
|
NORME DI SICUREZZA |
PEG PEREGO® vi ringrazia per aver preferito questo prodotto. Da oltre 50 anni PEG PEREGO porta a spasso i bambini. Appena nati con le carrozzine, poi con i passeggini e ancora dopo, con i giocattoli a pedali e a batteria.
Scopri la gamma completa dei prodotti,le novità e altre informazioni sul mondo Peg Perego sul nostro sito
www.pegperego.com
INFORMAZIONI IMPORTANTI
Leggete attentamente questo manuale istruzioni per familiarizzare con l’uso del modello e insegnare al vostro bambino una guida corretta, sicura e divertente. Conservare poi il manuale per ogni futuro riferimento.
Prima di utilizzare il veicolo per la prima volta, caricare la batteria per 18 ore. Non osservare questa procedura potrebbe causare danni irreversibili alla batteria.
•Anni 3 - 10
•Veicolo a 2 posti
•1 Batteria ricaricabile da 24V 15Ah al piombo sigillata
•2 ruote motrici
•2 motori da 280 W
•Velocità in 1ª marcia 5 Km/h
•Velocità in 2ª marcia 10,5 Km/h
•Velocità in Retromarcia 5 Km/h
Peg Perego si riserva il diritto di apportare in qualunque momento variazioni a modelli e dati presenti in questa pubblicazione, per ragioni di natura tecnica o aziendale.
DICHIARAZIONE DI CONFORMITA’
DENOMINAZIONE DEL PRODOTTO
Polaris Ranger RZR
CODICE IDENTIFICATIVO DEL PRODOTTO
IGOD0513
NORMATIVE di RIFERIMENTO (origine)
Direttiva generale Sicurezza dei Giocattoli 88/378/CE
Standard EN 71 / 1 -2 -3
Standard EN62115
Direttiva Compatibilità Elettromagnetica
2004/108/CE
Standard EN55022 – EN55014
Direttiva Europea RAEE 03/108/CE
Direttiva Europea RoHS 2002/95/CE
Direttiva Ftalati 2005/84/CE
Normativa EN 60825-1
Non è conforme alle disposizioni delle norme di circolazione su strada e pertanto non può circolare su strade pubbliche.
DICHIARAZIONE di CONFORMITA’
PegPerego S.p.A. dichiara sotto la propria responsabilità che l’ articolo in oggetto è stato sottoposto a test di collaudo interni e omologato secondo le normative vigenti presso laboratori esterni ed indipendenti.
DATA E LUOGO DEL RILASCIO
Italia - 06. 05.2008
Peg Perego S.p.A. via A. De Gasperi, 50 20043 Arcore (MI) - ITALIA
I nostri giocattoli sono conformi alle Norme di Sicurezza Europee per i giocattoli (requisiti di sicurezza previsti dal Consiglio della EEC) e dal “U.S. Consumer Toy Safety Specification”. Sono approvati dall’ I.I.S.G. (Istituto Italiano Sicurezza Giocattoli). Non sono conformi alle disposizioni delle norme di circolazione su strada e pertanto non possono circolare su strade pubbliche.
Peg Perego S.p.A. è certificata ISO 9001.
La certificazione offre ai clienti e ai consumatori la garanzia di una trasparenza e fiducia nel modo di lavorare dell'impresa.
ATTENZIONE! LA SUPERVISIONE DI UN ADULTO É SEMPRE NECESSARIA.
•Non adatto ai bambini di età inferiore ai 36 mesi per la presenza di piccole parti che possono essere ingerite o inalate.
•Non usare il veicolo su strade pubbliche, dove c’è traffico e macchine parcheggiate, su pendenze ripide,
vicino a gradini e scale, corsi d’acqua e piscine.
•I bambini devono sempre indossare scarpe durante l’uso del veicolo.
•Quando il veicolo è operativo fare attenzione affinché i bambini non mettano mani, piedi o altre parti del corpo, indumenti o altre cose, vicino alle parti in movimento.
•Non bagnare mai componenti del veicolo come motori, impianti, pulsanti, etc.
•Vicino al veicolo non usare benzine o altre sostanze infiammabili.
•Il veicolo deve essere usato assolutamente da un solo bambino qualora non rientrasse nella categoria dei veicoli a due posti.
DIRETTIVA RAEE (solo UE)
•Questo prodotto costituisce alla fine della sua vita un rifiuto classificato RAEE e pertanto non deve essere smaltito come rifiuto urbano, bensì deve essere soggetto a raccolta differenziata;
•Consegnare il rifiuto nelle apposite, preposte isole ecologiche;
•La presenza di sostanze pericolose contenute nelle componenti elettriche di questo prodotto costituiscono fonte di potenziale pericolo per la salute umana e per l’ ambiente se i prodotti non vengono correttamente smaltiti;
•Il bidone barrato indica che il prodotto deve essere assoggettato a raccolta differenziata.
SMALTIMENTO DELLA BATTERIA
•Contribuite alla salvaguardia dell’ambiente.
•La batteria usata, non va buttata tra i rifiuti domestici.
•Potete depositarla presso un centro di raccolta di batterie usate o di smaltimento rifiuti speciali; informatevi presso il vostro comune.
AVVERTENZE PILE AA 1,5 VOLT
L’inserimento delle pile deve essere effettuato e supervisionato solo dagli adulti. Non lasciare che i bambini giochino con le pile.
•Le pile devono essere sostituite da un adulto.
•Utilizzare solo il tipo di pila specificato dal costruttore.
•Rispettare la polarità +/-
•Non cortocircuitare i morsetti di alimentazione, rischio di fuoco o esplosione.
•Ritirare sempre le pile quando il gioco non é utilizzato per un lungo periodo.
•Non gettare le pile nel fuoco.
•Non cercare mai di ricaricare le pile se non ricaricabili.
•Non mischiare pile vecchie e nuove.
•Rimuovere le pile scariche.
•Gettare le pile scariche negli appositi contenitori per il riciclaggio delle batterie usate.
AVVERTENZE BATTERIA
La carica della batteria deve essere effettuata e supervisionata solo dagli adulti.
Non lasciare che i bambini giochino con la batteria.
CARICA DELLA BATTERIA
•Caricare la batteria seguendo le istruzioni allegate al caricabatterie e comunque non superare le 24 ore.
•Caricare per tempo la batteria non appena il veicolo perde velocità, eviterete danni.
•Se lasciate fermo il vostro veicolo per lungo tempo, ricordatevi di caricare la batteria e di tenerla scollegata dall'impianto; ripetete l'operazione di ricarica almeno ogni tre mesi.
•La batteria non deve essere caricata capovolta.
•Non dimenticare la batteria in carica! Controllare periodicamente.
•Usare solo il caricabatterie in dotazione e la batteria originali PEG PEREGO.
•La batteria è sigillata e non necessita manutenzione.
ATTENZIONE
•LA BATTERIA CONTIENE SOSTANZE TOSSICHE CORROSIVE.
NON MANOMETTERLA.
•La batteria contiene elettroliti a base acida.
•Non provocare contatto diretto tra i terminali della batteria, evitare forti urti: rischio di esplosione e/o incendio.
•Durante la carica la batteria produce gas. Caricare la batteria in luogo ben ventilato, lontano da fonti di calore e materiali infiammabili.
•La batteria esaurita deve essere rimossa dal veicolo.
•È sconsigliato appoggiare la batteria agli indumenti; si potrebbero danneggiare.
•Utilizzare unicamente batterie o accumulatori del tipo consigliato o di tipo analogo.
SE VI É UNA PERDITA
Proteggete i vostri occhi; evitare il contatto diretto con l'elettrolita: proteggete le vostre mani.
Mettere la batteria in una borsa di plastica e seguire le istruzioni sullo smaltimento batterie.
SE PELLE O OCCHI ENTRANO IN CONTATTO CON L’ ELETTROLITA
Lavare abbondantemente con acqua corrente la parte intaccata.
Consultare il medico immediatamente.
SE L’ ELETTROLITA VIENE INGERITO
Sciacquare la bocca e sputare.
Consultare il medico immediatamente.
MANUTENZIONE E CURA VEICOLO
•Controllare regolarmente lo stato del veicolo, in particolare l’impianto elettrico, i collegamenti delle spine, i cappucci di protezione ed il caricabatterie. In caso di difetti accertati, il veicolo elettrico ed il caricabatterie non devono essere utilizzati.
Per riparazioni usare solo pezzi di ricambio originali
PEG PEREGO.
•PEG PEREGO non si assume nessuna responsabilità in caso di manomissione dell’impianto elettrico.
•Non lasciare le batterie o il veicolo vicino a fonti di calore come caloriferi, caminetti, etc.
•Proteggere il veicolo da acqua, pioggia, neve etc.; usarlo su sabbia o fango potrebbe causare danni a pulsanti, motori e riduttori.
•Lubrificare periodicamente (con olio leggero) parti semovibili come cuscinetti, sterzo etc.
•Le superfici del veicolo possono essere pulite con un panno umido e, se necessario, con prodotti di uso domestico non abrasivi.
•Le operazioni di pulizia devono essere effettuate solo da adulti.
•Non smontare mai i meccanismi del veicolo o i motori, se non autorizzati dalla PEG PEREGO.

REGOLE PER UNA GUIDA SICURA
Per la sicurezza del bambino: prima di azionare il veicolo, leggere e seguire attentamente le seguenti istruzioni.
•Insegnate al vostro bambino un uso corretto del veicolo per una guida sicura e divertente.
•Prima di partire assicurarsi che il percorso sia sgombro da persone o cose.
•Guidare con le mani sul manubrio/volante e guardare sempre la strada.
•Frenare per tempo per evitare scontri.
2ª VELOCITÁ (se presente)
Inizialmente si consiglia l’utilizzo della 1ª marcia. Prima di inserire la 2ª velocità, assicurarsi che il bambino abbia imparato correttamente l’uso del manubrio/volante, della 1ª velocità, del freno, e abbia acquisito dimestichezza con il veicolo.
ATTENZIONE!
•Controllare che tutte le borchie/dadi di fissaggio delle ruote siano ben salde.
•Se il veicolo agisce in condizioni di sovraccarico, come su sabbia soffice, fango o terreni molto sconnessi, l’interruttore di sovraccarico toglierà immediatamente potenza. L’erogazione di potenza riprenderà dopo alcuni secondi.
•Se il veicolo agisce in condizioni di sovraccarico su pendenze ripide, l’interruttore di sovraccarico toglierà immediatamente potenza al veicolo.
Se ciò accadesse TOGLIERE IL PIEDE DAL PEDALE DELL’ACCELERATORE. Il freno elettrico entrerà in funzione rallentando la discesa del veicolo.
•Solo per veicoli 12 e 24 Volt: in prima velocità, il veicolo é dotato di effetto differenziale come le vere automobili; su terreni lisci e con un solo bambino, le due ruote possono avere velocità diverse con possibilità di slittamento/rallentamento delle stesse.
DIVERTIMENTO SENZA INTERRUZIONI: tenete sempre un set-batterie carico di ricambio pronto all’uso.
PROBLEMI?
IL VEICOLO NON FUNZIONA?
•Verificare che non ci siano cavi scollegati sotto la piastra dell’ acceleratore.
•Controllare il funzionamento del pulsante dell’acceleratore ed eventualmente sostituirlo.
•Controllare che la batteria sia attaccata all’ impianto elettrico.
IL VEICOLO NON HA POTENZA?
•Caricare le batterie. Se dopo la ricarica il problema persiste far controllare le batterie ed il caricabatterie da un centro assistenza.
SERVIZIO ASSISTENZA
PEG PEREGO offre un servizio di assistenza postvendita,direttamente o tramite un network di centri di assistenza autorizzati, per eventuali riparazioni o sostituzioni e vendita di ricambi originali.
Per contattare i centri assistenza fare riferimento all’opuscolo “Centri Assistenza” presente nell’imballo.
Peg Perego è a disposizione dei suoi Consumatori per soddisfare al meglio ogni loro esigenza.
Per questo, conoscere il parere dei nostri Clienti, è per noi estremamente importante e prezioso.
Le saremo quindi molto grati se, dopo aver utilizzato un nostro prodotto, vorrà compilare il QUESTIONARIO SODDISFAZIONE CONSUMATORE che troverà in Internet al seguente indirizzo: www.pegperego.com segnalando eventuali osservazioni o suggerimenti.
ISTRUZIONI DI MONTAGGIO
ATTENZIONE
LE OPERAZIONI DI MONTAGGIO DEVONO ESSERE EFFETTUATE SOLO DA ADULTI. PRESTARE ATTENZIONE A QUANDO SI ESTRAE IL VEICOLO DALL'IMBALLO.
TUTTE LE VITI E I PICCOLI PEZZI SI TROVANO IN UN SACCHETTO ALL'INTERNO DELL'IMBALLO. LA BATTERIA POTREBBE GIA’ ESSERE INSERITA NELL’ARTICOLO.
MONTAGGIO
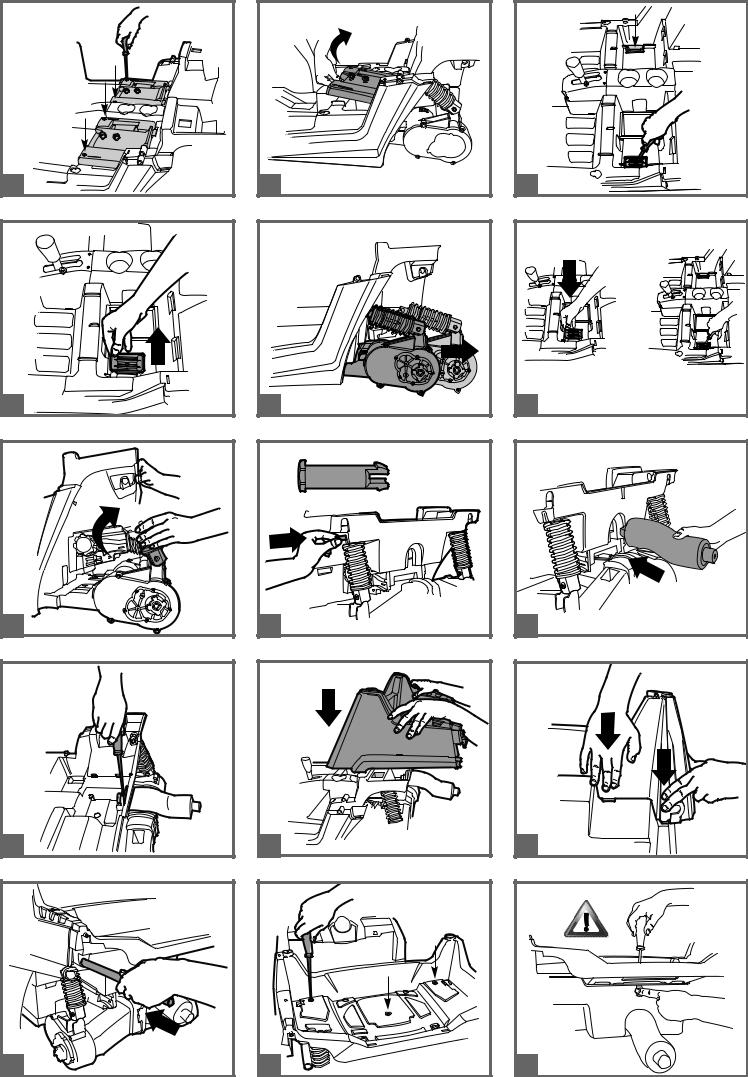
1 |
• Svitare le 4 viti di fissaggio delle due basi dei sedili. |
2 |
• Sfilare e togliere le due basi dei sedili. |
3 |
• Svitare le viti di fissaggio dei due fermi fondo |
posteriore.
4 • Estrarre i due fermi fondo posteriore.
5 • Tirare nel senso della freccia il fondo per estrarre completamente il gruppo dei motori.
6 • Riposizionare e riavvitare entrambi i fermi fondo posteriore.
7 • Sollevare i due ammortizzatori (1). Inserirli nei fori della scocca (2).
8 • Fissare gli ammortizzatori alla scocca con i due perni (uno per parte). Nota, nell'imballo trovate altri due perni di scorta.
9 • Inserire il tubo di scarico come mostrato in figura. 10 •Fissare con la vite in dotazione il tubo di scarico. 11 •Posizionare il cassone.
12 •Inserire nella scocca le linguette (due per parte) della parte anteriore del cassone.
13 •Inserire a fondo i due tubi di ferro (uno per parte) come mostrato in figura.
14 •Fissare il cassone avvitando le tre viti in dotazione.Attenzione, la vite centrale va avvitata come mostra la figura seguente.
15 •Premere il perno per aiutarsi ad allineare i buchi di passaggio della vite.
16 •Completare il fissaggio del cassone avvitando le due viti all'interno dell'abitacolo.
17 •Inserire le protezioni laterali come mostrato in figura prestando attenzione a montare i pezzi con la griglia che sporge verso l'esterno. Terminare l'aggancio spingendo in avanti le protezioni fino allo scatto.
18 •Allargare i laterali della scocca (1) e infilare i perni delle protezioni laterali (2).
19 •Premere i laterali della scocca nei due punti indicati in figura per fassarli.
20 •Mascherina posteriore:
• A - sede per l' aggancio alla scocca
• B - sede per l'inserimento tubo di ferro
• C - sede per l'inserimento del tubo di scarico
• D - linguette di fissaggio alla scocca
21 •Posizionare la mascherina posteriore unendo i vari punti contrassegnati con le lettere A B C.
22 •Sollevare la parte alta della mascherina posteriore per facilitare l'aggancio delle linguette di fissaggio (D).
23 •Fissare la mascherina posteriore avvitando le due viti come mostrato in figura.
24 •Completare il fissaggio della mascherina posteriore avvitando la vite sotto il tubo di scarico.
25 •Mascherina anteriore:
•A - linguette per l' aggancio alla scocca
•B - sede per l' aggancio alla scocca
•C - sede per l' aggancio al fondo
•D - linguetta per l' aggancio al cofano
•E - foro per inserimento roll bar anteriore 26 •Posizionare la mascherina anteriore inserendo
nella scocca i punti contrassegnati con le lettere A B. Premere fino allo scatto la mascherina e la scocca in corrispondenza del punto B (come mostrato nel tondo), posizionando la mano all’interno della scocca.
27 •Premere nella parte centrale della mascherina anteriore in corrispondenza della linguetta D per agganciarla al cofano.
28 •Premere la parte inferiore della mascherina per agganciare le due linguette C.
29 •Posizionare il roll-bar anteriore infilandolo sugli appositi perni.
30 •Prestare attenzione al fondo del roll-bar che deve inserirsi nel foro E della mascherina come mostra il disegno.
31 •Fissare il roll-bar con la vite in dotazione.
32 •Completare il fissaggio del roll-bar con le due viti nella parte anteriore.
33 •Premere le due parti del volante per agganciarle completamente.
34 •Inserire il tappo centrale del volante.
35 •Eliminare la protezione di plastica dell'asta volante.
36 •Posizionare il volante allineando i fori con quelli dell'asta volante.
37 •Fissare il volante con il perno filettato e il dado (il dado si fissa nel foro esagonale, il perno
filettato nel foro circolare) tenendo premuto il dado per mantenerlo nella sua sede.
38 •Inserire la maniglia del passeggero nel foro del cruscotto.
39 •Fissare la maniglia con la vite in dotazione.
40 •Montare a pressione il tappo serbatoio.
41 •Inserire la base del sedile (tolta in precedenza) dal lato guidatore.
42 •Inserire la battera (precedentemente ricaricata) nel vano sotto il sedile del lato passeggero.
43 •Infilare la spina della batteria e quella dell’impianto elettrico nei fori della restante base del sedile.
44 •Inserire le base del sedile dal lato passeggero.
45 •Collegare le spine della batteria e dell’impianto elettrico.
46 •Fissare le basi dei sedili utilizzando 4 viti (due per parte).
47 •Inserire nelle basi dei sedili le due parti corte delle cinture di sicurezza (nei fori posti vicino alla leva cambio) prestando attenzione ad inserire tutto il pezzo del cinturino evidenziato nel particolare A. Nota: i pulsanti delle fibie dei cinturini vanno rivolte verso la leva cambio come mostrato in figura.
48 •Svitare i pomoli dalla base del sedile.
49 •Posizionare il sedile. Nota: il sedile puo' essere regolato in lunghezza in due posizioni diverse a seconda dell'altezza del bambino.
50 •Riavvitare i pomoli.
51 •Abbassare la seduta del sedile.
52 •Avvitare la vite di sicurezza. Ripetere le operazioni per l'altro sedile.
53 •Assemblaggio tettuccio:
54 •Unire i pezzi A B C della parte anteriore del tettuccio come mostrato nel disegno avvitando le viti di fissaggio nei fori superiori. Prestare attenzione all'orientamento dei pezzi B C guardando la parte terminale inferiore.
55 •Unire i pezzi A D E della parte posteriore del tettuccio come mostrato nel disegno avvitando le viti di fissaggio nei fori inferiori. Prestare attenzione all'orientamento dei pezzi D E guardando la parte terminale inferiore.
56 •Montare a pressione il tettuccio sul veicolo.
57 •Inserire le fascette sui pezzi D e E del tettuccio. Prestare attenzione al verso d’ inserimento della fascetta.
58 •Inserire la parte terminale delle protezioni laterali nelle fascette.
59 •Avvitare le viti di fissaggio.
60 •Fissare il tettuccio nella parte posteriore con 2 viti. 61 •Fissare il tettuccio nella parte anteriore con 2 viti. 62 •Fissare al tettuccio le parti lunghe delle cinture di
sicurezza.
63 •Applicare i tre fanali fendinebbia sul tettuccio fissandoli avvitando le viti in dotazione (una per fanale).
64 •Eliminare le protezioni dall’assale posteriore.
65 •Infilare l’assale nella parte posteriore del veicolo come mostrato in figura.
66 •Posizionare il driver nella parte interna di una delle due ruote piu’ larghe.
67 •Infilare la ruota sull’assale con il driver rivolto verso il vicolo.
68 •Inserire sull’assale una rondella.
69 •Fissare la ruota avvitando con la chiave in dotazione, uno dei quatto dadi forniti.
•Ripetere le operazioni del montaggio della ruota posteriore sull’altro lato.Attenzione, eseguire le operazioni tenendo fermo l’assale dalla parte opposta aiutandovi con la seconda chiave in
dotazione.
70 •Eliminare le protezioni dagli assali anteriori.
71 •Inserire sull’assale una rondella.
72 •Infilare una delle due ruote rimaste (piu’ stretta rispetto alle posteriori) sull’assale.
73 •Inserire sull’assale una rondella.
74 •Fissare la ruota avvitando con la chiave in dotazione, uno dei due dadi rimasti.
•Ripetere le operazioni del montaggio della ruota anteriore sull’altro lato.
75 •Applicare a pressione sulle quattro ruote i copriborchia.
CARATTERISTICHE E USO DEL VEICOLO
76 •RADIO - Svitare le due viti come mostrato in figura per estrarla e inserire le pile.
77 •Aiutandosi con un utensile, fare leva sulla parte alta del frontalino della radio per estrarla.
78 •Svitare la vite dello sportellino del vano pile.
79 •Inserire due pile AA 1,5V seguendo la giusta polarità. Richiudere lo sportellino del vano pile. Attenzione, riavvitare sempre la vite.
80 •Inserire l'antenna e la radio nella sede del cruscotto.
81 •Funzioni della radio:
•A - attacco per il jack del vostro lettore MP3. ATTENZIONE!: Connettere il lettore MP3 (non fornito) alla radio della macchina, utilizzamdo un cavo di lunghezza NON superiore ai 150cm.
•B - selettore stazioni radio
•C - tasti on/off
•D - spia di radio accesa
•E - manopola regolazione volume
•F - tasti regolazione orologio digitale 82 •COMPONENTI ABITACOLO:
•A - volante
•B - radio funzionante (vedi fig 81)
•C - quadro di controllo velocita' e stato di carica della batteria (vedi fig 83)
•D - maniglia passeggero
•E - pedale acceleratore/freno elettrico (vedi fig 84-85-86)
•F - leva cambio (vedi fig 87)
•G - portabibite (vedi fig 88)
•H - vano porta lettore MP3
83 •QUADRO di CONTROLLO - Nella parte inferiore del quadro di controllo viene visualizzato lo stato di carica della batteria. Spia verde, la batteria e' carica; spia arancione, la batteria si sta scaricando, spia rossa, la batteria deve essere ricaricata. Nella parte superiore i led verdi si accendono pregressivamente all'aumentare della velocita' del veicolo (sono solo a scopo di gioco e non visualizzano la reale velocita' del veicolo).
84 •PEDALE ACCELERATORE/FRENO ELETTRICO - Premendo con il piede il pedale dell’acceleratore il veicolo si mette in moto. Rilasciando il pedale entrerà in funzione il freno elettrico arrestando il veicolo automaticamente.
85 •Sul pedale è posizionato il blocco seconda velocità. Quando viene tolto il veicolo dall’imballo, il blocco seconda velocità è posizionato come in figura A (LOW) e permette al veicolo di viaggiare alla velocità più bassa. Quando il blocco seconda velocità è posizionato come in figura B (HIGH), il veicolo viaggia alla velocità più alta.
86 •Per posizionare il blocco seconda velocità nella posizione B (HIGH), svitare la vite di fissaggio del blocco seconda velocità e spostarlo verso l’alto. Attenzione, riavvitare sempre la vite.
87 •LEVA CAMBIO - Quando la leva cambio e' posizionata in posizione verticale, il veicolo viaggia in avanti alla velocita' LOW o HIGH. Tirando indietro la leva cambio e premendo contemporaneamente il pedale dell’acceleratore il veicolo procede in retromarcia.
88 •PORTABIBITE - E’ dotato di due vani portabibite per lattine o bottigliette.
89 •CASSONE e MOLLEGGI - Il retro del veicolo è dotato di un ampio cassone portaoggetti e di veri molleggi funzionanti sulle ruote.
90 •CINTURE di SICUREZZA - Per agganciare la cintura di sicurezza inserire la parte terminale della cintura più lunga nella fibia della cintura più corta premendo le due estremita' tra di loro.
91 •Per sganciare la cintura di sicurezza premere il pulsante della fibia e contemporaneamente sganciare i due elementi.
92 •Per regolare la lunghezza della cintura di sicurezza, spostare il cursore come mostrato in figura.
SOSTITUZIONE DELLA BATTERIA
93 •Svitare la vite di sicurezza della seduta del sedile passeggero e sollevare la seduta;
94 •Svitare i pomoli e togliere il sedile;
95 •Svitare le due viti della base del sedile. Scollegare le spine della batteria e dell'impianto elettrico;
96 •Estrarre la base del sedile e sfilare le spine; 97 •Sostituire la batteria.
•Riposizionare la base del sedile dopo aver inserito le spine nei fori. Ricollegare le spine e riposizionare il sedile.
98 •ATTENZIONE: riavvitare sempre tutti i pomoli e le viti.
CARICA DELLA BATTERIA
ATTENZIONE: LA CARICA DELLA BATTERIA E QUALSIASI INTERVENTO ALL'IMPIANTO ELETTRICO DEVONO ESSERE EFFETTUATI DA ADULTI.
LA BATTERIA PUÓ ESSERE CARICATA ANCHE SENZA RIMUOVERLA DAL GIOCO.
99• Scollegare la spina A dell' impianto elettrico dalla spina B della batteria premendo le spine lateralmente.
100• Inserire la spina del caricabatterie ad una presa domestica seguendo le sue istruzioni allegate. Collegare la spina B con la spina C del caricabatterie.
101• A carica ultimata staccare il caricabatteria dalla presa domestica, poi scollegare la spina C dalla spina B.
102• Inserire a fondo, fino allo scatto, la spina B nella spina A.
•ATTENZIONE: terminate le operazioni di ricarica riavvitare sempre tutti i pomoli e le viti.
103• La batteria può essere caricata anche fuori dal veicolo in questo modo se avete una batteria di scorta, il bambino può continuare a giocare.
ENGLISH
Thank you for choosing a PEG PEREGO® product. For over 50 years PEG PEREGO have been with you as you take your children out - in carriages just after they are born, then in strollers, and later on in pedal and battery-powered toys
Discover our complete range of products, news and other information about the Peg Perego world on our web site.
www.pegperego.com
IMPORTANT INFORMATION
Read this instruction manual carefully to learn how to use the vehicle and teach your child to drive it properly and safely while enjoying it at the same time. Keep the manual safe for future reference. Before using the vehicle for the first time, charge the battery for 18 hours. Failure to do this could result in irreparable damage to the battery.
•Ages 3 to 10
•Two-seater vehicle
•One 24V 15Ah sealed lead acid rechargeable battery
•Two drive wheels
•Two 280 W motors
•Speed in 1st gear 5 km/h
•Speed in 2nd gear 10.5 km/h
•Speed in reverse gear 5 km/h
Peg Perego reserve the right to make changes to the models and information in the present publication at any time, for technical or company reasons.
DECLARATION OF CONFORMITY
PRODUCT NAME
Polaris Ranger RZR
PRODUCT IDENTIFICATION CODE
IGOD0513
REFERENCE STANDARD (origin)
General Toy Safety Directive 88/378/EEC Standard EN 71 / 1 -2 -3
Standard EN62115
Electromagnetic Compatibility Directive
2004/108/EC
Standard EN55022 – EN55014
European Directive WEEE 03/108/EC
European Directive RoHS 2002/95/EC
Phthalates Directive 2005/84/EC
Standard EN 60825-1
The vehicle is not compliant with the requirements of road transport standards and consequently cannot travel on public roads.
DECLARATION of CONFORMITY
Peg Perego S.p.A. declares under its own responsibility that the item in question has been subjected to internal operational tests and approved according to the standards in force at external, independent laboratories.
PLACE AND DATE OF ISSUE
Italy - 06.05.2008
Peg Perego S.p.A. via A. De Gasperi 50 20043 Arcore (MI) – ITALIA
SAFETY STANDARDS
Our toys are compliant with European Safety Standards for toys (safety requirements stipulated by the EEC Council) and with the “U.S. Consumer Toy Safety Specification”.They are approved by the I.I.S.G. (Italian Toy Safety Institute).They are not compliant with the requirements of road transport standards and consequently cannot travel on public roads.
Peg Perego S.p.A. is ISO 9001 certified.
This certification provides customers and consumers with a guarantee of transparency and assurance about the company’s working procedures.
WARNING! THE SUPERVISION OF AN ADULT IS ALWAYS NECESSARY.
•Not suitable for children of under 36 months of age due to the presence of small parts that could be swallowed or inhaled.
•Do not use the vehicle on public roads, in places where there is traffic or parked cars, on steep slopes, near to steps and stairs, watercourses or swimming pools.
•Children must always wear shoes when using the vehicle.
•When the vehicle is in operation make sure that children do not put their hands, feet, other body parts, clothing, or other objects close to the moving parts.
•Never wet sensitive vehicle components like the motors, electrical systems, buttons, etc.
•Do not use petrol or other flammable substances close to the vehicle.
•The vehicle must be only be used by a single child unless it is classed as a two-seater vehicle.
WEEE DIRECTIVE (EU only)
•At the end of its useful life, this product is classed as Waste Electrical and Electronic Equipment (WEEE) and must therefore not be disposed of as urban waste but instead taken to a designated separated waste collection facility.
•Take it to an appropriate collection centre.
•The presence of dangerous substances contained in the electrical components of this product represents a potential source of danger to human health and for the environment if the products are not disposed of correctly.
•The barred dustbin symbol indicates that the product must undergo sorted waste collection.
DISPOSAL OF THE BATTERY
•Help protect the environment.
•Used batteries must not be disposed of with domestic waste.
•They can be left at a used battery or special waste collection centre. Contact your local authorities for more information.
AA 1.5 VOLT BATTERY WARNINGS
The insertion of the batteries must be carried out and supervised by adults only. Do not allow children to play with the batteries.
•The batteries must be replaced by an adult.
•Only use the battery type specified by the manufacturer.
•Respect the +/- polarity.
•Do not short circuit the power supply terminals: risk of fire or explosion.
•Always remove the batteries when the toy is not used for a long time.
•Do not throw the batteries into a fire.
•Never try to recharge batteries if they are not rechargeable.
•Do not mix old and new batteries.
•Remove flat batteries.
•Dispose of flat batteries in the appropriate recycling containers.

BATTERY WARNINGS
Battery charging must be carried out and supervised by adults only.
Do not allow children to play with the battery.
CHARGING THE BATTERY
•Charge the battery according to the instructions enclosed with the battery charger and never for more than 24 hours.
•To avoid damage, the battery should be charged as soon as the vehicle starts to lose speed.
•If the vehicle is left unused for a long time, remember to charge the battery and to keep it disconnected from the electrical system. Repeat the recharge procedure at least once every three months.
•The battery must not be charged upside-down.
•Do not forget about the battery which is being charged! Check it from time to time.
•Only use the battery charger provided and the original PEG PEREGO battery.
•The battery is sealed and does not require maintenance.
WARNING
•THE BATTERY CONTAINS CORROSIVE TOXIC SUBSTANCES.
DO NOT TAMPER WITH IT.
•The battery contains acid-based electrolytes.
•Do not create direct contact between the battery terminals, avoid strong impacts: risk of explosion and/or fire.
•While charging, the battery produces gas. Charge the battery in a well-ventilated environment, away from sources of heat and flammable materials.
•The flat battery must be removed from the vehicle.
•It is not advisable to bring the battery into contact with clothes, as it could damage them.
•Only use the recommended type of battery or an equivalent type.
IF THERE IS A BATTERY LEAK
Protect your eyes.Avoid direct contact with the electrolyte. Protect your hands.
Put the battery in a plastic bag and follow the instructions for battery disposal.
IF SKIN OR EYES COME INTO CONTACT WITH THE ELECTROLYTE
Thoroughly rinse the area concerned with running water.
Consult a doctor immediately.
IF THE ELECTROLYTE IS SWALLOWED Rinse the mouth and spit out the water. Consult a doctor immediately.
MAINTENANCE AND VEHICLE CARE
•Check the condition of the vehicle regularly, paying particular attention to the electrical system, the plug connections, the terminal protectors and the battery charger. If defects are identified, the electrical vehicle and the battery charger must not be used. For repairs use only original PEG PEREGO spare parts.
•PEG PEREGO do not accept any responsibility for cases of tampering with the electrical system.
•Do not leave the batteries or the vehicle close to sources of heat like radiators, fireplaces, etc.
•Protect the vehicle from water, rain, snow, etc. Using the vehicle on sand or mud may damage the buttons, motors and gears.
•Lubricate moving parts like bearings, steering, etc. periodically with light oil.
•The vehicle surfaces can be cleaned with a damp cloth and, if necessary, with non-abrasive domestic cleaning products.
•Cleaning must only be carried out by adults.
•Never dismantle the vehicle mechanisms or motors, unless authorized by PEG PEREGO.
RULES FOR SAFE DRIVING
For the safety of the child, before starting up the vehicle read and carefully follow the following instructions.
•Teach the child how to use the vehicle properly for safe and enjoyable driving.
•Before starting, check that there are no people or objects obstructing the vehicle’s path.
•Drive with hands on the handlebars/steering wheel and always watch the road ahead.
•Brake in good time to avoid collisions.
2nd GEAR (if present)
Initially, use in 1st gear is recommended. Before enabling 2nd gear, check that the child has learned to use the handlebars/steering wheel, 1st gear and the brake correctly, and has become familiar with the vehicle.
WARNING!
•Check that all the wheel fixing studs/nuts are fastened properly.
•If the vehicle is overloaded, as can happen on soft sand, mud, or very uneven ground, the overload switch will immediately disconnect the power.The power supply will be restored after a few seconds.
•If the vehicle is overloaded on steep slopes, the overload cut-out will immediately disconnect the power. If this happens, REMOVE THE FOOT FROM THE ACCELERATOR.The electrical brake will be activated, slowing down the descent of the vehicle.
•Only for 12 and 24 Volt vehicles: in first gear the vehicle has a differential effect like a real motor vehicle; on smooth terrain and with just one child on board, the two wheels can turn at different speeds and they can slip and slow down.
UNINTERRUPTED FUN: Keep a spare set of charged batteries ready for use.
PROBLEMS?
THE VEHICLE DOES NOT WORK?
•Check that there are no disconnected cables under the accelerator plate.
•Check the operation of the accelerator button and replace it if necessary.
•Check that the battery is connected to the electrical system.
THE VEHICLE LACKS POWER?
•Charge the batteries. If after charging the problem persists, have the battery and charger checked by an assistance centre.
ASSISTANCE SERVICE
PEG PEREGO offers an after-sales assistance service, directly or through a network of authorized assistance centres, for any repairs or replacements and the sale of original spare parts. To contact the assistance centres refer to the “Assistance Centres” booklet included in the packaging.
Peg Perego always strive to best satisfy their customers' needs. Knowing the opinions of our customers is therefore very important and valuable to us.We would be very grateful if, once you have used the product, you would fill out the CONSUMER SATISFACTION QUESTIONNAIRE which you can find on the internet at: www.pegperego.com, making any observations or suggestions you might have.
ASSEMBLY INSTRUCTIONS
WARNING
ASSEMBLY MUST ONLY BE CARRIED OUT BY ADULTS.TAKE CARE WHEN REMOVING THE VEHICLE FROM ITS PACKAGING.ALL THE SCREWS AND SMALL PARTS ARE CONTAINED IN A BAG INSIDE THE PACKAGING.THE BATTERY MAY ALREADY BE FITTED INSIDE THE ITEM.
ASSEMBLY
1 • Remove the 4 fixing screws from the two seat base sections.
2 • Pull out and remove the two seat bases.
3 • Remove the fixing screws from the two rear base fixtures.
4 • Remove the two rear base locks.
5 • Pull the base in the direction of the arrow to fully remove the motor unit.
6 • Reposition and screw on both rear base locks. 7 • Lift the two shock absorbers (1). Insert them
into the holes in the bodywork (2).
8 • Attach the shock absorbers to the bodywork with the two pins (one each side). Note: the packaging contains two spare pins.
9 • Insert the exhaust pipe as shown in the figure. 10 •Attach the exhaust pipe with the screw
provided.
11 •Position the rear box.
12 •Insert the tabs on the front of the rear box into the bodywork (two each side).
13 •Fully insert the two metal tubes (one each side) as shown in the figure.
14 •Attach the rear box with the three screws provided. Important: the middle screw must be tightened as shown in the following figure.
15 •Press the pin to help align the screw holes. 16 •Complete the attachment of the rear box by fastening the two screws inside the cabin.
17 •Insert the side guards as shown in the figure, taking care to fit the parts with the grid extending towards the outside. Complete the attachment by pushing the guards forward until they click into position.
18 •Pull out the sides of the bodywork (1) and insert the pins of the side guards (2).
19 •Press the sides of the bodywork at the two points indicated in the figure to fix them in position.
20 •Rear cover plate:
•A - Housing for attachment to bodywork.
•B - Housing for the insertion of metal tubes.
•C - Housing for the insertion of the exhaust pipe.
•D - Tabs for fixture to bodywork.
21 •Position the rear cover plate, matching the various points marked with the letters A, B and C.
22 •Lift the upper part of the rear cover plate to facilitate the engagement of the tabs (D).
23 •Secure the rear cover plate with the two screws as shown in the figure.
24 •Complete the attachment of the rear cover plate by fastening the screw under the exhaust pipe.
25 •Front cover plate:
•A - Tabs for fixing to the bodywork.
•B - Housing for engagement with the bodywork.
•C - Housing for attachment to the base
•D - Tab for engagement to the hood.
•E - Hole for inserting the front roll bar.
26 •Position the front cover plate by inserting the points indicated with the letters A and B into the bodywork. Put a hand inside the bodywork at point B and squeeze it together with the mask to click it into place (as shown in the circle).
27 •Press on the central area of the front cover plate at the tab D to attach it to the hood.
28 •Press the lower part of the cover plate to engage the two tabs C.
29 •Position the front roll bar, sliding it onto the relevant pins.
30 •Take care with the bottom of the roll bar, which must be inserted into the hole E of the cover plate as shown in the picture.
31 •Attach the roll bar with the screw provided.
32 •Complete the attachment of the roll bar with the two screws at the front.
33 •Press together the two sections of the steering wheel to fully engage them.
34 •Insert the central steering wheel cap.
35 •Remove the plastic protectors from the steering shaft.
36 •Position the steering wheel, aligning the holes with those on the steering shaft.
37 •Attach the steering wheel with the threaded pin and the bolt (the bolt must be inserted into the hexagonal hole, the threaded pin in the circular hole), holding the bolt to keep it in place.

38 •Insert the passenger's handle into the hole on the dashboard.
39 •Attach the handle with the screws provided.
40 •Snap fit the petrol cap.
41 •Insert the seat base (removed previously) on the driver's side.
42 •Insert the battery (charged previously) into the compartment under the seat on the passenger's side.
43 •Thread the battery plug and the electrical system plug through the holes in the passenger’s seat base.
44 •Insert the seat base on the passenger side.
45 •Connect the battery and electrical system plugs. 46 •Fasten down the seat bases using 4 screws (two
on each side).
47 •Insert the two short sections of the safety belts into the seat bases (in the holes near the gear lever), taking care to insert all of the section of belt highlighted in detail A. Note: the safety belt buckle buttons must be facing the gear lever, as shown in the figure.
48 •Unscrew the knobs from the seat base.
49 •Position the seat. Note: the seat can be adjusted in length to two different positions, depending on the height of the child.
50 •Screw the knobs back into position.
51 •Lower the seat.
52 •Tighten the safety screw. Repeat for the other seat.
53 •Assembling the roof bars.
54 •Join parts A, B and C of the front of the roof bars as shown in the picture, inserting the fixing screws into the upper holes.Take care with the orientation of the lower ends of parts B and C.
55 •Join parts A, D and E of the rear section of the roof bars as shown in the picture, inserting the fixing screws in the lower holes.Take care with the orientation of the lower ends of parts D and E.
56 •Push down to mount the roof bars on the vehicle.
57 •Insert the clips on parts D and E of the roof bars.Take care with the direction of insertion of the clips.
58 •Insert the ends of the side guards into the clips. 59 •Tighten the fixing screws.
60 •Attach the roof bars at the rear with 2 screws. 61 •Attach the roof bars at the front with 2 screws. 62 •Attach the long sections of the safety belts to
the roof bars.
63 •Mount the three fog lights on the roof bars and attach them with the screws provided (one per light).
64 •Remove the protectors from the rear axle. 65 •Insert the axle into the rear of the vehicle, as
shown in the figure.
66 •Position the driver in the inside of one of the two larger wheels.
67 •Slide the wheel onto the axle with the driver towards the vehicle.
68 •Slide a washer onto the axle.
69 •Fasten the wheel, tightening one of the four nuts supplied with the spanner provided.
•Repeat the fitting operations for the other rear wheel. Important: carry out the operations while holding the axle still on the opposite side with the help of the second spanner provided.
70 •Remove the protectors from the front axles.
71 •Slide a washer onto the axle.
72 •Slide one of the remaining wheels (narrower than the rear wheels) onto the axle.
73 •Slide a washer onto the axle.
74 •Fasten the wheel, tightening one of the two remaining bolts with the spanner provided.
•Repeat the fitting operations for the front wheel on the other side.
75 •Snap fit the four hub covers onto the wheels.
FEATURES AND USE OF THE VEHICLE
76 •RADIO - Remove the two screws as shown in the figure to extract the radio and insert the batteries.
77 •Use a tool to lever the upper part of the radio front panel and extract it.
78 •Release the screw on the battery compartment cover.
79 •Insert two AA 1.5V batteries with the polarities as indicated. Close the battery compartment cover. Important: always tighten the screw.
80 •Insert the antenna and the radio into the housing on the dashboard.
81 •Radio functions:
•A - Socket for an MP3 reader jack. IMPORTANT!: Connect the MP3 reader (not included) to the vehicle radio using a cable NO longer than 150 cm.
•B - Radio station selector.
•C - On/Off buttons.
•D - Radio On indicator light.
•E - Volume control knob.
•F - Digital clock adjustment buttons. 82 •Driving cab features:
•A - Steering wheel.
•B - Fully functional radio (see fig 81).
•C - Speedometer and battery charge level panel (see fig 83).
•D - Passenger handle.
•E - Accelerator/electrical brake pedal (see fig 84- 85-86).
•F - Gear lever (see fig 87).
•G - Drinks holder (see fig 88).
•H - MP3 player storage compartment.
83 •CONTROL PANEL - The lower part of the control panel shows the battery charge level.The green light indicates that the battery is charged, orange indicates that the battery level is getting low and a red light indicates that the battery must be recharged.At the top of the control panel the greed LEDs light up progressively as the vehicle’s speed increases (they are for play purposes only and do not indicate the true speed of the vehicle).
84 •ACCELERATOR/ELECTRICAL BRAKE PEDAL - When the accelerator pedal is pressed, the vehicle starts moving.When the pedal is released, the electrical brake is activated, automatically stopping the vehicle.
85 •The second gear lock is located on the pedal. When the vehicle is removed from its packaging, the second gear lock is positioned as shown in figure A (LOW), limiting the vehicle to the lower speed.When the second gear lock is positioned as shown in figure B (HIGH), the vehicle can travel at the faster speed.
86 •To adjust the second gear lock to position B (HIGH), release the second gear lock fixing screw and move the unit upwards. Important: always replace the fixing screw.
87 •GEAR LEVER - When the gear lever is in the vertical position, the vehicle travels forward at LOW or HIGH speed.When the gear lever is pulled back and the accelerator pedal is pressed at the same time, the vehicle travels in reverse.
88 •DRINKS HOLDER - There are two drinks holders for cans or bottles.
89 •REAR BOX and SUSPENSION - The rear of the vehicle has a spacious cargo box and real functional suspension on the wheels.
90 •SAFETY BELT - To fasten the safety belt, insert the end of the longer belt section into the buckle on the shorter belt section, pushing the two parts together.
91 •To release the safety belt, press the buckle button and at the same time separate the two elements.
92 •To change the length of the safety belt, move the adjuster as shown in the figure.
REPLACING THE BATTERY
93 •Release the passenger seat safety screw and lift the seat.
94 •Unscrew the knobs and remove the seat.
95 •Unscrew the two seat base screws. Disconnect the battery and electrical system plugs.
96 •Extract the seat base and pull out the plugs. 97 •Replace the battery.
•Replace the seat base after passing the plugs through the holes. Connect the plugs and replace the seat.
98 •WARNING: always replace and tighten all the knobs and screws.
CHARGING THE BATTERY
WARNING: BATTERY CHARGING AND ANY OTHER WORK ON THE ELECTRICAL SYSTEM MUST BE CARRIED OUT BY ADULTS.
THE BATTERY CAN ALSO BE CHARGED WITHOUT REMOVING IT FROM THE TOY.
99 • Disconnect the electrical system plug A from the battery plug B, pushing on the sides of the plugs to release them.
100 • Plug the battery charger into a domestic power outlet following the instructions enclosed with it. Connect plug B to the battery charger plug C.
101 • When charging is complete, disconnect the battery charger from the domestic power supply and then disconnect plug C from plug B.
102 • Fully insert plug B into plug A until it clicks into position.
•WARNING: when the charging operations are complete, always replace and tighten all the
knobs and screws.
103 • The battery can also be charged outside the vehicle.This means that if you have a spare battery, the child can continue to use the toy.
FRANÇAIS
PEG PEREGO® vous remercie d’avoir choisi ce produit. Depuis plus de 50 ans, PEG PEREGO accompagne les promenades des enfants. Dès leur naissance,avec les landaus puis avec les poussettes et plus tard, avec les jouets à pédales et à batterie.
Découvrez sur notre site la gamme complète des produits, les nouveautés et d’autres renseignements sur le monde Peg Perego.
www.pegperego.com
RECOMMANDATIONS IMPORTANTES
Lisez attentivement ce manuel d’instructions pour vous familiariser avec le modèle et apprendre à votre enfant à le conduire de façon correcte, amusante et en toute sécurité. Conserver ensuite ce manuel pour pouvoir vous y référer à l’avenir.
Avant d’utiliser le véhicule pour la première fois, mettez en charge la batterie pendant 18 heures.
Ne pas appliquer cette règle pourrait être à l’origine de dommages irréversibles à la batterie.
•Âge 3 - 10 ans
•Véhicule à 2 places
•1 Batterie rechargeable de 24V 15 Ah scellée au plomb
•2 roues motrices
•2 moteurs de 280 W
•Vitesse en première 5 km/h
•Vitesse en seconde 10,5 km/h
•Vitesse en marche arrière 5 km/h
Peg Perego se réserve le droit d’apporter, à tout moment, des modifications aux modèles et aux données figurant dans ce livret, pour des raisons de caractère technique ou de management.
DECLARATION DE CONFORMITE
DENOMINATION DU PRODUIT
Polaris Ranger RZR
CODE D’IDENTIFICATION DU PRODUIT
IGOD0513
REFERENCES NORMATIVES (origine)
Directive générale Sécurité des Jouets 88/378/CE Standard EN 71 / 1 -2 -3
Standard EN62115
Directive Compatibilité électromagnétique (CEM) 2004/108/CE
Standard EN55022 - EN55014
Directive européenne RAEE 03/108/CE Directive européenne RoHS 2002/95/CE Directive Ftalati 2005/84/CE
Norme EN 60825-1
Ce produit n’est pas conforme aux normes de circulation routière et, par conséquent, ne doit pas circuler sur les voies publiques.
DECLARATION DE CONFORMITE
PegPerego S.p.A. déclare sous son entière responsabilité que l’article ci-dessus référencé a été soumis à des essais internes et a été homologué auprès de laboratoires externes et indépendants, conformément aux normes en vigueur.
DATE ET LIEU DE DELIVRANCE
Italie - 06.05.2008
Peg Perego S.p.A. Via A. De Gasperi, 50
20043 Arcore (MI) - ITALIA

NORMES DE SECURITE
Nos jouets sont conformes aux normes de sécurité européennes sur les jouets (conditions essentielles de sécurité prévues par le Conseil de l’EEC) et par l’ « U.S. Consumer Toy Safety Specification ». Ils ont été approuvés par l’I.I.S.G. (Institut Italien pour la Sécurité des Jouets).Ces produits ne sont pas conformes aux normes de circulation routière et, par conséquent, ne doivent pas circuler sur les voies publiques.
La société Peg Perego S.p.A. est certifiée ISO 9001.
La certification garantit aux clients et aux consommateurs la transparence et la fiabilité des méthodes de travail de l'entreprise.
ATTENTION! LA SURVEILLANCE D’UN ADULTE EST TOUJOURS NECESSAIRE.
•Ce produit ne convient pas à des enfants de moins de 36 mois à cause de la présence de parties de petites dimensions qu’ils pourraient avaler ou inhaler.
•Ne pas utiliser le véhicule sur les voies publiques, là où il y a de la circulation et des voitures en stationnement, sur des pentes raides, à proximité de marches et d’escaliers, des cours d’eau et des piscines.
•Les enfants doivent toujours porter des chaussures lorsqu’ils jouent avec le véhicule.
•Quand le véhicule est en fonction, veillez à ce que les enfants ne mettent pas les mains, les pieds ou autres parties du corps, ni des vêtements ou autres objets près des parties en mouvement.
•Ne jamais mouiller les composants du véhicule tels que moteurs, circuits, boutons, etc.
•Ne jamais utiliser d’essence ou autres substances inflammables à proximité du véhicule.
•Si le véhicule n’appartient pas à la catégorie des véhicules à deux places, il devra impérativement n’être utilisé que par un seul enfant.
DIRECTIVE RAEE (UE seulement)
•A la fin de sa vie, ce produit constitue un déchet classé RAEE et, par conséquent, ne doit pas être éliminé comme déchet urbain mais doit faire l'objet du tri sélectif des déchets;
•Déposer le déchet dans les conteneurs écologiques des déchetteries prévus à cet effet;
•Si les produits ne sont pas éliminés comme il se doit, la présence de substances dangereuses dans les composants électriques de ce produit en fait une source potentielle de danger pour la santé et l’environnement;
•La poubelle barrée indique que le produit doit faire l’objet du tri sélectif des déchets.
ELIMINATION DE LA BATTERIE
•Contribuez à la sauvegarde de l’environnement.
•Ne pas jeter la batterie usée parmi les ordures ménagères.
•Vous pouvez la confier à un centre de collecte des batteries usées ou de traitement des déchets spéciaux; renseignez-vous auprès de votre mairie.
RECOMMANDATIONS CONCERNANT LES PILES AA 1,5 VOLT
Les piles doivent être mises exclusivement par un adulte et sous sa responsabilité. Ne pas laisser les enfants jouer avec les piles.
•Les piles doivent être remplacées par un adulte.
•N’utiliser que le type de pile recommandé par le fabricant.
•Respecter la polarité +/-
•Ne pas court-circuiter les bornes d’alimentation: risque d’incendie ou d’explosion.
•Enlevez toujours les piles quand le jouet n’est pas utilisé pendant une longue période.
•Ne pas jeter les piles dans le feu.
•Ne jamais tenter de recharger des piles non rechargeables.
•Ne pas mélanger des piles neuves avec de vieilles piles.
•Enlever les piles usées.
•Jeter les piles usées dans les conteneurs de recyclage prévus à cet effet.
RECOMMANDATIONS CONCERNANT LA BATTERIE
La mise en charge de la batterie doit être faite et surveillée exclusivement par un adulte.
Ne pas laisser les enfants jouer avec la batterie.
MISE EN CHARGE DE LA BATTERIE
•Charger la batterie en suivant les instructions jointes au chargeur de batterie et, quoi qu’il en soit, ne pas dépasser 24 heures de mise en charge.
•Mettre la batterie en charge dès que le véhicule perd de la vitesse, vous éviterez tout dommage.
•Si le véhicule n’est pas utilisé pendant longtemps, n’oubliez pas de mettre la batterie en charge puis de la conserver débranchée du secteur; répéter cette opération au moins tous les trois mois.
•La batterie ne doit pas être chargée renversée.
•Ne pas oublier la batterie en charge! Contrôlez-la de temps en temps.
•Utilisez uniquement le chargeur de batterie fourni et la batterie originale PEG PEREGO.
•La batterie est scellée et ne nécessite aucun entretien.
ATTENTION!
•LA BATTERIE CONTIENT DES SUBSTANCES TOXIQUES CORROSIVES.
NE PAS L’OUVRIR NI LA MANIPULER.
•La batterie contient des électrolytes à base acide.
•Evitez tout contact direct entre les cosses de la batterie, évitez les chocs: risque d’explosion et/ou d’incendie.
•Pendant son chargement la batterie produit du gaz. Mettre la batterie en charge dans un endroit bien aéré, loin de toute source de chaleur et des matières inflammables.
•Retirer la batterie déchargée du véhicule.
•Il est déconseillé de poser la batterie sur des vêtements, cela risquerait de les abîmer.
•Utilisez uniquement des batteries ou des accumulateurs du type recommandé ou de type analogue.
EN CAS DE FUITE
Protégez vos yeux ; éviter tout contact direct avec l'électrolyte : protégez vos mains.
Mettre la batterie dans un sac en plastique et suivre les instructions concernant l’élimination de la batterie.
EN CAS DE CONTACT DE LA PEAU OU DES YEUX AVEC L’ ELECTROLYTE
Rincer abondamment la partie touchée sous l’eau courante.
Consulter immédiatement un médecin.
EN CAS D’INGESTION D’ELECTROLYTE Se rincer la bouche et cracher.
Consulter immédiatement un médecin.
ENTRETIEN ET SOIN DU VEHICULE
•Contrôler régulièrement l’état du véhicule, en particulier le circuit électrique, le branchement des fiches, les cosses de protection et le chargeur de batterie.Au cas où vous relèveriez des anomalies, n’utilisez ni le véhicule électrique ni le chargeur de batterie. Pour les réparations, n’utilisez que des pièces de rechange originales PEG PEREGO.
•PEG PEREGO décline toute responsabilité en cas d’intervention technique sur le circuit électrique par un tiers non agréé.
•Ne pas laisser les batteries ou le véhicule à proximité de sources de chaleur telles que poêles, cheminées, etc.
•Protéger le véhicule contre l’eau, la pluie, la neige etc.; l’utiliser sur du sable ou de la boue pourrait endommager les boutons, les moteurs et les réducteurs.
•Graisser périodiquement (avec une huile légère) les parties mobiles telles que coussinets, volant, etc.
•Les surfaces du véhicule peuvent être nettoyées avec un chiffon humide et, si nécessaire, avec des produits d’entretien ordinaires non abrasifs.
•Les opérations de nettoyage doivent être effectuées uniquement par un adulte.
•Ne jamais démonter les mécanismes ou les moteurs du véhicule sans l’autorisation de PEG PEREGO.
REGLES POUR UNE CONDUITE EN
TOUTE SECURITE
Pour la sécurité de l’enfant: avant de mettre en marche le véhicule, lire et suivre attentivement les instructions suivantes:
•apprenez à l’enfant à utiliser correctement le véhicule pour garantir une conduite amusante en toute sécurité.
•avant de démarrer, vérifier qu’il n’y ait pas d’obstacle et que personne ne se trouve sur le parcours.
•conduire avec les mains sur le guidon/volant et toujours regarder la route.
•freiner à temps pour éviter les chocs.
SECONDE (s’il y a lieu)
Au début, il est conseillé d’utiliser la première vitesse. Avant de passer la seconde, s’assurer que l’enfant a bien appris à utiliser le guidon/volant, la première vitesse, le frein, et qu’il s’est familiarisé avec le véhicule.
ATTENTION!
•Contrôler si toutes les plaques/écrous de fixation des roues sont bien serrés.
•Si le véhicule fonctionne en surcharge, comme sur du sable, de la boue ou des terrains très irréguliers, l’interrupteur de surcharge coupera aussitôt la puissance. La distribution de puissance reprendra après quelques secondes.
•Si le véhicule fonctionne en surcharge sur une pente raide, l’interrupteur de surcharge coupera aussitôt la puissance. Dans ce cas LEVER LE PIED DE LA PEDALE DE L’ACCELERATEUR; le frein électrique se déclenchera pour ralentir la descente du véhicule.
•Pour les véhicules de 12 et 24 Volt uniquement: en première, le véhicule est doté de différentiel comme les vraies automobiles; sur des terrains lisses et avec un seul enfant, les deux roues peuvent avoir des vitesses différentes et risquent de patiner/ralentir.
DIVERTISSEMENT SANS INTERRUPTION: prévoyez une batterie de rechange chargée et prête à l’emploi.
DES PROBLEMES?
LE VEHICULE NE FONCTIONNE PAS?
•Vérifiez si les câbles ne sont pas débranchés sous la plaque de l’accélérateur.
•Contrôlez le fonctionnement du bouton de l’accélérateur et, s’il y a lieu, remplacez-le.
•Vérifiez si la batterie est branchée sur le circuit électrique.
LE VEHICULE MANQUE DE PUISSANCE?
•Chargez les batteries. Si le problème persiste après le chargement, faire contrôler les batteries et le chargeur de batterie auprès d'un centre d'assistance.
SERVICE D’ASSISTANCE
PEG PEREGO offre un service d’assistance après-vente, directement ou par le biais de centres d’assistance agréés, pour toute réparation, remplacement et achat de pièces de rechange originales.Pour contacter les centres d’assistance, consultez l’opuscule « Centres d’Assistance » joint à l’emballage.
Peg Perego reste à la disposition de ses Clients pour satisfaire au mieux leurs exigences. Pour ce faire, connaître l’opinion de nos Clients, est extrêmement important et précieux pour nous. Par conséquent nous vous serions très reconnaissants si, après avoir utilisé l’un de nos produits, vous vouliez bien remplir
le QUESTIONNAIRE DE SATISFACTION CONSOMMATEUR que vous trouverez sur Internet à l’adresse suivante : www.pegperego.com et nous transmettre vos éventuelles observations ou suggestions.
 Loading...