

Parkside PDWE 8 A2 Instructions Manual
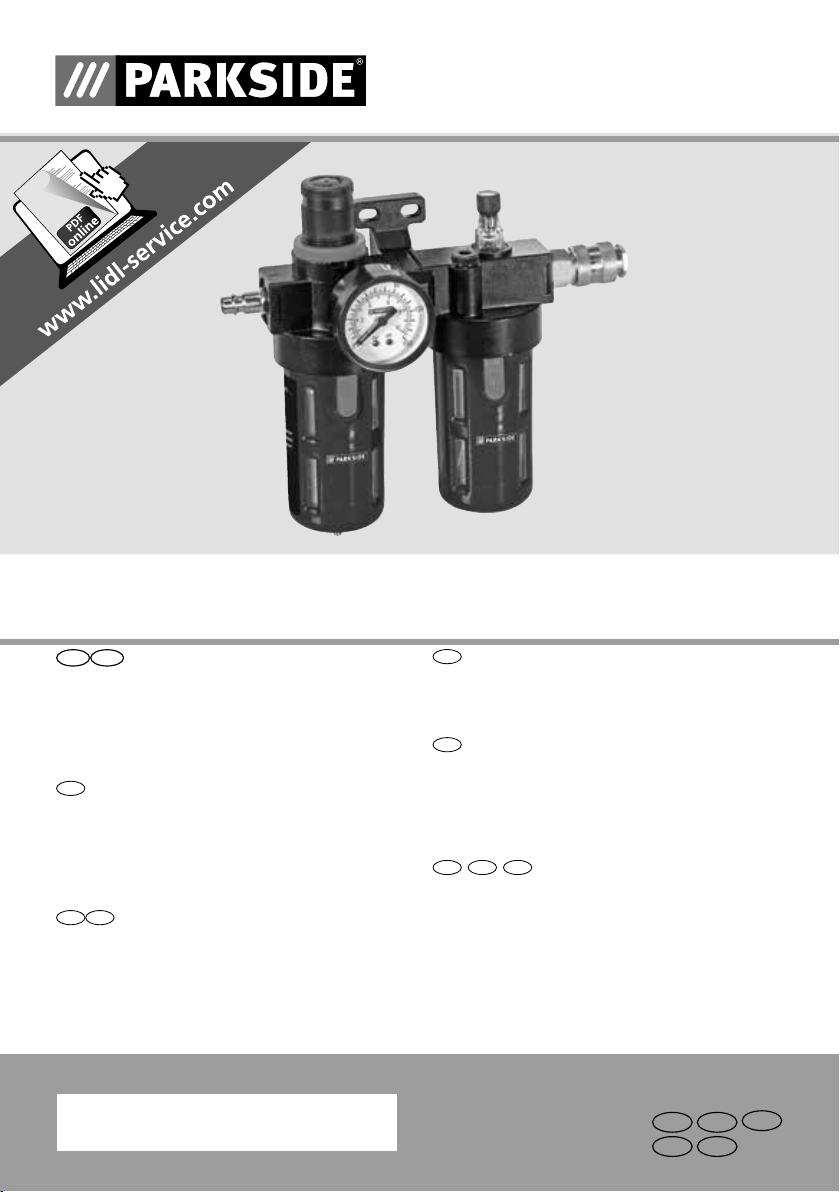
AIR FILTER REGULATOR & LUBRICATOR
PDWE 8 A2
GB CY
AIR FILTER REGULATOR &
LUBRICATOR
Operation and Safety Notes
Translation of the original instructions
RO
UNITATE DE REVIZIE PENTRU AER
COMPRIMAT
Indicații de operare și siguranță
Traducerea instrucţiunilor de utilizare originale
GR CY
ΜΟΝΆΔΆ ΣΥΝΤΉΡΉΣΉΣ
ΠΕΠΙΕΣΜΕΝΟΥ ΆΕΡΆ
Υποδείξεις χειρισμού και ασφαλείας
Μετάφραση των αυθεντικών οδηγιών λειτουργίας
RS
PRIPREMNA GRUPA
Prevod originalnog uputstva za upotrebu
BG
ПНЕВМОПОДГОТВЯЩА ГРУПА
Указания за монтаж, работа и безопасност
Превод на оригиналното ръководство
за експлоатация
DE AT CH
DRUCKLUFT WARTUNGSEINHEIT
Bedienungs- und Sicherheitshinweise
Originalbetriebsanleitung
IAN 304723
RS
RO
CYGR
BG

GB CY
Before reading, unfold the page containing the illustrations and familiarise yourself with all
functions of the device.
RS
Pre čitanja rasklopite obe strane sa slikama te se upoznajte sa svim funkcijama uređaja.
RO
Desfaceți înainte să citiți pagina cu ilustrații și apoi familiarizați-vă cu toate funcțiile
aparatului.
BG
Преди да прочетете отворете страницата с фигурите и след това се запознайте с
всички функции на уреда.
GR CY
Πριν ξεκινήσετε την ανάγνωση, ανοίξτε τη σελίδα με τις εικόνες και εξοικειωθείτε με όλες τις
λειτουργίες τηςна уреда.συσκευής.
DE AT CH
Klappen Sie vor dem Lesen die Seite mit den Abbildungen aus und machen Sie sich
anschließend mit allen Funktionen des Gerätes vertraut.
GB / CY Operation and Safety Notes Page 5
RS Prevod originalnog uputstva za upotrebu Stranica 17
RO Instrucţiuni de utilizare şi de siguranţă Pagina 29
BG Инструкции за обслужване и безопасност Страница 41
GR / CY Υποδείξεις χειρισμού και ασφαλείας Σελίδα 55
DE / AT / CH Montage-, Bedienungs- und Sicherheitshinweise Seite 69
A
3
4 5 6 7
2
1 9
14 13 12
11
8
1010
B C
MAX.
DRUCKLUFTÖL
PNEUMATIC OIL
HUILE
PNEUAMTIQUE
MIN.
MAX.
KONDENSAT
CONDENSATE
CONDENSAT


Table of contents
Table of pictograms used .............................................................................. Page 6
Introduction .......................................................................................................... Page 6
Intended use ............................................................................................................ Page 6
Residual risk ............................................................................................................ Page 6
Parts description ...................................................................................................... Page 7
Technical specifications ........................................................................................... Page 7
Package contents ..................................................................................................... Page 7
Safety notes ......................................................................................................... Page 7
Safety notes for using pneumatic devices ............................................. Page 8
Installation ........................................................................................................... Page 9
Filling the oil mist unit .............................................................................................. Page 10
Starting up ............................................................................................................ Page 10
Setting the working pressure .................................................................................. Page 10
Filter unit .................................................................................................................. Page 11
Condensate drain via the drain valve ..................................................................... Page 11
Oil mister unit .......................................................................................................... Page 11
Troubleshooting .................................................................................................. Page 12
Cleaning and maintenance ........................................................................... Page 12
Warranty and service information ........................................................... Page 12
Warranty conditions ................................................................................................ Page 12
Extent of warranty ................................................................................................... Page 13
Processing of warranty claims ................................................................................. Page 13
Environmental notes and disposal information ................................. Page 13
Disposal of the maintenance unit ............................................................................. Page 13
5GB/CY
Table of pictograms used / Introduction
Table of pictograms used
Read the operating
instructions!
Note!
Use hearing protection!
Use a dust mask! Use a goggles!
Use protective gloves! Made of recycling material.
AIR FILTER REGULATOR &
LUBRICATOR PDWE 8 A2
Introduction
Congratulations! You have purchased
one of our high-quality devices.
Before setup or first use, please
familiarise yourself with the product. To do
so, please read through the following
operating and safety instructions carefully.
This tool must be set up or used only by
people who have been trained to do so.
Observe warnings and the
safety instructions!
Dispose of the pneumatic
devices and packaging environmentally compatibly!
all documentation when passing the product
on to anyone else. Any use that differs to
the intended use as stated above is prohibited and potentially dangerous. Damage
or injury caused by misuse or disregarding
the above warning is not covered by the
warranty or any liability on the part of the
manufacturer. The device was designed for
household use and must not be used commercially or industrially.
Residual risk
KEEP OUT OF THE REACH OF
CHILDREN!
Intended use
The air filter regulator & lubricator serves to
oil the compressed air for pneumatic tools
and at the same time filters condensation
from the compressed air. Use the products
only as described and only for the specific
applications as stated. Keep these instructions in a safe place. Ensure you hand over
6 GB/CY
Even if you operate the device according to
the instructions, there will always be residual
risks remaining. The following risks may
occur in connection with the build and execution of this pneumatic maintenance unit:
Danger from beating compressed air
hoses.
Danger of falling from compressed air
hoses lying around.

Introduction / Safety notes
Reduce the residual risk by carefully using
the device as intended and observing all
instruction.
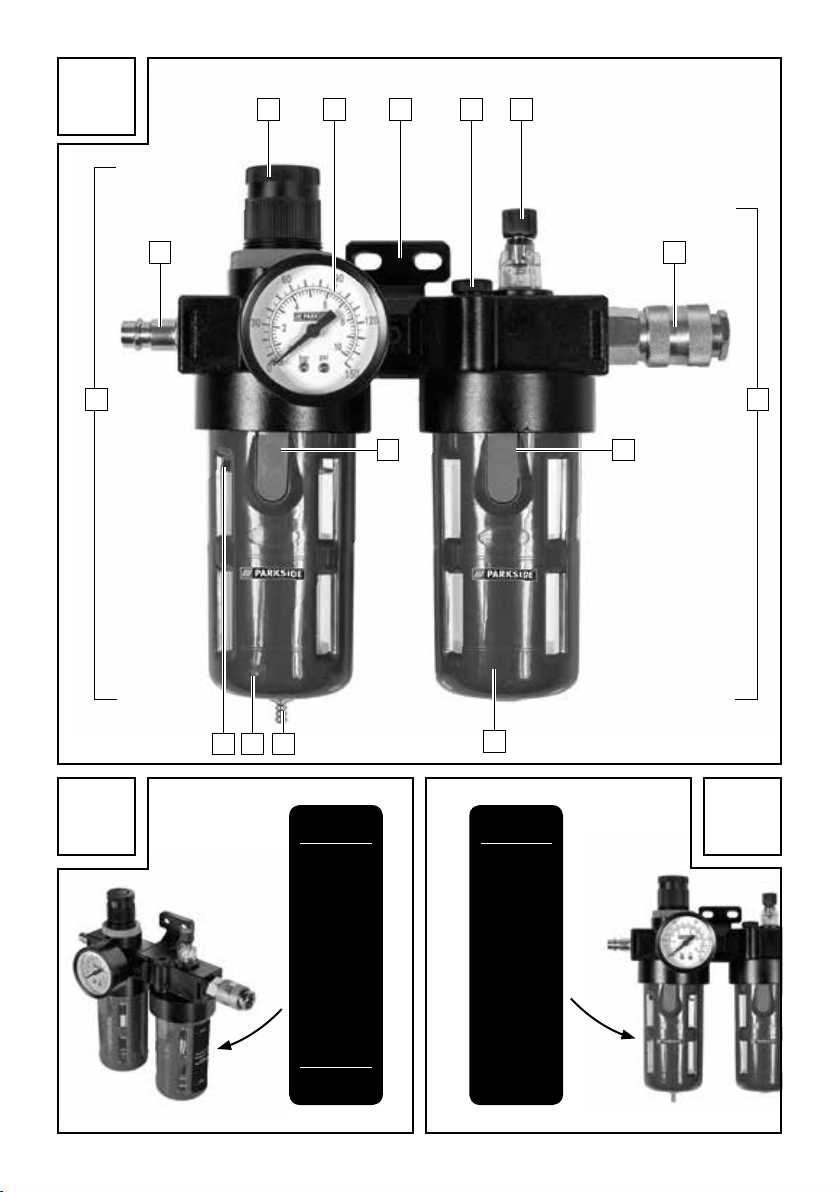
Parts description
After unpacking the product, please check
that the device is in perfect condition. Do not
use the product if it is defective.
1
Filter unit
2
Barbed fitting
3
Compressed air controller
4
Compressed air pressure gauge
5
Wall bracket
6
Oil refilling inlet
7
Oil gauge plug
8
Quick coupling
9
Oil mister unit
10
Release knob
11
Container for pneumatic oil, oil container
12
Drain valve
13
Condensate collection container
14
Filter insert
Technical specifications
Max. working pressure: 8 bar
Oil: Suitable compressor
oil
Package contents
1 pneumatic air maintenance unit including
connections
Safety notes
Please read the operating
instructions with care and
observe the notes described.
Familiarise yourself with the
device, its proper use and the
safety notes based on these
operating instructions.
The rating plate container all
technical data of this pneumatic maintenance unit; please
learn about the technical features of this device.
This device can be used by
children 16 years and older and also by persons with
reduced physical, sensory or
mental capacities or a lack of
experience and knowledge
if they are supervised or they
have been instructed with
regard to the safe use of the
device and they understand
the dangers it presents. Do
not allow children to play with
the product. Cleaning and
user maintenance must not be
performed by children without
supervision.
In connection with a com-
pressor, the maintenance unit
serves maintenance and care
(e.g. filtering, oiling and regulation) of your pneumatic tools.
The maintenance unit must
only be used with a pneumatic
compressor. When using the
device, observe the maximum
compressed air values of the
connected tools and check
7GB/CY

Safety notes / Safety notes for using pneumatic devices
them several times during use.
This product is only intended
for private use. The maintenance unit must only be used
as intended. Any further, deviating use is forbidden!
Consideration of the safety
note sin the operating instruction and the assembly instructions are also part of intended
use. The manufacturer or
dealer assumes no liability for
any damage caused by non-intended or wrong use.
Only accessories suitable for
this product must be used.
Persons who use the pneumatic maintenance unit and who
may perform maintenance
work are obligated to familiarise themselves with it. They
also must be informed about
potential dangers. The applicable accident prevention provisions must be correctly and
conscientiously observed.
Any changes to the pneumatic
maintenance unit exclude liability of the manufacturer and
any connected damage.
Safety notes for using
pneumatic devices
Important!
Always keep the compressed
air hose firmly in your hands
when releasing a connection.
The lashing backlash of the
compressed air hose may
cause injury.
The compressed air mainte-
nance unit must be installed
before it can be safely taken
into operation. A stable wall
is suitable for installation (with
screw connections).
We recommend only using
the lubricants specified by the
manufacturer.
Never exceed the indicated
maximum pressure values of
the maintenance unit.
The pneumatic maintenance
unit must only be connected to
a compressed air source that
does not exceed the working
pressure of 8 bar.
Do not put the compressed air
lines near any heat, oils, heat
and sharp edges.
The maintenance unit must
only be operated in connection with a pneumatic
compressor. Use of other
compressed air sources, such
as a compressed air cylinder,
is forbidden. There is a danger
of fire and/or explosion.
Make sure that children and
persons with limited physical
or mental capacities are kept
8 GB/CY
Safety notes for using pneumatic devices / Installation
away from the maintenance
unit and the connected compressed air tools.
Only use genuine spare parts
for repairs. Any non-genuine
spare parts may cause severe
damage.
When conducting any main-
tenance, setting and repair
work, always disconnect the
maintenance unit from the
compressed air supply first.
Changes to the maintenance
unit are forbidden.
Use the maintenance unit only
when it is in an impeccable
condition. In doubt, use a specialist's advice.
Have repairs only conducted
by qualified specialists.
User safety
Try out the pneumatic tool
used before every use.
Never use the compressed air
maintenance unit with any higher
operating pressure then indicated
in the technical data. Before you
connect your pneumatic tools to
the pneumatic maintenance unit,
ensure that they are properly and
securely connected.
explosive environment. Avoid
working in environments with substances such as flammable gases, liquids, paint and dust mist.
These substances may inflame
due to very hot surfaces at the
pneumatic unit.
Important note:
Do not use the mainte-
nance unit in connection
with pneumatic devices that
must not use any prepared compressed air (e.g. grease guns,
sand-blasting units, tyre fillers,
etc.).
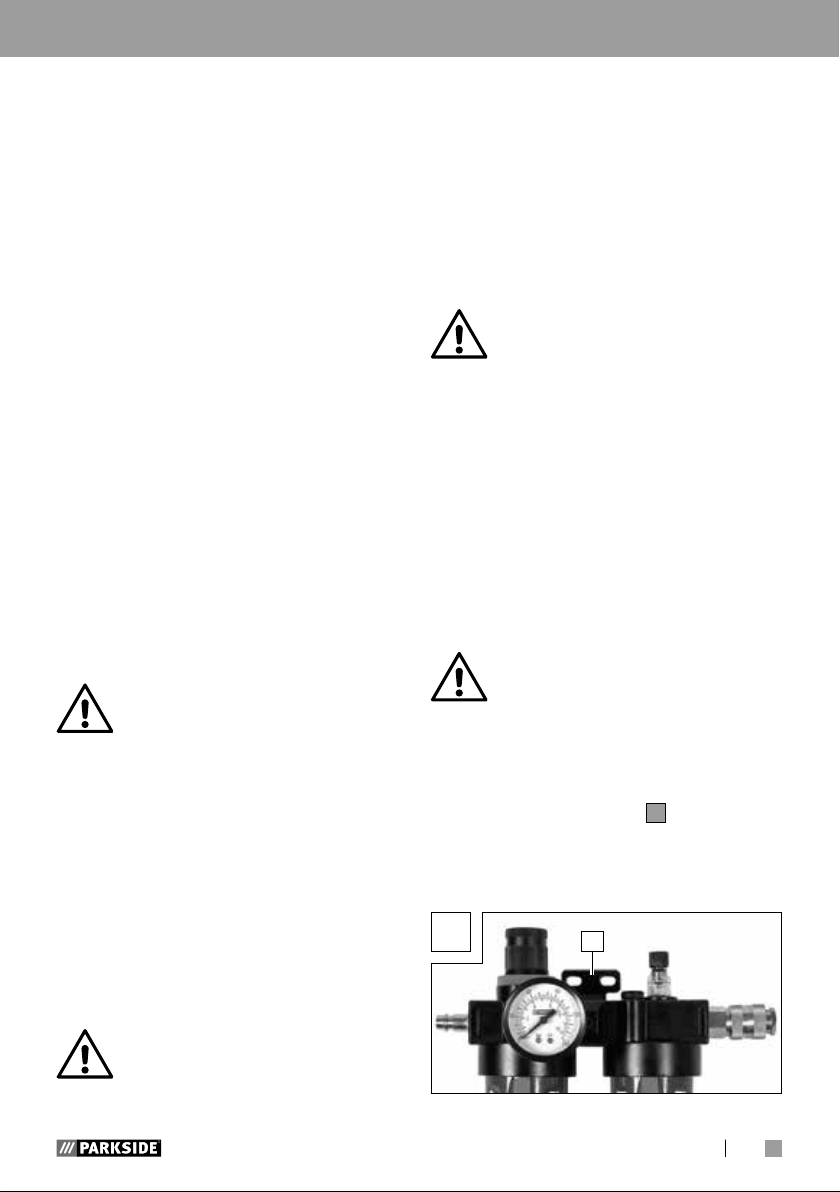
Installation
Attention:
To minimise potential injury or dam-
age, the maintenance unit must be
installed on a suitable wall before first commissioning. Ensure a stable and
assembly of the pneumatic maintenance unit.
Use the attachment unit 5 to mark the
wall for wall installation and for screwing
on with matching connection material
(see Fig. D).
D
5
horizontal
Forbidden uses
Do not use this maintenance unit in a potentially
9GB/CY
Installation / Starting up
Filling the oil mist unit
Ensure that the maintenance unit
has been separated from the
compressed air source before filling
or releasing the container
Remove the oil container
the release knob
10
and simultaneously
turning the oil container
Fill the oil container
11
using suitable
11
11
by pressing
11
(see Fig. E).
.
compressor oil until the max. mark has
been reached (see Fig. B).
Subsequently tighten the container
11
only manually (without tools).
E
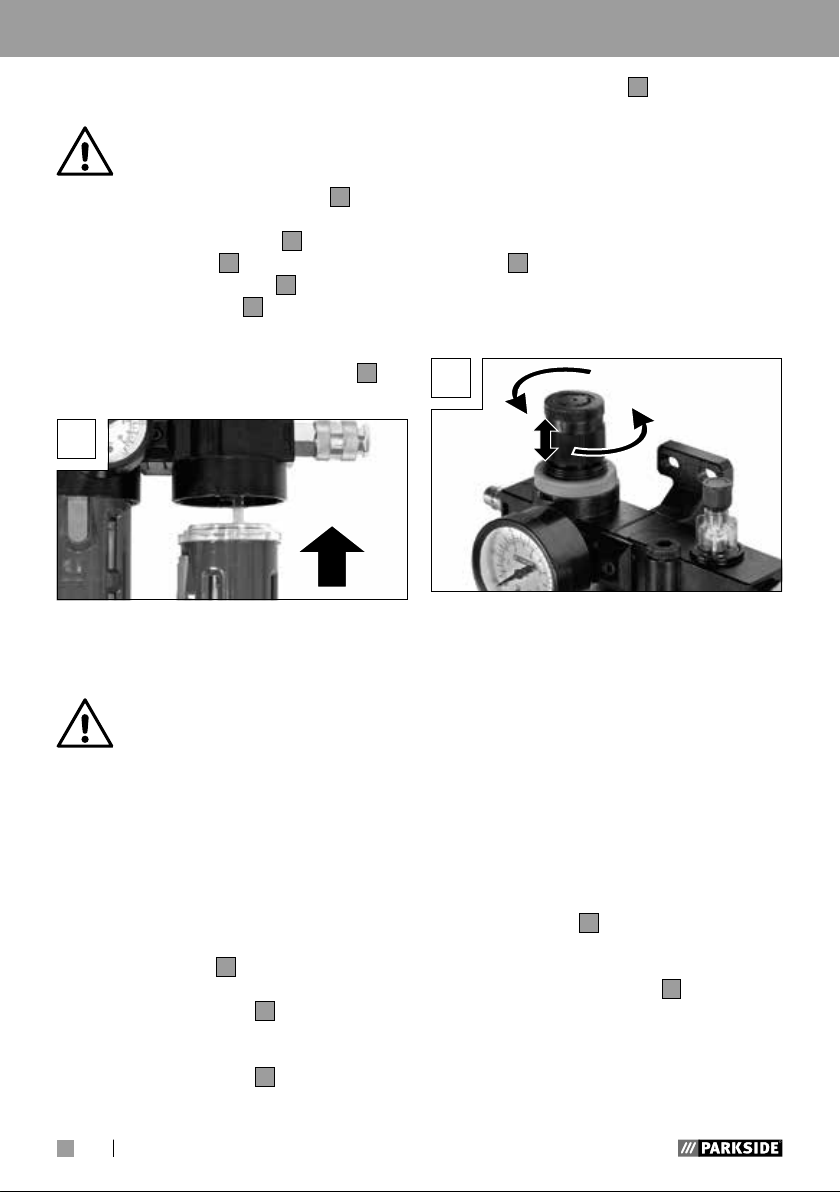
Starting up
Ensure that the connected compressed air line is clean and oil-free
in order to properly use the
compressed air maintenance unit. Further
ensure that the pneumatic system is depressurised. To minimise pressure loss, it is
beneficial if the compressed air lines are
kept as short as possible.
Connect the pneumatic maintenance unit
to the compressed air source
First release the lock by mpulling the
pressure regular
Turn counter-clockwise to set the com-
pressed air controller
possible level. The desired settings will
be assumed by pushing down the compressed air controller
Connect the compressed air supply line
3
upwards. (see Fig. F)
3
to the lowest
3
.
at the quick coupling 8 of the tool to
be connected to the right side (output) of
the maintenance unit (see figure on the
right). A triangle "" on the surface of
the device indicates the flow direction of
the compressed air.
Connect the compressed air supply of
the compressed air source at the barbed
2
fitting
on the left (input) of the maintenance unit (directly at the input, the
surface has a triangle "", that indicates
the flow direction of the compressed air).
F
Before commissioning of the mainte-
nance unit, check the compressed air
flow direction with the mark " " on the
surface. If the setting is not correct, the
pressure generated will not be correct.
Setting the working
pressure
After linking the maintenance unit to a
compressed air source (see above), you can
set the desired operating pressure with the
pressure controller
First release the lock by pulling the
compressed air controller
(see Fig. F)
Turning counter-clockwise reduces the
pressure, and turning clockwise increases the pressure.
Read the set pressure at the pressure
3
.
3
upwards.
10 GB/CY
Starting up
gauge display 4.
Lock the setting by pressing the com-
pressed air controller
3
downwards.
Note:
Ensure that the maximum possible
operating pressure of the maintenance unit and the pneumatic tool is
not exceeded.
Filter unit
The filter unit 1 is linked to the pressure con-
3
troller
. The maximum working pressure
is 8 bar and the operating pressure can be
adjusted from 0.5 to 8 bar. The filter unit
1
is used to filter condensate and stores the
condensate in the filter tank
13
.
You can check the condensate fill level
through the transparent sight windows (see
Fig. C). The stored condensate can be
drained via the drain valve
12
.
Condensate drain via the
drain valve
Ensure horizontal installation of the maintenance unit so that the condensate can be
stored horizontally in the tank
The filter unit
13
tank
1
installed.
must not be used without the
Use a matching tank in order to drain the
stored condensate from the tank
against the drain valve
(see Fig. G), this causes it to open and
thus, the condensate flows into the
container.
13
as well.
13
12
from below
. Press
G
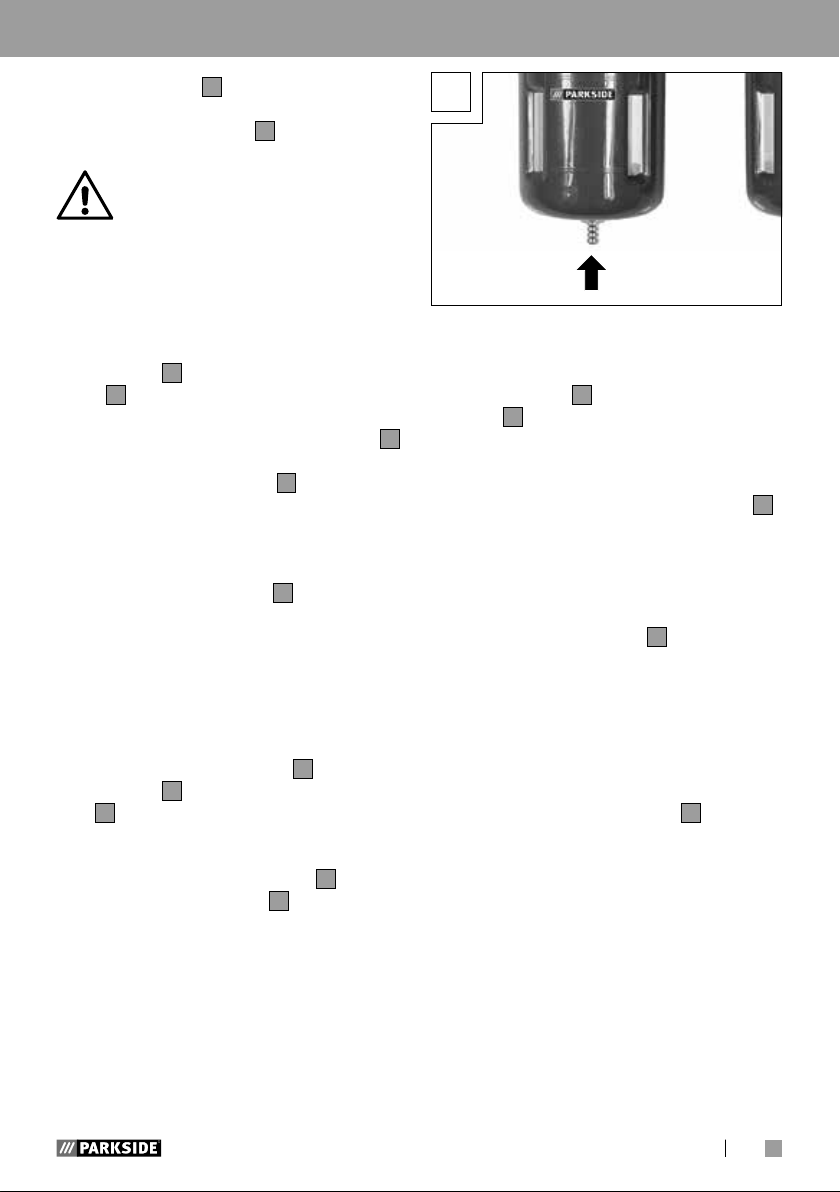
Oil mister unit
The oil mister unit 9 is connected to the
filter unit
filtered compressed air that is transported
towards the compressed air tool.
You can check the fill level of the oil tank
(integrated into the oil mister unit) through
the transparent sight windows. Use only
matching oil for this maintenance unit (see
above).
Turn the oil drain screw
The integrated sight window permits
To top up oil, turn the screw
1
. It has the function of oiling the
7
that is installed on the sight glass clockwise ("–"),
in order to reduce the required volume
of oil. Turn it counter-clockwise ("+") to
increase the volume of oil.
continuous overview of the filtered compressed air.
6
with a suitable socket wrench. Fill the
tank with a matching hopper and tighten
the screw again with the wrench.
down
11
11GB/CY
Troubleshooting / Cleaning and maintenance / Warranty and service ...
Troubleshooting
Faults Causes Solution
The lubrication is not
sufficient
The operating pressure
of the compressed air
is too low.
The oil passage screw
7
it tightened too far
in direction
("–").
The compressed air
volume is
too low, i.e.
below the
minimum fill
level.
The pressure
controller
is tightened
too far
(see above).
Increase
lubrication
(see above).
Pour more
oil into the
oil tank
Observe the
maximum fill
level.
Increase the
pressure
3
(see above).
Cleaning and maintenance
11
and the connections with a moist cloth at
regular intervals.
Drain the pneumatic maintenance unit's
tank at regular intervals. For this, press in
the metal pin
condensate drain (see Fig. G). Note that
the pneumatic maintenance unit must be
depressurised for safety.
12
at the bottom and let the
Warranty and service infor-
mation
.
Warranty from Creative Marketing
Consulting GmbH
Dear Customer, The warranty for this device
is 3 years from the date of purchase. In the
event of product defects, you have legal
rights against the retailer of this product.
Your statutory rights are not affected in any
way by our warranty conditions, which are
described below.
Warranty conditions
Note:
The pneumatic maintenance unit
must be regularly serviced and overhauled for proper function and for compliance with the safety requirements. Improper
and wrong operation may cause failures
and damage to the device.
Never use any sharp and/or scraping
cleaning agents or solvents. They may
damage the plastic parts of the pneumatic maintenance unit.
Make sure that no water can enter inside
the oiler.
Ensure that the housing and the inside of
the pneumatic maintenance unit remains
dust- and dirt-free. For this, regularly rub
the pneumatic maintenance unit with a
clean cloth.
Clean the pneumatic maintenance unit
12 GB/CY
The warranty period begins on the date of
purchase. Please retain the original sales
receipt. This document is required as your
proof of purchase. Should this product show
any defect in materials or manufacture within
3 years from the date of purchase, we will
repair or replace it – at our discretion – free
of charge. To claim against this warranty,
you must present the defective device and
your purchase receipt within the 3-year period, and include a brief written description
of the nature of the defect and the date it
occurred. If the defect is covered by our warranty, we will repair and return your product
or send you a replacement.
The original warranty period is not extended
when a device is repair or replaced.
... / Environmental notes and disposal information
Extent of warranty
The device has been manufactured according to strict quality guidelines and meticulously examined before delivery. The warranty applies to material and manufacturing
defects only. This warranty does not extend
to product parts which are subject to normal
wear and tear and can thus be regarded as
consumable parts, or for damages to fragile
parts, e.g. switches, rechargeable batteries,
or parts made from glass. This warranty is
voided if the product becomes damaged or
is improperly used or maintained. For proper
use of the product, all of the instructions
given in the operating instructions must be
followed precisely. If the operating instructions advise you or warn you against certain
uses or actions, these must be avoided in all
circumstances. The product is for consumer
use only and is not intended for commercial
or trade use. The warranty becomes void in
the event of misuse and improper use, use
of force, and any work on the device that
has not been carried out by our authorised
service branch.
Note
If you visit www.lidl-service.com,
you can download this manual
and many other manuals, product
videos and software.
How to contact us:
GB / CY
Name: C. M. C. GmbH
Website: www.cmc-creative.de
E-mail: service.gb@cmc-creative.de
Phone: 0-808-189-0652
Registered office: Germany
IAN 304723
Please note that the following address is not
a service address. Please first contact the
service point given above.
Address:
C. M. C. GmbH
Katharina-Loth-Str. 15
D-66386 St. Ingbert
GERMANY
Processing of warranty
claims
Please follow the instructions below to ensure
quick processing of your claim: Please
retain your proof of purchase and quote the
product number (e.g. the IAN 12345) in all
correspondence. The product number can be
found on the type plate, an engraving, the
cover page of your instructions (bottom left),
or the sticker on the back or bottom. In the
event of malfunctions or other defects, please
first contact our service department below by
phone or email. If your product is found to
be defective, you can then send your product with proof of purchase (till receipt) and a
statement describing what the fault involves
and when it occurred free of charge to the
service address given.
Environmental notes and
disposal information
Always recycle the device, accessories and packaging in an environmentally-friendly manner.
Do not dispose of pneumatic devices in
household waste! Devices that are no longer
functional should be recycled wherever possible. Ask your local stockist for advice.
Disposal of the
maintenance unit
Dispose of the maintenance unit according
to the provisions applicable in your country.
13GB/CY

Environmental notes and disposal information
If the maintenance unit can no longer be
used, return it to a collection point of your
municipality/quarter. This ensures that it
will be professionally recycled and avoids
negative effects on the environment.
14 GB/CY

15GB/CY

16 GB/CY

Sadržaj
Tabela simbola ............................................................................................... Stranica 18
Uvod .................................................................................................................. Stranica 18
Primerena upotreba ........................................................................................ Stranica 18
Ostale opasnosti ............................................................................................. Stranica 18
Opis delova ..................................................................................................... Stranica 19
Tehnički podaci................................................................................................Stranica 19
Sadržaj isporuke ............................................................................................. Stranica 19
Sigurnosne napomene ................................................................................ Stranica 19
Sigurnosne napomene za upotrebu
pneumatskih uređaja.................................................................................... Stranica 20
Montaža .......................................................................................................... Stranica 22
Punjenje jedinice za raspršivanje ulja ............................................................. Stranica 22
Upotreba .......................................................................................................... Stranica 22
Podešavanje radnog pritiska .......................................................................... Stranica 23
Filterska jedinica ............................................................................................. Stranica 23
Ispuštanje kondenzata pomoću ispusnog ventila............................................ Stranica 23
Jedinica za raspršivanje ulja ........................................................................... Stranica 24
Otkrivanje i otklanjanje kvarova................................................................ Stranica 24
Čišćenje i održavanje ................................................................................... Stranica 24
Napomene o garanciji i servisiranju ........................................................ Stranica 25
Uslovi garancije ............................................................................................... Stranica 25
Obim garancije ................................................................................................ Stranica 25
Obrada garantnih zahteva............................................................................... Stranica 25
Zaštita životne sredine i odlaganje .......................................................... Stranica 26
Odlaganje pripremne grupe ............................................................................ Stranica 26
Garancija i garantni list ............................................................................... Stranica 27
17RS

Tabela simbola / Uvod
Tabela simbola
Pročitajte uputstvo za
upotrebu!
Napomena!
Koristite zaštitu za uši!
Koristite masku protiv
prašine!
Koristite zaštitne rukavice!
PRIPREMNA GRUPA PDWE 8 A2
Uvod
Čestitamo! Odabrali ste kvalitetan
uređaj iz naše kuće. Upoznajte se
s proizvodom pre prve upotrebe.
Pažljivo pročitajte ovo uputstvo i sigurnosne
napomene. Ovaj uređaj smeju da
upotrebljavaju samo obučena lica.
Pridržavajte se sigurnosnih
napomena!
Pneumatske uređaje
i ambalažu odlažite na
ekološki prihvatiljiv način.
Koristite zaštitne naočare!
Proizvedeno od recikliranog
materijala.
Zabranjena je i može biti potencijalno
opasna svaka primena koja odstupa
od primerene upotrebe. Šteta nastala
nepridržavanjem uputstava ili pogrešnom
upotrebom proizvoda nije pokrivena
garancijom i za nju odgovornost ne može
snositi proizvođač. Uređaj je dizajniran
za kućnu upotrebu i ne sme se koristiti za
komercijalne ili industrijske namene.
DRŽATI DALJE OD DOMAŠAJA DECE!
Primerena upotreba
Pripremna grupa služi za podmazivanje
komprimovanog vazduha za pneumatski
alat i istovremeno uklanja kondenzat iz
komprimovanog vazduha. Koristite proizvod
samo onako kako je opisano i samo za
navedene oblasti primene. Sačuvajte ovo
uputstvo.
Prilikom ustupanja proizvoda drugom
licu predajte i sve propratne dokumente.
18 RS
Ostale opasnosti
Postoje druge opasnosti čak i kada uređaj
koristite primereno. U vezi sa konstrukcijom
i projektovanjem ove pripremne grupe može
doći do sledećih opasnosti:
Opasnost usled „nemirnog“
pneumatskog creva.
Opasnost od pada usled pneumatskih
creva koja leže okolo.
Svedite ostale opasnosti na najmanju meru
pažljivim i primerenim korišćenjem uređaja

Uvod / Sigurnosne napomene
i poštovanjem uputstava.
Opis delova
Proverite da li je proizvod u besprekornom
stanju odmah nakon otpakivanja. Nemojte
koristiti proizvod koji je u kvaru.
1
Filterska jedinica
2
Nasadna spojnica
3
Regulator komprimovanog vazduha
4
Manomater komprimovanog vazduha
5
Zidni nosač
6
Otvor za dolivanje ulja
7
Čep za dovod ulja
8
Brza spojka
9
Jedinica za raspršivanje ulja
10
Dugme za oslobađanje
11
Rezervoar za ulje komprimovanog
vazduha
12
Ispusni ventil
13
Rezervoar za kondenzat
14
Uložak ltera
Tehnički podaci
Najveći radni pritisak 8 bara
Ulje: odgovarajuće ulje
za kompresore
Sadržaj isporuke
1 pripremna grupa uključujući priključke
Sigurnosne napomene
Pažljivo pročitajte uputstvo
za upotrebu i pridržavajte
se napomena. Upoznajte
se s uređajem, njegovom
pravilnom upotrebom
i sigurnosnim napomenama
prema ovom uputstvu.
Na natpisnoj pločici navedeni
su tehnički podaci ove
pripremne grupe. Upoznajte
se s tehničkim podacima ovog
uređaja.
Ovaj proizvod smeju da
koriste deca starija od
16 godina i osobe sa
smanjenim zičkim, čulnim
ili mentalnim sposobnostima
odnosno nedovoljnim
iskustvom i znanjem ako su
pod nadzorom ili su podučena
o bezbednoj upotrebi uređaja
i razumeju opasnosti koje
iz toga proističu. Deca se
ne smeju igrati uređajem.
Čišćenje i održavanje ne
smeju obavljati deca bez
nadzora odraslih.
U spoju s kompresorom
pripremna grupa služi za
održavanje i negu (npr.
ltriranje, podmazivanje
i regulaciju) vašeg
pneumatskog alata.
Pripremna grupa sme
19RS

... / Sigurnosne napomene za upotrebu pneumatskih uređaja
se koristiti isključivo s
kompresorom za vazduh.
Vodite računa o najvećim
vrednostima komprimovanog
vazduha za priključeni
pneumatski alat pri upotrebi
uređaja i proveravajte ih
više puta u toku korišćenja.
Ovaj proizvod je predviđen
isključivo za privatnu
upotrebu. Pripremna grupa
sme se koristiti samo u skladu
s namenom. Zabranjena je
svaka druga upotreba koja
odstupa od predviđene!
Sastavni deo primerene
upotrebe takođe predstavlja
poštovanje sigurnosnih
napomena navedenih
u uputstvu kao i uputstva
za montažu. Proizvođač
i prodavac ne snose
odgovornost za štetu nastalu
neprimerenom ili pogrešnom
upotrebom.
Sme se koristiti samo pribor
pogodan za ovaj proizvod.
Lica koja koriste pripremnu
ili vrše radove na održavanju
dužna su da se upoznaju
s uređajem. Osim toga moraju
biti informisana o mogućim
opasnostima. Potrebno
je tačno i savesno se
pridržavati važećih propisa za
sprečavanje nezgoda na radu.
Za izmene na pripremnoj
grupi i štetu nastalu na takav
način proizvođač ne snosi
odgovornost.
Sigurnosne napomene
za upotrebu pneumatskih
uređaja
Važno!
Uvek čvrsto rukama držite
pneumatsko crevo prilikom
otpuštanja priključka.
Trzaj pneumatskog creva
može da dovede do povrede.
Potrebno je montirati
pripremnu grup pre upotrebe.
Za montažu je potreban
stabilan zid (za ksiranje
vijcima).
Preporučuje se upotreba
maziva koja je odredio
proizvođač.
Nikada ne prekoračujte
navedene najveće vrednosti
pritiska pripremne grupe .
Pripremna grupa sme
se priključiti na izvor
komprimovanog vazduha koji
ne premašuje radni pritisak od
8 bara.
Ne postavljajte vodove
komprimovanog vazduha
u blizini toplote, ulja i oštrih
ivica.
Pripremna grupa sme se
20 RS
Sigurnosne napomene za upotrebu pneumatskih uređaja... / Sigurnosne napomene za upotrebu pneumatskih uređaja
koristiti samo u spoju s
kompresorom za vazduh.
Zabranjena je upotreba
drugih izvora komprimovanog
vazduha, npr. boce s
komprimovanim vazduhom.
Postoji opasnost od požara
odnosno eksplozije.
Decu i osobe sa smanjenim
zičkim i psihičkim
sposobnostima uvek udaljite
od pneumatskih jedinica za
održavanje i priključenog
pneumatskog alata.
Koristite samo originalne
rezervne delove pri popravci.
Neoriginalni rezervni delovi
mogu da prouzrokuju ozbiljna
oštećenja.
Pri obavljanju radova na
održavanju, podešavanju ili
popravci uvek prvo isključite
pripremnu grupu sa dovoda
komprimovanog vazduha.
Nije dozvoljeno vršiti izmene
na pripremnoj grupi.
Pripremnu grupu koristite
samo ako se nalazi u
besprekornom stanju. Ako
postoji sumnja, posavetujte se
sa stručnjakom pre upotrebe
motalice.
Popravku sme da vrši samo
kvalikovano stručno lice.
Bezbednost korisnika
Pre svake upotrebe
testirajte pneumatski
alat. Ni u kom slučaju nemojte
koristiti pripremnu grupu pri
većem radnom pritisku od onog
koji je propisan tehničkom
dokumentacijom. Uverite se
da je pneumatski alat pravilno
i sigurno priključen pre nego
što ga povežete s jedinicom za
održavanje.
Zabranjene oblasti
primene
Nemojte koristiti ovu
pripremnu grupu u okruženju
gde postoji opasnost od
eksplozije. Izbegavajte rad u
okruženjima u kojima se nalaze
supstance poput zapaljivih
gasova i tečnosti, raspršene boje
ili prašine. Ove supstance mogu
se zapaliti
zbog vrelih površina
na pneumatskom uređaju.
Važna napomena:
Nemojte koristiti
pripremnu grupu u spoju
s pneumatskim uređajima
koji ne smeju da se napajaju
pripremljenim komprimovanim
vazduhom (npr. prese za mast,
uređaji za mlazno peskarenje,
uređaji za naduvavanje
pneumatika itd.).
21RS
Montaža / Upotreba
Montaža
Pažnja: Da bi se mogućnost
nastanka povreda ili štete svela
na najmanju meru potrebno je
montirati pripremnu grupu na podesni zid
pre upotrebe. Vodite računa da pripremna
grupa bude montirana stabilno i
horizontalno.
E
Za montažu na zid koristite zidni nosač
5
kako biste obeležili mesto na zidu
i pričvrstili ga odgovarajućim materijalom
za ksiranje. (videti sliku D)
D
5
Punjenje jedinice za
raspršivanje ulja
Vodite računa da je pripremna
grupa isključena s dovoda
komprimovanog vazduha
punjenja odnosno uklanjanja
rezervoara za ulje.
Skinite rezervoar za ulje
na dugme za oslobađanje
i istovremenim odvrtanjem rezervoara
11
za ulje (videti sliku E). Napunite
rezervoar za ulje
uljem za kompresore dok ne dostignete
oznaku maksimalno (videti sliku B).
Zatim rezervoar za ulje čvrsto zavrnite
11
rukom (bez upotrebe alata).
11
odgovarajućim
11
pritiskom
10
11
pre
Upotreba
Vodite računa da priključeni vod
komprimovanog vazduha bude čist
i bez ulja kako biste mogli pravilno
da koristite pripremnu grupu. Takođe vodite
računa da sistem komprimovanog vazduha
bude oslobođen pritiska. Da bi se gubici
pritiska sveli na najmanju meru, savetuje se
da vodovi komprimovanog vazduha budu što
kraći.
Povezivanje pripremne grupe s izvorom
komprimovanog vazduha.
Najpre otpustite ustavni mehanizam
povlačenjam regulatora komprimovanog
vazduha
Postavite regulator komprimovanog
vazduha na najniži stepen
okretanjem suprotno smeru kazaljke.
Željene postavke se primenjuju
pritiskom na regulator komprimovanog
vazduha
Priključite dovod komprimovanog
vazduha pneumatskog alata koji
želite da povežete na brzu spojku
(na desnoj strani – izlaz) pripremne
grupe. Troguao „“ na spoljnoj strani
uređaja pokazuje smer toka
komprimovanog vazduha.
Priključite dovod komprimovanog
vazduha sa izvora komprimovanog
vazduha na nasadnu spojnicu
3
naviše. (videti sliku F)
3
naniže.
3
8
2
22 RS
Upotreba
(na levoj strani – ulaz) pripremne grupe.
Direktno na ulazu na spoljnoj strani
nalazi se trougao „“ koji pokazuje
smer toka komprimovanog vazduha.
F
Pre upotrebe pripremne grupe proverite
smer toka komprimovanog vazduha
pomoću oznake „“ na spoljnoj strani.
U slučaju pogrešnog podešavanja ne
proizvodi se dovoljan pritisak.
Podešavanje radnog pritiska
vazduha
3
naniže.
Napomena:
Vodite računa da ne prekoračite
najveći mogući radni pritisak
pripremne grupe i pneumatskog alata koji
koristite.
Filterska jedinica
Filterska jedinica 1povezana je
s regulatorom
Najveći radni pritisak iznosi 8 bara i može
se podešavati u rasponu od 0,5 do 8 bara.
Filterska jedinica
kondenzata i prikuplja kondenzat
u rezervoaru za kondenzat
Nivo kondenzata može se proveriti pomoću
prozirnih kontrolnih površina (videti sliku C).
Prikupljeni kondenzat može se ispustiti
pomoću
3
komprimovanog vazduha.
1
služi za izdvajanje
12
ispusnog ventila.
13
.
Ispuštanje kondenzata
pomoću ispusnog ventila
Po priključivanju pripremne grupe na izvor
komprimovanog vazduha možete da
podesite željeni radni pritisak pomoću
regulatora komprimovanog
3
vazduha.
Najpre otpustite ustavni mehanizam
povlačenjem regulatora komprimovanog
vazduha
3
naviše (videti sliku F).
Okretanjem regulatora suprotno
smeru kazaljke pritisak se smanjuje.
Okretanjem regulatora u smeru kazaljke
pritisak se povećava.
Podešavanje pritiska očitajte
na manometru komprimovanog
vazduha
4
.
Zakočite željeno podešavanje
pritiskanjem regulatora komprimovanog
Vodite računa da pneumatska jedinica za
održavanje bude montirana horizontalno
kako bi se kondenzat horizontalno
13
prikupljao u rezervoaru. Upotreba lterske
jedinice
kondenzat
1
bez montiranog rezerovara za
13
nije dozvoljena.
Da biste ispraznili nakupljeni kondenzat
iz rezervoara 13za kondenzat, koristite
odgovarajuću posudu. Pritisnite ispusni
ventil s donje strane nagore
12
(videti
sliku G) koji će se otvoriti, a kondenzat
će iscuriti u posudu.
23RS
Upotreba / Otkrivanje i otklanjanje kvarova / Čišćenje i održavanje
G
Jedinica za raspršivanje ulja
Jedinica za raspršivanje ulja 9povezana
je s lterskom
podmazivanje ltriranog komprimovanog
vazduha koji se transportuje u smeru
pneumatskog alata.
Nivo rezervoara za ulje
u jedinicu za raspršivanje ulja) može se
proveriti pomoću prozirnih kontrolnih
površina. Koristite samo odgovarajuće ulje
za ovu pripremnu grupu (videti gore).
Okrenite čep za dovod ulja
na kontrolno okno u smeru kazaljke („–“)
kako biste smanjili potrebnu količinu
ulja. Okrenite ga suprotno smeru
kazaljke („+“) da povećate količinu ulja.
Ugrađeno kontrolno okno omogućuje
stalan nadzor ltriranog komprimovanog
vazduha.
Da biste dopunili ulje, okrenite čep
otvora za dolivanje ulja
odgovarajućeg inbus ključa. Napunite
rezervoar korišćenjem odgovarajućeg
levka, a zatim ponovo čvrsto zategnite
čep pomoću ključa.
1
jedinicom. Njena uloga je
11
(ugrađen
7
montiran
6
pomoću
Otkrivanje i otklanjanje
kvarova
Kvar Uzroci Rešenje
3
Povećajte
količinu ulja.
Dospite još
ulja
u rezervoar
11
.
ulja
Vodite
računa
o maksima lnom nivou
ulja.
Povećajte
pritisak.
Nedovoljno
podma zivanje.
Radni
pritisak
kompr imovanog
vazduha je
preslab.
Čep za
dovod ulja je
7
previše
zavrnut u
smeru („–“).
Količina ulja
za kompri movani
vazduh je
premala
odnosno
ispod
minimalnog
nivoa.
Regulator
pritiska
je previše
zavrnut.
Čišćenje i održavanje
Napomena:
Da bi se obezbedio besprekoran
rad i pridržavanje sigurnosnih
zahteva, potrebno je redovno održavati
pripremnu grupu. Nepravilna i pogrešna
upotreba može za posledicu imati kvarove i
štetu na uređaju.
Nemojte koristiti jaka ni abrazivna
sredstva za čišćenje ili rastvarače.
Ona mogu da oštete plastične delove
pripremne grupe.
Vodite računa da voda ne dospe
u unutrašnjost mazalice.
Vodite računa da kućište i unutrašnjost
24 RS

Čišćenje i održavanje / Napomene o garanciji i servisiranju
pripremne grupe uvek budu čisti.
Redovno brišite pneumatsku jedinicu za
održavanje čistom krpom.
Redovno čistite pripremnu grupu i
priključke vlažnom krpom.
Redovno praznite rezervoar pripremne
grupe. Pritisnite ispusni ventil
sliku G) s donje strane naviše. U svrhu
bezbednosti vodite računa da pripremna
grupa bude oslobođena pritiska.
12
(videti
Napomene o garanciji
i servisiranju
Garancija preduzeća
Creative Marketing & Consulting GmbH
Poštovani korisniče, na ovaj uređaj imate
trogodišnju garanciju od dana kupovine.
Ako proizvod ima nedostataka, sleduju Vam
zakonom zagarantovana prava u odnosu
na prodavca. Vaša zakonska prava nisu
ograničena dole navedenom garancijom.
Uslovi garancije
Garantni rok počinje danom kupovine.
Molimo Vas da dobro čuvate skalni isečak.
On je potreban kao dokaz o kupovini. Ako
se u roku od tri godine od dana kupovine
na proizvodu pojavi materijalni ili proizvodni
nedostatak, Vaš proizvod će po našoj
proceni ili besplatno biti popravljen ili
zamenjen novim. Da biste ostvarili ovo
pravo po garanciji, potrebno je da priložite
pokvareni uređaj i dokaz o kupovini (skalni
isečak) uz kratak opis nedostatka i naznaku
vremena njegovog nastanka. Ako je kvar
pokriven našom garancijom, vratićemo
Vam popravljen proizvod ili dati nov. Nakon
popravke ili zamene proizvoda ne počinje
novi garantni rok.
Obim garancije
Ovaj uređaj je proizveden u skladu sa
strogim standardima kvaliteta i pažljivo
ispitan pre isporuke.
Garancija važi za materijalne i proizvodne
greške. Ova garancija ne pokriva delove
proizvoda koji podležu uobičajenom
habanju i shodno tome se smatraju
potrošnim delovima niti oštećenja lomljivih
delova, npr. prekidači, baterije ili delovi
izrađeni od stakla.
Garancija ne važi za proizvod koji je
oštećen nepravilnom upotrebom ili
održavanjem. Za pravilnu upotrebu
proizvoda potrebno je strogo se pridržavati
svih uputstava navedenih u priručniku.
Izbegavajte upotrebu i rukovanje koji se
ne savetuju u priručniku ili na koje se
u priručniku upozorava.
Proizvod je namenjen isključivo za kućnu
upotrebu, ne i za komercijalnu. Garancija
ne važi u slučaju neprimerene i nepravilne
upotrebe, nasilne upotrebe ili intervencija
koje nije obavio ovlašćeni servis.
Obrada garantnih zahteva
Kako bismo obezbedili brzu obradu
Vašeg zahteva, pridržavajte se sledećih
napomena: Za sve upite molimo Vas da
pripremite skalni isečak i broj artikla (npr.
IAN 12345) kao dokaz kupovine. Broj artikla
nalazi se na natpisnoj pločici, gravuri,
naslovnoj strani uputstva (dole levo) ili
na nalepnici na zadnjoj ili donjoj strani. U
slučaju funkcionalnih ili drugih nedostataka,
obratite se najpre dole navedenom servisu
25RS
 Loading...