


R
Digital Camera
Model No. PV-DC2090/PV-DC2590
Operating Instructions
®
(PV-DC2590 shown)
For assistance, call 1-800-272-7033.
Before attempting to connect, operate or adjust this product, please read these instructions thoroughly, and keep them for future reference.

Things You Should Know
Attach your purchase receipt here
Thank you and congratulations
on your purchase of this state of the art Panasonic Digital Camera. This product has been manufactured and tested to Panasonic’s highest standards to give you the best in performance and reliability.
Save this operating instruction manual as an operating and information guide.
Unpack your Digital Camera
Date of Purchase
Dealer Purchased From
Dealer Address
Dealer Phone No.
Model No.
Serial No.
Please confirm that the following items are packed in the Digital Camera box. They are provided to help you use or set up your Digital Camera.
1pc. Digital Camera |
1 pc. 8 MB CompactFlash |
4pcs. AA Alkaline Battery |
(PV-DC2090/DC2590) |
Card |
(LSSB0003) |
|
(LSFA0009, or LSFA0011) |
|
(PV-DC2590 shown) |
|
|
1pc. Video Cable |
1pc. PC Connection Cable |
1pc. Hand Strap |
(LSJA0238) |
for Windows |
(LSFC0010) |
|
(LSJA0236) |
|
1 pc. CD-ROM of Driver |
1 pc. Compact Modem Card |
1pc. Ferrite Core |
Software for Windows 95/98 |
(Only for PV-DC2590) |
(Only for PV-DC2590) |
and Macintosh / |
(PV-CFM10(LSFA0010)/ |
(LSLP0059) |
Adobe PhotoDeluxe |
LSJA0244) |
|
(LSFT0163) |
|
|
Microsoft, Windows, and Windows 95/98 are registered trademarks of Microsoft in the United States and other countries.
Macintosh is a registered trademark of Apple Computer Incorporated.
Adobe, the Adobe logo & PhotoDeluxe are trademarks of Adobe Systems Inc. CompactFlash is a trademark of SanDisk Corporation.
All product/brand names are trademarks or registered trademarks of the respective holders.
2 |
|
For assistance, call 1-800-272-7033. |

Information
Note: This equipment has been tested and found to comply with the limits for a Class B digital device, pursuant to Part 15 of the FCC Rules. These limits are designed to provide reasonable protection against harmful interference in a residential installation. This equipment generates, uses and can radiate radio frequency energy and, if not installed and used in accordance with the instructions, may cause harmful interference to radio communications. However, there is no guarantee that interference will not occur in a particular installation. If this equipment does cause harmful interference to radio or television reception, which can be determined by turning the equipment off and on, the user is encouraged to try to correct the interference by one or more of the following measures:
--Reorient or relocate the receiving antenna.
--Increase the separation between the equipment and receiver.
--Connect the equipment into an outlet on a circuit different from that to which the receiver is connected.
--Consult the dealer or an experienced radio/TV technician for help.
FCC Warning: To assure continued FCC compliance, use only the provided shielded interface cable with ferrite cores when connecting digital camera to computer and clip-on ferrite core mounted over the user provided modular cable in accordance with instruction herein.
Also, any unauthorized changes or modifications to this equipment could void the user’s authority to operate.
Precautions
USE & LOCATION
•TO AVOID SHOCK HAZARD ... Your Digital Camera and power supply should not be exposed to rain or moisture. Do not connect the power supply or operate your Digital Camera if it gets wet. Your Digital Camera has been designed for outdoor use, however it is not designed to sustain direct exposure to water, rain, sleet, snow, sand, dust, or a direct splashing from a pool or even a cup of coffee. This action could permanently damage the internal parts of your Digital Camera. Do not attempt to disassemble this unit. There are no user serviceable parts inside. Unplug your Digital
Camera from the power supply and have it serviced.
•DO NOT AIM YOUR DIGITAL CAMERA AT THE SUN OR OTHER BRIGHT OBJECTS.
•DO NOT EXPOSE YOUR DIGITAL CAMERA TO EXTENDED HIGH TEMPERATURE ... Such as, in direct sunlight, inside a closed car, next to a heater, etc... This action could permanently damage the internal parts of your Digital Camera.
•AVOID SUDDEN CHANGES IN TEMPERATURE ... If the unit is suddenly moved from a cold place to a warm place, moisture may form inside the unit.
•DO NOT LEAVE YOUR DIGITAL CAMERA OR THE POWER SUPPLY TURNED ON WHEN NOT IN USE.
•STORAGE OF YOUR DIGITAL CAMERA ... Store and handle your Digital Camera in a manner that will not subject it to unnecessary movement (avoid shaking and striking). Your Digital Camera contains a sensitive pick-up device which could be damaged by improper handling or storage.
CARE
•TO CLEAN YOUR DIGITAL CAMERA ... Do not use strong or abrasive detergents when cleaning your Digital Camera body.
•TO PROTECT THE LENS ... Do not touch the surface of the lens with your hand. Use a commercial Digital Camera lens solution and lens paper when cleaning the lens. Improper cleaning can scratch the lens coating.
•TO PROTECT THE FINISH OF YOUR DIGITAL CAMERA ... Before handling your Digital Camera, make sure your hands and face are free from any chemical products, such as suntan lotion, as it may damage the finish.
Started Getting
3

Important Safety Instructions for Digital Camera with Compact Modem Card
1.Read and understand all instructions.
2.Follow all warnings and instructions marked on the product.
3.Unplug this product from the card slot before cleaning. Do not use liquid cleaners or aerosol cleaners. Use a damp cloth for cleaning.
4.Do not use this product near water, for example, near bathtub, wash bowl, kitchen sink, or laundry tub, in a wet basement, or near a swimming pool.
5.Do not place this product on an unstable cart, stand, or table. The product may fall, causing serious damage to the product.
6.This product should never be placed near a radiator or heat register. This product should not be placed in a built-in installation unless proper ventilation is provided.
7.Do not allow anything to rest on the special cable. Do not locate this product where the cable will be abused by personal walking on it.
8.Do not insert any other cables to the product except the assignment. Do not use this cable for any other products. This cable is only for the exclusive use. It may cause serious damage to the product.
9.Never push objects of any kind into this product through cabinet as they may touch dangerous voltage points or short out parts that could result in a risk of fire or electric shock. Never spill liquid of any kind on the product.
10.To reduce the risk of electric shock, do not disassemble this product, but take it to a qualified serviceman when some service or repair work is required. Opening or removing covers may expose you to dangerous voltages or other risks. Incorrect reassembly can cause electric shock when the appliance is subsequently used.
11.Unplug this product from the card slot and refer servicing to qualified service personnel under following conditions:
A.If liquid has been spilled into the product.
B.If the product has been exposed to rain or water.
C.If the product does not operate normally by following the operating instructions. Adjust only those controls that are covered by the operating instructions because improper adjustment or other controls may result in damage and will often require extensive work by a qualified technician to restore the product to normal operation.
D.If the product has been dropped or the cabinet has been damaged.
E.If the product exhibits a distinct change in performance.
12.Avoid using a telephone (other than a cordless type) during an electrical storm. There may be a remote risk of electric shock from lightning.
13.Do not use the telephone to report a gas leak in the vicinity of the leak.
14.The telecommunication cord which is used for this modem should be minimum 26AWG.
15.These accessory modem card and modular cable models are intended only for use in and with listed Information Technology Equipment where the host machine includes instructions for the installation of accessories by the operator.
4 |
|
For assistance, call 1-800-272-7033. |

Precautions for Compact Modem Card
1.This equipment complies with Part 68 of the FCC rules. On the back side of this equipment is a label that contains, among other information, the FCC registration number and ringer equivalence number (REN) for this equipment. If requested, this information must be provided to the Telephone Company.
Guarantee's Name : FUJITSU MEDIA DEVICES LIMITED
Serial number : The date of manufacture is printed on the side of the card.
2.USOC Jack, RJ11C is suited to this equipment.
3.An FCC compliant telephone cord and modular plug is provided with this equipment. This equipment is designed to be connected to the telephone network or premises wiring using a compatible modular jack which is Part 68 compliant. See installation instructions for details.
4.The REN is used to determine the quantity of devices, which may be connected to the telephone line. Excessive RENs on the telephone line may result in the devices not ringing in response to an incoming call. In most, but not all areas, the sum of RENs should not exceed five(5.0). To be certain of the number of devices that may be connected to a line, as determined by the total RENs, contact the local Telephone Company.
5.If the terminal equipment PV-CFM10 causes harm to the telephone network, the Telephone Company will notify you in advance that temporary discontinuance of service may be required. But if advance notice isn't practical, the telephone company will notify the customer as soon as possible. Also, you will be advised of your right to file a compliant with the FCC if you believe it is necessary.
6.The Telephone Company may make changes in it's facilities, equipment, operations or procedures that could affect the operation of the equipment. If this happens the Telephone Company will provide advance notice in order for you to make necessary modifications to maintain uninterrupted service.
7.If trouble is experienced with this equipment PV-CFM10 for repair or warranty information, please contact Panasonic. If the equipment is causing harm to the telephone network, the Telephone Company may request that you disconnect the equipment until the problem is resolved.
8.This equipment cannot be used on public coin phone service provided by the Telephone Company. Connection to party line service is subject to state tariffs. (Contact the state public utility commission, public service commission or corporation commission for Information.)
9.The Telephone Consumer Protection Act of 1991 makes it unlawful for any person to use a computer or other electric device, including fax machines, to send any message unless such message clearly contains in a margin at the top or bottom of each transmitted page or on the first page of the transmission, the date and time it is sent and an identification of the business or other entity, or other individual sending the message and the telephone number of the sending machine or such business, other entity, or individual (refer to page 76).
10.According to the FCC's electrical safety advisory, we recommend that you may install an AC surge arrestor in the AC outlet to which this equipment is connected. Telephone companies report that electrical surges, typically lighting transients, are very destructive to customer terminal equipment connected to AC power sources and that this is a major nationwide problem.
Started Getting
5

Table of Contents |
|
Getting Started |
|
Things You Should Know .................................................................................................. |
2 |
Information ........................................................................................................................ |
3 |
Important Safety Instructions for Digital Camera with Compact Modem Card ................. |
4 |
Precautions for Compact Modem Card ............................................................................ |
5 |
Declaration of Conformity ................................................................................................. |
7 |
Index of Controls .............................................................................................................. |
8 |
On Screen Display (OSD) .............................................................................................. |
11 |
LCD Monitor Indication ................................................................................................... |
12 |
Power Supply .................................................................................................................. |
14 |
Attaching the Hand Strap ............................................................................................... |
15 |
CompactFlash Card ........................................................................................................ |
16 |
Setting the Clock ............................................................................................................ |
18 |
Basic Operation |
|
Capturing Images ........................................................................................................... |
19 |
Adjusting LCD Viewfinder Brightness ............................................................................. |
23 |
Playing Back Captured Images ...................................................................................... |
24 |
Viewing Images on Your TV Screen and Transferring Your Images (VCR) ..................... |
28 |
Special Features |
|
Focus/Macro Recording ................................................................................................. |
29 |
Using the built-in Flash ................................................................................................... |
30 |
White Balance ................................................................................................................ |
32 |
Light Metering ................................................................................................................. |
33 |
Capture B/W Images ...................................................................................................... |
34 |
Self Timer Recording ...................................................................................................... |
35 |
Adjusting the Iris Manually ............................................................................................. |
36 |
Time Lapse Recording ................................................................................................... |
37 |
To Delete Specific Images .............................................................................................. |
38 |
To Delete All Images....................................................................................................... |
39 |
Formatting CF Card ........................................................................................................ |
40 |
To Copy Image Pages .................................................................................................... |
41 |
To Copy All Images ......................................................................................................... |
42 |
Slide Show ...................................................................................................................... |
43 |
Inserting the PCMCIA Adaptor ....................................................................................... |
44 |
Transferring your Images (Windows 95/98) .................................................................... |
46 |
Transferring your Images (Macintosh) ............................................................................ |
52 |
Communication Function ................................................................................................ |
58 |
Remote Access .............................................................................................................. |
61 |
Remote Access (Windows 95/98) .................................................................................. |
62 |
Remote Access (Macintosh) .......................................................................................... |
68 |
Communication ............................................................................................................... |
74 |
PC Connection ............................................................................................................... |
76 |
Using the Digital Photo Printer ....................................................................................... |
78 |
6 |
|
For assistance, call 1-800-272-7033. |

|
Table of Contents |
For Your Information |
|
Digital Camera Accessory List .................................................................................... |
80 |
Digital Camera Accessory List Order Form ................................................................. |
81 |
Before Requesting Service .......................................................................................... |
82 |
Specifications .............................................................................................................. |
83 |
Warranty ...................................................................................................................... |
84 |
Service Center Directory ............................................................................................. |
85 |
Index ............................................................................................................................ |
86 |
This operating Instruction book is designed for use with models PV-DC2090 and
PV-DC2590.
The PV-DC2590 is the model used for illustrative purposes. Features may vary, so please read carefully.
Types of Differences
|
PV-DC2090 |
PV-DC2590 |
B/W Full Feature Indicator Panel |
No |
Yes |
REC MODE Button |
No |
Yes |
SELF TIMER Button |
No |
Yes |
FLASH Button |
No |
Yes |
Compact Modem Card |
Not Included |
Included |
Started Getting
|
Declaration of Conformity |
Model Number : |
PV-DC2090/PV-DC2590/PV-CFM10/LSJA0244 |
Trade Name : |
Panasonic |
Responsibility Party : Matsushita Electric Corporation of America |
|
Address : |
One Panasonic Way Secaucus New Jersey 07094 |
Telephone Number : |
1-800-211-PANA (7262) |
This device complies with Part 15 of the FCC Rules. Operation is subject to the following two conditions: (1) This device may not cause harmful interference, and (2) this device must accept any interference received, including interference that may cause undesired operation.
7

Index of Controls
Front View
POWER Switch (PLAY•OFF•REC•MANUAL REC)
Rotate the POWER switch to REC, MANUAL REC or PLAY. See pages 16, 18, 19, 22~26, 28~30, 32~38, 41~43, 48, 54, 61, 74, 78.
SHTR (SHUTTER) Button
See pages 19, 20, 25, 26, 35, 37~41, 74, 78.
FLASH Emitter
See page 30.
SELF TIMER |
|
|
|
Lamp |
Light Sensor |
Lens |
|
See page 35. |
|||
|
|||
|
see page 30. |
|
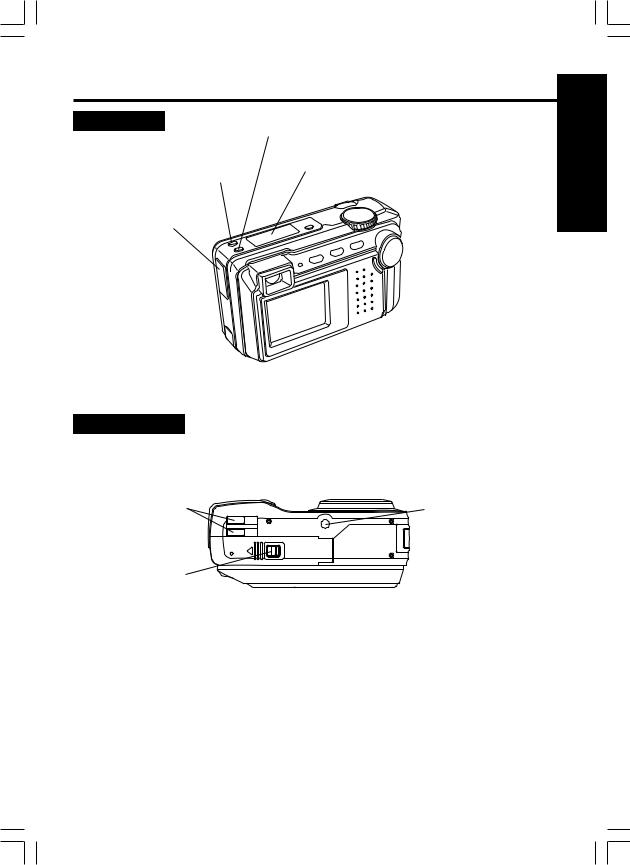
Rear View
DISPLAY Button
See pages 20, 74.
Optical Viewfinder
See page 20.
LED Lamp 
See pages 18~20, 22~26, 29, 30, 32~38, 41~43, 61, 74, 78.
LCD Viewfinder
See pages 11~13, 19.
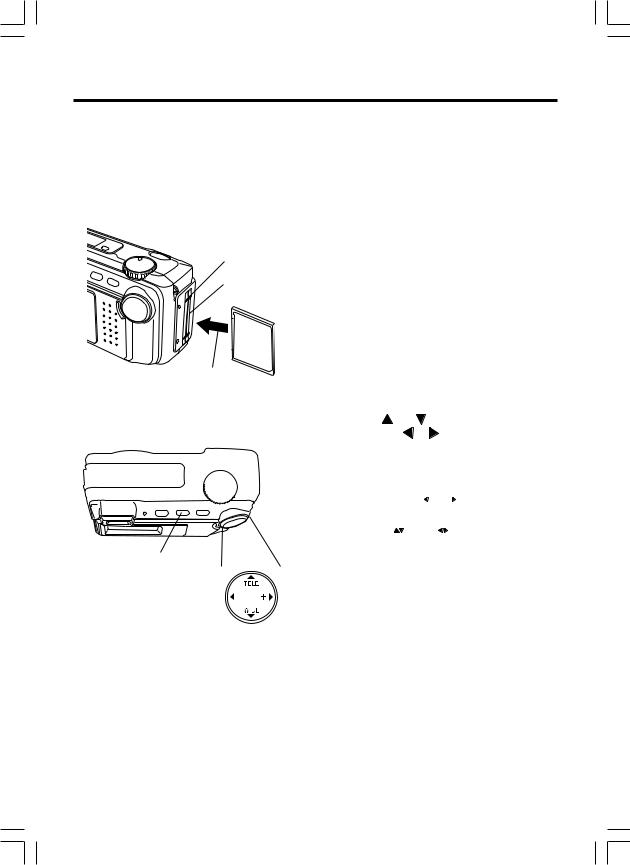
/ TELE Button
See pages 16, 18, 19, 22, 23, 25, 27, 29, 30, 32, 33~40, 42, 43, 61, 74, 75, 78.
 / - Button
See pages 16, 19, 22~26, 29, 30, 32~36, 38, 41, 74, 75.
MENU Button
See pages 16, 18, 19, 22~26, 29, 30, 32~38, 41~43, 61, 74, 78.
STAND BY Button
See page 22.
 Strap Attachment Ring
See page 15.
CompactFlash Card
Slot
See pages 16, 44, 58.
 / + Button
See pages 16, 18, 19, 22~26, 29, 30, 32~43, 61, 74, 75, 78.
 / WIDE Button
See pages 16, 18, 19, 22, 23, 25, 27, 29, 30, 32~40, 42, 43, 61, 74, 75, 78.
8 |
|
For assistance, call 1-800-272-7033. |
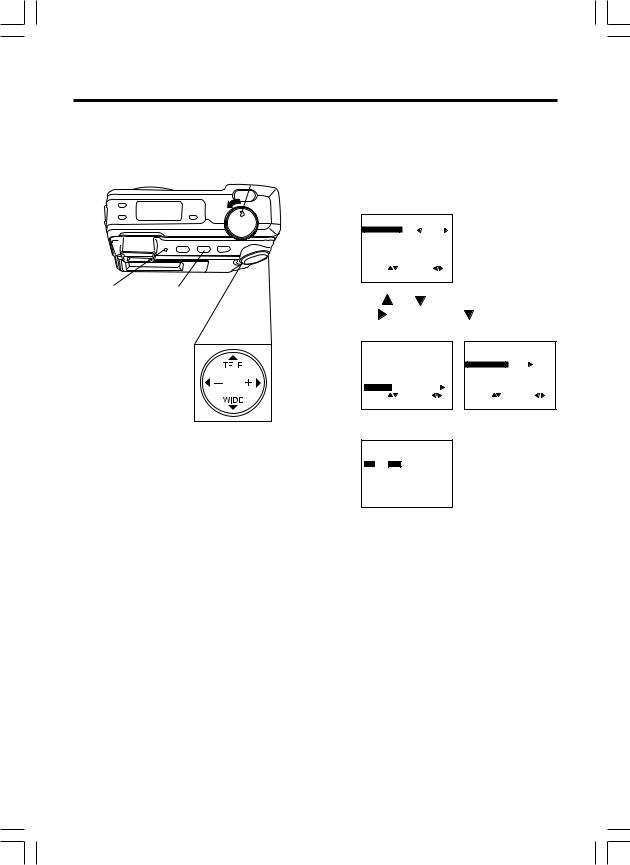
Index of Controls
Rear View
FLASH Button *
See page 31.
VIDEO OUT
Terminal
See page 28.
SERIAL  Terminal
See page 48, 54.
DC IN Terminal 
See page 15.
* : PV-DC2590 Only
SELF TIMER Button *
See page 35.
B/W Full Feature Indicator Panel *
See pages 10, 19, 31, 35.
 REC MODE Button *
See page 19.
(PV-DC2590 shown)
Started Getting
Bottom View
CARD EJECT |
Tripod Receptacle |
Switch |
Used when securing |
See page 17. |
the camera to a tripod |
Battery |
|
Compartment |
|
See page 14. |
|
9

Index of Controls
B/W Full Feature Indicator Panel (PV-DC2590 Only)
Battery |
B/W Mode |
Modem |
Flash Mode |
Indication |
Indication |
Indication |
Indication |
See page 11. |
See page 34. |
See pages 58, |
See page 30. |
|
|
61, 74. |
|
Time Lapse |
|
|
|
Indication |
|
|
|
See page 37. |
|
|
|
Recording Mode |
Self Timer |
Card Slot |
Remaining |
Indication |
Indication |
Indication |
Indication |
See page 21. |
See page 35. |
See page 16. |
See page 11. |
Compact Modem Card (Included with PV-DC2590)
Compact Modem Card
See page 58.
Modem Cable
See page 58.
10 |
|
For assistance, call 1-800-272-7033. |
On Screen Display (OSD)
The indication displayed on the LCD screen will tell you the operation status of the Digital Camera.
REC OSD
White Balance Mode |
Focus Mode |
|
(See page 32) |
(See page 29) |
|
AUTO |
: No Indication |
AUTO : No Indication |
OUTDOOR : |
ZONE : |
|
INDOOR |
: |
|
Flash Mode
(See pages 30, 31)
AUTO |
: No Indication |
ON |
: |
RED EYE : |
|
OFF |
: |
B/W Mode
(see page 34)
Selected
Card Slot
CARD1
10
|
LIGHT |
F |
MAY 24 1999 |
10 : 00 AM |
Light Metering Mode
(See page 33)
AUTO : No Indication
SPOT :
Self-Timer Mode
(See page 35)
Low Light Warning
"LIGHT" will appear when the light level is inadequate. In this case, more light should be provided or use flash to achieve better picture quality and color.
Date/Time Indication
Image Pages left |
Recording Mode : |
|
in memory |
SF(Super Fine), F(Fine), N(Normal), |
|
|
ZOOM(Zoom), |
(Motion Image Rec Mode), |
|
(Burst Rec |
Mode). |
Started Getting
PLAY OSD
Print Mark
(See page 78)
Directory/ |
|
CARD1 |
MAY 24 1999 |
|
100-0001 F |
10 : 00 AM |
|
|
Image Number
Battery Condition
FULL
 EMPTY
EMPTY
As the Battery is depleted, the indication changes.
LED Lamp will flash when battery is empty.
Displayed Image Page and its captured mode F(Fine), N(Normal), or  (Motion Image Rec Mode).
•If the image is captured in SF(Super Fine), the displayed image mode will be F(Fine).
•If the image is captured in ZOOM or  (Burst Rec Mode),
the displayed image mode will be N(Normal).
11

LCD Monitor Indication
Recording Menu
< REC Mode>
1 |
|
|
|
|
|
<REC MENU> |
||||||
2 |
|
|
|
|
|
|
|
|
|
|
N |
|
|
|
REC MODE |
|
|
|
|
||||||
|
|
|
|
|
|
|
|
|
||||
3 |
|
|
|
|
CARD SLOT |
|
|
NO. 1 |
||||
|
|
|
|
FLASH |
|
|
AUTO |
|||||
|
|
|
|
|
|
|||||||
4 |
|
|
|
|
SELF TIMER |
|
|
OFF |
||||
|
|
|
|
OTHERS |
|
|
|
|||||
5 |
|
|
|
|
SEL |
: |
|
|
|
SET |
: |
|
|
|
|
|
EXIT |
: MENU |
|
|
|
||||
|
|
|
|
|
|
|
|
|||||
6 |
|
|
|
|
|
|
|
|
|
|
||
|
|
|
|
|
|
|
|
|
||||
|
|
|
|
|
|
<OTHERS> |
|
|||||
7 |
|
|
|
|
BRIGHTNESS |
|
|
|
|
|||
|
|
|
|
CLOCK SET |
|
|
ON |
|||||
|
|
|
|
|
|
|||||||
8 |
|
|
|
|
BEEP |
|
|
|
|
|
|
|
|
|
|
|
|
|
|
|
|
|
|
|
|
|
|
|
|
|
SEL |
: |
|
|
|
SET |
: |
|
|
|
|
|
|
EXIT |
: MENU |
|
|
|
|||
|
|
|
|
|
|
|
|
|||||
< MANUAL REC Mode> |
|
|||||||||||
|
|
|
|
|
|
|
|
|||||
|
|
|
|
|
<MANUAL REC 1/3> |
|||||||
|
|
|
|
|
|
|
|
|
|
N |
||
|
|
|
|
|
REC MODE |
|
|
|
|
|||
|
|
|
|
|
CARD SLOT |
|
|
NO. 1 |
||||
|
|
|
|
|
FLASH |
|
|
AUTO |
||||
9 |
|
|
|
|
SELF TIMER |
|
|
OFF |
||||
|
|
|
|
IRIS |
|
|
|
|
|
|
|
|
|
|
|
|
|
|
|
|
|
|
|
||
|
|
|
|
|
SEL |
: |
|
|
|
SET |
: |
|
|
|
|
|
|
EXIT |
: MENU |
|
|
|
|||
10 |
|
|
|
|
|
|
|
|||||
|
|
|
|
|
|
|||||||
|
|
|
|
<MANUAL REC 2/3> |
||||||||
11 |
|
|
|
|
|
|
|
|
AUTO |
|||
|
|
|
|
FOCUS |
|
|
|
|||||
|
|
|
|
|
|
|
|
|
|
|
||
12 |
|
|
|
|
WHITE BALANCE |
AUTO |
||||||
|
|
|
|
LIGHT METER |
|
|
AUTO |
|||||
|
|
|
|
|
|
|||||||
13 |
|
|
|
|
B/W |
|
|
|
|
|
|
OFF |
|
|
|
|
TIME LAPSE |
|
|
OFF |
|||||
14 |
|
|
|
|
SEL |
: |
|
|
|
SET |
: |
|
|
|
|
|
EXIT |
: MENU |
|
|
|
||||
|
|
|
|
|
|
|
|
|||||
|
|
|
|
|
|
|
||||||
|
|
|
|
|
|
|||||||
|
|
|
|
|
<MANUAL REC 3/3> |
|||||||
15 |
|
|
|
|
|
|
||||||
|
|
|
REMOTE ACCESS |
|
|
|||||||
|
|
|
|
|
||||||||
|
|
|
|
OTHERS |
|
|
|
|||||
|
|
|
|
SEL |
: |
|
|
|
SET |
: |
||
|
|
|
|
EXIT |
: MENU |
|
|
|
||||
|
|
|
|
|
|
|
|
|
|
|
|
|
1.REC MODE (See Page 21)
To change one of the 6 recording modes.
2.CARD SLOT (See Page 16)
To change card slot NO.1 or NO.2.
•When the 2 pieces of CF card are not inserted, this item can not be selected.
3.FLASH (See Pages 30, 31)
To change one of the 4 flash modes.
4.SELF TIMER (See Page 35) To set Self Timer.
5.OTHERS
To select other menu.
6.BRIGHTNESS (See Page 23)
To adjust LCD Viewfinder brightness.
7.CLOCK SET (See Page 18) To set clock.
8.BEEP (See Page 22)
To set beep on/off when capturing images.
9.IRIS (See Page 36) To adjust Iris manually.
10.FOCUS (See Page 29)
To select one of the 4 focus modes.
11.WHITE BALANCE (See Page 32)
To change one of the 3 White Balance modes.
12.LIGHT METERING (See Page 33) To change AUTO or SPOT.
13.B/W (See Page 34)
To capture Black/White images.
14.TIME LAPSE (See Page 37) To set time lapse recording.
15.REMOTE ACCESS (See Page 61) To operate camera from PC.
•When the Compact Modem Card is not inserted, this item can not be selected.
12 |
|
For assistance, call 1-800-272-7033. |

LCD Monitor Indication
Playback Menu
1<PLAY MENU 1/2>
2DISPLAY MODE 
 NORMAL
|
|
|
CARD SLOT |
NO. 1 |
|||
3 |
|
|
DELETE |
|
|
||
|
|
|
|
||||
4 |
|
|
COPY |
|
|
||
|
|
PRINT MARK |
|
|
|||
|
|
|
|
|
|||
5 |
|
|
SEL |
: |
|
SET |
: |
|
|
|
EXIT |
: MENU |
|
|
|
|
|
|
|
|
|
||
|
|
|
|
|
|||
6 |
|
|
|
<PLAY MENU 2/2> |
|||
|
|
|
|
|
|
|
|
7 |
|
|
SLIDE SHOW |
|
|
|
|
|
|
COMMUNICATION |
|
||||
|
|
|
|||||
8 |
|
|
OTHERS |
|
|
||
|
|
|
|
|
|
|
|
|
|
|
SEL |
: |
|
SET |
: |
|
|
|
EXIT |
: MENU |
|
|
|
|
|
|
|
|
|
|
|
1.DISPLAY MODE
(See Pages 24, 25, 26, 27) Select playback mode.
2.CARD SLOT (See Page 16) To select card slot.
3.DELETE (See Pages 38, 39, 40) Delete image from CF card.
4.COPY (See Pages 41, 42) Copy image to other CF card.
5.PRINT MARK (See Page 58) To set print mark.
6.SLIDE SHOW (See Page 43) Playback images as slide show.
7.COMMUNICATION (See Pages 74, 75) To send images to a PC or FAX machine.
8.OTHERS
To select other menu.
Started Getting
On Screen Display Order
|
|
Press |
Press |
||||||||
|
|
DISPLAY |
|
DISPLAY |
|
|
|||||
CARD1 |
MAY 24 1999 |
OSD OFF |
LCD OFF |
||||||||
|
|
|
|
|
|
||||||
|
|
|
|
|
|
||||||
|
|
|
|
|
|
|
|
|
|||
10 F |
10 : 00 AM |
|
|
|
|
|
|
|
|
|
|
|
|
|
|
|
Press DISPLAY |
|
|
|
|
|
|
|
|
|
|
|
|
|
|
|
|
||
|
|
|
|
|
|
|
|
|
|||
|
|
|
|
|
|
|
|
|
|
|
|
|
|
|
|
|
|
|
|
|
|
|
|
Note:
• Pressing MENU with LCD OFF turns LCD ON and displays the menu.
However, after selecting the settings and exiting the menu, the LCD will stay ON.
13

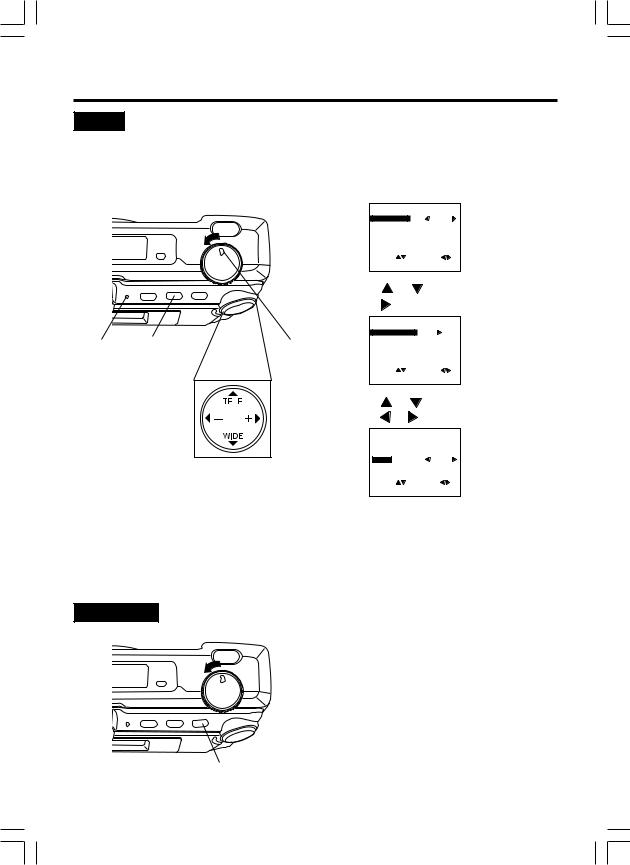
Power Supply
Loading the Alkaline Batteries
Bottom View
 + - + -
1 While pressing the Lock button, slide the Battery Compartment lid in the direction of the arrow and swing it open.
2 Install four Alkaline Batteries.
•Be sure to use Alkaline Batteries. Never use manganese batteries.
•Make sure that the positive (+) and (-) ends of the batteries are facing the correct direction.
3 Swing the Battery Compartment lid down and slide it shut.
WARNING! Do not dispose of in fire, put in backwards, disassemble, or short circuit; otherwise battery may leak or burst, causing possible personal injury.
Battery Notes
Safety precautions:
•Do not mix old and new batteries.
•Do not mix alkaline with manganese batteries.
•Do not get the AA alkaline batteries near, or dispose of in fire.
•Do not directly connect (short circuit) the positive (+) and negative (–) terminals.
•Never attempt to disassemble or reassemble the Battery.
•Do not drop or jar the Battery.
Note:
•Instead of the supplied Alkaline batteries, you can also use AA type Ni-Cd (high density type) or nickel-hydride batteries available on the market.
•If you are not going to use the Digital Camera for an extended period of time, remove the batteries from the Digital Camera.
Operation Time
When using the supplied Panasonic alkaline batteries, you will have a maximum of about 160 images* (at an ambient temperature of 25°C).
*Conditions :
•Using the Panasonic Alkaline batteries.
•Capturing an image every 30 seconds.
•Using Flash once for every other capture.
•Recording mode is Normal.
14 |
|
For assistance, call 1-800-272-7033. |

Power Supply
AC Adaptor (Optional)
|
|
1 Pull up the Jack Cover. |
|
|
2 Connect DC OUT on the AC Adaptor |
|
|
to DC IN on the Digital Camera. |
|
|
3 Plug the AC Adaptor into an AC |
1 |
|
outlet. |
3 |
Note: |
|
|
• While not in use, unplug the AC Adaptor |
from the AC outlet.
2
Attaching the Hand Strap
Started Getting
Thread the Hand Strap through the Strap
Attachment Ring as shown.
a |
b |
|
15
CompactFlash Card
Inserting the CompactFlash Card
•The captured images will be stored on this CompactFlash Card.
•Be sure to insert the CompactFlash Card before using the camera.
•You can insert a total of two CompactFlash cards into the camera, one in each slot.
CARD SLOT 1
CARD SLOT 2
1, 2, 6


 3
3
1 Set POWER OFF before inserting the CompactFlash card.
Insert the CompactFlash Card into the Card Slot NO.1 or NO.2 in the direction of the arrow mark and so that the arrow mark side of the card faces the front (lens side) of the Digital Camera.
2 Push the card fully into CompactFlash Card Slot.
3 Set POWER to REC.
4 Press MENU to display REC MENU.
5 Press or |
|
to select CARD SLOT |
||||
and press |
or |
to select card slot |
||||
NO. 1 or NO. 2 if you inserted the CF |
||||||
Card into both slots. |
||||||
|
|
|
|
|||
|
|
<REC MENU> |
|
|||
|
|
REC MODE |
|
N |
|
|
|
|
CARD SLOT |
|
|
NO. 1 |
|
|
|
FLASH |
|
AUTO |
|
|
|
|
SELF TIMER |
|
OFF |
|
|
|
|
OTHERS |
|
|
|
|
|
|
SEL : |
SET |
: |
|
|
|
|
EXIT : MENU |
|
|
|
|
|
|
|
|
|
|
|
4 |
5 |
|
|
|
|
• If a CF card is inserted in either of the |
|
|
|
|
card slots, that particular slot will |
||
|
|
|
|
|
automatically be selected. All buttons |
|
|
|
|
|
|
|
are inoperable while NO.1 or NO.2 is |
|
|
|
|
|
|
flashing on the menu screen. |
|
|
|
|
|
||
|
|
|
|
|
|
|
16 |
|
For assistance, call 1-800-272-7033. |

CompactFlash Card
 6
6
Note:
•Do not bend, drop, apply high pressure or subject the card to strong shocks.
•Do not store it in places with high temperature, high humidity, a lot of dust, or static electricity and strong electromagnetic waves.
•Keep the card's contacts free from dust, water or other foreign substances. Do not touch them with your fingers, etc.
•Do not disassemble or deform the card.
•Be sure to make a backup copy of important data.
•Make sure that you do not insert the card in the wrong direction.
Removing the CompactFlash Card.
6 Set POWER OFF before removing the CompactFlash card.
Slide the CARD EJECT Switch, so the Card pops out. (Be careful not to drop the card.)
•Do not, under any circumstances, eject the card immediately after pressing the Shutter Button (during recording of an image) or while deleting (when "PLEASE WAIT" is displayed). This could damage the format of the card and make it unusable.
•When the card does not eject after pressing the CARD EJECT Switch, push the card fully into the slot again and then press the CARD EJECT Switch firmly.
•"NO CF CARD" will appear on the LCD Viewfinder and the LED Lamp will flash when the CompactFlash Card is not inserted.
•"CF CARD ERROR" will appear on the LCD Viewfinder and the LED Lamp will flash if the CompactFlash Card is defective.
Started Getting
17
Setting the Clock
LED Lamp 2, 6
3, 4, 5
1 |
1 Set POWER to REC. |
|
|
||
• The LED Lamp lights up. |
|
||||
|
|
||||
|
2 Press MENU to display REC MENU. |
||||
|
<REC MENU> |
|
|
||
|
REC MODE |
N |
|
|
|
|
CARD SLOT |
NO. 1 |
|
|
|
|
FLASH |
|
AUTO |
|
|
|
SELF TIMER |
OFF |
|
|
|
|
OTHERS |
|
|
|
|
|
SEL : |
SET : |
|
|
|
|
EXIT : MENU |
|
|
|
|
|
3 Press |
or |
to select OTHERS and |
||
|
press |
. Then, press |
to select |
||
|
CLOCK SET. |
|
|
|
|
|
<REC MENU> |
|
<OTHERS> |
||
|
REC MODE MODE |
N |
BRIGHTNESS |
||
|
CARD SLOT |
NO. 1 |
CLOCK SET |
||
|
FLASH |
|
AUTO |
BEEP |
ON |
|
SELF TIMER |
OFF |
|
|
|
|
OTHERS |
|
|
|
|
|
SEL : |
SET : |
SEL |
: SET : |
|
|
EXIT : MENU |
|
EXIT |
: MENU |
|
4 Press  for CLOCK SET menu.
<CLOCK SET>
10 : 00 AM MAY. 24 1999
SEL :  SET :
SET : 
 EXIT : MENU
5 Press or hold down  or
or  to select hour, then press
  to set.
Repeat for minute, month, day and year.
•Double check all items before exiting the menu.
6 Press MENU twice to exit.
Clock starts when menu is exited.
Note:
•To make corrections, repeat steps 2-5.
•The clock will continue to operate about 8 hours after the battery has been removed. If you need to set clock again, repeat steps above.
18 |
|
For assistance, call 1-800-272-7033. |

Capturing Images
Using LCD Viewfinder
5, 6
Lamp |
2 |
1 |
LED |
|
|
LCD Viewfinder
3, 4
B/W Full Feature
Indicator Panel
 REC MODE
(Model PV-DC2590 Only)
1 Set POWER to REC or MANUAL REC.
• The LED Lamp lights up.
2 Press MENU to display REC MENU.
|
<REC Mode> |
|
<MANUAL REC Mode> |
|||||||
|
|
<REC MENU> |
|
|
<MANUAL REC 1/3> |
|||||
|
|
|
N |
|
|
|
|
N |
||
|
REC MODE |
|
|
|
REC MODE |
|||||
|
CARD SLOT |
NO. 1 |
|
|
CARD SLOT |
NO. 1 |
||||
|
FLASH |
AUTO |
|
|
FLASH |
AUTO |
||||
|
SELF TIMER |
OFF |
|
|
SELF TIMER |
OFF |
||||
|
OTHERS |
|
|
|
IRIS |
|
|
|
||
|
SEL |
: |
|
SET : |
|
|
SEL |
: |
|
SET : |
|
EXIT |
: MENU |
|
|
|
EXIT |
: MENU |
|
||
|
|
|
|
|
|
|
|
|
|
|
3 Press  or
or  to select REC MODE and select recording modes
(see page 21), press MENU to exit.
4 Press  (Tele) or
  (Wide) to zoom In and Out.
•Zoom magnification level is up to x3.
•There is no zoom indication on the LCD Viewfinder.
5 Press SHTR down halfway to lock Auto Focus.
• Beep sounds twice (see page 22).
6 Press SHTR down the rest of the way to actually capture the image.
•Beep sounds once (see page 22).
•While the Digital Camera processes theimage, the LED Lamp will flash and then the captured image will be displayed on the LCD Viewfinder for a few seconds.
For model PV-DC2590,
■Do step 1 above.
■Then, press REC MODE repeatedly to select recording mode.
•Selected mode will be changed on the B/W Full Feature Indicator Panel
(see page 10).
■Now, do step 4 above.
Operation Basic
19

Capturing Images
Using Optical Viewfinder
In addition to using the LCD Viewfinder, you can also use the Optical Viewfinder to frame and capture images.
Using the Optical Viewfinder will prolong battery life.
4
1 Repeat steps 1 to 3 on page 19.
2 Press DISPLAY twice to turn off the LCD Viewfinder.
• If you press MENU, the LCD Viewfinder will automatically turn on.
3 Frame the image you want to capture within the recording area guide marks on the Optical Viewfinder.
<Normal> |
<Short Distance> |
LED
Lamp
Optical
Viewfinder
2 1 1
4 Press SHTR to capture the image.
• LED Lamp will flash while the Digital Camera processes the image.
You may capture another image as soon as LED Lamp stops flashing.
Notes for LCD and Optical Viewfinder use:
•The number of image pages left in the selected mode is displayed on the LCD Viewfinder. When no memory remains, 0
|
|
|
|
|
|
and LED Lamp will flash. To capture other |
|
|
|
|
|
|
images, you will first need to delete some |
1 |
|
|
|
|
|
images from memory. (see page 38) |
|
|
|
|
|
• The Digital Camera is focused automati- |
|
|
|
|
|
|
cally. |
|
|
|
|
|
|
|
• Avoid covering the lens with your fingers |
|
|
|
|
|
|
when capturing images. |
•Do not subject the LCD Viewfinder to pressure or shock.
•Hold the Digital Camera as steady as possible when capturing an image.
•The active LCD Viewfinder image will have a slightly degraded appearance when compared to a captured or transferred image. This is normal.
20 |
|
For assistance, call 1-800-272-7033. |
Capturing Images
Recording Mode
Recording Mode
SF : Super Fine Mode
Select this mode when you want the highest quality resolution with the lowest compression
(i.e. for printing).
F : Fine Mode
Select this mode when you want a high resolution
(i.e. for printing or for archiving an image).
N : Normal Mode
Select this mode when you want a lower resolution image
(i.e. for e-mailing or posting on the Internet).
ZOOM: Zoom Mode
Using ZOOM mode magnifies the image to twice its normal size.
: Motion Image Rec Mode
Capture an image every 0.1 sec/ frame to create a 4 sec. mini movie.
• The LED Lamp will flash while processing a motion image.
: Burst Rec Mode
Capture image every 0.5 sec./ frame up to 16 frames while shutter button is pressed.
• If the remaining page number is less than 16, you will only be able to capture up to the number of images remaining in memory.
Image Resolution and Capacity
REC Mode |
Image |
Capacity |
|||
Resolution |
(w/Supplied 8MB CF Card) |
||||
|
|
|
|||
|
|
|
|
|
|
SF |
1,280 x 960 |
Approx. 15 images |
|||
|
|
|
|
|
|
F |
1,280 x 960 |
Approx. 30 images |
|||
N |
640 x 480 |
Approx. 100 images |
|||
|
|
|
|
|
|
ZOOM |
640 x 480 |
Approx. 100 images |
|||
|
|
|
320 x 240 |
Approx. 6 images |
|
|
|
|
|||
|
|
|
|
|
|
|
|
|
640 x 480 |
Approx. 100 images |
|
•The number of images given for each mode applies when all images are taken in same mode.
•You can change recording modes at any time before capturing an image.
•The number of images that can be taken may differ depending on the subject. After capturing an image, the number may not decrease or may decrease by two.
Operation Basic
21
Capturing Images
Beep
Set to ON to beep when capturing an image.
To cancel the beep, set to OFF.
1
2
Set POWER to REC.
• The LED Lamp lights up.
Press MENU to display REC MENU.
LED
Lamp
|
|
|
<REC MENU> |
||
|
|
REC MODE |
|
N |
|
|
|
CARD SLOT |
|
NO. 1 |
|
|
|
FLASH |
|
AUTO |
|
|
|
SELF TIMER |
|
OFF |
|
|
|
OTHERS |
|
|
|
|
|
SEL |
: |
SET |
: |
|
|
EXIT |
: MENU |
|
|
|
|
3 Press |
or |
to select OTHERS, and |
|
|
|
press to display OTHERS menu. |
|||
|
|
|
<OTHERS> |
|
|
2, 5 |
1 |
BRIGHTNESS |
|
|
|
CLOCK SET |
|
|
|||
BEEP |
|
|
ON |
||
|
|
SEL |
: |
SET |
: |
|
|
EXIT |
: MENU |
|
|
3, 4 |
|
4 Press |
or |
to select BEEP and |
|
|
press |
or |
to select ON or OFF. |
||
|
|
|
<OTHERS> |
|
|
|
|
BRIGHTNESS |
|
|
|
|
|
CLOCK SET |
|
|
|
|
|
BEEP |
|
|
ON |
|
|
SEL |
: |
SET |
: |
|
|
EXIT |
: MENU |
|
|
|
|
5 Press MENU twice to exit. |
|||
Digital Camera will beep:
•Once when you capture an image
•Twice when you press the shutter button half way to adjust the focus.
Stand By
Press STAND BY, lens will not shorten and power will turn off. If no operation is performed for one minute while POWER is ON, the Camera will go to Stand By mode. To resume Power ON, press STAND BY.
STAND BY
22 |
|
For assistance, call 1-800-272-7033. |

Adjusting LCD Viewfinder Brightness
You may want to brighten or darken the LCD (Liquid Crystal Display) Viewfinder for easier viewing. This adjustment will not affect the captured image brightness.
1
LED 2, 6
Lamp
3, 4, 5 
1 Set POWER to REC or PLAY.
• The LED Lamp lights up. |
|
|
||||||||
2 Press MENU to display MENU. |
|
|||||||||
|
|
<REC Mode> |
|
|
<PLAY Mode> |
|||||
|
|
|
|
|
|
|
||||
|
|
<REC MENU> |
|
|
<PLAY MENU 1/2> |
|||||
|
|
|
|
N |
|
|
|
NORMAL |
||
|
|
REC MODE |
|
|
|
DISPLAY MODE |
||||
|
|
CARD SLOT |
NO. 1 |
|
|
CARD SLOT |
|
NO. 1 |
||
|
|
FLASH |
AUTO |
|
|
DELETE |
|
|
||
|
|
SELF TIMER |
OFF |
|
|
COPY |
|
|
|
|
|
|
OTHERS |
|
|
|
PRINT MARK |
|
|
||
|
|
SEL : |
SET : |
|
|
SEL |
: |
SET : |
||
|
|
EXIT : MENU |
|
|
|
EXIT |
: MENU |
|
|
|
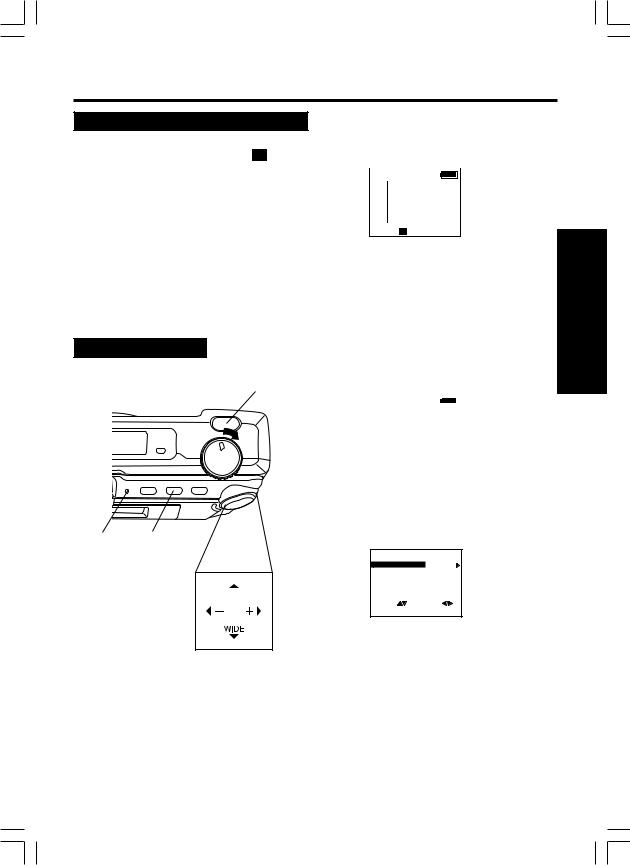
3 Press  or
or  to select OTHERS and press
  to display OTHERS menu.
|
<OTHERS> |
|
BRIGHTNESS |
|
|
CLOCK SET |
|
|
BEEP |
|
ON |
SEL |
: |
SET : |
EXIT |
: MENU |
|
4 Press  to display LCD BRIGHTNESS screen.
<LCD BRIGHTNESS>
- 


 +
+
SET : 
 EXIT : MENU
5 Press  (-) or
  (+) to change the brightness of the LCD Viewfinder;
(+) for brighter, (-) for darker.
6 Press MENU twice to exit.
Note:
•The BRIGHT adjustment will be reset to the original setting when the Digital Camera is turned off and in Stand By mode.
Operation Basic
23

Playing Back Captured Images
Manual Playback
 6
6  1
1
LED 2
Lamp
2, 3, 4
Note:
•Turn off the LCD monitor when not in use by pressing the DISPLAY twice. To turn the monitor back on, press the DISPLAY again.
•Pressing MENU with LCD OFF turns LCD ON and displays the menu. However, after selecting settings and exiting the menu, the LCD will stay ON.
1 Set POWER to PLAY.
CARD1 |
|
|
|
|
|
|
|
MAY 24 1999 |
|||
100-0001 F |
10 : 00 AM |
||
• The LED Lamp lights up.
2 Press MENU to display PLAY MENU and press  to set display mode to NORMAL. Press MENU to exit.
|
|
|
<PLAY MENU 1/2> |
|
|||
|
|
|
|
NORMAL |
|
||
|
|
DISPLAY MODE |
|||||
|
|
CARD SLOT |
|
|
NO. 1 |
|
|
|
|
DELETE |
|
|
|
|
|
|
|
COPY |
|
|
|
|
|
|
|
PRINT MARK |
|
|
|
|
|
|
|
SEL |
: |
SET : |
|
||
|
|
EXIT |
: MENU |
|
|
|
|
3 Press |
|
|
|
|
|
||
(+) or |
(-) repeatedly, |
||||||
[  (+) for ascending order, and
  (-) for descending order] to change the displayed image on the LCD Viewfinder.
•The image page number and recording mode are displayed at the bottom of the screen.
CARD1 |
|
|
|
|
|
|
|
MAY 24 1999 |
|||
100-0001 F |
10 : 00 AM |
||
•If there are no images in memory,
a blue back screen will be displayed.
4 Hold down  (+) or
  (-), [
  (+) for ascending order, and
  (-) for descending order] to change the displayed image on the LCD Viewfinder by fast page advance.
•Page number is changed continuously while  (+) or
  (-) is held down.
•Selected page is displayed when button is released.
(Continued on next page)
24 |
|
For assistance, call 1-800-272-7033. |
Playing Back Captured Images
Manual Playback (Continued)
When you capture an image in |
5 The following message will appear. |
||||||
(Motion Image Rec) mode (see page 21). |
|
|
|
|
|
|
|
|
|
|
|
|
|
|
|
|
|
|
|
|
|||
|
|
PUSH SHTR |
|
|
|||
|
|
TO AUTO PLAY |
|
||||
|
|
|
|
|
|
|
|
|
|
CARD1 |
|
MAY 24 1999 |
|||
|
100-0001 |
|
10 : 00 AM |
||||
6 Press SHTR to start playback of motion image.
Zoom Playback
1 5
5
LED 2, 3
Lamp
2, 4 
1 Set POWER to PLAY.
CARD1 |
|
|
|
|
|
|
|
MAY 24 1999 |
|||
100-0001 F |
10 : 00 AM |
||
• The LED Lamp lights up.
2 Press MENU to display PLAY MENU and press  to set display mode to ZOOM.
<PLAY MENU 1/2> DISPLAY MODE 
 ZOOM
ZOOM
CARD SLOT |
NO. 1 |
|
DELETE |
|
|
COPY |
|
|
PRINT MARK |
|
|
SEL |
: |
SET : |
EXIT |
: MENU |
|
3 Press MENU, the center portion is zoomed X2.
4 Press  ,
,  ,
,  , or
, or  repeatedly to change the zooming area.
5 Press SHTR to restore the image to its normal size.
Operation Basic
25

Playing Back Captured Images
Multi Playback
1
 7
7
LED 2, 3
Lamp
2, 4, 5, 6
1 Set POWER to PLAY.
CARD1 |
|
|
|
|
|
|
|
MAY 24 1999 |
|||
100-0010 F |
10 : 00 AM |
||
• The LED Lamp lights up.
2 Press MENU to display PLAY MENU and press  to set display mode to
  .
.
<PLAY MENU 1/2> DISPLAY MODE 


CARD SLOT |
NO. 1 |
|
DELETE |
|
|
COPY |
|
|
PRINT MARK |
|
|
SEL |
: |
SET : |
EXIT |
: MENU |
|
3 Press MENU. A Multi Image Playback
screen will appear.
100
0002 0003 0004
0005 0006 0007
0008 0009 0010
SEL : 

 SET:SHTR
4 Press  (+) repeatedly to scroll forward through Multi Image pages (each page contains 9 images).
100 |
|
|
Press |
100 |
|
|
0002 |
0003 |
0004 |
|
0011 |
0012 |
0013 |
0005 |
0006 |
0007 |
|
0014 |
0015 |
0016 |
0008 |
0009 |
0010 |
|
0017 |
0018 |
0019 |
SEL : |
|
SET:SHTR |
|
SEL : |
|
SET:SHTR |
5 Press  (-) to move back through the images on the page until the number of the image you want to select is highlighted.
100 |
|
|
Press |
100 |
|
|
0002 |
0003 |
0004 |
|
0002 |
0003 |
0004 |
0005 |
0006 |
0007 |
|
0005 |
0006 |
0007 |
0008 |
0009 |
0010 |
|
0008 |
0009 |
0010 |
SEL : |
|
SET:SHTR |
|
SEL : |
|
SET:SHTR |
26 |
|
For assistance, call 1-800-272-7033. |

Playing Back Captured Images
6 Press  to display the preceding images and
  to display the next 9 images.
• When the first image on CARD1 is selected, press  to select an image on CARD2 (if inserted).
When the last image on CARD1 is selected, press  to select an image on CARD2 (if inserted).
7 Press SHTR to playback the image you selected, and to go back to Manual Playback.
Operation Basic
27
 Loading...