


Chapter 3 Basic Operations - Powering on/off
Powering on/off
Connecting the power cord
Make sure that the supplied power cord is securely fixed to the projector body to prevent it from being removed easily.
For details of power cord handling, refer to “Read this first!” (x page 2).
Attaching
1)Check the shapes of the <AC IN> terminal on the back of the projector body and the power cord connector and insert the plug completely in the correct direction (until you hear the side tabs click in place).
Removing
1)Confirm that the projector is in standby mode, and remove the power plug from the outlet.
2)Remove the power cord connector from the <AC IN> terminal of the projector body while pressing the side tabs.
Power indicator
The power indicator <ON(G)/STANDBY(R)> informs you the status of the power. Confirm the status of the power indicator <ON(G)/STANDBY(R)> before operating the projector.
Power indicator <ON(G)/STANDBY(R)>
Indicator status |
Status |
||
|
Off |
The power cord is unplugged. |
|
|
Lit |
The power is switched off (in standby mode). The [PROJECTOR SETUP] menu x [ECO |
|
|
MANAGEMENT] x [STANDBY MODE] is set to [ECO]. |
||
|
|
||
Red |
|
The power is switched off (in standby mode). The [PROJECTOR SETUP] menu x [ECO |
|
|
Blinking |
MANAGEMENT] x [STANDBY MODE] is set to [NETWORK].*1 |
|
|
The power is switched off (in standby mode). The [PROJECTOR SETUP] menu x [ECO |
||
|
|
||
|
|
MANAGEMENT] x [STANDBY MODE] is set to [NORMAL].*2 |
|
Orange |
Lit |
The projector is cooling down. |
|
The power is switched off after a while. (Changes to the standby mode.) |
|||
|
|
||
ENGLISH - 41

|
|
Chapter 3 Basic Operations - Powering on/off |
|
|
|
|
|
|
Indicator status |
Status |
|
|
Lit |
Projecting. |
Green |
|
The power is on and the lamp is not working. The [PROJECTOR SETUP] menu x [ECO |
Blinking |
MANAGEMENT] x [POWER MANAGEMENT] is set to [READY].*3 |
|
|
|
The lamp starts work. The projector will project image after a while.*4 |
*1: The indicator will light as the following order:
2.75 seconds (light) → 0.25 seconds (off) → 0.75 seconds (light) → 0.25 seconds (off) *2: The indicator will light as the following order:
2.75 seconds (light) → 0.25 seconds (off) *3: The indicator will light as the following order:
2.0 seconds (light) → 2.0 seconds (off)
*4: The indicator will light as the following order:
0.5 seconds (light) → 0.5 seconds (off)
Powering On the Projector
Before switching on the projector, make sure all the other devices are correctly connected (x page 36) and remove the lens cap.
1)Connect the power cord to the projector body.
2)Connect the power plug to an outlet.
ffThe power indicator <ON(G)/STANDBY(R)> lights or blinks, and the projector will enter the standby mode.
3)Press the power <v/b> button on the control panel or the power on <b> button on the remote control. ffThe power indicator <ON(G)/STANDBY(R)> lights in green and the image is soon projected on the screen.
Attention
ffBe sure to remove the lens cap before starting projection.
Note
ffIf the [PROJECTOR SETUP] menu → [ECO MANAGEMENT] → [STANDBY MODE] is set to [ECO], it may take approx. 10 seconds longer before the projector starts projecting after the power is turned on, compared with when [NORMAL] is set.
When the initial setting screen is displayed
When the projector is switched on for the first time after purchase as well as when [INITIALIZE ALL] in the [PROJECTOR SETUP] menu is executed, then the initial setting screen is displayed. Set them in accordance with circumstances.
In other occasions, you can change the settings by menu operations.
Initial setting (display language)
Select the language to show on the screen.
After completed the initial setting, you can change the display language from the [LANGUAGE] menu.
1)Press asqw to select the display language.
42 - ENGLISH

Chapter 3 Basic Operations - Powering on/off
2)Press the <ENTER> button to proceed to the initial setting.
Initial setting (installation setting)
Set each item.
PT-VW355N |
PT-VX425N |
1)Press as to select an item.
Item |
Description |
Page |
[PROJECTION METHOD] |
Set [PROJECTION METHOD] depending on the installation mode. |
|
After completed the initial setting, you can change the setting from the |
78 |
|
|
[PROJECTOR SETUP] menu → [PROJECTION METHOD]. |
|
[SCREEN FORMAT]*1 |
Set the screen format (aspect ratio) and display position of the image. |
|
After completed the initial setting, you can change the settings of each |
72 |
|
|
item from the [DISPLAY OPTION] menu → [SCREEN SETTING]. |
|
[SCREEN POSITION]*1 |
Set the display position of the image. |
|
After completed the initial setting, you can change the settings of each |
72 |
|
|
item from the [DISPLAY OPTION] menu → [SCREEN SETTING]. |
|
|
Change the setting when the projector is used at high altitude. |
|
|
Set it to [OFF] when using the projector at altitude lower than 1 400 m |
|
[HIGH ALTITUDE MODE] |
(4 593'), set it to [HIGH1] when using the projector at altitude between |
78 |
1 400 m (4 593') and 2 000 m (6 562') above sea level, and set it to |
||
|
[HIGH2] when using the projector at altitude between 2 000 m (6 562') |
|
|
and 2 700 m (8 858') above sea level. |
|
|
|
|
*1 Only for PT-VW355N.
2)Press qw to switch the setting.
3)Press the <ENTER> button to perform next initial setting.
ENGLISH - 43

Chapter 3 Basic Operations - Powering on/off
Initial setting (standby mode)
Item |
Description |
Page |
|
|
|
|
Set the operation mode during standby. |
|
|
ffThe default setting is [ECO] that keeps power consumption low during |
|
|
standby. |
|
|
ffSet to [NORMAL] to use the network function or the serial communication |
|
[STANDBY MODE] |
function during standby. |
80 |
ffSet to [NETWORK] to reduce power consumption during standby, and |
||
|
to operate the projector via the wired LAN or the serial communication |
|
|
function by using the Wake on LAN function. |
|
|
After completed the initial setting, you can change the setting from the |
|
|
[PROJECTOR SETUP] menu x [ECO MANAGEMENT] x [STANDBY |
|
|
MODE]. |
|
1)Press qw to switch the setting.
2)Press the <ENTER> button.
ffConfirm the setting value and complete the initial setting.
Note
ffIf you press the <RETURN> button while the initial setting screen is displayed, you can go back to the previous screen. ffThe above initial setting screen is the one displayed when the projector is switched on for the first time after purchase.
When [PROJECTOR SETUP] menu → [INITIALIZE ALL] is executed, the setting of [STANDBY MODE] before execution is displayed.
Making adjustments and selections
It is recommended that images are projected continuously for at least 30 minutes before the focus is adjusted.
1)Adjust the focus of the image roughly. (x page 46)
2)Change the settings of the [PROJECTOR SETUP] menu → [PROJECTION METHOD] depending on the installation mode. (x page 78)
ffRefer to “Navigating through the menu” (x page 56) for the operation of the menu screen.
3)Press the <INPUT SELECT> button on the control panel or the input selection (<COMPUTER 1>, <COMPUTER 2>, <HDMI>, <VIDEO/S-VIDEO>) buttons on the remote control to select the input signal.
ff<MEMORY VIEWER>, <MIRRORING> and <Panasonic APP> buttons on the remote control can also be used to switch the input signal.
4)Adjust the front, back and sideway tilt of the projector with the adjustable feet. (x page 35)
5)If the input signal is an analog RGB signal, press the <AUTO SETUP/CANCEL> button.
44 - ENGLISH
Chapter 3 Basic Operations - Powering on/off
6)Press the <EASY SETTING/CANCEL> button on the control panel.
ffFor details, refer to "Adjusting the projected image via EASY SETTING function". (x page 47)
Note
ffWhen the projector is switched on for the first time after purchase as well as when the [PROJECTOR SETUP] menu → [INITIALIZE ALL] is executed, the initial setting screen is displayed after projection starts.
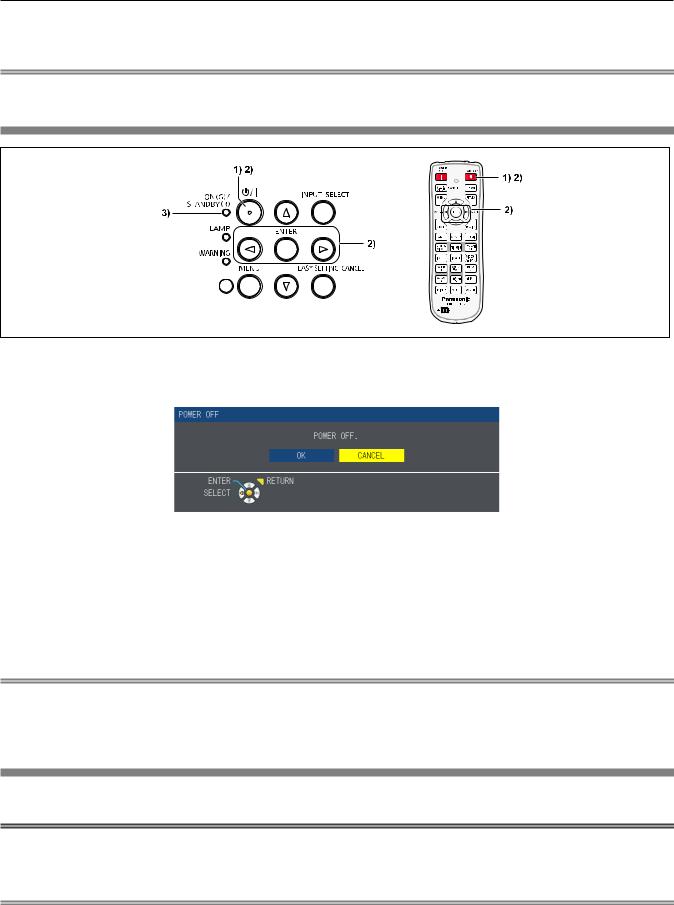
Powering Off the Projector
1)Press the power <v/b> button on the control panel or the power standby <v> button on the remote control.
ffThe following message appears.
2)Press qw to select [OK], and press the <ENTER> button.
(Or press the power <v/b> button on the control panel or the power standby <v> button on the remote control again.)
ffProjection of the image will stop, and the power indicator <ON(G)/STANDBY(R)> lights in orange. (The fans keep running.)
3)Wait until the power indicator <ON(G)/STANDBY(R)> lights or blinks in red.
ffThe projector enters standby mode when the power indicator <ON(G)/STANDBY(R)> lights or blinks in red.
Note
ffWhile the power indicator <ON(G)/STANDBY(R)> is lighting in orange, the lamp is being cooled down and the projector cannot be turned on. Wait until the power indicator <ON(G)/STANDBY(R)> starts lighting or blinking in red to turn on the projector again.
ffWhen packing the projector for transportation and storage, please make sure that each indicator is off.
Direct Power Off function
You can disconnect the power cord from the wall outlet or turn off the power breaker switch even during projection.
Attention
ffDo not disconnect the power cord from the wall outlet or turn off the power breaker switch in a short time (about 1 minute) after the lamp is lit. Doing so may cause the lamp fail to light while you powering on the projector next time, or result in premature deterioration of the lamp.
Note
ffWhen using the Direct Power Off function, you cannot restart the projector immediately after disconnecting the power cord from the wall outlet or turning off the power breaker switch. The lamp remains high temperature and needs to cool down, so it sometimes takes a longer time than usual for the lamp to light up again.
ENGLISH - 45

Chapter 3 Basic Operations - Projecting
Projecting
Check the connections of the peripheral devices (x page 36) and connection of the power cord (x page 41) and switch on the power (x page 42) to start the projector. Select the image and adjust the state of the image.
Selecting the input signal
Select an input signal.
1)Press <COMPUTER 1>, <COMPUTER 2>, <HDMI>, <VIDEO/S-VIDEO>, <MEMORY VIEWER>, <MIRRORING> or <Panasonic APP> button on the remote control or <INPUT SELECT> button on the control panel.
ffThe image of the signal being input in the selected terminal is projected.
ffYou can check the input source through [DETAILED] / [SIMPLE] under the [DISPLAY OPTION] → [ON-SCREEN DISPLAY] → [INPUT GUIDE] menu.
ffYou can also select the input source by pressing asqw on the [DETAILED] screen.
[DETAILED] input guide |
[SIMPLE] input guide |
If there is no signal input
([COMPUTER1], [COMPUTER2] or [HDMI]), this screen will be displayed. Check the output settings of your computer.
Attention
ffImages may not be projected properly depending on the connected device and DVD, video tape, etc. to be played. Set the
[PICTURE] menu → [RGB/YCBCR] or [RGB/YPBPR] (x page 64).
ffCheck the aspect ratio of the screen and the image and select the optimum aspect ratio under the [POSITION] menu (x page 68).
How to adjust the state of the image
If the projected image or the position is not correct when the positioning of the projector and the screen is correctly installed, adjust the focus and zoom.
1)Adjust the projection angle.
ffInstall the projector on a flat surface and parallel to the screen so that the projected screen is rectangular.
ffIf the screen is tilted downward, extend the adjustable feet and adjust the projection screen so that the projected screen is rectangular.
ffFor details, see “Adjusting adjustable feet” (x page 35).
2)Adjust the zoom and the focus.
ffRotate the zoom ring to zoom in and out the image.
ffRotate the focus ring to adjust the focus of the projected image.
Zoom ring
Focus ring
Note
ffIt is recommended that the images are projected continuously for at least 30 minutes before the focus is adjusted. ffIf you adjust the focus, you may need to adjust the size of the image by turning the zoom ring again.
ffIf keystone distortion occurs, see the [POSITION] menu → [KEYSTONE] (x page 65).
46 - ENGLISH

Chapter 3 Basic Operations - Projecting
Adjusting the projected image via EASY SETTING function
EASY SETTING function makes the semi-automatically adjustment possible, so that to get the optimal image. EASY SETTING function including these following setting items:
[FOCUS ASSIST] |
The color and the length of the bar assists the focus adjustment. |
|
[SCREEN FIT] |
Detect and correct the image automatically to fit the frame. If you can not detect the frame of the |
|
screen, Keystone executes automatically. |
||
|
||
[COLORBOARD] |
The color values will change automatically to reach the optimal white balance according to the |
|
color of screen. |
||
|
Executing the EASY SETTING function
When all of the above mentioned functions are set to [ON] (However, [SCREEN FIT] is set to [FULL] or [ORIGINAL]), the adjustment orders are as follows.
1)Project an image.
2)Adjust the zoom ring so that the image is larger than the screen frame.
3)Press the <EASY SETTING/CANCEL> button on the control panel during projection.
ffA test pattern for [FOCUS ASSIST] appears on the screen and the focus assist bar appears in the center bottom of the screen.
4)Rotate the focus ring until the bar changes to the maximum level.
ffThe focus assist bar will display different colors and different lengths according to the clarity of image.
Color |
State |
Red The projected image is turning unclear.
Yellow The projected image is turning clear.
Blue The projected image is optimal.
Length |
State |
|
Short |
The focus of the projected image is shifting |
|
greatly. |
||
|
||
Long |
The focus of the projected image is shifting |
|
slightly. |
||
|
||
Maximum |
The projected image is optimal. |
|
length |
||
|
Attention
ffWhen the EASY SETTING function is started, the focus assist bar does not display blue color, even if the focus adjustment is optimal. So readjust the focus with rotating the focus ring.
5)Press the <ENTER> button on the remote control or the control panel. ffThe adjustment image of [SCREEN FIT] appears.
Screen frame detected
If it detects a screen frame, the projected image is corrected to fit the screen frame automatically.
ENGLISH - 47

Chapter 3 Basic Operations - Projecting
Adjust the image to fit the screen according to the SCREEN FIT function's different states.
[FULL] |
The aspect ratio will change to fit the screen frame. |
[ORIGINAL] |
The aspect ratio will maintain to fit the screen frame. The image may be displayed with the left and right/ top |
and bottom parts cut off. |
Then the COLORBOARD function is activated to get an optimal image. [CORNER CORRECTION] appears and it can be adjusted manually if it is necessary (x page 66). It will exit without any operation in few seconds.
Screen frame undetected
If it does not detect a screen frame, the KEYSTONE function starts to work automatically and the keystone can be adjust horizontally and vertically.
Then the COLORBOARD function is activated to get an optimal image. [KEYSTONE] appears and it can be adjusted manually if it is necessary (x page 65). It will exit without any operation in few seconds.
The conditions of SCREEN FIT function to adjust the projected image as follows.
Items |
Conditions |
Projected image |
40" - 100" (after correction) |
Distance between projector and screen approx. 0.9 m to 3.5 m (when execute the keystone function, less than 2.5 m)
Correction angle |
approx. 20° right and left /approx. 30° up and down |
0.9 m ~3.5 m
20° |
20° |
30° |
|
Attention
ffIf the FOCUS ASSIST / SCREEN FIT / COLORBOARD function is working, please do not block some or all of the projected image to interfere with the projected image, such as putting things before the camera which is on the front of the projector body. Otherwise, the projected image will not be corrected properly.
Note
ff[SCREEN FIT] corrects the projected image when it detects two or more sides inside the projected area, and fits the detected frame.
ff[SCREEN FIT] may not work well in bright environments and the projected image is in low contrast. In this case, make the room darker, and then try executing [SCREEN FIT] again.
ffBecause [SCREEN FIT] uses a sensor, it may not work properly depending on the condition of the projection surface (deflections, patterns, and so on), the distance between projector and screen, or the effects of outside light such as fluorescent. In this case, make the adjustments manually.
ffIt is recommended to use a black frame screen when using SCREEN FIT function.
ffWhen the EASY SETTING function does not complete, [Projection situation is out of condition.] message will be displayed. Please reconfirm the setting status of the projector.
ffWhen the EASY SETTING function is executing, press the <EASY SETTING/CANCEL> button to exit, and then the next function will execute.
ffWhen the EASY SETTING function is executing, press the power <v/b> button to exit, and then return to the previous state of the running EASY SETTING function.
ffWhen the projector is mounted on a ceiling, do not use the EASY SETTING function. Otherwise it may not be adjusted correctly.
ffWhen the COLORBOARD function is executed, [PICTURE MODE] will be switched to [EASY SETTING] mode automatically. When you want to cancel the status of the running EASY SETTING function, please set from [EASY SETTING] mode to any other mode of [PICTURE MODE]. (x page 60)
ffWhen the SCREEN FIT function is executed, [KEYSTONE] or [CORNER CORRECTION] will be adjusted automatically. When you want to fine-tune the keystone or cancel the status of the running EASY SETTING function, please adjust [KEYSTONE] or [CORNER CORRECTION] manually. (x page 65)
48 - ENGLISH

Chapter 3 Basic Operations - Basic operations by using the remote control
Basic operations by using the remote control
Using the AUTO SETUP function
The automatic setup function can be used to automatically adjust the resolution, clock phase, and image position when analog RGB signals consisting of bitmap images such as computer signals are being input. Supplying images with bright white borders at the edges and high-contrast black and white characters is recommended when the system is in automatic adjustment mode.
Avoid supplying images that include halftones or gradation, such as photographs and computer graphics.
button
1) Press the <AUTO SETUP/CANCEL> button on the remote control.
Note
ffThe [CLOCK PHASE] may shift even if it has completed without any incident. In such cases, adjust the [POSITION] menu → [CLOCK PHASE] (x page 67).
ffAutomatic adjustment may not work depending on the model of the computer and the input signal. ffImages may be disrupted for a few seconds during automatic adjustment, but it is not a malfunction.
ffIf you press any button on the remote control during the automatic adjustment, the automatic adjustment will be canceled. ffIf the automatic setup function is used while moving images are being input, the adjustment may not be performed properly
even for an RGB signal that can use automatic setup.
Using the KEYSTONE button
You can correct the trapezoidal distortion that occurs when the projector is installed tilted or when the screen is tilted.
button
1)Press the <KEYSTONE> button to select [KEYSTONE] or press the <KEYSTONE> button again to select [CORNER CORRECTION].
ffThe [KEYSTONE] or [CORNER CORRECTION] individual adjustment screen is displayed.
2)Press asqw to adjust the item.
Note
ffFor more details, refer to the [POSITION] menu → [KEYSTONE] (x page 65).
Controlling the volume of the speaker
You can control the volume of the projector’s speaker or audio output.
ENGLISH - 49

Chapter 3 Basic Operations - Basic operations by using the remote control
 buttons
1)Press the <VOL -> button or <VOL +> button on the remote control. ffThis operation can be also performed using the qw buttons on the control panel.
<VOL -> |
Decreases the volume. |
<VOL +> |
Increases the volume. |
Using the FUNCTION button
Some operations in the menu can be assigned to the <FUNCTION> button on the remote control so that it can be used as an easy shortcut button.
button
1)Press the <FUNCTION> button on the remote control.
To assign functions to the <FUNCTION> button
1)Press the <MENU> button on the control panel or the remote control to display the menu items (main menu, sub-menu or details menu) you want to assign.
ffRefer to “Navigating through the menu” (x page 56) for the operation of the on-screen menu.
2)Press and hold the <FUNCTION> button for 3 seconds or more.
Note
ffAfter settings have been completed, the assigned menu item (main menu, sub-menu or details menu) will be displayed in [ASSIGNED FUNCTION] of the operation guide under the menu.
ffPerform the [PROJECTOR SETUP] menu → [FUNCTION BUTTON] (x page 81) when deallocating functions.
Switching the input signal
You can switch the input signals to project.
buttons
1)Press the <COMPUTER 1>, <COMPUTER 2>, <HDMI> or <VIDEO/S-VIDEO> button on the remote control.
ffYou can also press the <INPUT SELECT> button on the control panel.
<COMPUTER 1> Switch to COMPUTER1 input.
<COMPUTER 2> Switch to COMPUTER2 input.
<HDMI > Switch to HDMI input.
<VIDEO/S-VIDEO> Press this button to switch the input signal between VIDEO and S-VIDEO.
Using the MEMORY VIEWER function
It is possible to project the video and pictures which are stored in the USB memory when the USB memory inserted into the projector.
 button
1)Press the <MEMORY VIEWER> button on the remote control. ffSwitches the input to MEMORY VIEWER.
50 - ENGLISH
Chapter 3 Basic Operations - Basic operations by using the remote control
Note
ffIf you want to use this function, insert the USB memory directly into the <USB A/VIEWER> port. For details, please refer to " Memory Viewer function" (x page 116).
ffWhen [MIRRORING] or [Panasonic APPLICATION] is selected in [CONNECTION LOCK], [KEY NOT APPLICABLE] screen will be displayed (x page 92).
Using the MIRRORING function
The MIRRORING is a function to project the same images as the displayed images on the device with the projector. The MIRRORING function connects the Intel® WiDi / Intel® Pro WiDi / Miracast compatible device to the projector via wireless LAN.

 button
1)Press the <MIRRORING> button on the remote control. ffSwitches the input to MIRRORING.
Note
ffFor details, please refer to "About MIRRORING" (x page 123).
ffWhen [MEMORY VIEWER] or [Panasonic APPLICATION] is selected in [CONNECTION LOCK], [KEY NOT APPLICABLE] screen will be displayed (x page 92).
Using the Panasonic APPLICATION function
This function can be used to project still images or video to the projector through the supplied software "Wireless Manager ME6.3" with CD-ROM. In addition, the iOS application and Android application can also make it possible.
 button
1)Press the <Panasonic APP> button on the remote control.
ffSwitches the input to Panasonic APPLICATION, then the idle screen is displayed.
Panasonic APPLICAION idle screen
2)Press the <AUTO SETUP/CANCEL> button.
ffIf you select [SIMPLE] in [WIRELESS LAN], the SSID and KEY will be displayed.
Note
ffFor details, please refer to the "Operating Instructions-Wireless Manager ME6.3" in CD-ROM.
ffWhen [MEMORY VIEWER] or [MIRRORING] is selected in [CONNECTION LOCK], [KEY NOT APPLICABLE] screen will be displayed (x page 92).
ffFor details about how to use the application for iOS/Android, refer to the application guide described in the following URL.
[iOS support site] http://panasonic.net/avc/projector/ios/ [Android support site] http://panasonic.net/avc/projector/android/
Using the PAGE UP/PAGE DOWN buttons
Scroll back and forth when viewing files such as PowerPoint which are projected through Wireless Manager.
ENGLISH - 51

Chapter 3 Basic Operations - Basic operations by using the remote control
buttons
1) Press the <PAGE UP/PAGE DOWN> buttons on the remote control. Note
ffTo use these buttons, connect with Wired LAN or Wireless LAN, connect <USB B/DISPLAY> port of the projector and your computer with a USB cable.
Using the DIGITAL ZOOM function
(Only for still image-based computer (RGB) and still image-based HDMI signals input)
You can enlarge the center area. You can also change the location of the area to be enlarged.
buttons
1)Press the <D.ZOOM +> button or < D.ZOOM -> button on the remote control. ffThe moving screen is displayed.
ffThe [DIGITAL ZOOM] individual adjustment screen is displayed when executing the menu operation. For details, refer to [DISPLAY OPTION] → [OTHER FUNCTIONS] (x page 75).
ffYou can press the <RETURN> button to cancel the function.
rrButton functions during [DIGITAL ZOOM]
Operation menu |
Operation |
Adjustment |
Adjustment range |
|
Press the <D.ZOOM +> |
Increases magnification. |
|
|
button or w button. |
|
1.0 ~ 3.0 |
|
Press the <D.ZOOM -> |
Decreases magnification. |
|
|
|
||
|
button or q button. |
|
|
rrButton functions of moving screen
Operation menu |
Operation |
Adjustment |
|
Press the a button. |
The display position moves down. |
|
Press the s button. |
The display position moves up. |
|
Press the q button. |
The display position moves right. |
|
Press the w button. |
The display position moves left. |
ffWhen you have executed the operation of remote control directly, the individual adjustment screen is not be displayed and the operation menu of the moving screen is displayed. At this time, you can adjust the magnification by using the <D.ZOOM +> button or <D.ZOOM -> button on the remote control.
ABC
AB 
 ABC
ABC
 BC
BC
 E.g. When you press the w button, the display position moves to the left.
Note
ffMagnification can be set from 1.0x to 3.0x in 0.1 increments.
ffWhen press the <MENU> button during [DIGITAL ZOOM], the adjustment value of DIGITAL ZOOM will be cancelled. ffWhen the input signals change during [DIGITAL ZOOM], the adjustment value of DIGITAL ZOOM will be cancelled. ffWhen [DIGITAL ZOOM] is active, the FREEZE function is not available.
ffThe digital zoom function may not work properly for some still image-based signals.
52 - ENGLISH
 Loading...