


PV-840F
Table of contents
 Loading...
Panasonic
Video Cassette Recorder
Omni
viBlon
______
Operating Instructions
MODEL PV-840F
Pleaee read №eee netrucions carefuly before
•tttmptirM lo oonntcì. operate or adjust ttis
product, ftewe
Spamah Quick üee Guide • included. (Guía
para ripida oonaufta en eepaAoi eeti incUda.)
Quick Uaa Guida la on tha back covar.
112 30AM1
|aoQ^
For assistance, call 1-800*211-PANA(7262).
trinad, operate or
aave tfae manual.
1130
nor pfttm
CLOCK
As ENBfíGY STAAPPMiar.
Alazsushlta Eiecthc CoipofWÈon tH
Amsncs ho$ drtsrnmad #iar ana ptoduct
orpnduct modat mam ih$ EnEÑGY
STAfí^giMdetnesforortorgyoffeitney
|BtNI
TICSTAIF
Important Safeguards and Precautions
FOR YOUR SAFETY^EAD AND OUTDOOR ANTENNA INSTALLATION
FOR YOUR SAFETY, READ AND
RETAIN ALL SAFETY AND OPERATING
INSTRUCTIONS. HEED ALL WARNINGS
IN THE MANUAL AND ON THE UNIT
INSTALLATION
1 POWER SOURCE CAUTION
Operate only from a power source indicated on the unit or in
this manual, if necessaiy, have your Electric Utiiity Service
Company or Video Products Dealer verify the power source
in your home.
2 POLARIZED OR GROUNDING PLUG
As a safety feature, this Video product comes with either
a polarized power cord plug (one blade is wider than the
other), or a three-wire grounding type plug.
POLARIZED. PLUG_CAUTION:
This plug will only fit into an outlet one way. If you cannot
fully insert the plug, try reversing it. If it still will not fit,
have an electrician install the proper wall outlet.
Do not defeat the safety feature by tampering with the plug.
GROUNDING PLUG CAUTION:
This plug wilt only fit into a three-hole grounding outlet.
If necessary, have an electrician install the proper outlet.
Do not defeat the safety feature by tampering with the plug.
3 POWER CORD
Make sure power cords are routed so that they are not likely
to have anything rest on them, roll over them, or be in the
it also has either a polarized or grounded plug and that the
cords can be securely connected. Frayed cords, damaged
and should be replaced by a qualified service technician.
Overloaded outlets and extension cords are fire hazards and
4 DO NOT BLOCK VENTILATION HOLES
Ventilation openings in the cabinet release heat generated
during operation. If they are blocked, heat build-up inside the
damage to cassettes.
5 AVOID EXTREMELY HOT LOCATIONS OR
6 TO AVOID PERSONAL INJURY
liking Ui
ay of walking traffic. If an extension cord is used, make sure
af&
plugs, and damaged or cracked wire insulation are hazardous
should be avoided.
unit can cause failures that may result in a fire hazard or heal
For protection, follow these rules:
a. Never cover ventilation slots or the unit
while in use, or operate the unit when placed
on a bed, sofa, rug, or other soft surface.
b. Avoid built-in installation, such as a book case
or rack, unless proper ventilation is provided.
SUDDEN TEMPERATURE CHANGES
Do not place the unit over or near any kind of heater
or regulator, in direct sunlight, inside a closed vehicle, etc..
Do not move the unit suddenly between areas of extreme
temperature variation. If №e unit is suddenly moved from a
cold place to a warm place, moisture may condense in the
unit and on the tape.
• Do not place unsecured equipment on a sloping surface.
• Do not place this unit on any support
that is not firm, level, and adequately
strong. The unit could fall causing
serious injury to a child or adult and
damage to the unit.
• An appliance and cart combination
should be moved vrith care.
Quick stops, excessive force, and
uneven surfaces may cause the
appliance and carl combination to overturn.
• Carefully follow alt operating instructions and use
the manufacturer's recommended accessories when
operating this unit or connecting it to any other equipment.
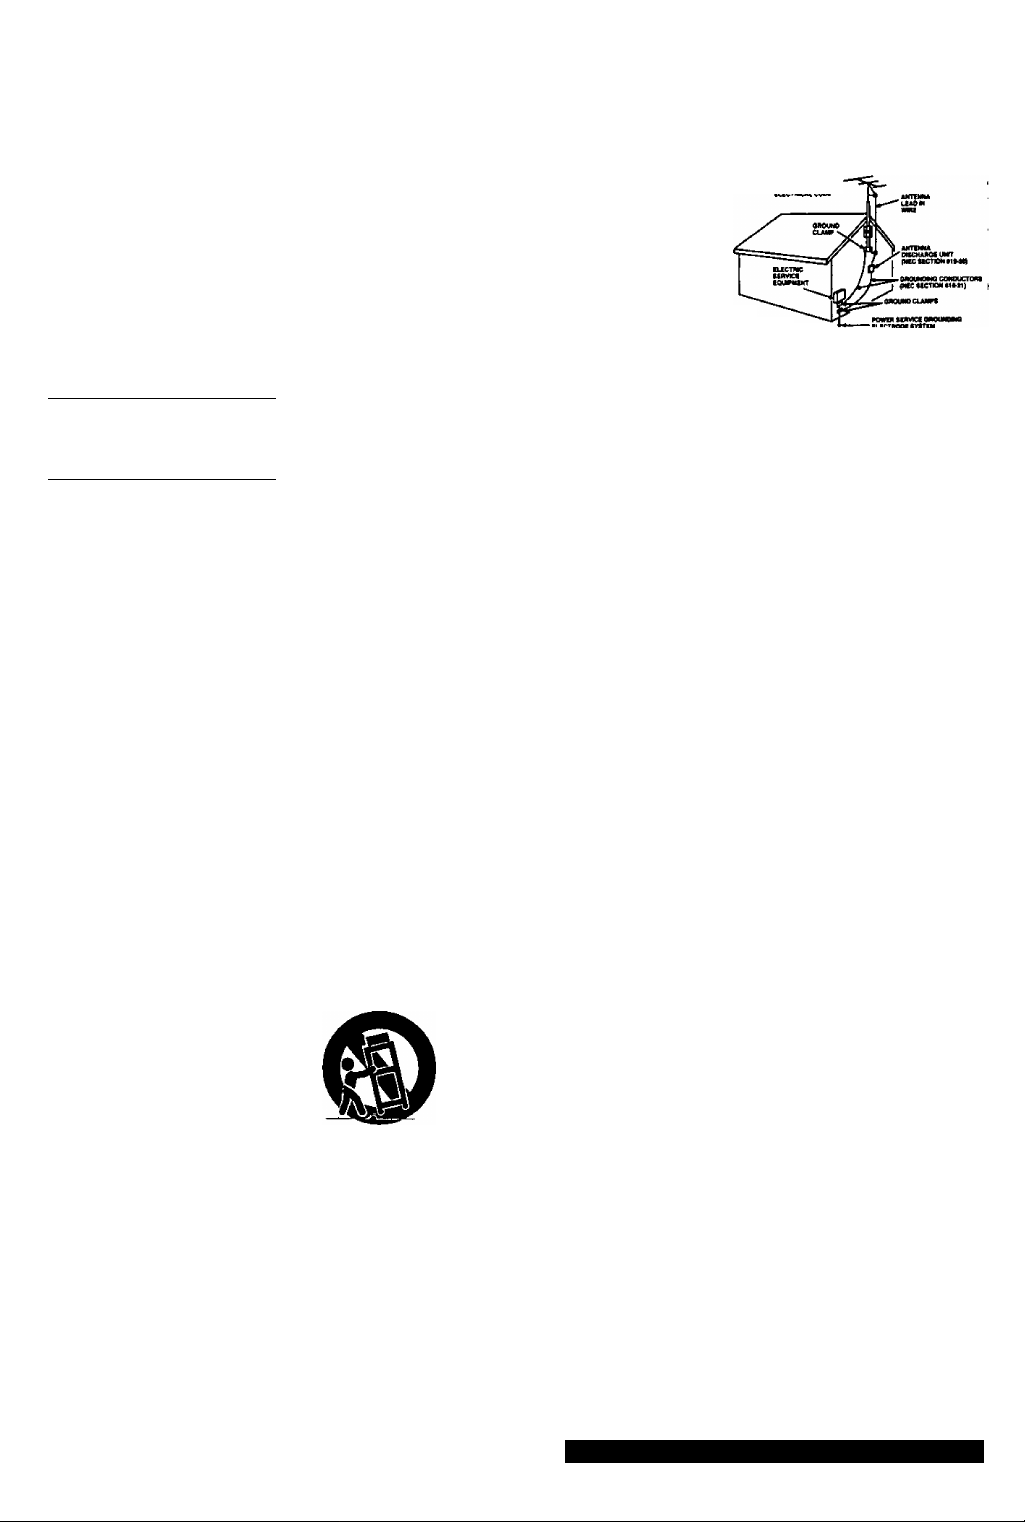
SAFE ANTENNA AND CABLE CONNECTION
If an outside antenna or cable system
is connected to the equipment,
be sure the antenna or cable system
is grounded so as to provide some
protection against built up static
charges and voltage surges.
Section 810 of the National
Electrical Code, ANSI/NFPA 70
(in Canada, part 1 of the Canadian
Electrical Code) provides information
with respect to proper grounding of the
mast and supporting structure, grounding
of the lead-in wire to an antenna discharge unit,
size of grounding conductors, location of antenna discharge unit, connection
to grounding electrodes and requirements for the grounding electrode.
piccjiffTm,purrH)
KEEP ANTENNA CLEAR OF HIGH VOLTAGE POWER LINES
OR CIRCUITS
An outside antenna system should be located welt away from power lines,
electric light or power circuits and where it will never come into contact with
these power sources if it should happen to fall. When installing an outside
antenna, extreme care should be taken to avoid touching power lines, circuits
or other power sources as this could be fatal. Because m the hazards
involved, antenna installation should be left to a professional.
USING THE VIDEO UNIT
If the unit has been in stor^e or moved to a new location,
refer first to the INSTALLATION section of these safeguards.
1 KEEP THIS VIDEO UNIT AWAY FROM WATER OR
MOISTURE OF ANY KIND.
2 IF EQUIPMENT IS EXPOSED TO RAIN, MOISTURE, OR
STRONG IMPACT, unplug the unit and have it inspected by a qualified
service technician before use.
3 DURING AN ELECTRICAL STORM
During a lightning storm, whether indoors or outdoors, or before leaving the
unit unused for extended periods of time, disconnect all equipment from the
power source as well as the antenna and cable system.
4 WHEN THE UNIT IS PLUGGED IN
• Never expose the unit to rain or water. DO NOT OPERATE
if liquid has been spilled into the unit. Immediately unplug the unit,
and have it inspected by a service technician, Fire and shock hazards
can result from electrical shorts caused by liquid contact inside.
• Never drop or push any object through openings in the unit. Some internal parts
carry hazardous voltages and contact can cause elecfric shock or fire hazard.
> Avoid placing the unit directly above or below your TV set as this may cause
electrical interference. Keep all magnets away from electronic equipment.
5 USING ACCESSORIES
Use only accessories recommended by the manufacturer to avoid risk of fire,
shock, or other hazards.
6 CLEANING THE UNIT
Unplug the unit. Then, use a clean, dry, chemically untreated cloth to gently
remove dust or debris. DO NOT USE cleaning fluids, aerosols, or forced air
that could over-spray, or seep into the unit and cause electrical shock.
Any substance such as wax, adhesive tape, etc. may mar the cabinet surface.
Exposure to greasy, humid, or dusty areas may adversely affect internal parts.
SERVICE
DO NOT SERVICE THIS PRODUCT YOURSELF
If, after carefully following the detailed operating instructions, this Video
product does not operate property, do not attempt to open or remove covers,
or make any adjustments not described in the manual.
Unplug the unit and contact a qualified service technician.
IF REPLACEMENT PARTS ARE REQUIRED
Make sure the sen/ice technician uses only parts specified by the manufacturer,
or those having the same safety characteristics as the original parts. The use of
unauthorized substitutes may result in fire, electric shock, or other hazards.
HAVE THE SERVICE TECHNICIAN PERFORM A SAFETY CHECK
After any service or repairs to the unit, request the service technician to
conduct a thorough safety check as described in the manufacture's service
literature to insure that the video unit is in safe operating condition.
Safety Precautions
Warning: To prevent fire or shock hazard, do not expose this equipment to rain or moisture.
This symbol warns the user that uninsulated voltage within the unit may have sufficient magnitude to cause
A
electric shock. Therefore, it is dangerous to make any kind of contact with any inside part of this unit.
This symbol alerts the user that important literature concerning the operation and maintenance of
nota ttnviCMl TO OlMLKD tlMCt iVnOMCl,
this unit has been included. Therefore, it should be read carefully in order to avoid any problems.
A
For assistance, cail 1-800-211-PANA(7262).

Table of Contents
Use
Now!^
Enjoy
more!
Important Safeguards and Precautions
.............................................
Accessories............................................................................................4
Loading the Batteries............................................................................4
Basic Connections (Antenna, VCR, TV)...............................................4, 5
One Time VCR Setup (Language, Channel, Clock)................................6, 7
Playback a Tape (Slow Motion, Stlll picture. Frame by Frame)
Record On a Tape
• One Touch Recording
\ Advanced Connections (Cabie/oss, AudioA/ideo)..............................................10,11
Timer Recording
/ • Timer Recording • Review, Replace or Clear
Using VCR Buttons
Multi-Brand Control Feature........................................................................14,15
Tape Operation.........................................................................................16-18
• VMS Index Search System.... 16, 17 • Zero Search ..............................18
• Auto Operation Functions
• Repeat Play...............................18
Copying Your Tapes (Dubbing)
Special VCR Features..............................................................................20 - 25
• Channel Caption
• Time Stamp..........................22, 23 • Weak Signal Display ON/OFF.. 25
• Remote Warning ON/OFF
....................................
..................
.......................................... ...............................................
.....................
..........
..................
.........
9
12 Program Contents
17 * One Minute Skip.........................18
..........................................................................
20, 21 • VCR Lock
24 • Auto Shut-Off
..............................................9
.........................................
..............................
................
12,13
......................
13
24
25
2
8
19
Other /
Information!
Reset Language, Channels, Clock
VCR & Cassette Information
• Reset all VCR Memory Functions.. 28 • Head Cleaning
• DST (Daylight Saving Time)
• Prevent Accidental Tape Erasure . 28 • Specifications.............................29
• Record/Playback Time....................28 • Features for Quality
...........
..............................................
........................................................
...........................
28 • Cleaning the VCR
......................
...................
26, 27
28, 29
29
29
29
On Screen Displays (OSD)..................................................................30
• Function & Channel Display.... 30 • Warning and
• VCR Status & Clock Display... 30 Instruction Displays
Before Requesting Service
Service Center List
..............................................................................
................................................................
..............................
32
31
32
Warranty................................................................................................33
Spanish (Español) Quick Use Guide...........................................34, 35
Location of Controls.....................................................................36, 37
Qujck Use Guide (Playback, Recording)
..................................
Back Cover
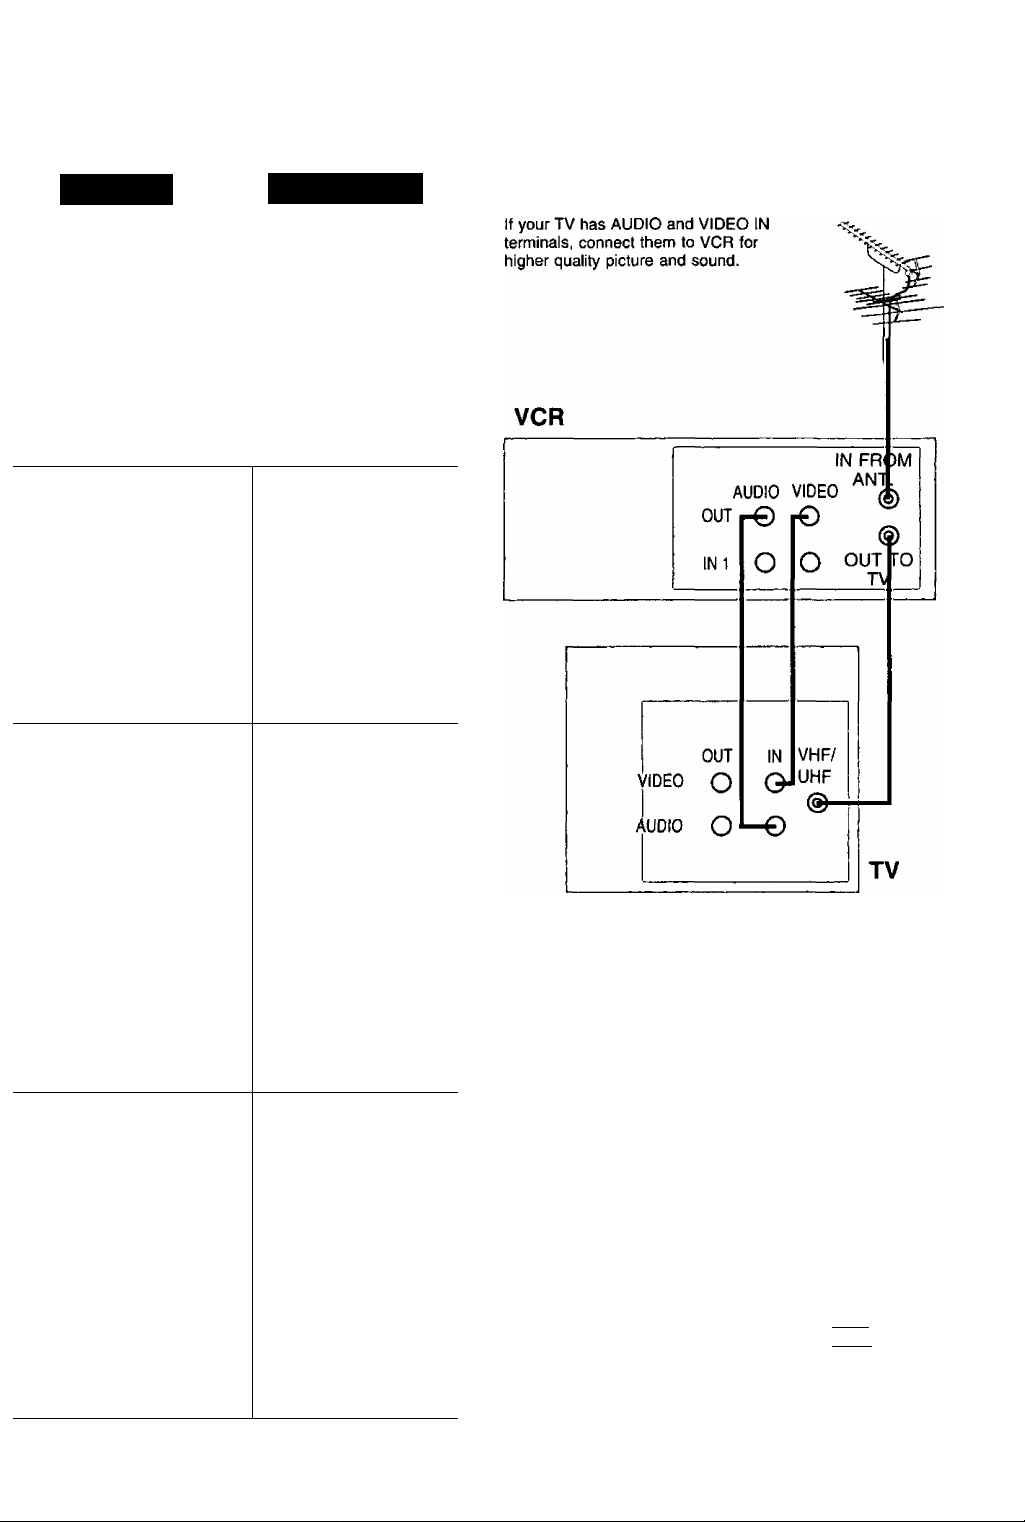
Before Using Basic Connection
Congratulations
on your purchase ot one of the most sophisticated and
reliable products on the market today. Used properly,
it will bring you and your family years of enjoyment.
Please fill in the information below. The serial number
is on the tag located on the back of your VCR.
ANTENNA
(See page 5)
• Date of Purchase
• Dealer Purchased From
• Dealer Address________________________
• Dealer Phone No.______________________
• Model No
•Serial No
____
_____
------------------------------------_______:_________
PV-84QF
Accessories
□ Remote Control
VSQS1560
□ Batteries 2 "AA”
^
___
□ RF Coaxial Cable
VJAS0196
)
To order accessories, call toll free
1-800-332-5368.
Loading the Batteries
1) Open the cover.
2) Insert the
batteries as
marked.
3) Close the cover.
r~l Battery replacement caution
♦ Do not mix old and new batteries.
• Do not mix alkaline with manganese batteries.
the same one you set in step 3.
-WARNING
When using “Nut type” RF coaxial cables, tighten with
fingers only. Overtightening may damage terminals.
For assistance, call 1-800-211-PANA(7262).
1 Between ANT, and VCR
2 Between VCR and TV
Case 1: Twin Lead Cable Only
To VCR Terminal
From Antenna
300-75 ohm
(Flat) Twin Lead
300 Ohm Cable
Case 2: Twin Lead & Coaxial Cables
T ransformer
(not supplied)
--------^____________
UHFA/HF Band Mixer
(not supplied)
^==£33
(Round) 75 Ohm
coaxial Cable
To VCR Terminal
Case 1: Screw & Plug Type Terminal
UHFA/HF Band
Separator
(not supplied)
RF Coaxial Cable
Case 2: Screw Type Terminal
75-300 ohm
Transformer
(not supplied)
=£33
Case 3: Double Screw Type Terminal
UHF/VHF Band
Separator
(not supplied)
VHF
UHF
TV
VHF
Case 3: Two Twin Lead Cables
-------------------
300-75 ohm
Transformer
(not supplied)
If your TV has both post and plug-type
VHF terminals, the post connection is
recommended to minimize signal loss.
To VCR Terminal
UHF
I Case 4: Complex TV Terminal
TERMINALS ON BACK OF TV SET
Split out
ANT2
Connect to one of the ANT terminals and
select the same antenna number on the TV.
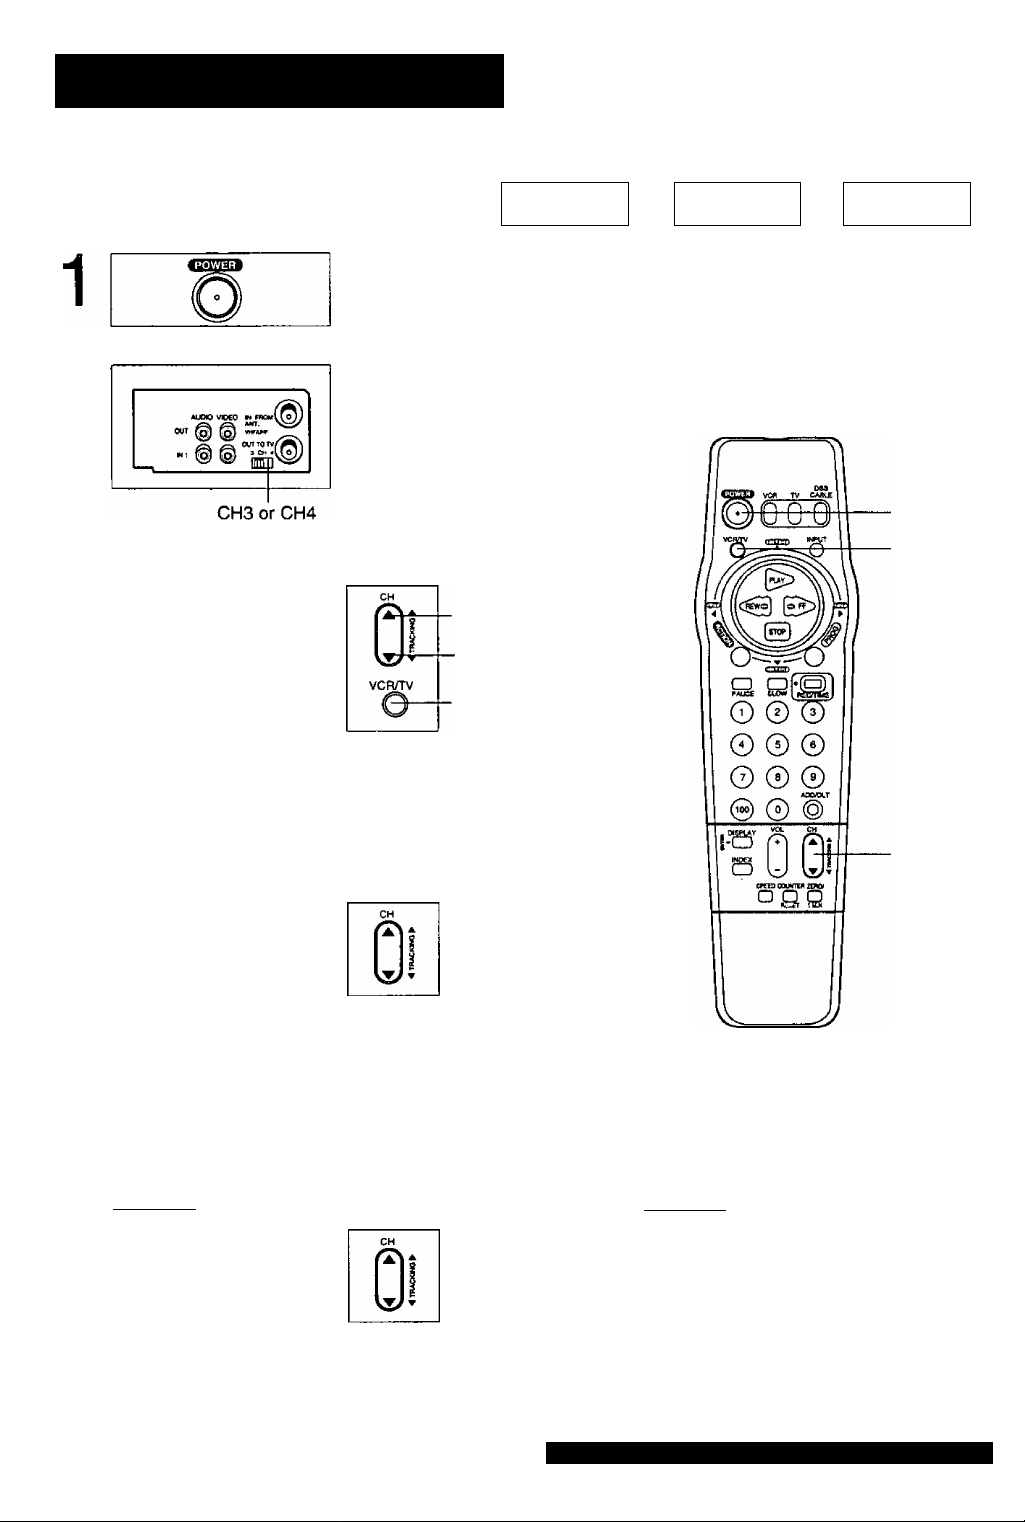
One Time VCR Setup
When VCR is turned on the first time,
setup mode is entered automatically.
Turn the TV and VCR on.
Press POWER.
Tune to VCR output channel.
2
SELECT LANGUAGE
3
PUSH VCR CH A: ENGLISH
OPRIMIR VCR CH T:ESPAÑOL
APP. VCR/TV : FRANÇAIS
(TV Screen)
Tune TV to CH3 or CH4.
(Same as back of VCR)
Always tune TV to this channel to
monitor the VCR.
If you used audio/video jack connection,
tune the TV to its video input.
Select the language.
Use remote or VCR buttons.
If wrong language is set, do
“Reset all VCR Memory Functions"
steps on page 28.
Process of Setup
IlÉIjSgJïEQS SGsiiiiM)
for English
for Spanish
(ESPAÑOL)
for French
(FRANQAIS)
o
1 POWER
3 VCR/TV
4
CHANNEL/CLOCK AUTO SET
CONNECT ANTENNA CABLE
AND IF YOU USE A CABLE
BOX, TUNE I T TO YOUR
LOCAL PBS CH THEN, . .
PLEASE PUSH CH UP KEY
CH AUTO SET PROCEEDING
0
AUTO CLOCK SET
PROCEEDING
( Case 1 ] ^ (Setup completed)
1/ 4/2000 TUE 12:00PM
SETTING : CH 02
AUTO CLOCK SET
COMPLETED
: PUSH CH UP KEY
END
OST:ON
Start Channel Auto Set and Clock Auto Set.
Press CH A.
Press CH A to exit.
• If your area observes
DST (daylight saving
time), but the time is
incorrect; do the
Time Zone Adjust"
steps on page 27.
[ Case 2 ] V {Setup incomplete)
AUTO CLOCK SET
IS INCOMPLETE
PUSH ACTION TO SET CLOCK
See next
page.
3CH AW
4
For assistance, call 1-800-211-PANA{7262]
[ Case 2) Clock Setup incomplete.
-
AUTO CLOCK SET
IS INCOMPLETE
PUSH
,
_____
SELECT MONTH
ACTION TO SET CLOCK
SELECT
A ▼ KEY
► KEY
SET
ACTION KEY
END
Set the clock manually.
-
• Likewise, set date, year, time,
To Make Corrections,
repeatedly press ► to move to
error, then correct.
------------
SET CLOCK
1/ 4/2000 TUE 12:00PM
ET COMPLETED
SET ► KEY
START :ACT ION KEY
-----------------
DST:ON
1) Press ACTION.
2) Press AW to
select month.
3) Press ► to set.
DST (Daylight Saving Time).
4) Press ACTION.
(Clock starts.)
• To exit this mode,
press ACTION
again.
SELECT/
SET
A:PLAY
▼ :STOP
◄ :REW
► ;FF
ACTION
VCR calendar is accurately maintained to
Dec. 31, 2096'11:59PM.
Channel auto set selects normal TV or Cable
channels depending on your VCR hookup.
IMPORTANT NOTE FOR AUTO CLOCK SET
• Auto clock set is performed the first time the VCR is turned off each day. If used, a cable box must be left on and
tuned to the PBS channel at the time VCR power is turned off if you want auto clock set to be done.
• If used, a DSS receiver must be turned off lor auto clock set.
• If Cable Box or DSS receiver is connected to VCR via Audio/Video jacks, an RF coaxial cable must also be
connected for auto clock set and channel auto set features.
--------
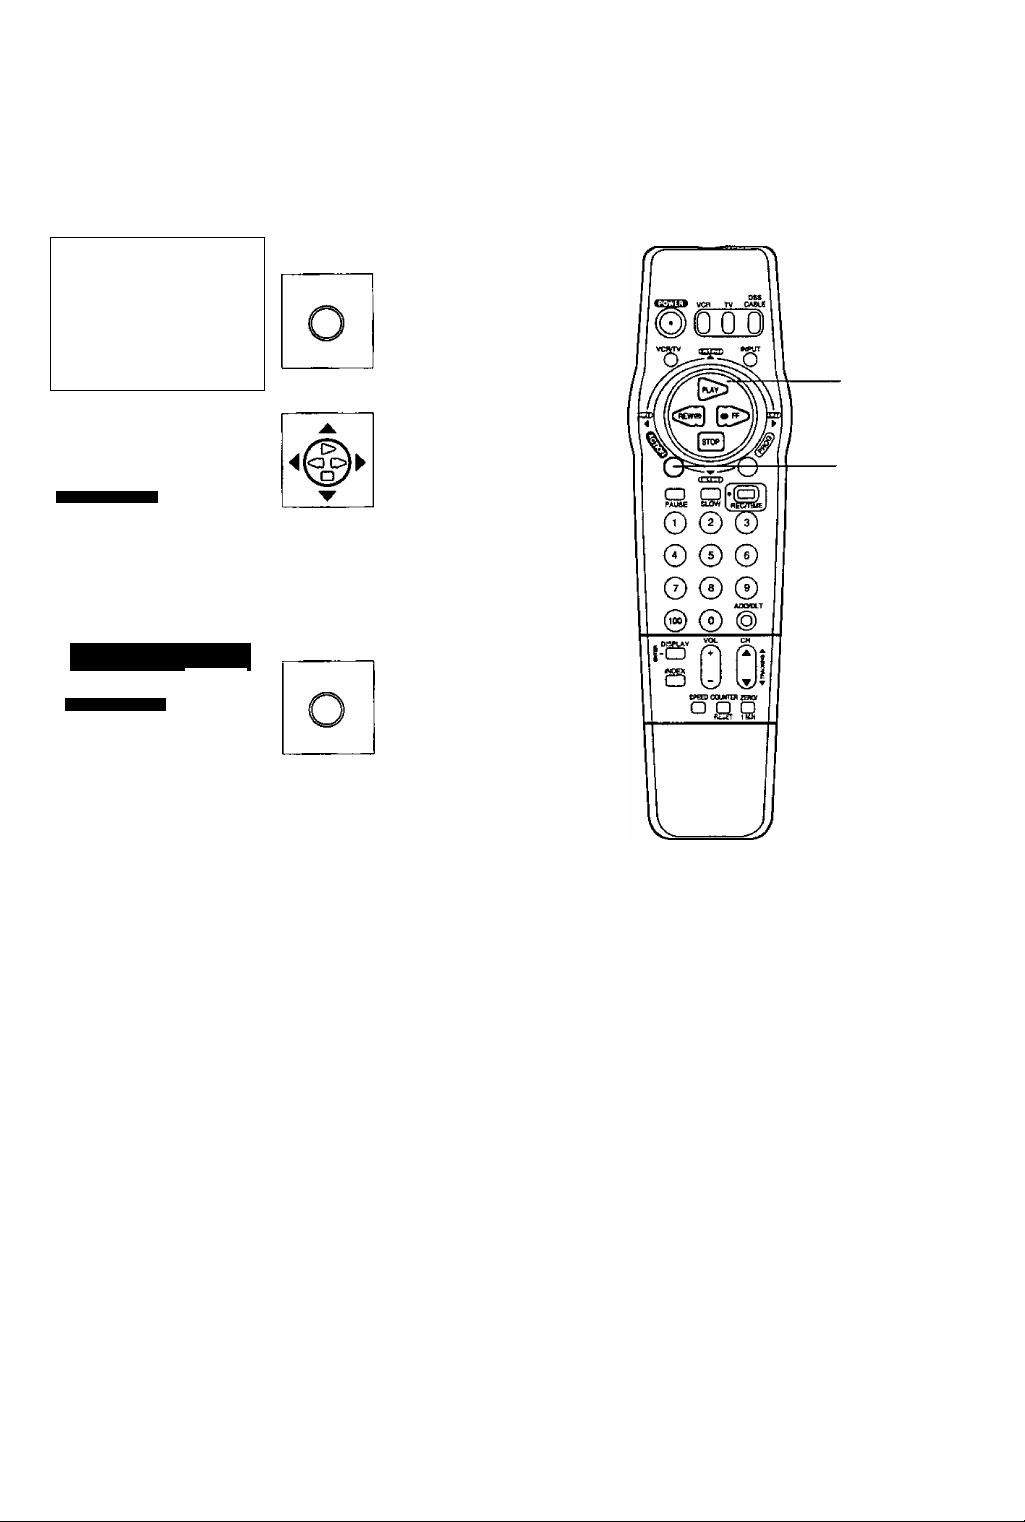
Using AWM ► keys —
You can also operate the menu screen
using VCR buttons.
If you use VCR buttons, press CH A and
CH T together to display the menu screen.
When menu screens are displayed, PLAY,
STOP, REWIND, and FF buttons function
as AW< ► only.
On Remote
^6^
On VCR
a: PLAY
▼: STOP
◄ : REW
► : FF
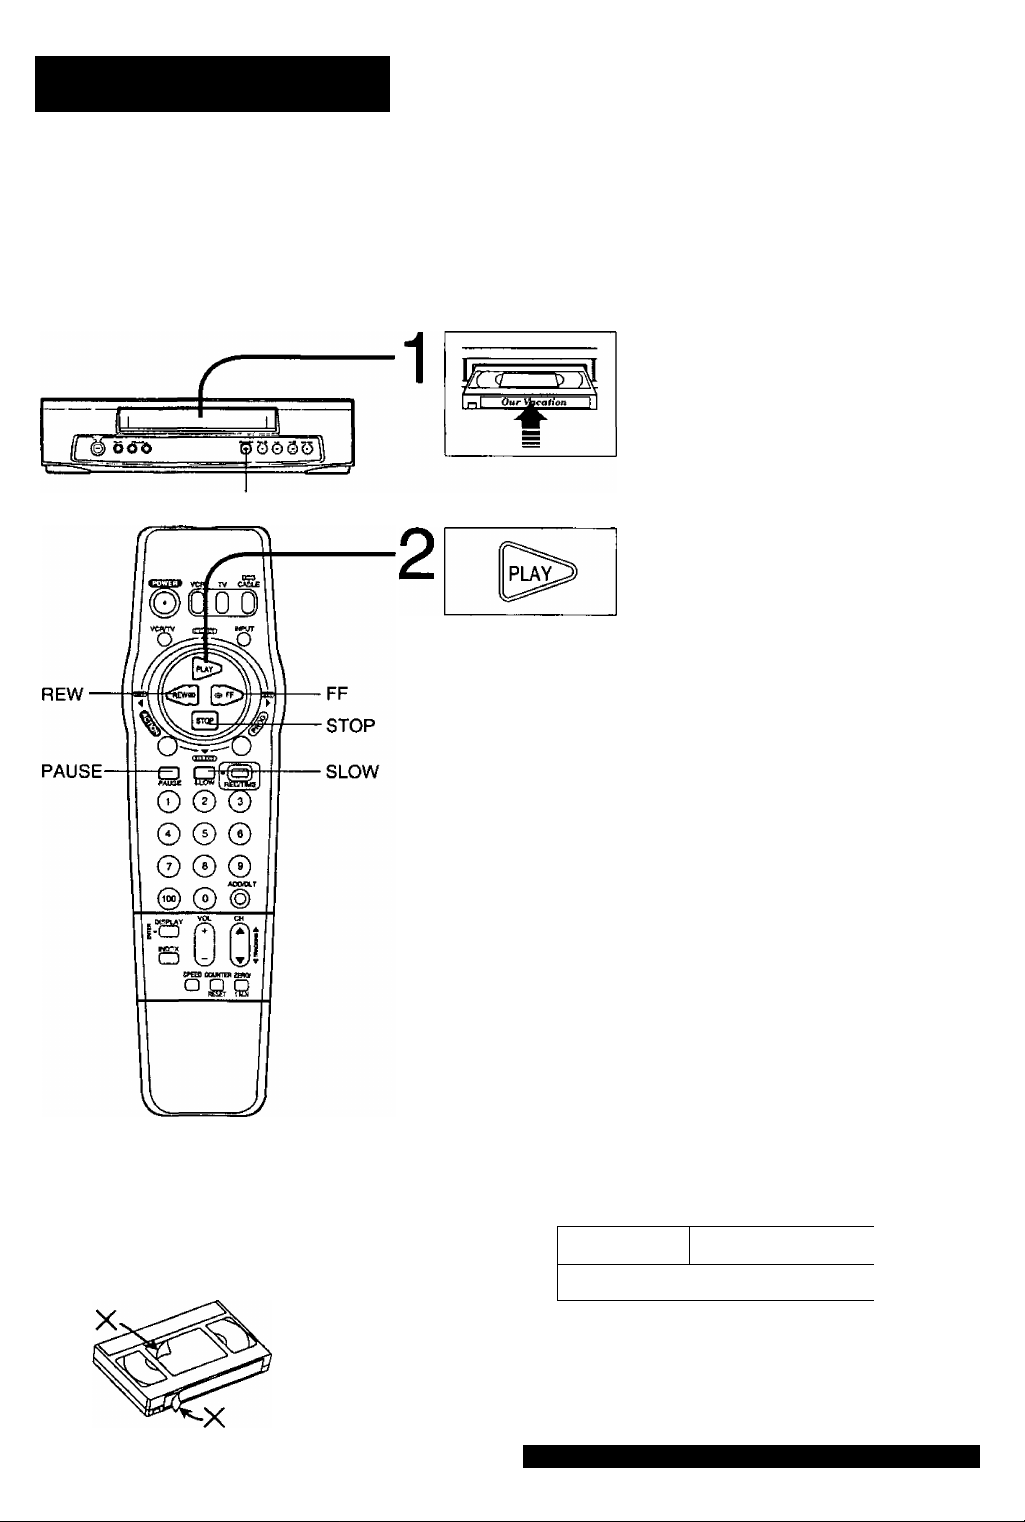
Playback a Tape
STOP/ EJECT
Check list before you begin.
D All connections are made.
□ TV and VCR are plugged in.
□ TV is turned on and set to the VCR channel (CH 3 or 4).
D Remote is in VCR mode.
Insert a cassette.
• VCR power comes on and VCR
appears on VCR display.
Press PLAY.
• Playback begins if cassette has
no record tab.
To Find a Particular Scene
Forward Search -> Press FF.
Reverse Search --> Press REW.
For Slow Motion --> Press SLOW.
(To release, press SLOW.)
For Still (Freeze) picture --> Press PAUSE.
(To release, press PAUSE.)
For Frame by Frame picture --> Press SLOW in Still mode.
(To release, press PAUSE.)
• To reduce picture noise, see "Manual Tracking Control" on
page 29.
• After the VCR is in Still or Slow mode for 3 minutes, it will
switch to Stop mode automatically to protect the tape and
the video head.
• To prevent tape jam
Inspect your cassette tapes and
remove any loose or peeling labels.
8
To Stop --> Press STOP.
To rewind tape --> Press REW in Stop mode.
To fast forward tape --> Press FF in Stop mode.
To eject tape --> Press STOP/ EJECT on the VCR.
Playback using VCR controls
11nsert a cassette.
2 Press PLAY.
--------------
u-------
{( ©5(yb
For assistance, call 1-800-211-PANA(7262).
n 7-^
Press to stop and/ or
eject tape.

Record On a Tape
*lmportant;
If the remote control POWER, ACTION,
PROG. CH A/V, INDEX, NUMBERED
keys, INPUT,or ADD/DLT button does not
work when pressed, press the VCR button
on the remote and try the button again.
Check list before you begin.
a"
Q All connections are made.
D TV is turned on and set to the VCR channel (CH 3 or 4).
□ Cassette with record tab in place.
Q Remote in VCR mode.
Insert a cassette.
• VCR power comes on
automatically.
Select Channel.
Press CH A/V* or NUMBERED keys.
•To select “LINE", see page 19.
• To select channels over 100,
first press 100 key, then enter
remaining two digits.
Select Recording speed.
(See page 28.)
Press SPEED.
• SP = Standard Play
LP = Long Play
SLP = Super Long Play
• Selected speed is displayed
on TV screen and VCR display.
After the VCR has been in Pause mode
for 5 minutes, it will stop automatically
to protect the tape and the video head.
Start Recording.
Press REC/TIME.
• To edit out unwanted portions,
press PAUSE to pause and
resume recording.
I To stop "> Press STOP.
I One Touch Recording
Press REC/TIME repeatedly to set the recording
length (30 min. - 4 hours).
• The VCR turns itself off at a preset time.
►Normal Rec—►0:30—►l:00-.v
(
4:00-*-3:00-*—2:00-^1:30
I Record One Program While Watching Another
Press VCR/TV--> “VCR” disappears on VCR display
--> Select Channel at the TV.
■ Selecting Channel at the VCR
Press VCR/TV"> “VCR” appears on VCR display
--> Select Channel at the VCR.
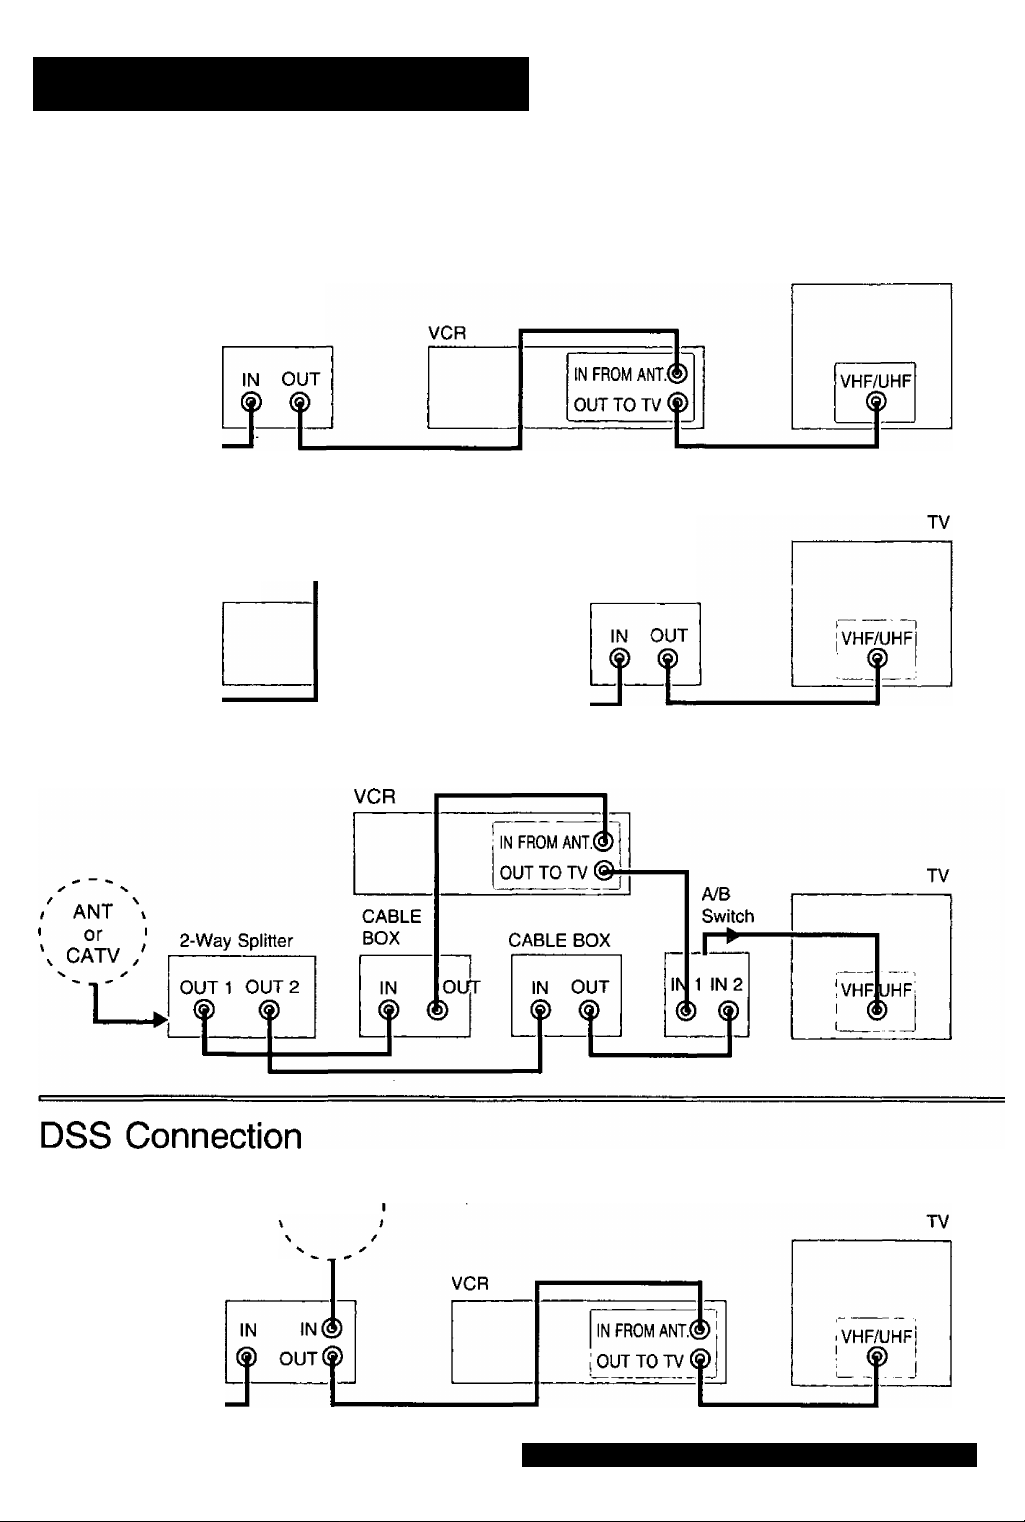
Advanced Connections
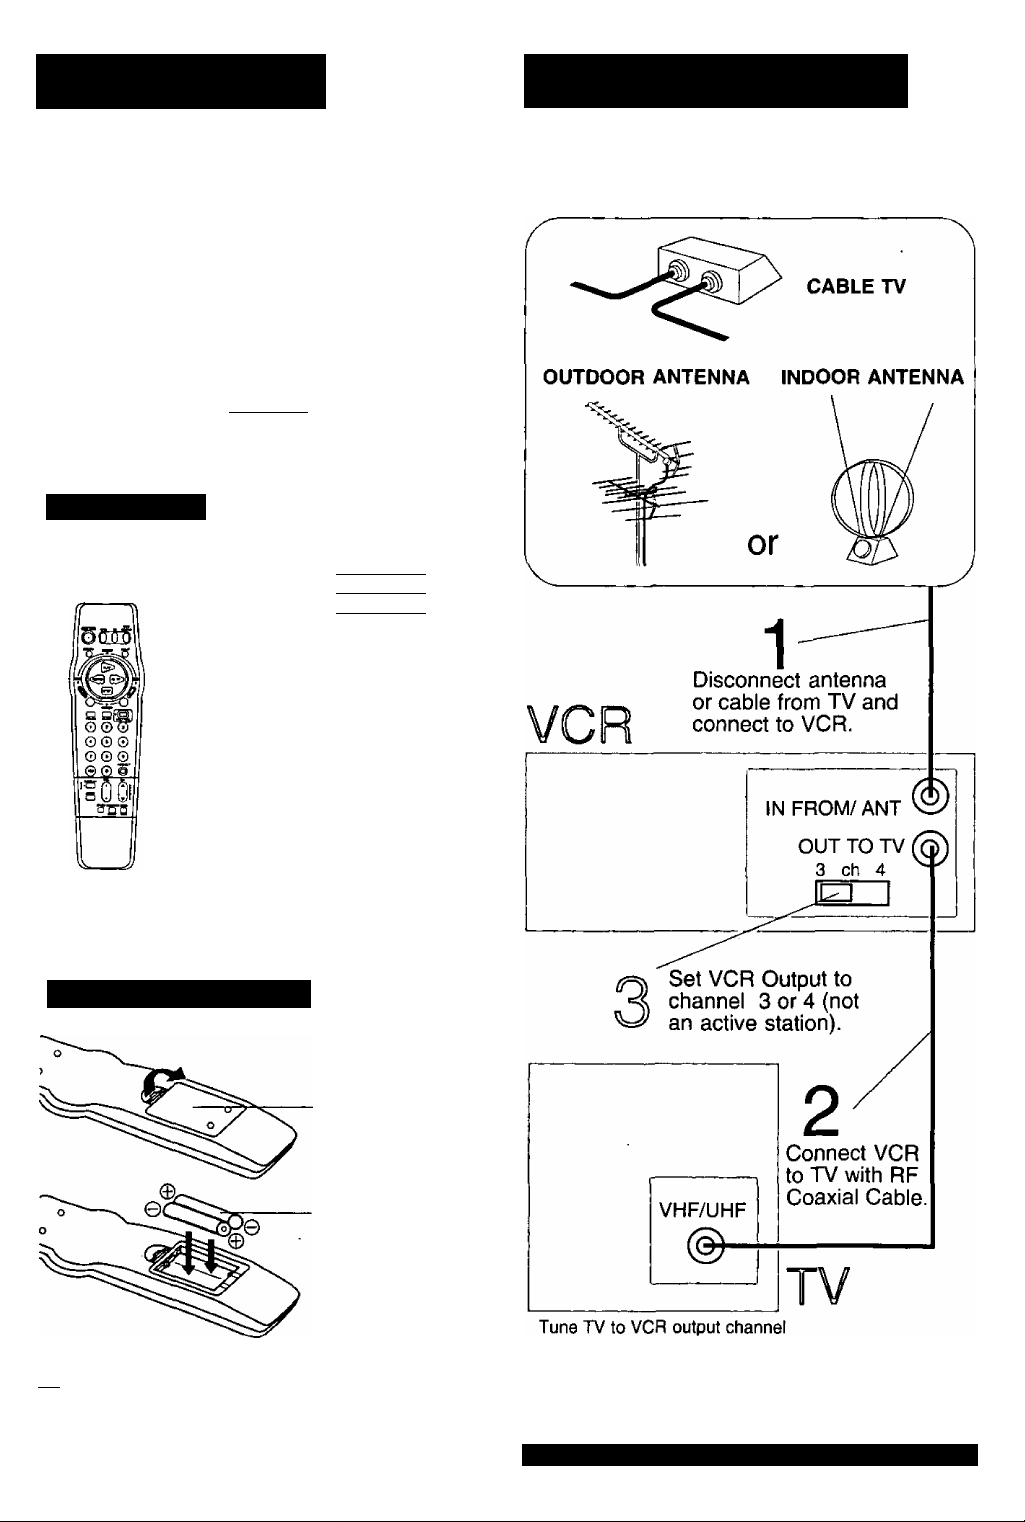
_ / ^ i- Make sure to tune TV to VCR output channel the same one you
CATV Connection set on back of VCR: CH3 or CH4.
All connections on these pages are made with 75 Ohm coaxial cables.
■ With a Cable Box (Cable Box^VCR)
/ ANT ,
I or I
\ CATV /
With a Cable Box (VCR^ Cable Box)
/' ant \
I or I
\ CATV !
With Two Cable Boxes
CABLE BOX
VCR
I
-- -- -- -- -- -- -
! IN FROM ANT.(
OUT TO TV
L '
TV
CABLE BOX
i
/ ANT \
I or I
V CATV /
10
■ SATELLITE
DSS
RECEIVER
For assistance, call 1-800-211-PANA(7262).
You Can
You Cannot
AudioA/ideo Connections
record or view any
(including scrambled)
channel.
use VCR Remote
Control to select
channels using Multi-
brand control feature.
• view any (including
scrambled) channel.
• use VCR Remote
Control to select
channels without
using Multi-brand
control feature.
• record and view both
scrambled and
unscrambled
channels if additional
equipment is added.
This connection
requires: two
converter boxes.
an A/B switch, and a
2-way splitter.
view channel
other than the one
selected for any
type of recording.
do a Timer
recording of a
channel unless you
select it at the
cable box.
• record scrambled
channels.
• view channel
other than the one
selected for any
type of recording.
• do a Timer recording
of a channel unless
you select it at the
cable box.
To use your TV as a VCR monitor, set the VIDEO/TV
selector on the TV (Monitor/Receiver) to “VIDEO."
• record and view any
(including scrambled)
channel.
• use your VCR
Remote Control to
select channels
using Multi-brand
control feature.
NOTE:
DSS receiver must be
turned off to view cable
box or antenna programs.
• view channel
other than the one
selected for any
type of recording.
• do a Timer recording
of a channel unless
you select it at the
DSS Receiver.
Note to CABLE system installer:
This reminder is provided to call the CABLE system
installer's attention to Article 820-40 of the NEC in USA
(and to the Canadian Electrical Code in Canada) that
provides guidelines for proper grounding and, in
particular, specifies that the cable ground shall be
connected to the grounding system of the building, as
close to the point of cable entry as practical.
FCC Warning: Any unauthorized changes or modifications
to this equipment would void the user's authority to operate.
This video recorder, equipped with the HQ (High
Quality) System, is compatible with existing VHS
equipment. Only use those tapes with the iVHSI
mark. It is recommended that only cassette tapes
that have been tested and inspected for use in 2,
4, 6, and 8 hour VCR machines be used.
11

Timer Recording
You can set up to 8 programs to be recorded while you are away.
Display menu. Display program
Press ACTION/ M O
You can also set up using
VCR buttons. See the bottom
right of this page.
^ \J 1) Press PROG.
_______
If a program is already in memory,
press AT and to select an
unused program number.
2) Go to step 4.
Check list before you begin.
(
Q All connections are made.
(See pages 4~5.)
□ TV and VCR are plugged in and turned on.
Q VCRyTV selector is set to “VCR."
Q Clock is set to correct lime.
□ Record tab in place. (See page 20.)
□ Remote in VCR mode.
--------------
MENU
2
3
4
SET UP VCR
SET UP FEATURE
SET CLOCK
SET UP CHANNEL
IDlOMA/LANGUE:ENGLISH
SELECT:* ▼ KEY
SET :► KEY
END : ACT
--------
TIMER PROGRAM
SET
END
qAteI/ start stop ch
I ON KEY
SET UP FEATURE ----------------
:► KEY
: ACTI ON KEY
7 FRI
T(DbAt\
category :N/A SLP
SELECT START DATE
SELECT;* ▼ KEY
SET :► KEY
END :PROG/ACTION KEY
Example ^8—9
Today — 7 SELECTA / T Selection Order DAILY
^ I I Channel (or LINE for
............
L WEEKLY WEEKLY WEEKLY outside source), Category“
(SA-n
Display SET UP FEATURE.
1) Press AT to select.
2) Press ► to display.
Display Program screen.
1) Press ► to display.
• If a program is already in
memory, press AT and
► to select an unused
program number.
Set the recording DATE.
1) Press AT to select.
2) Press ► or ◄ to set.
1-31 = One time
DAILY = MON-FRI
WEEKLY = Same time
31 —1— 2........6—^ Repeat step 4 to set:
.....
(MON) (SUN) tape speed (SP, LP, SLP).
once a week
7 POWER
SELECT/
OSET
^ A:PUY
T:STOP
5 ◄:REW
► :FF
1 PROG
5
6
1 ACTION
5
6
DATE START STOP
5
8 SAT 10:00P 12:00P 02
TODAY
CATEGORY:MOV IE
SET COMPLETED
WISH TO MAKE NOTES:* KEY
SET ► KEY
END :PR0G/ACT10N KEY
DATE START STOP
8 S AT 1 0: 00 P 12 :0 0P 02
TODAY
CATEGORY;MOV IE
NOTES :fl------------------
MAKE NOTES
SELECT:* ▼ KEY
SET :► KEY
END :PROG/ACTION KEY
-Important notes when using a DSS receiver-
12
Make the notes.
ABC
• If not wanted, go to step 6.
SP
1) Press A to begin.
2) Press AT to select.
3) Press ► to set.
• Characters will change in
the following order.
+ Z**BLANK«--^*&-—I
4) Press PROG (or
ACTION) to end.
ABC
CH
SP
Continued on the next page.
When recording programs via a DSS receiver, the DSS
receiver must be left on.
When recording programs via an antenna or cable, the DSS
receiver must be turned off.
For assistance, call 1-800-211-PANA(7262).
I --------
"Category Items
N/A(not applicable), SPORTS,
MOVIE, COMEDY, MUSIC, DRAMA
— Using AT"^ ► keys
'
You can also operate the menu screen
using VCR buttons.
If you use VCR buttons, press CH A and
CHT together to display the menu screen.
On Remote On VCR
When menu screens are displayed,
PLAY, STOP, REWIND, and FF buttons
function as AT^ ► only.
-----------------
A; PLAY
▼; STOP
◄ :REW
► : FF
Loading...