


Digital Video Camcorder
Operating Instructions
Models No. PV-GS19
PV-GS31
PV-GS35
(PV-GS35 Shown)
Before attempting to connect, operate or adjust this product, please read these instructions thoroughly.
Spanish Quick Use Guide is included.
Guía para rápida consulta en español está incluida.
For assistance, please call : 1-800-211-PANA(7262) or, contact us via the web at: http://www.panasonic.com/contactinfo
LSQT0886 A

Things You Should Know
Thank you for choosing Panasonic!
You have purchased one of the most sophisticated and reliable products on the market today. Used properly, we’re sure it will bring you and your family years of enjoyment. Please take time to fill in the information on the right.
The serial number is on the tag located on the underside of your Camcorder. Be sure to retain this manual as your convenient Camcorder information source.
Safety Precautions
Date of Purchase
Dealer Purchased From
Dealer Address
Dealer Phone No.
Model No.
Serial No.
WARNING :
TO PREVENT FIRE OR SHOCK HAZARD, DO NOT EXPOSE THIS EQUIPMENT TO RAIN OR MOISTURE.
Your 


 Camcorder is designed to record and play back in Standard Play (SP) mode and Long (LP) mode.
It is recommended that only cassette tapes that have been tested and inspected for use in Camcorders with the 


 mark be used.
This symbol warns the user that uninsulated voltage within the unit may have sufficient magnitude to cause electric shock. Therefore, it is dangerous to make any kind of contact with any inside part of this unit.
This symbol alerts the user that important literature concerning the operation and maintenance of this unit has been included. Therefore, it should be read carefully in order to avoid any problems.
The above markings are located on the appliance bottom cover.
2 |
For assistance, please call : 1-800-211-PANA(7262) or, contact us via the web at: http://www.panasonic.com/contactinfo |
|

Declaration of Conformity
Trade Name : |
Panasonic |
Model No. : |
PV-GS19/PV-GS31/PV-GS35 |
Responsibility Party : Panasonic Corporation of North America |
|
Address : |
One Panasonic Way Secaucus New Jersey 07094 |
Telephone Number : |
1-800-211-PANA(7262) |
This device complies with Part 15 of the FCC Rules. Operation is subject to the following two conditions: (1) This device may not cause harmful interference, and (2) this device must accept any interference received, including interference that may cause undesired operation.
FCC Note:
This equipment has been tested and found to comply with the limits for a Class B digital device, pursuant to Part 15 of the FCC Rules. These limits are designed to provide reasonable protection against harmful interference in a residential installation. This equipment generates, uses, and can radiate radio frequency energy and, if not installed and used in accordance with the instructions, may cause harmful interference to radio communications. However, there is no guarantee that interference will not occur in a particular installation. If this equipment does cause harmful interference to radio or television reception, which
can be determined by turning the equipment off and on, the user is encouraged to try to correct the interference by one or more of the following measures:
●Reorient or relocate the receiving antenna.
●Increase the separation between the equipment and receiver.
●Connect the equipment into an outlet on a circuit different from that to which the receiver is connected.
●Consult the dealer or an experienced radio/TV technician for help.
FCC Caution:
To assure continued compliance, follow the attached installation instructions and use only shielded interface cables when connecting to computer or peripheral devices.
Any changes or modifications not expressly approved by the party responsible for compliance could void the user’s authority to operate this equipment.
CAUTION:
TO PREVENT FIRE OR SHOCK HAZARD AND ANNOYING INTERFERENCE, USE THE RECOMMENDED ACCESSORIES ONLY.
CAUTION:
DANGER OF EXPLOSION IF BATTERY IS INCORRECTLY REPLACED. REPLACE ONLY WITH THE SAME OR EQUIVALENT TYPE.
•Since this product gets hot during use, operate it in well ventilated place; do not install this equipment in a confined space such as a bookcase or similar unit.
 WARNING
AS WITH ANY SMALL OBJECT, SD CARDS CAN BE SWALLOWED BY YOUNG CHILDREN. DO NOT ALLOW CHILDREN TO HANDLE THE SD CARD.
3

Important Safety Instructions
1)Read these instructions.
2)Keep these instructions.
3)Heed all warnings.
4)Follow all instructions.
5)Do not use this apparatus near water.
6)Clean only with dry cloth.
7)Do not block any ventilation openings. Install in accordance with the manufacturer’s instructions.
8)Do not install near any heat sources such as radiators, heat registers, stoves, or other apparatus
(including amplifiers) that produce heat.
9)Do not defeat the safety purpose of the polarized or grounding-type plug. A polarized plug has two blades with one wider than the other. A grounding type plug has two blades and a third grounding prong. The wide blade or the third prong are provided for your safety. If the provided plug does not fit into your outlet, consult an electrician for replacement of the obsolete outlet.
10)Protect the power cord from being walked on or pinched particularly at plugs, convenience receptacles, and the point where they exit from the apparatus.
11)Only use attachments/accessories specified by the manufacturer.
12)Use only with the cart, stand, tripod, bracket, or the table specified by the manufacturer, or sold with the apparatus. When a cart is used, use caution when moving the cart/apparatus combination to avoid injury from tip-over.
13) Unplug this apparatus during lightning storms or when it will be left unused for long periods of time.
14)Refer all servicing to qualified service personnel. Servicing is required when the apparatus has been damaged in any way, such as when the power-supply cord or plug is damaged, liquid has been spilled or objects have fallen into the apparatus, the apparatus has been exposed to rain or moisture, does not operate normally, or has been dropped.
4 |
For assistance, please call : 1-800-211-PANA(7262) or, contact us via the web at: http://www.panasonic.com/contactinfo |
|

Precautions
USE & LOCATION
 WARNING
●TO AVOID SHOCK HAZARD ... Your
Camcorder and power supply should not be exposed to rain or moisture. Do not connect the power supply or operate your Camcorder if it gets wet. Your Camcorder has been designed for outdoor use, however it is not designed to sustain direct exposure to water, rain, sleet, snow, sand, dust, or a direct splashing from a pool or even
a cup of coffee. This action could permanently damage the internal parts of your Camcorder.
Do not attempt to disassemble this unit. There are no user serviceable parts inside. Unplug your Camcorder from the power supply before cleaning.
 CAUTION
●DO NOT AIM YOUR CAMCORDER AT THE SUN OR OTHER BRIGHT OBJECTS
●DO NOT LEAVE THE CAMCORDER WITH THE EVF AIMED DIRECTLY AT THE SUN AS THIS MAY CAUSE DAMAGE TO THE INTERNAL PARTS OF THE EVF
●DO NOT EXPOSE YOUR CAMCORDER TO EXTENDED HIGH TEMPERATURE
... Such as, in direct sunlight, inside a closed car, next to a heater, etc... This action could permanently damage the internal parts of your
Camcorder.
●AVOID SUDDEN CHANGES IN TEMPERATURE ... If the unit is suddenly moved from a cold place to a warm place, moisture may form on the tape and inside the unit.
●DO NOT LEAVE YOUR CAMCORDER OR THE POWER SUPPLY TURNED ON WHEN NOT IN USE.
●STORAGE OF YOUR CAMCORDER ...
Store and handle your Camcorder in a manner that will not subject it to unnecessary movement (avoid shaking and striking). Your Camcorder contains a sensitive pick-up device which could be damaged by improper handling or storage.
CARE
●TO CLEAN YOUR CAMCORDER ... Do not use strong or abrasive detergents when cleaning your Camcorder body.
●TO PROTECT THE LENS ... Do not touch the surface of the lens with your hand. Use a commercial Camcorder lens solution and lens paper when cleaning the lens. Improper cleaning can scratch the lens coating.
●TO PROTECT THE FINISH OF YOUR CAMCORDER ... Before handling your
Camcorder, make sure your hands and face are free from any chemical products, such as suntan lotion, as it may damage the finish.
Apparatus Claims of U.S. Patent Nos. 4,631,603, 4,577,216, and 4,819,098, licensed for limited viewing.
This product incorporates copyright protection technology that is protected by method claims of certain
U.S. patents and other intellectual property rights owned by Macrovision Corporation and other rights owners. Use of this copyright protection technology must be authorized by Macrovision Corporation, and is intended for home and other limited viewing uses only unless otherwise authorized by Macrovision Corporation. Reverse engineering or disassembly is prohibited.
U.S.A. CONSUMERS: ATTENTION:
A lithium ion/polymer battery that is recyclable powers the product you have purchased. Please call 1-800-8-BATTERY for information on how to recycle this battery.
5

End User License Agreement (for USB Driver, Video Stream Driver and MotionDV STUDIO)
Before opening the CD-ROM package (PV-GS35 Only), please read the following.
You (“Licensee”) are granted a license for the Software defined in this End User Software Agreement
(“Agreement”) on condition that you agree to the terms and conditions of this Agreement. If Licensee does not agree to the terms and conditions of this Agreement, promptly return the Software to Matsushita Electric Industrial Co., Ltd. (“Matsushita”), its distributors or dealers from which you made the purchase.
Article 1 License
Licensee is granted the right to use the software, including the information recorded or described on the CD-ROM, instruction manuals, and any other media provided to Licensee (collectively “Software”), but all applicable rights to patents, copyrights, trademarks and trade secrets in the Software are not transferred to Licensee.
Article 2 Use by a Third Party
Licensee may not use, copy, modify, transfer or allow any third party, whether free of charge or not, to use, copy or modify the Software, except as expressly provided for in this Agreement.
Article 3 Restrictions on Copying the Software
Licensee may make a single copy of the Software in whole or in part solely for back-up purpose.
Article 4 Computer
Licensee may only use the Software on a single computer at a single location.
Article 5 Reverse Engineering, Decompiling or Disassembly
Licensee may not reverse engineer, decompile, or disassemble the Software, except to the extent either of them is permitted under law or regulation of the country where Licensee resides. Matsushita, or its distributors or dealers will not be responsible for any defects in the Software or damage to Licensee caused by Licensee’s reverse engineering, decompiling, or disassembly of the Software.
Article 6 Limitation of Liability
The Software is provided “AS-IS” without warranty of any kind, either expressed or implied, including, but not limited to, warranties of non-infringement, merchantability and/or fitness for a particular purpose.
Further, Matsushita does not warrant that the operation of the Software will be uninterrupted or error free. Matsushita or any of its distributors or dealers will not be liable for any damage suffered by Licensee arising from or in connection with Licensee’s use of the Software.
Article 7 Export Control
Licensee agrees not to export or re-export to any country the Software in any form without the appropriate export licenses under regulations of the country where Licensee resides, if necessary.
Article 8 Termination of License
The right granted to Licensee hereunder will be automatically terminated if Licensee violates any of the terms and conditions of this Agreement. Upon such automatic termination, Licensee must destroy the Software and related documentation together with all the copies thereof at Licensee’s own expense.
6 |
For assistance, please call : 1-800-211-PANA(7262) or, contact us via the web at: http://www.panasonic.com/contactinfo |
|

Differences between models
This operating instruction book is designed for use with models PV-GS19, PV-GS31 and PV-GS35. The PV-GS35 is the model used for illustrative purposes. Features may vary, so please read carefully.
Model Number |
PV-GS19 |
PV-GS31 |
PV-GS35 |
|
|
|
|
|
|
Battery Pack |
CGR-DU06 |
CGR-DU06 |
CGA-DU12 |
|
(Supplied) |
(640 mAh) |
(640 mAh) |
(1 150 mAh) |
|
CD-ROM |
– |
– |
Supplied (LSFT0618) |
|
|
|
|
|
|
Remote Control |
– |
– |
Supplied (LSSQ0992) |
|
|
|
|
|
|
USB Cable |
– |
– |
Supplied (K1HA05CD0010) |
|
|
|
|
|
|
|
f2.1–50.4 mm, F1.8–3.6 |
f1.9–49.4 mm, F1.8–3.3 |
f1.9–57 mm, F1.8–3.9 |
|
Lens |
(35 mm equivalent: |
(35 mm equivalent: |
(35 mm equivalent: |
|
39.5–948 mm), |
35.7–928 mm), |
35.7–1 072 mm), |
||
|
||||
|
24× zoom lens |
26× zoom lens |
30× zoom lens |
|
Digital Zoom |
50×, 800× |
50×, 1 000× |
50×, 1 000× |
|
Magnification |
||||
|
|
|
||
Viewfinder |
Electronic Viewfinder |
Liquid Crystal Color Electronic |
Liquid Crystal Color Electronic |
|
Viewfinder |
Viewfinder |
|||
|
|
|||
LED Video Light |
No |
Yes |
Yes |
|
|
|
|
|
|
S-Video Output |
No |
No |
Yes |
|
Jack |
||||
|
|
|
||
Microphone Jack |
No |
No |
Yes |
|
|
|
|
|
|
Remote Control |
No |
No |
Yes |
|
Sensor |
||||
|
|
|
How to Turn off the Demo Mode
To terminate the demonstration mode, insert a cassette or set the [  DEMO MODE] to [OFF] as follows.
1 Set [  SETUP] >> [
  DEMO MODE] >> [OFF].
7

Contents |
|
Before Using |
|
Things You Should Know.................................. |
2 |
Safety Precautions............................................ |
2 |
Precautions ....................................................... |
5 |
End User License Agreement ........................... |
6 |
Differences between models............................. |
7 |
Quick Guide .................................................... |
10 |
Standard Accessories ..................................... |
12 |
Parts Identification and Handling .................... |
12 |
The Remote Control (PV-GS35 Only)............. |
14 |
Power Supply.................................................. |
15 |
Charging Time and Available Recording Time |
|
........................................................................ |
16 |
How to remove the Sensor tag ....................... |
16 |
To Use as a Grip Belt...................................... |
16 |
Re-attaching the Lens Cap ............................. |
16 |
Attaching the Shoulder Strap .......................... |
17 |
Inserting a Cassette ........................................ |
17 |
Using a Memory Card (Optional) .................... |
18 |
Turning on the Camcorder .............................. |
18 |
Easy to Use Mode Dial ................................... |
19 |
How to Use the Joystick Control ..................... |
19 |
Using the Viewfinder/LCD Monitor.................. |
20 |
Using the Menu Screen .................................. |
21 |
Selecting Language ........................................ |
22 |
List of Menus................................................... |
22 |
Setting Date and Time .................................... |
24 |
Internal Lithium Battery Recharge .................. |
24 |
LP Mode.......................................................... |
24 |
Audio Recording Mode ................................... |
24 |
Recording Mode |
|
About Recording ............................................. |
25 |
Recording on a Tape ...................................... |
25 |
Recording a Still Picture on a Card |
|
(Photoshot) ................................................... |
26 |
Recording Yourself ......................................... |
27 |
Recording with the Built-in LED Video Light |
|
(For PV-GS31/PV-GS35).............................. |
27 |
Quick Start ...................................................... |
28 |
Self-timer Recording ....................................... |
28 |
Zoom In/Out Functions ................................... |
28 |
Digital Zoom Function ..................................... |
29 |
Image Stabilizer Function ............................... |
29 |
Fade In/Out Functions .................................... |
29 |
Backlight Compensation Function .................. |
30 |
MagicPix Function........................................... |
30 |
Soft-Skin Mode ............................................... |
31 |
Wind Noise Reduction Function...................... |
31 |
Cinema Function............................................. |
31 |
Recording in Special Situations |
|
(Scene Mode) ............................................... |
31 |
Recording in Natural Colors |
|
(White Balance) ............................................ |
32 |
Adjusting White Balance Manually.................. |
32 |
Manual Shutter Speed Adjustment ................. |
33 |
Manual Iris Adjustment (F Number) ................ |
34 |
Manual Focus Adjustment .............................. |
34 |
8 |
For assistance, please call : 1-800-211-PANA(7262) or, contact us via the web at: http://www.panasonic.com/contactinfo |
|

Playback Mode |
|
Playing Back a Tape ....................................... |
35 |
Finding a Scene You Want to Play Back ........ |
35 |
Slow Motion Playback (PV-GS35 Only).......... |
36 |
Still Playback/Still Advance Playback ............. |
36 |
Playing Back a Memory Card ......................... |
37 |
Slide Show ...................................................... |
37 |
Deleting the Files Recorded on a Card........... |
38 |
Writing Printing Data on a Card |
|
(DPOF Setting) ............................................. |
38 |
Protecting the Files on a Card |
|
(Lock Setting)................................................ |
39 |
Formatting a Card ........................................... |
39 |
Playing Back on Your TV ................................ |
40 |
Editing Mode |
|
Recording from a Tape onto a Card ............... |
41 |
Audio Dubbing (PV-GS35 Only) ..................... |
41 |
Copying onto a DVD Recorder or a VCR |
|
(Dubbing) ...................................................... |
42 |
Using the DV Cable for Recording |
|
(Digital Dubbing) ........................................... |
42 |
PC Connection With DV Interface Cable ........ |
43 |
With a PC |
|
|
Using Camcorder with a PC............................ |
|
44 |
Using the USB Driver...................................... |
|
44 |
To disconnect USB cable safely ..................... |
|
46 |
Using as a Web Camera................................. |
|
47 |
Using MotionDV STUDIO (PV-GS35 Only) .... |
52 |
|
If you no longer need software or driver |
|
|
(Uninstall)...................................................... |
|
55 |
Notes............................................................... |
|
55 |
Others |
|
|
Indications....................................................... |
|
57 |
Initializing the Modes ...................................... |
|
58 |
Warning/Alarm Indications .............................. |
|
58 |
Notes and Hints .............................................. |
|
59 |
Cautions for Use ............................................. |
|
63 |
Before Requesting Service |
|
|
(Problems and Solutions).............................. |
|
67 |
Using the RESET button................................. |
|
70 |
Explanation of Terms ...................................... |
|
70 |
Specifications.................................................. |
|
71 |
Camcorder Accessory System........................ |
|
72 |
Camcorder Accessory Order Form ................. |
|
73 |
Request for Service Notice ............................. |
|
74 |
Limited Warranty............................................. |
|
75 |
Customer Services Directory .......................... |
|
76 |
Spanish Quick Use Guide/ |
|
|
Guía Para Uso Rápido.................................. |
|
77 |
Guía rápida ..................................................... |
|
78 |
Index ................................................ |
Back Cover |
|
9
Before Using
Quick Guide
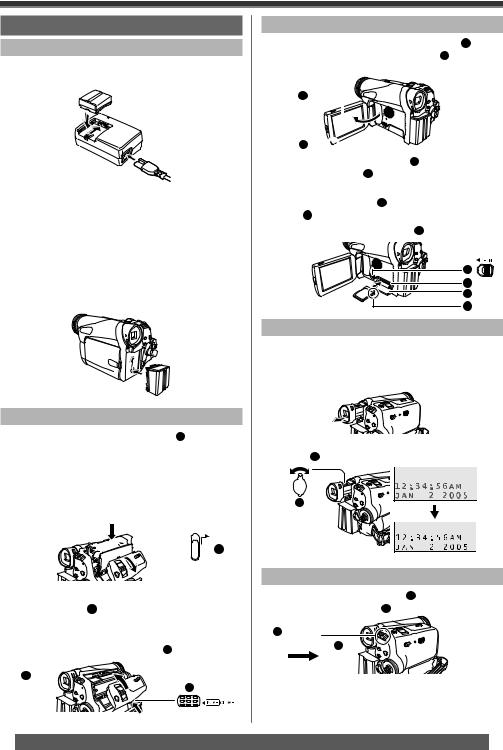
Using the Battery
1 Attach the Battery to the AC Adaptor and charge it.
•Before use, fully charge the Battery.
•Since the Battery will not be charged when the DC Cable is connected to the AC Adaptor, disconnect it from the AC Adaptor.
•The [CHARGE] Lamp lights up, and charging starts.
•When the [CHARGE] Lamp goes off, charging is completed.
2 Attach the charged Battery to the Camcorder.
Inserting a Cassette
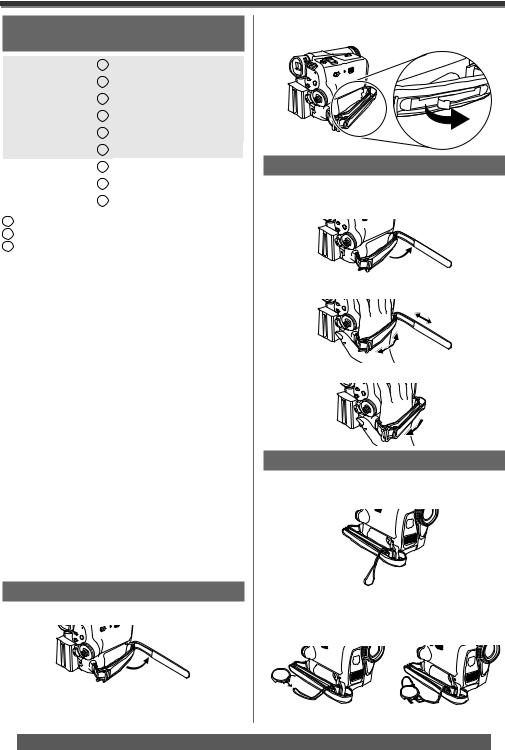
1 Slide the [OPEN/EJECT] Lever 1 toward the front and pull down to fully open the Cassette Compartment Cover.
•To protect the tape, if the cover is not fully opened, the cassette holder cannot be ejected.
2 After the Cassette Holder is opened, insert a Cassette.


 1
1
3 Close the Cassette Holder by pressing the [PUSH] mark 2 .
4 Only after the Cassette Holder is completely housed, close the Cassette Compartment Cover by pressing the mark 3 .
2 
 3
3
Inserting a Card
1 Place your Thumb on the [OPEN▼] 1 Knob and pull the LCD Monitor 2 out in the direction of the arrow.
2
1 
2 Slide the [◄OPEN] Lever 3 to open the Card Slot Cover 4 .
3 While holding the Memory Card with its cut corner facing right 5 insert it into the Card Slot 6 .
4 Close the Card Slot Cover 4 securely.
3
6
4
5
Using the Viewfinder
Before using the Viewfinder, adjust the field of view so that the displays inside the Viewfinder become clear and easy to read.
1 Pull the Viewfinder.
2 Adjust by turning the Eyepiece Corrector Knob 1 .
1
Recording on a Tape
1 Set the [OFF/ON] Switch 1 to [ON].
• The [POWER] Lamp 2 lights up.
1 


 2
2
10 |
For assistance, please call : 1-800-211-PANA(7262) or, contact us via the web at: http://www.panasonic.com/contactinfo |
|

Before Using
2 Set the Mode Dial to Tape Recording Mode.
3 Press the Recording Start/Stop Button.
• Recording starts.
4 Press the Recording Start/Stop Button again to pause the recording.
Recording a Still Picture on Card
(Photoshot)
1 Set the Mode Dial to Card Recording Mode.
2 Press the [PHOTO SHOT] Button.
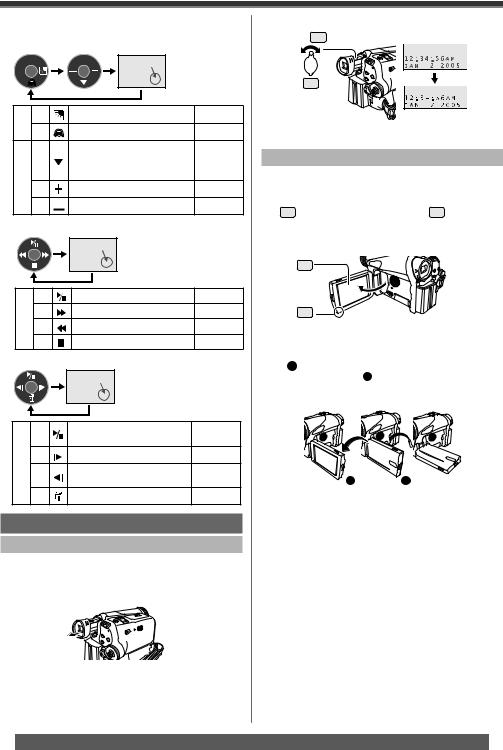
Playing Back a Tape
1 Set the [OFF/ON] Switch 1 to [ON].
• The [POWER] Lamp 2 lights up.
1 


 2
2
2 Set the Mode Dial to Tape Playback Mode.
•The One-Touch Navigation icon is displayed on the lower right of the screen.
[One-Touch Navigation icon]
3 Move the Joystick Control [◄] 3 to rewind the tape.
3
4 Move the Joystick Control [▲] 4 to start
playback.
4
5 Move the Joystick Control [▼] 5 to stop playback.
5
Playing Back a Card
1 Set the Mode Dial to Picture Playback Mode.
•The One-Touch Navigation icon is displayed on the lower right of the screen.
[One-Touch Navigation icon]
2 Start Playback.
Joystick Control [▲] : Starting the Slide Show Stop the Slide Show
Joystick Control [▼] : Erase the pictures Joystick Control [◄] : Playing back the previous
picture
Joystick Control [►] : Playing back the next picture
11
Before Using
Before Using
Standard Accessories
The followings are the accessories supplied with the Camcorder.
1)
PV-DAC14D K2GJ2DC00011 K2CA2CA00025
2) |
|
3) |
CGA-DU12 |
CGR-DU06 |
|
(PV-GS35 Only) |
(For PV-GS19/ |
K2KC4CB00020 |
|
PV-GS31) |
|
4) |
|
5) |
LSSQ0992 |
CR2025 |
LSFC0018 |
(PV-GS35 Only) |
|
6)
K1HA05CD0010 LSFT0618
(PV-GS35 Only) (PV-GS35 Only)
1) AC Adaptor, DC Cable and AC Cable (p. 15)
CAUTION:
This unit will operate on 110/120/220/240 V AC. An AC plug adaptor may be required for voltages other than 120 V AC. Please contact either a local or foreign electrical
parts distributor for assistance in selecting an alternate AC plug.
We recommend using the accessory power plug adaptor (VJSS0070/KZDB4ZE00001) in an area which has special AC outlets.
2)Battery Pack (p. 15)
3)AV Cable (pp. 40, 42)
4)Remote Control and Button-Type Battery (PV-GS35 Only) (p. 14)
5)Shoulder Strap (p. 17)
6)USB Cable and CD-ROM (PV-GS35 Only) (pp. 44, 46, 49, 54)
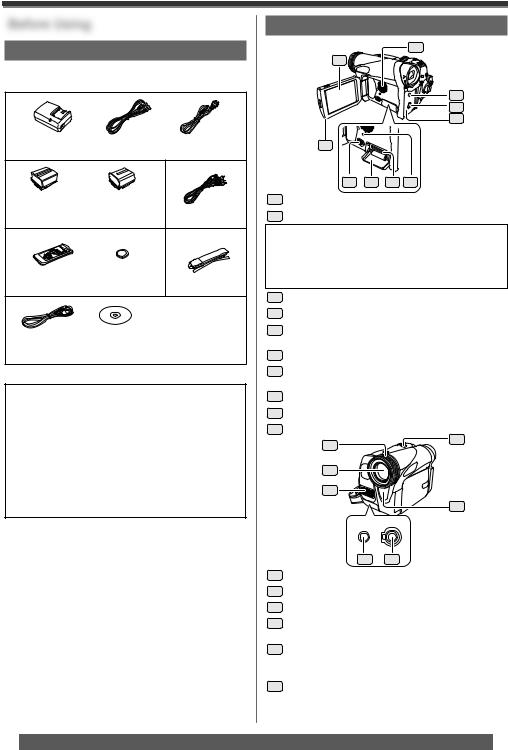
Parts Identification and Handling
Camcorder |
3 |
2 |
|
4
5
6
1
7 8 9 10
1LCD Monitor Open Knob [OPEN▼] (p. 20)
2LCD Monitor (pp. 20, 66)
Due to limitations in LCD production technology, there may be some tiny bright or dark spots on the LCD Monitor screen.
However, this is not a malfunction and does not affect the recorded picture.
3Speaker (p. 35)
4DC Input Jack [DC IN] (p. 15)
5S-Video Output Jack [S-VIDEO OUT] (PV-GS35 Only) (pp. 40, 42)
6Battery Holder
7Card Slot Cover Open Lever [◄OPEN] (p. 18)
8Card Slot Cover (p. 18)
9Card Slot (p. 18)
10 Card Access Lamp (p. 18)
11 |
14 |
|
12
13
15
MIC A/V
16 17
11Lens Hood (p. 66)
12Lens
13Microphone (built-in, stereo) (pp. 28, 31)
14Zoom Lever [W/T] (pp. 28, 29)
Volume Lever [–  / VOL +] (pp. 35, 37)
15White Balance Sensor (p. 33)
Remote Control Sensor (PV-GS35 Only) (p. 14)
16Microphone Jack [MIC] (PV-GS35 Only)
•When connecting an external microphone or audio equipment to this jack, the built-in microphone does not operate.
12 |
For assistance, please call : 1-800-211-PANA(7262) or, contact us via the web at: http://www.panasonic.com/contactinfo |
|

Before Using
17Audio-Video Output Jack [AV OUT] (pp. 40, 42)
•Connecting an AV Cable to this jack activates the Camcorder’s built-in speaker.
•When connecting the pin plug of the AV Cable to this jack, plug it in as far as it goes.
18
19
22
20 21
18Cassette Holder
19Cassette Compartment Cover (p. 17)
20USB Jack [ 
 ] (pp. 46, 49, 54)
21DV Input/Output Terminal (pp. 42, 43, 54)
• Connect this to the digital video equipment.
22Built-in LED Light
(For PV-GS31/PV-GS35) (p. 27)
24 25 26 27
28 |
32 |
|
23 |
||
33 |
||
29 |
||
|
34 |
30 |
35 |
|
|
31 |
|
23 Viewfinder (pp. 20, 66)
Due to limitations in LCD production technology, there may be some tiny bright or dark spots on the Viewfinder screen.
However, this is not a malfunction and does not affect the recorded picture.
24Eyepiece Corrector Knob (p. 20)
25Photoshot Button [PHOTO SHOT] (pp. 25, 26)
26Mode Selector Switch [AUTO/MANUAL/FOCUS] (pp. 25, 31~34)
27Cassette Eject Lever [OPEN/EJECT] (p. 17)
28Power Switch [OFF/ON] (pp. 18, 25)
29Quick Start Recording Button [QUICK START] (p. 28)
Quick Start Recording Lamp (p. 28)
30Menu Button [MENU] (p. 21)
31Recording Start/Stop Button (p. 25)
32Power Lamp [POWER] (p. 18)
33Light Button [LIGHT]
(For PV-GS31/PV-GS35) (p. 27)
34Mode Dial (p. 19)
35Joystick Control (pp. 19~20, 21)
36 37 38
40
39
36Shoulder Strap Holders (p. 17)
37Reset Button [RESET] (pp. 58, 67, 69, 70)
38Grip Belt (p. 16)
39Battery Eject Switch [BATTERY RELEASE] (p. 15)
40Tripod Receptacle
•This is a hole for attaching the Camcorder to optional tripod. (Please carefully read the Operating Instructions for how to attach the tripod to the Camcorder.)
•You cannot open the Card Slot Cover when the tripod is used. Insert the card first and then attach the tripod.
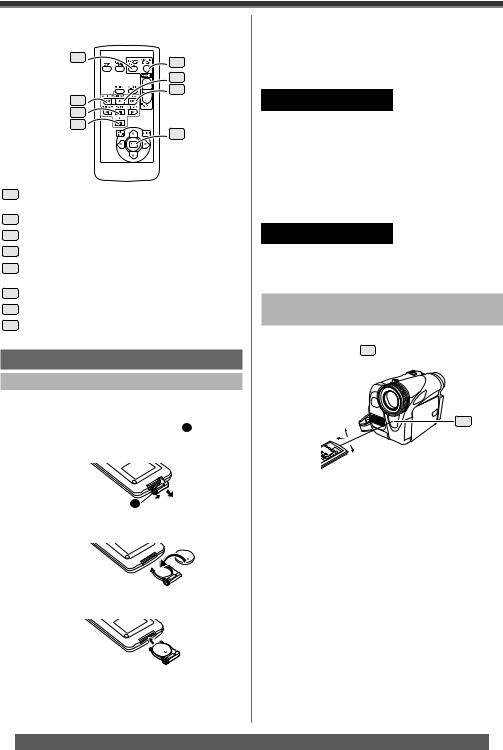
Remote Control (PV-GS35 Only)
Using the wireless Remote Control with the Camcorder, most of the Camcorder functions can be operated from a distance.
41 |
45 |
|
42 |
||
46 |
||
|


 47
47
43


44

 48
48
49
41Date/Time Button [DATE/TIME] (p. 58)
42Indication Output Button [OSD] (p. 40)
43Slow Motion/Still Advance Buttons [◄Ι, Ι►] (◄Ι: reverse, Ι►: forward) (p. 36)
44Variable Speed Search Button [VAR.SEARCH] (p. 36)
45Recording Button [● REC] (p. 43)
46Audio Dubbing Button [A.DUB] (p. 41)
47Zoom/Volume Button [ZOOM/VOL] (p. 35)
48Menu Button [MENU] (p. 22)
49Cursor buttons for Variable Speed Search Function [▲, ▼] (p. 36)
Select Button [▲▼◄►] (p. 22)
13
Before Using
The following buttons function in the same manner as the corresponding buttons on the Camcorder.
50 |
54 |
|
|
|
55 |
51 |
56 |
|
|
52 |
|
53 |
57 |
|
50Photoshot Button [PHOTO SHOT] (pp. 25, 26)
51Rewind/Review Button [◄◄] (p. 35)
52Pause Button [ 
 ] (pp. 36, 41, 43)
53Stop Button [■] (pp. 15, 43)
54Recording Start/Stop Button [START/STOP] (p. 25)
55Play Button [►] (pp. 36, 42)
56Fast Forward/Cue Button [►►] (p. 35)
57Enter Button [ENTER] (p. 22)
The Remote Control (PV-GS35 Only)
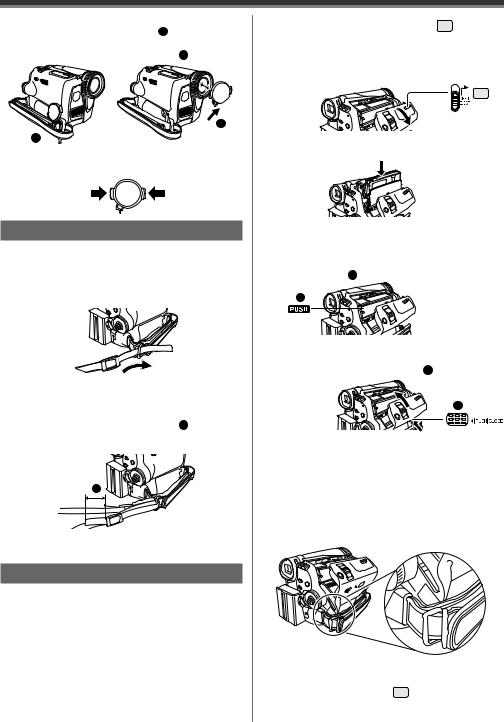
Inserting the Button-type Battery
Before using the Remote Control, insert the supplied button-type battery.
1 While pressing the Lock Button 1 , pull out the Battery Holder. Then, remove the button-type battery.
1 
2 Insert the button-type battery with the (+) marking facing upward.
3 Insert the Battery Holder into the Remote Control.
•When the button-type battery is exhausted, replace it with a new CR2025 battery. (A battery is normally expected to last about 1 year. However, it depends on operation frequency.)
•Make sure to match the poles correctly when inserting the button-type battery.
 WARNING
●Replace Battery with Panasonic or Lixing type CR2025 only. Use of another battery may present a risk of fire or explosion.
●Battery may explode if mistreated.
●As with any small object, this type of Battery can be swallowed by young children. Do not allow children to handle this Battery.
 CAUTION
●Dispose of used battery promptly.
●Do not recharge, disassemble or dispose of in fire.
Using the Remote Control
(PV-GS35 Only)
1 Direct the Remote Control at the Remote Control Sensor 15 of the Camcorder and press an appropriate button.
15° |
15 |
15°
 15° 15°
•Distance from the Camcorder: Within approximately 15 feet (5 meters)
•Angle: Within approximately 15° in the vertical and horizontal directions from the central axis
•The above operating ranges are for indoor use. Outdoors or under strong light, the Camcorder may not operate properly even within the above ranges.
Selecting Remote Control Modes
When 2 Camcorders are used simultaneously, they can be operated individually by selecting different Remote Control Modes.
•If the Remote Control Mode of the Camcorder and that of the Remote Control do not match with each other, [REMOTE] will appear. When the Remote Control is operated for the first time after the Camcorder is turned on, [CHECK REMOTE MODE] (p. 58) will appear and operation is impossible. Set the same Remote Control Mode.
14 |
For assistance, please call : 1-800-211-PANA(7262) or, contact us via the web at: http://www.panasonic.com/contactinfo |
|
Before Using
Setup on the Camcorder
Set [ REMOTE] on the [ |
SETUP] Sub-Menu to |
the desired Remote Control Mode. (pp. 22, 23) |
|
Setup on the Remote Control |
|
2 |
1 |
[VCR1]:
Press the [Ι►] Button and [ ■ ] Button simultaneously. 1
[VCR2]:
Press the [◄Ι] Button and [ ■ ] Button simultaneously. 2
•When the battery in the Remote Control is replaced, the mode is automatically reset to [VCR1] Mode.
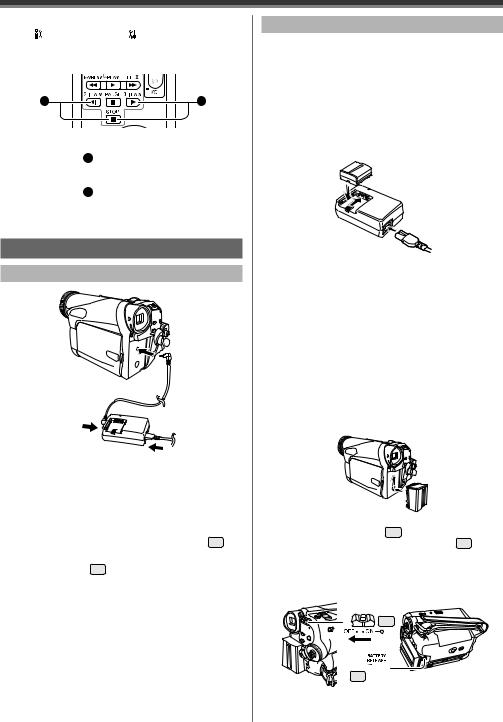
Power Supply
Using the AC Adaptor
1 Connect the DC Cable to the Camcorder.
2 Connect the DC Cable to the AC Adaptor.
3
•Before connecting or disconnecting the power supply, set the [OFF/ON] Switch 28 on the Camcorder to [OFF] and make sure that [POWER] Lamp 32 is not lit. (p. 18)
Using the Battery
Before use, fully charge the Battery.
•We recommend using a Panasonic Battery.
•We cannot guarantee the quality of this Camcorder when batteries from other companies are used.
1 Attach the Battery to the AC Adaptor and charge it.
2 Put the Battery on the Battery Mount by aligning the mark, and then securely plug it in.
•Since the Battery will not be charged when the DC Cable is connected to the AC Adaptor, disconnect it from the AC Adaptor.
•The [CHARGE] Lamp lights up, and charging starts.
•When the [CHARGE] Lamp goes off, charging is completed.
•When the battery is completely discharged, the [CHARGE] Lamp blinks at first, but the battery is charged normally. When the temperature of the battery is too high or low, the [CHARGE] Lamp blinks and the charging time becomes longer than usual.
3 Attach the charged Battery to the Camcorder.
Disconnecting the Power Source
Set the [OFF/ON] Switch 28 to [OFF], and while sliding the [BATTERY RELEASE] Switch 39 , remove the Battery downward or DC Cable.
•When attaching or removing Battery, set the [OFF/ON] Switch to [OFF] and make sure the [POWER] Lamp is not lit.
28
39 
•Hold down the battery with your hand so it does not fall.
•For other notes concerning this item, see page 59.
15
Before Using
Charging Time and Available
Recording Time
Supplied battery |
A |
1 h 40 min. |
|
(PV-GS19/PV-GS31) |
|
|
|
B |
1 h 45 min. (1 h 25 min.) |
||
CGR-DU06 |
|
|
|
C |
|
||
(7.2 V / 640 mAh) |
55 min. (45 min.) |
||
Supplied battery |
A |
2 h 25 min. |
|
(PV-GS35) |
B |
3 h 10 min. (2 h 35 min.) |
|
CGA-DU12 |
|||
C |
|
||
(7.2 V / 1 150 mAh) |
1 h 35 min. (1 h 20 min.) |
||
CGA-DU21 |
A |
3 h 55 min. |
|
B |
5 h 30 min. (4 h 30 min.) |
||
(7.2 V / 2 040 mAh) |
|||
C |
2 h 45 min. (2 h 15 min.) |
||
|
ACharging Time
BMaximum Continuous Recording Time
CIntermittent Recordable Time
(The intermittent recordable time refers to recordable time when the recording and stopping operations are repeated.)
•“1 h 40 min.” indicates 1 hour and 40 minutes.
•Battery CGR-DU06 (PV-GS19/PV-GS31) or CGA-DU12 (PV-GS35) is supplied.
•The times shown in the table are approximate times. The numbers indicate the recording time when the Viewfinder is used. The numbers in parentheses indicate the recording time when the LCD Monitor is used. In actual use, the available recording time may be shorter.
•The times shown in the table are for continuous recording at a temperature of 68 °F (25 °C) and humidity of 60 %. If the Battery is charged at a higher or lower temperature, the charging time may be longer.
•We recommend the Battery Pack CGA-DU12 and CGA-DU21 for long time recording (2 hours or more for continuous recording, 1 hour or more for intermittent recording.)
•The available recording time becomes shorter if you use both of Viewfinder and LCD Monitor simultaneously when rotating the LCD Monitor forward to record yourself.
•The batteries heat up after use or charging. The Camcorder being used will also heat up. This is normal.
How to remove the Sensor tag
1 Detach the end of the Grip Belt.
2 Remove the Sensor tag. Then, replace the Grip Belt.
To Use as a Grip Belt
Adjust the length of the Grip Belt to the size of your hand.
1 Detach the end of the Grip Belt.
2 Adjust the length of the Grip Belt to the size of your hand.
3 Reattach the Grip Belt.
Re-attaching the Lens Cap
To protect the Lens surface, attach the Lens Cap.
•The Lens Cap and Lens Cap Cord come preattached to the Grip Belt.
1 Pass one end of the Lens Cap Cord through the attached eye on the Lens Cap. Then pass the Lens Cap through the loop made by itself and pull tight.
16 |
For assistance, please call : 1-800-211-PANA(7262) or, contact us via the web at: http://www.panasonic.com/contactinfo |
|
Before Using
•When not using the Lens Cap, pull the Lens Cap Cord in the direction of the arrow. 1
•When you are not recording, be sure to cover the Lens with the Lens Cap for protection. 2
 2
2
1

•When you remove the Lens Cap, press the knobs firmly.
Attaching the Shoulder Strap
We recommend that you attach the Shoulder Strap before going out to avoid dropping the Camcorder.
1 Pull the end of the Shoulder Strap through the Shoulder Strap Holder on the Camcorder.
2 Fold the end of the Shoulder Strap, run it through the Shoulder Strap Length Adjuster, and pull it.
•Pull it out more than 1 inch (2 cm) 1 from the Shoulder Strap Length Adjuster so that it cannot slip off.
1
•Attach the other end of the Shoulder Strap to the other Shoulder Strap Holder in the same way.
Inserting a Cassette
•Please use Genuine Panasonic DVC Tapes for more information please contact your local dealer or visit www.panasonic.com.
•For your reference if you travel frequently you should also purchase a Panasonic head cleaning tape AY-DVMCLA and use when HEAD CLOG message appears on the LCD/EVF of your Camcorder.
1 Slide the [OPEN/EJECT] Lever 27 toward the front and pull down to fully open the Cassette Compartment Cover.
•To protect the tape, if the cover is not fully opened, the cassette holder cannot be ejected.
27
2 After the Cassette Holder is opened, insert a Cassette.
•When inserting a cassette, orient it as shown in the above, and then securely insert it as far as it goes.
3 Close the Cassette Holder by pressing the [PUSH] mark 1 .
1
4 Only after the Cassette Holder is completely housed, close the Cassette Compartment Cover by pressing the mark 2 .
2
When the Cassette Holder does not come out
•Close the Cassette Compartment Cover completely, and then open it again completely.
•Check if the battery has run down.
•Check if the Cassette Compartment Cover is in contact with grip belt as shown below. If so, be sure the grip belt stays clear of the cover when opening.
When the Cassette Holder cannot be housed
•Set the [OFF/ON] Switch 28 to [OFF], then to [ON] again.
•Check if the battery has run down.
17
Before Using
Accidental Erasure Prevention
Opening the accidental erasure prevention slider
1 on the cassette (by sliding it to the [SAVE] arrow direction) prevents recording. To enable recording, close the accidental erasure prevention slider (by sliding it to the [REC] arrow direction).
1
•For other notes concerning this item, see page 59.
Using a Memory Card (Optional)
A Card can be used to record still pictures.
•Use a genuine SD Memory Card or MultiMediaCard manufactured by Panasonic only.
Before inserting or removing a Card, be sure to turn off the Camcorder.
•Otherwise, the Camcorder may not function properly or it may cause the loss of recorded data in a Card.
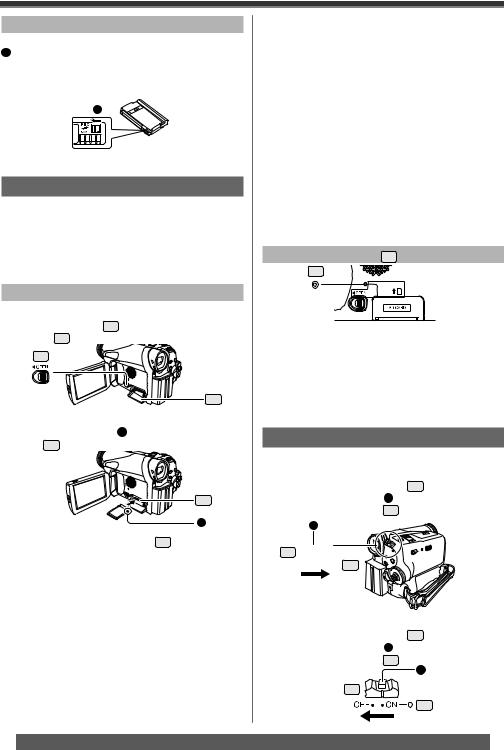
Inserting a Card
1 Open the LCD Monitor and then slide the [◄OPEN] Lever 7 to open the Card Slot Cover 8 .
7
8
2 While holding the Memory Card with its cut corner facing right 1 , insert it into the Card Slot 9 .
9
1
3 Close the Card Slot Cover 8 securely.
Removing the Card
Open the Card Slot Cover and press the center of the Card and then pull it straight out.
•After removing the Card, close the Card Slot Cover.
•The Camcorder may be damaged if the Card is forced out when the Card is fully inserted.
Concerning the Card
•Do not touch the terminals on the back of the card.
•Do not format the card with another Camcorder or any personal computer. This operation may make the card unusable.
•Electrical noise, static electricity, or failure of the Camcorder or the card may damage or erase the data stored on the card. We recommend saving important data on a personal computer by using a USB Cable, PC Card Adaptor, or USB Reader/ Writer.
SD Memory Card
•The memory capacity indicated on the SD Memory Card label corresponds to the total amount of capacity to protect and manage the copyright and the capacity available as
conventional memory for a Camcorder, personal computer or other equipment.
Card Access Lamp 10
10
While the Camcorder is accessing the Card (reading, recording, playback or erasing), the Card Access Lamp lights up.
•While the Card Access Lamp is on, never attempt to open the Card Slot Cover, to pull out the Card, to turn off the Camcorder, or to turn the Mode Dial. Such actions will damage the Card, and recorded data, and cause the Camcorder to malfunction.
Turning on the Camcorder
Turn on the power first and then select modes.
How to Turn on the Power
1 Set the [OFF/ON] Switch 28 to [ON] while pressing the button 1 .
• The [POWER] Lamp 32 lights up.
1
28 


 32
32
How to Turn off the Power
2 Set the [OFF/ON] Switch 28 to [OFF] while pressing the button 1 .
• The [POWER] Lamp 32 goes off.
1
28
32
18 |
For assistance, please call : 1-800-211-PANA(7262) or, contact us via the web at: http://www.panasonic.com/contactinfo |
|
Before Using
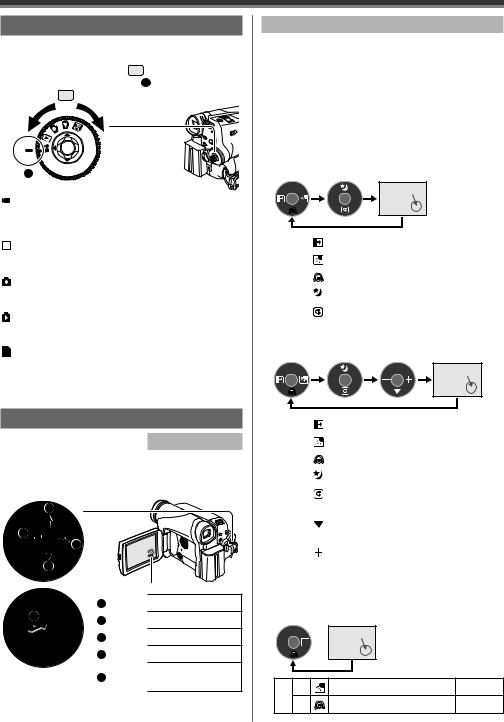
Easy to Use Mode Dial
You can choose a desired mode by rotating the Mode Dial.
1 Rotate the Mode Dial 34 .
• Set your desired mode to 1 .
34

 Joystick Control
(See below)
1
 : Tape Recording Mode
Use this mode when recording pictures on a tape. Also, you can record still pictures on the card simultaneously while recording on a tape.
 : Tape Playback Mode
Use this mode when playing back the recorded scene on a tape.
:Card Recording Mode
Use this mode when recording still pictures on a card.
:Picture Playback Mode
Use this mode when playing back the recorded still picture on a card.
 : PC Mode
Use this mode when you want to connect the Camcorder to your Personal Computer.
You can view or edit the images recorded on a card on your personal computer.
How to Use the Joystick Control
Basic Joystick Control Operations
Operations on the menu screen and selection of files to be played back on the multi-image display.
Move the Joystick Control [▲,▼,◄, or ►] to select an item or file, and then press in the center to set it.
1
4
 2 3
2 3
5
One-Touch Navigation icon
1Select by moving [▲].
2Select by moving [►].
3Select by moving [▼].
4Select by moving [◄]. Push the center to select
5the item.
Joystick Control and Screen Display
Press the center of the Joystick Control, and One-Touch Navigation icon will be displayed on the lower right of the screen. Each press switches the display as follows depending on the mode.
Move the Joystick Control [▲, ▼, ◄, or ►] to select an item.
•In the Tape Playback Mode or the Picture Playback Mode, the One-Touch Navigation icon will be automatically on the lower right of the screen.
Tape Recording Mode
•When the [AUTO/MANUAL/FOCUS] Switch is set to [AUTO].
|
One-Touch |
|
Navigation icon OFF |
1/2 |
2/2 |
|
◄ |
|
Fade |
pp. 29~30 |
1/2 |
► |
|
Backlight compensation |
p. 30 |
|
▼ |
|
Soft Skin Mode |
p. 31 |
2/2 |
▲ |
|
MagicPix Mode |
p. 30 |
▼ |
|
Recording Check |
p. 25 |
Tape Recording Mode
•When the [AUTO/MANUAL/FOCUS] Switch is set to [MANUAL].
|
|
One-Touch |
|
|
Navigation icon OFF |
1/3 |
2/3 |
3/3 |
|
◄ |
|
|
|
Fade |
pp. 29~30 |
1/3 |
► |
|
|
|
Backlight compensation |
p. 30 |
|
▼ |
|
|
|
Soft Skin Mode |
p. 31 |
2/3 |
▲ |
|
|
|
MagicPix Mode |
p. 30 |
▼ |
|
|
|
Recording Check |
p. 25 |
|
|
|
|
|
|
Manual Mode (White |
|
|
▼ |
|
|
|
Balance, Shutter Speed, |
pp. 32~34 |
3/3 |
|
|
|
|
Iris, Focus) |
|
◄ |
|
|
|
Adjust + |
pp. 32~34 |
|
|
|
|
|
|||
|
► |
|
|
|
Adjust – |
pp. 32~34 |
|
|
|
|
Card Recording Mode
•When the [AUTO/MANUAL/FOCUS] Switch is set to [AUTO].
One-Touch Navigation icon OFF
1/1 

1/1 |
► |
Backlight compensation |
p. 30 |
|
▼ |
Soft Skin Mode |
p. 31 |
19
|
|
|
Before Using |
|
|
Card Recording Mode |
|
2 Adjust by turning the Eyepiece Corrector |
|||
• When the [AUTO/MANUAL/FOCUS] Switch is |
Knob 24 . |
|
|||
set to [MANUAL]. |
|
|
|||
|
|
|
|||
|
|
One-Touch |
|
|
|
|
|
Navigation icon OFF |
|
|
|
1/2 |
32/32 |
|
|
|
|
|
|
|
|
24 |
|
1/2 |
► |
Backlight compensation |
p. 30 |
• You can adjust the brightness of the Viewfinder from |
|
|
▼ |
Soft Skin Mode |
p. 31 |
||
|
the Menu. |
|
|||
|
|
Manual Mode (White |
|
|
|
|
|
|
Using the LCD Monitor |
|
|
|
▼ |
Balance, Shutter Speed, |
pp. 32~34 |
|
|
2/2 |
|
Iris, Focus) |
|
With the LCD Monitor open, you can also record the |
|
◄ |
Adjust + |
pp. 32~34 |
picture while watching it. |
|
|
|
|
||||
|
1 Place your Thumb on the [OPEN▼] Knob |
||||
|
► |
Adjust – |
pp. 32~34 |
||
|
1 and pull the LCD Monitor 2 out in the |
||||
|
|
|
|
||
Tape Playback Mode |
|
direction of the arrow. |
|
||
|
|
One-Touch |
|
• The Viewfinder is now deactivated. |
|
|
|
|
• It can open up to 90°. |
|
|
|
|
Navigation icon OFF |
|
|
|
|
|
|
|
|
|
|
|
|
|
2 |
|
|
▲ |
Playback / Pause |
p. 35 |
|
|
– |
► |
Fast (Cue Playback) |
p. 35 |
1 |
|
|
◄ |
Rewind (Review Playback) |
p. 35 |
2 Adjust the LCD Monitor angle according to |
|
|
▼ |
Stop |
p. 35 |
||
|
the desired recording angle. |
||||
Picture Playback Mode |
|
• The LCD Monitor can rotate a maximum of 180° |
|||
|
|
|
|
1 from the vertical position upwards and a |
|
|
|
One-Touch |
|
maximum of 90° 2 to the downward direction. |
|
|
|
Navigation icon OFF |
|
||
|
|
|
|
Forcefully rotating the LCD Monitor beyond |
|
|
|
|
|
these ranges will damage the Camcorder. |
|
|
▲ |
Start the Slide Show |
p. 37 |
|
|
|
Stop the Slide Show |
|
|
||
|
|
|
|
|
|
– |
► |
Playback the next picture |
p. 37 |
|
|
|
◄ |
Playback the previous |
p. 37 |
1 180° |
2 90° |
|
picture |
||||
|
|
|
|||
|
▼ |
Erase the picture |
p. 37 |
• The brightness and color level of the LCD Monitor |
|
|
|
|
|
can be adjusted from the Menu. |
|
Using the Viewfinder/LCD Monitor |
• If it is forcibly opened or rotated, the Camcorder may |
||||
be damaged or fail. |
|
||||
|
|
|
|
|
|
Using the Viewfinder |
|
• Check that the Card Slot Cover is closed before |
|||
Before using the Viewfinder, adjust the field of view so |
closing the LCD Monitor. |
|
|||
• When the LCD Monitor is rotated by 180° towards |
|||||
that the displays inside the Viewfinder become clear |
the lens (when recording yourself), the LCD Monitor |
||||
and easy to read. |
|
and the Viewfinder will be simultaneously activated. |
|||
1 Pull the Viewfinder. |
|
Closing the LCD Monitor |
|||
|
|
|
|
Push the LCD Monitor until it is securely locked. |
|
|
|
|
|
• Make sure the Card Slot Cover is closed. |
|
20 |
For assistance, please call : 1-800-211-PANA(7262) or, contact us via the web at: http://www.panasonic.com/contactinfo |
|
Before Using
Adjusting Brightness and Color Level
When [  LCD SET] or [
 EVF SET] on the [
SETUP] Sub-Menu is set to [YES], the following items are displayed.
LCD SET |
|
EVF SET |
|
SET |
|
|
|
SETUP ENTER |
EXIT |
SET ENTER |
EXIT |
[  LCD SET] LCD Brightness [
  ]
]
Adjusts the brightness of the image on the LCD screen.
[  LCD SET] LCD Color Level [
  ]
]
Adjusts the color saturation of the image on the LCD screen.
[ 
 EVF SET] Brightness of the Viewfinder [
 ]
]
Adjusts the brightness of the image in the Viewfinder.
To Adjust
Move the Joystick Control [▲] or [▼] and select the item to be adjusted, and then move the Joystick Control [◄] or [►] to raise or lower the number of vertical bars in the Bar Indication.
•More vertical bars indicates stronger brightness or color saturation.
•In order to adjust the brightness of the Viewfinder, close the LCD Monitor, and the Viewfinder will be activated.
•These settings will not affect the images actually recorded.
•For other notes concerning this item, see page 66.
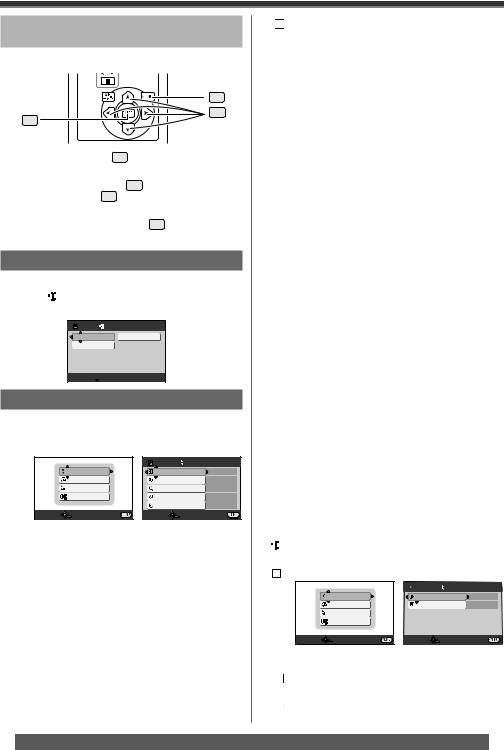
Using the Menu Screen
To facilitate the selection of a desired function or setup, this Camcorder displays various function setups on Menus.
1 Press the [MENU] Button 30 .
30
• The Menu corresponding to the Mode selected by the Mode Dial 34 is displayed.
•Do not switch the Mode Dial 34 when the Menu is displayed.
2 Move the Joystick Control [▲] or [▼] 35 to select the top menu.
|
|
BASIC |
|
|
|
|
ADVANCE |
|
|
|
|
SETUP |
|
|
|
|
LANGUAGE |
|
|
|
SETUP |
ENTER |
EXIT |
|
3 |
Move the Joystick Control [►] 35 or press |
|||
|
it to set the selection. |
|
|
|
4 Move the Joystick Control [▲] or [▼] |
35 to |
|||
|
select the Sub-Menu. |
|
|
|
|
|
BASIC |
|
|
|
SCENE MODE |
OFF |
|
|
|
REC SPEED |
SP |
|
|
|
BLANK SEARCH |
NO |
|
|
|
WIND CUT |
ON |
|
|
|
CLOCK SET |
NO |
|
|
|
SETUP |
ENTER |
EXIT |
|
5 |
Move the Joystick Control [►] 35 or press |
|||
|
it to set the selection. |
|
|
|
6 Move the Joystick Control [▲] or [▼] |
35 to |
|||
|
select the item to be set. |
|
|
|
|
BASIC |
|
SCENE MODE |
OFF |
|
REC SPEED |
|
|
BLANK SEARCH |
|
|
WIND CUT |
|
|
CLOCK SET |
|
|
SETUP |
ENTER |
EXIT |
7 Press the Joystick Control 35 to determine the setting.
•While a Menu is displayed, you cannot record or play back. Menus can be displayed during playback but not during recording.
To Return to the Previous Screen
Move the Joystick Control [◄] 35 .
To Exit the Menu Screen
Press the [MENU] Button 30 again.
About the Menu Mode Setting
The setting selected on the Menu will be retained even when the Camcorder is turned off. However, if the Battery or AC Adaptor is disconnected before turning off the Camcorder, the selected setup may not be retained.
• Menu operation flow is shown in this text by >>.
34
35
21
Before Using
Operating with Remote Control
(PV-GS35 only)
The menu screen transition is the same as when the buttons on the main unit are used.
48
49
57
1 Press the [MENU] 48 Button.
2 Select a menu item.
•Use the Select Button 49 (▲▼◄►) and [ENTER] Button 57 in place of the Joystick Control on the main unit.
3 Press the [MENU] Button 48 to exit the menu screen.
Selecting Language
You can select the desired language.
1 Set [ 

 LANGUAGE] >> [English], [Français] or [Español].

 LANGUAGE
English  Français
Español
SETUP
 ENTER EXIT

List of Menus
The figures of the Menus are for explanation purposes only, and they are different from the actual Menus.
 [TAPE RECORDING MENU]
e.g., |
|
BASIC |
|
BASIC |
|
SCENE MODE |
OFF |
ADVANCE |
|
REC SPEED |
SP |
SETUP |
|
BLANK SEARCH |
NO |
LANGUAGE |
|
WIND CUT |
ON |
|
|
CLOCK SET |
NO |
SETUP ENTER |
EXIT |
SETUP ENTER |
EXIT |
[  BASIC]
Basic Setup Sub-Menu
[ 
 SCENE MODE]
Scene Mode (pp. 31~32)
[  REC SPEED]
Recording Speed Mode (p. 24)
[  BLANK SEARCH]
Blank Search Mode (p. 26)
[  WIND CUT]
Wind Noise Reduction (p. 31)
[  CLOCK SET]
Date and Time Setting (p. 24)
[  ADVANCE]
Advance Setup Sub-Menu
[ 
 PICT.QUALITY]
Picture Quality (p. 26)
[  EIS]
EIS]
Image Stabilizer (p. 29)
[  CINEMA]
Cinema-like Format Recording (p. 31)
[  USB FUNCTION] (PV-GS35 Only)
USB Functions Mode (pp. 49, 54)
[  D.ZOOM]
Digital Zoom (p. 29)
[ 
 ZOOM MIC]
Zoom Microphone (p. 28)
[  DATE/TIME]
Date and Time Indication (p. 58)
[  INITIAL SET]
Initial Setting Mode (p. 58)
[  SETUP]
Setup Sub-Menu
[  FADE COLOR]
Fade color (p. 29)
[  AUDIO REC]
Audio Recording Mode (p. 24)
[  DISPLAY]
Display Mode (p. 58)
[  REMOTE] (PV-GS35 Only)
Remote Control Mode (p. 15)
[ 
 BEEP SOUND]
Beep Sound (p. 59)
[  LCD SET]
LCD Adjustment (p. 21)
[ 
 EVF SET]
Viewfinder Adjustment (p. 21)
[  DEMO MODE]
Demonstration Mode
•If you set to [  DEMO MODE] >> [ON] without inserting a cassette or a card, the Camcorder is automatically set to the demonstration mode for introducing its functions. If any button is pressed or operated, the demonstration mode is canceled. If no operations take place for approx. 10 minutes, the demonstration mode automatically starts.
To terminate the demonstration mode, insert a cassette or a card, or set to [  DEMO MODE] >> [OFF]. For normal use, set this function to [OFF].
[  POWER SAVE]
Power Save Mode (p. 58)
[ 

 LANGUAGE]
 [TAPE PLAYBACK MENU]
e.g., |
|
BASIC |
|
BASIC |
|
DATE/TIME |
D/T |
ADVANCE |
|
USB FUNCTION |
MOTION DV |
SETUP |
|
|
|
LANGUAGE |
|
|
|
SETUP ENTER |
EXIT |
SETUP ENTER |
EXIT |
[ BASIC]
Basic Setup Sub-Menu
[  DATE/TIME]
Date and Time Indication (p. 58)
[  USB FUNCTION] (PV-GS35 Only)
USB Functions Mode (pp. 49, 54)
22 |
For assistance, please call : 1-800-211-PANA(7262) or, contact us via the web at: http://www.panasonic.com/contactinfo |
|

Before Using
[ ADVANCE]
Advance Setup Sub-Menu
[  BLANK SEARCH]
Blank Search Mode (p. 26)
[ REC SPEED]
Recording Speed Mode (p. 24)
[ REC STDBY]
Recording Standby Mode (p. 43)
[ PICT.QUALITY]
Picture Quality (p. 26)
[ REPEAT PLAY]
Repeat Play Mode (p. 62)
[ SETUP]
Setup Sub-Menu
[ |
12bit AUDIO] |
Audio Selector (pp. 35, 41) |
|
[ |
AUDIO OUT] |
Audio Output Mode (p. 62) |
|
[ |
DISPLAY] |
Display Mode (p. 58) |
|
[ |
REMOTE] (PV-GS35 Only) |
Remote Control Mode (p. 15)
[  LCD SET]
LCD Adjustment (p. 21)
[  EVF SET]
Viewfinder Adjustment (p. 21)
[  POWER SAVE]
Power Save Mode (p. 58)
[
 LANGUAGE]
Language Setup Sub-menu (p. 22)
 [CARD RECORDING MENU]
e.g., |
|
BASIC |
|
BASIC |
|
SCENE MODE |
OFF |
ADVANCE |
|
PICT.QUALITY |
|
SETUP |
|
SELF TIMER |
NO |
LANGUAGE |
|
CLOCK SET |
NO |
SETUP ENTER |
EXIT |
SETUP ENTER |
EXIT |
[ BASIC]
Basic Setup Sub-Menu
[ SCENE MODE]
Scene Mode (pp. 31~32)
[ PICT.QUALITY]
Picture Quality (p. 26)
[  SELF TIMER]
Self-timer Recording (p. 28)
[  CLOCK SET]
Date and Time Setting (p. 24)
[ ADVANCE]
Advance Setup Sub-Menu
[ BURST MODE]
RapidFire Consecutive Photoshot (p. 27)
[ SHTR EFFECT]
Shutter Effect (p. 26)
[  DATE/TIME]
Date and Time Indication (p. 58)
[ INITIAL SET]
Initial Setting Mode (p. 58)
[ SETUP]
Setup Sub-Menu
[  DISPLAY]
Display Mode (p. 58)
[  REMOTE] (PV-GS35 Only)
Remote Control Mode (p. 15)
[ BEEP SOUND]
Beep Sound (p. 59)
[  LCD SET]
LCD Adjustment (p. 21)
[  EVF SET]
Viewfinder Adjustment (p. 21)
[  POWER SAVE]
Power Save Mode (p. 58)
[
 LANGUAGE]
Language Setup Sub-menu (p. 22)
 [PICTURE PLAYBACK MENU]
e.g., |
|
BASIC |
|
BASIC |
|
DATE/TIME |
D/T |
ADVANCE |
|
PROTECT |
NO |
SETUP |
|
|
|
LANGUAGE |
|
|
|
SETUP ENTER |
EXIT |
SETUP ENTER |
EXIT |
[ BASIC]
Basic Setup Sub-Menu
[  DATE/TIME]
Date and Time Indication (p. 58)
[ PROTECT]
Setting the Lock (p. 39)
[ ADVANCE]
Advance Setup Sub-Menu
[ DPOF SET]
Setting DPOF (p. 38)
[ CARD FORMAT]
Formatting a Card (p. 39)
[ SETUP]
Setup Sub-Menu
[  DISPLAY]
Display Mode (p. 58)
[  REMOTE] (PV-GS35 Only)
Remote Control Mode (p. 15)
[  LCD SET]
LCD Adjustment (p. 21)
[  EVF SET]
Viewfinder Adjustment (p. 21)
[  POWER SAVE]
Power Save Mode (p. 58)
[
 LANGUAGE]
Language Setup Sub-menu (p. 22)
23
Before Using
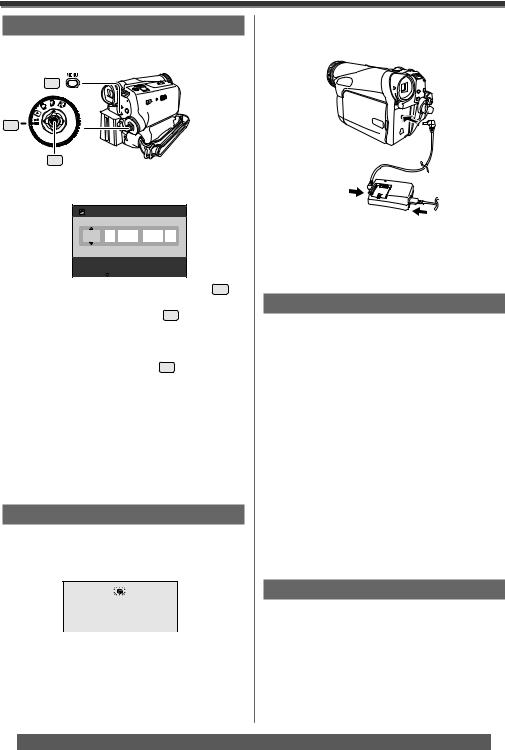
Setting Date and Time
Since the internal clock of the Camcorder has a slight imprecision make sure to check the time before recording.
30
34
35
• Set to Tape/Card Recording Mode.
1 Set [  BASIC] >> [
  CLOCK SET] >> [YES].
 CLOCK SET
 JAN
JAN  /01/2005 12AM:00
SETUP
SET
 ENTER EXIT
2 Move the Joystick Control [◄] or [►] 35 to select the item to be set. Then move the Joystick Control [▲] or [▼] 35 to set the desired value.
•Year will cycle in the order shown below. 2000, 2001, ..., 2089, 2000, ...
3 Press the Joystick Control 35 to finish setting the date and time.
•The clock operation starts from [00] second.
•If the built-in battery is weak, the [  ] Indication flashes. In this case, charge the built-in battery.
•The clock uses the 12-hour system.
About date/time
•The Date and Time function are driven by a built-in lithium battery.
•Make sure to check the time before recording because the built-in clock is not very accurate.
Internal Lithium Battery Recharge
The internal lithium battery sustains the operation of the clock. If the [  ] or [--] is indicated when the
Camcorder is turned on, the internal lithium battery is near exhaustion.
1 Connect the AC Adaptor to the Camcorder with the power turned off and then connect to the AC jack.
•After charging for 4 hours, the built-in lithium battery can power the clock for approximately 3 months.
•Leave the Camcorder as is for approx. 24 hours, and the battery will drive the Date and Time for approx. 6 months. (Even if the [OFF/ON] Switch is set to [OFF], the battery is still being recharged.)
LP Mode
You can switch the tape recording speed.
•Set to Tape Recording/Playback Mode.
Set [ BASIC] or [
 ADVANCE] >> [
 REC SPEED] >> [LP].
If the LP mode is selected, the recording time will be 1.5 times the SP mode, but some functions will be disabled.
•We recommend using the SP mode for important recordings.
•In order to fully exhibit the performances of the LP mode, we recommend using Panasonic cassettes marked LP mode.
•Audio dubbing is not possible with LP Mode. (p. 41)
•In the LP mode, the picture quality will not be degraded in comparison with the SP mode, but mosaic noise may appear on the playback image or some functions may be disabled.
-Playback on other digital video equipment or on digital video equipment without the LP mode
-Playback of the image on other digital video equipment recorded in the LP mode
-Slow Motion/Still Advance playback
Audio Recording Mode
You can select the sound quality of the recorded sound.
• Set to Tape Recording Mode.
Set [ SETUP] >> [
 AUDIO REC] >> [12bit] or
[16bit].
High sound-quality recording is possible with “16 bit 48 kHz 2 track” Mode. With the “12 bit 32 kHz 4 track” Mode, the original sound can be recorded on 2 tracks in stereo, while the other 2 tracks can be used for Audio Dubbing.
24 |
For assistance, please call : 1-800-211-PANA(7262) or, contact us via the web at: http://www.panasonic.com/contactinfo |
|
 Loading...