


Panasonic NE-17523, NE-12523, NE-21521, NE-17521, NE-17723 User Manual
...Operating Instructions
Commercial Microwave Ovens
Models No.
NE-12521 / NE-12523 / NE-17521 / NE-17523 / NE-17723 / NE-21521 / NE-21523
*Model No. NE-17723
Please read these instructions carefully before using this product and save this manual for future use.
Before Calling for Service:
If failure code “F ” appears in the display, unplug oven and wait for 5 seconds before reconnecting. If normal operation does not resume, call the service agent with the information of failure code.

Contents
page
PRECAUTIONS TO AVOID POSSIBLE EXPOSURE TO EXCESSIVE
MICROWAVE ENERGY . . . . . . . . . . . . . . . . . . . . . . . . . . . . . . . . . . . . . . . . . . . . . . . . . . . . . 3 IMPORTANT SAFETY INSTRUCTIONS . . . . . . . . . . . . . . . . . . . . . . . . . . . . . . . . . . . . . . . . 3 Installation and GROUNDING INSTRUCTIONS . . . . . . . . . . . . . . . . . . . . . . . . . . . . . . . . . . 4 Caution . . . . . . . . . . . . . . . . . . . . . . . . . . . . . . . . . . . . . . . . . . . . . . . . . . . . . . . . . . . . . . . . . . 4 ATTENTION . . . . . . . . . . . . . . . . . . . . . . . . . . . . . . . . . . . . . . . . . . . . . . . . . . . . . . . . . . . . . . 5 Self Diagnostics Failure Code Explanation. . . . . . . . . . . . . . . . . . . . . . . . . . . . . . . . . . . . . . . 6 If a “U” Appears In The Display. . . . . . . . . . . . . . . . . . . . . . . . . . . . . . . . . . . . . . . . . . . . . . . . 6 Power Source Voltage Adjustment . . . . . . . . . . . . . . . . . . . . . . . . . . . . . . . . . . . . . . . . . . . . . 7 How Does The Microwave Work?. . . . . . . . . . . . . . . . . . . . . . . . . . . . . . . . . . . . . . . . . . . . . . 7 Outline Diagram . . . . . . . . . . . . . . . . . . . . . . . . . . . . . . . . . . . . . . . . . . . . . . . . . . . . . . . . . . . 8 SD Memory Card . . . . . . . . . . . . . . . . . . . . . . . . . . . . . . . . . . . . . . . . . . . . . . . . . . . . . . . . . . 9 How to Operate
POWER LEVEL SELECTOR PAD . . . . . . . . . . . . . . . . . . . . . . . . . . . . . . . . . . . . . . . . . . 10 A. MANUAL HEATING . . . single stage heating . . . . . . . . . . . . . . . . . . . . . . . . . . . . . . . . 10
. . . . . . . . . . . . . . . . . . . 2 to 5 stage heating . . . . . . . . . . . . . . . . . . . . . . . . . . . . . . . . 11 B. PROGRAMMED HEATING . . . . . . . . . . . . . . . . . . . . . . . . . . . . . . . . . . . . . . . . . . . . . 12 C. PROGRAMMING NUMBER/MEMORY PADS . . .single stage heating . . . . . . . . . . . . 12
. . . . . . . . . . . . . . . . . . . . . . . . . . . . . . . . . . . . . . .2 to 5 stage heating . . . . . . . . . . . . 13 D. PROGRAMMING DOUBLE OR TRIPLE QUANTITY PAD. . . . . . . . . . . . . . . . . . . . . . 14 E. PROGRAM LOCK . . . . . . . . . . . . . . . . . . . . . . . . . . . . . . . . . . . . . . . . . . . . . . . . . . . . 14 F. BEEP TONE. . . . . . . . . . . . . . . . . . . . . . . . . . . . . . . . . . . . . . . . . . . . . . . . . . . . . . . . . 15 G.PROGRAM LIST . . . . . . . . . . . . . . . . . . . . . . . . . . . . . . . . . . . . . . . . . . . . . . . . . . . . . 17 H.CYCLE COUNTER . . . . . . . . . . . . . . . . . . . . . . . . . . . . . . . . . . . . . . . . . . . . . . . . . . . 18 I. AIR FILTER CLEANING. . . . . . . . . . . . . . . . . . . . . . . . . . . . . . . . . . . . . . . . . . . . . . . . 18 J. OVEN LAMP . . . . . . . . . . . . . . . . . . . . . . . . . . . . . . . . . . . . . . . . . . . . . . . . . . . . . . . . 19
Installation Instructions for Stacking . . . . . . . . . . . . . . . . . . . . . . . . . . . . . . . . . . . . . . . . . . . 21 Sanitary Counter Top Seal . . . . . . . . . . . . . . . . . . . . . . . . . . . . . . . . . . . . . . . . . . . . . . . . . . 21 Care of Your Oven . . . . . . . . . . . . . . . . . . . . . . . . . . . . . . . . . . . . . . . . . . . . . . . . . . . . . . . . 22 Cleaning and Maintenance procedures . . . . . . . . . . . . . . . . . . . . . . . . . . . . . . . . . . . . . . . . 23 Heating and Defrosting Time Charts . . . . . . . . . . . . . . . . . . . . . . . . . . . . . . . . . . . . . . . . . . 24 PANASONIC COMMERCIAL MICROWAVE OVEN WARRANTY . . . . . . . . . . . . . . . . . . . . 38 Technical Specifications . . . . . . . . . . . . . . . . . . . . . . . . . . . . . . . . . . . . . . . . . . . . . . . . . . . . 40
Owner’s Record |
See page 6 before calling |
||||||||
Toll Free |
|||||||||
|
|
|
|
|
|
|
|
||
Model No. |
|
|
Service Information |
||||||
Serial No. |
|
|
|||||||
To locate a convenient service agent call |
|||||||||
|
|
The serial number of this product |
|||||||
|
|
1-888-350-9590 |
|||||||
|
|
may be found on the side of the oven. |
|||||||
Date of Purchase |
|
|
|||||||
Chef Support: 201-348-7305 |
|||||||||
Dealer’s Name |
|
|
www.panasonic.com/cmo |
||||||
Dealer’s Address |
Virtual Test Kitchens |
||||||||
|
|
|
|
|
|
|
|
|
|
- 2 -

PRECAUTIONS
TO AVOID POSSIBLE EXPOSURE TO EXCESSIVE MICROWAVE ENERGY
(a)Do not attempt to operate this oven with the door open since open-door operation can result in harmful exposure to microwave energy. It is important not to defeat or tamper with the safety interlocks. Under normal conditions, the oven will not operate with the door open.
(b)Do not place any object between the oven front face and the door, or allow soil or cleaner residue to accumulate on sealing surfaces.
(c)Do not operate the oven if it is damaged. It is particularly important that the oven door close properly and that there is no damage to the :
(1)door (bent)
(2)hinges and latches (broken or loose)
(3)door seals and sealing surfaces.
(d)The oven should not be adjusted or repaired by anyone except properly qualified service personnel.
IMPORTANT SAFETY INSTRUCTIONS
Your microwave oven is a cooking device and you should use as much care as you use with a stove or any other cooking device.
When using this electric appliance, basic safety precautions should be followed, including the following:
WARNING—To reduce the risk of burns, electric shock, fire, injury to persons or exposure to excessive microwave energy:
1.Read all instructions before using the appliance.
2.Read and follow “PRECAUTIONS TO AVOID
POSSIBLE EXPOSURE TO EXCESSIVE MICROWAVE ENERGY,” found above.
3.This appliance must be grounded. Connect only to a properly grounded outlet. See “Grounding Instructions” found on page 4.
4.Install or locate this appliance only in accordance with the provided installation instructions found on page 4.
5.Do not cover or block any openings on this appliance.
6.Do not store or use this appliance outdoors. Do not use this product near water for example, near a kitchen sink, in a wet basement, or near a swimming pool, and the like.
7.Use this appliance only for its intended use as described in this manual. Do not use corrosive chemicals or vapors in this appliance. This type of oven is specifically designed to heat, or cook food. It is not designed for industrial or laboratory use.
8.When cleaning surfaces of door and oven that come together on closing the door, use only mild, non-abrasive soaps or detergents applied with a sponge or soft cloth.
9.As with any appliance, close supervision is necessary when used by children.
10.Do not operate this appliance if it has a damaged cord or plug, if it is not working properly, or if it has been damaged or dropped.
11.Do not immerse cord or plug in water.
12.Keep cord away from heated surfaces.
13.Do not let cord hang over edge of table or counter.
14.This appliance should be serviced only by qualified service personnel. Contact the nearest authorized service facility for examination, repair or adjustment.
15.Some products such as whole eggs and sealed containers (for example, closed glass jars) may explode and should not be heated in this oven.
16.To reduce the risk of fire in the oven cavity:
(a)Do not overcook food. Carefully attend appliance if paper, plastic, or other combustible materials are placed inside the oven to facilitate cooking.
(b)Remove wire twist-ties from paper or plastic bags before placing bag in oven.
(c)If materials inside the oven should ignite, keep oven door closed, turn oven off, and disconnect the power cord, or shut off power at the fuse or circuit breaker panel.
(d)Do not use the cavity for storage purposes.
Do not leave paper products, cooking utensils, or food in the cavity when not in use.
17.Liquids, such as water, coffee, or tea are able to be overheated beyond the boiling point without appearing to be boiling due to surface tension of the liquid. Visible bubbling or boiling when the container is removed from the microwave oven is not always present. THIS COULD RESULT IN VERY HOT LIQUIDS SUDDENLY BOILING OVER WHEN A SPOON OR OTHER UTENSIL IS INSERTED INTO THE LIQUID. To reduce the risk of injury to persons:
(a)Do not overheat the liquid.
(b)Stir the liquid both before and halfway through heating it.
(c)Do not use straight-sided containers with narrow necks.
(d)After heating, allow the container to stand in the microwave oven for a short time before removing the container.
(e)Use extreme care when inserting a spoon or other utensil into the container.
SAVE THESE INSTRUCTIONS
For proper use of your oven read remaining safety cautions and operating instructions.
- 3 -
Installation and GROUNDING INSTRUCTIONS
Placement of the Oven
Locate the oven on a smooth, flat and stable surface. There should be no gap between the table surface and the bottom of the oven. Do not place the oven in a hot or damp area, ie. near a stove, sink or directly above heat lamps on a serving line. Free airflow around the oven is important. There is a possibility of a small amount of interference with weak broadcast signals if the microwave oven is too close to a radio or TV.
Grounding Instructions
This oven must be grounded electrically. In the event of an electrical short circuit, grounding reduces the risk of electric shock by providing an escape wire for the electric current. The appliance is equipped with a cord having a grounding wire with a grounding plug. The plug must be plugged into an outlet that is properly installed and grounded.
WARNING — improper use of the grounding plug can result in a risk of electric shock.
Consult a qualified electrician or service person if the grounding instructions are not completely understood, or if doubt exists as to whether the appliance is properly connected.
If it is necessary to use an extension cord, use only a three wire extension cord that has a three blade grounding plug, and a three slot receptacle that will accept the plug on the appliance. The marked rating of the extension cord should be equal to or greater than the electrical rating of the oven.
Protective Film Removal
A blue protective film is used to prevent scratching of the outer case during transportation. Peel the film from the exterior of the oven before installation or use.
Wiring Requirements
No other appliance should share the circuit with the microwave oven. If it does, the branch circuit fuse may overload and either cause the oven to heat slower than expected or blow the fuse.
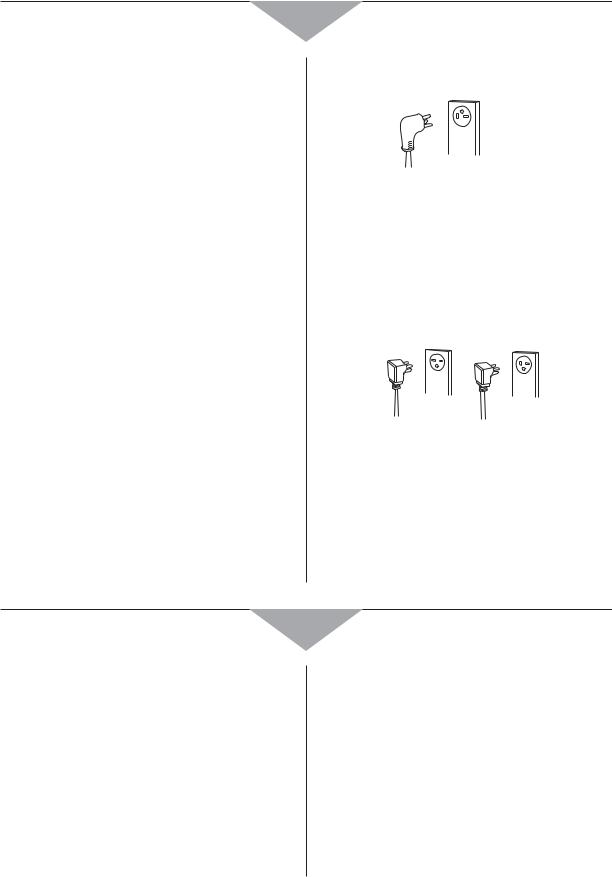
A.For Models No. NE-12521/NE-12523
The oven must be on a SEPARATE, 20 amp, 60 Hz-120 V GROUNDED CIRCUIT.
|
120 V |
NEMA# |
Grounded |
5-20P |
Outlet |
|
NEMA# 5-20R |
B.For Models No. NE-17521/NE-17523/NE-17723/ NE-21521/NE-21523
1.This oven must be on a separate, 60 Hz GROUNDED CIRCUIT - minimum 15 amps for Models No. NE-17521/NE-17523/NE-17723; minimum 20 amps for Models No. NE-21521/ NE-21523.
2.The microwave ovens are built to operate on 2 different voltages (230-240 V or 208 V).
Models No. |
Models No. |
NE-17521/NE-17523/ |
NE-21521/NE-21523 |
NE-17723 |
|
NEMA# |
NEMA# |
6-15P |
6-20P |
208 V/230-240 V |
208 V/230-240 V |
Grounded Outlet |
Grounded Outlet |
NEMA# 6-15R or 6-20R |
NEMA# 6-20R |
Caution
1.Do not attempt to tamper with or make any adjustments or repairs to the door, control panel housing, safety interlock switches or any other part of the oven. Do NOT remove the outer panel of the oven. Repairs should only be done by a qualified service person.
2.Do NOT operate the oven empty. The microwave energy will reflect continuously throughout the oven if no food or water is present to absorb energy.
3.If a fire occurs in the oven, press the Stop/Reset pad and LEAVE THE DOOR CLOSED. Disconnect the power cord, or shut off the power at the fuse or circuit breaker panel.
4.Do NOT attempt to dry clothes, newspapers or other materials in the oven, as they may catch on fire.
5.Do NOT use recycled paper products, as they may contain impurities which may cause sparks and/or fires.
6.Do NOT use newspapers or paper bags for cooking.
7.Do NOT hit or strike the control panel. Damage to controls may occur.
8.POT HOLDERS may be needed when removing food from the oven. Heat is transferred from the hot food to the container.
9.Do NOT store flammable materials next to, on top of, or in the oven. It could be a fire hazard.
10.Do NOT operate the oven without the spatter shields (located in the top of inner cavity) in place.
- 4 -

ATTENTION
PLEASE READ THE FOLLOWING CAUTIONS BEFORE USING THIS MICROWAVE OVEN
Failure to follow these instructions and properly maintain this unit may lead to premature failure of the Microwave and may void the warranty.
Please read the following guidelines along with the included owner’s manual prior to operating this unit.
ss5NIT MUSTSBE PLACED IN ANAOPEN AREA MAKINGNCERTAIN THAT THEREAIS ADEQUATEECLEARANCE AND VENTILATION INTTHEOBACKK and front of the unit.
ss&ILTERSTMUSTSBE CLEANED AND RE INSTALLEDAON A REGULAR SCHEDULEAIN ORDER TODPROVIDE PROPERPAIROFLOWWTHROUGHROUTUTHEH unit. Failure to properly maintain the filters will result in the Microwave overheating and possible early component failure.
ss4OP 3PLATTERLSHIELD -534 BE INSTALLED AT-ALL3TIMESBWHEN UNITSIS INIOPERATION &AILURE TORINSTALLOTHEISPLATTER SHIELDT will result in food buildup on the inside top of the cavity and will eventually lead to arcing and the eventual destruction of the cavity and will void the warranty.
ss$O NOT SCRAP OR PEEL OFF RUBBEREGASKET AROUNDRTHEUBASE OFTTHEEBOTTOMTPLATE AS THISTWILL ALLOWWSPILLAGE UNDER THE bottom plate and may lead to destruction of the cavity.
ss$O NOT SLAMTDOOR SHUTMOR PULLODOWN ON THENDOOR ASETHIS MAYYDAMAGE THE DOORELATCHOMECHANISMAANDC HOR HINGESH and render the Microwave inoperative.
ss$O NOT OVER FILLFPANS AS SPILLAGE MAYYOCCUR )F)SPILLAGE DOESLOCCUR PLEASE WIPESIT UPWIMMEDIATELY &OLLOWWTHET guides on pages 22 to 23 for proper cleaning instructions.
ss$O NOT PLACE UNITLNEAR OTHER SOURCES OFEHEAT SUCH ASESTOVES HEATALAMPS OR OVENSNAS THISSMAYYSHORTENETHE LIFEEOF the Microwave oven components and render the unit inoperative.
ss$O NOT PLACE METAL OBJECTS SUCHTAS ALUMINUM FOIL METAL PANSTOR METAL UTENSILSUAS THISSWILL DAMAGESBOTH THE inside of the cavity as well as electronic components.
IF BOTTOM PLATE BREAKS or CRACKS, or THERE IS SPARKING IN THE CAVITY WHILE HEATING FOOD, DO NOT CONTINUE TO USE OVEN CONTACT AUTHORIZED SERVICE AGENCY IMMEDIATELY!! 1-888-350-9590
- 5 -
Self Diagnostics Failure Code Explanation
This oven monitors its operation and displays a Failure Code in Digital Display Window when a problem occurs.
What to do when a Failure Code appears:
When “F ” is displayed, remove the plug, wait 5 seconds, and reinsert.
If “F” is displayed again, call the service agent.
Note: Not all codes displayed in the Digital Display Window indicate a failure.
If a “U” Appears In The Display
A fault will also show as a Failure Code in the display window (it will appear as a “U” then a two digit number). Follow the steps in the following chart:
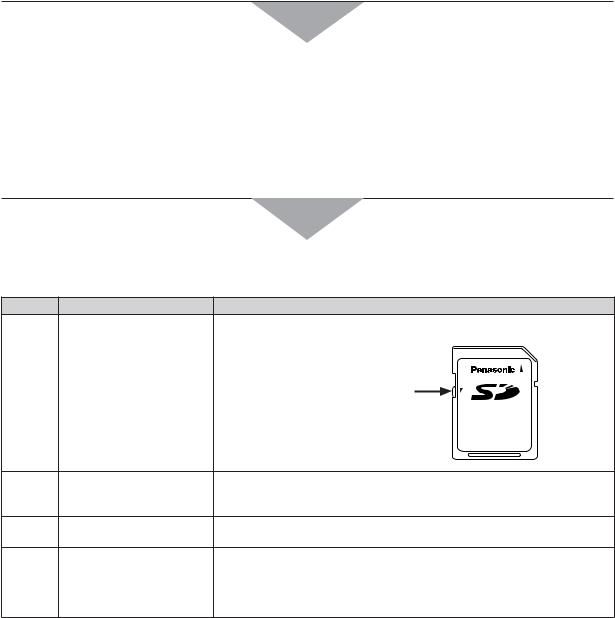
CODE PROBLEM
U16 Cannot write because the SD Memory Card is locked.
*SD Memory Card information can be read.
U17 An SD Memory Card other than the card provided is in use.
U19 SD Memory Card is not inserted.
U30 Memory cooking has exceeded the maximum time during Double Quantity and Triple Quantity settings.
WHAT TO DO
Remove the SD Memory Card and check whether it is locked. Replace the SD Memory Card when finished.
Slide this up to unlock. |
LOCK |
|
Recipe
Card
Use the provided SD Memory Card.
Remove the SD Memory Card Cover and insert an SD Memory Card.
Check and change the time. —See page 11, step 5 “Note”.
- 6 -

Power Source Voltage Adjustment
Models No. NE-17521/NE-17523/NE-17723/NE-21521/NE-21523
The microwave automatically detects 208 V and 230 V–240 V. Insert the plug, and if the Digital Display Window goes blank 10 seconds after use, unplug and insert the plug again.
How Does The Microwave Work?
Microwaves are a form of high frequency radio waves similar to those used by a radio including AM, FM, and CB. They are, however, much shorter than radio waves. Electricity is converted into microwave energy by the magnetron tube. From the magnetron tube, microwave energy is transmitted to the oven cavity where it is: reflected, transmitted and absorbed.
Reflection
Microwave are reflected by metal just as a ball is bounced off a wall. A combination of stationary (interior walls) and rotating antenna, located underneath the bottom shelf and above the ceiling cover assure that the microwaves are well distributed within the oven cavity to produce even heating or cooking of foods.
Transmission
Microwave pass through some materials such as paper, glass and plastic much like sunlight shining through a window. Because these substances do not absorb or reflect the microwave energy, they are ideal materials for microwave oven heating containers when covered.
Absorption
During heating, microwaves will be absorbed by food. They penetrate to a depth of about 3⁄4 to 11⁄2 inches. Microwave energy excites the molecules in the food (especially water, fat and sugar molecules), and causes them to vibrate at a rate of 2,450,000,000 times per second. This vibration causes friction, and heat is produced just as you will feel heat produced if you vigorously rub your hands together. The internal heating of larger foods is done by conduction. The heat which is produced by friction is conducted to the center of the food. Foods also continue to heat by conduction during standing time. (“carry-over” cooking)
Because microwave dissipate, much like sunlight as it reaches the Earth’s surface, they are not stored in food.
Radio Inference
1.Operation of the microwave oven may cause interference to your radio, TV or similar equipment.
2.When there is interference, it may be reduced or eliminated by taking the following measures:
a.Clean door and sealing surfaces of the oven. (See Care of Your Microwave Oven found on page 22.)
b.Place the radio, TV, etc. away from the microwave oven as far as possible.
c.Use a properly installed antenna, on the radio to obtain stronger signal reception.
- 7 -

Outline Diagram
(1) |
(2) (3) (4) (5)(6) |
(7) |
(8) |
(9) |
|
|||||||||
|
|
|
|
|
|
|
|
|
|
|
|
|
|
|
|
|
|
|
|
|
|
|
|
|
|
|
|
|
|
|
|
|
|
|
|
|
|
|
|
|
|
|
|
|
|
|
|
|
|
|
|
|
|
|
|
|
|
|
|
|
|
|
|
|
|
|
|
|
|
|
|
|
|
|
(12)
(13)
(10)
|
|
|
|
|
|
|
|
(11) |
|
(1) |
Digital Display Window (see below) |
(8) |
Stop/Reset pad |
|
(2) |
Program pad |
(9) |
Start pad |
|
(3) |
Shift (A/B/C) pad |
(10) |
Door Handle |
|
(4) |
Power Level Selector pad |
(11) |
Air Filter |
|
(5) |
Double Quantity pad |
(12) |
SD Memory Card Cover* |
|
(6) |
Triple Quantity pad |
(13) |
Splatter Shield (top of inner cavity) |
|
(7)ss.UMBER -EMORYYPADS ssTime input
|
|
|
A |
|
|
B |
A – Program Display |
||||
|
|
|
|
|
|
|
|
|
|
|
B – Heating Time Display (“min. sec.” or “hour min.”) |
|
|
|
|
|
|
|
|
|
|
|
|
|
|
|
|
|
|
|
|
|
|
|
##n ss-EMORYYPADP.UMBER $ISPLAY |
C |
|
|
|
|
|
|
|
|
|
|
ss(EATINGA3TAGEN)NDICATOR |
|
|
|
|
|
|
|
D – Pattern of buzzer sound settings |
||||
|
|
|
|
|
|
||||||
|
|
|
|
|
|
|
|
|
|
|
%%n ssCalling Programmed Heating: Stage Number Indicator |
|
|
|
|
|
|
|
|
|
|
|
ssProgrammed Heating in Progress: Operation Indicator |
|
|
|
|
|
|
|
|
|
|
|
ss"EEP TONEPSETTINGS 3CALE )NDICATOR |
|
|
|
|
|
|
|
|
|
|||
|
|
|
|
|
|
|
|
|
|
||
|
|
|
|
|
|
|
|
|
|||
|
|
D |
|
E |
|
||||||
This oven is preset at the factory as follows:
Number/Memory pads preset HIGH power at the indicated heating times for single stage heating (See pages 10-13)
1 |
= 10 sec. |
2 |
= 20 sec. |
3 |
= 30 sec. |
4 |
= 40 sec. |
5 |
= 50 sec. |
6 |
= 1 min. |
7 |
= 1 min. 15 sec. |
8 |
= 1 min. 30 sec. |
9 |
= 1 min. 45 sec. |
0 |
= 2 min. |
ss-ODELO.O .% Memory numbers are displayed using 1 digit for 1 to 9, 2 digits for 10 to 99, and 3 digits for |
|||||||||
ss/THERTMODELS |
000 to 999. Additionally, there are three sides, A (00 to 99), B (00 to 99) and C (00 to 99). |
||||||||
There are three sides, A, B and C. Only A-side is preset. |
|
||||||||
Program Unlocked (See pages 14-15) |
|
|
Double Quantity = 1.6 |
Triple Quantity = 2.2 (See page 14) |
|
Oven Lamp When the door is open = ON |
Blinking at the end of heating cycle = OFF |
|
Decrease brightness during cooking = OFF (See pages 19-20) The default filter cleaning time is set to “0”.
If you wish to change these settings, please consult the operating instructions for programming procedure. (See page 18)
*In this manual, illustrations of Model No. NE-17723 is used for explanation purposes. Model numbers other than NE-17723 do not have SD Memory Card functions.
- 8 -
SD Memory Card
*Model No. NE-17723 only (An SD Memory Card is included in the unit purchased.)
ss!N 3$ -EMORYY#ARD ISRINCLUDED INITHECUNIT PURCHASED )T)ALLOWS YOU TO STORE UP TOO -EMORYY0ROGRAMMES in the oven.
ss 5SESTHE CARD WHENCSTORINGNOR RECALLING -EMORYY0ROGRAMMES
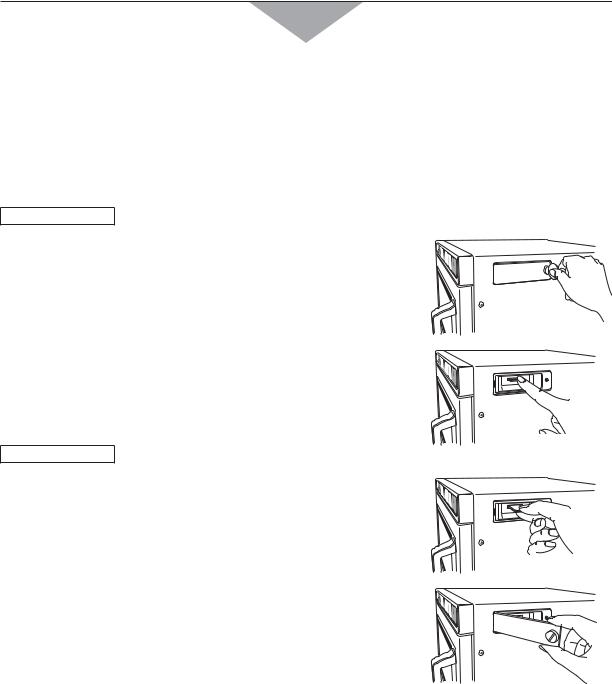
How to insert / remove the SD Memory Card
*Before you insert / remove an SD Memory Card, always disconnect the oven from the power supply.
If this is not possible, the display window should be blank, otherwise, the data on the SD Memory Card may be damaged.
How to remove
1. Use a coin or tool to remove the screw from the SD Memory Card Cover.
2. Push the SD Memory Card with your finger to draw it out. Then, remove it.
How to insert
1. Insert an SD Memory Card with its label facing up as indicated by  mark until it snaps into place.
2. Fit the left edge of the SD Memory Card Cover. Screw to close at the right-hand side.
Caution:
1.Always close the SD Memory Card Cover except when an SD Memory Card is inserted/removed in order to prevent water or dust from entering.
2.Insert only an SD Memory Card specified for this oven. Do not use any other type or substitute SD Memory Card.
3.Keep the removed SD Memory Card away from static electricity.
4.Do not disassemble or modify SD Memory Cards.
5.Do not apply a physical shock to SD Memory Cards. Do not bend, drop, or get them wet.
6.Do not touch the metal terminals of an SD Memory Card with your hand or metal.
7.Do not remove the label. Do not paste another label onto the SD Memory Card.
8.Do not leave SD Memory Cards in locations subject to high temperatures or direct sunlight and corrosive gases.
9.If the SD Memory Card is lost or becomes faulty, please contact a Service Engineer to obtain a replacement.
-9 -

How to Operate
POWER LEVEL SELECTOR PAD
Each time the pad is pressed, the Power Level switches as the illustration below.
P10 |
|
|
P9 |
|
|
P8 |
|
|
P7 |
|
|
P6 |
|
|
P5 |
|
P4 |
|
|
P3 |
|
|
|
|
|||||||||||
|
|
|
|
|
|
|
|
|
|
|
|
|
|
|
|
|
|
|
|
|
|
|
|
|
|
|
|
|
|
|
|
|
|
|
|
|
|
|
|
|
|
|
|
|
|
|
|
|
|
|
|
|
|
|
|
|
|
|
|
|
|
|
|
|
|
|
|
|
|
|
|
P2 |
|
|
|
P1 |
|
|
|
P0 |
|
|
|
PU1 |
|
|
|
PU2 |
|
|
|
PL1 |
|
|
PL2 |
|
|
|
P10 |
|
again. |
|
|
||||
|
|
|
|
|
|
|
|
|
|
|
|
||||||||||||||||||||||||
|
HIGH |
|
P10: Models No. NE-12521 / NE-12523 (1200 W), NE-17521 / NE-17523 / NE-17723 (1700 W), |
|
|||||||||||||||||||||||||||||||
|
|
|
|
|
|
|
|
|
NE-21521 / NE-21523 (2100 W) |
|
|
|
|
|
|
|
|
|
|
||||||||||||||||
|
|
|
|
|
|
|
|
|
|
|
|
|
|
|
|
|
|
|
|
|
|
|
|||||||||||||
|
|
|
|
|
|
P9: |
95 % |
|
LOW |
|
P3: |
35 % |
HEAT FROM |
|
PU1: |
50 % |
|
||||||||||||||||||
|
MEDIUM |
|
P8: |
85 % |
|
|
P2: |
25 %* |
TOP DOWN |
|
|
PU2: |
25 % |
|
|||||||||||||||||||||
|
|
|
|
|
|
|
|
|
|
|
|||||||||||||||||||||||||
|
HIGH |
|
P7: |
75 % |
|
DEFROST |
|
P1: |
340 W |
HEAT FROM |
|
PL1: |
50 % |
|
|||||||||||||||||||||
|
|
|
|
|
|
P6: |
65 % |
|
|
BOTTOM UP |
|
PL2: |
25 % |
|
|||||||||||||||||||||
|
|
|
|
|
|
|
|
|
|
|
|
|
|
|
|
|
|
|
|
|
|||||||||||||||
|
|
|
|
|
|
|
|
|
|
|
|
|
|
|
|
|
|
|
|
|
|
|
|
|
|
|
|
|
|
|
|||||
|
MEDIUM |
|
P5: |
55 % |
|
— |
|
P0: |
0 % |
|
|
|
|
|
|
|
|
|
|
||||||||||||||||
|
|
P4: |
45 % |
|
|
|
|
|
|
|
|
|
|
|
|
||||||||||||||||||||
|
|
|
|
|
|
|
|
|
|
|
|
|
|
|
|
|
|
|
|
|
|
|
|
|
|
|
|
|
|||||||
*: “LOW (P2)” for Model No. NE-12521 / NE-12523 is 30%. |
|
|
|
|
|
|
|
|
|
|
|
|
|
||||||||||||||||||||||
A. MANUAL HEATING — single stage heating — |
|
|
|
|
|
|
|||||||||||||||||||||||||||||
|
|
|
|
|
|
|
|
|
|
|
|
|
|
|
|
||||||||||||||||||||
Example: To cook food at HIGH power for 2 minutes |
|
|
|
|
|
|
|
|
|
|
|
|
|
||||||||||||||||||||||
|
|
|
|
|
|
|
|
|
|
|
|
|
|
|
|
|
|
|
|
|
|
|
|
||||||||||||
|
PAD |
|
|
|
|
|
|
|
|
|
|
|
INSTRUCTION |
|
|
|
|
|
|
|
|
DIGITAL DISPLAY WINDOW |
|
||||||||||||
1 |
|
|
|
|
|
Place food inside the oven and close the door. |
|
|
|
|
|
|
|
|
|
|
|||||||||||||||||||
|
|
|
|
|
|
The oven lamp will turn on and “0” will appear. |
|
|
|
|
|
|
|
|
|
|
|||||||||||||||||||
|
|
|
|
|
|
Note: While “0” appears, operation is available. 1 minute after the door is |
|
|
|
|
|
|
|||||||||||||||||||||||
|
|
|
|
|
|
|
|
|
closed, “0” will disappear. |
|
|
|
|
|
|
|
|
|
|
|
|
|
|
|
|
|
|
||||||||
|
|
|
|
|
|
|
|
|
|
|
|
|
|
|
|
|
|
|
|
||||||||||||||||
2 |
|
|
|
|
|
Press Power Level Selector pad once. |
|
|
|
|
|
|
|
|
|
|
|
|
|
||||||||||||||||
|
|
|
|
|
|
The selected power level will be indicated and 1st Stage Heating |
|
|
|
|
|
|
|||||||||||||||||||||||
|
|
|
|
|
|
Indicator “1” will start to blink. |
|
|
|
|
|
|
|
|
|
|
|
|
|
|
|
|
|
|
|||||||||||
|
|
|
|
|
|
Note: Each time the pad is pressed, the Power Level switches as the |
|
|
|
|
|
|
|||||||||||||||||||||||
|
|
|
|
|
|
|
|
|
above Power Level Selector pad illustrates. |
|
|
|
|
|
|
|
|
|
|
||||||||||||||||
|
|
|
|
|
|
|
|
|
|
|
|
|
|
|
|
|
|
|
|
||||||||||||||||
3 |
|
|
|
|
|
Press Number/Memory pads “2”, “0” and “0”. |
|
|
|
|
|
|
|
|
|
|
|
|
|
||||||||||||||||
|
|
|
|
|
|
The set heating time will appear. |
|
|
|
|
|
|
|
|
|
|
|
|
|
||||||||||||||||
|
|
|
|
|
|
Note: The maximum set time for “DEFROST” and “P0” is 30 minutes, and |
|
|
|
|
|
|
|||||||||||||||||||||||
|
|
|
|
|
|
|
|
|
15 minutes for all others. |
|
|
|
|
|
|
|
|
|
|
|
|
|
|
|
|
|
|
||||||||
|
|
|
|
|
|
|
|
|
|
|
|
|
|
|
|
|
|
|
|
|
|
|
|
|
|
|
|
|
|
||||||
4 |
|
|
|
|
|
Press Start pad. |
|
|
|
|
|
|
|
|
|
|
|
|
|
|
|
|
|
|
|
|
|
|
|
||||||
|
|
|
|
|
|
The oven lamp will turn on and heating will start. |
|
|
|
|
|
|
|
|
|
|
|||||||||||||||||||
|
|
|
|
|
|
During operation, the indicator appears from the left and heating time |
|
|
|
|
|
|
|||||||||||||||||||||||
|
|
|
|
|
|
will count down. |
|
|
|
|
|
|
|
|
|
|
|
|
|
|
|
|
|
|
|
|
|
|
|
||||||
|
|
|
|
|
|
|
|
|
|
|
|
|
|
|
|
|
|
|
|
|
|
|
|
|
|
|
|
|
|
|
|
|
|
|
|
ss 7HEN ALL TIMELEXPIRES BEEP TONEPWILL SOUND AND HEATING WILLUSTOP 4HEHOVEN LAMPLWILL TURNN off. “0000” will blink until the door is opened. 1 minute later, cooling fan will stop.
ss /PEN THE DOORHAND TAKEETHETFOODOOUT 4HEHOVEN LAMPLWILL TURNNON $IGITAL $ISPLAYY7INDOWW will show the originally selected time and power stage.
ss #LOSEOTHEEDOOR 4HEHOVEN LAMPLWILL TURNNOFF MINUTETLATER $IGITALT$ISPLAYY7INDOWWWILL GOL blank.
- 10 -
How to Operate
A. MANUAL HEATING — 2 to 5 stage heating —
Example: To cook food at HIGH power for 2 minutes and at LOW power for 1 minute
|
PAD |
INSTRUCTION |
DIGITAL DISPLAY WINDOW |
|||||
|
|
Follow steps 1 to 3 on page 10. |
|
|
|
|
|
|
|
|
|
|
|
|
|
|
|
4 |
|
Press Power Level Selector pad. |
|
|
|
|
|
|
|
|
Each time the pad is pressed, the Power Level switches as the Power |
|
|
|
|
|
|
|
|
Level Selector pad illustration on page 10. |
|
|
|
|
|
|
|
|
The selected power level will be indicated and 2nd Stage Heating |
|
|
|
|
|
|
|
|
Indicator “2” will start to blink. |
|
|
|
|
|
|
|
|
|
|
|
|
|
|
|
5 |
|
Press Number/Memory pads “1”, “0” and “0”. |
|
|
|
|
|
|
|
|
The set heating time will appear. |
|
|
|
|
|
|
|
|
Note: The maximum set time for “DEFROST” and “P0” is 30 minutes, and |
|
|
|
|
|
|
|
|
15 minutes for all others. |
|
|
|
|
|
|
|
|
However, the TOTAL TIME can be set up to 25 minutes for |
|
|
|
|
|
|
|
|
continuous heating (1 to 5 stage heating) that excludes |
|
|
|
|
|
|
|
|
“DEFROST” and “P0”. |
|
|
|
|
|
|
|
|
|
|
|
|
|
|
|
6 |
|
Press Start pad. |
|
|
|
|
|
|
|
|
The oven lamp will turn on. |
|
|
|
|
|
|
|
|
The total time is displayed. During operation, the indicator appears in |
|
|
|
|
|
|
|
|
order from the left and heating time for the first stage will count down. |
|
|
|
|
|
|
|
|
|
|
|
|
|
|
|
ss !FTERTTHERFIRSTHSTAGEFHEATING BEEPTTONE WILLHSOUND 4HEH(EATINGG3TAGET)NDICATOR)h v ARE |
|
|
|
|
|
|
||
|
displayed and heating time will count down. |
|
|
|
|
|
|
|
ss 7HEN ALL TIMELEXPIRES BEEP TONEPWILL SOUND AND HEATING WILLUSTOP 4HEHOVEN LAMPLWILL TURNN |
|
|
|
|
|
|
||
|
off. “0000” will blink until the door is opened. 1 minute later, cooling fan will stop. |
|
|
|
|
|
|
|
|
|
|
|
|
|
|
||
ss /PEN THE DOORHAND TAKEETHETFOODOOUT 4HEHOVEN LAMPLWILL TURNNON $IGITAL $ISPLAYY7INDOWW |
|
|
|
|
|
|
||
|
will show the originally set time and Heating Stage Number. |
|
|
|
|
|
|
|
|
|
|
|
|
|
|
||
ss |
#LOSEOTHEEDOOR 4HEHOVEN LAMPLWILL TURNNOFF MINUTETLATER $IGITALT$ISPLAYY7INDOWWWILL GOL |
|
|
|
|
|
|
|
|
blank. |
|
|
|
|
|
|
|
|
|
|
|
|
|
|
|
|
|
|
|
|
|
|
|
|
|
Note: Repeat the above procedure to set Heating for the third stage and later stages.
SPECIAL NOTE: For both single and 4 stage heating
1.While heating, one press on Stop/Reset pad stops the operation. You can restart it by pressing Start pad or a second press on Stop/Reset pad will cancel the selected program.
2.While not heating, one press on Stop/Reset pad cancels the selected program.
3.When heating is complete, you can repeat exactly the same manually selected heating time by pressing only Start pad you use the oven again within 1 minute.
4.1 minute later of non-use with door closed, the repeat feature will be cancelled.
-11 -

How to Operate
PROGRAM MEMORY
Model No. NE-17723 (1300 memory): Other models (30 memory):
1 digit input = 0 to 9, 2 digit input = 00 to 99, 3 digit input = 000 to 999 and A00 to C99 A0 to C9 *For only A0 through A9 settings, you do not need to press Shift (A/B/C) pad.
To change the number of memory digits:
1.Press “Start” + “0” while the door is open.
2.Press the number of digits you want to set. (1 digit=1, 2 digits=2, 3 digits=3)
3.Press “Prog”.
Note: The Digital Display Window illustration here is Model No. NE-17723.
The Digital Display Window differs for other models.
B. PROGRAMMED HEATING
)N 0ROGRAM 5NLOCKA-ODE
Example: To select Number/Memory pads “1” and “3” at A side in which your desired heating program (at HIGH power for 3 min., single stage heating) is set
|
PAD |
INSTRUCTION |
DIGITAL DISPLAY WINDOW |
1 |
|
Place food inside the oven and close the door. |
|
|
|
The oven lamp will turn on and “0” will appear. |
|
|
|
Note: While “0” appears, operation is available. 1 minute after the door is |
|
|
|
closed, “0” will disappear. |
|
|
|
|
|
2 |
|
Press Shift (A/B/C) pad, the desired Number/Memory pads “1” and |
|
|
|
“3”. |
|
|
|
The currently programmed information will be indicated. |
|
|
|
Note: All models except Model No. NE-17723 display the memory |
|
|
|
number and time. |
|
|
|
|
|
3 |
|
Press Start pad. |
|
|
|
The oven lamp will turn on and heating will start. The heating time will |
|
|
|
count down. |
|
|
|
|
|
ss 7HEN ALL TIMELEXPIRES BEEP TONEPWILL SOUND AND HEATING WILLUSTOP 4HEHOVEN LAMPLWILL TURNN off. “0000” will blink until the door is opened. 1 minute later, cooling fan will stop.
ss /PEN THE DOORHAND TAKEETHETFOODOOUT 4HEHOVEN LAMPLWILL TURNNON
ss #LOSEOTHEEDOOR 4HEHOVEN LAMPLWILL TURNNOFF MINUTETLATER $IGITALT$ISPLAYY7INDOWWWILL GOL blank.
)N 0ROGRAM ,OCKR-ODE
Just press the desired Number/Memory pad. Heating will automatically start without pressing Start pad. (See page 14)
For Double (or Triple) Quantity heating:
Press Double (or Triple) Quantity pad before pressing the desired Number/Memory pad.
C. PROGRAMMING NUMBER/MEMORY PADS — single stage heating —
THE OVEN CAN NOT BE PROGRAMMED WHEN PROGRAM LOCK IS ACTIVATED! (See pages 14-15) Example: To program cooking at DEFROST power for 1 minute into Number/Memory pads “1” and “5” at A side
|
PAD |
INSTRUCTION |
DIGITAL DISPLAY WINDOW |
1 |
|
Open the door and leave it open. |
|
|
|
The oven lamp will turn on, and “0” will appear. |
|
|
|
|
|
2 |
|
Press Prog pad. |
|
|
|
“PROG” will start to blink. |
|
|
|
|
|
- 12 -
 Loading...