


 Loading...
Panasonic NE-2152, NE-21523, NE-17723, NE-1772, NE-12523 User Manual
...Order Number MOD1206355CE
TABLE OF CONTENTS
|
|
PAGE |
1 |
Safety Precautions----------------------------------------------- |
2 |
2 |
Specifications ----------------------------------------------------- |
3 |
3 |
Technical Descriptions ----------------------------------------- |
4 |
4 |
Location of Controls and Components ------------------- |
5 |
5 |
Installation Instructions ---------------------------------------- |
6 |
6 |
Operating Instructions------------------------------------------ |
7 |
7 |
Test Mode ---------------------------------------------------------- |
12 |
Commercial Microwave Oven
Model No. NE-1252
Model No. NE-1752
Model No. NE-1772
Model No. NE-2152
Model No. NE-12521
Model No. NE-12523
Model No. NE-17521
Model No. NE-17523
Model No. NE-17723
Model No. NE-21521
Model No. NE-21523
|
|
PAGE |
8 |
Troubleshooting Guide --------------------------------------- |
14 |
9 |
Disassembly and Assembly Instructions--------------- |
17 |
10 |
Measurements and Adjustments -------------------------- |
22 |
11 |
Schematic Diagram -------------------------------------------- |
25 |
12 |
Exploded View and Replacement Parts List ----------- |
29 |
© Panasonic Corporation 2012 Unauthorized copying and distribution is a violation of law.

1 Safety Precautions
2
2 Specifications
Models: |
|
NE-12521 |
NE-1252 |
NE-17521 |
|
NE-1752 |
NE-21521 |
NE-2152 |
|
|
NE-12523 |
|
NE-17523 |
|
NE-1772 |
NE-21523 |
|
|
|
|
|
NE-17723 |
|
|
|
|
Power Source: |
|
120 V AC Single |
Phase 60 Hz |
|
|
208/230 V AC Single Phase 60 Hz |
|
|
Power Requirement: |
1990 W, (17.3A) |
1970 W, (17.1A) |
2650 W, (13.6A) |
|
2610 W, (13.5A) |
3160 W, (16.3A) |
3120 W, (16.1A) |
|
|
|
|
|
208 V |
|
208 V |
208 V |
208 V |
|
|
|
|
2650 W, (12.2A) |
|
2610 W, (12.2A) |
3160 W, (14.9A) |
3120 W, (14.7A) |
|
|
|
|
230 V |
|
230 V |
230 V |
230 V |
|
|
|
|
|
|
|
|
|
*High |
HIGH (P10) |
1200 |
W |
1700 |
W |
2100 |
W |
|
frequency |
|
|
|
|
||||
MED (P5, P4) |
Approx. 55%~45% |
Approx. 55%~45% |
Approx. 55%~45% |
|||||
Output: |
|
|
|
|
||||
DEFROST (P1) |
340 W |
340 W |
340 W |
|||||
Microwave Frequency: |
|
|
2,450MHZ |
|
|
|||
Timer: |
|
Maximum programmable time for single stage heating |
|
|
|
|||
|
|
P10-P2 power = 15 min. |
|
|
|
|
|
|
|
|
P1 (DEF) = 30 min. |
|
|
|
|
|
|
|
|
|
|
|
||||
Outside Dimensions: |
16 5/8 inch (W) X 20 inch (D) X 13 1/4 inch (H) |
|
|
|
||||
|
|
422 mm (W) X 508 mm (D) X 337 mm (H) |
|
|
|
|||
Inside Dimensions: |
13 inch (W) X 12 7/32 inch (D) X 6 7/8 inch (H) |
|
|
|
||||
|
|
330 mm (W) X 310 mm (D) X 175 mm (H) |
|
|
|
|||
Weight: |
|
56 lbs/25.5 kg |
60 lbs/27.5 kg |
66 lbs/29.5 kg |
||||
|
|
*Output power: IEC705-88 Test procedure |
|
|
||||
|
|
Specifications subject to change without notice. |
|
|
||||
3
3 Technical Descriptions
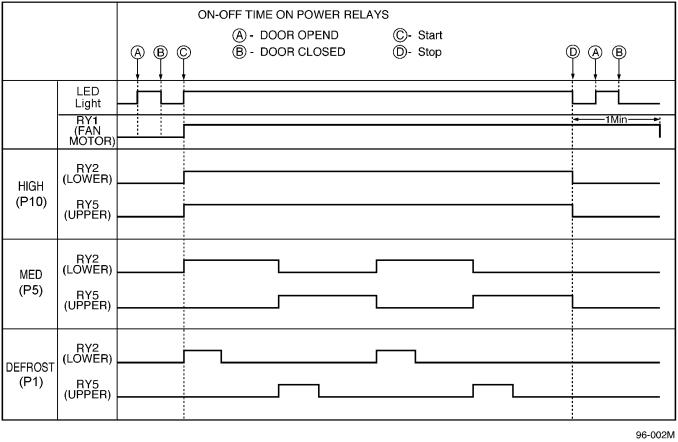
3.1.Description of operating sequence
Variable power cooking control
The coil of power relays are energized intermittently by the digital programmer circuit, when the oven is set to MEDIUM or DEFROST power position. The digital programmer circuit controls the ON-OFF time of each power relay contacts in order to vary the output power of the microwave oven. One complete ON and OFF cycle of the power relay is 44 seconds. The relation between indications on the control panel and the output power of the microwave oven is as shown in Figure.
4
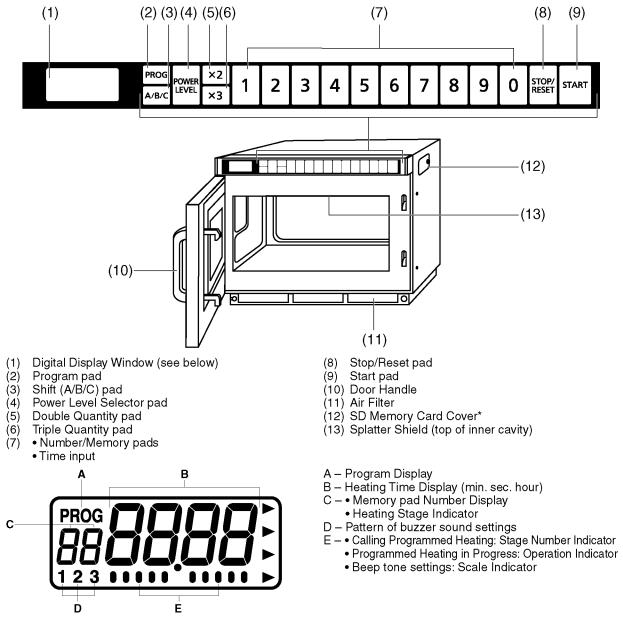
4 Location of Controls and Components
4.1.Outline diagram
5
5 Installation Instructions
5.1.Wiring requirements and power source voltage selection
Wiring Requirements
No other appliance should share the circuit with the microwave oven. If it does, the branch circuit fuse may overload and either cause the oven to heat slower than expected or blow the fuse.
1.For Mode NE-12521/NE-12523/NE-1252
The oven must be on a SEPARATE, 20 Amp, 60 Hz-120V GROUNDED CIRCUIT.
3.For Model NE-21521/NE-21523/NE-2152
This oven must be on a separate, 60 Hz GROUNDED CIRCUIT-minimum 20 amps.
2.For Model NE-1752/NE-1772/NE-17521/NE-17523/NE- 17723
This oven must be on a separate, 60 Hz GROUNDED CIRCUIT-minimum 15 amps.
Power Source Voltage Adjustment
For 208V/230V models
The microwave oven automatically detects 208 V and 230 V-240 V. Insert the plug, and if the Digital Display Window goes blank 10 seconds after use, unplug and insert the plug again.
6
6 Operating Instructions
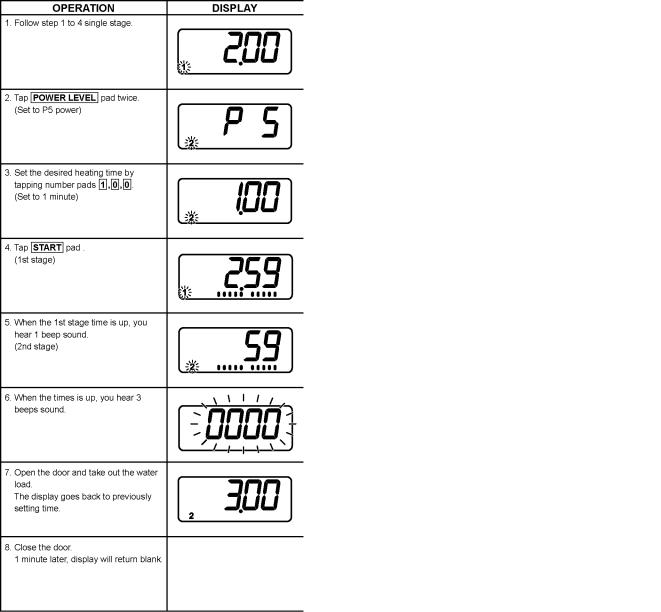
6.1.Operation procedure
1. Manual heating for single stage |
2. Manual heating for 2nd or 3rd stage |
NOTE: For a 3rd stage heating cycle, select a further power level and time between steps 3 and 4 above.
7
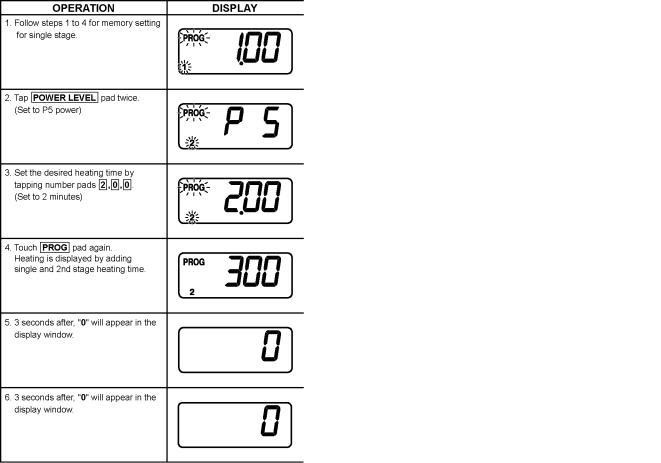
3. Memory setting for single stage |
4. Memory setting for 2nd or 3rd stage |
TO PROGRAM MEMORY AREA B: Follow steps 1 above. Touch the Memory Shift pad  twice and a small [B] will appear beneath the flashing [PROG].
Touch the memory pad you wish to program, and the previously selected time and power level will appear in the display window.
NOTE: Once the Memory area B has been selected it cannot be changed back to Memory area A. If you do not require Memory area B, cancel it by touching the cancel pad and begin again.
NOTE: For a 3rd stage heating cycle, select a further power level and dial in a time, between steps 3 and 4 above.
8
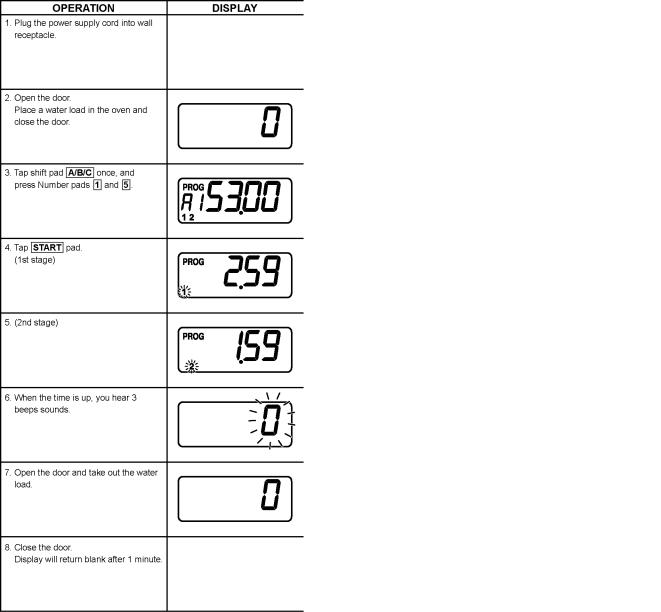
5. Memory pad heating |
6. Programming Double or Treble Quantity Pad |
NOTE: When program is locked, heating can be started automatically by tapping memory pad.
9
7. Memory Pad Heating for Double or Treble Quantity Heating
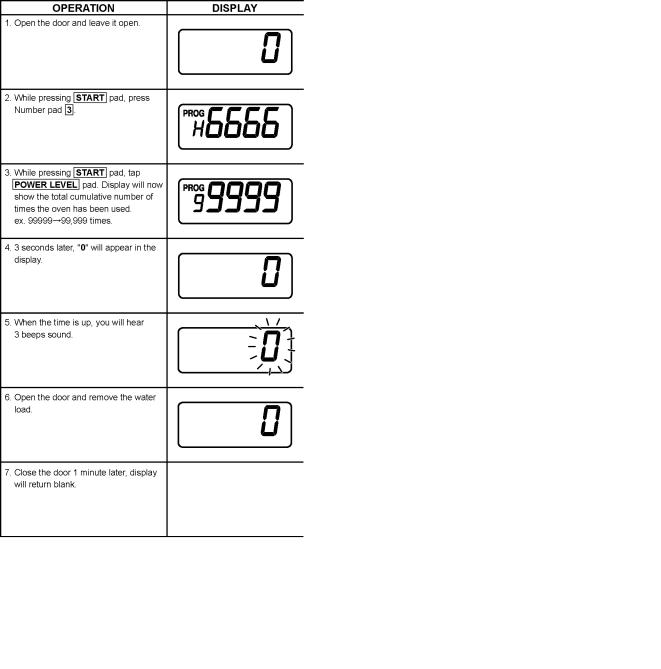
8. To Read the Cycle Counter
NOTE: Total cumulative number includes programming memory heating and manual heating number of times has been used. Cooking times over 99,999 times will be back 0.
9. To Activate Program Lock
10
10. To Release Program Lock |
11. To Select Beep Tone Options |
To select length of tone at end of heating cycle there are 3 options.
1. 3 beeps (factory setting)
2. 60 seconds of short beeps.
3. Beep sounds for 5 seconds, and 3 beeps 30 seconds later and 60 seconds later again.
11
Loading...