


Explorer Pro
Instruction Manual
Declaration of Conformity
The undersigned, representing the following manufacturer
Ohaus Corporation
19A Chapin Road
PO Box 2033
Pine Brook, NJ 07058 USA
hereby declares that the following products are in conformity with the EEC directives listed below (including any and all modifications).
Balance models: EP64,EP64C, EP64CN, EP64CM, EP114, EP114C, EP114CN, EP114CM, EP164, EP214, EP214C, EP214CN, EP214CM, EP214D, EP214DC, EP214DCN, EP214DCM, EP213, EP213N, EP213C, EP213CN, EP213CM, EP413, EP413N, EP413C, EP413CN, EP413CM, EP513CM, EP613, EP613C, EP613CN, EP613CM, EP413D, EP413DN, EP413DC, EP413DCN, EP413DCM, EP612, EP612N, EP612C, EP612CN, EP612CM, EP1502, EP2102, EP2102N, EP2102C, EP2102CN, EP2102CM, EP4102, EP4102N, EP4102C, EP4102CN, EP4102CM, EP6102, EP6102N, EP6102C, EP6102CN, EP6102CM, EP4102D, EP4102DN, EP4102DC, EP4102DC, EP4102DCM, EP410, EP4101N, EP4101C, EP4101CN, EP4101CM, EP6101, EP6101N, EP6101C, EP6101CN, EP6101CM, EP810, EP8101N, EP8101C, EP8101CN, EP8101CM, EPG114, EPG114C, EPG2102, EPG2102C, EPG213, EPG213C, EPG214, EPG214C, EPG214D, EPG214DC, EPG4101, EPG4101C, EPG4102, EPG4102C, EPG4102D, EPG4102DC, EPG413, EPG413C, EPG413C, EPG413D, EPG413DC, EPG6101, EPG6101C, EPG6101C, EPG6102, EPG6102C, EPG612, EPG612C, EPG613, EPG613C, EPG64, EPG64C, EPG8101, EPG8101C
|
|
|
|
|
|
|
|
Marked with: |
|
EC Directive (Including applicable amendments) |
Standard |
|
|
|
|
|
|
|
|
|
|
|
|
|
73/23/EC |
IEC 1010 -1:1990 + A1: 92 + A2: 95 |
|
|
|
|
|
Electrical equipment for use within specified |
Safety requirements for Electrical Equipment for Measurement, |
|
|
|
|
|
voltage limits |
Control Laboratory Use, Part 1: General Requirements |
|
|
|
|
|
CE marking affixed in 97 |
|
|
|
|
|
|
89/336/EC |
EN61326: -1:1997 (class B) + A1: 1998 |
|
|
|
|
|
Electromagnetic compatibility |
EMC Emissions, residential, commercial and light industry. |
|
|
|
|
|
|
EN61326: -1:1997 A1:1998 (industrial requirements) |
|
|
|
|
|
|
EMC Immunity. |
|
|
|
|
|
|
EN61000-3-2:1995 + A1:1998 + A2: 1998; EN61000-3-3:1995 |
|
|
|
|
|
|
EMC Part 3 (for equipment rated input current < or=16A) |
|
|
|
|
|
|
LimitsSection 2: Limits for harmonic current emissions |
|
|
|
|
|
|
Limitssection 3: Limitation of voltage fluctuations and flicker in low |
|
|
|
|
|
|
voltage supply systems |
|
|
|
|
|
|
|
|
|
|
xx |
|
EU 90/384 NAWI |
EN45501:1992 Non Automatic Weighing Instruments |
|
|
|
|
T2914 |
|
|
|
|
|
|
|
xx= year CE affixed |
|
|
|
|
|
|
|
|
|
|
|
|
|
|
|
|
ISO 9001 Registration for Ohaus Corporation. Ohaus Corporation, USA, was examined and evaluated in 1994 by the Bureau Veritas Quality International, BVQI, and was awarded ISO 9001 registration. This certifies that Ohaus Corporation, USA, has a quality system that conforms with the international standards for quality management and quality assurance (ISO 9000 series). Repeat audits are carried out by BVQI at intervals to check that the quality system is operated in the proper manner.
|
|
Ted Xia |
Johan Dierbach |
|
|
|
President |
General Manager |
|
|
|
Ohaus Corporation |
Ohaus Europe |
|
|
|
Pine Brook, NJ USA |
Greifensee, Switzerland |
|
|
|
Date: March 6, 2003 |
Date: March 6, 2003 |
|
|
|
Additional Standards |
|
|
|
|
CAN/CSA-C22.2 No. 1010.1-92; UL Std. No. 3101-1 |
|
|
|
|
Safety requirements for Electrical Equip. for measurement, Control and Laboratory Use, Part 1; General Requirements |
|
|
|
FCC |
FCC, Part 15, class A Emission |
|
|
|
315 |
AS/NZS4251.1 AS/NZS4252.1 Emission and Immunity |
|
|
|
|
|
|
|
|
|
|
|
|
|
|
|
|
|
Note: This equipment has been tested and found to comply with the limits for a Class A digital device, pursuant to Part 15 of the FCC Rules. These limits are designed to provide reasonable protection against harmful interference when the equipment is operated in a commercial environment. This equipment generates, uses, and can radiate radio frequency energy and, if not installed and used in accordance with the instruction manual, may cause harmful interference to radio communications. Operation of this equipment in a residential area is likely to cause harmful interference in which case the user will be required to correct the interference at his own expense.
This Class A digital apparatus complies with Canadian ICES-003.
Cet appareil numérique de la classe A est conforme à la norme NMB-003 du Canada

Explorer Pro EN-1
|
|
TABLE OF CONTENTS |
|
1. |
INTRODUCTION...................................................................................................................................... |
EN-3 |
|
1.1 |
Description ........................................................................................................................................... |
EN-3 |
|
1.2 |
Features ............................................................................................................................................... |
EN-3 |
|
1.3 |
Safety Precautions ................................................................................................................................. |
EN-3 |
|
2. |
INSTALLATION ....................................................................................................................................... |
EN-3 |
|
2.1 |
Unpacking ............................................................................................................................................ |
EN-3 |
|
2.2 |
Installing Components ............................................................................................................................ |
EN-4 |
|
|
2.2.1 |
Platform Installation .................................................................................................................... |
EN-4 |
|
2.2.2 |
Windshield Installation ................................................................................................................ |
EN-4 |
|
2.2.3 |
Weigh Below Preparation ............................................................................................................. |
EN-4 |
2.3. |
Selecting the Location ............................................................................................................................ |
EN-5 |
|
|
2.3.1 |
Balance Location ........................................................................................................................ |
EN-5 |
|
2.3.2 |
Leveling the Balance ................................................................................................................... |
EN-5 |
2.4 |
Connecting Power and Communications .................................................................................................. |
EN-6 |
|
|
2.4.1 |
AC Adapter Installation ................................................................................................................. |
EN-6 |
|
2.4.2 |
RS232 Interface .......................................................................................................................... |
EN-6 |
|
2.4.3 |
Initial Calibration ......................................................................................................................... |
EN-7 |
3. OPERATION .............................................................................................................................................. |
EN-8 |
||
3.1 |
Overview of Controls .............................................................................................................................. |
EN-8 |
|
3.2 |
Overview of Display Indicator ................................................................................................................ |
EN-10 |
|
3.3 |
Menu |
................................................................................................................................................. |
EN-11 |
|
3.3.1 ......................................................................................................................... |
Menu Structure |
EN-11 |
|
3.3.2 ............................................................................................................................... |
Navigation |
EN-11 |
|
3.3.3 .............................................................................................................Turning On the Balance |
EN-11 |
|
3.4 |
Applications ........................................................................................................................................ |
EN-12 |
|
|
3.4.1 ................................................................................................................................. |
Weighing |
EN-12 |
|
3.4.2 .......................................................................................................................... |
Parts Counting |
EN-13 |
|
3.4.3 ...................................................................................................................... |
Percent Weighing |
EN-17 |
|
3.4.4 ...................................................................................................................... |
Animal Weighing |
EN-19 |
|
3.4.5 ....................................................................................................................... |
Check Weighing |
EN-20 |
|
3.4.6 ........................................................................................................... |
Gross/Net/Tare Weighing |
EN-21 |
|
3.4.7 ...................................................................................................................................... |
Filling |
EN-22 |
3.5 |
Balance ..................................................................................................................................Settings |
EN-23 |
|
|
3.5.1 ............................................................................................................................... |
Calibration |
EN-23 |
|
3.5.2 ....................................................................................................................... |
Balance Options |
EN-24 |
|
3.5.3 ................................................................................................................................... |
Readout |
EN-25 |
|
3.5.4 .................................................................................................................... |
Application Modes |
EN-26 |
|
3.5.5 ........................................................................................................................................Units |
EN-26 |
|

EN-2 Explorer Pro
|
|
|
TABLE OF CONTENTS (Cont.) |
|
3.5.6 |
Interface.................................................................................................................................. |
EN-27 |
|
3.5.7 |
Print Options ........................................................................................................................... |
EN-28 |
|
3.5.8 |
GLP Print Options..................................................................................................................... |
EN-28 |
|
3.5.9 |
Lockout .................................................................................................................................. |
EN-29 |
|
3.5.10 |
Factory reset ............................................................................................................................ |
EN-29 |
|
3.9.11 |
LFT Legal for Trade ................................................................................................................... |
EN-30 |
|
3.5.12 Hardware Lock Switch .............................................................................................................. |
EN-30 |
|
|
3.5.13 |
Sealing the Balance ................................................................................................................. |
EN-30 |
3.6 |
Printing Data ....................................................................................................................................... |
EN-30 |
|
4. |
CARE AND MAINTENANCE ........................................................................................................................ |
EN-31 |
|
4.1 |
Cleaning ............................................................................................................................................. |
EN-31 |
|
4.2 |
Troubleshooting................................................................................................................................... |
EN-31 |
|
4.3 |
Error Codes List ................................................................................................................................... |
EN-32 |
|
4.4 |
Service Information .............................................................................................................................. |
EN-33 |
|
4.5 |
Replacement Parts ............................................................................................................................... |
EN-33 |
|
4.6 |
Accessories......................................................................................................................................... |
EN-33 |
|
5. TECHNICAL DATA ...................................................................................................................................... |
EN-34 |
||
5.1 |
RS232 Commands .............................................................................................................................. |
EN-34 |
|
5.2 |
Specifications ...................................................................................................................................... |
EN-35 |
|

Explorer Pro |
EN-3 |
|
|
1. INTRODUCTION
1.1 Description
Thank you for deciding to purchase an Explorer Pro®
Balance from Ohaus. Explorer® Pro’s software design allows direct access to 7 application modes and all menus. The backlit dot matrix display, is capable displaying either limited or multiple data fields at each application. Explorer® Pro’s optional AutoCal™ automatically calibrates the balance due to temperature changes that may affect calibration. Panel controls and soft key functions on the display clearly indicate functions and data. Operation is extremely simplified, you enter a menu, select an item, modify the item according to menu selections and exit.
Capacities from 62 grams to 8,100 grams are available. Legal for Trade versions are also available.
To ensure you make full use of the possibilities offered by your Explorer® Pro balance, we advise you to read through these operating instructions.
1.2 Features
•Ready to weigh without complicated setup
•3 soft keys are application mode specific.
•Operating languages include English, Spanish, French, German and Italian.
•Simplified menu navigation and balance setup.
•Capacity Bar guide and Fill bar guide.
•Flexibility to display either simple weighing results or more advanced results including piece count, average piece weight, sample size, tare weight, weight, under and over.
•Dot Matrix display with backlight
•Weighing, Parts Counting, Animal Weighing, Percent Weighing, Check Weighing, Gross/Net/Tare Weighing and Filling.
1.3 Safety Precautions
Please follow the safety precautions as listed.
CAUTION:
•Do not operate the balance around corrosive fumes.
•Only use the adapter provided with the balance.
•Do not try to service the Explorer® Pro balance.
2. INSTALLATION
2.1 Unpacking
Open the package and remove the instrument and the accessories. Check the completeness of the delivery. The following accessories are part of the standard equipment of your new Explorer® Pro balance.
Pan 3.5”, 90mm Round - Analytical 62g, 110g, 162g, 210g, 210/100g
Pan 4.7", 120mm Round -Precision 210g 410g, 510, 610g, 410/100g
Pan 6.8", 152mm Square (0.01 g units) - Precision 610g, 1500g, 2100g, 4100g, 6100g, 4100/1000g
Pan 8", 203mm Square (0.1 g units) - Precision* 6100g, 4100g, 8100g
Draft Shield - Analytical 62g, 110g, 162g, 210g, 210/100g
Draft Shield (0.001g units)- Precision 210g 410g, 610g, 410/100g
Wind Shield (0.01g Units) - Precision 610g, 1550g, 2100g, 4100g, 6100g, 4100/1000g
*4100 g, 6100 g and 8100 g balances with internal calibration are equipped with a 6" Pan and Windshield.
The following items are supplied with all balances:
AC Power Adapter, Instruction Manual, Warranty Card, In Use
Cover
•Remove packing material from the instrument.
•Check the instrument for transport damage. Immediately inform your Ohaus dealer if you have complaints or parts are missing.
•Store all parts of the packaging. This packaging
guarantees the best possible protection for the transport of your instrument.
EN-4 |
Explorer Pro |
|
|
2.2 Installing Components
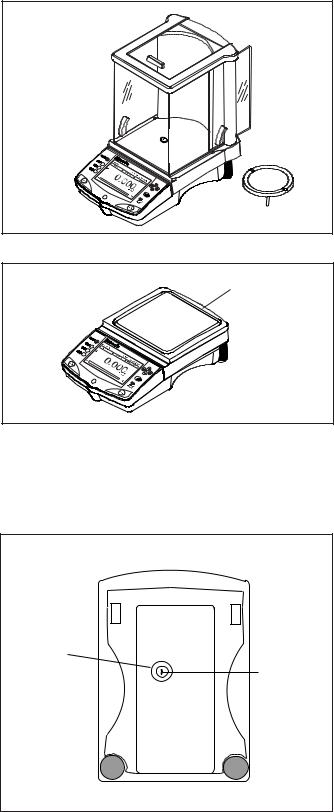
2.2.1 Platform Installation
Balances are shipped with the pan not installed. On balances equipped with a draft shield, slide open the side door and insert the pan into the center hole.
2.2.2 Windshield Installation
On 610 g to 6100 g balances with 0.01 g resolution, a windshield is required to reduce the possibility of air currents from disturbing the pan. When the windshield is in place, air currents are deflected up over the pan. Make sure the windshield is firmly snapped into place.
NOTE: 4100 g, 6100 g and 8100 g balances with internal calibration are equipped with a 6" Pan and Windshield.
Wind Shield
2.2.3 Weigh Below Preparation
The Explorer Pro balance is equipped with a weigh below hook at the bottom of the balance. To use this feature, remove the protective cover underneath the balance. See illustration for location. The balance can be supported using lab jacks or any other convenient method. Make sure the balance is level and secure. Apply power and operate the balance. Attach items to be weighed to the hook underneath the balance.
BOTTOM OF BALANCE
REMOVE |
|
|
PROTECTIVE |
|
|
COVER. |
|
|
WEIGH BELOW |
WEIGH BELOW |
|
HOOK IS INSIDE OF |
||
HOOK LOCATION |
||
BALANCE. |
||
|
Explorer Pro
2.3 Selecting the Location
2.3.1 Balance Location
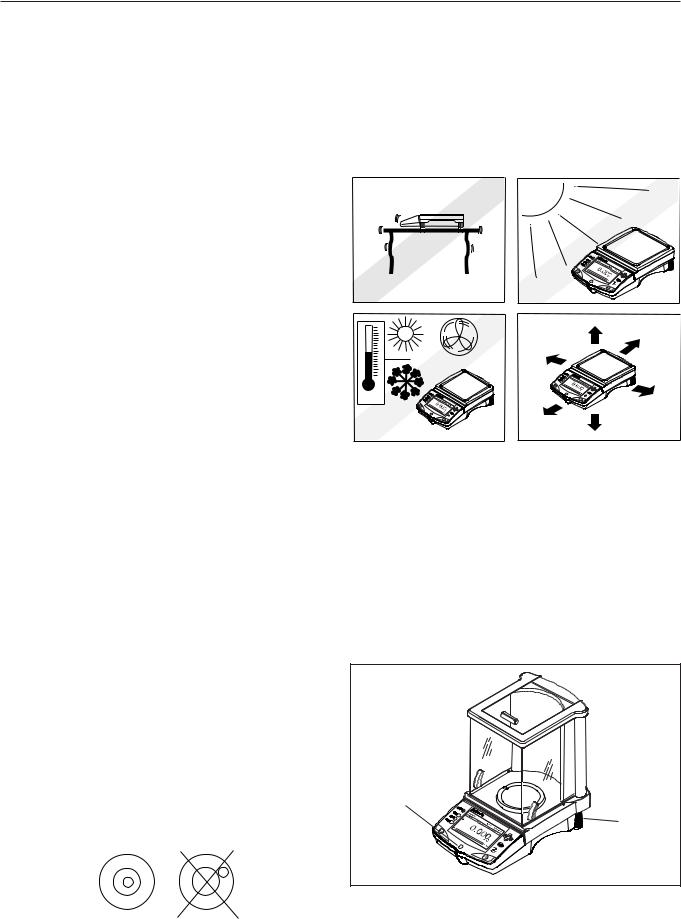
The balance should always be used in an environment which is free from excessive air currents, corrosives, vibration, and temperature or humidity extremes. These factors will affect displayed weight readings.
DO NOT install the balance:
• Next to open windows or doors causing drafts or rapid temperature changes.
• Near air conditioning or heat vents.
•Near vibrating, rotating or reciprocating equipment.
•Near magnetic fields or equipment that generates magnetic fields.
•On an unlevel work surface.
•Allow sufficient space around the instrument for ease of
operation and keep away from radiating heat sources.
2.3.2 Leveling the Balance
Exact horizontal positioning and stable installation are prerequisites for repeatable results. To compensate for small irregularities or inclinations at the location, the instrument can be leveled.
For exact horizontal positioning, the balance is equipped with a level indicator located at the front on the control panel and two leveling feet located at the rear of the balance.
Position the balance in the intended operating location. Adjust the leveling feet at the rear of the balance until the air bubble in
the indicator is centered.
Leveling Indicator
NOTE: The instrument should be leveled each time its location is changed.
EN-5
Leveling
Foot
Correct Incorrect
EN-6 |
Explorer Pro |
|
|
2.4Connecting Power and Communications
2.4.1AC Adapter Installation
Connect the AC Adapter supplied to the three pin connector located at the rear of the balance.
The balance is now ready for operation.
AC Adapter Connection
Rear of Balance
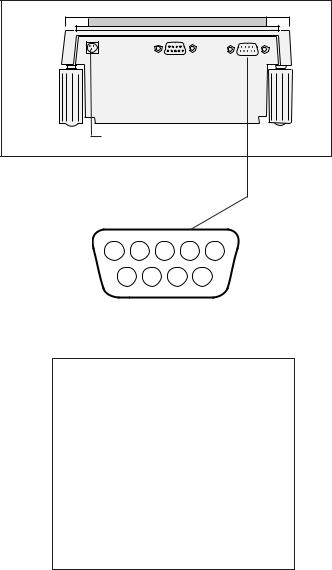
2.4.2 RS232 Interface
Explorer Pro balances are equipped with a bidirectional RS232 compatible interface for communication with serial printers and computers. When the balance is connected directly to a printer, displayed data can be output at any time by simply pressing the Print button, or by using the Auto Print feature. Connecting the balance to a computer enables you to operate the balance from the computer, as well as receive data such as displayed weight, weighing mode, stability status, etc.
1 2 3 4 5
6 7 8 9
Male Connector
The following sections describe the hardware and software provided with the balance
Hardware
On the rear of the balance, the right-hand, 9-pin male subminiature “D” connector is provided for interfacing to other devices. The pinout and pin connections are shown in the adjacent illustration. Refer to paragraph 3.5.6 for setup.
The balance is equipped with hardware handshaking, it will not output any data unless pin 5 (CTS) is held in a high state (+3 to +15 V dc). Interfaces not utilizing the CTS handshake may tie pin 5 to pin 6 to defeat it.
1N/C
2 Data Out (TXD)
3Data In (RXD)
4N/C
5Clear To Send (CTS)
6Data Terminal Ready (DTR)
7Ground
8 Request To Send (RTS)
9N/C
Output Formats
Data output can be initiated in one of three ways: 1) By pressing PRINT; 2) Using the Auto Print feature; 3) Sending a print command (“P”) from a computer.
Additional information is located in Section 5, Technical Data which contains the RS232 Command Table.
Explorer Pro |
EN-7 |
|
|
2.4.3 Initial Calibration
Calibration Masses
Calibration masses are required if the balance is not equipped with internal calibration. Before beginning calibration, make sure masses are available. If you begin calibration and realize calibration masses are not available, exit the menu. The balance will retain previously stored calibration data. Calibration should be performed as necessary to ensure accurate weighing. Masses required to perform the procedures are listed in the following table.
NOTE: Any of the calibration modes can be terminated at any time by pressing the Menu button.
CALIBRATION MASSES
|
LINEARITY |
SPAN ONLY |
CAPACITY |
MASSES |
MASSES |
62 g |
20g/50 g |
50 g |
162 g |
50g/150 g |
150 g |
110 g |
50g/100 g |
100 g |
210 g |
100g/200 g |
200 g |
410 g |
200g/400 g |
400 g |
510g/610 g |
200g/500 g |
500 g |
1550 g |
500g/1500 g |
1500 g |
2100 g |
1000g/2000 g |
2000 g |
4100 g |
2000g/4000 g |
4000 g |
6100 g |
2000g/5000 g |
5000 g |
8100 g |
4000g/8000 g |
8000 g |
|
|
|
It is recommended that masses must meet or exceed ASTM Class 1 Tolerance. Calibration masses are available as accessories.
Calibrating from the Weighing Screen
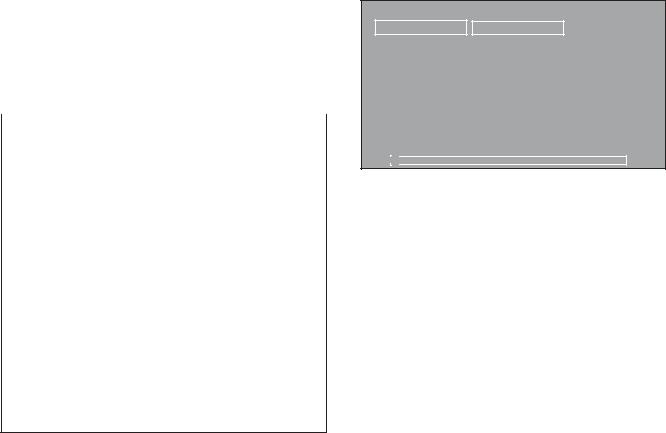
When the balance is first turned on, three soft keys appear on the weighing screen. The CALIBRATE soft key is highlighted. This permits calibration immediately without entering the CALIBRATION menu. On balances equipped with internal calibration, the balance automatically calibrates. On balances that do not have internal calibration, an external mass is required.
WEIGHING |
01/01/03 |
03:05:45: PM |
|
UNITS |
2nd UNITS |
|
|
|
CALIBRATE |
||
* |
|
0.00g |
|
|
0.00g |
0g |
|
6100g |
|
Press the Enter button with the CALIBRATE soft key highlighted. On balances that do not have internal calibration, a message appears on screen indicating the mass value to be placed on the pan and also indicates other values of masses that can be used.
Place the required mass on the pan and press the Enter button. The balance performs a span calibration.

EN-8 |
Explorer Pro |
|
|
3OPERATION
3.1 Overview of Controls
|
1 |
|
|
2 |
|
|
|
|
|
3 |
|
|
WEIGHING |
01/01/03 |
03:05:45: PM |
4 |
|
|
UNITS |
2nd UNITS |
CALIBRATE |
||
13 |
* |
0.00g |
5 |
||
|
|||||
12 |
6 |
||||
|
|
0.00g |
|||
11 |
|
|
|
|
|
10 |
0g |
|
6100g |
|
|
|
|
|
|
7 |
|
|
|
|
|
14 |
|
|
9 |
8 |
|
|
|
No. |
Designation |
Function |
|
|
|
1 |
I |
Power On/ Off button. |
|
||
2 |
button |
When pressed in Menu mode, single press moves menu selection bar in an up direction and |
|
|
highlights the activated field or changes the settings of a selected field in increasing order. |
When at an alphanumeric field, then the number or letter is incremented.
3 |
button |
When pressed in Menu mode, single press moves the cursor within a alphanumeric field |
|
|
to the left (example date 07/02/2003). Selection does not wrap at end. |
|
|
In application mode, single press moves to the next soft key selection to the left. |
4 |
button |
When pressed in Menu mode, single press moves the cursor within a alphanumeric field |
|
|
to the right (example date 07/02/2003). Selection does not wrap at end. |
|
|
In application mode, single press moves to the next soft key selection to the right. |
Explorer Pro |
EN-9 |
||
|
|
|
|
|
|
|
|
No. |
Designation |
Function |
|
|
|
|
|
5 |
button |
When pressed In Menu mode, single press moves menu selection bar in a down direction |
|
|
|
and highlights the selected field or changes the settings of a selected field in decreasing |
|
|
|
order. |
|
|
|
When at an alphanumeric field, then the number or letter is decremented. |
|
6 |
Enter button |
When pressed in application modes, functions as an “Enter” button to accept Soft-key selection. |
|
|
|
When pressed in menu, functions as an “Accept” button for accepting and saving |
|
|
|
parameter of selected items. |
|
7 & 9 |
>O/T< buttons |
When pressed, performs tare function or zero function. |
|
8 |
Spirit Level |
Provides a leveling indication for the balance. |
|
10 |
LCD Display |
Backlit LCD display provides all necessary indications for operation. |
|
11 |
Mode button |
When pressed, causes the balance to cycle through all active application modes. |
|
12 |
Print button |
When pressed in any application mode, causes a print function to occur. |
|
13 |
Menu button |
When pressed in any application mode, will bring up the Menu screen. Pressing the button |
|
|
|
within a Menu screen will return to the application mode. |
|
14 |
Feet |
Two adjustable feet used to level the balance. |
|
|
|
|
|

EN-10 |
Explorer Pro |
|
|
3.2 Overview of Display Indicator
No.
1
2
3
4
5
6
7
8
9
10
11
12
13
|
1 |
|
2 |
3 |
|
|
WEIGHING |
|
01/01/03 03:05:45: PM |
|
|
|
UNITS |
|
2nd UNITS |
CALIBRATE |
4 |
|
Message Line |
|
|
5 |
|
13 |
* |
200.0000dwt |
6 |
||
12 |
|||||
|
|
||||
11 |
-0 |
7 |
|||
|
Result Line |
|
|
Result Line |
8 |
|
Result Line |
|
|
Result Line |
|
|
Result Line |
|
|
Result Line |
|
|
0g |
|
|
6100g |
9 |
|
|
|
|
|
|
|
|
|
10 |
|
|
Designation |
Function |
|
|
|
|
Application |
Indicates the active application by function. |
|
|||
Date |
Indicates current date when properly set. |
Time |
Indicates current time when properly set. |
Soft Keys |
Three Soft-keys are displayed in the upper display area. Depending on the application mode |
|
selected, the functionality changes. A Soft-key can be selected by using the left and right |
|
arrow buttons. Pressing the Enter button on a highlighted soft-key will activate the |
|
function. |
Message Line |
Contains instructional messages. |
Numerical Display |
Indicates primary weight/load. |
Unit of measure |
Indicates active unit of measure. |
Result Lines 1-6 Six lines that contain balance results.
Capacity |
Indicates full balance capacity. |
Bar Graph |
Shaded area indicates capacity used for, under, accept, over for check weighing application, |
|
or target values for filling application. |
0 |
Indicates center of zero (only active in legal for trade). |
|
|
- |
Indicates negative value. |
* |
Stability indicator. |
|

Explorer Pro |
EN-11 |
|
|
|
|
3.3 Menu
3.3.1 Menu Structure
The Explorer Pro balance utilizes a menu structure that permits entering various menus by using a dedicated Menu button. Pressing the Menu button allows access to additional sub menus. See illustration below.
MENU
Calibration
Balance Options
Readout
Application Modes
Units
Interface
Print Options
GLP Print Options
Lockout
Factory Reset
Exit
3.3.2 Navigation
When the balance is first turned on, the main weighing screen is displayed. To enter the menu and to change parameters, the following controls are used:
Menu button - When pressed, enters the Menu.
Enter buttonWhen pressed, accepts the menu field selections.  - Scrolls up through the menus.
 -Scrolls down through the menus.
 - Moves the cursor within the field to the left.
 - Moves the cursor within the field to the right.
There are two ways to exit the Menu; one is to scroll to Exit and press the Enter button, the other is to press the Menu button. All changes will be saved.
To select a highlighted menu, press the Enter button. Each menu item contains a display that allows setting balance parameters to individual requirements. These are described in detail in section 3.5 Balance Settings.
Section 3.5.1 describes Calibration procedures and section 3.4 describes the Applications.
3.3.3Turning on the Balance
The Explorer Pro balance is ready to operate after the installation procedures are performed. When the balance is first turned on and it completes its checks, it can be used to weigh or tare materials without setting the menus.
It is recommended that you read this manual carefully and set the balance to operate to your specific applications before using.
Power On/Off
To turn the balance ON, press the On/Off button. To turn OFF, press the button again.
Stabilization
Before initially using the balance, allow time for it to adjust to its new environment. The balance only requires to be plugged in to warm up.
Recommended warm up period is twenty (20) minutes. Analytical Class I balances require at least 2 hours.
The internal circuits of the balance are powered whenever it is plugged into a power source.
 Loading...