


Ohaus SPX621, SPX622, SPX6201, SPX8200, SPX223 Instruction Manual
...ScoutTM Series Balances - SPX
Instruction Manual
Balanzas ScoutTM Series - SPX
Manual de instrucciones
Balances ScoutTM Séries - SPX
Mode d’emploi
ScoutTM Waagen-Serien - SPX
Bedienungsanleitung
Bilance Serie ScoutTM - SPX
Manuale d’Istruzioni
EN-2 |
SCOUTTM SERIES BALANCES - SPX |
|
|

SCOUTTM SERIES BALANCES - SPX |
EN-1 |
1. INTRODUCTION
This manual contains installation, operation and maintenance instructions for the Scout SPX Series Balances. Please read the manual completely before using the balance.
1.1 Definition of Signal Warnings and Symbols
Safety notes are marked with signal words and warning symbols. These show safety issues and warnings. Ignoring the safety notes may lead to personal injury, damage to the instrument, malfunctions and false results.
Signal Words |
|
|
WARNING |
For a hazardous situation with medium risk, possibly resulting in injuries or |
|
|
death if not avoided. |
|
CAUTION |
For a hazardous situation with low risk, resulting in damage to the device or |
|
|
the property or in loss of data, or injuries if not avoided. |
|
Attention |
For important information about the product. |
|
Note |
For useful information about the product |
|
Warning Symbols |
|
|
|
Attention Symbol |
Electric Shock Hazard |
1.2 Safety Precautions
CAUTION: Read all safety warnings before installing, making connections, or servicing this equipment. Failure to comply with these warnings could result in personal injury and/or property damage. Retain all instructions for future reference.
Verify that the local AC power supply is within the input voltage range printed on the AC adapter’s data label.
Only connect the AC adapter to a compatible grounded electrical outlet.
Do not position the scale such that it is difficult to disconnect the AC adapter from the power receptacle.
Make sure that the power cord does not pose a potential obstacle or tripping hazard.
This equipment is intended for indoor use and should only be operated in dry locations.
Operate the equipment only under ambient conditions specified in the user instructions.
Do not operate the equipment in hazardous or unstable environments.
Do not drop loads on the pan.
Only use approved accessories and peripherals.
Disconnect power from the equipment before cleaning or servicing.
Service should only be performed by authorized personnel.
2.INSTALLATION
2.1 Installing Components
Refer to the illustrations and instructions below to identify and assemble your Scout balance with its components. All components must be assembled before using the balance.

EN-2 |
SCOUTTM SERIES BALANCES - SPX |
2.1.1 Releasing the transportation Lock
Release the red Transportation Lock on |
Subplatform |
|
subplatform of the balance by turning the |
||
|
red pointer 90 counter-clockwise.
Transportation
Lock Pointer
Locked
Position
Unlocked
Position
Figure 2-1. Transportation Lock
2.1.2 Installing the Weighing Pan
Balances with a rectangular pan are placed into the sub-platform as shown and rotated counter-clockwise until it locks. Round pans are placed straight down on sub-platform.
Figure 2-2. Pan Installation
2.1.3 Security Slot
A security slot is provided at the rear of the balance allowing the balance to be secured by an optional cable and lock accessory.
2.2 Selecting the Location
For best performance, the Scout SPX balance should be used in a clean, stable environment. Do not use the balance in environments with excessive drafts, with rapid temperature changes, near magnetic fields or near equipment that generates magnetic fields, or vibrations.
2.3 Leveling the Balance
The Scout has an illuminated level indicator as a reminder that the balance should be leveled for accurate weighing. There is a level bubble in a small round window on the front of the balance. To level the balance, adjust the feet at each corner until the bubble is centered in the circle. Be sure the equipment is level each time its location is changed.
Figure 2-3. Level indicator
SCOUTTM SERIES BALANCES - SPX |
EN-3 |
2.4 Connecting Power
AC Adapter Installation
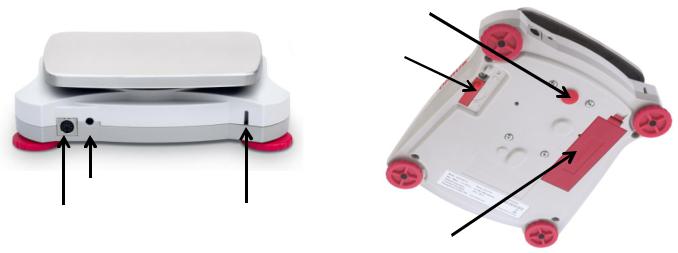
AC power is used to power the scale when battery power is not needed. First, connect the AC Adapter (supplied) to the AC Adapter Input Jack at the rear of the balance then connect the AC plug to an electrical outlet.
Weigh Below Hole
Security Switch
AC Adapter Input Jack
Interface Connection |
Security slot (Anti-theft lock slot) |
|
Battery Compartment Cover |
Figure 2-4. Rear and bottom view of balance
Battery Installation
Install the four “AA” batteries with polarity as shown in the battery compartment.
Note:
After power on, it is recommended to warm up the balance for at least 5 minutes before using it.
2.5 Initial Calibration
When the Balance is first installed, and when it is moved to another location, it must be calibrated to ensure accurate weighing results. Have the appropriate calibration masses available before beginning calibration. Refer to the Calibration Section for masses and calibration procedure.

EN-4 |
SCOUTTM SERIES BALANCES - SPX |
3. OPERATION
3.1 Controls
Figure 3-1. Scout Control Panel
TABLE 3-1. Button Functions
Button |
|
|
|
|
|
|
|
|
|
|
|
|
|
|
|
|
|
|
|
|
|
|
|
|
|
|
|
|
|
|
|
|
|
|
|
|
|
|
|
|
|
|
|
|
|
|
|
|
|
|
|
|
|
|
|
|
|
|
|
|
|
|
|
|
|
|
|
|
|
|
|
|
|
|
|
|
|
|
|
|
|
|
|
Primary Function |
|
Zero/On |
|
|
Function |
|
Tare |
|||||||||||||
(Short Press) |
Turns the balance |
Sends the current |
Initiates an |
Enter/clear a |
||||||||||||||||
|
on |
value to the selected |
application |
tare value. |
||||||||||||||||
|
|
|
|
|
|
|
COM ports if |
mode. |
|
|
|
|
|
|||||||
|
If balance is On, |
AUTOPRINT is set |
|
|
|
|
|
|
|
|
|
|||||||||
|
to Off. |
|
|
|
|
|
|
|
|
|
||||||||||
|
sets Zero |
|
|
|
|
|
|
|
|
|
||||||||||
|
|
|
|
|
|
|
|
|
|
|
|
|
|
|
||||||
Secondary Function |
Zero/Off |
Units |
Mode |
Menu |
(Long Press) |
Turns the balance |
Changes the |
Allows changing |
Enter the |
|
Off. |
weighing unit. |
the application |
User menu. |
|
|
|
mode. |
|
Menu Function |
Yes |
No |
Back |
Exit |
(Short Press) |
Accepts the current |
Advances to the next |
Moves Back to |
Exits the |
|
setting on the |
menu or menu item. |
previous menu |
User menu. |
|
display. |
Rejects the current |
item. |
Aborts the |
|
|
setting on the |
|
calibration in |
|
|
display and |
|
progress. |
|
|
advances to the next |
|
|
|
|
available setting. |
|
|
Notes: 1 Short Press: Press less than 1 second.
2 Long Press: Press and hold for more than 2 seconds.

SCOUTTM SERIES BALANCES - SPX |
EN-5 |
1 |
|
|
13 |
|
|
|
|
2 |
|
|
12 |
3 |
|
|
11 |
4 |
|
|
10 |
5 |
|
|
9 |
6 |
|
|
|
|
7 |
|
8 |
|
Figure 3-1. Scout Display |
||
|
|
||
|
|
TABLE 3-2. Display Symbols* |
|
Item |
Description |
Item |
Description |
1 |
Battery charge symbol |
8 |
Kilogram, grain symbols |
2 |
Stable weight symbol |
9 |
Check Weighing symbols |
3 |
Negative symbol |
10 |
Pound, Ounce, Pound:Ounce symbols |
4 |
Center of Zero symbol |
11 |
Percent, dwt, g/mol symbols |
5 |
NET symbol |
12 |
Gravity, Pieces, t hk, t sg, t tw, Hold |
|
|
|
symbols |
6 |
Preset Tare symbol |
13 |
Newton, Totalization, Dynamic, Bluetooth |
|
|
|
symbols |
7 |
Pointer symbols |
|
|
Note: * Some symbols might not be available depending on different models.
3.2 Turning Balance On/Off
To turn the balance on, press and hold the On/Zero Off button for 1 second. The balance performs a display test, momentarily displays the software version, and then enters the active weighing mode.
To turn the balance off, press and hold the On/Zero Off button until OFF is displayed.
3.3 Calibration Operation
When the balance is operated for the first time, a span calibration is recommended to ensure accurate weighing results. Before performing the calibration, be sure to have the appropriate calibration weights. Ensure that the Security switch is set to unlocked position.
Press and hold Menu until [mMeNU] (Menu) is displayed. When the button is released, the display will show [C.A.L]. Press Yes to accept. [SpaN] will then be shown. Press Yes to begin the span calibration.
[--C--] will be displayed while zero reading is stored. Next, the display shows the calibration weight value (press No to toggle value). Place the specified calibration mass on the pan. [--C--] will be displayed while the reading is stored. The display will show [done] if the calibration was successful. The balance returns to the previous application mode and is ready for use.
EN-6 |
SCOUTTM SERIES BALANCES - SPX |
3.4 Weighing Mode
This mode is the factory default setting.
1.If needed, press and hold Mode until [wWeIGH] (Weigh) is displayed.
2.If required, place an empty container on the pan and press Tare.
3.Add sample to the pan or container. The display shows the weight of the sample.
3.5 Counting Mode
This mode counts large numbers of items based on the weight of a reference count.
1.Place an empty container on the pan and press Tare.
2.Press and hold Mode until [Count] (Count) is displayed. [CLr.PwW] (Clear Average Piece Weight, APW) will then display.
If no APW exists, the balance will display [Put.10], proceed to step 5.
3.Press No to use the stored APW. Proceed to step 7.
4.Press Yes to establish an APW.
5.The balance will then display the stored sample size, i.e. [Put 10]. Press No or Back to toggle the choices (5, 10, 20, 50 or 100).
6.Put the indicated number of pieces on the pan then press Yes to calculate the APW. The display shows the piece count.
7.Add additional pieces until the desired count is reached.
8.To clear the stored APW press and hold Mode until [Count] is displayed. Press Yes when
[Clr.pwW] is displayed.
Note: Press Function to view the current APW.
3.6 Percent Mode
This mode measures the weight of a sample as a percentage of a reference weight.
1.If required place an empty container on the pan and press Tare.
2.Press and hold Mode until [Percnt] is displayed. [Clr.ref] (clear reference) will then display. If no reference weight exists, the balance will display [Put.ref], proceed to step 5.
3.Press No to use the stored reference weight and proceed to step 6.
4.Press Yes to establish a new reference. Balance will now display [Put.ref].
5.Add the desired reference material to the pan or container. Press Yes to store the reference weight. The display shows 100%.
6.Replace the reference material with the sample material. The display shows the percentage of the sample compared to reference weight.
7.To clear the stored reference press and hold Mode until [Percnt] is displayed. Press Yes when [Clr.ref] is displayed.
Note: Press Function to view the current reference weight.
SCOUTTM SERIES BALANCES - SPX |
EN-7 |
3.7 Check Mode
Use this mode to compare the Weight to a target weight range. The balance supports positive, negative and zero check weighing.
3.7.1 Check Weighing
Use this mode to compare the weight of items to a target weight range.
1.Press and hold Mode until [CHeCk] (Check) is displayed. [CLr.ref] (clear check limits) will then display.
2.Press No to use the stored check limits and proceed to step 5.
3.Press Yes to establish new check limits. The balance will then display [Set. Lo]. Press Yes to view the “Low” limit value. Press Yes to accept or No to edit the “Low” limit value. The
stored value then displays with the first digit highlighted [ 00.000 kg]. Repeatedly press No until the desired number appears. Press Yes to accept and highlight the next digit. Repeat until all the digits are correct. Press Yes to accept the “low” limit value, [Set. Hi] will be displayed.
4.Repeat the same procedure to accept or edit the “high” value.
5.If required, place an empty container on the pan and press Tare.
6.Place sample material on the pan or in the container. If the sample weight is under the target weight range, the under icon  will light.
If the sample is within the target weight range, the accept symbol  will light. If the sample is over the target weight range, over icon
  will light.
Note: Press Function to view the low and high check limits.
Positive Check
Positive check is used to determine when the material added to the balance is within the target range. In this case the UNDER and OVER limits must be positive values. (The OVER limit must be greater than the UNDER limit.)
Add material to the balance until it is within the ACCEPT ( ) range.
Negative Check
Negative check is used to determine when the material removed from the balance is within the target range. In this case the UNDER and OVER limits are both negative values.
(The UNDER limit must be greater than the OVER limit.) Place the item to be weighed on the balance and press TARE.
Remove a portion of the item until it is within the ACCEPT range.
Zero Check
Zero check is used when comparing subsequent samples to an initial reference sample. In this case, the UNDER limit must be a negative value and the OVER limit must be a positive value. Place the reference item on the balance and press TARE. Remove the reference sample and place the item to be compared on the balance to determine if it is within the ACCEPT range.
EN-8 |
SCOUTTM SERIES BALANCES - SPX |
3.8 Totalization Mode
This mode allows the user to store a series of weight measurements. Totalize mode has been initiated when the symbol “∑” is displayed and the current unit is displayed.
Notes: Only positive numbers are totalized.
1.Press and hold Mode until [total] (Totalization) is displayed. [CLr.tot] will then be displayed.
2.Press Yes or No key to clear the current totalized data or not. When a weight is added to the scale the value is displayed.
3.If required, place an empty container on the pan and press Tare. Add the first item, its weight is displayed. Press Function to store the weight, the “∑” symbol will flash and the display will show the total weight.
4.Press Tare (or remove the weight in previous operation) and add the next item. The scale will display its weight. Press Function to store its weight. The “∑” symbol will flash and the new total weight will be displayed.
5.Repeat step 4 for all of the items to be accumulated.
6.To clear the stored total press and hold Mode until [total] is displayed. When [Clr. tot] is displayed, press Yes.
3.9 Hold Mode
There are two modes for the display hold:
-Peak Hold: allows the user to capture and store the highest stable weight value (>=5d).
-Display Hold (default): allows the user to capture and store the first stable weight value (>=5d).
Start
If no weight value is held on the display, press Function key to begin. The [rEAdY] (Ready) will be displayed until a weight is added on the pan.
When the stable value is being held on the display, the Hold icon (H) will blink and the displayed weight will not change.
Reset
If the pan is empty and a weight value was held on the display, a single short press of the Function key will clear the held value and show the new weight on the pan.
1.Press and hold Mode until [HoLd] is displayed.
2.If required, place an empty container on the pan and press Tare. Zero value will then display.
3.Press Function key to begin. The [rEAdY] (Ready) will be displayed.
4.Place samples to be weighed on the pan.
5.The stable value will be held on the display, the Hold icon (H) will blink.
SCOUTTM SERIES BALANCES - SPX |
EN-9 |
4. MENU SETTINGS
The User Menu allows the customizing of balance settings.
Note: Additional Sub-Menus may be available if Interface Options are installed. See Interface User Manual for the additional setting information.
4.1 Menu Navigation
User Menu:
|
|
Sub-Menus |
C.a.l |
S.e.t.u.p |
M.o.d.e |
U.n.i.t |
E.n.d |
||
|
|
|
|
|
|
|
|
|
|
|
|
|
User Menu |
Span |
Reset |
Reset |
Reset |
|
|
|
|
|
Items: |
Lin |
Yes/No |
Yes/No |
g |
|
|
|
|
|
|
Long press - |
|
Filter |
Weighing |
kg |
|
|
|
|
|
|
Low/Med/High |
On/Off |
ct |
|
|
|
|
|
|
Enter menu |
|
|
|||
|
|
|
|
|
AZT |
Counting |
N |
|
|
|
|
|
|
|
|
|
|||
|
|
|
|
|
|
0.5/1/3/Off |
On/Off |
oz |
|
|
|
|
|
|
|
StableRange |
Percent |
ozt |
|
|
|
|
|
Short press - |
|
0.5/1/2//5 |
On/Off |
dwt |
|
|
Yes |
|
|
Backlight |
Check |
lb |
|
||
|
|
|
|
Accept |
|
Off/On/Auto |
On/Off |
lb:oz |
|
|
|
|
|
|
|
|
|||
|
|
|
|
|
|
Auto Tare |
Totalize |
grn |
|
|
|
|
|
|
|
Off/On/On-acc |
On/Off |
hkt* |
|
|
No/Back Short press – |
|
Auto Off |
Hold |
sgt* |
|
|||
|
|
|
|
Go to |
|
Off/1/5/10 |
Disp/Peak/Off |
twt* |
|
|
|
|
|
Next/Prev. |
|
|
|||
|
|
|
|
|
|
|
t* |
|
|
|
|
|
|
menu |
|
|
|
|
|
|
|
|
|
|
|
|
tola/tical |
|
|
|
|
|
|
|
|
|
|
|
|
|
Exit |
|
|
|
|
|
C |
|
|
|
|
|
|
Short press – |
|
|
|
|
|
|
|
|
|
Exit menu |
|
|
|
|
|
|
|
|
|
|
End |
End |
End |
End |
|
Notes:
* Only available in certain regions.
When the Security Switch is in locked position, the Calibration function is hidden, Units are locked to the current setting.
Security switch:
4.2 Calibration Menu
Enter this menu to perform calibrations.
Span: |
Perform |
Linearity: |
Perform |
End Calibration: |
Exit menu |
|
|
Span [SpaN]
Initiates a span calibration procedure (zero and span)
Lin [LIN]
Initiates a linearity calibration procedure (zero, mid-point and span).
End Cal [End]
Advance to the next menu or return to the top of the current menu.

EN-10 SCOUTTM SERIES BALANCES - SPX
4.3 Setup Menu
Enter this menu to set balance parameters.
Reset: |
no, yes |
Filter: |
Low, Med, High |
Auto Zero Tracking: |
off, 0.5d, 1d, 3d |
Stable: |
0.5d, 1d, 2d, 5d |
Backlight: |
off, on, auto |
Auto Tare: |
off, on, on-acc |
Auto Off: |
off, 1, 5, 10 |
End Setup: |
Exit menu |
|
|
Note: Bold always represents factory default value
Reset [reset]
Reset the Setup menu to factory defaults.
NO |
= not reset |
YES |
= reset |
Filter [FILtEr]
Set the amount of signal filtering.
LOW |
= less stability, faster stabilization time |
MED |
= normal stability, stabilization time |
HI |
= greater stability, slower stabilization time |
AZT [AZt]
Set the automatic zero tracking functionality.
OFF |
= disabled |
0.5d |
= the display will maintain zero until a change of 0.5 divisions per second has |
|
been exceeded. |
1d |
= the display will maintain zero until a change of 1 divisions per second has been |
|
exceeded. |
3d |
= the display will maintain zero until a change of 3 divisions per second has been |
|
exceeded. |
Stable Range [Stable]
Set the amount the reading can vary while the stability symbol remains on. 0.5d = 0.5 balance division
1d = 1 balance division
2d = 2 balance division
5d = 5 balance division
Back Light [LIGHt]
Sets backlight functionality.
OFF |
= always off |
ON |
= always on |
AUTO |
= turns on when a button is pressed or the displayed weight changes. |
Note: When connected with power pack, the backlight is always on.
Auto Tare [A.tArE]
Set the automatic tare functionality.
OFF |
= Automatic Tare is disabled |
ON |
= the first stable gross weight is tared |
ON-ACC |
= stable gross loads within the accept limits are tared (in Check weighing mode) |
SCOUTTM SERIES BALANCES - SPX |
EN-11 |
|
Auto off [A.OFF] |
|
|
Set the automatic shut off functionality. |
|
|
OFF |
= disabled |
|
1 |
= powers off after 1 minute of no activity |
|
5 |
= powers off after 5 minutes of no activity |
|
10 |
= powers off after 10 minutes of no activity |
|
End Setup [End]
Advance to the next menu or return to the top of the current menu.
4.4 Mode Menu
This menu activates modes so they will be available for use with the Mode button.
Reset: |
no, yes |
Weigh: |
off, on |
Count: |
off, on |
Percent: |
off, on |
Check: |
off, on |
Totalize: |
off, on |
Hold: |
Disp, Peak, Off |
End Mode: |
Exit menu |
|
|
Reset [reset]
Reset the Mode menu to factory defaults.
NO |
= not reset |
YES |
= reset |
Weigh [wWEIGH]
Set the status.
OFF |
= disabled |
ON |
= enabled |
Count [COUNt]
Set the status.
OFF |
= disabled |
ON |
= enabled |
Percent [PerCNt]
Set the status.
OFF |
= disabled |
ON |
= enabled |
Check [CHECk]
Set the sub-mode
OFF |
= disabled |
ON |
= enabled |
Totalize [total]
Set the sub-mode
OFF |
= disabled |
ON |
= enabled |
EN-12 |
SCOUTTM SERIES BALANCES - SPX |
Hold [Hold] |
|
Set the sub-mode. |
|
OFF |
= disabled |
Peak Hold |
= allows the user to capture and store the highest stable weight value |
|
(>=5d). |
Display Hold |
= allows the user to capture and store the first stable weight value (>=5d). |
When the stable value is being held on the display, the “Hold” icon will blink and the displayed weight will not change.
Advance to the next menu or return to the top of the current menu.
End Mode [End]
4.5 Unit Menu
This menu activates units so they will be accessible with the Units button. The units in the menu must be turned “on” to be active.
Note: Available units vary by model and local regulations.
g: |
off, on |
kg: |
off, on |
ct: |
off, on |
N: |
off, on |
oz: |
off, on |
ozt: |
off, on |
dwt: |
off, on |
lb: |
off, on |
lb:oz: |
off, on |
grn: |
off, on |
hkt: |
off, on |
sgt: |
off, on |
twt: |
off, on |
t: |
off, tola, tical |
C: |
off, on |
End Unit: |
Exit menu |
|
|
Custom Unit (C)
Use the Custom Unit to display weight in an alternative unit of measure. The custom unit is defined using a conversion factor based on gram unit, where the conversion factor is the number of custom units per gram expressed in scientific notation (Factor x 10^Exponent).
Factor
Set the conversion factor (0.1 to 1.99) using the numeric keypad.
The default setting is 1.0.
SCOUTTM SERIES BALANCES - SPX |
EN-13 |
Exponent
Set the factor multiplier.
-3 = divide the Factor by 1000 (1x10⁻³) -2 = divide the Factor by 100 (1x10⁻²) -1 = divide the Factor by 10 (1x10⁻¹)
0= multiply the Factor by 1 (1x100)
1= multiply the Factor by 10 (1x101)
2= multiply the Factor by 100 (1x10²)
3= multiply the Factor by 1000 (1x10³)
Least Significant Digit
Set the graduation.
Settings of 0.5, 1, 2, 5, 10, 100 are available.
Note: Custom Unit is locked at Off position when the Security Switch is set to the locked position.
Follow below instructions below to enter the unit menu to set the Custom Unit.
Press and hold Menu until [mMeNU] is displayed. When the button is released, the display will show [C.A.L]. Press No through the succeeding menu items: [C.A.L], [SEtUP], [mModE] until [Unit] is displayed.
1.When [Unit] is displayed, press Yes.
2.[rESEt] will be displayed. Press No, [Unit g] will be displayed.
3.Press No to toggle through active units until [Unit c] is displayed.
4.Press Yes, [On c] will be displayed, then press Yes.
5.[Factor] is displayed. Press Yes to view the default Factor. Press Yes to accept or No to edit
the “factor multiplier”. The stored value is then displayed with the first digit highlighted
[ .0000000]. Repeatedly press No until the desired number appears. Press Yes to accept and highlight the next digit. Repeat until all the digits are correct. Press Yes to accept the “Factor” value.
6.[EPt] is displayed. Repeat the same procedure as in step 5 to accept or edit the “Exponent” value. Press Yes to accept the “Exponent” value.
7.[LSd] is displayed. Repeat the same procedure as in step 5 to accept or edit the “Least Significant Digit” value. Press the Yes key to accept the graduation value, [End] is displayed.
8.When [End] is displayed, press Exit to exit to weighing mode.

EN-14 |
SCOUTTM SERIES BALANCES - SPX |
4.6 Additional Features
Weigh Below Hook
The Scout Balance is equipped with a weigh below hook for weighing below the balance. The weigh below hook is located at the reverse side of the battery cover as shown below.
To use this feature, remove the red protective cover underneath for the weigh below opening. Attention: Before turning the balance over, remove the Pan and Pan Support (if present), and turn the transportation lock to “locked” position to prevent damage.
Weigh Below Hook |
|
Weigh Below Hook installed |
|
|
|
Weigh below opening
Figure 4-2. Weigh below
The balance can be supported using lab jacks or any other convenient method. Ensure the balance is level and secure and that the transportation lock has been released. Power on the balance, then use a string or wire to attach items to be weighed.
Figure 4-3. Weigh below application
Connecting the Interface
Use an optional interface connectivity kit to connect the balance either to a computer or a printer.
Below Interface kit accessories are available:
RS232, USB Host, USB Device, Ethernet,
Bluetooth®*.
Security slot
Interface connection |
AC Adapter jack |
|
Figure 4-4. Rear of the balance
*Interface kits may vary according to local regulations
The Bluetooth® word mark and logos are registered trademarks owned by Bluetooth SIG, Inc. and any use of such marks by OHAUS is under license.

SCOUTTM SERIES BALANCES - SPX |
EN-15 |
5. MAINTENANCE
5.1 Cleaning
WARNING: Electric Shock Hazard. Disconnect the equipment from the power supply before cleaning. Electric Shock Hazard.
The housing may be cleaned with a cloth dampened with a mild detergent if necessary.
Attention: Do not use solvents, chemicals, alcohol, ammonia or abrasives to clean the housing or control panel.
5.2 Troubleshooting
The following table lists common problems and possible causes and remedies. If the problem persists, contact OHAUS or your authorized dealer.
|
|
TABLE 5-1 |
|
Symptom |
Possible Cause |
||
Cannot turn on |
No power to balance |
||
Poor accuracy |
Improper calibration; Unstable environment |
||
Cannot calibrate |
Security switch in locked position |
||
Err |
8.1 |
Weight exceeds power on zero range. |
|
Err |
8.2 |
Weight below power on zero range. |
|
Err |
8.3 |
Over load (weight exceeds rated capacity) |
|
Err |
8.4 |
Under load (pan removed) |
|
Err |
8.5 |
Tare out of range |
|
Err |
8.6 |
Displayed value exceeds 999999 (possible in Totalization mode) |
|
ref.err |
Parts counting or percentage error – sample weight <1d. Balance shows |
||
error then exits parts counting or goes to [Clr.APU]. |
|||
|
|
||
Lo.ref |
Percent Reference weight or APW is too low for accurate results |
||
CAL E |
Fail to do calibration. |
||
USB.Err |
Cannot find menu or app file in U-disk. |
||
5.3 Service Information
If the troubleshooting section does not resolve or describe your problem, contact your authorized OHAUS service agent. For service assistance or technical support in the United States call toll-free 1-800-672-7722 ext. 7852 between 8:00 AM and 5:00 PM EST. An OHAUS product service specialist will be available to provide assistance. Outside the USA, please visit our web site, www.ohaus.com to locate the OHAUS office nearest you.
5.4 Accessories
TABLE 5-2. ACCESSORIES
DESCRIPTION |
Item Number |
RS232 kit |
30268982 |
USB Host kit |
30268983 |
USB Device Kit |
30268984 |
|
|
Bluetooth Kit* |
30268985 |
|
|
Ethernet Kit |
30268986 |
Stacking Kit, x6 |
30268987 |
DESCRIPTION |
Item Number |
Stacking Kit, x1 |
30268988 |
Specific Gravity kit |
30269020 |
Auxiliary Display Kit |
30269019 |
|
|
Carrying Case |
30269021 |
|
|
In-Use Cover |
30269022 |
Printers and Cables |
Contact OHAUS |
Note: * Bluetooth kit is only available in certain regions according to the local regulations.
EN-16 |
SCOUTTM SERIES BALANCES - SPX |
6. TECHNICAL DATA
The technical data is valid under the following ambient conditions: Indoor use only
Operating temperature range: +5°C to +40°C
Relative humidity: 10% to 80% at 31°C, decreasing linearly to 50% at 40°C, non-condensing Altitude: Up to 2000 m
Power: AC power adaptor input 100-240V 50/60 Hz and output 5 V DC 1 A, or 4 AA batteries Pollution degree: 2
Installation category: II
Main supply voltage fluctuations: up to ± 10% of the nominal voltage
6.1 Specifications
TABLE 6-1. SPECIFICATIONS
Model |
SPX123 |
|
SPX223 |
SPX222 |
SPX422 |
SPX622 |
SPX1202 |
|
SPX2202 |
|
|
|
|
|
|
|
|
|
|
|
|
Capacity (g) |
120 |
|
220 |
220 |
420 |
620 |
1200 |
|
2200 |
|
Readability (g) |
0.001 |
|
0.001 |
0.01 |
0.01 |
0.01 |
0.01 |
|
0.01 |
|
Repeatability (Std. Dev.) (g) |
0.002 |
|
0.002 |
0.01 |
0.01 |
0.01 |
0.02 |
|
0.02 |
|
Linearity (g) |
0.003 |
|
0.003 |
0.01 |
0.01 |
0.02 |
0.03 |
|
0.03 |
|
Span Calibration Mass* |
100 g |
|
200 g |
200 g |
200 g |
300 g |
1 kg |
|
2 kg |
|
Linearity Calibration Mass |
50, 100 g |
|
100, 200 g |
100, 200 g |
200, 400 g |
300, 600 g |
500 g, |
|
1 kg, 2 kg |
|
|
1 kg |
|
||||||||
|
|
|
|
|
|
|
|
|
||
Stabilization Time (s) |
|
1.5 |
|
1 |
|
1.5 |
|
|||
Construction |
|
|
ABS plastic housing with 304 stainless steel (SST) pan |
|
||||||
Draftshield |
|
Yes |
|
|
No |
|
|
|
||
Calibration |
User-selectable external span or linearity calibration / Digital with external weight |
|||||||||
Tare Range |
|
|
|
Full Capacity by subtraction |
|
|
|
|||
Weighing Units** |
g, kg, ct, N, oz, ozt, dwt, lb, lb:oz, grn,Tael (HongKong),Tael (Singapore),Tael (Taiwan), tical, |
|||||||||
|
|
|
tola, C (Custom unit) |
|
|
|
||||
|
|
|
|
|
|
|
||||
Application Modes |
Weighing, Parts Counting, Percent Weighing, Check Weighing, Totalization, Display Hold |
|||||||||
Typical Battery Life |
80 hours |
120 hours |
|
80 hours |
|
|||||
Specified Temperature |
10° C (50° F) to 40° C (104° F) at 10% to 80% relative humidity, non-condensing |
|||||||||
Range |
||||||||||
|
|
|
|
|
|
|
|
|
||
Storage Conditions |
-20° C (-4° F) to 55° C (131° F) at 10% to 90% relative humidity, non-condensing |
|||||||||
Communication |
RS232, USB Host, USB Device, Ethernet or Bluetooth*** (all available as accessory) |
|||||||||
Display Type |
|
|
Backlit LCD: 6-digit 7-segment with white LED backlight |
|
||||||
Display Size |
|
|
|
0.78 in / 20 mm digits |
|
|
|
|||
Pan Size (W x D) |
Ø 93 mm / 3.7 in |
Ø 120 mm / 4.7 in |
170 x 140 mm / |
|||||||
6.7 x 5.5 in |
||||||||||
|
|
|
|
|
|
|
||||
Balance Dimensions |
202 x 222 x 103 mm / |
|
202 x 224 x 54 mm / 8 x 8.8 x 2.1 in |
|
||||||
(W x D x H) |
8 x 8.7 x 4.1 in |
|
|
|||||||
|
|
|
|
|
|
|||||
Shipping Dimensions |
300 x 250 x 129mm / |
|
300 x 250 x 86 mm / 11.8 x 9.8 x 3.4 in |
|
||||||
(W x D x H) |
11.8 x 9.8 x 5.1 in |
|
|
|||||||
|
|
|
|
|
|
|||||
Net Weight |
|
|
|
|
1 kg / 2.2 lb |
|
|
|
|
|
Shipping Weight |
|
|
|
|
1.5 kg / 3.3 lb |
|
|
|
|
|
Notes:
*Calibration weights are included with models up to 620g capacity.
**Availability is dependent on model and region.
***Bluetooth kit is only available in certain regions according to the local regulations
SCOUTTM SERIES BALANCES - SPX |
EN-17 |
TABLE 6-2. SPECIFICATIONS cont.
Capacity x Readability:
Model |
SPX123 |
SPX223 |
SPX222 |
SPX422 |
SPX622 |
SPX1202 |
SPX2202 |
|
Gram (g) |
120 x 0.001 |
220 x 0.001 |
220 x 0.01 |
420 x 0.01 |
620 x 0.01 |
1200 x 0.01 |
2200 x 0.01 |
|
Kilogram (kg) |
/ |
/ |
/ |
/ |
/ |
1.2 x 0.00001 |
2.2 x 0.00001 |
|
Carat (ct) |
600 x 0.005 |
1100 x 0.005 |
1100 x 0.05 |
2100 x 0.05 |
3100 x 0.05 |
6000 x 0.05 |
11000 x 0.05 |
|
|
|
|
|
|
|
|
|
|
Newton (N) |
1.17679 x |
2.15744 x |
2.1574 x |
4.1188 x |
6.0801 x |
11.7679 x |
21.5744 x |
|
0.00001 |
0.00001 |
0.0001 |
0.0001 |
0.0001 |
0.0001 |
0.0001 |
||
|
||||||||
Ounce (oz) |
4.23290 x |
7.76030 x |
7.7600 x |
14.8150 x |
21.8700 x |
42.3290 x |
77.6030 x |
|
0.00005 |
0.00005 |
0.0005 |
0.0005 |
0.0005 |
0.0005 |
0.0005 |
||
|
||||||||
Ounce Troy (ozt) |
3.85810 x |
7.07320 x |
7.0730 x |
13.5030 x |
19.9335 x |
38.5810 x |
70.7320 x |
|
0.00005 |
0.00005 |
0.0005 |
0.0005 |
0.0005 |
0.0005 |
0.0005 |
||
|
||||||||
Pennyweight (dwt) |
77.162 x |
141.463 x |
141.46 x 0.01 |
270.07 x 0.01 |
398.67 x 0.01 |
771.62 x 0.01 |
1414.63 x |
|
0.001 |
0.001 |
0.01 |
||||||
|
|
|
|
|
||||
Pound (lb) |
/ |
/ |
/ |
/ |
1.36690 x |
2.64555 x |
4.85020 x |
|
0.00005 |
0.00005 |
0.00005 |
||||||
|
|
|
|
|
||||
Pound:Ounce |
/ |
/ |
/ |
/ |
1lb:5.8700oz |
2lb:10.3290oz |
4lb:13.6030oz |
|
(lb:oz) |
x 0.0005oz |
x 0.0005oz |
x 0.0005oz |
|||||
|
|
|
|
|||||
Grain (grn) |
1851.88 x |
3395.12 x |
3395.0 x |
6481.6 x |
9568.0 x |
18518.8 x 0.2 |
33951.2 x 0.2 |
|
0.02 |
0.02 |
0.2 |
0.2 |
0.2 |
||||
|
|
|
TABLE 6-3. SPECIFICATIONS cont.
Model |
SPX421 |
|
SPX621 |
SPX2201 |
|
SPX6201 |
SPX8200 |
|
Capacity (g) |
420 |
|
620 |
2200 |
|
6200 |
8200 |
|
Readability (g) |
0.1 |
|
0.1 |
0.1 |
|
0.1 |
1 |
|
Repeatability (Std. Dev.) (g) |
0.1 |
|
0.1 |
0.1 |
|
0.1 |
1 |
|
Linearity (g) |
0.1 |
|
0.1 |
0.1 |
|
0.2 |
1 |
|
Span Calibration Mass* |
200 g |
|
300 g |
2 kg |
|
5 kg |
8 kg |
|
Linearity Calibration Mass |
200, 400 g |
|
300, 600 g |
1 kg, 2 kg |
|
3 kg, 6 kg |
4 kg, 8 kg |
|
Stabilization Time (s) |
|
|
|
1 |
|
|
|
|
Construction |
|
ABS plastic housing with 304 stainless steel (SST) pan |
|
|||||
Draftshield |
|
|
|
No |
|
|
||
Calibration |
User-selectable external span or linearity calibration / Digital with external weight |
|||||||
Tare Range |
|
|
Full Capacity by subtraction |
|
|
|||
Weighing Units** |
g, kg, ct, N, oz, ozt, dwt, lb, lb:oz, grn,Tael (HongKong),Tael (Singapore),Tael (Taiwan), |
|||||||
|
|
tical, tola, C (Custom unit) |
|
|
||||
|
|
|
|
|
||||
Application Modes |
Weighing, Parts Counting, Percent Weighing, Check Weighing, Totalization, Display Hold |
|||||||
Typical Battery Life |
|
|
120 hours |
|
|
80 hours |
120 hours |
|
Specified Temperature Range |
10° C (50° F) to 40° C (104° F) at 10% to 80% relative humidity, non-condensing |
|||||||
Storage Conditions |
-20° C (-4° F) to 55° C (131° F) at 10% to 90% relative humidity, non-condensing |
|||||||
Communication |
RS232, USB Host, USB Device, Ethernet or Bluetooth*** (all available as accessory) |
|||||||
Display Type |
|
Backlit LCD: 6-digit 7-segment with white LED backlight |
|
|||||
Display Size |
|
|
0.78 in / 20 mm digits |
|
|
|||
Pan Size (W x D) |
Ø 120 mm / |
|
|
170 x 140 mm / 6.7 x 5.5 in |
|
|||
4.7 in |
|
|
|
|||||
|
|
|
|
|
|
|
||
Balance Dimensions |
202 x 222 x 103 mm / |
202 x 224 x 54 mm / 8 x 8.8 x 2.1 in |
||||||
(W x D x H) |
8 x 8.7 x 4.1 in |
|||||||
|
|
|
|
|||||
Shipping Dimensions |
300 x 250 x 129mm / |
300 x 250 x 86 mm / 11.8 x 9.8 x 3.4 in |
||||||
(W x D x H) |
11.8 x 9.8 x 5.1 in |
|||||||
|
|
|
|
|||||
Net Weight |
|
|
|
1 kg / 2.2 lb |
|
|
||
Shipping Weight |
|
|
|
1.5 kg / 3.3 lb |
|
|
||
Notes: * Calibration weights are included with models up to 620g capacity.
**Availability is dependent on model and region.
***Bluetooth kit is only available in certain regions according to the local regulations
EN-18 SCOUTTM SERIES BALANCES - SPX
TABLE 6-4. SPECIFICATIONS cont.
Capacity x Readability:
Model |
SPX421 |
SPX621 |
SPX2201 |
SPX6201 |
SPX8200 |
|
Gram (g) |
420 x 0.1 |
620 x 0.1 |
2200 x 0.1 |
6200 x 0.1 |
8200 x 1 |
|
Kilogram (kg) |
/ |
/ |
2.2 x 0.0001 |
6.2 x 0.0001 |
8.2 x 0.001 |
|
Carat (ct) |
2100 x 0.5 |
3100 x 0.5 |
11000 x 0.5 |
31000 x 0.5 |
41000 x 5 |
|
Newton (N) |
4.119 x 0.001 |
6.080 x 0.001 |
21.574 x 0.001 |
60.801 x 0.001 |
80.41 x 0.01 |
|
Ounce (oz) |
14.815 x 0.005 |
21.870 x 0.005 |
77.600 x 0.005 |
218.700 x 0.005 |
289.25 x 0.05 |
|
Ounce Troy (ozt) |
13.500 x 0.005 |
19.930 x 0.005 |
70.730 x 0.005 |
199.335 x 0.005 |
263.60 x 0.05 |
|
Pennyweight (dwt) |
270.1 x 0.1 |
398.7 x 0.1 |
1414.6 x 0.1 |
3986.7 x 0.1 |
5270 x 1 |
|
Pound (lb) |
/ |
1.3670 x 0.0005 |
4.8500 x 0.0005 |
13.6685 x |
18.080 x 0.005 |
|
0.0005 |
||||||
|
|
|
|
|
||
Pound:Ounce (lb:oz) |
/ |
1lb:5.870oz x |
4lb:13.600oz x |
13lb:10.700oz x |
18lb:1.25oz x |
|
0.005oz |
0.005oz |
0.005oz |
0.05oz |
|||
|
|
|||||
Grain (grn) |
6480 x 2 |
9570 x 2 |
33950 x 2 |
95680 x 2 |
126540 x 20 |
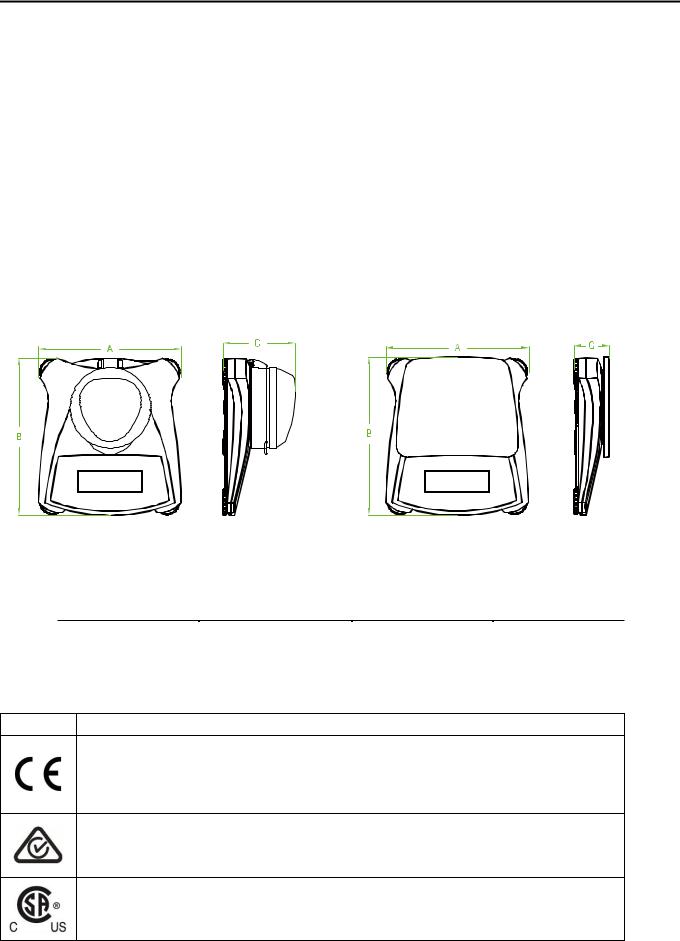
6.2 Drawings
Figure 6.1 Dimensions
Model |
A |
B |
C |
|
|
|
|
with draftshield |
202 mm / 8.0 in. |
222 mm / 8.7 in. |
103 mm / 4.1 in. |
w/o draftshield |
202 mm / 8.0 in. |
224 mm / 8.8 in. |
54 mm / 2.1 in. |
|
|
|
|
6.3 Compliance
Compliance to the following standards is indicated by the corresponding mark on the product.
Mark Standard
This product complies with the applicable harmonized standards of EU Directives 2011/65/EU (RoHS), 2014/30/EU (EMC), 2014/35/EU (LVD) and 2014/31/EU (NAWI). The EU Declaration of Conformity is available online at www.ohaus.com/ce.
EN 61326-1
CAN/CSA-C22.2 No. 61010-1
UL Std. No. 61010-1
SCOUTTM SERIES BALANCES - SPX |
EN-19 |
Important notice for verified weighing instruments in the EU
When the instrument is used in trade or a legally controlled application it must be set up, verified and sealed in accordance with local weights and measures regulations. It is the responsibility of the purchaser to ensure that all pertinent legal requirements are met.
Weighing Instruments verified at the place of manufacture bear the following supplementary metrology marking on the descriptive plate.
Weighing Instruments to be verified in two stages have no supplementary metrology marking on the descriptive plate. The second stage of conformity assessment must be carried out by the applicable weights and measures authorities.
If national regulations limit the validity period of the verification, the user of the weighing instrument must strictly observe the re-verification period and inform the weights and measures authorities
As verification requirements vary by jurisdiction, the purchaser should contact their local weights and measures office if they are not familiar with the requirements.
Disposal In conformance with the European Directive 2002/96/EC on Waste Electrical and Electronic Equipment (WEEE) this device may not be disposed of in domestic waste. This also applies to countries outside the EU, per their specific requirements.
Please dispose of this product in accordance with local regulations at the collecting point specified for electrical and electronic equipment. If you have any questions, please contact the responsible authority or the distributor from which you purchased this device.
Should this device be passed on to other parties (for private or professional use), the content of this regulation must also be related.
Disposal instructions in Europe are available online at www.ohaus.com/weee. Thank you for your contribution to environmental protection.
FCC Note
This equipment has been tested and found to comply with the limits for a Class B digital device, pursuant to Part 15 of the FCC Rules. These limits are designed to provide reasonable protection against harmful interference in a residential installation. This equipment generates, uses and can radiate radio frequency energy and, if not installed and used in accordance with the instructions, may cause harmful interference to radio communications. However, there is no guarantee that interference will not occur in a particular installation. If this equipment does cause harmful interference to radio or television reception, which can be determined by turning the equipment off and on, the user is encouraged to try to correct the interference by one or more of the following measures:
-Reorient or relocate the receiving antenna.
-Increase the separation between the equipment and receiver.
-Connect the equipment into an outlet on a circuit different from that to which the receiver is connected.
-Consult the dealer or an experienced radio/TV technician for help.
Industry Canada Note
This Class B digital apparatus complies with Canadian ICES-003.
EN-20 |
SCOUTTM SERIES BALANCES - SPX |
ISO 9001 Registration
In 1994, OHAUS Corporation, USA, was awarded a certificate of registration to ISO 9001 by Bureau Veritus Quality International (BVQI), confirming that the OHAUS quality management system is compliant with the ISO 9001 standard’s requirements. On June 21, 2012, OHAUS Corporation, USA, was re-registered to the ISO 9001:2008 standard.
LIMITED WARRANTY
OHAUS products are warranted against defects in materials and workmanship from the date of delivery through the duration of the warranty period. During the warranty period OHAUS will repair, or, at its option, replace any component(s) that proves to be defective at no charge, provided that the product is returned, freight prepaid, to OHAUS. This warranty does not apply if the product has been damaged by accident or misuse, exposed to radioactive or corrosive materials, has foreign material penetrating to the inside of the product, or as a result of service or modification by other than OHAUS. In lieu of a properly returned warranty registration card, the warranty period shall begin on the date of shipment to the authorized dealer. No other express or implied warranty is given by OHAUS Corporation. OHAUS Corporation shall not be liable for any consequential damages.
As warranty legislation differs from state to state and country to country, please contact OHAUS or your local OHAUS dealer for further details.

Balances ScoutTM Séries – SPX ES 1
1. INTRODUCCIÓN
Este manual contiene las instrucciones para la instalación, el funcionamiento y el mantenimiento de las Balanzas de la gama Scout SPX Series. Por favor, lea este manual en su
integridad antes de proceder a utilizar la balanza.
1.1 Definición de los símbolos y señales de advertencia
Las notas en materia de seguridad se hallan señalizadas con términos y símbolos de advertencia. Los mismos pueden transmitir informaciones sobre cuestiones y alertas de seguridad. Señalan cuestiones y advertencias de seguridad. Ignorar las indicaciones en materia de seguridad puede ser causa de daños tanto personales como al dispositivo, averías y lecturas erróneas.
Términos de advertencia |
|
|
ALERTA |
Indica una situación de un nivel de riesgo o peligro medio, de la que |
|
|
podrían resultar daños o incluso la muerte en el caso de no evitarse. |
|
PRECAUCIÓN Indica una situación de un nivel de riesgo o peligro bajo, de la que |
||
|
podrían resultar daños materiales, daños al dispositivo o las pérdida de |
|
|
datos, o daños físicos, en el caso de no evitarse. |
|
Atención |
Para informaciones de relevancia sobre el producto. |
|
Nota |
Para informaciones de utilidad sobre el producto. |
|
Símbolos de advertencia |
|
|
|
Riesgos general |
Riesgos de descarga eléctrica |
1.2 Precauciones de seguridad
PRECAUCIÓN : Lea atentamente todas las advertencias en material de seguridad antes de proceder a la instalación, de llevar a cabo conexiones u operaciones de mantenimiento en estos equipos. Del incumplimiento del contenido de estas advertencias podrían resultar daños personales y/o materiales. Conserve estas instrucciones para poder consultarlas en el futuro.
Compruebe que la alimentación eléctrica de corriente AC está en el rango del voltaje de entrada impreso en la etiqueta del adaptador.
Conecte el adaptador AC únicamente a un enchufe compatible que disponga de toma de tierra.
No colocar la balanza de tal modo que resulte difícil de desconectar el adaptador AC de la toma de corriente.
Asegúrese de que el cable de corriente no represente un obstáculo potencial o pueda provocar caídas y/o tropiezos.
Este equipo ha sido concebido y fabricado para ser utilizado en espacios interiores, y debería hacerse uso del mismo en emplazamientos secos.
Haga funcionar el equipo únicamente en las condiciones ambientales señalas las instrucciones del usuario.
No hacer funcionar el equipo en entornos peligrosos o inestables.
No dejar caer objetos o cargas sobre la bandeja.
Hacer uso únicamente de los accesorios y periféricos aprobados por el fabricante.
Desconectar el equipo de la red eléctrica antes de proceder a su limpieza o efectuar operaciones de mantenimiento.
Las operaciones de mantenimiento deben de ser únicamente llevadas a cabo por personal autorizado.

ES 2 |
Balances ScoutTM Séries – SPX |
2. INSTALACIÓN
2.1 Instalación de componentes
Consulte las instrucciones y los gráficos que aparecen a continuación para identificar y efectuar el montaje de los componentes de su balanza Scout. Todas los elementos y componentes deben de ser montados antes de hacer uso de la balanza.
2.1.1 Desbloqueo del cierre de seguridad de transporte
Desbloquee el cierre / bloqueo de transporte girando el puntero rojo 90 grados en el sentido contrario a las agujas del reloj (de DchaaIzda) para desbloquearlo.
Sub-platforma |
Indicador del |
|
|
|
|
|
bloqueo de |
Posición de |
|
transporte |
bloqueo |
|
Posición de |
|
|
desbloqueo |
|
Gráfico 2-1. Bloqueo de transporte
2.1.2 Instalar la bandeja de pesaje
Las balanzas provistas de una bandeja rectangular se deben colocar encajándolas en la subplataforma como se muestra a continuación y girándolas en el sentido contrario a las agujas del reloj (de Dcha a Izda) hasta que se produzca el encaje. Las bandejas redondas se colocan directamente sobre el soporte de la bandeja.
Gráfico 2-2. Instalación de la bandeja de pesaje
2.1.3 Ranura de seguridad
Existe una ranura de seguridad en la parte trasera de la balanza que permite el aseguramiento de la balanza mediante un cable opcional y un accesorio de cierre de bloqueo.
2.2 Seleccionar el emplazamiento idóneo
Para mejorar sus condiciones de funcionamiento, la balanza Scout debería ser colocada en un entorno limpio y estable. No hacer uso de la balanza en entornos con excesivas corrientes de aire, sometidos a cambios bruscos de temperatura, a proximidad de campos magnéticos o cerca de equipos que generen vibraciones o campos magnéticos.
2.3 Equilibrado de la balanza
La balanza Scout dispone de un indicador iluminado que sirve para recordar que la balanza debe hallarse equilibrada para un pesaje preciso. Hay una burbuja de equilibrado en una pequeña ventana en la parte frontal de la balanza. Para equilibrar la balanza, ajustar los soportes en cada una de las esquinas hasta que la burbuja quede centrada en el círculo. Asegúrese de que el equipo sea equilibrado cada vez que se cambia el equipo de emplazamiento.

Balances ScoutTM Séries – SPX |
ES 3 |
Gráfico 2-3. Indicador de equilibrio
2.4 Conexión a la corriente eléctrica
Instalación del adaptador AC
Se puede utilizar la corriente AC para hacer funcionar la balanza cuando no resulte necesario la energía de las pilas / baterías. Primero, conectar el adaptador AC (suministrado con el equipo) al jack de la conexión de entrada del adaptador AC situado en la partes posterior de la balanza y luego conecte el enchufe AC a una toma de corriente eléctrica.
Orificio de pesaje inferior
Interruptor de seguridad
Conexión del jack del adaptador AC
Conexión de Interfaz |
Ranura de seguridad (cierre de |
|
bloqueo anti-robo) |
|
Cubierta del compartimento de las |
|
pilas |
|
Figure 2-4. Partes posterior e inferior de la balanza |
Instalación de pilas / baterías
Instalar cuatro pilas “AA” con la polaridad tal y como se señala en el comportamiento de las pilas.
Nota:
Después de la alimentación, se recomienda dejar que el equilibrio caliente durante al menos 5 minutos antes de usarla.
2.5 Calibración inicial
Cuando se instala la balanza por primera vez, y cuando el equipo es desplazado a otro emplazamiento, debe de procederse a su calibrado para garantizar la precisión de los resultados de pesaje.
De un modo alternativo, las balanzas pueden ser calibradas manualmente mediante el uso de masas externas.
Debe de disponer de las masas de calibrado adecuadas antes de iniciar el proceso de calibrado. Por favor, consulte el apartado de calibrado en lo referente a las masas y al proceso de calibrado.

ES 4 |
Balances ScoutTM Séries – SPX |
3. FUNCIONAMIENTO
3.1 Controles
Gráfico 3-1.Panel de Control Scout
TABLA 3-1. Botones de funciones
Botón |
|
|
|
|
|
|
|
|
|
|
|
|
|
|
|
|
|
|
|
|
|
|
|
|
|
|
|
|
|
|
|
|
|
|
|
|
|
|
|
|
|
|
|
|
|
|
|
|
|
|
|
|
|
|
|
|
|
|
|
|
|
|
|
|
|
|
|
|
|
|
|
|
|
|
|
|
|
|
|
|
|
|
|
|
|
|
|
Función primaria |
|
Cero/On - |
|
Imprimir |
|
Función |
|
Tara |
|||||||||||||
(Pulsación corta) |
encendido |
Envía el valor actual |
Inicia un modo |
Introducir / |
|||||||||||||||||
|
Enciende la |
al Puerto de |
de aplicación. |
borrar un |
|||||||||||||||||
|
balanza |
comunicación |
|
|
|
|
|
valor de tara. |
|||||||||||||
|
|
|
|
|
|
|
seleccionado si el |
|
|
|
|
|
|
|
|
|
|
||||
|
Si la balanza está |
modo AUTOPRINT |
|
|
|
|
|
|
|
|
|
|
|||||||||
|
(impresión |
|
|
|
|
|
|
|
|
|
|
||||||||||
|
encendida, la |
|
|
|
|
|
|
|
|
|
|
||||||||||
|
automática) está en |
|
|
|
|
|
|
|
|
|
|
||||||||||
|
configura a cero |
|
|
|
|
|
|
|
|
|
|
||||||||||
|
Off .apagado. |
|
|
|
|
|
|
|
|
|
|
||||||||||
|
|
|
|
|
|
|
|
|
|
|
|
|
|
|
|
|
|||||
Función secundaria |
|
Zero/Off - |
|
Unidades |
|
Modo |
|
Menú |
|||||||||||||
(Pulsación larga) |
|
apagado |
Modifica la unidad |
Permite la |
Acceder al |
||||||||||||||||
|
Apaga la balanza. |
de pesaje. |
modificación del |
menú del |
|||||||||||||||||
|
|
|
|
|
|
|
|
|
|
|
|
modo de |
usuario. |
||||||||
|
|
|
|
|
|
|
|
|
|
|
|
aplicación. |
|
|
|
|
|
||||
Función Menú |
|
Yes - Sí |
|
No |
|
Atrás |
|
Salir |
|||||||||||||
(Pulsación corta) |
Acepta la |
Permite avanzar |
Permite volver |
Permite salir |
|||||||||||||||||
|
configuración |
hasta el siguiente |
hacia atrás al |
del Menú del |
|||||||||||||||||
|
actual que aparece |
menú o el siguiente |
elemento |
usuario. |
|||||||||||||||||
|
en pantalla. |
elemento del menú. |
anterior del |
Interrumpe el |
|||||||||||||||||
|
|
|
|
|
|
|
Anula la |
menú. |
proceso de |
||||||||||||
|
|
|
|
|
|
|
configuración que |
|
|
|
|
|
calibrado en |
||||||||
|
|
|
|
|
|
|
aparece en la |
|
|
|
|
|
curso. |
||||||||
|
|
|
|
|
|
|
pantalla y avanza |
|
|
|
|
|
|
|
|
|
|
||||
|
|
|
|
|
|
|
hasta la siguiente |
|
|
|
|
|
|
|
|
|
|
||||
|
|
|
|
|
|
|
configuración |
|
|
|
|
|
|
|
|
|
|
||||
|
|
|
|
|
|
|
disponible. |
|
|
|
|
|
|
|
|
|
|
||||
Notas: |
1 Pulsación corta : Pulsar durante menos de 1 segundo. |
|
2 Pulsación larga : Pulsar y mantener pulsado durante más de 2 segundos. |

Balances ScoutTM Séries – SPX ES 5
1 |
|
|
|
13 |
|
|
|
|
|
2 |
|
|
|
12 |
3 |
|
|
|
11 |
4 |
|
|
|
10 |
5 |
|
|
|
9 |
6 |
|
|
|
|
|
7 |
|
|
8 |
|
Figure 3-2. Pantalla de la Balanza Scout |
|||
|
|
|||
|
|
TABLE 3-2.Símbolos mostrados en pantalla |
||
Elemento |
Descripción |
|
Elemento |
Descripción |
1 |
Símbolo de carga de la |
8 |
Símbolos de Kilogramos, grano |
|
|
baterí |
|
|
|
2 |
Símbolo de peso estable |
9 |
Símbolos de verificación de pesaje |
|
3 |
Símbolo “Negativo” |
10 |
Libras, Onzas, Símbolos de Libras:Onzas |
|
4 |
Símbolo Cero centrado |
11 |
Símbolos de porcentaje, dwt, g/mol |
|
5 |
Símbolo NETO |
|
12 |
Símbolos G (Gravedad), Piezas, t hk, t sg, t tw, |
|
|
|
|
H (Mantener en pantalla) |
6 |
Símbolo Tara configurada |
13 |
Símbolos Newtons, Totalización, Dinámico, |
|
|
|
|
|
Bluetooth |
7 |
Símbolos del cursor |
|
|
|
Nota : * Algunos símbolos pueden no hallarse disponibles en función de los distintos modelos.
3.2 Encendido / apagado de la balanza
Encender la balanza, pulsar y mantener pulsado el botón [On/Zero Off]– Encendido / Cero – Apagado durante 1 segundo. La balanza efectuará una comprobación automática de la pantalla y mostrará momentáneamente la versión del software, y luego iniciará el modo de pesaje activo. Para apagar la balanza, pulsar y mantener pulsado el botón [On/Zero Off]- Encendido / Cero – Apagado hasta que se muestra OFF (apagado) en pantalla.
3.3 Operación de calibración
Cuando se pone en marcha la balanza primera vez, se recomienda llevar a cabo una calibración de rango para garantizar la precisión de los resultados de pesaje. Antes de efectuar el calibrado, asegúrese de disponer de los pesos de calibrado adecuados. Asegúrese de que el interruptor de seguridad está en la posición de desbloqueo.
Pulsar y mantener pulsado Menu hasta que [mMeNU] (Menú) se muestre en pantalla. Cuando se suelte el botón, la pantalla mostrará el mensaje [C.A.L]. Pulsar Yes - sípara aceptar. Entonces se mostrará el mensaje [SpaN] en pantalla. Pulsar Yes - sípara iniciar el calibrado de rango. Se mostrará el mensaje [--C--] mientras que se almacena la lectura del “cero”. Seguidamente, se mostrará en pantalla el valor del peso de calibrado. Pulsar la tecla [No] para modificar dicho
valor. Colocar la masa de calibrado especificada en la bandeja. Se mostrará el mensaje [--C--] mientras que se almacena la lectura en la memoria. Se mostrará el mensaje [done] si el calibrado se ha llevado a cabo con éxito. La balanza volverá al modo de la aplicación anterior y se encuentra preparada para ser utilizada.
ES 6 |
Balances ScoutTM Séries – SPX |
3.4 Modo de pesaje
Este es el modo de la configuración por defecto de salida de fábrica.
1.Si fuese necesario, pulsar y mantener pulsado el botón [Mode] hasta que [wWeIGH] (Weigh – peso) aparezca en pantalla.
2.Si fuese necesario, coloque un recipiente vacío sobre la bandeja y pulse Tare - Tara.
3.Coloque una muestra sobre la bandeja o en el recipiente. El peso de la muestra se mostrará en la pantalla.
3.5 Modo de recuento
Este modo permite contar grandes cantidad y cifras de elementos sobre la base de un peso de referencia para el recuento.
1.Si fuese necesario, coloque un recipiente vacío sobre la bandeja y pulse Tare - Tara.
2.Pulsar y mantener pulsado el botón [Mode] hasta que [Count] (Recuento) aparezca en pantalla. Entonces aparecerá en pantalla : [CLr.PwW] (Borrar el peso medio del elemento: AveragePieceWeight, APW).
En el caso de no existir un peso medio (APW) del elemento a pesar, la balanza mostrará el mensaje [PUt.10], proceder al paso 5.
3.Pulsar No para hacer uso del APW (peso medio del elemento a pesar) almacenado en la memoria. Proceder al paso 7.
4.Pulsar Yes – sípara configurar un APW (peso medio del elemento a pesar).
5.Entonces la balanza mostrará en pantalla el tamaño de la muestra, es decir [PUt 10]. Pulsar No o Back – vuelta atrás para modificar la selección efectuada (5, 10, 20, 50 o 100).
6.Introducir el número de elementos indicado sobre la bandeja y luego Yes - sípara calcularel APW (peso medio del elemento a pesar). La pantalla mostrará el recuento de elementos.
7.Añadir elementos adicionales hasta alcanzar la cifra deseada.
8.Para borrar de la memoria el APW (peso medio del elemento a pesar) almacenado, pulsar y mantener pulsado el botón [Mode] hasta que [Count] aparezca en pantalla. Pulsar Yes –
sícuando [Clr.pwW] aparezca en pantalla.
Nota : Pulsar Function (función) para ver el APW (peso medio del elemento a pesar) actualmente almacenado en la memoria.
3.6 Modo Porcentaje
Este modo permite medir el peso de un elementode muestra como un porcentaje de un peso de referencia.
1.Si fuese necesario, coloque un recipiente vacío sobre la bandeja y pulse Tare - Tara.
2.Pulsar y mantener pulsado el botón [Mode] hasta que [Percnt] aparezca en
pantalla. Entonces aparecerá en pantalla [Clr.ref] (borrar referencia).En el caso de no existir
un peso de referencia, la balanza mostrará el mensaje [Put.ref], proceder al paso 5.
3.Pulsar No para hacer uso del peso de referencia almacenado en la memoria y proceder al paso 6.
4.Pulsar Yes - sípara configurar un nuevo peso de referencia. Entonces aparecerá en pantalla en mensaje [Put.ref].
5.Coloque el material de referencia deseado sobre la bandeja o en el interior del recipiente Pulsar Yes– sípara almacenar en la memoria el peso de referencia. La pantalla mostrará :100%.
6.Remplazar el material de referencia con el material de muestra. La pantalla mostrará el porcentaje del peso de muestra en comparación con el peso de referencia.
Balances ScoutTM Séries – SPX |
ES 7 |
7.Para borrar de la memoria el peso de referencia almacenado en la memoria, pulsar y mantener pulsado [Mode] hasta que [Percnt] aparezca en pantalla. Pulsar Yes – sí
cuando [Clr.ref] aparezca en pantalla.
Nota : Pulsar Function (función) para ver el peso de referencia actualmente almacenado en la memoria.
3.7 Modo de Comprobación
Se utiliza este modo para comparar el Peso con un rango de peso a alcanzar. La balanza soporta un pesaje de comprobación positivo, negativo y cero.
3.7.1 Pesaje de comprobación
Utilizar este modo para comparar el Peso de los elementos con el rango de peso a alcanzar.
1.Pulsar y mantener pulsado el botón [CHeCk] (Check - comprobar) aparezca en pantalla. Entonces aparecerá en pantalla [CLr.ref] (borrar límite de comprobación).
2.Pulsar Nopara hacer uso del límite de comprobación almacenado en la memoria y proceder al paso 5.
3.Pulsar Yes - sípara configurar un nuevo límite de comprobación de referencia. Entonces
aparecerá en pantalla en mensaje[Set. Lo]. PulsarYes - sí para ver el valor del límite “inferior”. PulsarYes - sípara aceptar oNopara editar el valor del límite “inferior”. Entonces se mostrará en pantalla el valor almacenado en la memoria, con el primer dígito señalado
[ 00.000kg]. Pulsar No repetidamente hasta que aparezca la cifra deseada. Pulsar Yessípara aceptar y señalar el siguiente dígito. Repetir hasta que todos los dígitos sean correctos. PulsarYessípara aceptar el valor del límite “inferior, aparecerá en pantalla el mensaje :[Set. Hi].
4.Repetir el mismo procedimiento para aceptar o editar el valor del límite “superior”.
5.Si fuese necesario, coloque un recipiente vacío sobre la bandeja y pulse Tare - Tara.
6.Coloque el material de muestra sobre la bandeja o en el recipiente. Si el peso de la muestra está por debajo del rango del peso establecido, se encenderá el icono “inferior”, .
.
Si la muestra está dentro del rango del peso definido, se encenderá el icono de “aceptado”
 .
.
Si el peso de la muestra está por encima del rango del peso establecido, se encenderá el icono  .
.
Nota : Pulsar Function (función) para ver los límites de comprobación inferior y superior.
Comprobación Positiva
La comprobación positiva se utiliza para determinar si el material añadido colocado sobre la balanza se halla dentro del margen del peso establecido. En este caso los límites INFERIORESy SUPERIORES deben de ser valores positivos. (El límite SUPERIOR debe de ser mayor que el límite INFERIOR.)
Añadir material adicional a la bascule hasta que alcance el rango ACEPTADO ( ).
).
Comprobación negativa
La comprobación negativa se utiliza para determinar si el material sustraído del removed añadido colocado sobre la balanza se halla dentro del margen del peso establecido. En este caso los límites INFERIORES y SUPERIORES son en ambos casis valores negativos.
(El límite INFERIOR debe de ser mayor que el límiteSUPERIOR.)
Colocar el elemento que debe de ser pesado sobre la balanza y pulsar TARE - TARA. Sustraer una porción o parte del elemento hasta alcanzar el rango ACEPTADO.
Zero Check
Zero check is used when comparing subsequent samples to an initial reference sample. In this case, the UNDER limit must be a negative value and the OVER limit must be a positive value. Place the reference item on the balance and press TARE. Remove the reference sample and place the item to be compared on the balance to determine if it is within the ACCEPT range.
ES 8 |
Balances ScoutTM Séries – SPX |
3.8 Modo Totalización
Este modo permite al usuario almacenar en la memoria una serie de mediciones de pesaje. El modo de totalización se inicia cuando el símbolo “∑” aparece en pantalla y se muestra la unidad actual.
Nota :Únicamente se totalizan cifras positivas.
1.Pulsar y mantener pulsado el botón [Mode] hasta que [total] (Totalización) aparezca en pantalla. Entonces aparecerá en pantalla[CLr.tot].
2.Pulsar la tecla Yes - sío Nopara borrar o no el dato de totalización actualmente almacenado en la memoria. Cuando se añade / coloca un peso en la balanza el valor aparecerá en pantalla.
3.Si fuese necesario, coloque un recipiente vacío sobre la bandeja y pulse Tare - Tara. Añada el primer elemento, su peso aparecerá en pantalla.
Pulsar Function (function) para almacenar su peso en la memoria, el símbolo “∑” parpadeará en la pantalla en la que aparecerá el peso total.
4.Pulsar Tare - Tara (o quitar el peso de la operación anterior) y añada el siguiente elemento La balanza mostrará su peso en pantalla.
Pulsar Function (function) para almacenar su peso en la memoria, el símbolo “∑” parpadeará en la pantalla en la que aparecerá el nuevo peso total.
5.Repetir el paso 4 para todos los elementos cuyo peso haya que acumular.
6.Para borrar de la memoria el total almacenado, pulsar y mantener pulsado Mode hasta que [total] aparezca en pantalla. Cuando aparezca en pantalla [Clr.tot] , pulsar Yes - sí.
3.9 Modo de mantenimiento de los valores mostrados en pantalla
“Hold”
Hay dos modos que permiten mantener los valores mostrados en pantalla “hold” :
-PeakHold – Mantener el valor más elevado “pico” :permite al usuario capturar y almacenar en la memoria el valor de pesaje estable más elevado (>=5d).
-DisplayHold – Mantener los valores mostrados en pantalla (configuración por defecto):permite al usuario capturar y almacenar en la memoria el primer valor de pesaje estable(>=5d).
Inicio
Si no se mantiene en pantalla ningún valor de pesaje, pulsar la tecla [Function] para iniciar. Se mostrará en pantalla el mensaje [rEAdY] (Ready - Preparado) hasta que se coloque un peso en la balanza.
Cuando la balanza muestre en pantalla un valor estable, el icono Hold– mantener en pantalla - (H)parpadeará y el peso mostrado en pantalla no cambiará.
Reset - Reconfigurar
Si no hay ningún peso colocado en la bandeja y se mantiene un valor mostrado en la pantalla, basta con una pulsión corta de la tecla [Function]– función para eliminar el valor mostrado en pantalla y que se muestre el valor del nuevo pesaje en la pantalla.
1.Pulsar y mantener pulsado el botón Mode hasta que [HoLd] aparezca en pantalla.
2.Si fuese necesario, coloque un recipiente vacío sobre la bandeja y pulse Tare - Tara. Entonces se mostrará en pantalla el valor Cero.
3.Pulsar la tecla [Function] para iniciar. Se mostrará en pantalla el mensaje [rEAdY] (Ready - Preparado).
4.Colocar las muestras que deban ser pesadas sobre la bandeja.
5.La pantalla mostrará el valor estable, el icono “Hold” (H) – mantener en pantalla - pestañeará.
 Loading...