


CompassTM CX Series
Instruction Manual
Serie compacta CompassTM CX
Manual de instrucciones
Série Compact CompassTM CX
Manuel d’instructions
Kompaktwaagen der CompassTM CX-Serie Bedienungsanleitung
Serie CX CompassTM compatta
Manuale di istruzioni
CompassTM CX Series Scales |
EN-1 |
1. INTRODUCTION
This manual contains installation and operation instructions for the CompassTM CX Series Scales. Please read the manual completely before using the scale.
1.1 Safety Precautions
Please follow these safety precautions:
Verify that the AC Adapter input voltage matches the local AC power supply.
Use the scale only in dry locations.
For best results, use the scale in the specified optimum operating temperature.
Do not operate the scale in hostile or unstable environments.
Use your scale with care, gently loading items to be weighed onto the center of the pan. Avoiding rough treatment will aid in the life of your scale.
Indoor use
If the equipment is used in a manner not specified by the manufacturer, the protection provided by the equipment may be impaired.
1.2. General Product Features
Power Up test: When the scale is turned on, all display segments will be displayed for a few seconds, indicating that the unit is self adjusting to zero.
Once the “0” is displayed, the scale is ready for use.
Stable Reading indication: A star indicator will appear in the lower left corner of the display when a stable reading has been reached.
Overload: If the applied load exceeds the capacity of the scale, an “E” will appear on the display and the load should be removed immediately. The scale will return to normal operation.
Tare Function: Values can progressively be added to a sample. By pressing the  button, the scale display returns to zero. After adding additional mass, press
  to zero the scale again. Additional mass may be added up to the capacity of the scale.
Negative Value: When a load is removed from the scale, any zeroed value will be displayed as a negative number. To return to normal operation, the zeroed value can be cancelled by pressing  button.
Low Battery Indication: The display will show “ ” when the batteries are weak and need to be replaced.
Auto Shut-Off: To extend battery life, the scale will automatically turn off after approximately (4) minutes if no active weighing is occurring. This feature is active with battery operation only.

EN-2 |
CompassTM CX Series Scales |
2. INSTALLATION
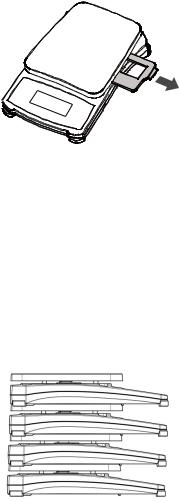
2.1 Transportation Protection (0.1g model only)
Remove the plastic transportation protective insert for use. Save the plastic insert to ensure safe transport.
2.2 Power
Power the scale using the AC power adapter (not included) or 3 AA batteries.
Battery Installation
Remove the battery cover on the bottom of the scale and place the 3 “AA” size batteries into the compartment as indicated. Do not use excessive force or press the weighing pan. Re insert the battery cover.
AC Power Connection
Connect the AC adapter (not included) to the receptacle at the rear of the scale. Plug the AC adapter into a properly grounded electrical outlet.
The scale base allows for the efficient stacking of one scale on top of another. Note: do not stack more that 4 scales on top of each other.

CompassTM CX Series Scales |
EN-3 |
3. OPERATION
3.1 Two Button Keypad
 : Pressing this button turns on the scale. This same button operates the zero feature when the scale is on. Press and hold this button for three seconds to turn the scale off.
 : Press this button briefly to change the weighing unit. Press and hold this button to enter user menu.
3.2 Calibration
For best results calibrate the scale at regular intervals. This is especially important if the scale is in use for prolonged periods.
Calibration weights are not provided with the scale.
Press and hold the  button until mMeNU is dsplayed. Release the button, first menu CAL will be displayed.
Press  to start span calibration.
The display shows 0. With no weight on the pan, press the  button to establish the zero point. The display shows --C-- while the scale stores the zero load signal.
The display shows the span calibration point, for example, 200g. Place the specified calibration weight on the pan and press the button. The display shows --C-- while the scale stores the calibration point signal.
The display shows [-DONE-] and returns to the normal weighing mode.
The message E will appear if the calibration steps are not followed or the wrong weight was used.
The calibration process can be aborted by pressing .
CAL
0 g
--C--
200 g
--C--
-dONe-
e

EN-4 |
CompassTM CX Series Scales |
3.3 Backlight
Press and hold the  button until mMeNU is dsplayed. Release the button, first menu CAL will be displayed.
b.Auto Menu
When CAL is displayed, press  to move to next menu b.Auto.
Press  to set the backlight to auto mode and return to current weighing mode. The scale will turn on the backlight automatically with any button operation and weighing operation.
b.ON Menu
When b.Auto is displayed, press  to move to next menu b.ON.
Press  to set the backlight always on and return to current weighing mode.
b.OFF Menu
When b.ON is displayed, press  to move to next menu b.OFF.
Press  to set the backlight always off and return to current weighing mode.
End Menu
When b.OFF is displayed, press  to move to next menu End. Press
  to return to current weighing mode.
CAL
b.Auto
b.ON
b.OFF
End
4. SERVICE INFORMATION
If the troubleshooting section does not resolve your problem, contact an Authorized OHAUS Service Agent. Please visit our website www.ohaus.com to locate the OHAUS office nearest you.
CompassTM CX Series Scales |
EN-5 |
5. TECHNICAL DATA
5.1 Specifications
TABLE 5-1. SPECIFICATIONS.
Model |
CX221 |
|
CX621 |
|
CX1201 |
|
CX2200 |
|
CX5200 |
Capacity (g) |
220 |
|
620 |
|
1200 |
|
2200 |
|
5200 |
|
|
|
|
|
|
|
|
|
|
Readability (g) |
0.1 |
|
0.1 |
|
0.1 |
|
1 |
|
1 |
|
|
|
|
|
|
|
|
|
|
Repeatability (Std. Dev.) (g) |
0.1 |
|
0.1 |
|
0.2 |
|
1 |
|
1 |
|
|
|
|
|
|
|
|
|
|
Linearity (g) |
0.1 |
|
0.1 |
|
0.2 |
|
1 |
|
1 |
|
|
|
|
|
|
|
|
|
|
Span Calibration Mass |
200 g |
|
500 g |
|
1 kg |
|
1 kg |
|
2 kg |
|
|
|
|
|
|
|
|
|
|
Stabilization Time (s) |
1.5 |
|
1.5 |
|
2 |
|
1.5 |
|
1.5 |
|
|
|
|
|
|
|
|
||
Construction |
|
|
ABS housing & stainless steel pan |
|
|||||
|
|
||||||||
Calibration |
User-selectable external span / Digital with external weight |
||||||||
|
|
|
|
|
|||||
Tare Range |
|
|
Full capacity by subtraction |
|
|||||
|
|
|
|
|
|
|
|
||
Weighing Units* |
|
|
|
g, N, oz, lb:oz |
|
|
|
||
|
|
|
|
|
|
|
|
|
|
Application Modes |
|
|
|
|
Weighing |
|
|
|
|
|
|
||||||||
Power Requirement |
3 AA batteries (included) or AC adapter (not included) |
||||||||
|
|
|
|
|
|
|
|
|
|
Typical Battery Life |
|
|
|
|
1,000 hours |
|
|
|
|
|
|
||||||||
Operation Temperature |
5°C (41°F) to 40°C (104°F) at 10% to 80% relative humidity, |
||||||||
Range |
|
|
|
non-condensing |
|
|
|
||
Specified Temperature |
18°C (64°F) to 25°C (77°F) at 10% to 80% relative humidity, |
||||||||
Range |
|
|
|
non-condensing |
|
|
|
||
Storage Conditions |
-20°C (-4°F) to 55°C (131°F) at 10% to 90% relative humidity, |
||||||||
|
|
|
non-condensing |
|
|
|
|||
|
|
|
|
|
|
|
|||
Display Type |
|
Liquid crystal display (LCD) with backlight |
|
||||||
|
|
|
|
|
|||||
Display Size |
|
|
0.71 in / 18 mm digits |
|
|||||
|
|
|
|
|
|||||
Pan Size (W x D) |
|
|
5 x 5.6 in / 128 x 142 mm |
|
|||||
|
|
|
|
|
|
|
|
|
|
Balance Dimensions |
|
|
5.3 x 7.9 x 1.6 in / 135 x 201 x 41 mm |
|
|||||
(W x D x H) |
|
|
|
||||||
|
|
|
|
|
|
|
|
|
|
Shipping Dimensions |
|
|
6.7 x 9.3 x 2.2 in / 170 x 235 x 55 mm |
|
|||||
(W x D x H) |
|
|
|
||||||
|
|
|
|
|
|
|
|
|
|
Net Weight |
|
|
|
1.1 lb / 0.5 kg |
|
|
|
||
|
|
|
|
|
|
|
|
||
Shipping Weight |
|
|
|
1.5 lb / 0.7 kg |
|
|
|
||
|
|
|
|
|
|
|
|
|
|
* Availability is dependent on model and region.

EN-6 |
CompassTM CX Series Scales |
5.2 Compliance
Compliance to the following standards is indicated by the corresponding mark on the product.
Mark Standard
This product complies with the applicable harmonized standards of EU Directives 2011/65/EU (RoHS), 2014/30/EU (EMC) and 2014/35/EU (LVD). The EU Declaration of Conformity is available online at www.ohaus.com/ce.
EN 61326-1
Disposal
In conformance with the European Directive 2012/19/EU on Waste Electrical and Electronic Equipment (WEEE) this device may not be disposed of in domestic waste. This also applies to countries outside the EU, per their specific requirements.
Please dispose of this product in accordance with local regulations at the collecting point specified for electrical and electronic equipment. If you have any questions, please contact the responsible authority or the distributor from which you purchased this device.
Should this device be passed on to other parties (for private or professional use), the content of this regulation must also be related. Thank you for your contribution to environmental protection.
For disposal instructions in Europe, refer to www.ohaus.com/weee.
FCC Note
This equipment has been tested and found to comply with the limits for a Class B digital device, pursuant to Part 15 of the FCC Rules. These limits are designed to provide reasonable protection against harmful interference in a residential installation. This equipment generates, uses and can radiate radio frequency energy and, if not installed and used in accordance with the instructions, may cause harmful interference to radio communications. However, there is no guarantee that interference will not occur in a particular installation. If this equipment does cause harmful interference to radio or television reception, which can be determined by turning the equipment off and on, the user is encouraged to try to correct the interference by one or more of the following measures:
Reorient or relocate the receiving antenna.
Increase the separation between the equipment and receiver.
Connect the equipment into an outlet on a circuit different from that to which the receiver is connected.
Consult the dealer or an experienced radio/TV technician for help.
CompassTM CX Series Scales |
EN-7 |
Industry Canada Note
This Class B digital apparatus complies with Canadian ICES-003.
ISO 9001 Registration
The management system governing the production of this product is ISO 9001 certified.
LIMITED WARRANTY
OHAUS products are warranted against defects in materials and workmanship from the date of delivery through the duration of the warranty period. During the warranty period OHAUS will repair, or, at its option, replace any component(s) that proves to be defective at no charge, provided that the product is returned, freight prepaid, to OHAUS.
This warranty does not apply if the product has been damaged by accident or misuse, exposed to radioactive or corrosive materials, has foreign material penetrating to the inside of the product, or as a result of service or modification by other than OHAUS. In lieu of a properly returned warranty registration card, the warranty period shall begin on the date of shipment to the authorized dealer. No other express or implied warranty is given by OHAUS Corporation. OHAUS Corporation shall not be liable for any consequential damages.
As warranty legislation differs from state to state and country to country, please contact OHAUS or your local OHAUS dealer for further details.
Básculas serie compacta CompassTM CX |
ES-1 |
1. INTRODUCCIÓN
Este manual contiene instrucciones de instalación y operación para las básculas de la serie compacta CompassTM CX. Lea el manual completamente antes de usar la báscula.
1.1 Precauciones de seguridad
Siga estas precauciones de seguridad:
Verifique que el voltaje del adaptador de corriente alterna coincida con la alimentación eléctrica local.
Use la báscula sólo en lugares secos.
Para obtener los mejores resultados, use la báscula en la temperatura de operación óptima especificada.
No opere la báscula en ambientes hostiles o inestables.
Use su báscula con cuidado, y cargue los artículos a ser pesados en el centro de la bandeja. Evite el trato rudo para prolongar la vida útil de la báscula.
Usos en interiores.
Si el equipo se usa de una manera no especificada por el fabricante, la protección brindada por el equipo puede ser deteriorada.
1.2 Características generales del producto
Prueba de encendido: Cuando se enciende la báscula, todos los segmentos de pantalla se muestran durante varios segundos, lo cual indica que la unidad se está ajustando automáticamente en cero. Una vez que aparece el “0”, la báscula está lista para usarse.
Indicación de lectura estable: Un indicador de estrella aparecerá en la parte inferior izquierda de la pantalla cuando se haya obtenido una lectura estable.
Sobrecarga: Si la carga aplicada excede la capacidad de la báscula, aparecerá una “E” en la pantalla y la carga debe ser retirada de inmediato.
La báscula regresará a su operación normal.
Función de tara: Se pueden agregar valores progresivamente a una
muestra. La pantalla de la báscula regresa a cero cuando se presiona el botón  . Después de agregar peso adicional, presione
  para volver a poner la báscula en cero. Se puede agregar peso adicional hasta el límite de la capacidad de la báscula.
Valor negativo: Cuando se retira una carga de la báscula, cualquier valor puesto en cero se mostrará como número negativo. Para regresar al funcionamiento normal, se puede cancelar el valor puesto en cero al presionar  .
.
Indicación de baterí baja: La pantalla mostrará “ ” cuando las baterías están débiles y necesiten reemplazarse.
ES-2 |
Básculas serie compacta CompassTM CX |
Apagado automático: Para extender la vida útil de las baterías, la báscula se apaga automáticamente después de aproximadamente (4) minutos si no se realiza pesaje activo. Esta característica está activa sólo con funcionamiento con baterías.
2.INSTALACIÓN
2.1 Procedimiento de transporte (solo modelo 0.1g)
Retire el inserto protector de transporte de plástico para su uso. Guarde el inserto de plástico para garantizar un transporte seguro.
2.2 Energía
Proporcione corriente a la báscula con un adaptador de corriente alterna (no incluido) o con 3 baterías AA.
Instalación de las baterías
Retire la tapa de las baterías en la parte inferior de la báscula y coloque las 3 baterías de tamaño “AA” en el compartimiento como se indica. No use fuerza ni presión excesiva sobre la bandeja de pesaje. Reinstale la tapa de las baterías.
Conexión de corriente alterna
Conecte el adaptador de corriente alterna (no incluido) en el receptáculo en la parte posterior de la báscula.
Conecte el adaptador de corriente alterna en una toma eléctrica conectada a tierra.
La base de la báscula permite colocar una sobre otra para apilarlas. Nota: No apile más de 4 básculas en forma vertical.

Básculas serie compacta CompassTM CX |
ES-3 |
3. OPERACIÓN
3.1 Teclado de dos botones
 : La báscula enciende cuando se presiona este botón. Este mismo botón hace funcionar la característica de cero cuando la báscula está encendida. Para apagar la báscula presione este botón durante tres segundos.
 : Presione brevemente este botón para cambiar la unidad de peso. Mantenga presionado este botón para ingresar en el menú del usuario.
3.2 Calibración
Para obtener los mejores resultados calibre la báscula a intervalos regulares. Esto es especialmente importante si la báscula se usa durante periodos extensos.
Con esta balanza, no se proporcionan los pesos de calibración.
Mantenga presionado el botón  hasta que se muestre mMeNU en la pantalla. Suelte el botón y podrá visualizar el primer menú CAL.
Presione  para iniciar la calibración de intervalos.
En la pantalla, se mostrará 0. Sin que haya nada sobre la base de pesaje de la balanza, presione el botón  para establecer el punto cero. En la pantalla, se visualizará --C-- cuando la balanza haya guardado el punto cero.
La balanza muestra el punto de calibración de intervalo, por ejemplo: 200 g. Ponga el peso de calibración predeterminado sobre base de pesaje de la balanza y presione el botón  . En la pantalla, se visualizará
--C-- cuando la balanza haya guardado el peso de calibración.
Se visualizará[-DONE-] y se volverá a la modalidad de pesaje normal.
Se mostrará el mensaje E en caso de que no se sigan los pasos
de calibración o no se permita usar cierto peso. |
|
Se puede salir del proceso de calibración al presionar |
. |
CAL
0 g
--C--
200 g
--C--
-dONe-
e

ES-4 |
Básculas serie compacta CompassTM CX |
3.3 Luz de fondo
Mantenga presionado el botón  hasta que se muestre el
botón mMeNU. Suelte el botón y podrá visualizar el primer menú
CAL.
Menú b.Auto
Cuando se visualice CAL, presione  para pasar el siguiente menú b.Auto.
Presione  para configurar la luz de fondo en modo automático y volver a la modalidad normal de pesaje. La balanza encenderá, de manera automática, la luz de fondo al presionar cualquier botón o al realizar una operación de pesaje.
Menú b.ON
Cuando se visualice b.Auto, presione  para pasar el siguiente menú b.ON.
Presione  para configurar la luz de fondo de manera tal que quede siempre encendida y volver a la modalidad normal de pesaje.
Menú b.OFF
Cuando se visualice b.ON, presione  para pasar el siguiente menú b.OFF.
Presione  para configurar la luz de fondo de manera tal que quede siempre apagada y volver a la modalidad normal de pesaje.
Menú End
Cuando se visualice b.OFF, presione  para pasar el siguiente menú b.EnD Presione
  para volver a la modalidad normal de pesaje.
CAL
b.Auto
b.ON
b.OFF
End
 Loading...