


Ohaus V11P15, V11P15T, V11P3T, V11P30T, V11P6T Instruction Manual
...Valor™ 1000 Series
Instruction Manual
Serie Valor™ 1000
Manual de Instrucciones
Série Valor™ 1000
Guide de I’utilisateur
Serie Valor™ 1000
Bedienungsanleitung
Serie Valor™ 1000
Manuale d’instruzioni
OHAUS ValorTM 1000 Series |
EN-1 |
1. INTRODUCTION
This manual contains installation, operation and maintenance instructions for the Ohaus ValorTM 1000 Series Scales. Please read the manual completely before using the scale.
1.1 Safety Precautions
Please follow these safety precautions:
•Verify AC Adapter input voltage matches the local AC power supply.
•Do not immerse the scale in water or other liquids.
•Do not operate the scale in hostile environments.
•Do not drop loads on the platform.
•Do not place the scale upside down on the pan.
•Service should only be performed by authorized personnel
•Disconnect the scale from the power supply when cleaning
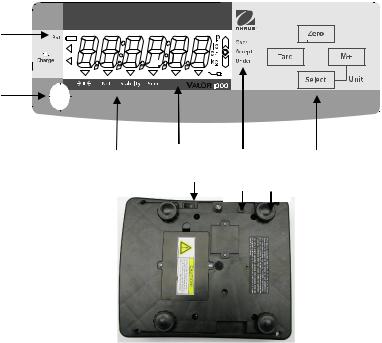
1.2. Controls
1
2 
3
4 |
5 |
6 |
7 |
|
10
9 8
Figure 1-1. Controls.
|
EN-2 |
|
OHAUS ValorTM 1000 Series |
||
|
|
|
|
TABLE 1-1. CONTROLS |
|
|
Item |
Description |
|
|
|
1 |
|
Low battery indicator |
|||
2 |
|
Battery charge indicator |
|||
3 |
|
Level Bubble |
|
|
|
4 |
|
Center of Zero, NET, Stability Sum icons |
|||
5 |
|
7-segment, 6 digit backlit LCD w/ units of measure enunciators |
|||
6 |
|
Over, Under , Accept Check weigh indicators |
|||
7 |
|
Control Buttons |
|
|
|
8 |
|
Adjustable feet |
|
|
|
9 |
|
Power input jack |
|
|
|
10 |
|
On/Off Power Switch |
|||
|
|
|
TABLE 1-2. CONTROL FUNCTIONS. |
||
Button |
|
Action |
Function |
||
|
|
|
|
|
|
|
ZERO |
|
Short Press |
Sets display to zero |
|
|
Enter |
|
|
|
|
|
|
Menu Press |
Confirms settings |
||
|
|
|
|||
|
|
|
|
|
|
|
TARE |
|
Short Press |
Tares weight of item on pan |
|
|
|
|
|
|
|
|
|
|
Menu Press |
Decrement over and under settings |
|
|
|
|
|
|
|
|
M+ |
|
Short press |
Stores displayed weight in accumulation memory |
|
|
Units |
|
|
Display accumulation data when display is at zero |
|
|
|
|
|
|
|
|
|
|
Menu Press |
Increment over and under settings |
|
|
|
|
|
|
|
|
|
|
Long Press |
Change unit of measure while already pressing |
|
|
|
|
|
SELECT button |
|
|
|
|
|
||
SELECT |
|
Short press |
Shift to next digit when setting over and under values |
||
|
Units |
|
|
|
|
|
|
Long Press |
Change unit of measure together with short press of |
||
|
|
|
|||
|
|
|
|
M+ button |
|
|
|
|
|
|
|
OHAUS ValorTM 1000 Series |
EN-3 |
2. INSTALLATION
2.1 Package Contents
•Valor 1000 Scale
•Stainless steel Pan
•AC Power Adapter
•Instruction Manual
•Warranty Card
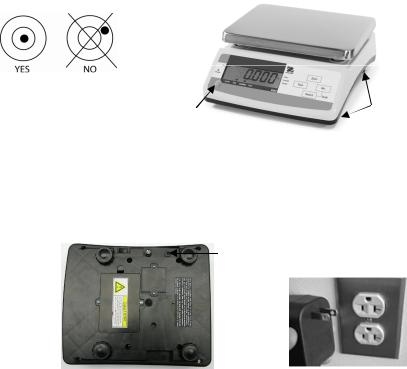
2.2 Location
Use the scale on a firm, steady surface. Avoid locations with excessive air current, vibrations, heat sources, or rapid temperature changes. Adjust the leveling feet so the bubble is centered in the circle.
Level Bubble |
|
4xLevel |
|
|
|
Figure 2-1. Leveling the Scale.
2.3 Power
Connect the AC Adaptor to the AC mains supply. Connect the plug to the DC jack on the bottom of the scale. The scale may be operated on the AC mains supply or the built in rechargeable battery. The scale must be turned on to charge the battery.
DC jack
Figure 2-2. Power Connection
2.3.1 Battery Power

EN-4 |
OHAUS ValorTM 1000 Series |
The scale can be operated on the internal rechargeable battery when AC power is not available. The scale will automatically switch to battery operation if there is a power failure or the power cord is removed.
Before using the scale for the first time, the battery should be fully charged for up to 12 hours. During charging, the battery Indicator displays the charge level (see table 1-1), and the scale can be operated during charging. The battery is protected against over charging and the scale can remain connected to the AC power line.
NOTE:
• Charging the scale must only be performed in a dry environment
CAUTION: Battery is to be replaced only by an authorized Ohaus service dealer
Risk of explosion can occur if replaced with the wrong type or connected improperly
Dispose of the lead acid battery according to local laws and regulations
2.4 Initial Calibration
When the scale is operated for the first time, a Span calibration is recommended to ensure accurate weighing results. Before performing the calibration, be sure to have the appropriate calibration weight.
Refer to section 4.3 for Span calibration procedures.
OHAUS ValorTM 1000 Series |
EN-5 |
3. OPERATION
3.1 Turning Scale On/Off
To turn the scale on, flip the toggle switch below the right front keyboard. The scale performs a display test, momentarily displays software version, and then enters the active weighing mode. To turn the scale off, toggle same switch to off position.
3.2 Zero Operation
Zero is set under the following conditions:
•Automatically at Power On (initial zero).
•Manually by pressing the ZERO button.
Press the ZERO button to zero the weight display. The scale must be stable and weight +/- 2% of capacity to accept zero operation.
3.3 Manual Tare
Place a container on the weighing pan, then press TARE. The display will show a net value of “0”. To clear the Tare value, press TARE with the pan empty.
3.4 Weighing Mode
Use this mode to measure the weight of a sample in the selected unit of measure. Press and hold SELECT and press M+ Unit until the desired unit icon is displayed. Press ZERO to set the display to zero. Put an empty container on the pan, and then press TARE to tare the container weight. Add material to the container. The display shows the weight of the material in selected unit of measure.

EN-6 OHAUS ValorTM 1000 Series
3.5 Accumulate Mode
Use this mode to store the weight and HI, LO, SUM statistics from a series of samples.
Press ZERO to set the display to zero.
Place the sample on the pan, wait for stabilization.
Press M+ to store the weight of the sample. Storage is confirmed by the display [n---
-x], where x is the sample number. The enunciator above SUM text will illuminate to let user know there are readings in memory. Remove the sample, wait for stable zero reading, then place the next sample on the pan. Press M+ to store the weight of the next sample. Repeat this process until all samples have been weighed.
Review the accumulation data by pressing M+ when the display is at zero. The display shows the number of samples [n----x]
Press M+ to view the maximum sample weight [Hxxxxx]. Press M+ to view the minimum sample weight [Lxxxxx]. Press M+ to view the sum of weights [xxxxx].
Press M+ to return to weighing.
Clear the accumulated data by pressing ZERO when the number of samples is displayed. Note – when stored values are in memory, unit of measure cannot be changed.
3.6 Check Weigh Mode
Use this mode to compare samples to a target weight range.
Press ZERO to set the display to zero. Place a sample on the pan and read the weight and under / accept / over status on display. (Refer to section 4.1 to set limits)
3.7 Changing Units of Measure
Press and hold the SELECT key, and while still holding the SELECT key, press M+ button to display the next available measuring unit. Repeat process to scroll through all units.
OHAUS ValorTM 1000 Series |
EN-7 |
4. SETTINGS
The scale allows the user to customize several settings including check weigh limits, backlight operation and calibration.
4.1 Over and Under Limits
Press and hold SELECT, and while still pressing SELECT, press ZERO until [SET--HL] is displayed.
Press ZERO to view the upper limit [000000].
Press SELECT (§), TARE (©), M+ (ª) to edit the digits of the upper limit. Press ENTER (ZERO Key) to confirm the setting and display the lower limit [000000].
Press SELECT (§), TARE (©), M+ (ª) to edit the lower limit.
Press ENTER (ZERO Key) to confirm the lower setting and display will show Run---X where x is the alarm setting. In this case x=
0 = Turns off check weigh mode
1 = under / accept / over indicators are displayed, alarm beeps when weight is outside accept range.
2 = under / accept / over indicators are displayed, alarm beeps when weight is within accept range.
3 = under / accept / over indicators are displayed, alarm is off. Press TARE & M+ to change the alarm to desired setting.
Press ENTER (ZERO key) to confirm setting and display [EndSEt]
When [EndSEt] is displayed, Press and hold SELECT, and while still pressing SELECT, press ZERO key to return to weighing.
4.2 Backlight
Press and hold ZERO button until [bL---x] is displayed, where x= 0 = backlight is turned off
1 = backlight is on during weighing (15 seconds of no activity) 2 = backlight is always on
Press TARE to change the setting. Press ZERO to confirm the setting and return to weighing.
EN-8 |
OHAUS ValorTM 1000 Series |
4.3 CALIBRATION
Span Calibration:
Turn on the scale. When the display flashes all of the segments ("1~9"), simultaneously press and hold the ZERO and SELECT key. When "999999" is displayed release both buttons. The display reads "CAL ---"
Press ZERO key to display "A____x" (x=divisions in grams:1,2,5,10,20,50). Press ZERO key to accept the default division setting which is shown on the display. Do not change default.
Display shows "b____x" (x=decimal point:0,1,2,3,4). Press ZERO key to accept the default decimal point setting which is shown on the display. Do not change default.
Display shows "Cxxxxx" (xxxxx=Capacity of scale). Press ZERO key to accept the default Capacity setting which is shown on the display. Do not change default.
Display shows "d____x" (x=Zero tracking setting:0-6 from 0d to 5d). Press ZERO key to accept the default setting which is shown on the display.
The display shows "E____x" (x=0, Accumulation and Check Weighing available; x=1, Accumulation and Check Weighing are not available). Press the ZERO key to accept the default setting which is shown on the display.
Press ZERO and display will show "Load 0". Make sure pan is empty then press ZERO key to accept. Display will show "Load F”.
Press ZERO to display "Fxxxxx" (xxxxx=Span weight ). To accept the default span weight, put displayed weight on the scale, and press ZERO to accept it.
If span weight is not available, the user can select a lower span calibration point value. Use the SELECT (scroll to next digit), TARE (decrease blinking digit) and M+ (increase blinking digit) keys to increment or decrement span calibration values. Once the desired span calibration weight is set, place displayed weight on the scale, and press ZERO to accept it. After completion, The display shows “EndCAL” and the scale will return to the weighing mode.
To abort calibration at any point, turn the scale off. To restart calibration, follow the procedure from the beginning.
OHAUS ValorTM 1000 Series |
EN-9 |
5. MAINTENANCE
Caution: before cleaning, turn off the scale, remove the AC adapter.
5.1 Cleaning
The housing may be cleaned with a cloth dampened with a mild detergent if necessary. Do not use solvents, chemicals, alcohol, ammonia or abrasives to clean the housing or control panels.
5.2 Troubleshooting
The following table lists common problems and possible causes and remedies. If the problem persists, contact Ohaus or your authorized dealer.
TABLE 5-1. TROUBLESHOOTING.
Symptom |
Possible Cause(s) |
Remedy |
|
|
|
Scale will not turn on |
No power to scale • |
Verify connections and voltage • |
|
Battery power used up |
Connect power and charge the battery |
Poor accuracy |
Improper calibration • |
Perform calibration • |
|
Unstable environment |
Move scale to suitable location |
Unable to calibrate |
Unstable environment • |
Move the scale to suitable location • |
|
Incorrect calibration mass |
Use correct calibration mass |
Scale flashes Bat |
Battery discharged |
Connect power and charge the battery |
Battery fails to charge |
Battery is defective |
Have battery replaced by authorized |
fully |
|
service dealer |
ZEro-E |
Pan has load during power on |
Remove weight from pan and re-zero |
ZEro-E |
Pan was removed |
Install pan and re-zero. |
-Over- |
Weight on pan exceeds |
Remove weight from the pan |
|
capacity |
|
Err-01 |
Invalid under and over limit |
Re-enter under and over limits |
|
settings |
|
Ad-Lo |
Incorrect Calibration Setting or |
Correct the Calibration setting or |
|
incorrect Calibration weight |
Calibration weight |
5.3 Service Information
If the troubleshooting section does not resolve or describe your problem, contact your authorized Ohaus service agent. For service assistance or technical support in the United States call toll-free 1-800-526-0659 between 8.00 AM and 5:00 PM EST. An Ohaus product service specialist will be available to provide assistance. Outside the USA, please visit our web site, www.ohaus.com to locate the Ohaus office nearest you.
EN-10 |
OHAUS ValorTM 1000 Series |
6. TECHNICAL DATA
The technical data is valid under the following ambient conditions: Ambient temperature: 0°C to 40°C, Maximum Relative humidity: 80% for
temperatures up to 31°1C, decreasing linearity to 50% relative humidity at 40°C. Height above sea level: Up to 2000m. Operability is assured at ambient temperatures between 0°C and 40°C Power: AC adapter : 9 or12 VDC, Protection: Protected against dust and water, Pollution degree: 2 , Installation category: Class III, EMC: See Declaration of Conformity
6.1 Specifications
TABLE 6-1. Specifications.
Single Display Models |
V11P3 |
V11P6 |
V11P15 |
|
V11P30 |
|
|
|
|
|
|
|
|
Dual Display Models |
V11P3T/ |
V11P6T/ |
V11P15T/ |
|
V11P30T/ |
|
V11P3TG* |
V11P6TG* |
V11P15TG* |
|
V11P30TG* |
||
|
|
|||||
|
|
|
|
|
|
|
Capacity (kg) |
3 |
6 |
15 |
|
30 |
|
|
|
|
|
|
|
|
Readability (g) |
0.5 |
1 |
2 |
|
5 |
|
|
|
|
|
|
|
|
Repeatability (g) |
1 |
2 |
5 |
|
10 |
|
|
|
|
|
|
|
|
Linearity (g) |
1 |
2 |
5 |
|
10 |
|
|
|
|
|
|
||
Weighing Units* |
Kilograms, Pounds, Grams, Ounces |
|||||
|
|
|
||||
App Modes |
|
Weigh, Accumulate, Checkweigh |
||||
|
|
|
|
|||
Tare range |
|
To capacity by subtraction |
|
|||
|
|
|
|
|||
Stabilization Time |
|
≤3 seconds |
|
|||
|
|
|||||
Power requirements |
9 VDC 500 mA AC adapter (supplied) |
|||||
Internal rechargeable sealed lead acid battery |
||||||
|
||||||
|
|
|
|
|||
Calibration |
|
Digital with external weight |
|
|||
|
|
|||||
Battery Life |
80/100 hours (with/without backlight on) |
|||||
|
|
|||||
Display Type |
6-digit 7-segment LCD with blue backlight |
|||||
|
|
|
|
|||
Display Size |
|
20 mm / 0.8 in digits |
|
|||
|
|
|
|
|||
Pan Size |
|
250 x 180 mm. / 9.9 x 7.1in. |
|
|||
|
|
|||||
Dimensions |
255w x 305d x 115h mm / 10w x 12d x 4.5h in |
|||||
|
|
|
|
|||
Net Weight |
|
3.2 kg / 7 lb |
|
|||
|
|
|
|
|||
Shipping Weight |
|
4.0 kg / 8.8 lb |
|
|||
|
|
|
|
|
|
|
* V11PxTG models have only Kilogram and Gram units enabled

OHAUS ValorTM 1000 Series |
EN-11 |
6.2 Compliance
Compliance to the following standards is indicated by the corresponding mark on the product.
This product conforms to the EMC directive 2004/108/EC and the Low Voltage Directive 2006/95/EC. The complete declaration of Conformity is available online at www.ohaus.com.
Disposal
In conformance with the European Directive 2002/96/EC on Waste Electrical and Electronic Equipment (WEEE) this device may not be disposed of in domestic waste. This also applies to countries outside the EU, per their specific requirements.
The Batteries Directive 2006/66/EC introduces new requirements from September 2008 on removability of batteries from waste equipment in EU Member States. To comply with this Directive, this device has been designed for safe removal of the batteries at end-of-life by a waste treatment facility.
Please dispose of this product in accordance with local regulations at the collecting point specified for electrical and electronic equipment.
If you have any questions, please contact the responsible authority or the distributor from which you purchased this device.
Should this device be passed on to other parties (for private or professional use), the content of this regulation must also be related.
For disposal instructions in Europe, refer to www.ohaus.com, choose your country then search for WEEE.
Thank you for your contribution to environmental protection.
FCC Note
This equipment has been tested and found to comply with the limits for a Class A digital device, pursuant to Part 15 of the FCC Rules. These limits are designed to provide reasonable protection against harmful interference when the equipment is operated in a commercial environment. This equipment generates, uses, and can radiate radio frequency energy and, if not installed and used in accordance with the instruction manual, may cause harmful interference to radio communications.
EN-12 |
OHAUS ValorTM 1000 Series |
Operation of this equipment in a residential area is likely to cause harmful interference in which case the user will be required to correct the interference at his own expense.
Industry Canada Note
This Class A digital apparatus complies with Canadian ICES-003.
OHAUS ValorTM 1000 Series |
EN-13 |
ISO 9001 Registration
In 1994, Ohaus Corporation, USA, was awarded a certificate of registration to ISO 9001 by Bureau Veritus Quality International (BVQI), confirming that the Ohaus quality management system is compliant with the ISO 9001 standard’s requirements. On May 21, 2009, Ohaus Corporation, USA, was re-registered to the ISO 9001:2008 standard.
LIMITED WARRANTY
Ohaus products are warranted against defects in materials and workmanship from the date of delivery through the duration of the warranty period. During the warranty period Ohaus will repair, or, at its option, replace any component(s) that proves to be defective at no charge, provided that the product is returned, freight prepaid, to Ohaus.
This warranty does not apply if the product has been damaged by accident or misuse, exposed to radioactive or corrosive materials, has foreign material penetrating to the inside of the product, or as a result of service or modification by other than Ohaus. In lieu of a properly returned warranty registration card, the warranty period shall begin on the date of shipment to the authorized dealer. No other express or implied warranty is given by Ohaus Corporation. Ohaus Corporation shall not be liable for any consequential damages.
As warranty legislation differs from state to state and country to country, please contact Ohaus or your local Ohaus dealer for further details.

Serie OHAUS ValorTM 1000 |
ES-1 |
1. INTRODUCCIÓN
Este manual contiene instrucciones de instalación, operación y mantenimiento para las básculas de la serie ValorTM 1000 de Ohaus. Por favor lea completamente el manual antes de usar la báscula.
1.1 Precauciones de seguridad
Por favor siga estas precauciones de seguridad:
•Verifique que el voltaje de entrada del adaptador de corriente alterna (CA) coincida con el voltaje del suministro eléctrico CA local.
•No sumerja la báscula en agua u otros líquidos.
•No opere la báscula en ambientes hostiles.
•No deje caer objetos sobre la plataforma.
•No coloque la báscula al revés sobre la bandeja de pesaje.
•El mantenimiento debe ser realizado solamente por personal autorizado.
•Desconecte la báscula de la fuente de alimentación cuando la esté limpiando.
1.2. Controles
1
2 
3
4 |
5 |
|
|
|
6 |
|
|
7 |
10 |
|
|
|
9 |
8 |
|
||
|
|
|
|
|
|
|||
|
|
|
|
|
||||
|
|
|
|
|
|
|
|
|
Figura 1-1. Controles.
|
ES-2 |
|
|
Serie OHAUS ValorTM 1000 |
|
|
|
|
|
|
TABLA 1-1. CONTROLES. |
||
|
Ítem |
|
Descripción |
|
|
|
1 |
|
Indicador de batería baja |
|
|
||
2 |
|
Indicador de carga de batería |
||||
3 |
|
Burbuja de nivel |
|
|
||
4 |
|
Íconos de suma de acumulado, NET y de estabilidad |
||||
5 |
|
Indicadores de verificación de peso por arriba, por abajo y aceptable |
||||
6 |
|
Pantalla con iluminación de fondo de LCD de 7-segmentos, 6-dígitos |
||||
|
con anunciadores de medida |
|||||
|
|
|
||||
7 |
|
Teclas |
|
|
||
8 |
|
Patas ajustables |
|
|
||
9 |
|
Enchufe de entrada de energía |
||||
10 |
|
Interruptor de encendido (On/Off) |
||||
|
|
|
|
TABLA 1-2. FUNCIONES DE CONTROL. |
||
|
Botón |
|
Acción |
Función |
||
|
ZERO |
|
Pulsación corta |
Establece la pantalla en cero |
||
|
Enter |
|
Pulsación en Menú |
Confirma las configuraciones |
||
|
TARE |
|
Pulsación corta |
Tara el peso del elemento que está en la |
||
|
|
|
|
|
bandeja de pesaje |
|
|
|
|
|
Pulsación en Menú |
Disminuye las configuraciones por arriba y |
|
|
|
|
|
|
por abajo |
|
|
M+ |
|
Pulsación corta |
Almacena el peso mostrado en la memoria |
||
|
Units |
|
|
de acumulación |
||
|
(unidades) |
|
Muestra los datos de acumulación cuando la |
|||
|
|
|
|
|
pantalla está en cero. |
|
|
|
|
|
Pulsación en Menú |
Aumenta las configuraciones por arriba y por |
|
|
|
|
|
|
abajo |
|
|
|
|
|
Pulsación larga |
Cambia la unidad de medida al hacer una |
|
|
|
|
|
|
pulsación larga del botón SELECT |
|
|
|
|
|
|
(seleccionar) |
|
|
SELECT |
|
Pulsación corta |
Cambia al siguiente dígito cuando se |
||
(seleccionar) |
|
configuran valores por arriba y por abajo |
||||
|
Units |
|
Pulsación larga |
Cambia la unidad de medida al hacer una |
||
|
(unidades) |
|
pulsación corta del botón M+ |
|||
Serie OHAUS ValorTM 1000 |
ES-3 |
2. INSTALACIÓN
2.1 Contenido del paquete
•Báscula Valor 1000
•Bandeja de acero inoxidable
•Adaptador de corriente CA
•Manual de instrucciones
•Tarjeta de garantía
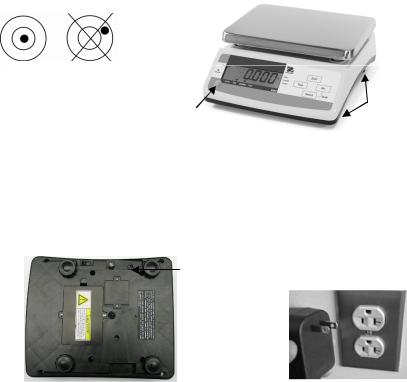
2.2 Ubicación
Use la báscula en una superficie firme y segura. Evite lugares con corrientes de aire excesivas, vibraciones, fuentes de calor o cambios bruscos de temperatura. Ajuste las patas niveladoras para que la burbuja esté centrada en el círculo.
SI NO
Burbuja de nivel |
|
Patas |
|
|
|
niveladoras |
|
Figura 2-1. Nivelación de la báscula. |
|||
|
|||
|
|||
2.3 Alimentación
Conecte el adaptador de corriente alterna al enchufe de entrada principal. Inserte la clavija en la toma DC en la parte inferior de la báscula. La báscula puede ser utilizada con suministro de corriente alterna CA o con la batería recargable interna. La báscula debe estar encendida para recargar la batería.
Alimentación principal
Figura 2-2. Conexión de corriente

ES-4 |
Serie OHAUS ValorTM 1000 |
2.3.1 Corriente de batería
La báscula puede ser usada con la batería interna recargable cuando la energía de la corriente CA no esté disponible. La báscula cambiará automáticamente a la operación con batería si hay una falla de corriente o si se quita el cable de corriente.
Antes de usar la báscula por primera vez, la batería debe ser cargada completamente hasta por 12 horas. Durante la carga, el indicador de batería muestra el nivel de carga (consulte la tabla 1-1), y la báscula puede ser usada mientras se está cargando. La batería está protegida contra sobrecargas y la báscula puede permanecer conectada al cable de corriente CA.
NOTA:
• La carga de la báscula solo debe realizarse en un ambiente seco.
PRECAUCIÓN: La batería solo debe ser reemplazada por un distribuidor de Ohaus autorizado.
Puede producirse un riesgo de explosión si se reemplaza con un tipo equivocado o si se conecta de forma inapropiada.
La eliminación de la batería de plomo-ácido debe hacerse de acuerdo a las leyes y regulaciones locales.
2.4 Calibración inicial
Cuando la báscula es utilizada por primera vez, se recomienda hacer una calibración de rango para asegurar resultados de pesaje exactos. Antes de realizar la calibración, asegúrese de tener el peso de calibración apropiado.
Consulte la sección 4.3 para los procedimientos de calibración de rango.
Serie OHAUS ValorTM 1000 |
ES-5 |
3. OPERACIÓN
3.1 Apagado y encendido de la báscula
Para encender la báscula, mueva el interruptor de palanca que está debajo del teclado frontal derecho. La báscula realiza una prueba de pantalla, muestra momentáneamente la versión del software y después entra al modo de pesaje activo. Para apagar la báscula, mueva el mismo interruptor de palanca a la posición de apagado (off).
3.2 Operación de puesta a cero
El cero se establece bajo las siguientes condiciones:
•Automáticamente en el encendido (cero inicial).
•Manualmente presionando el botón ZERO.
Presione el botón ZERO para establecer en cero la pantalla de pesaje. La báscula debe estar estable y el peso debe estar en +/- 2% de la capacidad para aceptar la operación de cero.
3.3 Tara manual
Coloque un recipiente en la bandeja de pesaje, después presione TARE. La pantalla mostrará un valor neto de “0”. Para borrar el valor de tara, presione TARE con la bandeja vacía.
3.4 Modo de pesaje
Utilice este modo para medir el peso de una muestra en la unidad de medida seleccionada. Mantenga presionado SELECT y presione M+ Unit hasta que se muestre el ícono de la unidad deseada. Presione ZERO para establecer la pantalla en cero. Ponga un recipiente vacío en la bandeja y después presione TARE para tarar el peso del recipiente. Agregue material al recipiente. La pantalla muestra el peso del material en la unidad de medida seleccionada.
 Loading...