


 Loading...
Ranger RC Compact Scales
Instruction Manual

Ranger RC |
|
Table of contents |
Table of contents |
|
|
|
|
Page |
1 |
Introduction ..................................................................................... |
5 |
1.1 |
Safety instructions ............................................................................. |
5 |
1.2 |
Description ...................................................................................... |
6 |
1.3 |
Putting into operation ...................................................................... |
10 |
2 |
Operation ...................................................................................... |
12 |
2.1 |
Switching on and off ....................................................................... |
12 |
2.2 |
Zeroing / Zero point correction .......................................................... |
12 |
2.3 |
Simple weighing ............................................................................. |
12 |
2.4 |
Weighing with tare .......................................................................... |
13 |
2.5 |
Calling up the gross weight and tare value ......................................... |
14 |
2.6 |
Displaying weight values with a higher resolution ............................... |
14 |
2.7 |
Displaying the capacity available ...................................................... |
14 |
2.8 |
Dynamic weighing .......................................................................... |
14 |
2.9 |
Printing results ............................................................................... |
15 |
2.10 |
Switching scales ............................................................................. |
15 |
2.11 |
Cleaning ........................................................................................ |
16 |
3 |
Counting ....................................................................................... |
17 |
3.1 |
Counting parts into a container ......................................................... |
17 |
3.2 |
Counting parts out of a container ...................................................... |
17 |
3.3 |
Counting with variable reference quantity ........................................... |
18 |
3.4 |
Counting with minimum accuracy .................................................... |
18 |
3.5 |
Reference optimization .................................................................... |
18 |
3.6 |
Counting with automatic reference determination ................................ |
19 |
3.7 |
Counting with two scales ................................................................. |
19 |
4 |
Settings in the menu ...................................................................... |
21 |
4.1 |
Operating the menu ........................................................................ |
21 |
4.2 |
Overview ....................................................................................... |
23 |
4.3 |
Scale settings (SCALE) .................................................................... |
26 |
4.4 |
Application settings (APPLICATION) .................................................. |
28 |
4.5 |
Terminal settings (TERMINAL) .......................................................... |
30 |
4.6 |
Configuring interfaces (COMMUNICATION) ......................................... |
31 |
4.7 |
Diagnosis and printing out of the menu settings (DIAGNOS) |
................34 |
5 |
Interface description ...................................................................... |
35 |
5.1 |
OHAUS interface commands ............................................................ |
35 |
5.2 |
SICS interface commands ................................................................ |
37 |
5.3 |
TOLEDO Continuous mode .............................................................. |
40 |
6 |
Event and error messages .............................................................. |
42 |
7 |
Technical data and accessories ...................................................... |
44 |
7.1 |
Technical data ................................................................................ |
44 |
7.2 |
Accessories .................................................................................... |
49 |
3

Table of contents |
|
Ranger RC |
8 |
Appendix ...................................................................................... |
50 |
8.1 |
Information for certified scales in EC countries ................................... |
50 |
8.2 |
Safety checks ................................................................................. |
50 |
8.3 |
Table of Geo Values ........................................................................ |
51 |
8.4 |
Sample protocols ........................................................................... |
54 |
9 |
Index ............................................................................................ |
55 |
4

Ranger RC |
Introduction |
1Introduction
1.1Safety instructions
CAUTION!
Do not use Ranger RC in hazardous areas!
Our product range includes special devices for hazardous areas.
DANGER!
Electric shock hazard!
 Always pull out the mains plug before any work on the device.
DANGER!
Electric shock hazard if the mains cable is damaged!
 Check the mains cable for damage regularly and replace it immediately if it is damaged.
 On the rear side of the device, maintain a clearance of at least 3 cm in order to prevent the mains cable bending too much.
CAUTION!
On no account open the device!
The warranty is void if this stipulation is ignored. The device may only be opened by authorized persons.
 Call OHAUS Service.
5
Introduction |
Ranger RC |
CAUTION!
Handle the compact scale with care. The scale is a precision instrument.
 When the weighing pan has been removed, never clean the area under the load plate holder with a solid object!
 Do not put excessive loads on the scale.
  Avoid banging the weighing pan.
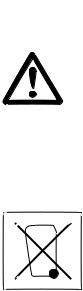
Disposal
 Observe the valid environmental regulations when disposing of the scale. If the device has a rechargeable battery:
The battery contains heavy metals and therefore must not be disposed of with normal waste.
 Observe the local regulations for disposing of environmentally hazardous materials.
Note Use with foodstuffs
Parts coming into contact with foodstuffs have smooth surfaces and are easy to clean. The materials used do not splinter and are free of harmful substances.
With foodstuffs, it is recommended to use the supplied protective cover.  Clean the protective cover regularly and carefully.
 Replace damaged or very dirty protective cover immediately.
1.2Description
This user manual applies to the following types of compact scales:
•Compact scale RC..S with strain gauge weighing cell
•Compact scale RC..M with Monobloc
The compact scales are available in a small and large size in various capacities and resolutions.
The power supply is carried out via a built-in power supply device, an internal rechargeable battery with an external mains adapter or an external battery.
One of the following options can also be ordered:
•Additional interface RS232 or RS485
•Ethernet interface
•USB interface
•Digital I/O
•Analog second scale interface
6
Ranger RC Introduction
|
1.2.1 |
Overview |
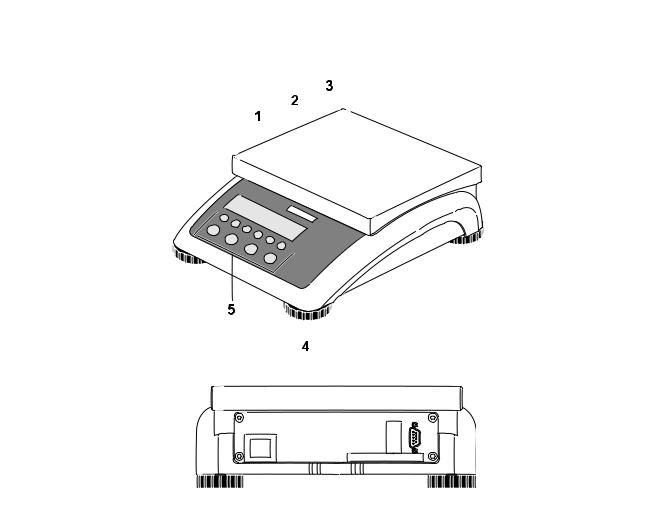
1 |
Display |
|
2 |
Scale specifications |
|
3Load plate
4Adjustable foot
5Keys
1Power supply
connection
2 Optional interface
3RS232 interface
1 |
2 |
3 |
7
Introduction |
Ranger RC |
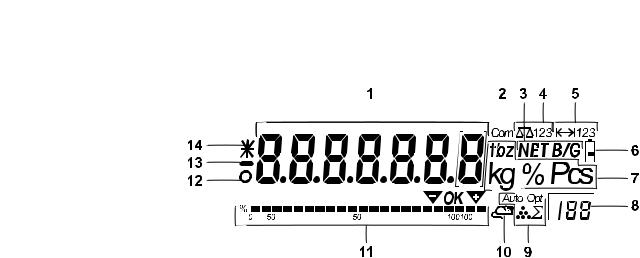
1.2.2Display
1 7-segment display, 7 digits, with decimal point
2Active interface
3 Symbol for displaying gross and net values
4Active scale
5Weighing range display
6 Battery charge level; only present on scales with a battery
7Weight units
8Selected reference quantity
9 Symbols for optimizing the average piece weight
10Symbol for dynamic weighing
11Graphic display of the weighing range
12Stability monitor (goes out when a stable weight value is reached)
13Sign
14Identification for changed or calculated weight values, e.g. higher resolution, minimum weight not reached
8
Ranger RC Introduction
1.2.3 |
Keypad |
|
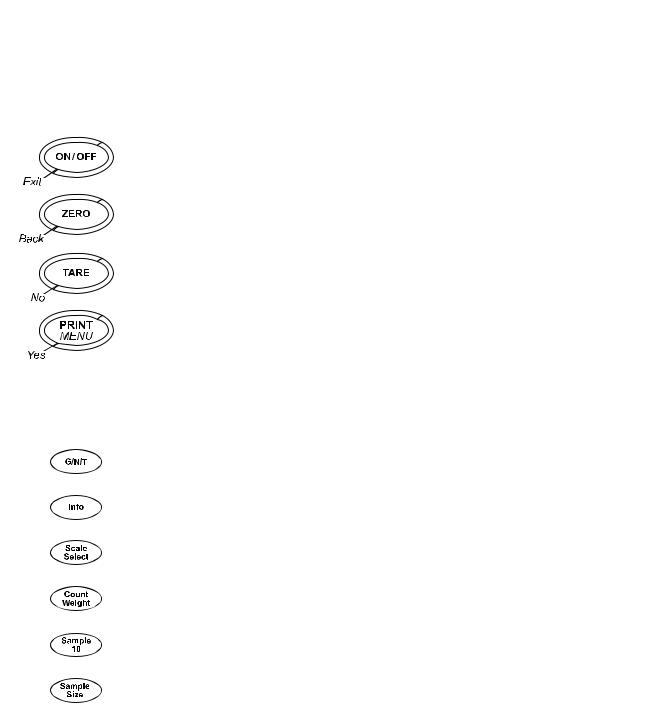
|
Main functions |
|
Key |
Function in operating mode |
Function in the menu |
|
Switching device on / off, abort |
To the last menu item –End- |
|
Setting scale to zero |
Scrolling back |
|
Taring scale |
Scrolling forward |
|
Transfer key |
Activating menu item |
|
Long key press: Calling up menu |
Accepting selected setting |
|
Additional functions |
|
Key |
Function |
|
Switching between gross and net weight; displaying tare specification
Calling up additional information, e.g. gross weight, average piece weight, higher
resolution ...
Switching the scale
Switching between weight value and number of pieces
Determining average piece weight from 10 pieces
Determining average piece weight from any number of pieces
9
Introduction |
Ranger RC |
1.3Putting into operation
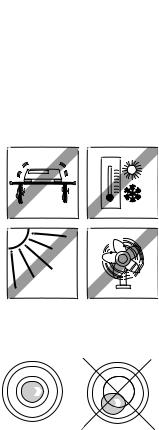
1.3.1Selecting or changing the location
The correct location is crucial to the accuracy of the weighing results!
 Select a stable, vibration-free and if possible a horizontal location.
The ground must be able to safely bear the weight of the fully loaded scale. Observe the following environmental conditions:
• No direct sunlight
• No strong drafts
• No excessive temperature fluctuations
Aligning the scale
Only scales that have been aligned precisely horizontally provide accurate weighing results. The certified scales have a spirit level to simplify alignment.
 Turn the adjustable feet of the scale until the spirit level’s air bubble is inside the inner circle.
Major geographical The manufacturer adjusts each scale to the local gravity conditions (GEO value). In location changes the event of major geographical location changes, this setting must be adjusted by a service technician. Certified scales must also be recertified observing the national certification regulations. These steps are not necessary for scales with an internal cali-
bration weight.
10
Ranger RC |
Introduction |
1.3.2Connecting the power supply CAUTION!
Before connecting the scale to the mains, check whether the voltage value printed on the rating plate corresponds with the local mains voltage.
 Never connect the device if the voltage value printed on the rating plate is different to the local mains voltage.
 Plug the mains plug into the socket.
After connection, the device performs a self-test. When the zero display appears, the device is ready to weigh.
 Calibrate the device in order to obtain the greatest possible precision, see Section 4.3.2.
Note Partially certified scales (scales with first-level certification) must be certified by an authorised body or by the OHAUS Service.
 Call OHAUS Service.
Scales with a built-in battery can work independently from the mains for approximately 30 hours in normal operation. A prerequisite for this is that the background
lighting is switched off and that no peripheral devices are connected.
The device automatically switches to battery operation as soon as the mains supply
is interrupted. When the mains supply is restored, the device automatically switches
back to mains operation.
The battery symbol indicates the present charging level of the battery. 1 segment corresponds to approx. 25 % capacity. When the symbol flashes the battery must be charged (min. 4 hours). The charging period is extended if work is continued during charging. The battery is protected against overcharging.
Note The battery’s charging capacity can be reduced under continuous mains operation.
 To maintain the charging capacity, after a maximum of 4 weeks discharge the battery completely before recharging it.
11
Operation |
Ranger RC |
2Operation
2.1Switching on and off
Switching on |
Press ON/OFF. |
The scale conducts a display test. When the weight display appears, the scale is ready to weigh.
Switching off |
Press ON/OFF. |
Before the display goes out, -OFF- appears briefly.
2.2Zeroing / Zero point correction
Zeroing corrects the influence of slight changes on the load plate.
Manual 1. Unload scale.
2.Press ZERO.
The zero display appears.
Automatic In the case of scales that cannot be certified, the automatic zero point correction can be deactivated in the menu or the amount can be changed.
As standard, the zero point of the scale is automatically corrected when the scale is unloaded.
2.3Simple weighing
1.Place weighing sample on scale.
2.Wait until the stability monitor  goes out.
3.Read weighing result.
12

Ranger RC |
Operation |
2.4Weighing with tare
2.4.1Taring
 Place the empty container on the scale and press TARE. The zero display and the symbol NET appear.
The tare weight remains saved until it is cleared.
2.4.2Clearing the tare
 Unload scale and press TARE.
The symbol NET goes out, the zero display appears.
If A.CL-tr is activated in the menu, the tare weight is automatically cleared as soon as the scale is unloaded.
2.4.3Automatic taring
Prerequisite
A-tArE is activated in the menu, the symbol T flashes in the display.  Place the container or packaging material on the scale.
The packaging weight is automatically saved as the tare weight, the zero display and the symbol NET appear.
2.4.4Chain tare
Prerequisite
The tare function CHAIn.tr is activated in the menu.
With this function it is possible to tare several times if, for example, cardboard is placed between individual layers in a container.
1.Place the first container or packaging material on the scale and press TARE.
The packaging weight is automatically saved as the tare weight, the zero display and the symbol NET appear.
2.Weigh the weighing sample and read/print out the result.
3.Place the second container or packaging material on the scale and press TARE again.
The total weight on the scale is saved as the new tare weight. The zero display appears.
4.Weigh the weighing sample in the second container and read/print the result.
5.Repeat the last two steps for other containers.
13
Operation |
Ranger RC |
2.5Calling up the gross weight and tare value
1.Press G/N/T.
The gross weight is displayed for 2 seconds.
2.Press G/N/T again while the gross weight is displayed.
The tare value is displayed. After a few seconds, the scale changes back to the net weight display.
2.6Displaying weight values with a higher resolution
 Press Info.
The current weight value is displayed for 2 seconds in a higher resolution. The scale then changes back to the normal resolution.
2.7Displaying the capacity available
The scale has a graphic display of the scale capacity available. The bar indicates how 
 many per cent of the scale capacity is already occupied and what capacity is still available. In the example, approx. 65 % of the scale capacity is occupied.
2.8 |
Dynamic weighing |
|
|
|
With the dynamic weighing function, it is possible to weigh restless weighing samples |
||
|
such as live animals. If this function is activated, the symbol |
appears in the dis- |
|
|
play. |
|
|
|
With dynamic weighing, the scale calculates the mean value from 56 weighing oper- |
||
|
ations within 4 seconds. |
|
|
With manual start |
Prerequisite |
|
|
|
AVErAGE -> MAnuAL is selected in the menu. |
|
|
|
The weighing sample must be heavier than 5 scale divisions. |
|
|
|
1. |
Place the weighing sample on the scale and wait until it has stabilized. |
|
|
2. |
Press PRINT to start dynamic weighing. |
|
|
|
During dynamic weighing, horizontal segments appear in the display, and the |
|
|
|
dynamic result is then displayed with the symbol *. |
|
|
3. |
Unload the scale to be able to start a new dynamic weighing operation. |
|
14

Ranger RC Operation
With automatic start Prerequisite
AVErAGE -> AUtO is selected in the menu.
The weighing sample must be heavier than 5 scale divisions.
1.Place the weighing sample on the scale.
The scale starts the dynamic weighing automatically.
During dynamic weighing, horizontal segments appear in the display, and the dynamic result is then displayed with the symbol *.
2.Unload the scale to be able to perform a new dynamic weighing operation.
2.9Printing results
If a printer or computer is connected to the scale, the weighing results can be printed out or sent to a computer.
 Press PRINT.
The display contents are printed out and transferred to the computer. See Section 8.4 for sample protocols.
2.10Switching scales
If a second scale or a weighing platform is connected, e. g. via the optional analog second scale interface, the currently active scale is shown in the display.
The second scale can be operated in exactly the same way as the first scale.  Press Scale Select.
The display changes from one scale to the other.
15

Operation |
Ranger RC |
2.11Cleaning
CAUTION!
Electric shock hazard!
 Before cleaning with a damp cloth, pull out the mains plug to disconnect the unit from the power supply.
CAUTION!
When the weighing pan has been removed, never clean the area under the load plate holder with a solid object!
This could damage the weighing cell.
Other cleaning information:
•Use damp cloths.
•Do not use any acids, alkalis or strong solvents.
•Do not clean using a high-pressure cleaning unit or under running water.
•If very dirty, remove the weighing pan, protective cover (if present) and adjustable feet and clean these items separately.
•Follow all the relevant instructions regarding cleaning intervals and permissible cleaning agents.
16

Ranger RC |
Counting |
3Counting
The Ranger RC compact scales have additional functions for piece counting.
The relevant settings in the menu are described in Section 4.4.1.
3.1Counting parts into a container
1.Place the empty container on the scale and press TARE. The container is tared and the zero display appears.
2.Place 10 reference parts on the scale and press Sample 10. -or-
|
|
Place the number of pieces displayed above the key Sample Size on the scale |
|
|
and press Sample Size. |
|
|
The scale determines the average piece weight and then shows the number of |
|
|
pieces. |
|
3. |
Add more parts to the container until the required number of pieces is reached. |
Note |
• |
The average piece weight remains saved in the factory setting until a new average |
|
|
piece weight is determined. |
•With Count Weight it is possible to switch betweenthe number of pieces and the weight.
•When the number of pieces is displayed, it is possible to display the average piece weight with Info, i. e. the weight of a single reference part, for 2 seconds.
•If A.CL-APW ON is set in the menu, the average piece weight is automatically cleared after each counting operation. The average piece weight must be determined again for the next counting operation.
•If ACCurCY ON is set in the menu, the accuracy achieved is briefly shown after the number of pieces is determined.
3.2Counting parts out of a container
1.Place the full container on the scale and press TARE. The container is tared and the zero display appears.
2.Remove 10 reference parts and press Sample 10.
-or-
 Remove the number of pieces displayed above the key Sample Size and press
Sample Size.
The scale determines the average piece weight and then shows the number of pieces removed, together with a minus sign.
3.Remove more parts from the container until the required number of pieces is reached.
17

Counting |
Ranger RC |
3.3Counting with variable reference quantity
If VAr-SPL ON is set in the menu, it is possible to select from 5 preset reference quantities via Sample Size.
 Press Sample Size as often as necessary until th e display above the key has changed to the desired reference quantity.
The rest of the counting process is as described earlier.
3.4Counting with minimum accuracy
The item Min.rEFW in the menu allows to preset a minimum accuracy of 97.5 %, 99.0 % or 99.5 %. On the basis of this, the scale calculates the minimum reference weight necessary to reach the defined accuracy.
1.Place the reference parts on the scale and press Sample 10 or Sample Size.
2.If the average piece weight is not sufficient to ensure the desired accuracy, Add x PCS appears.
3.Add the displayed number of pieces.
The scale then automatically determines the average piece weight with the larger reference quantity.
The rest of the counting process is as described earlier.
3.5Reference optimization
The greater the reference quantity, the more accurately the scale determines the number of pieces.
3.5.1Automatic reference optimization
rEF.OPt -> AUtO must be set in the menu for this. The symbol Auto Opt appears in the display.
1.Place the reference parts on the scale and press Sample 10 or Sample Size.
2.Place additional reference parts, max. the same number as for the first reference determination, on the scale.
The scale automatically optimises the average piece weight with the larger number of reference parts.
The rest of the counting process is as described earlier.
Note The reference optimization can be performed several times.
18
Loading...