


Ohaus Corporation
29 Hanover Road Florham Park NJ 07932-0900
Electronic Balances
Mode
Off
Scout |
II |
|
|
g |
|
Z |
|
er |
|
On |
o |
|
|
1

NOTICE:
This equipment has been tested and found to comply with the limits for a Class B digital device, pursuant to part 15 of the FCC Rules. These limits are designed to provide reasonable protection against harmful interference in a residential installation. This equipment generates, uses and can radiate radio frequency energy and, if not installed and used in accordance with the instructions, may cause harmful interference to radio communications. However, there is no guarantee that interference will not occur in a particular installation. If this equipment does cause harmful interference to radio or television reception, which can be determined by turning the equipment off and on, the user is encouraged to try to correct the interference by one or more of the following measures:
•Reorient or relocate the receiving antenna.
•Increase the separation between the equipment and the receiver.
•Connect the equipment into an outlet on a circuit different from that to which the receiver is connected.
•Consult the dealer or an experienced radio/TV technician for help.
This digital apparatus does not exceed the Class B limits for radio noise emissions from digital apparatus as set out in the interference-causing equipment standard entitled "Digital Apparatus", ICES-003 of the department of communications.
Cet appareil numérique respecte les limites de bruits radioélectriques applicables aux appareils numériques de Classe B prescrites dans la norme sur le matériel brouilleur: "Appareils Numériques", NMB-003 édictée par le ministre des communications.
Unauthorized changes or modifications to this equipment are not permitted.
This device corresponds to requirements stipulated in 73/23/EEC and features radio interference suppression in compliance with valid EC Regulation 89/336/EEC. Note: The displayed value may be adversely
affected under extreme electromagnetic influences, eg. when using a radio unit in the immediate vicinity of the device. Once the interference has been rectified, the product can once again be used for its intended purpose.
Cet appareil correspond aux exigences selon la norme 73/23/CEE et est déparasité conformément à la directive de la CE 89/336/CEE en vigueur. Remarque: Dans des conditions d’influences électromagnétiques extrêmes, par exemple en cas d’exploitation d’un appareil radio à proximité immédiate de I’appareil la valeur d’affichage risque d’être influencée. Une fois que l’influence parasite est terminée, le produit peut être de nouveau utilisé de manière conforme aux prescriptions.
Dieses Gerät entspricht den Anforderungen nach 73/23/EWG und ist funkentstört entsprechend der geltenden EG-Richtlinie 89/336/EWG. Hinweis: Unter extremen elektromagnetischen Einflüssen z.B. bei Betreiben eines Funkgerätes in unmittelbarer Nähe des Gerätes kann eine Beeinflussung des Anzeigewertes verursacht werden. Nach Ende des Störeinflusses ist das Produkt wieder bestimmungsgemäss benutzbar.
2
TABLE OF CONTENTS |
|
DESCRIPTION ................................................................................................. |
4 |
UNPACKING ..................................................................................................... |
4 |
INSTALLATION ................................................................................................. |
5 |
Power ................................................................................................. |
5 |
Pan Installation .................................................................................. |
5 |
Weigh Below Hook ............................................................................ |
6 |
IMPORTANT INFORMATION ............................................................................ |
6 |
TURNING THE BALANCE ON ......................................................................... |
7 |
TURNING THE BALANCE OFF ........................................................................ |
7 |
WEIGHING ........................................................................................................ |
7 |
TARING ............................................................................................................ |
7 |
MENU DESCRIPTION ...................................................................................... |
8 |
AUTO SHUT-OFF ACTIVATION ......................................................................... |
8 |
SPAN CALIBRATION ........................................................................................ |
9 |
LINEARITY CALIBRATION ............................................................................... |
9 |
ACTIVATING UNITS ....................................................................................... |
10 |
PARTS COUNTING ....................................................................................... |
10 |
PRINT MENU ................................................................................................. |
11 |
SETTING PRINT MENU FUNCTIONS .......................................................... |
12 |
Entering the Print Menu .................................................................. |
12 |
Power On/Off ................................................................................... |
12 |
Baud Rate ....................................................................................... |
12 |
Data Bits .......................................................................................... |
13 |
Parity Bit .......................................................................................... |
13 |
Stop Bits .......................................................................................... |
13 |
Auto Print ......................................................................................... |
13 |
Stable Data Output Only ................................................................. |
14 |
PRINTING ...................................................................................................... |
14 |
RS232 INTERFACE ....................................................................................... |
14 |
Hardware ........................................................................................ |
14 |
RS232 Commands ......................................................................... |
15 |
Output Formats ................................................................................ |
15 |
Error Codes ..................................................................................... |
16 |
CARE AND MAINTENANCE ......................................................................... |
16 |
TROUBLESHOOTING ................................................................................... |
16 |
PARTS INFORMATION .................................................................................. |
17 |
REPLACEMENT PARTS ............................................................................... |
17 |
ACCESSORIES ............................................................................................. |
17 |
SPECIFICATIONS .......................................................................................... |
18 |
WARRANTY ................................................................................................... |
19 |
3
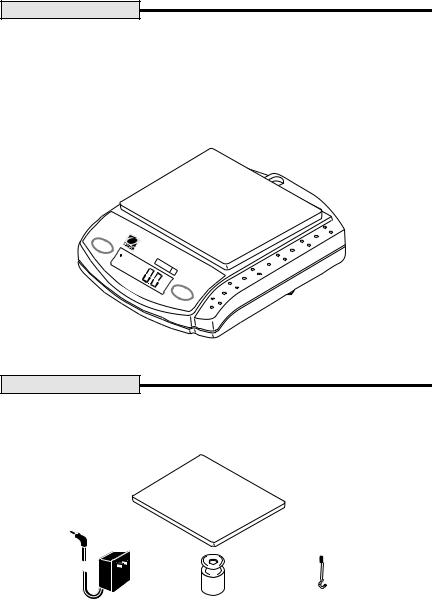
DESCRIPTION
ScoutII balances are precision weighing instruments, designed to provide years of service. Features include front panel controls, simplified menu, automatic shutoff, multiple weighing units, parts counting and a weigh below hook. A total of ten models are available with full capacity ranges of 200g to 6000g. Five of the models are available with RS232 communications for operation with external computers or printers. The balance can be operated by a 9 Volt battery or with the AC Adapter supplied. High capacity model is shown below.
Mode
Off
S |
|
cout |
II |
g |
|
|
Zero |
|
On |
ScoutII Balance
UNPACKING
ScoutII balances are shipped with the following components:
• |
Stainless steel pan |
• |
Instruction manual |
• |
Weigh below hook |
• |
Calibration mass* |
• |
Power adapter |
• |
Warranty card |
Stainless Steel Pan
AC Adapter |
Calibration Mass* Weigh Below Hook |
|
(Stored in battery cover) |
1.Carefully unpack the balance, verify that all items are on hand. Save the packing material for transporting the balance.
2.Remove the retaining band and cardboard insert from the pan support. * Calibration masses are not supplied with 1200g and 6000g balances.
4

INSTALLATION
For best performance, the balance should be used in a clean, stable environment. Do not use the balance in environments with excessive drafts, near magnetic fields or equipment that generates magnetic fields, rapid temperature changes, vibrations or corrosive vapors.
Power
Connect the AC Adapter at the rear of the balance. For portable operation, install a 9 V battery in the battery compartment as shown in the illustration.
BATTERY COMPARTMENT AND |
|
HOOK STORAGE |
BATTERY (NOT SUPPLIED) |
|
RS232 JACK
(CERTAIN MODELS)
AC ADAPTER
POWER INPUT JACK
Pan Installation
Place the pan over the pan support as shown in the illustration.
PAN 
PAN
SUPPORT 
Mode
Off
Scout |
II |
|
|
g |
|
Zero
On
(400g, 600g, 1200g, 6000g Balances Illustrated)
5
INSTALLATION (Cont.)
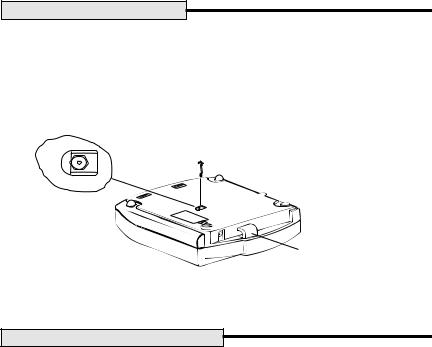
Weigh Below Hook
For below balance weighing applications (eg. density determination), the weigh below hook may be installed at the bottom of the balance as shown.
Do not over tighten the screw, tighten finger tight. Place the balance on a suitable stand which will allow below balance weighing.
WEIGH BELOW HOOK
BOTTOM OF
BALANCE
SECURITY
BRACKET
Security Bracket
A security bracket is provided at the rear of the balance which allows the balance to be secured by the optional cable and lock accessory.
IMPORTANT INFORMATION
ScoutII balances are sensitive, precision devices and when shipped, occasionally require calibration before they are used. The balances are calibrated at the factory and due to rough handling and vibration during shipping, the balance may display an ERR1 or ERR4 when first turned on.
This does not mean that the balance is defective. We recommend you perform span calibration for an ERR1 indication and linear calibration for ERR4 before you call for service. If the balance does not span calibrate, try linear calibration.
Linear calibration requires two masses to be used. The 200g, 400g and 600g balances are shipped with one mass, you will require a second mass which can be ordered from Ohaus. 1200g and 6000g balances are not shipped with masses. Refer to the accessory table at the rear of the manual for the required calibration masses.
Review the Menu and then perform both Span and Linear calibration. Span calibration does not require entering the Menu. Linear calibration (LIN) does require entering the Menu.
In the event the balance fails to operate properly, please call Ohaus Corporation toll-free at (800) 526-0659 for service or parts.
6

TURNING THE BALANCE ON
Press Zero On. All segments will appear briefly followed by a software revision number and then 00 g. Allow 5 minutes warm-up time.
LOW BATTERY |
|
dwt |
WEIGHING UNIT |
INDICATOR |
BAT |
||
|
g |
|
|
|
lb |
PC |
INDICATORS |
STABILITY |
oz t |
|
|
|
|
|
|
INDICATOR |
Balance Display |
|
|
|
|
|
TURNING THE BALANCE OFF
To turn the balance OFF, press and hold Mode Off until the display indicates OFF, then release.
WEIGHING
The balance is shipped from the factory ready to weigh in g, oz, oz t, dwt and lb.
1.Select the desired weighing unit by momentarily pressing Mode Off.
2.If it is necessary to rezero the display, momentarily press Zero On.
3.Place item(s) to be weighed on the pan and read the weight on the display. The stability indicator * appears when the reading is stable.
TARING
When weighing items that must be held in a container, taring subtracts the container's weight from the total weight on the pan. Remember, the weight of the container and the material it holds must not exceed the capacity of the balance.
1.With an empty container on the pan, press Zero On to zero the display.
2.As material is added to the container, the net weight is displayed. Tared weight remains in balance memory until Zero On is pressed again.
3.If the container is no longer used and is removed from the balance, the display indicates a negative weight which was the container’s weight. Press Zero On to zero the display.
7
MENU DESCRIPTION
The User Menu permits you to activate the Auto Shut-off feature, select weighing units, select parts counting, select printing parameters on RS232 equipped models and perform Linearity calibration and store settings. Bolded items shown in the menu are factory default settings. Each menu item is covered in a separate procedure in this manual, to enter an individual menu item and select it requires alternating between the Mode Off and Zero On buttons.
To enter the menu, start with the balance OFF, press and hold Zero On until
MENU is displayed, then release it. The first menu item A. OFF (automatic
shutoff) is displayed. Refer to the individual procedures to select and enable
menu items.
MENU
A.OFF - Set to On or Off.
UNITS - g, oz, lb, oz t, dwt, pc, set each to On or Off.
PRINT*-Power - On or Off.
Baud Rate - 300, 1200, 2400, 4800, 9600
Data Bits - 7 or 8
Parity Bit - Odd, Even or None
Stop Bits - 1 or 2
Auto Print - Continuous, On Stability, or Off
Stable Data Output Only - On or Off
End.
LIN - Performs linearity calibration.
END - Exit menu and store settings.
*RS232 models only.
AUTO SHUT-OFF ACTIVATION
When Auto Shut-off is activated, the balance will shut off after three minutes of non use. To activate auto shut-off, proceed as follows:
1.Start with the balance OFF. Press Zero On until MENU is displayed. When Zero On is released, A. OFF is displayed.
2.With A. OFF displayed, press Zero On to view current state (ON or OFF).
3.Press Mode Off to change the displayed setting to either On or OFF.
4.To accept the displayed setting, press Zero On. The display returns to
A.OFF.
5.Press Mode Off until End is displayed, then press Zero On to store and save setting. Balance is now in a weighing mode.
8
 Loading...