

QUESTIONS?
We are available to answer
any of your questions
regarding the assembly, use
or maintenance of your
equipment. Please call our
Customer Service
Department on our free
phone number:
0800 616329
Mon-Fri. 8:00 am to 8:30 pm
Sat. 10:00 am to 4:30 pm
Part No. 141647 R0698A NETL79070 Printed in USA
© 1998 NordicTrack, Inc., a CML Company. NordicTrack and related marks are trademarks of NordicTrack Inc. All rights reserved.
ª
CAUTION: Read
this ownerÕs guide carefully
before using the treadmill.
Save this ownerÕs guide for
future reference.
OwnerÕs Guide
How to Order Replacement Parts
If you encounter any difficulties or problems with this product, please call our Customer Service Department on
our freephone number: 0800 616329, Monday through Friday from 8:00 am to 8:30 pm and Saturday from 10:00
am to 4:30 pm:
¥ The MODEL NUMBER of the product (NETL79070).
¥ The NAME of the product (NORDICTRACK PowerTread PT 5.0 treadmill).
¥ The SERIAL NUMBER of the product (see the front cover this manual).
¥ The KEY NUMBER of the part(s) (see the EXPLODED DRAWING attached to the centre of this ownerÕs guide
and the PART LIST on page 19).
¥ The DESCRIPTION of the part(s) (see the EXPLODED DRAWING attached to the centre of this ownerÕs guide
and the PART LIST on page 19).
If possible, place the treadmill near your telephone for easy reference when calling.

2 19
ª
Part ListÑModel No. NETL79070 R0698A
Key No. Qty. Description
1 2 Rear Roller Adj. Bolt
2 1 Front Roller Adj. Bolt
3 1 Filter
4 1 On/Off Switch
5 1 Storage Latch
6 4 Front Isolator
7 2 Earth Wire Screw
8 4 Platform Screw
9 1 Left Foot Rail
10 4 Handrail Endcap
11 1 Small Incline Spacer
12 2 Latch Spacer
13 1 Power Board
14 2 Endcap Plate
15 1 Key/Clip
16 1 Frame
17 1 Front Roller
18 1 Rear Roller
19 1 Incline Frame
20 1 Electronics Shield
21 1 Incline Motor Shield
22 2 Incline Pivot Spacer
23 2 Side Hood Bracket
24 8 Wheel Nut
25 2 Incline Motor Bolt
26 1 Incline Motor
27 1 Controller
28 1 Electronics Plate
29 1 Choke
30 2 Wheel
31 1 Receptacle
32 1 Power Cord Grommet
33 1 Front Hood Bracket
34 1 Outlet Bracket
35 1 Circuit Breaker
36 2 Rear Platform Screw
37 2 Wheel Bolt
38 1 Front Belly Pan
39 1 Motor Pivot Bolt
40 1 Motor Pivot Nut
41 1 Motor/Pulley/Flywheel/Fan
42 1 Motor Belt
43 18 Hood Screw/Console Screw
44 5 Motor Tension Bolt
45 1 Motor Tension Washer
46 1 Tension Star Washer
47 1 Sensor Screw
48 2 Belt Guide
49 3 Roller Adjustment Washer
50 1 Belly Pan
51 4 Plastic Stand-Off
52 1 Wire Harness
Key No. Qty. Description
53 2 Rear Pad
54 1 Left Rear Endcap
55 2 Pad Screw
56 1 Sensor Nut
57 1 Console Wire Harness
58 1 Right Foot Rail
59 1 Motor Flange Nut
60 1 Storage Latch Bracket
61 2 Sensor Locknut
62 18 Belly Pan Fastener
63 1 Right Rear Endcap
64 2 Base Endcap
65 1 Releaseable Wire Tie
66 5 8Ó Wire Tie
67 1 Wire Tie Holder
68 2 Frame Endcap
69 1 Incline Disk
70 1 Upright/Base
71 1 Motor
72 1 Pulley/Flywheel/Fan
73 1 Optic Sensor Wire
74 1 Reed Switch Clamp
75 1 Incline Spacer
76 1 Photo Switch
77 1 8Ó Earth Wire
78 1 Console
79 1 Shock
80 1 Walking Belt
81 1 Walking Platform
82 2 Wire Clip
83 1 Latch Warning Decal
84 1 Motor Hood
85 1 Incline Motor Plate
86 1 Reed Switch Wire
87 1 Allen Wrench
88 1 Wrench Clip
89 6 Base Pad
90 45 Screw
91 1 Magnet
92 2 Small Star Washer
93 1 Incline Stop Bracket
94 2 Motor Pivot Bushing
95 1 Motor Pivot Sleeve
96 3 Nylon Washer
97 2 Rear Isolator
# 1 8Ó Blue Wire, 2 Female
# 1 4Ó Black Wire, 2 Female
# 1 8Ó White Wire, 2 Female
# 1 14Ó White Wire, 2 Female
# 1 14Ó Blue Wire, 2 Female
# 1 4Ó Green Wire, Ring/Female
# 1 OwnerÕs Guide
To find the parts listed below, refer to the Exploded Drawing attached in the centre of this ownerÕs guide.
# These parts are not illustrated. Specifications are subject to change without notice.

Table of Contents
Important Precautions . . . . . . . . . . . . . . . . . . . . . . . . . . . . . . . . . . . . . . . . . . . . . . . . . . . . . . . . . . . . . . . . . . . . . . .4
Before You Begin . . . . . . . . . . . . . . . . . . . . . . . . . . . . . . . . . . . . . . . . . . . . . . . . . . . . . . . . . . . . . . . . . . . . . . . . . . .6
Assembly . . . . . . . . . . . . . . . . . . . . . . . . . . . . . . . . . . . . . . . . . . . . . . . . . . . . . . . . . . . . . . . . . . . . . . . . . . . . . . . . .7
Treadmill Operation . . . . . . . . . . . . . . . . . . . . . . . . . . . . . . . . . . . . . . . . . . . . . . . . . . . . . . . . . . . . . . . . . . . . . . . . .8
Conditioning Guidelines . . . . . . . . . . . . . . . . . . . . . . . . . . . . . . . . . . . . . . . . . . . . . . . . . . . . . . . . . . . . . . . . . . . . 12
Maintenance and Trouble-shooting . . . . . . . . . . . . . . . . . . . . . . . . . . . . . . . . . . . . . . . . . . . . . . . . . . . . . . . . . . . . 16
How to Fold and Move the Treadmill . . . . . . . . . . . . . . . . . . . . . . . . . . . . . . . . . . . . . . . . . . . . . . . . . . . . . . . . . . .18
Part List . . . . . . . . . . . . . . . . . . . . . . . . . . . . . . . . . . . . . . . . . . . . . . . . . . . . . . . . . . . . . . . . . . . . . . . . . . . . . . . . .19
How to Order Replacement Parts . . . . . . . . . . . . . . . . . . . . . . . . . . . . . . . . . . . . . . . . . . . . . . . . . . . . . .Back Cover
Note: An Exploded Drawing is attached in the centre of this ownerÕs guide.
318
How to Fold and Move the Treadmill
HOW TO FOLD THE TREADMILL FOR STORAGE
Before folding the treadmill, adjust the incline to the
lowest position. Next, unplug the power cord. Caution:
You must be able to safely lift 45 pounds (20 kg) in order
to raise, lower, or move the treadmill.
1. Hold the treadmill with your hands in the locations shown
at the right. To decrease the possibility of injury, bend
your legs and keep your back straight. As you raise
the treadmill, make sure to lift with your legs rather
than your back. Raise the treadmill halfway to the vertical
position.
2. Move your right hand to the position shown and hold the
treadmill firmly. Raise the treadmill until the frame passes
the storage latch. Make sure that the storage latch is
inserted into the slot in the side of the frame.
To protect the floor or carpet from damage, place a
mat under the treadmill. Keep the treadmill out of
direct sunlight. Do not leave the treadmill in the
storage position in temperatures above 34¡ Celsius.
HOW TO MOVE THE TREADMILL
Before moving the treadmill, convert the treadmill to the
storage position as described above. Make sure that the
storage latch is in the slot in the side of the frame.
1. Hold the handrails of the treadmill and place one foot on
the base as shown.
2. Tilt the treadmill back until it rolls freely on the front
wheels. Carefully move the treadmill to the desired
location. Never move the treadmill without tipping it
back. To reduce the risk of injury, use extreme
caution whilst moving the treadmill. Do not attempt
to move the treadmill over an uneven surface.
3. Place one foot on the base, and carefully lower the
treadmill until it is resting in the storage position.
HOW TO LOWER THE TREADMILL FOR USE
1. Refer to drawing 2 above. Hold the treadmill with your right hand as shown. Using your left thumb, press the
storage latch to the left. Pivot the treadmill until the frame and foot rail are past the storage latch.
2. Refer to drawing 1 above. Hold the treadmill firmly with both hands, and lower the treadmill to the floor. To
decrease the possibility of injury, bend your legs and keep your back straight.
Base
Front Wheels
Storage
Latch
Slot
1
2
1. It is the responsibility of the owner to ensure
that all users of this treadmill are adequately
informed of all warnings and precautions.
2. Use the treadmill only as described in this
ownerÕs guide.
3. Place the treadmill on a level surface, with
eight feet of clearance behind it. Do not place
the treadmill on any surface that blocks air
openings. To protect the floor or carpet from
damage, place a mat under the treadmill.
4. Keep the treadmill indoors, away from
moisture and dust. Do not put the treadmill
in a garage or covered patio, or near water.
5. Do not operate the treadmill where aerosol
products are used or where oxygen is being
administered.
6. Keep children under the age of 12 and pets
away from the treadmill at all times.
7. The treadmill should not be used by persons
weighing more than 250 pounds (115 kg).
Never allow more than one person on the
treadmill at a time.
8. Wear appropriate clothing when using the
treadmill. Do not wear loose clothing that
could become caught in the treadmill. Athletic
support clothes are recommended for both
men and women. Always wear athletic shoes.
Never use the treadmill with bare feet,
wearing only stockings, or in sandals.
9. When connecting the power cord (see How to
Plug in the Power Cord on page 8), plug the
power cord into an earthed circuit. When
replacing the fuse, an ASTA approved BS1362
type should be fitted to the fuse carrier. A 13
amp fuse should be used. No other appliance
should be on the same circuit.
10. If you need an extension cord, use only a
14-gauge cord of five feet (1,50 m) or less in
length.
11. Keep the power cord away from heated surfaces.
12. Never move the walking belt whilst the power
is turned off. Do not operate the treadmill if
the power cord or plug is damaged, or if the
treadmill is not working properly. (See
Before You Begin on page 6 if the treadmill
is not working properly.)
13. Never start the treadmill whilst you are
standing on the walking belt. Always hold
the handrails whilst using the treadmill.
14. The treadmill is capable of high speeds.
Adjust the speed in small increments to avoid
sudden jumps in speed.
15. To reduce the possibility of the treadmill
overheating, do not operate the treadmill
continuously for longer than one hour.
16. The pulse sensor is not a medical device.
Various factors may affect the accuracy of
heart rate readings. The pulse sensor is
intended only as an exercise aid in determining heart rate trends in general.
17. Never leave the treadmill unattended whilst it
is running. When the treadmill is not in use,
remove the key and press the on/off switch to
the ÒoffÓ position. (See the drawing on page 6
for the location of the on/off switch.)
18. Do not attempt to raise, lower, or move the
treadmill until it is properly assembled. (See
Assembly on page 7, and How to Move the
Treadmill on page 18.) You must be able to
safely lift 45 pounds (20 kg) in order to raise,
lower, or move the treadmill.
19. When folding or moving the treadmill, make
sure that the frame is held securely by the
storage latch.
20. Inspect and tighten all parts of the treadmill
every three months.
WARNING:To reduce the risk of burns, fire, electric shock, or injury to persons, read the
following important precautions and information before operating the treadmill.
Important Precautions
4 17
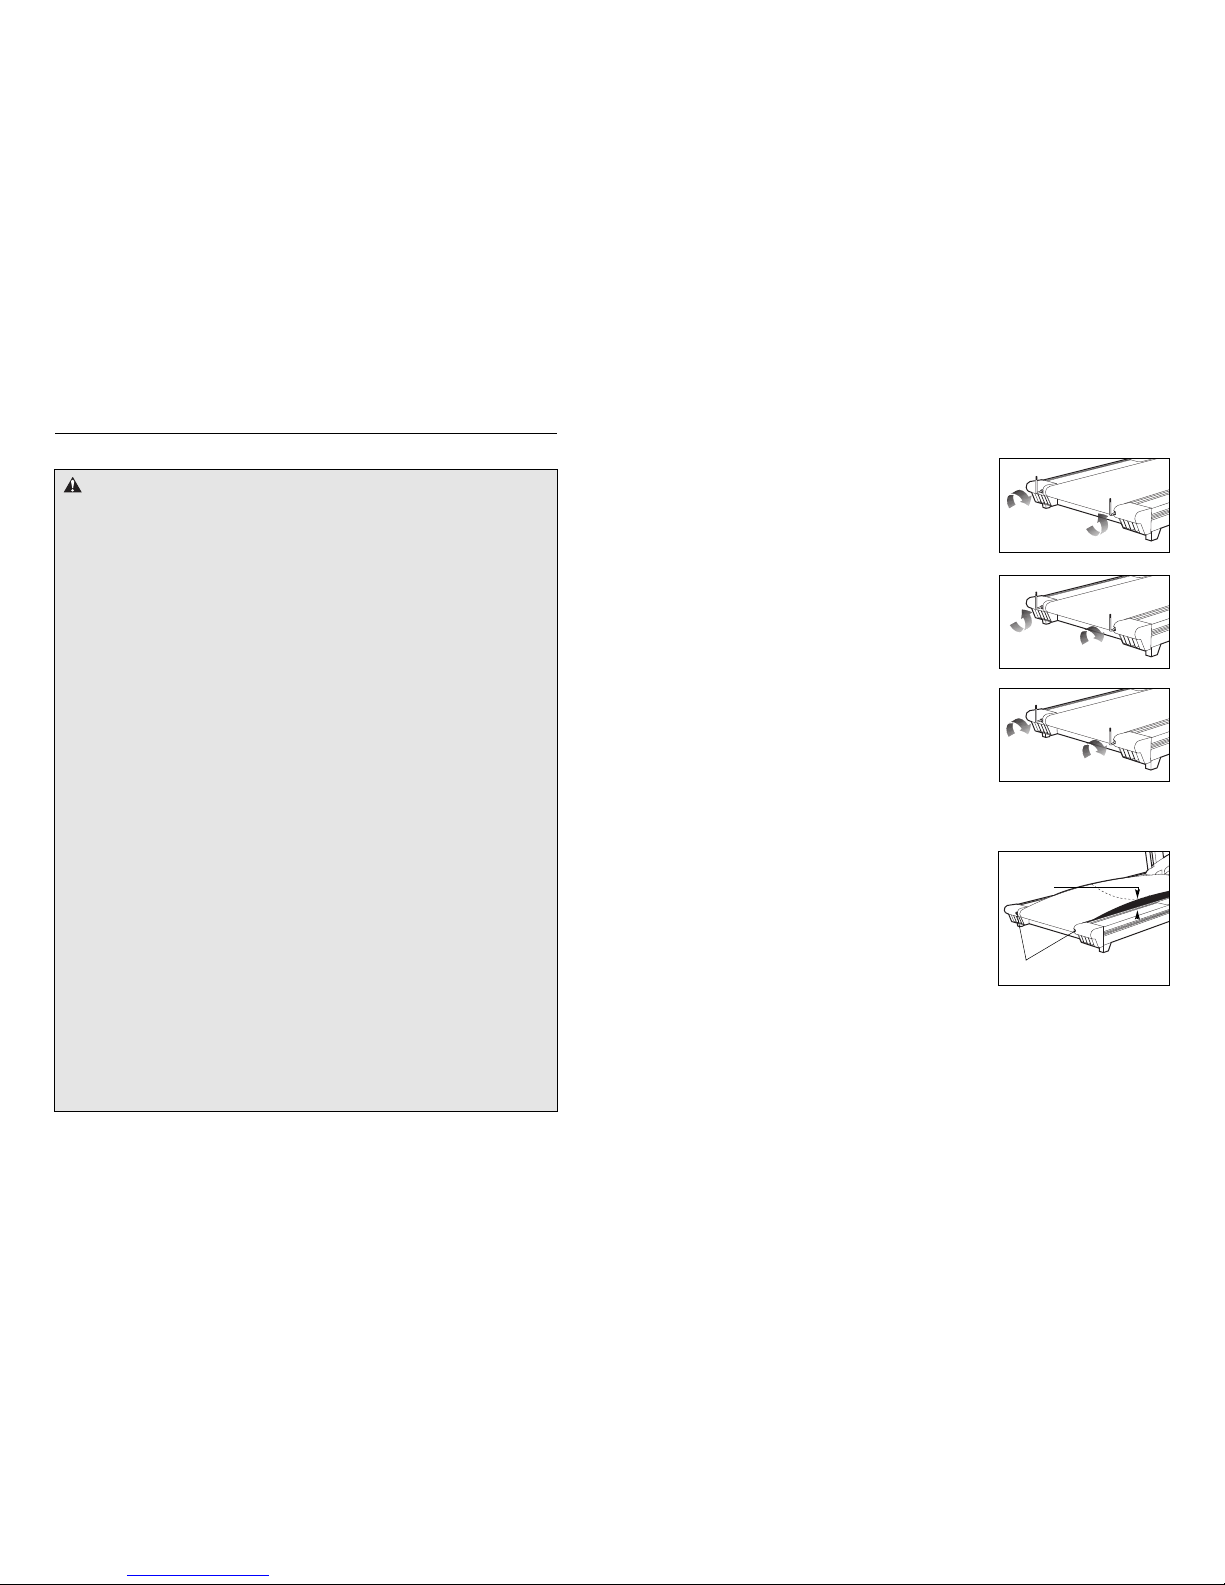
3. SYMPTOM: THE WALKING BELT IS OFF-CENTRE WHEN WALKED ON
a. If the walking belt has shifted to the left, first remove the key
and UNPLUG THE POWER CORD. Using the included allen
wrench, turn the left rear roller adjustment bolt clockwise, and
the right bolt counterclockwise, 1/4 of a turn each. Be careful not
to overtighten the walking belt. Plug in the power cord, insert the
key and run the treadmill for a few minutes. Repeat until the
walking belt is centred.
b. If the walking belt has shifted to the right, first remove the
key and UNPLUG THE POWER CORD. Using the allen wrench,
turn the left rear roller adjustment bolt counterclockwise, and the
right bolt clockwise, 1/4 of a turn each. Be careful not to
overtighten the walking belt. Plug in the power cord, insert the
key and run the treadmill for a few minutes. Repeat until the
walking belt is centred.
c. If the walking belt slips when walked on, first remove the key
and UNPLUG THE POWER CORD. Using the allen wrench, turn
both rear roller adjustment bolts clockwise, 1/4 of a turn. When
the walking belt is correctly tightened, you should be able to lift
the edges of the walking belt 3 to 4 inches off the walking
platform. Be careful to keep the walking belt centred. Plug in the
power cord, insert the key and run the treadmill for a few minutes. Repeat until the walking belt is properly tightened.
4 SYMPTOM: THE WALKING BELT SLOWS WHEN WALKED ON
a. If an extension cord is needed, use only a 14-gauge cord of five feet (1,50 m) or less in length.
b. If the walking belt is overtightened, treadmill performance may
decrease and the walking belt may be permanently damaged.
Remove the key and UNPLUG THE POWER CORD. Using the
allen wrench, turn both rear roller adjustment bolts counterclockwise, 1/4 of a turn. When the walking belt is correctly tightened,
you should be able to lift the edges of the walking belt 7 to
10 cm off the walking platform. Be careful to keep the walking
belt centred. Plug in the power cord, insert the key and run the
treadmill for a few minutes. Repeat until the walking belt is
properly tightened.
c. If the walking belt still slows when walked on, please contact our Customer Service Department.
b
c
a
Rear Roller Adjustment Bolts
7-10 cm
b
 Loading...