

Page 1

Silentwriter SuperScript™
Windows® 95
User's Guide
Page 2

PROPRIETARY NOTICE AND LIABILITY DISCLAIMER
The information disclosed in this document, including all designs and related materials, is the valuable property of NEC Corporation (NEC) and/or its licensers. NEC and/
or its licensers, as appropriate, reserve all patent, copyright and other proprietary rights
to this document, including all design, manufacturing, reproduction, use, and sales
rights thereto, except to the extent said rights are expressly granted to others.
The NEC product(s) discussed in this document are warranted in accordance with the
terms of the Warranty Statement accompanying each product. However, actual
perfomance of each such product is dependent upon factors such as system configuration, customer data, and operator control. Since implementation by customers of
each product may vary, the suitability of specific product configurations and applications must be determined by the customer and is not warranted by NEC.
To allow for design and specification improvements, the information in this document
is subject to change at any time, without notice. Reproduction of this document or
portions thereof without prior written approval of NEC is prohibited.
Silentwriter is a U.S. registered trademark of NEC Corporation. SuperScript is a trademark of NEC
Corporation. All other product, brand, or trade names used in this publication are the trademarks or
registered trademarks of their respective owners.
© NEC Corporation., 1995.
© Copyright, WinStyler™/Phase II, 1992-1995, Destiny Technology Corp. Ver. 2.0
© Copyright, WinRefs™/Phase II, 1995, Destiny Technology Corp. Ver. 2.0
© Copyright, DTIR™, 1992-1995, Destiny Technology Corp. Ver. 1.0
© Copyright, LaserAct®/Phase II, 1990-1995, Destiny Technology Corp, Ver. 4.5
© Copyright, PageStyler®/Phase II, 1989-1995, Destiny Technology Corp. Ver. 1.0
© Copyright, 1992, Microsoft Corporation
First Printing — Septmber 1995
Copyright 1994
NEC Corporation
7-1 Shiba 5-Chome, Minato-ku
Tokyo 108-01, Japan
All Rights Reserved
Page 3

Contents i
Contents
1 Introduction 1-1
Introduction 1-2
Standard Feature 1-3
Network Configuration Overview 1-4
Personal Configuration 1-5
Network Configuration 1-6
Network Configuration Example 1-7
SuperScript Console and Printer Status 1-8
2 System Requirements 2-1
System Requirements 2-2
3 SuperScript Software Installation 3-1
SuperScript Software Installation Overview 3-2
Installing the SuperScript Software 3-5
SuperScript Installation Dialogs 3-7
Testing the SuperScript Installation 3-17
Removing SuperScript Software 3-18
4 SuperScript Console 4-1
Control Panel 4-2
GDI Setup Screen 4-6
Local Queue 4-10
Remote Queue 4-13
Job Log 4-16
SuperScript Console Menu Items 4-18
File 4-18
View 4-18
Settings 4-18
Network 4-19
Run 4-20
Help 4-20
Exiting Before Printing has Completed 4-20
Page 4

ii Contents
5 Sharing and Connecting 5-1
Sharing the Printer 5-3
Connecting To the Printer 5-5
Printing 5-6
Printer Access and Client Privilege Checks 5-7
6 PostScript Printing 6-1
Switching Postscript Print Mode 6-2
From the Control Panel of SuperScript Console 6-2
PostScript Options 6-3
TrueType Font Substitution 6-4
PostScript Print Mode Overview 6-5
Printing from a Windows Application 6-5
Printing from DOS 6-6
Printing PostScript or PCL Files from the MS-DOS
Command Line 6-7
Printing ASCII Text Files 6-7
7 SuperScript Printer Status 7-1
Expanded SuperScript Printer Status Display 7-4
Printer Error Status Messages and Recovery 7-4
8 Using Fonts 8-1
Fonts in PostScript Mode 8-2
Fonts in GDI Mode 8-5
Fonts in PCL Mode 8-6
Installing SuperScript TrueType Fonts 8-7
Saving Downloaded Fonts and Macros (PCL Mode) 8-8
A Troubleshooting A-1
Installation Problems A-2
Wrong System or Hardware Configuration A-2
Insufficient Memory A-2
No Printer Port A-2
Insufficient Disk Space A-2
Removing the Previously installed SuperScript Software A-2
B PostScript Character Sets B-1
Glossary
Index
Page 5

1Introduction
1
Introduction 1–1
Page 6

1–2 Introduction
INTRODUCTION
This guide provides installation and operating
instructions for the NEC Silentwriter SuperScript for
Windows 95 software.
The NEC Silentwriter SuperScript for Windows 95
software is developed specially for users of
Windows 95. The software supports PostScript
emulation mode in addition to GDI mode and PCL
emulation mode and provides network printing
features.
Page 7

Introduction 1–3
STANDARD
FEATURE
NEC Silentwriter SuperScript for Windows 95 is a
printing solution developed for Windows 95 users
that provides complete Windows-based printing.
This new SuperScript for Windows 95 provides the
following additional features for your standard
SuperScript printer:
• Full Windows 95 Compatibility
• Network Printing
The SuperScript for Windows 95 expands
capabilities of the SuperScript printer to support
the Microsoft Windows 95 network solution.
• Software emulation of PostScript
The SuperScript for Windows 95 provides both
PostScript Level I and Level II emulations.
(PostScript Level II emulation is available for
only SuperScript 660 and 660i printer users.)
Available printing modes are different depending
on your printer type.
GDI (All SuperScript printers)
PCL4.5 (SuperScript 610 / 610plus)
PCL5e (SuperScript 660 / 660i)
PostScript I (SuperScript 610 / 610plus)
PostScript II (SuperScript 660 / 660i)
• New Integrated User Interface.
Page 8

1–4 Introduction
NETWORK CONFIGURATION OVERVIEW
SuperScript network program provides three
software configuration options that can be selected
based on how you intend to use the printer:
• Personal
• Server
• Client
Which configuration option you should choose is
primarily dependent on whether you will use the
SuperScript printer in a network or as a non-network
“Personal” printer connected directly to your PC.
Regardless of whether you use the SuperScript
printer in a network configuration or as a nonnetwork printer, the software provides all the same
print modes and printer features. Network and
resource sharing features are not available in the
Personal configuration.
Page 9

Introduction 1–5
Personal Configuration
The Personal configuration is for users not connected
to a network, or who will not use the SuperScript
printer as a shared network resource. This
configuration is a conventional PC and printer
arrangement in which only the PC to which the
printer is connected can print to the printer.
For existing SuperScript users, the new SuperScript
software provides compatibility for Windows 95, the
PostScript emulation mode, and a newer, more
modern user interface with additional Help files.
There are features not available in this configuration
that are related to network administration and
selecting and viewing remote queues. These features
are disabled in the Personal configuration.
If at some point you choose to add network
capabilities to your PC or allow the SuperScript
printer to be a shared network resource, you will
have to re-install the SuperScript software and select
the Server User Type option.
Page 10

1–6 Introduction
Network Configuration
Microsoft’s Windows is designed to be a peer-topeer network. In other words, each PC is a peer to
every other PC in the workgroup. This peer approach
means that no PC in the workgroup acts as a network
administrator.
SuperScript software adopts this peer-to-peer model.
However, to provide user configuration flexibility
and to save memory for some users, SuperScript
software can be configured differently when a user
has a connected printer than when a user prints from
a printer connected to another peer PC in the
workgroup. The PC that has the printer connected to
it performs some additional functions not needed for
PCs without a connected printer.
Therefore, we have adopted the Client/Server
terminology to differentiate between those PCs that
have a printer connected to them and those that do
not. A Server is a peer with a connected and shared
printer. A Client is a peer using a printer connected
to a Server.
Server
Any Server in the workgroup with SuperScript
software installed can be effectively both a Server
and a Client. As a Server, that PC shares the
connected printer with other peers in the workgroup.
However, when that Server opts to print to a printer
supported by another Server, that PC is acting as a
Client to the other Server.
Page 11
Introduction 1–7
Client
The Client is a peer in the workgroup that can print
to another peer’s printer. The Client configuration is
a subset of the Server configuration.
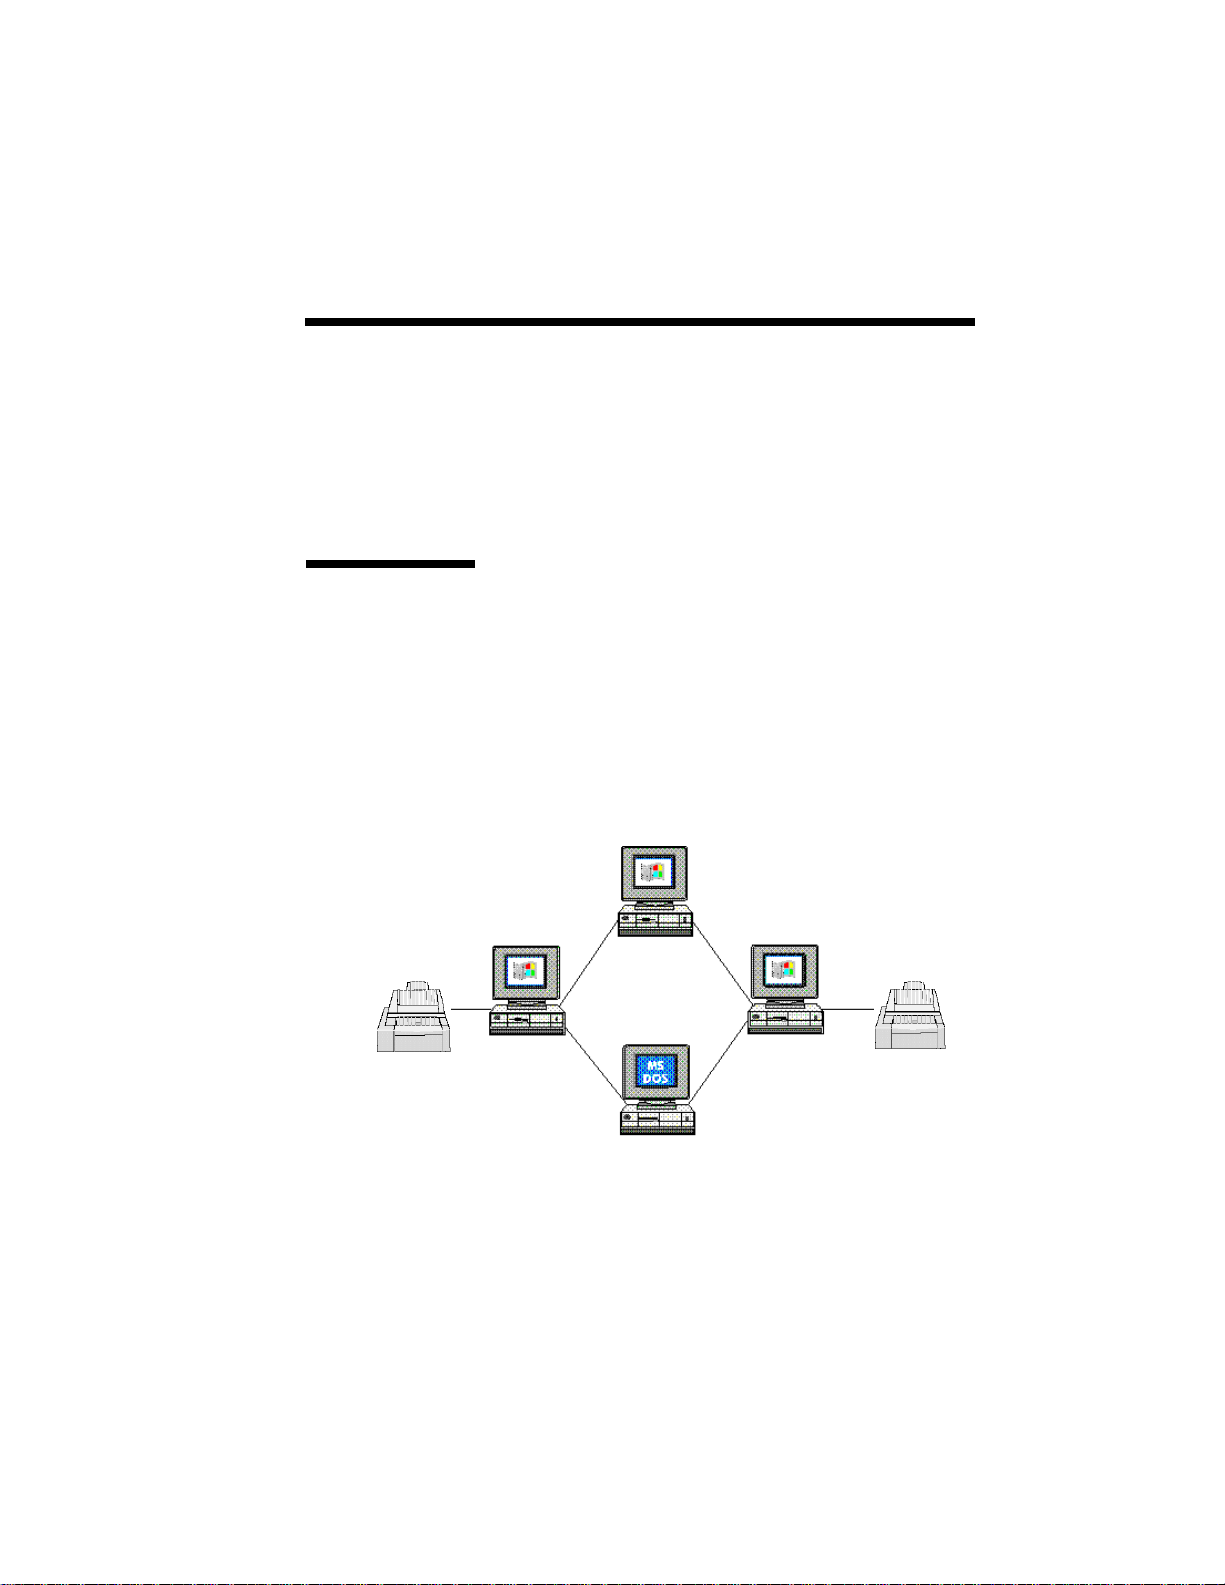
Network Configuration Example
Printer A
The following figure shows this flexible SuperScript
approach. As shown in the figure, there are two PCs
that have printers connected: Peer A with Printer A
and Peer D with Printer D. If Peer B chooses to print
to Printer A then for that print job Peer B is the
Client and Peer A is the Server. If Peer A prints to
Printer D, then for that print job Peer A becomes a
Client to Peer D, but Peer A remains the Server for
Peer B’s print job.
Peer B
(Client)
Peer A
(Server)
Peer D
(Server)
Printer D
Peer C
(Client)
Page 12
1–8 Introduction
The SuperScript software menus will help you easily
view and manage your print jobs. A print job is a
request for print services made when you select Print
from one of your applications. Print jobs are
considered “local” if they are queued to a printer
connected to the PC queuing the print job. Print jobs
are considered “remote” if queued to a printer
connected to another PC.
SUPERSCRIPT
CONSOLE AND
PRINTER
STATUS
There are two programs that allow you to configure
and monitor your printing environment:
• SuperScript Console
• SuperScript Printer Status
SuperScript Console provides a dialog with the
SuperScript Control Panel, Local Queue, Remote
Queue, and Job Log.
SuperScript Console
Page 13
Introduction 1–9
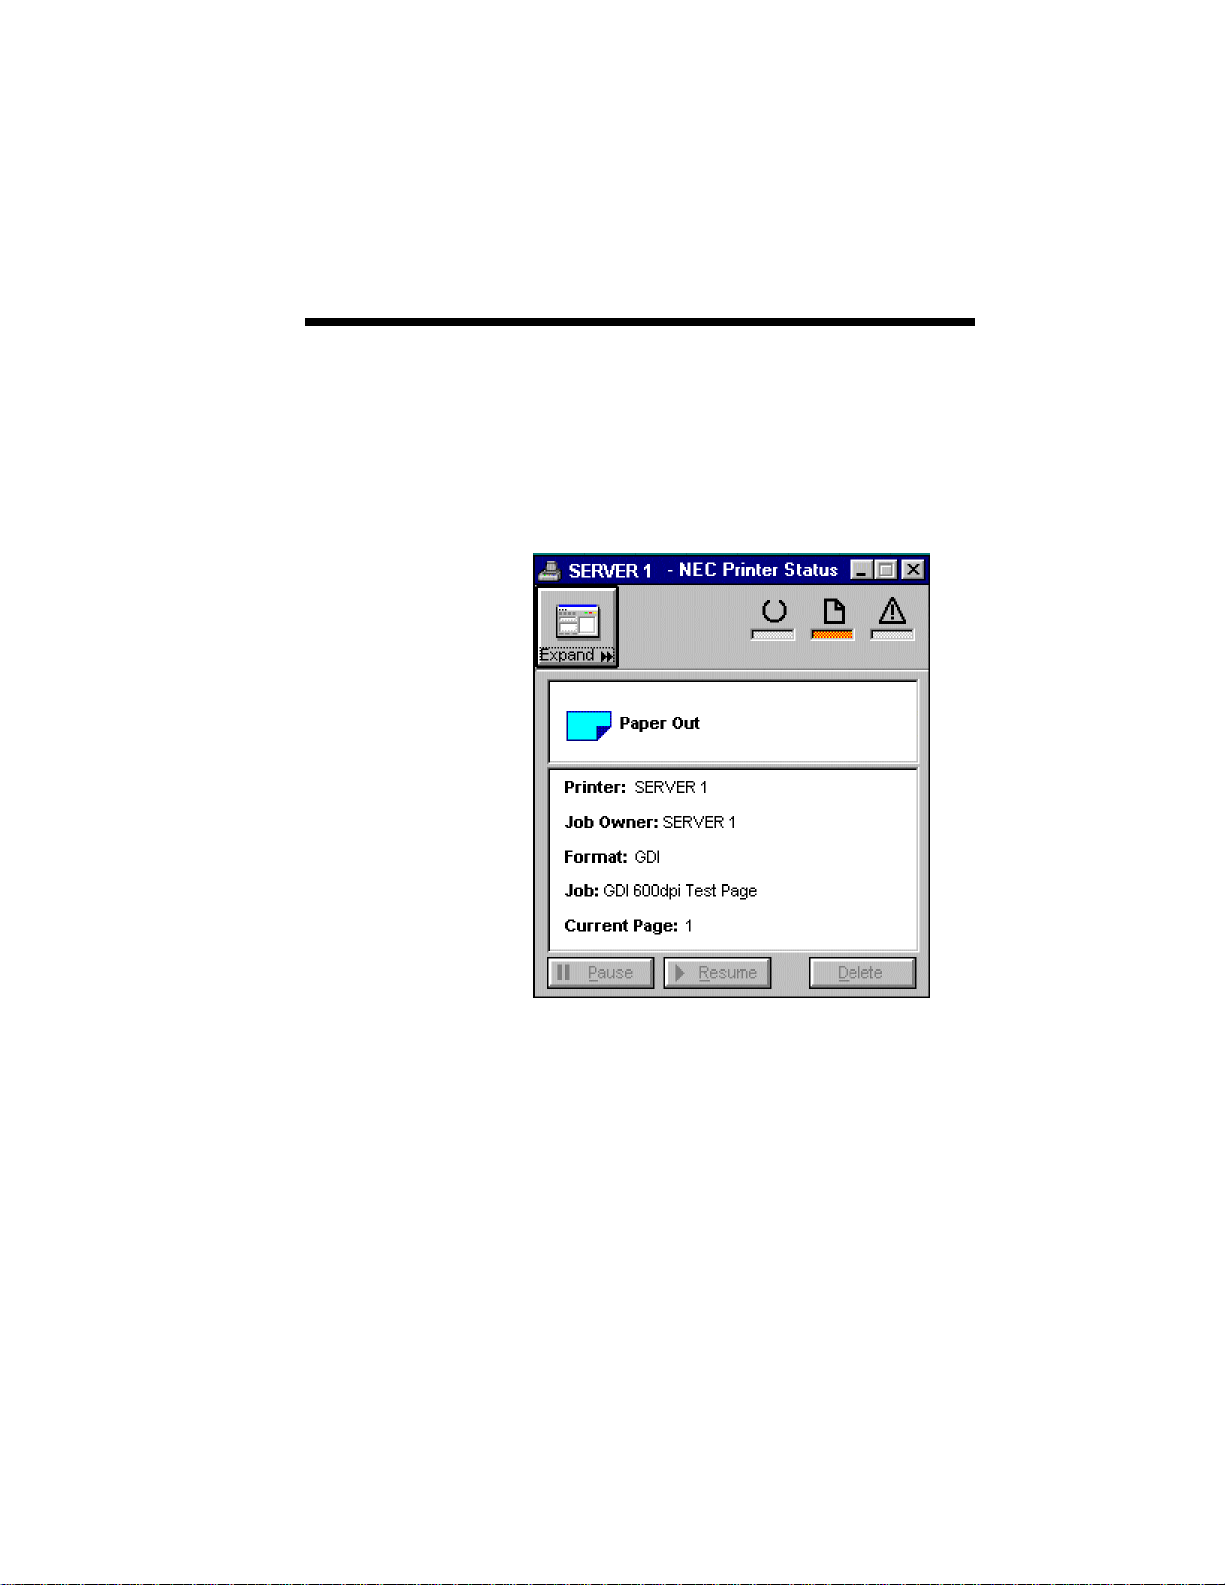
SuperScript Printer Status lets you know the current
printer status and alerts you in case of a problem. It
displays a warning or error message. In addition, it
points to the problem area on the printer and gives
instructions for what to do next.
SuperScript Printer Status (Reduced Version)
Page 14
1–10 Introduction
SuperScript Printer Status (Expanded Version)
Page 15

System Requirements 2–1
2System Requirements
2
Page 16

2–2 System Requirements
SYSTEM REQUIREMENTS
Table 2.1 shows the hardware and software
requirements for SuperScript software.
Hardware requirements differ between the three
SuperScript software configurations (Personal,
Server, and Client). As shown in Table 2.1, the
Server must be at least an i486DX-based PC running
at no less than 33MHz. If the Server PC is to be used
in a large workgroup or with heavy print loads and
will be used at the same time for other applications
such as word processors, it is recommended that the
Server PC be at least an i486DX2. A PC running as a
Client only, that is with no printer connected, can be
based on an i80386DX running at 33MHz or faster.
A Personal configuration PC can also be based on an
i80386DX running at 33MHz or faster.
The requirement table shows the minimum and
recommended configurations. The minimum
configuration will provide good quality output under
normal conditions. Using the recommended
configuration will boost output, especially under
high volume workgroup network loads.
The minimum free disk space is 40MB. This
matches the Microsoft general recommendation that
users maintain 40MB of free disk space at all times
when running Windows for best performance. The
minimum Server PC random access memory (RAM)
is 8MB, and 16MB is recommended. The minimum
Client RAM is 8MB.
Note: Because of SuperScript’s high speed interface,
it is important to use a properly manufactured
parallel cable. The use of a poor quality parallel
cable may affect your output. A long cable may also
cause print problem. It is recommended to use 6feet-length cable.
Page 17

System Requirements 2–3
Table 2.1 SuperScript Software Configuration Requirements
HARDWARE AND
SOFTWARE PERSONAL SERVER(S) CLIENT(S)
REQUIREMENTS
Minimum CPU i80386DX i486DX i80386DX
Recommended CPU i486DX2
Minimum Processing Speed (MHz) 33 33 33
Free Disk Space (MB) 40 40 40
Hard Disk Space for 17 17 13
installation of Software
(MB)
Hard Disk Space for 3.5 3.5 3.5
installation of TrueType
fonts (MB)
RAM (MB) Min. 8 8 8
(standard)
RAM (MB) Min. 16*
(recommended)
Microsoft Windows Windows 95 Windows 95 Windows 95
or
Windows for
Workgroups 3.1**
or
Windows for
Workgroups 3.11**
1.4MB, 3.5" Floppy Yes Yes Yes
Drive or CD ROM
Drive
Page 18

2–4 System Requirements
HARDWARE AND
SOFTWARE PERSONAL SERVER(S) CLIENT(S)
REQUIREMENTS
Centronics Parallel Yes Yes N/A
Port
Printer Yes Yes N/A
Network card N/A Yes Yes
Network cable, N/A Yes Yes
connector(s), and
terminator(s)
Network adapter N/A Yes Yes
driver if using a
network other than
SuperScript network
* For Server, 16MB of RAM is required to support all print modes
simultaneously.
** Clients under Windows for Workgroups 3.1/3.11 cannot use Server's
printer if the printer is SuperScript 660i.
Page 19

SuperScript Software Installation 3–1
3 SuperScript Software
3
Installation
Page 20

3–2 SuperScript Software Installation
SUPERSCRIPT
SOFTWARE
INSTALLATION
OVERVIEW
This section describes the hardware and software
setup steps necessary to configure and use your
printer. Installation includes the following steps:
• Pre-installation
• Installation of the three SuperScript user
configurations (Personal, Server, and Client)
• Testing and verifying the installation
You can choose from the three installation
configurations according to your network
capabilities and PC hardware. Table 3.1 presents an
overview of the configuration options and
parameters to consider before choosing a
configuration.
Table 3.1 Choosing a User Configuration
CONFIGURATION NETWORK PRINTER CPU RAM
DESCRIPTION AVAILABLE CONNECTED
Personal -- For users whose Not Required i80386DX 8MB
computers do not have network required to use alone or faster
capability or network connections and have a printer
directly connected.
Server -- For users whose Required Required i486DX 8MB
computers have network to share or faster
connections and printers
connected that may be shared
with other clients on the
network.
Client -- For users whose Required Not i80386DX 8MB
computers do not have Required or faster
printers directly connected,
but who plan to print documents
to a Server on the network.
Page 21

SuperScript Software Installation 3–3
Some steps described below, such as disk
defragmentation, may not be necessary due to your
PC configuration. The installation description
provides a common approach. Your network
configuration may provide an alternate set of
selections, such as an installation folder. This section
describes the installation process and identifies the
few installation differences between the
configurations. For Server and Client installations,
normally the Server PC is installed first, then one or
more Client PCs.
NOTE: You must have a license for each PC Client
and PC Server installed.
Suggestion: If you are in the process of creating your
workgroup but haven’t successfully established a
workgroup environment, you should configure your
system so that peer-to-peer communication is
working before installing SuperScript software to
make verification of SuperScript interconnection
easier.
Page 22

3–4 SuperScript Software Installation
Table 3.2 Pre-Installation Steps
STEP ACTION COMMENT
1 Install Network SuperScript software will operate with any network
(Server, Client) card and network software supported by Windows.
2 Install Windows 95 Install Windows.
SuperScript can be used as a personal printer or as a
shared printer while running under Windows.
3 Remove the current Follow these steps.
SuperScript software • Click the Start button and click Run.
if it is installed in • Type "C:\SSCRIPT\NECDELETE.EXE" in the
the PC. command line box and press enter.
• Or, if your current SuperScript software is
SuperScript Network and PS option kit software, type
"C:\NECSSFW\WSREMOVE.EXE" in the command
line box and press enter.
4 Ensure that the peer This step is recommended to ensure that your network
to peer network is is operational and all connected network peers can
up by opening the communicate with one another.
Network Neighborhood window and
finding neighbors.
(Server, Client)
5 Defragment You can use Disk Defragmenter in Windows (Refer to
the disk Windows 95 document.).
This is recommended but not generally necessary.
Note: Be sure to remove the current SuperScript software prior to
installing the SuperScript for Windows 95 in order to avoid installation
problem.
Note: Appendix A "Troubleshooting" provides some instructions on what
to do for installation problems.
Page 23

SuperScript Software Installation 3–5
INSTALLING
THE
SUPERSCRIPT
SOFTWARE
The SuperScript software installation program
analyzes your system configuration, installs the
SuperScript software and fonts, and makes the
necessary changes to the Windows startup files. As
shown in the following tables, there are two ways to
install SuperScript software:
• Installation via diskettes or CD
• Initial installation via diskette #1 then across the
network from a SuperScript Server
Installation can be performed either from installation
diskettes (or CD) or from across the Windows
network. Once the SuperScript software has been
installed on the Server PC, Client software can be
installed on the Client PCs from across the network.
If CD drive is not available, network installation
proceeds faster than diskette installation.
For a Client to perform installation across the
Windows network, the SuperScript Server must
share its Windows folder and the NECSSFW folder
containing the file NETSETUP.EXE.
NOTE: If you need to make SuperScript for
Windows95 installation diskettes, you can do it from
SuperScript for Windows95 installation CD as
follows. (You need seven diskettes. The following
instruction assumes CD drive is drive D and diskette
drive is A.)
At the DOS prompt, type:
(1) d:
(2) cd \software\win95\makedisk
(3) makefd a:
Then you can follow the instructions on your screen
to make the installation diskettes.
Page 24

3–6 SuperScript Software Installation
Table 3.3 SuperScript Software Installation Steps
STEP ACTION COMMENT
1 Diskette or CD Installation (Server, Client, Personal) See Table 3.4
2 Via Diskette #1 then Across the Network (Client) See Table 3.5
Table 3.4 Diskette or CD Installation Steps (for Server, Client,
and Personal Software Installation)
STEP ACTION COMMENT
1 Connect your SuperScript printer to PC and
turn on the printer. (Server/Personal)
2 Turn on the PC.
3 Windows may display New Hardware Found
dialog box. If you find this message, select
"Driver from disk provided by hardware
manufacturer", and click OK. Then go to
step 4A.
4 Insert the software diskette #1 or CD in
the drive.
5 Click the Start button, and then click Run.
6 (In case of diskette)
drive:\netsetup.exe
(In case of CD)
drive:\software\win95\ss6x0\netsetup.exe
4A Install From Disk dialog box appears.
Insert the software diskette #1 or CD in
the drive.
5A (In case of diskette)
drive:\
(In case of CD)
drive:\software\win95\ss6x0
You must turn off your PC
before the printer is turned on.
Windows 95 will start.
If you do not find this
message, go to step 4.
The Run Program dialog box
appers.
Type the command and press
enter.
SuperScript setup program
will start.
Type the text and press enter.
SuperScript setup program
will start.
Note: Once you start the installation, you can cancel at any time by
selecting the Quit button.
Page 25
SuperScript Software Installation 3–7
Table 3.5 Via Diskette #1 then Across the Network (for Client
Software Installation only)
STEP ACTION COMMENT
1 Insert the software diskette Place the SuperScript diskette into
labeled #1 or CD in the disk drive. the drive.
2 Click the Start button, The Run Program dialog box appears.
and then click Run.
3 (In case of diskette) Type the command and press enter.
drive:\netsetup.exe SuperScript setup program will start.
(In case of CD)
drive:\software\win95\ss6x0
\netsetup.exe
SuperScript
Installation
Dialogs
The installation dialogs presented during the setup
process are the same whether installation is via
diskettes or via the network.
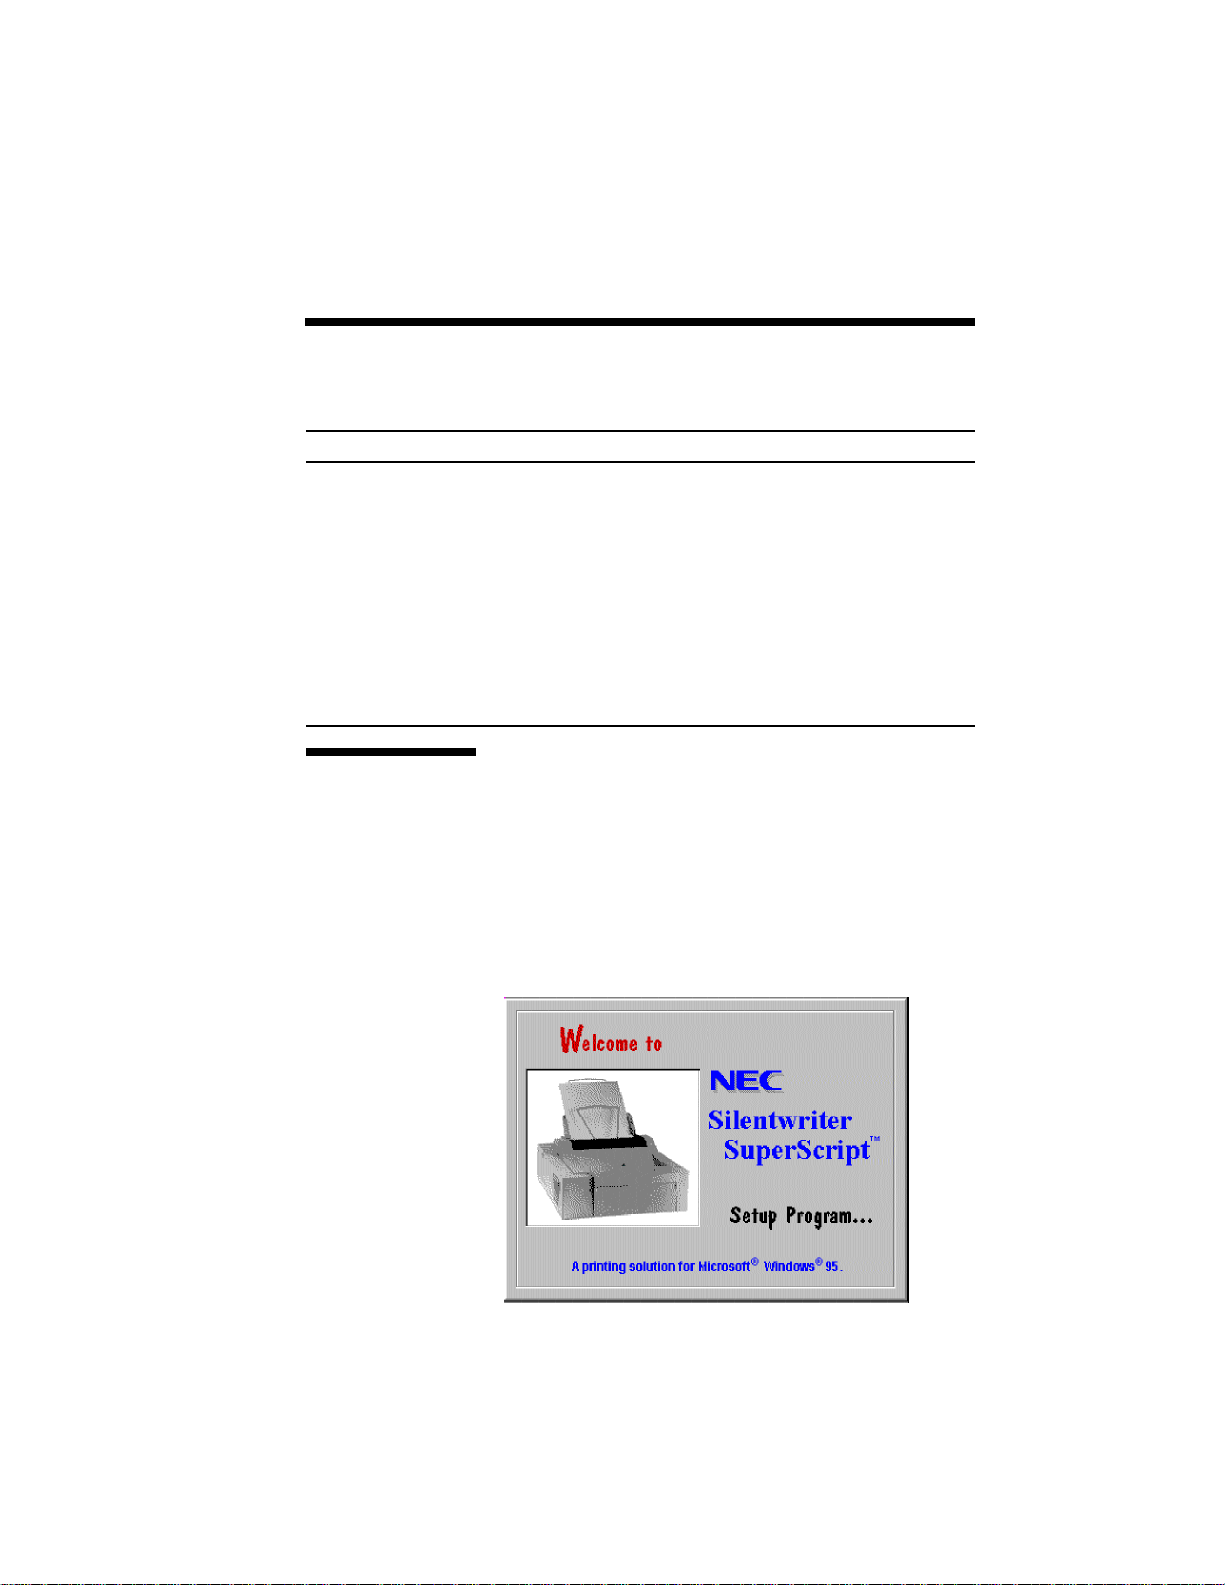
1. Once installation has been started, the initial
Welcome to SuperScript software Setup Program
screen appears as shown in the following figure.
This screen will be displayed for approximately
5 seconds.
Page 26
3–8 SuperScript Software Installation
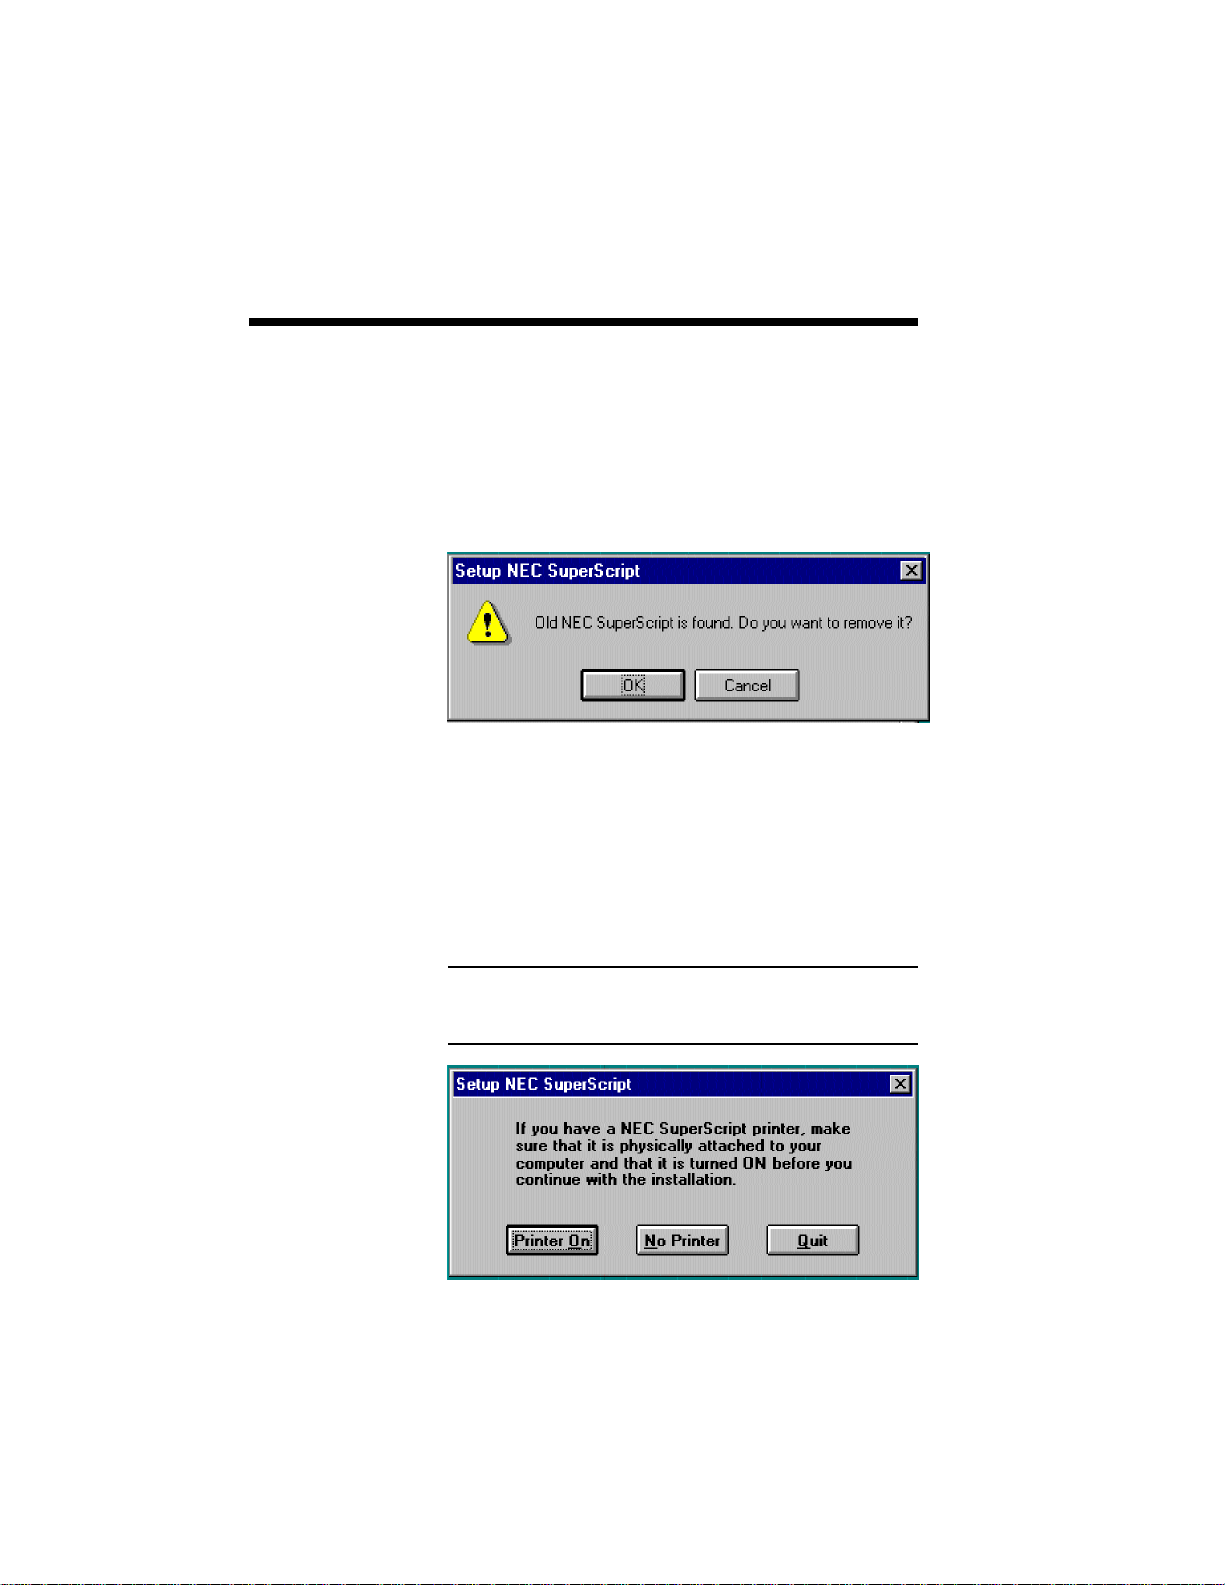
2. If you have a previously installed version of the
SuperScript Software installed on your system
you will be prompted to remove this software
before installing the new software. Select OK to
remove the older version of software and
continue installing the new software.
3. The installation program will display the
following dialog and ask you to turn on the
printer. When the printer is connected and you
have turned it on, select the Printer On button to
continue. Select No Printer if there is no printer
connected.
Note: You do not have to have a printer connected to
successfully install the Personal or Server program.
You can then connect and use the printer later.
Page 27
SuperScript Software Installation 3–9
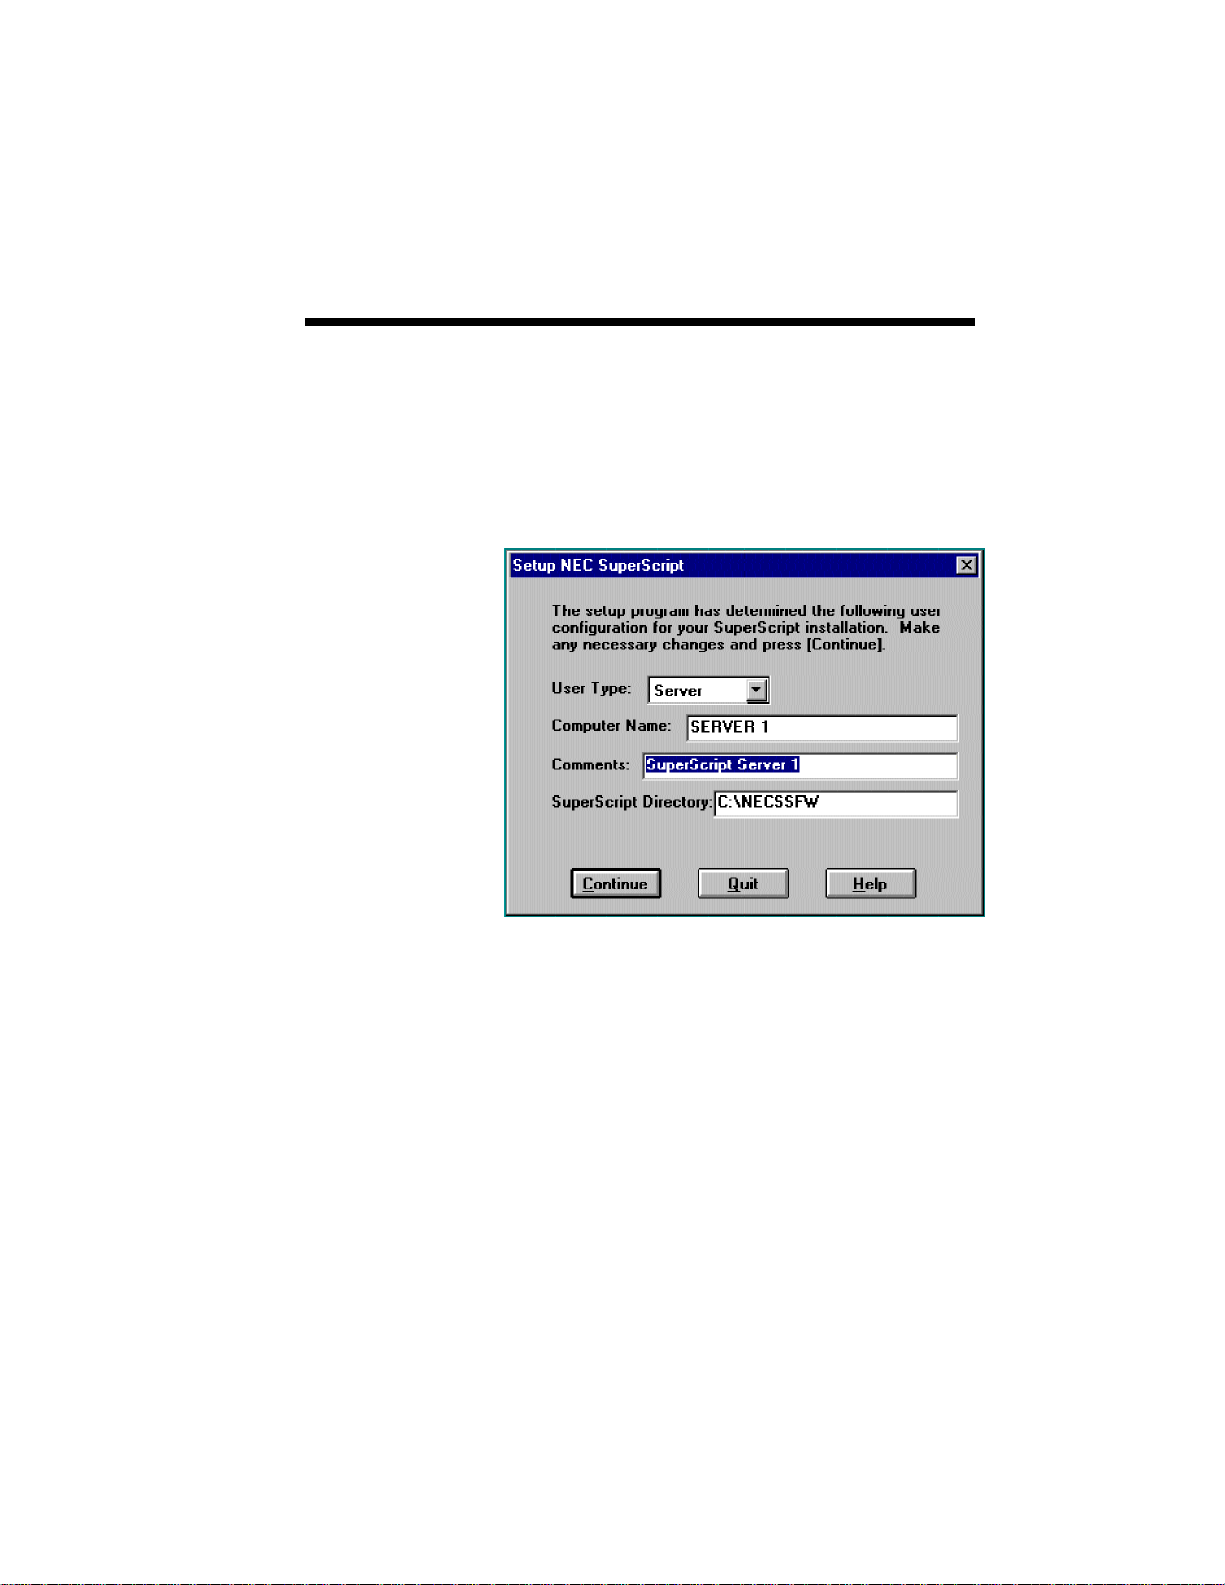
4. The SuperScript Setup Program presents the
configuration User Type option (Personal, Client
or Server), asks for a computer name, provides a
comments area, and asks for the folder where you
want the files installed.
Page 28

3–10 SuperScript Software Installation
SuperScript Setup Program will examine your PC
hardware and system configuration to ensure that the
minimum configuration requirements have been met.
• For computers not running Windows with
networking, the default is for Personal printer
installation.
• If the Setup Program finds a SuperScript
printer connected and the PC is connected to a
network, then the default setup is for a Server
installation.
• If no printer is detected and if the PC is
connected to a network, then the default setup
is for a Client installation.
You may override the default and setup.
Page 29
SuperScript Software Installation 3–11
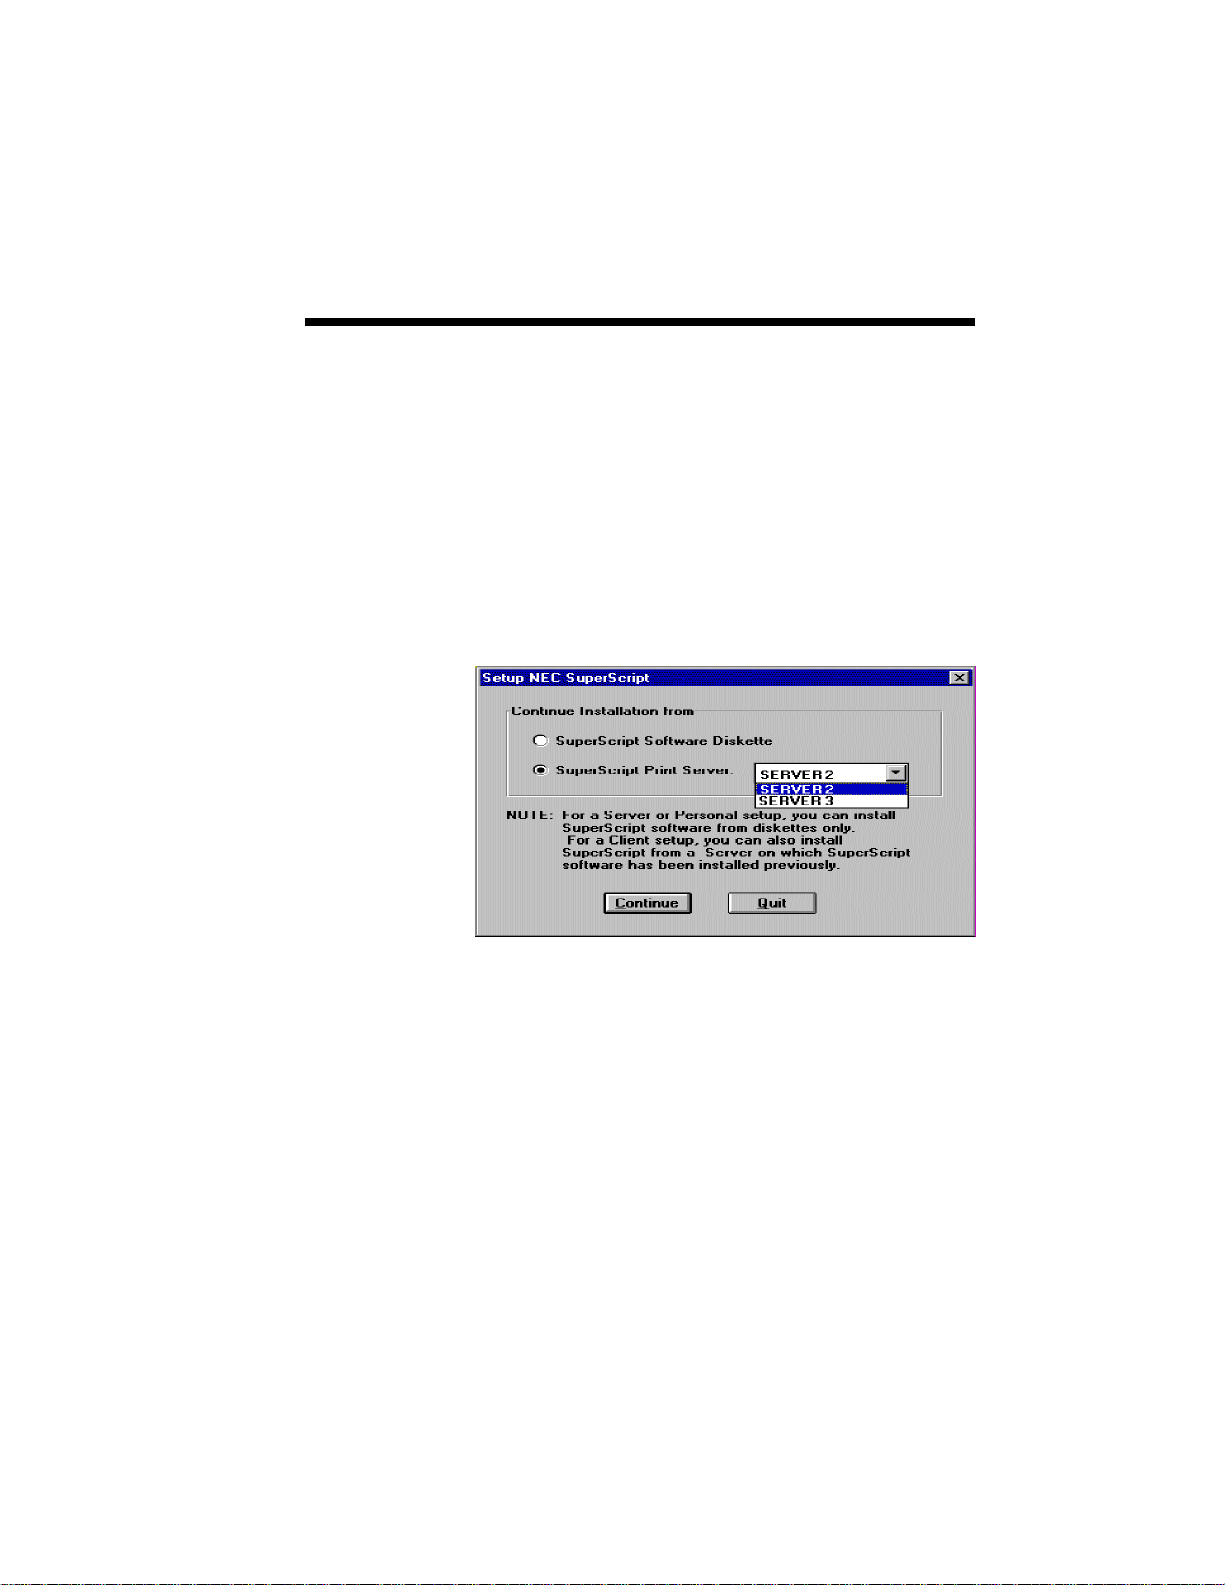
5. SuperScript can be installed entirely from
diskettes or CD, or from a SuperScript Software
diskette #1 and then continued from a Server.
The default is from diskettes (or CD).
For a Server or Personal setup, install
SuperScript software from diskettes (or CD).
For a Client, install SuperScript from a Server on
which SuperScript software has been installed
previously.
To install from a specific Server, select from the
list of available servers.
Page 30
3–12 SuperScript Software Installation
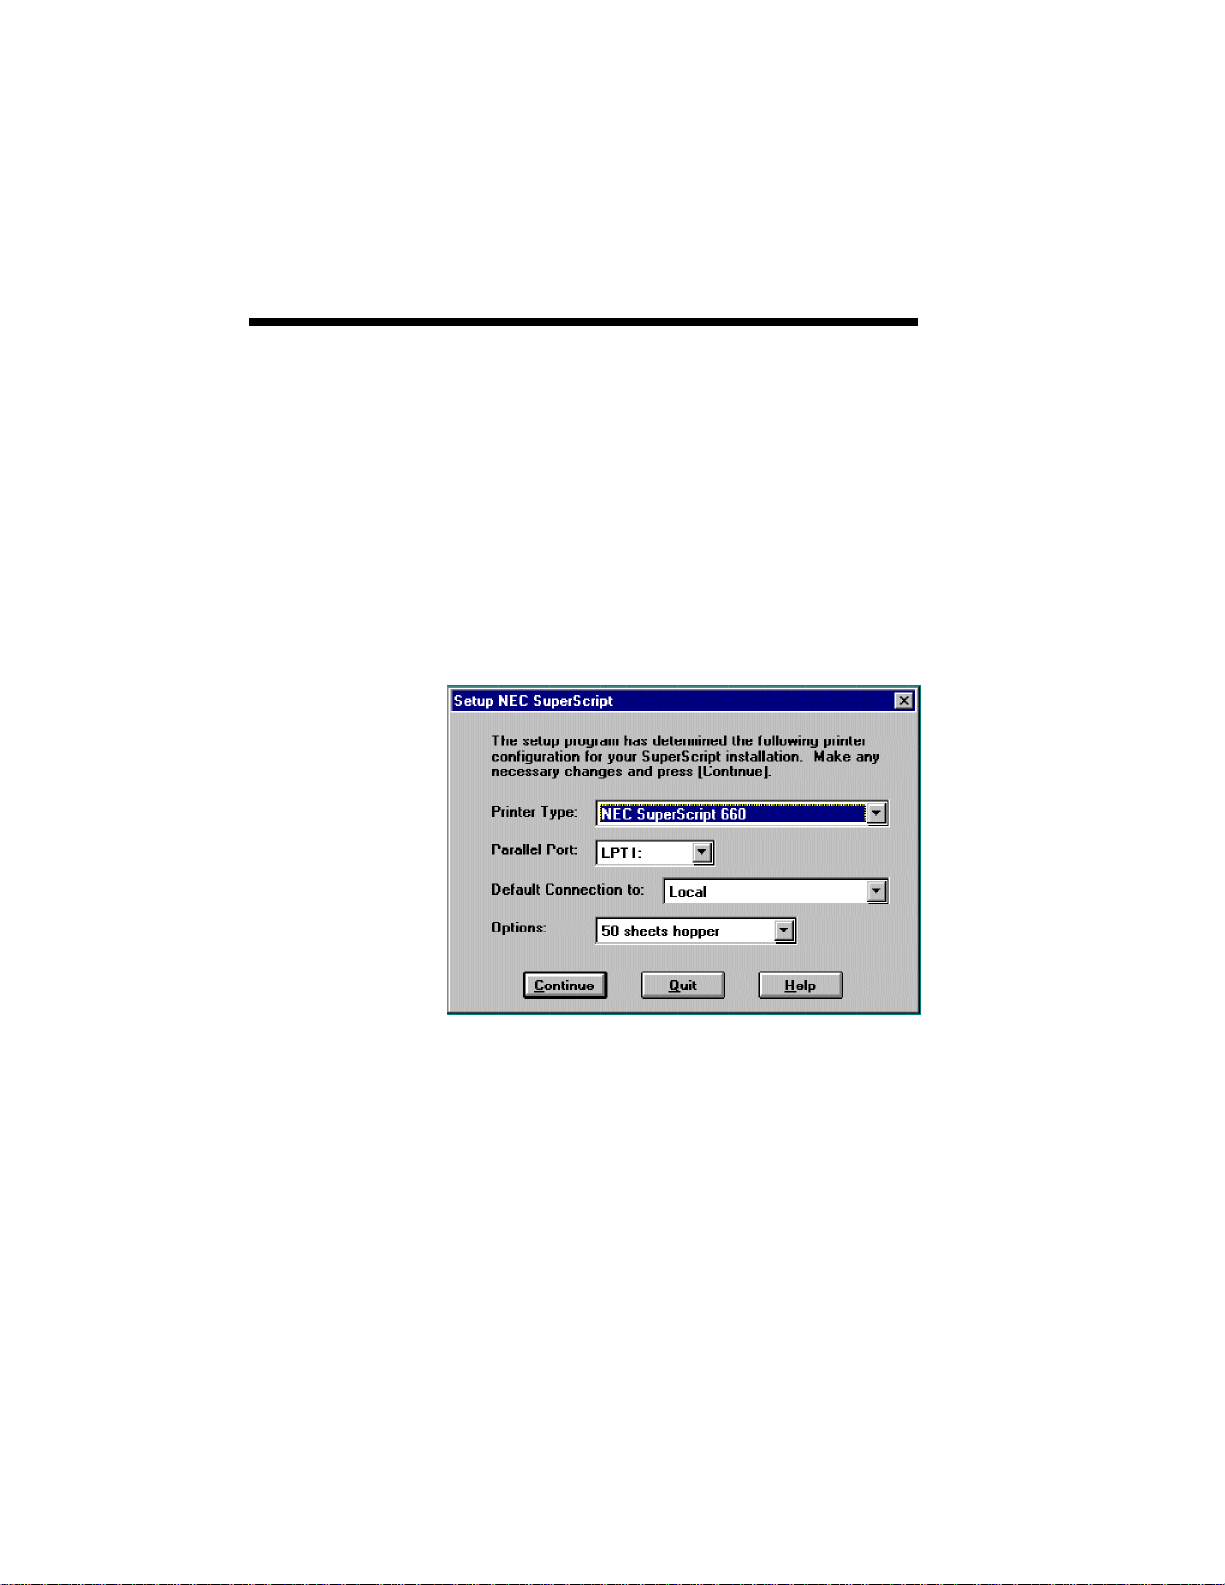
6. Following the initial user and folder information
dialog the Setup Program will present the default
printer configuration information. For a Client
installation, the menu will provide a default
connection for an initial Server path. The default
connection for Server and Personal set up is the
local printer. The Parallel Port indicates the
physical port to which the SuperScript printer is
attached.
At this point the SuperScript Setup Program has
all the information necessary to install the
SuperScript software and configure the system.
Page 31

SuperScript Software Installation 3–13
7. SuperScript Setup will display the installation
progress. If you choose to do so, you may click
the Quit button to abort the installation at any
time.
NOTE: Quitting at any time will leave you without
the ability to print to the SuperScript printer. There is
no reason to quit the program. If you quit you will
have to reinstall your old SuperScript software or the
new SuperScript software later.
Page 32

3–14 SuperScript Software Installation
8. There are 53 TrueType fonts are bundled with
your SuperScript software. You may choose to
install all or none of the fonts or do a custom
install. A custom install allows you to install
only the fonts you want.
The default for the fonts to be installed to is
C:\WINDOWS\FONTS directory. You can
change the default directory at this time by
specifying a different path. When you select OK
after choosing fonts, the installation program will
copy the fonts to the folder and install them in
Windows automatically. This requires
approximately 3.5 MB of hard disk space.
If you select Skip you will skip this step and
continue with the SuperScript installation. You
can install the fonts individually later from the
standard Windows Control Panel Font Utility.
See Chapter 8 Installing SuperScript TrueType
Fonts or your Windows documentation for more
information.
Page 33
SuperScript Software Installation 3–15
Note: The TrueType fonts cannot be installed
across the network. When installing the fonts, you
must install them via diskettes or CD.
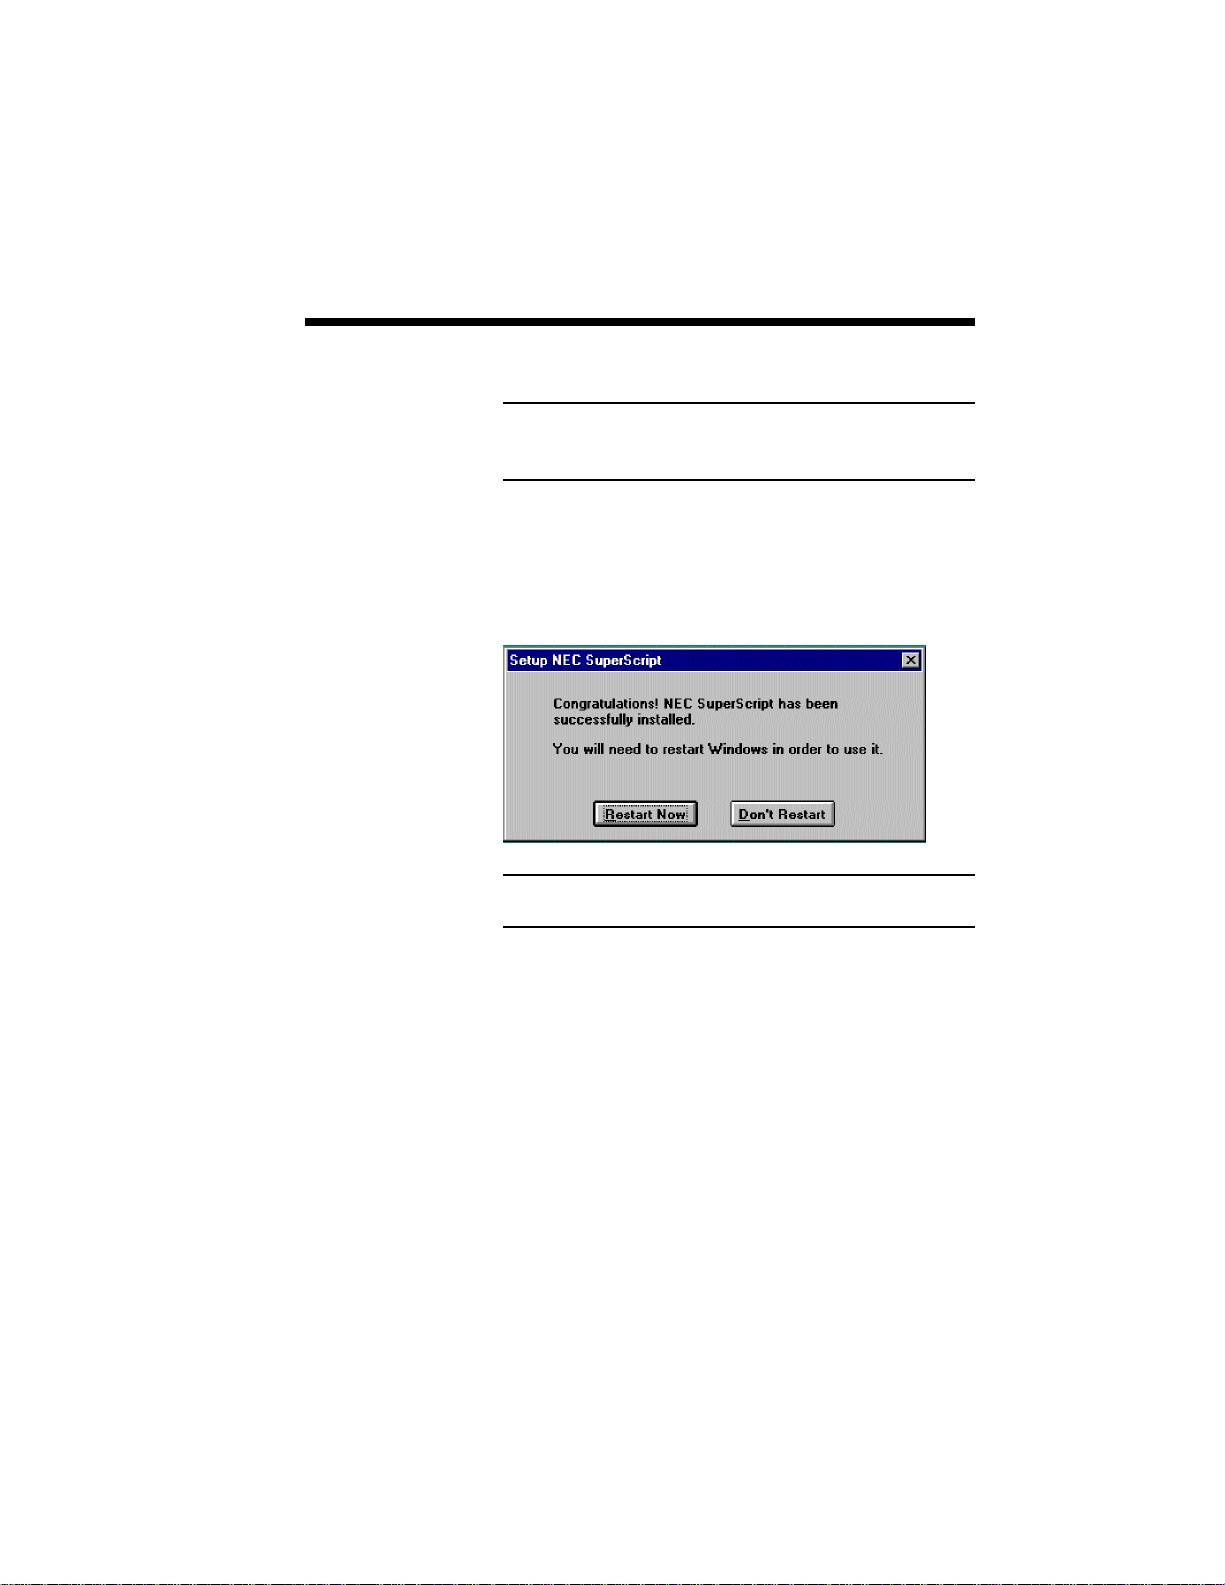
9. In order for the installation to take effect,
Windows must be restarted. The final menu
provides you the option of restarting Windows or
continuing without restarting Windows.
Note: You will have to restart Windows before
SuperScript can start running.
Page 34
3–16 SuperScript Software Installation
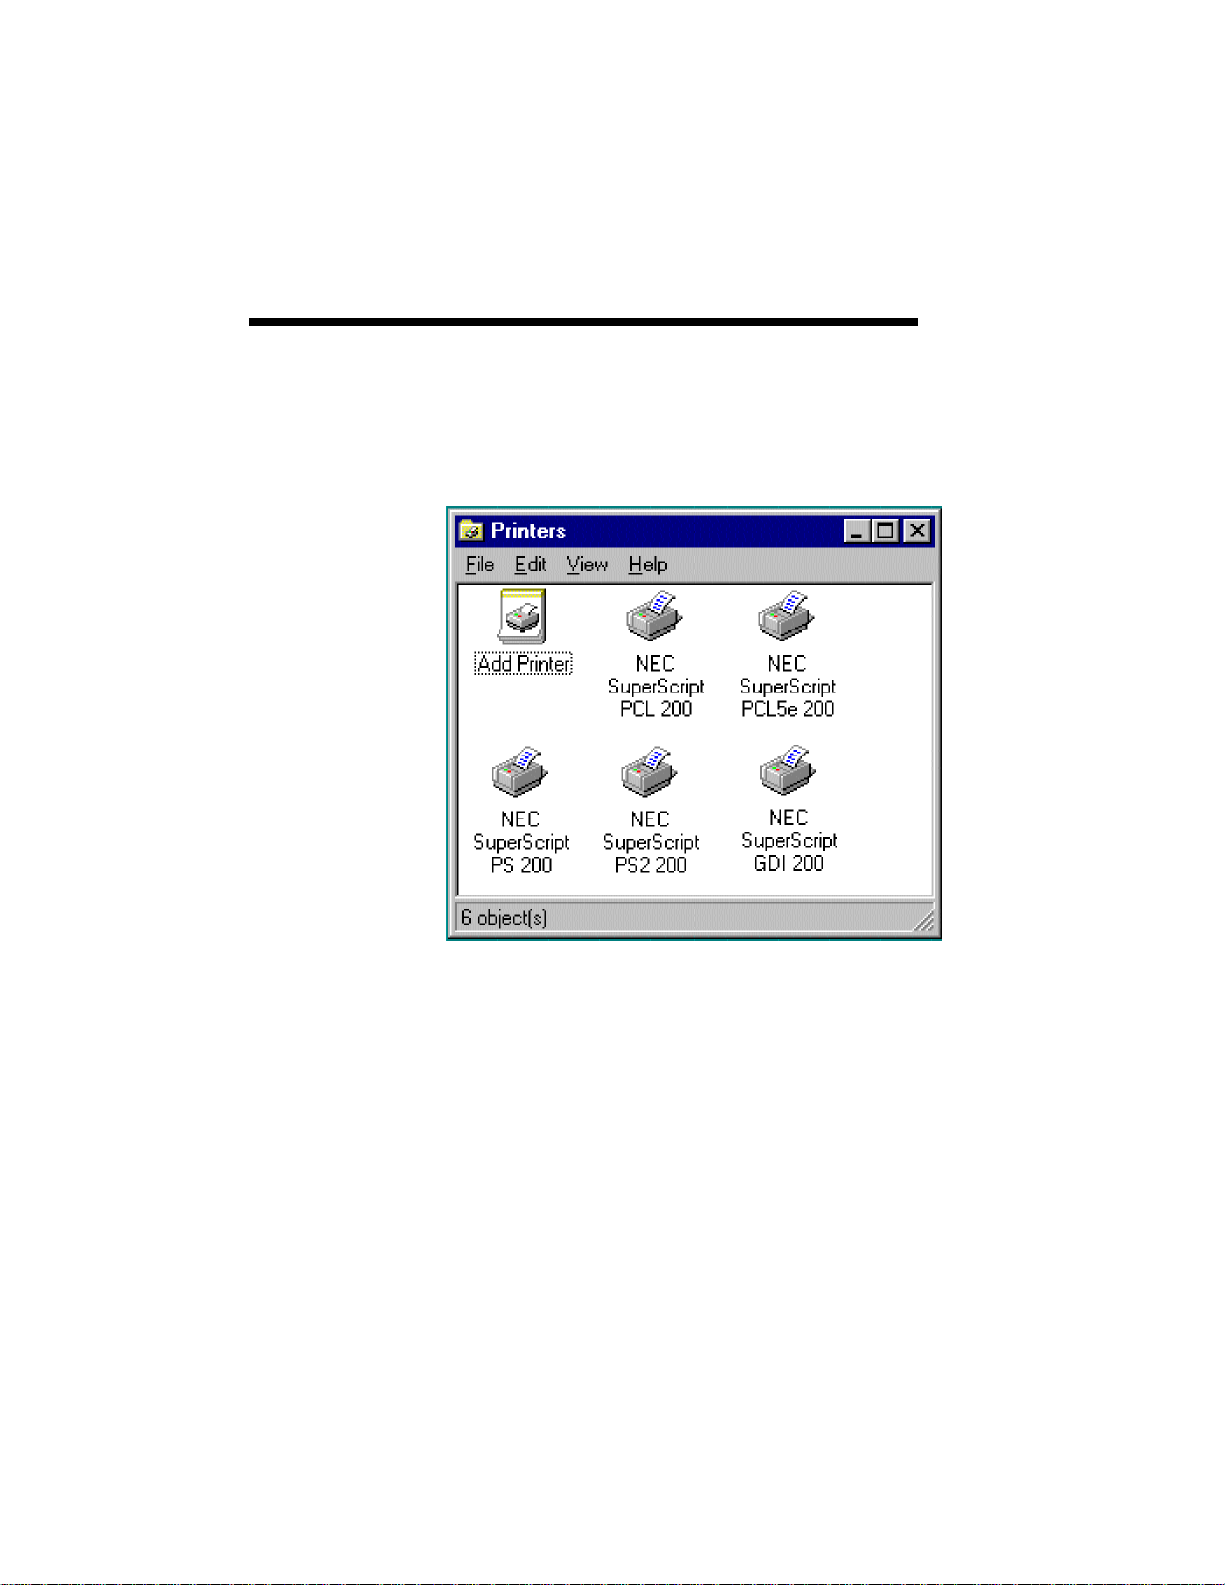
10. Once SuperScript software is installed, NEC
SuperScript device names appear in the Printers
window of your My Computer (see the next
figure).
Page 35
SuperScript Software Installation 3–17
Testing the
SuperScript
Installation
When Windows is restarted, you can use the
SuperScript printer test function to make sure the
installation was successful. The printer test utility is
available through the Print Test Page button on the
Control Panel tab of the SuperScript Console.
The test utility will print several pages during the
test. To begin a test print you must do the following:
1. Confirm the printer is connected to the
parallel printer port selected in the installation
if you are performing a local print test, or
confirm the server has been selected for all
print modes if you are performing a print test
on a Client.
2. Confirm that the printer is turned on.
3. Click the Start button, point to Programs,
NEC SuperScript Tools, and then click
NEC SuperScript Console.
4. Click the Control Panel tab of the
SuperScript Console.
5. Click the Print Test Page button.
6. Choose the print mode, and select OK.
Print Test Page button
Page 36

3–18 SuperScript Software Installation
Removing
You can easily remove any installed SuperScript
software.
SuperScript
Software
Table 3.7 Removing SuperScript Software with the Run
Command
STEP ACTION COMMENT
1 Click the Start button and then The Run Program dialog box
click Run. appears.
• Click the Start button and then click Run. Run
the executable wsremove.exe.
WSREMOVE.EXE must be run from within
Windows. WSREMOVE.EXE is in the folder where
SuperScript software is installed.
2 C:\NECSSFW\WSREMOVE.EXE Type the path of the folder
containing the WSREMOVE.EXE
in the Run command line and
press enter.
NOTE: In the case of default, the de-install program was loaded in
C:\NECSSFW. If you have set up the SuperScript files to different folder,
you need to specify your setup folder.
Page 37

SuperScript Console 4–1
4SuperScript Console
4
Page 38

4–2 SuperScript Console
The SuperScript Console provides a single access
point to the four major SuperScript program screens.
The purpose of the SuperScript Console is to provide
an easy way to configure the SuperScript printer and
to monitor and control print jobs. To activate the
SuperScript Console, click the Start button, point to
Programs, NEC SuperScript Tools, and then click
NEC SuperScript Console. Each of the four major
program features can be viewed by clicking the
folder tab under the window menu bar. The four tabs
are:
• Control Panel
• Local Queue
• Remote Queue
• Job Log
You will be pleased to find that SuperScript software
provides a standard Microsoft Windows set of
screens and menus with the familiar Windows look
and feel.
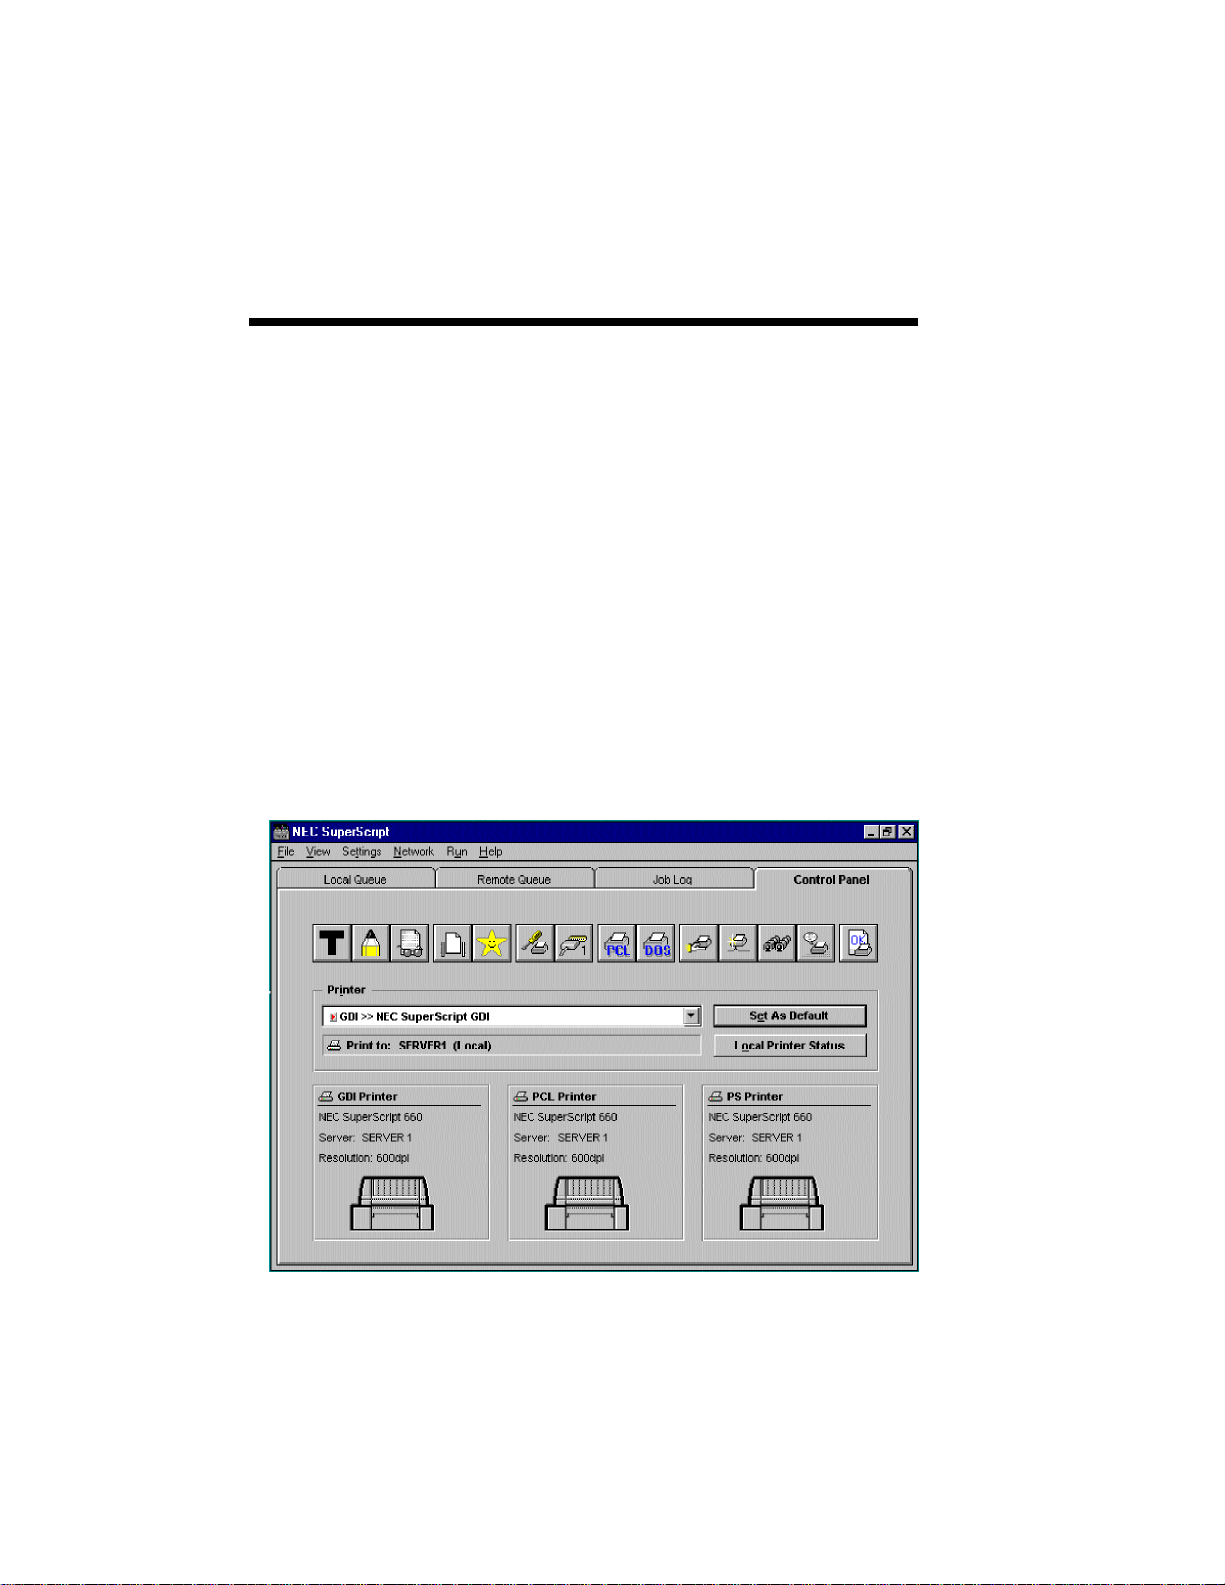
CONTROL PANEL
The Control Panel provides a mechanism to
configure and control the SuperScript printer. The
Control Panel is divided into the printer selection
section, the 14 buttons, and the printer information
section.
The Printer selection display presents the currently
selected printer and provides a list of additional
printer selections. The printer selections applicable
to SuperScript software are:
• NEC SuperScript GDI
• NEC SuperScript PS
• NEC SuperScript PCL
Page 39

Printer Selection Section
SuperScript Console 4–3
14 buttons
Printer Information Section (Printer Selection Buttons)
Use the list bar to highlight the print mode you want
to use. To use the selected printer as default, click the
Set As Default button. You can also request the
current printer status information with the Local
Printer Status button.
Table 4.1 presents the Control Panel button icons
with a brief description of what they do.
The printer information section shows the picture
and information of the currently selected printer in
each mode (GDI, PCL, PS). Printer selection can
also be done by clicking one of the three parts.
Page 40

4–4 SuperScript Console
Table 4.1 SuperScript Control Panel Buttons
ICON DESCRIPTION
Toner Saving Mode: This feature allows you to save toner by
controlling print density. You can select one of 3 tones
(Maximum, Medium, and Minimum). (If the printer is
SuperScript 610, this function is not available.)
Sharp Edge Technology: Silentwriter SuperScript features
the patented Sharp Edge Technology (SET). This feature
detects and smoothes the jagged edges of raster images by
dividing one full dot into several subdots set in the same area.
The print quality of both text and line graphics is thus
improved.
Print Darkness: This feature allows you to control the
darkness of any page as required. You can set this mode to
light, medium, or dark. (If the printer is SuperScript 610, this
function is not available.)
Page Save Mode: When enabled the current page is saved in
memory until printing is complete. Enable for sensitive
documents where loss of data cannot be tolerated. Disable the
feature to increase throughput.
Power Saving Mode: This printer has Power Saving Mode.
In this mode, if the printer is idle for a specified time (default
15 minutes), the fuser unit pauses and power consumption will
be decreased.
Printer Setup: This selection allows you to set up the printer.
Clicking this icon displays a setup screen for the printing
mode currently selected. (See the next section "GDI setup
screen".)
Connect Port: This selection allows you to identify the port
your printer is connected to, such as LPT1.
.
Page 41

SuperScript Console 4–5
Table 4.1 SuperScript Control Panel Buttons (Cont'd)
ICON DESCRIPTION
PCL Control Panel: This selection displays the PCL Control
Panel menu. The PCL Control Panel is used to setup of PCL
mode when DOS printing.
DOS Printing Option: This selection allows you to select
printing mode for printing from DOS within Windows.
Selectable printing modes are PCL4.5, PCL5e, PS Level I, and
PS Level II. If the printer is SuperScript 610/610plus, PCL5e
and PS Level II are not available.
Share Printer: This selection allows you to share the printer
with SuperScript Clients. See Chapter 5, Sharing and
Connecting.
Connect To: This selection allows you to connect to a shared
printer. See Chapter 5, Sharing and Connecting.
Client Monitor: This selection allows the Server to view the
Clients connected to the sharing printer. Server can
temporarily stop sharing its printer by clicking Suspend button
and resume sharing by clicking Resume button.
Status Report Options: This selection provides status report
options. The following options are selectable.
Minimize Printer Status Display / Remote Status Report
Notify When a Job Submitted to Remote Server is Finished
Notify When a Job Submitted to Remote Server is Deleted
Beep When a Job is Complete / Beep on Printer Error
Selecting Remote Status Report allows Clients to see Printer
Status window of Remote printer when an error occurs.
Print Test Page: This selection allows you to output the
printer test page. You can test the connection between your PC
and the SuperScript pritner by this function.
Page 42
4–6 SuperScript Console
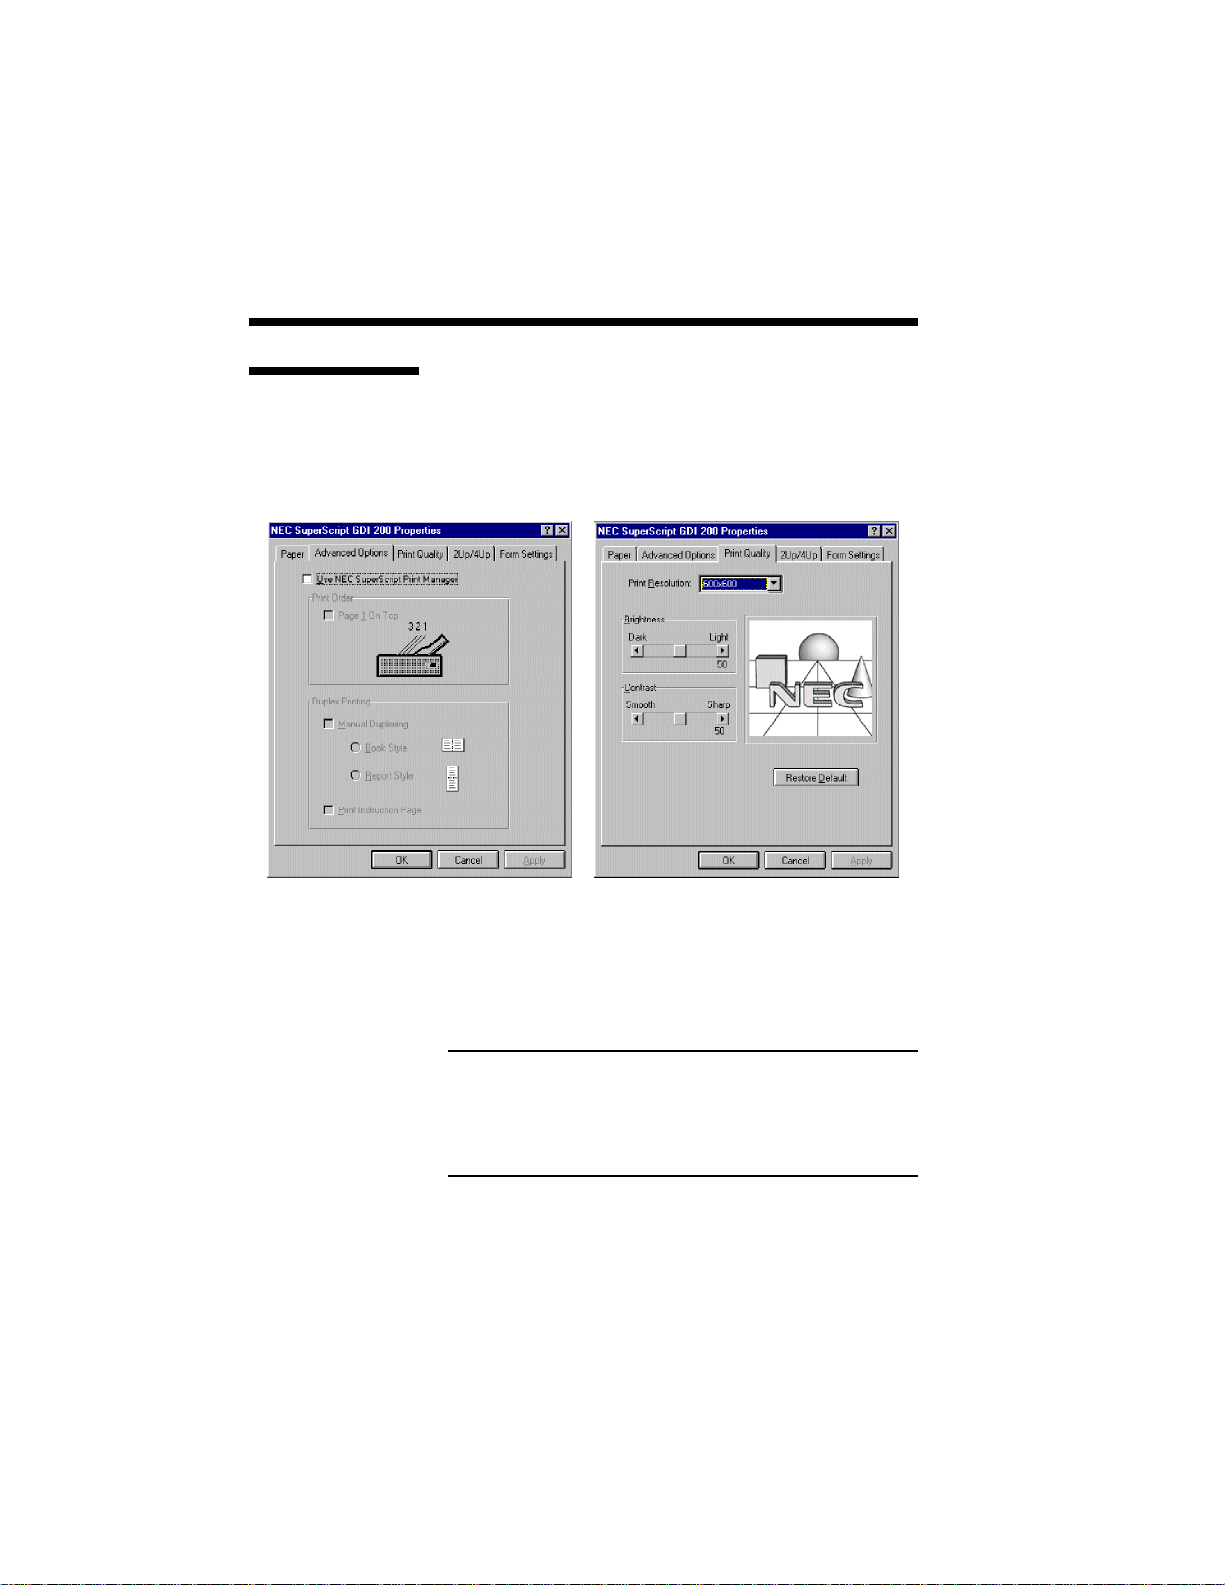
GDI Setup Screen
When you click Printer Setup button in Control
Panel of SuperScript Console in GDI mode, GDI
setup screen appears.
Settings for GDI printing can be set through the
setup screen. All features of GDI can be also used
through the screen.
Note: If you want the print jobs in GDI to be listed
in the Local Queue, Remote Queue, or Job Log, you
must activate SuperScript Print Manager by selecting
Use NEC SuperScript Print Manager in the GDI
setup screen.
GDI Setup Screen consists of the following five
pages.
Paper, Advanced Options, Print Quality ,
2Up/4Up, Form Settings.
Page 43

SuperScript Console 4–7
Paper
The paper page lets you select:
• Paper Source: Hopper Feed
Manual Feed
• Orientation: Portrait
Landscape
• Paper Size: Letter 8-1/2 x 11in
Legal 8-1/2 x 14in
A4 210 x 297mm
B5 182 x 257mm
Executive 7-1/4 x 10-1/2in
Envelope Monarch
3-7/8 x 7-1/2in
Envelope #10 4-1/8 x 9-1/2in
Envelope DL 110 x 220mm
Envelope C5 162 x 229mm
• Number of copies: 1 up to 99
• Scaling: 10 to 200%
Advanced Options
The Advanced Options page lets you select:
• Use NEC SuperScript Print Manager
• Print Order: Page 1 On Top
• Duplex printing:
Manual Duplexing: Book Style
Report Style
Print Instruction Page
You must select Use NEC SuperScript Print Manager to
use Print Order and Duplex features.
Page 44

4–8 SuperScript Console
Print Quality
The Print Quality page lets you select:
• Print Resolution: 600 x 600
• Brightness
Use this control to lighten or darken an image.
• Contrast
This control is used to adjust the difference in the
light and dark areas of an image, to improve a
flat image.
• Image Box
The Image Box shows an image which
demonstrates how the brightness and contrast
settings will effect the printed output.
2Up / 4Up
This feature is to print 2-page or 4-page data on one
sheet.
• Draw Frame Border
Allows you to draw a Frame or Border around
multiple image on the same page when 2Up or
4Up feature is selected.
(SuperScript 660/660i Only)
Photo Enhanced
(SuperScript 610plus Only)
300 x 300
Form Settings
This feature allows you to set up a Cover / Trailer
Page or Print Overlay. You must select Use NEC
SuperScript Print Manager to use these features.
• Use NEC SuperScript Print Manager
• Print Cover Page
When selected cover page will be printed at the
beginning of each print job. The File Name
designates the GDI file to be used as the cover
page.
Page 45

SuperScript Console 4–9
• Print Trailer Page
When selected a trailer page will be printed after
each print job. The File Name designates the GDI
file to be used as the trailer page.
• Print Overlay
When selected this feature will overlay a GDI file
on the print job. The File Name designates the
GDI file to be used as the overlay.
Procedures for creating a Cover / Trailer Page and an
Overlay File are different from one of the standard
SuperScript printer. The followings are the
instruction for SuperScript for Windows 95.
Create a Cover / Trailer Page or Overlay file
You can create a Cover / Trailer Page or an Overlay
File using Windows application. The following
instruction is for Microsoft WordPad as an example.
1. Using your application, create or open the
document to use as the Cover / Trailer.
2. Select Print in the File menu.
3. In the Print Setup screen, check to be sure the
printer selected is NEC SuperScript GDI.
Click on the Print to File check box in the Setup
screen and click OK.
4. In the Print to File screen, type the file name.
Check the Save in list box to be sure where the
file is saved. And select Save button.
You are now ready to print using your Cover /
Trailer Page or Overlay.
Page 46
4–10 SuperScript Console
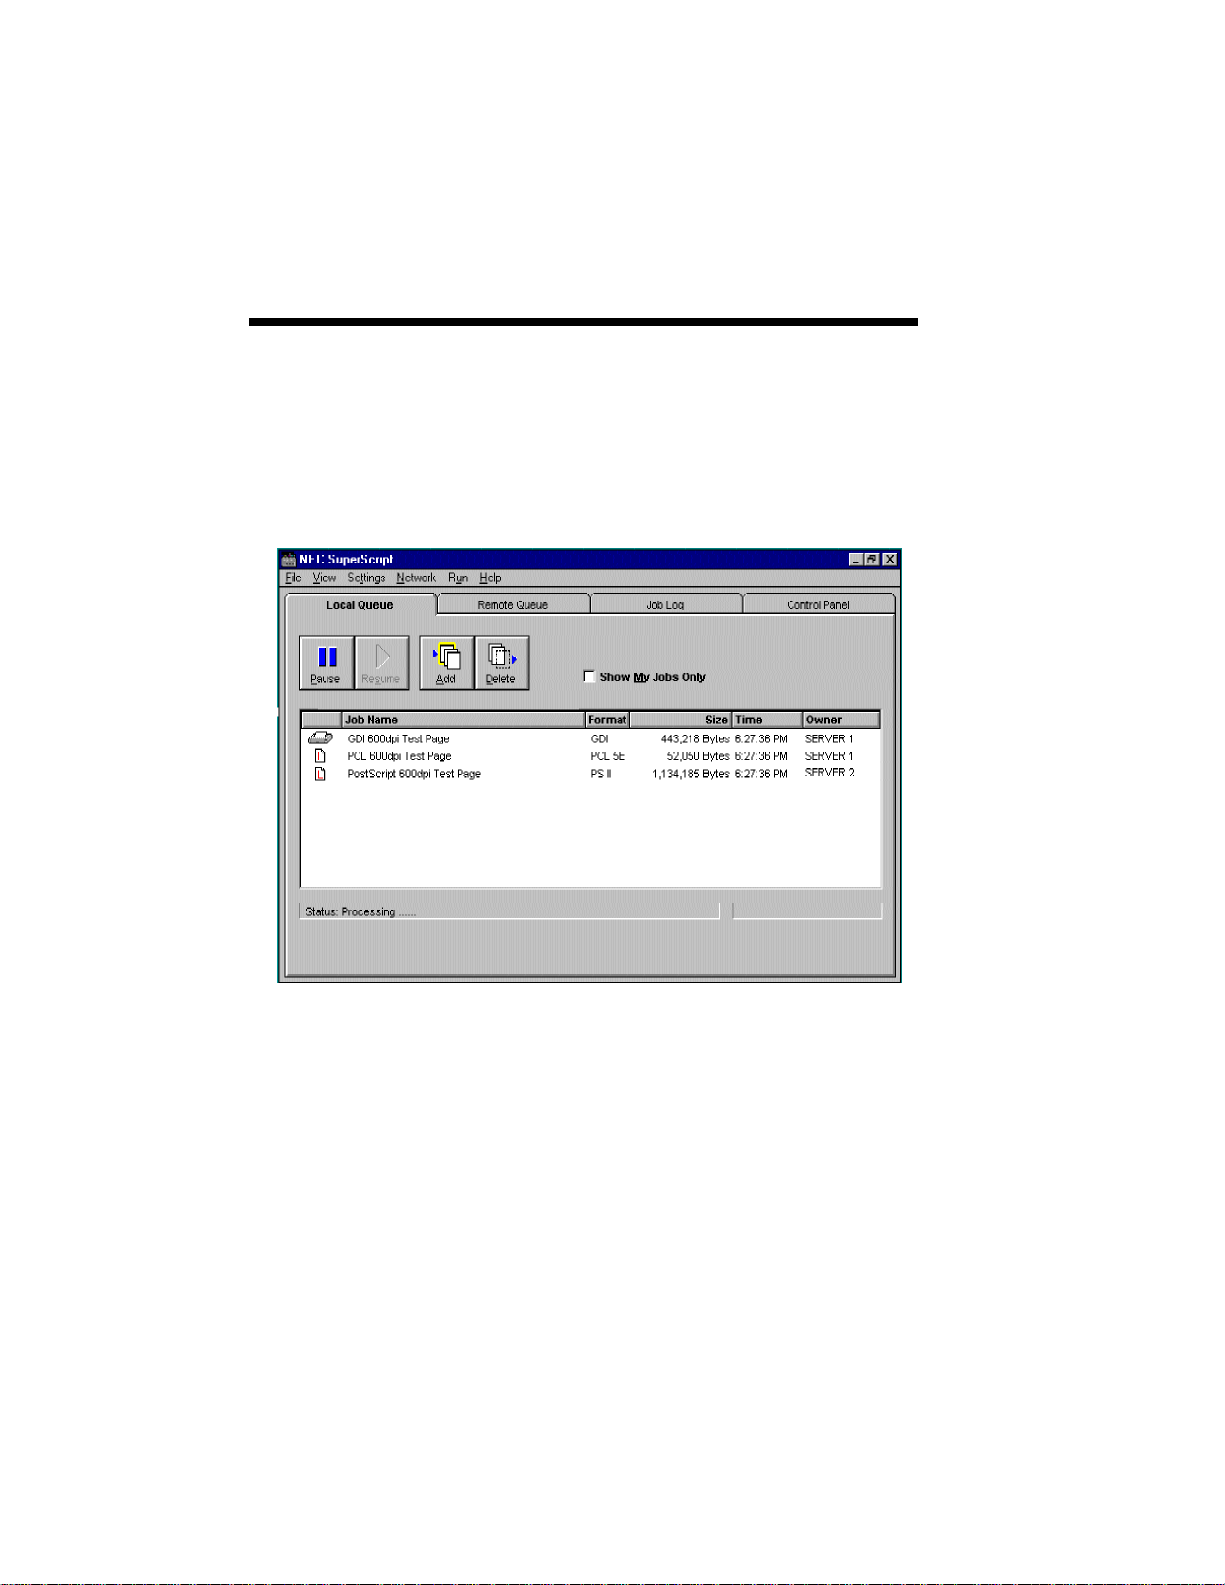
LOCAL QUEUE
The Local Queue is used to review the status of your
queued print jobs. For Servers, all pending print jobs
are local to the Server. For Clients, the Local Queue
represents print jobs that have been queued to a
remote Server but that have not yet been transferred
to that remote Server.
The local queue shows:
• the print job name
• the format of the print job (GDI, PS, PCL)
• the size in bytes of the print job
• the time the job was sent to the queue
• the owner of the print job
Page 47
SuperScript Console 4–11
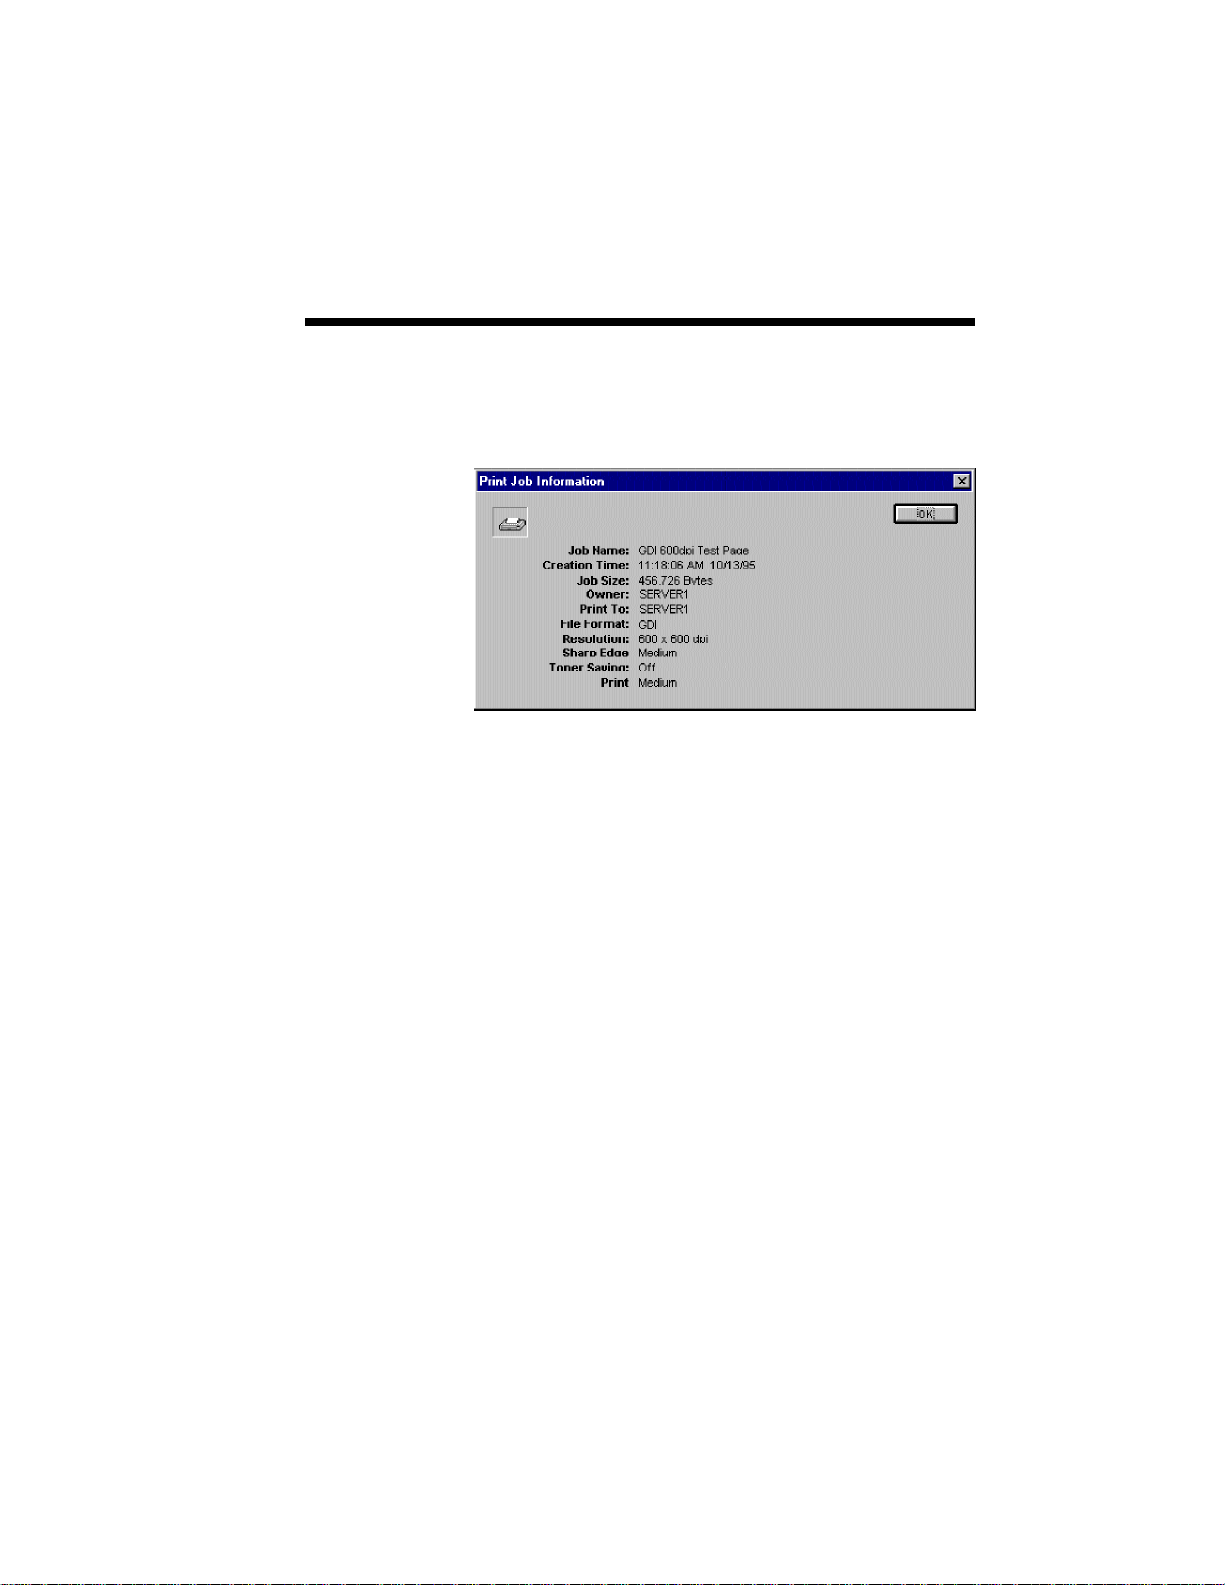
If you double-click an entry in the job queue, a Print
Job Information dialog will pop up to show you
more information about the job.
Both Servers and Clients can highlight, then dragand-drop jobs within the Local Queue to reorder the
print queue. Drag-and-drop is available for jobs that
have not started printing. To drag-and-drop, follow
these steps:
1. Move the mouse cursor to the entry you want
to select.
2. Press down on the left button of your mouse.
Do not lift your finger. The entry will turn
blue to indicate that it has been selected.
3. Without lifting your finger, drag the print job
(in other words, move the mouse) to the
desired new location in the queue.
4. Release your finger from the mouse button.
The print job will now show up in its new
location, and the other print jobs will
subsequently move up or down in the queue.
The following table shows the Local Queue button
icons along with brief descriptions of what they do:
Page 48

4–12 SuperScript Console
Table 4.2 Local Queue Buttons
ICON DESCRIPTION
Pause: Pauses the printer
Resume: Resumes printing
Add: Adds a print job to the print queue
Delete: Deletes the highlighted print job from the print
queue
Note: If the print job is in GDI without the NEC
SuperScript Print Manager active, then the job is not
listed in the Local Queue. (Refer to the section "GDI
Setup Screen" in this chapter.)
Page 49

SuperScript Console 4–13
REMOTE QUEUE
The Remote Queue is used to review the status of
your queued print jobs at the remote printer.
Checking Show Servers will search for all shared
SuperScript servers currently running on the network
and display those servers in the Print Server List
box which is located under the Print Job List box.
Clients can select a shared print queue through the
Show Print Queue for drop-down list box, or from
the Print Server List box.
The remote queue presents:
• the print job name
• the format of the print job (GDI, PS, PCL)
• the size in bytes of the print job
• the time the job was sent to the queue
• the owner of the print job
Page 50

4–14 SuperScript Console
The drag-and-drop feature is also available in the
Remote Queue. Clients can drag-and-drop their
print jobs to reschedule within the Print Job List
box or to redirect to one of the print servers within
the Print Server List box. Job Rescheduling is
available for jobs that have not been processed at the
print server side. To drag-and-drop, please follow
these steps:
1. Move the mouse cursor to the entry you want
2. Press down on the left button of your mouse.
3. Without lifting your finger, drag the print job
4. Release your finger from the mouse button.
to select.
Do not lift your finger. The entry will turn
blue to indicate that it has been selected.
(in other words, move the mouse) to the
desired new location in the queue.
The print job will now show up in its new
location, and the other print jobs will
subsequently move up or down in the queue.
To drop the selected print job to a print server
within the Print Server List box is to redirect
the print job from the current print server to
the designated print server.
Page 51

The following table presents the Remote Queue
button icons along with brief descriptions of what
they do.
Table 4.3 Remote Queue Buttons
ICON DESCRIPTION
Pause: Pauses the printer. This button cannot be used in the
Remote Queue.
Resume: Resumes printing. This button cannot be used in
the Remote Queue.
Add: Adds a print job to the print queue.
Delete: Deletes the highlighted print job from the print
queue.
Note: If the print job is in GDI without the NEC
SuperScript Print Manager active, then the job is not
listed in the Remote Queue. (Refer to the section
"GDI Setup Screen" in this chapter.)
SuperScript Console 4–15
Page 52
4–16 SuperScript Console
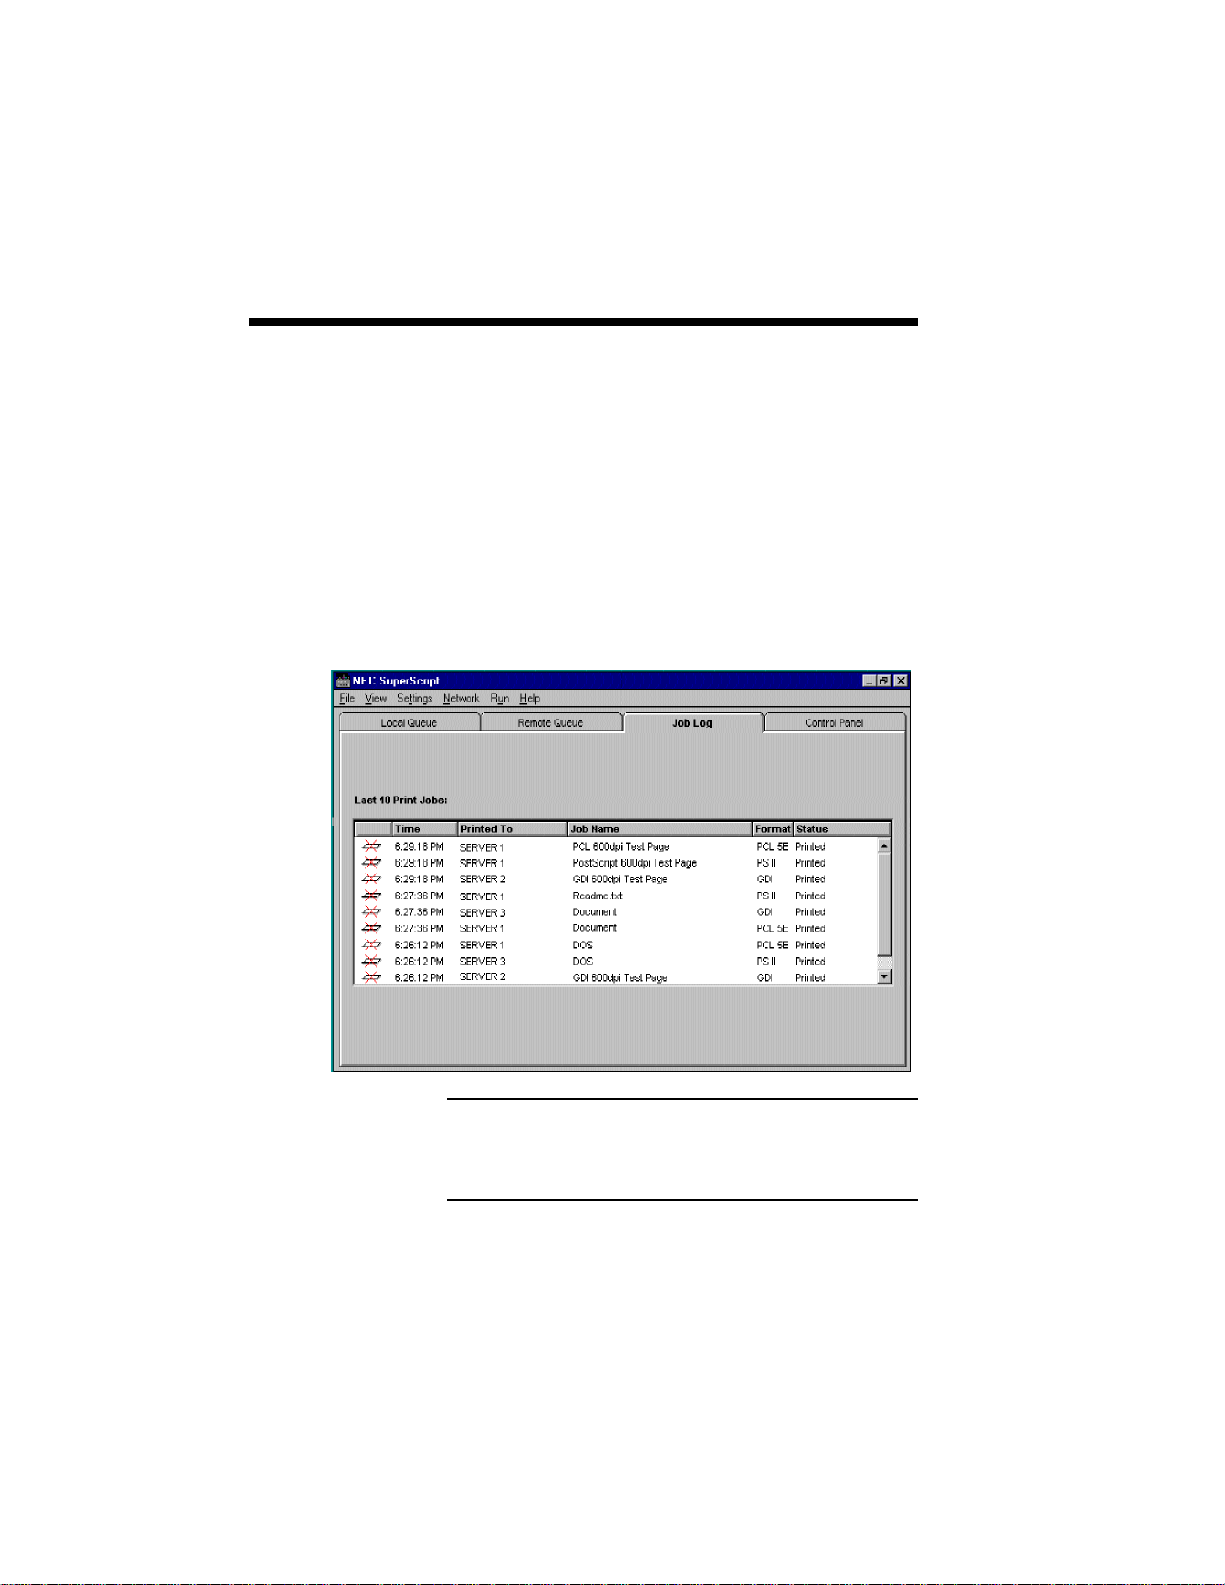
JOB LOG
The Job Log provides a historical log of the last 10
jobs originated by your PC. It will especially help
Client users to know what happened to those jobs
and where they can pick up the printed sheet.
The Job Log includes:
• the time the job was printed
• the Server name of the print job
• the job name
• the format of the print job (GDI, PS, PCL)
• the print result
Note: If the print job is in GDI without the NEC
SuperScript print manager active, then the job is not
listed in the Job Log. (Refer to the section "GDI
Setup Screen" in this chapter.)
Page 53

SuperScript Console 4–17
If you double-click a job entry in the job queue, a
Print Job Information dialog will pop up to show you
more information about the job.
Page 54

4–18 SuperScript Console
SUPERSCRIPT
CONSOLE
MENU ITEMS
File
View
Settings
SuperScript software provides the standard Windows
menu items available in most Windows applications
as well as application-specific menu items. Some of
the menu items match buttons available in the tabbed
dialog. However, there are some SuperScript
software functions that can only be accessed through
the pull-down menu, such as the Print Priority
setting.
The File pull-down menu provides the application
exit item, as well as items to pause and resume the
printer, and to add or delete a document from the
queue.
The View pull-down menu allows you to display the
Print Servers. This selection applies to the Remote
Queue.
The Settings pull-down menu allows you to make
changes to the following printer settings:
• Toner Saving
• Sharp Edge Technology
• Print Darkness
• Page Save
• Power Saving
• Printer Setup
• Connect Port
• PCL Control Panel
• DOS Printing Option
• Print Priority
• Local Printer Change
"Print Priority" and "Local Printer Change" can be
accessed only through this pull-down menu.
Page 55

SuperScript Console 4–19
Priority
Windows lets you run several applications at the
same time. This helps productivity, but means you
are sharing your PC resources among several
activities. SuperScript software priority settings let
you control the priority of the printing activity
relative to other applications running at the same
time.
The menu lets you select high, medium, or low
priority processing when you print. High priority
produces output faster, but it may slow down your
system as well. On the other hand, printing at a
lower priority lets other applications run faster, but
also means your document will take longer to print.
Local Printer Change
If you have another SuperScript printer and want to
replace the currently connected SuperScript printer
with it, you have to reinstall the SuperScript software
or use this function.
Network
After the new SuperScript printer is connected to
your PC and turned ON, select Local Printer Change
and then click Printer On button.
The Network pull-down menu allows you to share
and connect to a network printer, Monitor Clients if
configured as a Server, select Status Report Options,
and Change Name. Change Name can be accessed
only through the pull-down menu.
Change Name
This selection is available to all users and allows the
user to change the computer name. You must exit
and restart Windows before this change takes effect.
Page 56

4–20 SuperScript Console
Run
Help
EXITING
BEFORE
PRINTING HAS
COMPLETED
The Run pull-down menu allows you to view Local
Printer Status, Print Test Page, and Close Interpreter.
The Help menu links you to the SuperScript Help
system. With Help you can select Index to see a list
of topics related to SuperScript Software. Clicking
About shows version and copyright information for
SuperScript.
If you try to close the SuperScript Console, or exit
Windows, while there are print jobs queued and
waiting to be printed, the SuperScript program
displays a message asking if you want to save the
remaining print jobs.
If you select Yes the print jobs will be saved as you
exit. When the SuperScript Console next starts up, it
will resume processing and printing the documents.
Selecting No will delete all pending print jobs on
exit. The original applications files, from which the
print jobs were created, are not affected. Selecting
Cancel will cancel the exit selection and you will
return to the previous window.
Page 57

Sharing and Connecting 5–1
5Sharing and Connecting
5
Page 58

5–2 Sharing and Connecting
The primary purpose of a network workgroup is to
provide an easy and flexible environment for sharing
information and resources. The SuperScript printer is
designed to be a shared resource. In the Windows
environment, a resource owner can share the
resource.
Notes:
• Establishing a workgroup with a specific name
and members is described in the Microsoft Windows
documentation. This User's Guide presumes that you
have established an operational workgroup. If you
are able to perform normal workgroup tasks, such as
sending and receiving mail or reading and sharing
file resources, then you will be able to use
SuperScript for Network.
• If you have a stand-alone Windows
configuration, without other workgroup peers, then
this section may be skipped.
SuperScript supports the Windows Share and
Connect features. Before a SuperScript Client can
use the SuperScript printer you must make sure that:
• the Server is on and Windows is running
• the printer is on
• the printer resource is shared by the Server
• the Client has connected to the printer resource
Page 59

Sharing and Connecting 5–3
SHARING THE PRINTER
Windows allows peers to use resources connected
and assigned to other PCs through the Share facility.
To share a resource in a workgroup, the resource
owner must set the resource as shared. To share the
SuperScript printer among other SuperScript peers in
the workgroup, the Server performs the following
steps:
1. Click the Start button, point to Programs,
NEC SuperScript Tools, and then click
NEC SuperScript Console.
2. Select Share Local Printer in the Network
menu.
3. Check item(s) you are going to share (i.e.
GDI, PCL and PostScript).
4. Select OK. Printer sharing will be established
automatically every time Windows starts up.
Note: Only one SuperScript printer can be connected
to any PC. Therefore, the Share command
automatically selects the SuperScript printer
connected to the Server’s PC. If an additional nonSuperScript printer is also connected to the Server’s
PC then click Sharing in the Network menu of the
Printers window to share that printer.
To stop sharing the SuperScript printer resource,
perform the following steps:
1. Click the Start button, point to Programs,
NEC SuperScript Tools, and then click
NEC SuperScript Console.
2. Click the Control Panel tab or select the
Network menu.
3. Select the Share Local Printer menu item.
Page 60

5–4 Sharing and Connecting
4. Check off item(s) you want to stop sharing.
5. Select OK.
To authorize or restrict sharing of the printer:
1. Click the Start button, point to Programs,
NEC SuperScript Tools, and then click
NEC SuperScript Console.
2. Click the Control Panel tab or select the
Network menu.
3. Select the Share Local Printer menu item.
4. Select the Client button. A list of clients
appears.
5. To add authorized users:
• Select users from the “Choose from” list
• (Selecting Add All will authorize all
box, then select the Add button.
current and subsequently connected users
to share the printer)
6. To remove authorized users:
• Select users from the “Share with” list
box, then select the Remove button.
• (Selecting Remove All will remove all
currently connected users.)
7. Select OK.
NOTE: When a Server PC uses MS-DOS from
Windows, you should not set Exclusive through
Windows PIF dialog box or control menu.
Otherwise, Clients will not be able to see this
SuperScript Server while the Server runs in a full
screen DOS session. Please do not check the
Exclusive option on Server PC.
Page 61
Sharing and Connecting 5–5
CONNECTING TO THE PRINTER
The SuperScript printer is local to the connected PC,
so the Server does not have to connect to the
attached printer. However, this section is applicable
to both Clients and Servers. To connect to a
SuperScript printer attached to another PC, the Client
performs the following steps:
1. Click the Start button, point to Programs,
NEC SuperScript Tools, and then click
NEC SuperScript Console.
2. Click the Control Panel tab or select the
Network menu.
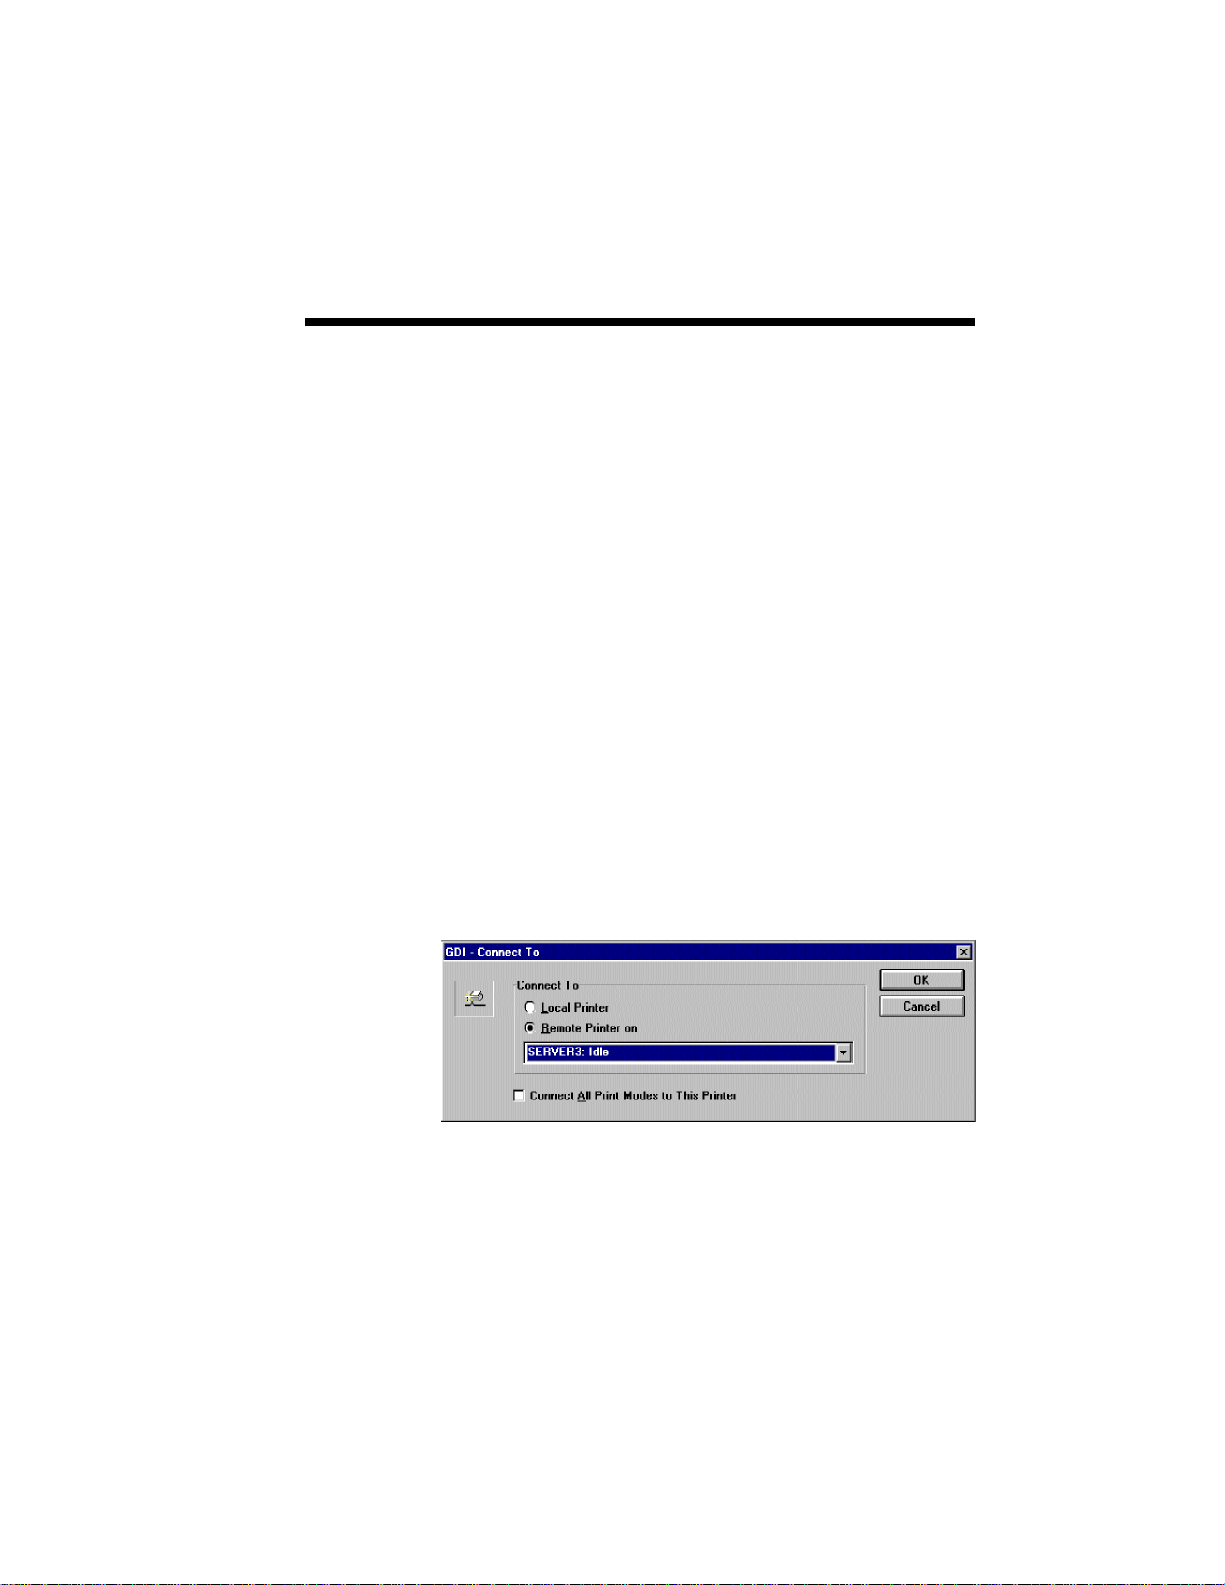
3. Select the Connect to... menu item.
4. Select Remote Printer on.
5. Select the Server you want to connect to.
6. You may click on Connect All Print Modes
to This Printer to use this server for all your
print modes.
Page 62

5–6 Sharing and Connecting
PRINTING
You can select the SuperScript printer the same way
you select other printers in the Windows. You can
select the printer one of two ways:
• By using the SuperScript Console
• By using Print Setup in your Windows
applications, such as Microsoft Word.
To print a file from one of your applications, do the
following:
1. Run your application.
2. Open your file.
3. Select Print Setup
4. Select a printer, such as NEC SuperScript
GDI on NECGDI.
5. Choose OK.
6. Choose Print.
GDI print mode was selected as an example.
Page 63

Sharing and Connecting 5–7
Printer Access
and Client
Privilege
Checks
When a Client requests a print job, the Server will
detect the print request and accept or deny it based
on two main characteristics:
• Print job type
• Client print privileges
Servers review the print job request to ensure that it
matches the capabilities of the SuperScript printer.
For example, if the printer is a 300 dots per inch
(dpi) SuperScript printer and the Client has queued a
600 dpi print job, the Server will reject the print
request and send the message shown in the next page
back to the Client. This scenario can occur if there
are two different SuperScript printers, one at 300 dpi
and one at 600 dpi, and the Client selects one default
printer type but connects to the incorrect print server.
Page 64

5–8 Sharing and Connecting
When the Invalid Job Type dialog appears, you can
redirect or delete the print job. If you want to redirect
the job, you must select a new server and click the
OK button.
Clients can submit jobs with any settings, including
Toner Saving Mode, Sharp Edge Technology and
Darkness without affecting jobs sent from other
Clients. Form Overlay, Head Page, Trailer Page
Manual Duplex and 2/4-Up Printing are also
available to Client users. (See the section "Control
Panel" in Chapter 4.)
Page 65

PostScript Printing 6–1
6PostScript Printing
6
Page 66

6–2 PostScript Printing
SWITCHING POSTSCRIPT PRINT MODE
From the
Control Panel
of SuperScript
Console
Once you install SuperScript software, the
SuperScript can operate in three different imaging
modes: GDI, PCL, and PS. The imaging mode can
be easily switched to PS from the Console Control
Panel tab or your application.
To change imaging modes, select the PS printer from
the Control Panel of SuperScript Console. Select
"PS>>NEC SuperScript PS" from the list bar or click
PS Printer button located right-below in the Control
Panel. After selecting the PS imaging mode, click
on Set As Default.
Page 67

PostScript Printing 6–3
POSTSCRIPT OPTIONS
For those users who want to bring the PostScript file
to a typesetter or service bureau for higher resolution
output or color separation, the next screens provide
options that allow you to easily accomplish that
purpose.
Also, the Graphics field in the following screen lets
you convert your output to a negative image for film
or slide production, and provides other advanced
options.
Page 68

6–4 PostScript Printing
TRUETYPE FONT SUBSTITUTION
If you used TrueType Fonts in your application, this
screen provides a table substituting TrueType fonts
with printer fonts.
Page 69

PostScript Printing 6–5
POSTSCRIPT
PRINT MODE
OVERVIEW
Printing from a
Windows
Application
Both Windows applications and DOS applications
running under Windows can use PostScript printing.
Both PostScript Level I and Level II emulations are
available. (PostScript Level II emulation is only
available for SuperScript 660 and 660i printer.)
Once you have selected your printer mode from
GDI, PostScript, or PCL emulation, you can print
from your Windows application as you would to any
other printer. If the SuperScript printer has not been
selected, then for most applications, perform the
following general steps:
1. Select the File menu.
2. Select Print (Some applications have a
Printer Setup item as part of the File menu).
3. Select Printer Setup (Some applications use
Print... and then have an option for Printer
Setup).
4. Highlight the SuperScript printer, such as
NEC SuperScript PS2 on NEC PS. 600.
5. Select the printer as the default printer.
6. Choose OK.
Page 70

6–6 PostScript Printing
Printing from DOS
NOTE: SuperScript is a Windows printer, designed
for use with Windows. In particular, SuperScript's
GDI mode is based on Windows and does not work
with MS-DOS. However, SuperScript will work in
PostScript or PCL mode if you create an MS-DOS
session from within Windows. SuperScript will not
run if you exit Windows completely.
To specify the printer port and printing mode,
perform the following steps:
1. Click the Start button, point to Programs,
NEC SuperScript Tools, and then click NEC
SuperScript Console.
2. Select DOS Printing in the Setting menu.
3. Select Printer Port you would use and Printing
Mode for the file.
4. Choose OK.
Enter MS-DOS from Windows by clicking the Start
button, pointing to Programs, and clicking MS DOS
Prompt.
When ready to print, start your DOS application and
print as you normally would. Set up your application
to print to the parallel port LPT1 (or LPT2 or LPT3
if you have SuperScript set to print to one of these
ports instead). Be sure the NEC SuperScript driver is
the default driver in Windows and the DOS
application is using an HP LaserJet 4P driver.
If an HP LaserJet 4P driver is not available in the
application, you can select one of the following:
LaserJet IIIP, Laser Jet IIP, or LaserJet.
Page 71

PostScript Printing 6–7
Printing
PostScript or
PCL Files from
the MS-DOS
Command Line
Printing ASCII
Text Files
If you have a file in PostScript language format, PCL
format, or ASCII text format, you can print that file
from the MS-DOS command line within Windows.
At the command line prompt, type
COPY/B <filename.ext> LPT1
where <filename.ext> is the name of your
PostScript, PCL, or ASCII formatted file. If you have
configured SuperScript to print to a different parallel
port, use that parallel port instead of LPT1.
Although the PostScript language does not print
plain ASCII text files, you can output them to the
SuperScript printer by performing the following
steps:
1. Click on the Write application provided with
Windows.
2. Open the file you wish to print.
3. Print the file.
4. Exit without saving changes.
Page 72

6–8 PostScript Printing
Page 73

SuperScript Printer Status 7–1
7SuperScript Printer
7
Status
Page 74
7–2 SuperScript Printer Status
For Personal and Server users to run the SuperScript
Printer Status, click the Start button, point to
Programs, NEC SuperScript Tools, and then click
Local Printer Status Display. You can also access
SuperScript Printer Status by clicking the Local
Printer Status button on the Control Panel tab of the
SuperScript Console. SuperScript Printer Status will
also appear automatically if a printer error is
detected.
For Client users to use SuperScript Printer Status,
open Control Panel of the SuperScript Console, click
Status Report Option button, then select Remote
Status Report. After this setting, when a printer error
is detected in the Server's printer, SuperScript Printer
Status will appear automatically.
The SuperScript Printer Status program has two
primary functions:
• To let you monitor the status of the local printer
• To alert you in case of a problem with your
printer, such as paper running out
Page 75

SuperScript Printer Status 7–3
Note: On some particular PCs, when the Printer
Status Display appears, the shortcut key operation is
not available. If you have this problem, use the
mouse.
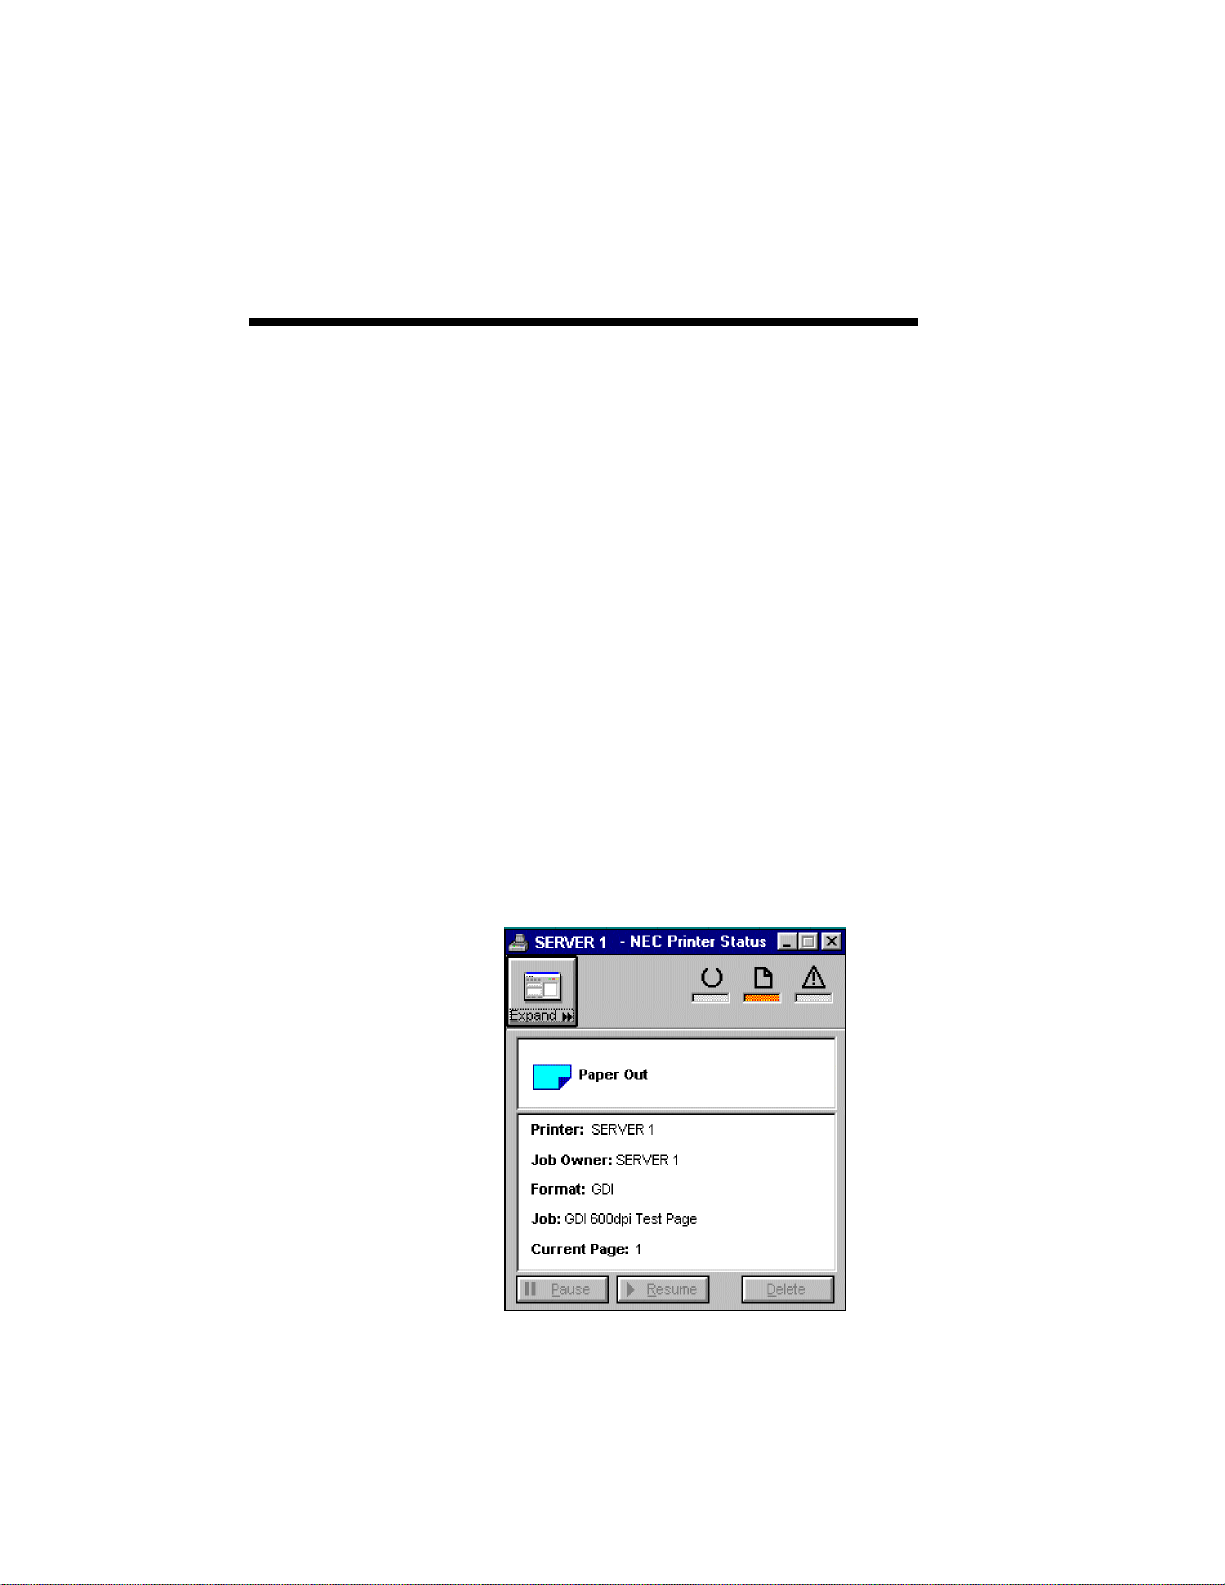
The SuperScript Printer Status display provides three
printer status "lights", two information boxes, and
various printer control buttons. The printer status
lights mimic what you would see on the status panel
of your printer and provide a quick view of the
printer status.
The top information box gives the current printer
status and shows an icon if there is an error that
represents the error condition. The bottom
information box provides specific job information if
a print job is printing or paused.
The following table shows the SuperScript Printer
Status button icons along with brief descriptions of
what they do.
ICON DESCRIPTION
Expand: Expands the Printer Status display. This is useful when an
error has occurred and you want more detailed information about the
recommended solution.
Reduce: Reduces the Printer Status display.
Pause: Pauses the printer.
Resume: Resume the print job if it has been paused. There are some
error conditions where fixing the problem will cause the printer to
resume automatically. However, some error conditions require you to
tell the printer after the problem is fixed.
Delete: Deletes the job that is currently printing. Click this button
after clicking Pause button if the printer does not pause.
Page 76
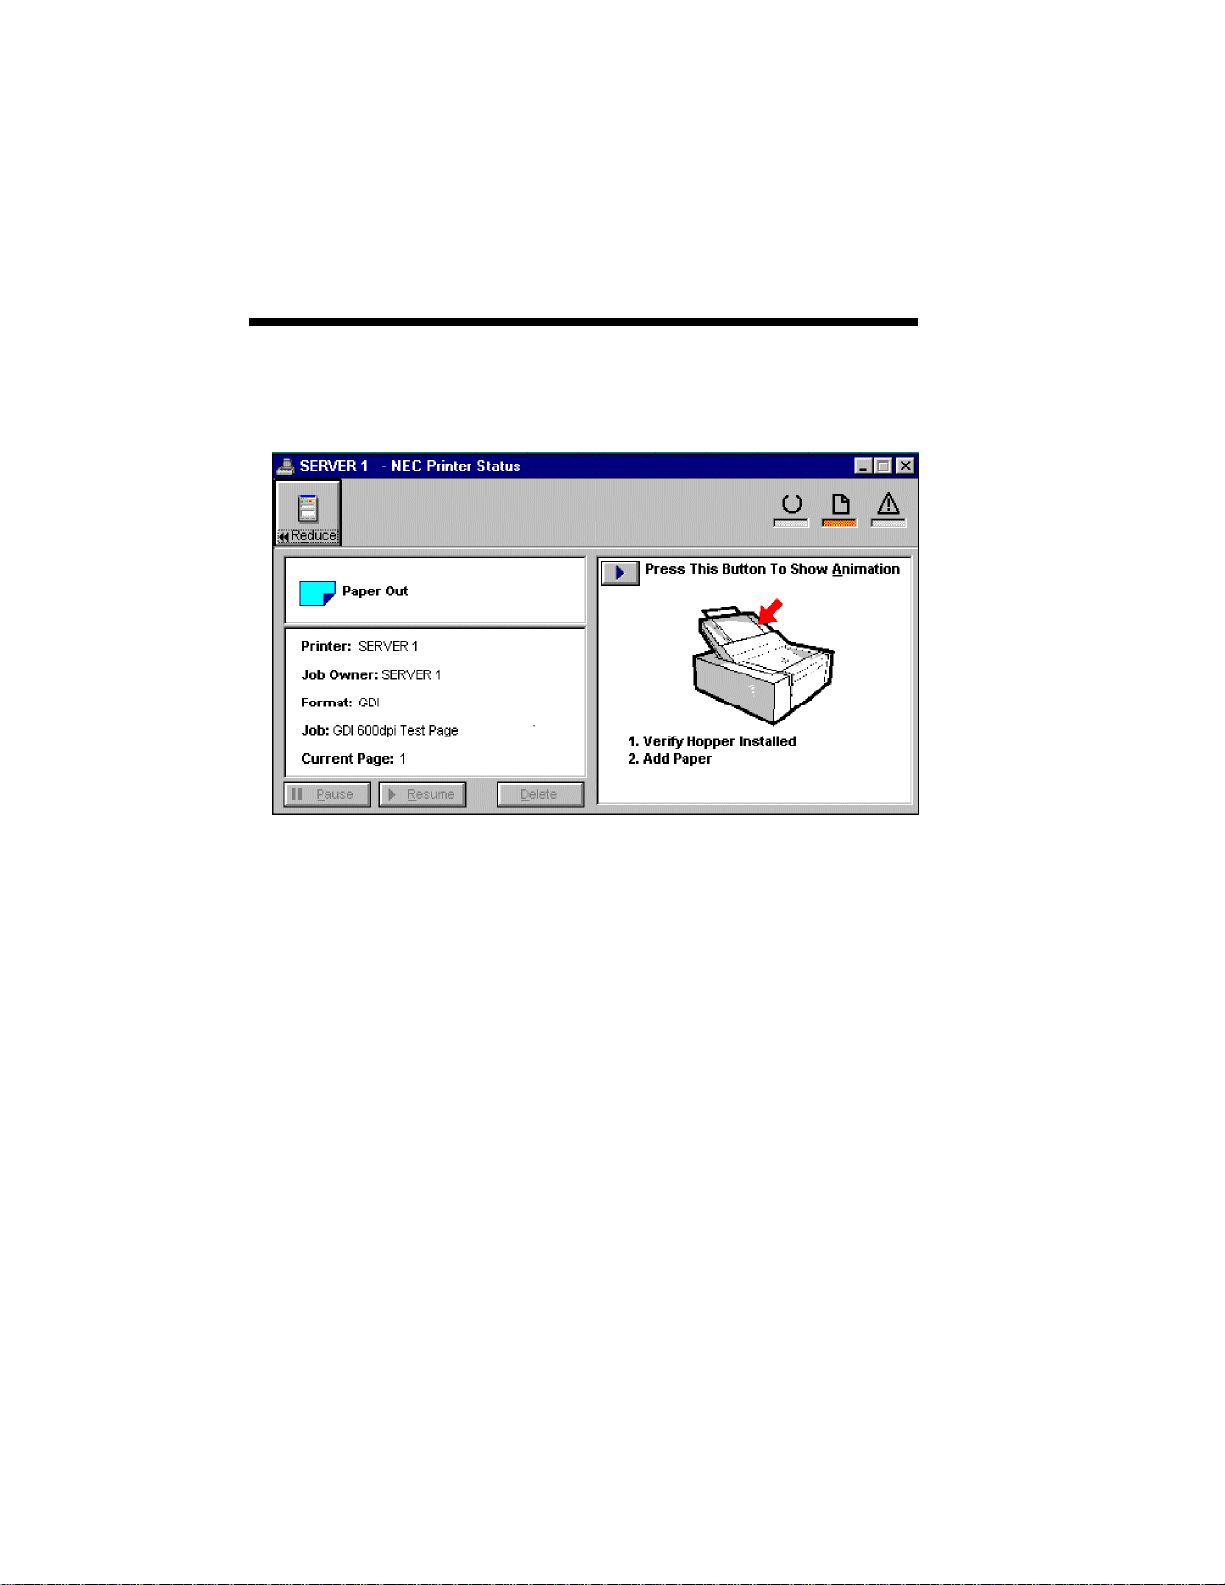
7–4 SuperScript Printer Status
EXPANDED
SUPERSCRIPT
PRINTER
STATUS
DISPLAY
Printer Error
Status
Messages and
Recovery
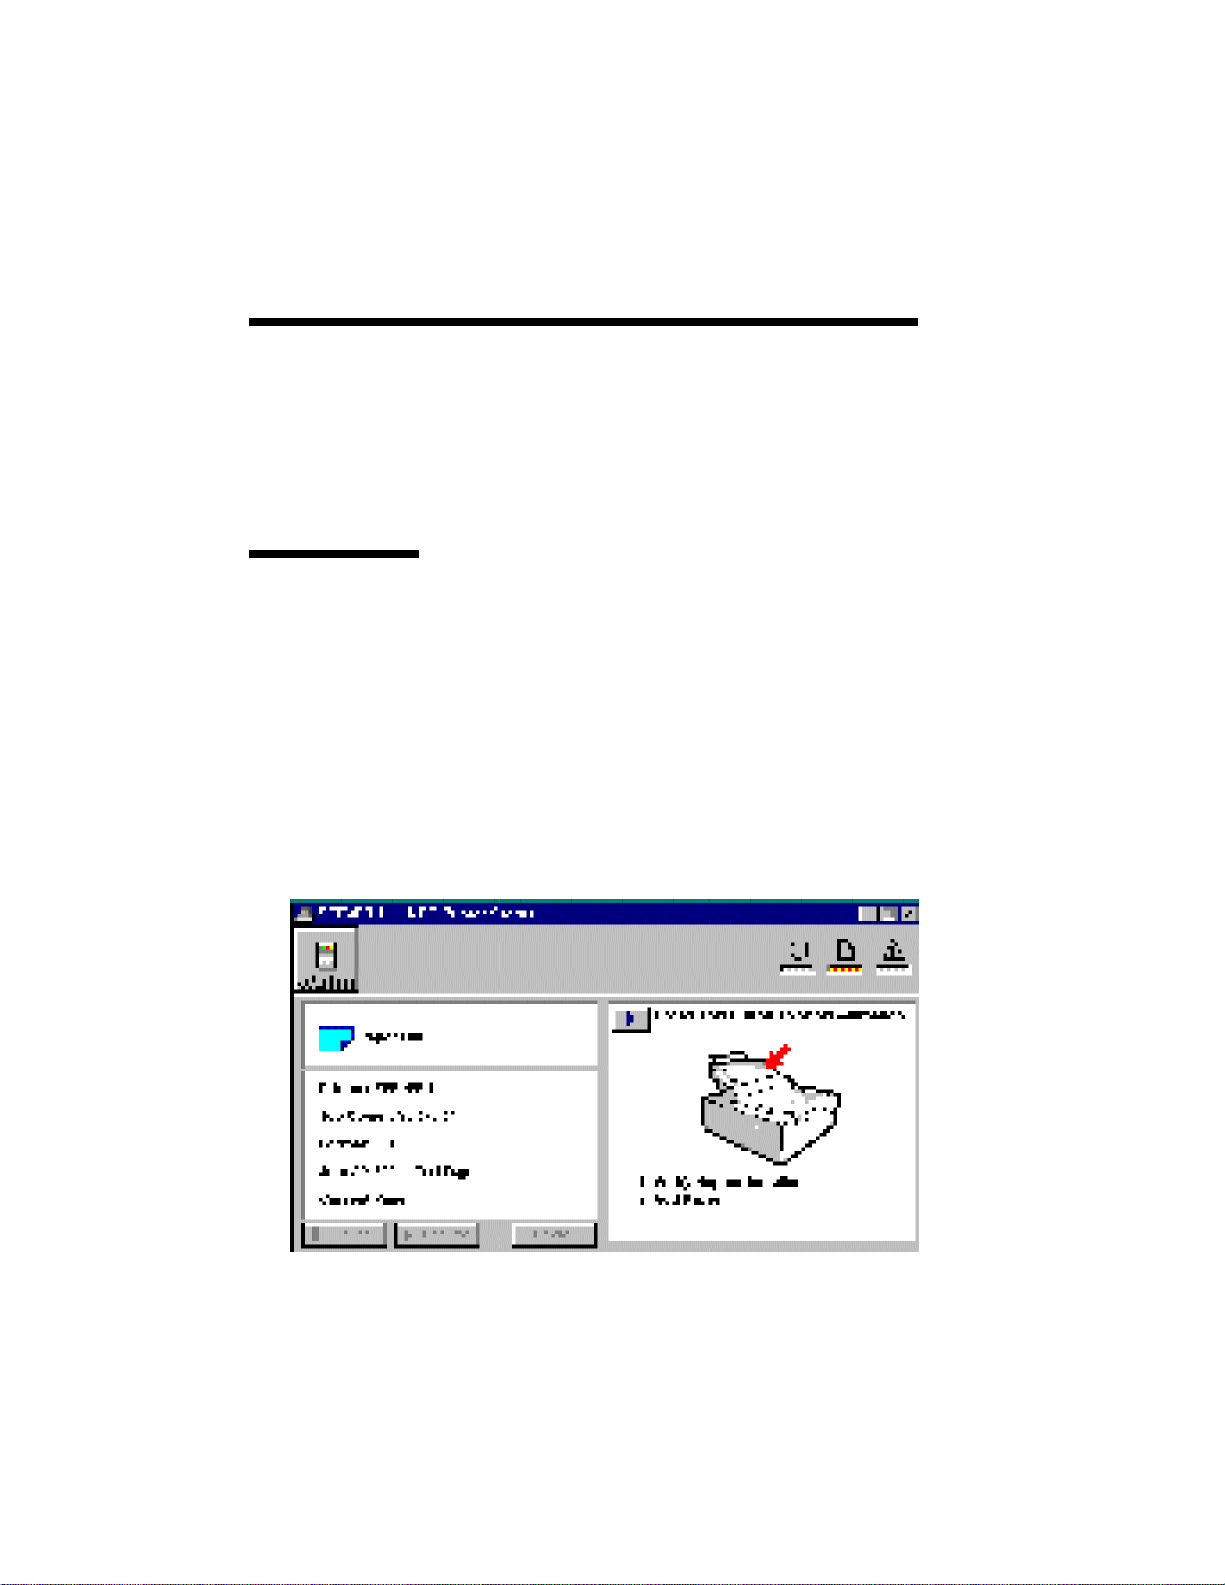
Expanded Printer Status display has several features
that monitor, control, and resolve printer errors. To
expand the Printer Status display, click the expand
button.
Part of the display will show a printer animation that
highlights the problem area on the printer and
provide instructions for what to do to solve the
problem. To access the printer animation, click the
button located at the upper left hand corner of the
box with the printer illustration.
This feature provides animated help and walks you
through the steps required to get your printer running
again. In most cases, printing will resume
automatically once the problem has been resolved. In
some cases you must click the Resume button.
Page 77

SuperScript Printer Status 7–5
Paper Out
The Printer has run out of paper. Add more paper to
your printer's paper tray.
Paper Jam
Paper has jammed inside the printer, making it
impossible to continue printing. Open the printer's
cover, remove all paper, and close the cover.
NEC SuperScript will start up again automatically
once the jam has been cleared. The printer will
reprint the page that jammed before continuing with
the rest of your document.
Cover Open or Toner Cartridge Missing
Either your printer's cover is open, or there is no
toner cartridge in the printer. Insert a toner cartridge,
if necessary, and then firmly close the printer's cover.
Manual Cover Open
The cover of your printer's manual feed entrance is
open. Shut the cover before resuming.
Manual Cover Closed
The cover of your printer's manual feed entrance
needs to be open slightly, at about a 60 degree angle,
for manual sheet feeding to work properly. Open the
cover slightly before feeding a sheet of paper for
printing.
Duplex Printing
Duplex (double-sided) mode is enabled, and the NEC
SuperScript has finished printing on one side of your
document. Turn the sheets over and reinsert them
into the paper feeder to print on the other side.
Page 78

7–6 SuperScript Printer Status
Color Overlay
Color overlay allows you to produce spot color areas
or watermark effects on your document pages.
Replace the toner cartridge with the appropriate
color toner cartridge. Then reinsert the sheets
printed with black into the paper feeder to print with
the other color.
Power Off or Cable Problem
The NEC SuperScript cannot find your printer, either
because the power is off, the cable is not installed
properly, or there is a problem with the connection.
Make sure the power switch is turned on, the cable
fits snugly, and nothing else is wrong with the
connection.
Engine is Warming Up
Wait until the printer's engine has finished warming
up. The NEC SuperScript will start printing once the
printer has warmed up.
Engine Error
There is a problem with your printer's engine. Call
Customer Support.
Page 79

8 Using Fonts
8
Using Fonts 8–1
Page 80

8–2 Using Fonts
SuperScript software can work fast and accurately
with the standard Type 1 PostScript and TrueType
fonts as well as the Windows GDI.
FONTS IN POSTSCRIPT MODE
SuperScript software's PostScript emulation mode
supports thirty-five kinds of resident fonts. These
include the Windows thirteen basic TrueType fonts
(excluding Wingdings) and twenty-two additional
TrueType fonts that correspond to the Microsoft
Font Pack in Windows 3.1. The additional 22
TrueType fonts are bundled with your SuperScript
for Windows 95.
Note: If you did not install the SuperScript
TrueType fonts included with your software, you
will not be able to select these resident fonts. Install
these font now by reinstalling your SuperScript
software or by using the font utility in Windows.
(Refer to "Installing SuperScript TrueType Fonts" in
this chapter.)
SuperScript software can handle other TrueType
fonts, as well as Type 1 font formats, and other
screen font formats such as Intellifont for Windows
that download to PostScript printers. However, these
other fonts are not considered “printer-resident” that
is, native to the SuperScript printer. Instead, they are
downloaded, so they may take slightly more
processing time, as is also the case with conventional
printers.
Page 81

Using Fonts 8–3
The resident PostScript fonts are as follows.
Resident Fonts
POSTSCRIPT TYPEFACES SUPERSCRIPT EQUIVALENT
(TYPE 1) (TRUETYPE)
Page 82

8–4 Using Fonts
Resident Fonts (Cont'd)
POSTSCRIPT TYPEFACES SUPERSCRIPT EQUIVALENT
(TYPE 1) (TRUETYPE)
Page 83

Using Fonts 8–5
FONTS IN GDI
MODE
One benefit of SuperScript GDI's WYSIWYG (What
You See Is What You Get) approach becomes clear
as you use fonts. In Windows, any font you can see
on the screen will print on your printer. This includes
TrueType, Type 1 (through Intellifont for Windows).
TrueType is most common, since it is already built
into Windows. However, in most cases the
performance difference between TrueType and other
fonts is negligible.
One advantage of GDI mode becomes evident when
you work with documents that have multiple fonts.
A standard printer language such as PostScript must
fetch additional information every time it processes a
new font. A document with many different fonts can
take a noticeably long time to print. In GDI mode,
the work of fetching font information takes place at
the time the document is retrieved and displayed to
the screen. Printing the document requires only a
small amount of additional processing, which means
quick text printing no matter how many fonts are
included.
Note: Windows includes some special built-in fonts
that were not meant for printing, including MS Serif
and MS Sans. These special fonts were designed for
screen display, and so their resolution (number of
dots per inch) is coarser than the fonts that normally
appear on a printed page. It is recommended that
you do not select these fonts when creating your
documents.
Page 84

8–6 Using Fonts
If you only need TrueType fonts (identified with a
TT symbol on your font list), you can hide all others
from your list of available fonts, by following these
steps:
1. Click the Start button, point to Settings, and
then click Control Panel. Control Panel
window appears.
2. Double-click the Fonts icon in the Control
Panel window. Fonts window appears.
3. Select the View menu and click Options.
Options dialog box appears.
4. Click the TrueType tab.
5. Select Show only TrueType fonts in the
programs on my computer, and click OK to
exit the Options dialog box.
FONTS IN PCL
MODE
NEC SuperScript PCL mode supports all resident
fonts, corresponding to the internal fonts in the HP
LaserJet 4P.
You can select these resident fonts in SuperScript
PCL mode. If you did not install the SuperScript
TrueType fonts included with your software, you
will not be able to select these resident fonts. Install
these fonts now by reinstalling your SuperScript
software or by using the font utility in Windows.
(See next section).
Page 85

Using Fonts 8–7
Installing
SuperScript
TrueType
Fonts
There are 53 additional TrueType fonts are bundled
with your SuperScript software. This font
installation is necessary to access all resident fonts in
the HP LaserJet 4P and the additional resident fonts
in PostScript emulation mode. If you did not install
them when you installed the SuperScript software,
follow these instructions to install them now.
1. Click the Start button, point to Settings, and then
click Control Panel.
2. In the Control Panel window, double-click Fonts
icon. The Fonts window appears.
3. Select Install New Font... in the File menu. Add
Fonts dialog box appears.
4. Insert NEC SuperScript Software Disk #6 or CD
and then select the drive in the Drives list box.
The fonts on the NEC SuperScript Software Disk
or CD appear in the List of Fonts box.
5. Select the fonts you wish to install in the List of
Fonts box or choose the Select All button to
install all the fonts. You can add multiple fonts
at one time by holding down the Control button
on your keyboard while selecting additional fonts
with the mouse.
6. Choose the OK button to add the selected font(s).
The Font window box appears.
7. Choose the Close button.
8. Repeat above steps with Disk #7 if you install
fonts from diskettes.
Page 86

8–8 Using Fonts
SAVING
DOWNLOADED
FONTS AND
MACROS
(PCL MODE)
When the PCL interpreter is closed any downloaded
fonts or macros will be lost, just as if you had turned
off a regular PCL printer.
You can preserve this information through the NEC
SuperScript Console to keep the PCL interpreter
active.
1. Click the Start Button, point to Programs,
NEC SuperScript tools, and then click NEC
SuperScript Console.
2. Download macros or soft fonts in advance
using the ADD button of the Local Queue tab
to copy the macros or soft font data to the
printer.
3. Minimize the SuperScript Console. (Place the
SuperScript Console on the Taskbar.)
4. Start or return to your application and print
your document.
This will preserve your downloaded fonts and
macros. Also, if your next print job uses PCL, it will
take less time to print because the SuperScript PCL
interpreter has already been loaded. However, if you
switch from PCL to GDI or PostScript mode, this
information will be lost, just as if you were changing
printer languages in a conventional printer.
NOTE: For Clients this feature can be used only if
the Server activates the SuperScript Console
program and adds the fonts and macros as described
above.
Page 87

ATroubleshooting
A
Troubleshooting A–1
Page 88

A–2 Troubleshooting
INSTALLATION PROBLEMS
Wrong System
or Hardware
Configuration
Insufficient
Memory
No Printer Port
Insufficient
Disk Space
This section provides suggestions for installation
related problems.
SuperScript software requires a different minimum
PC hardware and software configuration for
Personal, Servers, and Clients. Refer to Chapter 2 for
detailed system requirements. If the installation
program detects that your PC is not powerful
enough, it will quit without installing SuperScript.
SuperScript requires at least 8 megabytes of memory
(8MB RAM) to install. If the installation program
detects that your PC does not have sufficient
memory, it will quit without installing SuperScript.
No parallel port is required to install a SuperScript
Client. To connect to a SuperScript printer a parallel
port is required. If the installation program does not
detect a parallel port it will notify you but will allow
you to continue installation.
SuperScript software requires at least 40 megabytes
of free disk space. Clear enough disk space on your
hard disk drive before continuing with the
installation.
Removing the
Previously
installed
SuperScript
Software
You must remove the previously installed
SuperScript software prior to installing the
SuperScript for Windows 95. If you do not so,
Windows may fail to work. If Windows do not work
normally, you can start Windows in Safe Mode* and
then remove the previous SuperScript software by
running the Remove program. (See Chapter 3, Table
3.2.)
* Note: About the Safe Mode, refer to Windows
documentation or Windows Help.
Page 89

PostScript Character Sets B–1
B PostScript Character
B
Sets
Page 90

B–2 PostCaript Character Sets
Page 91

PostScript Character Sets B–3
Page 92
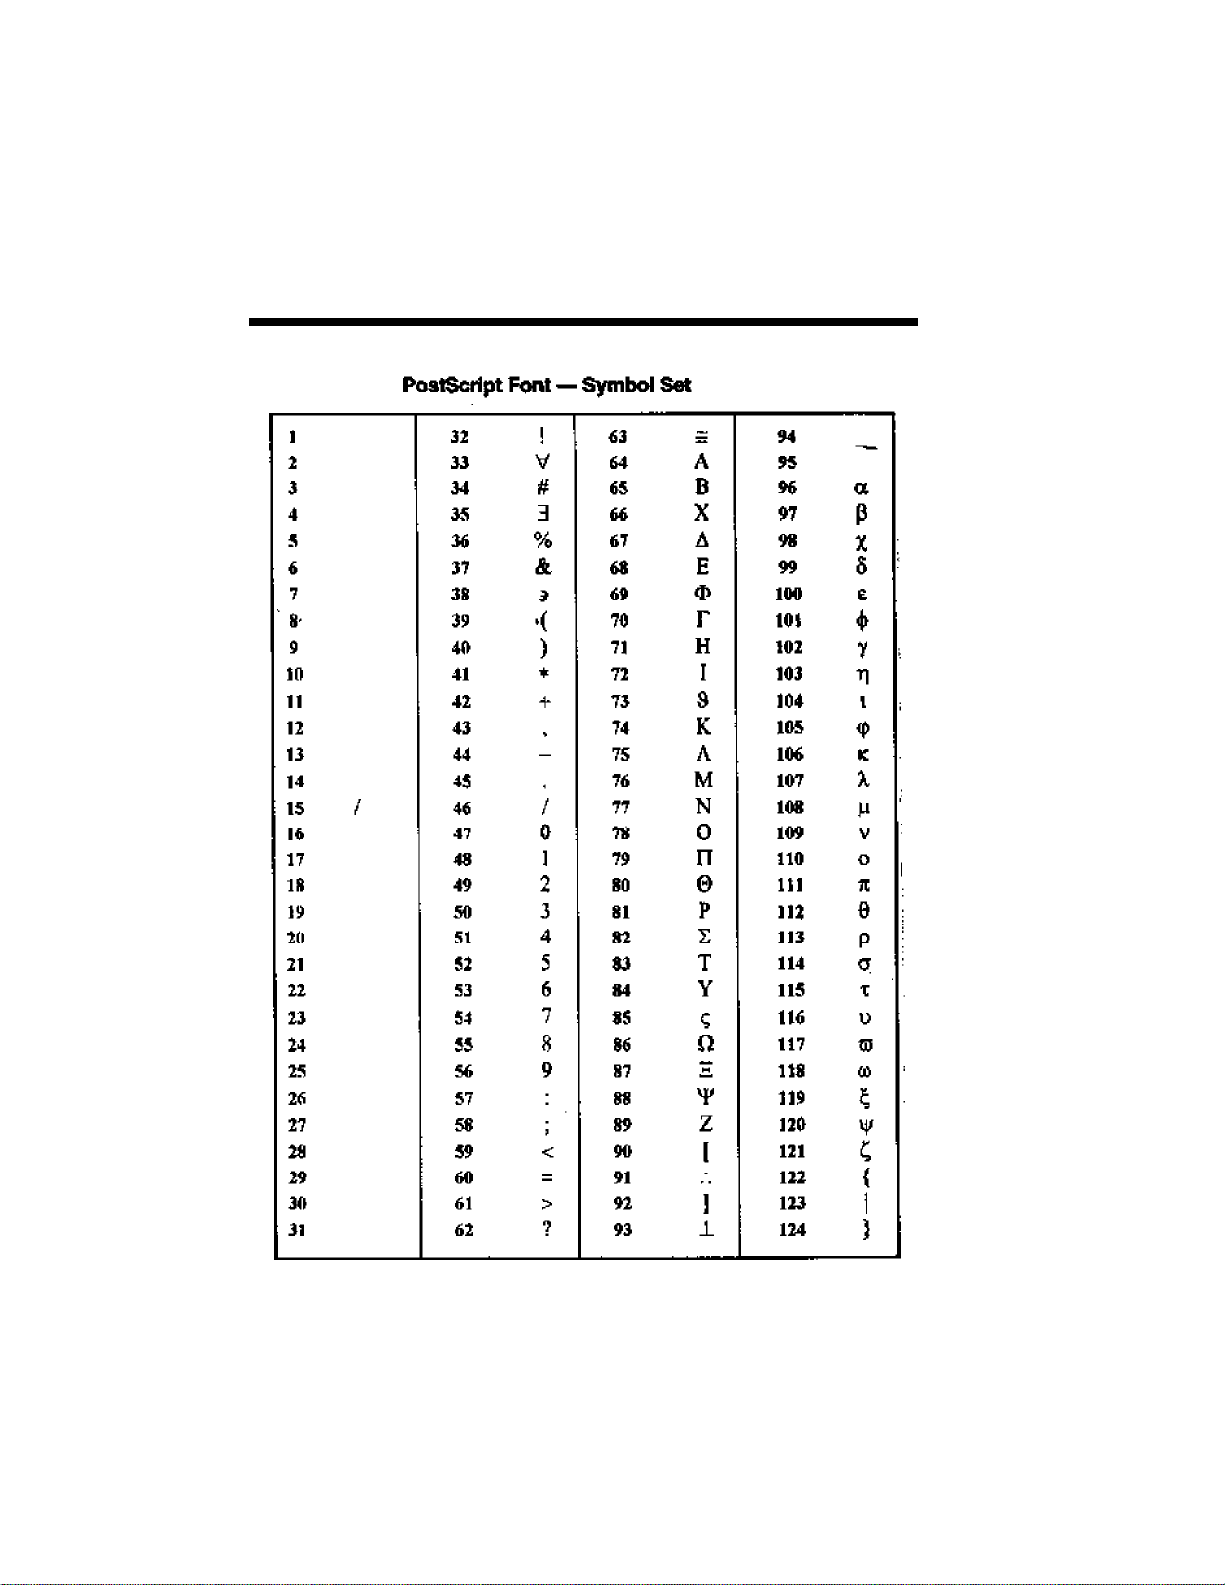
B–4 PostCaript Character Sets
Page 93
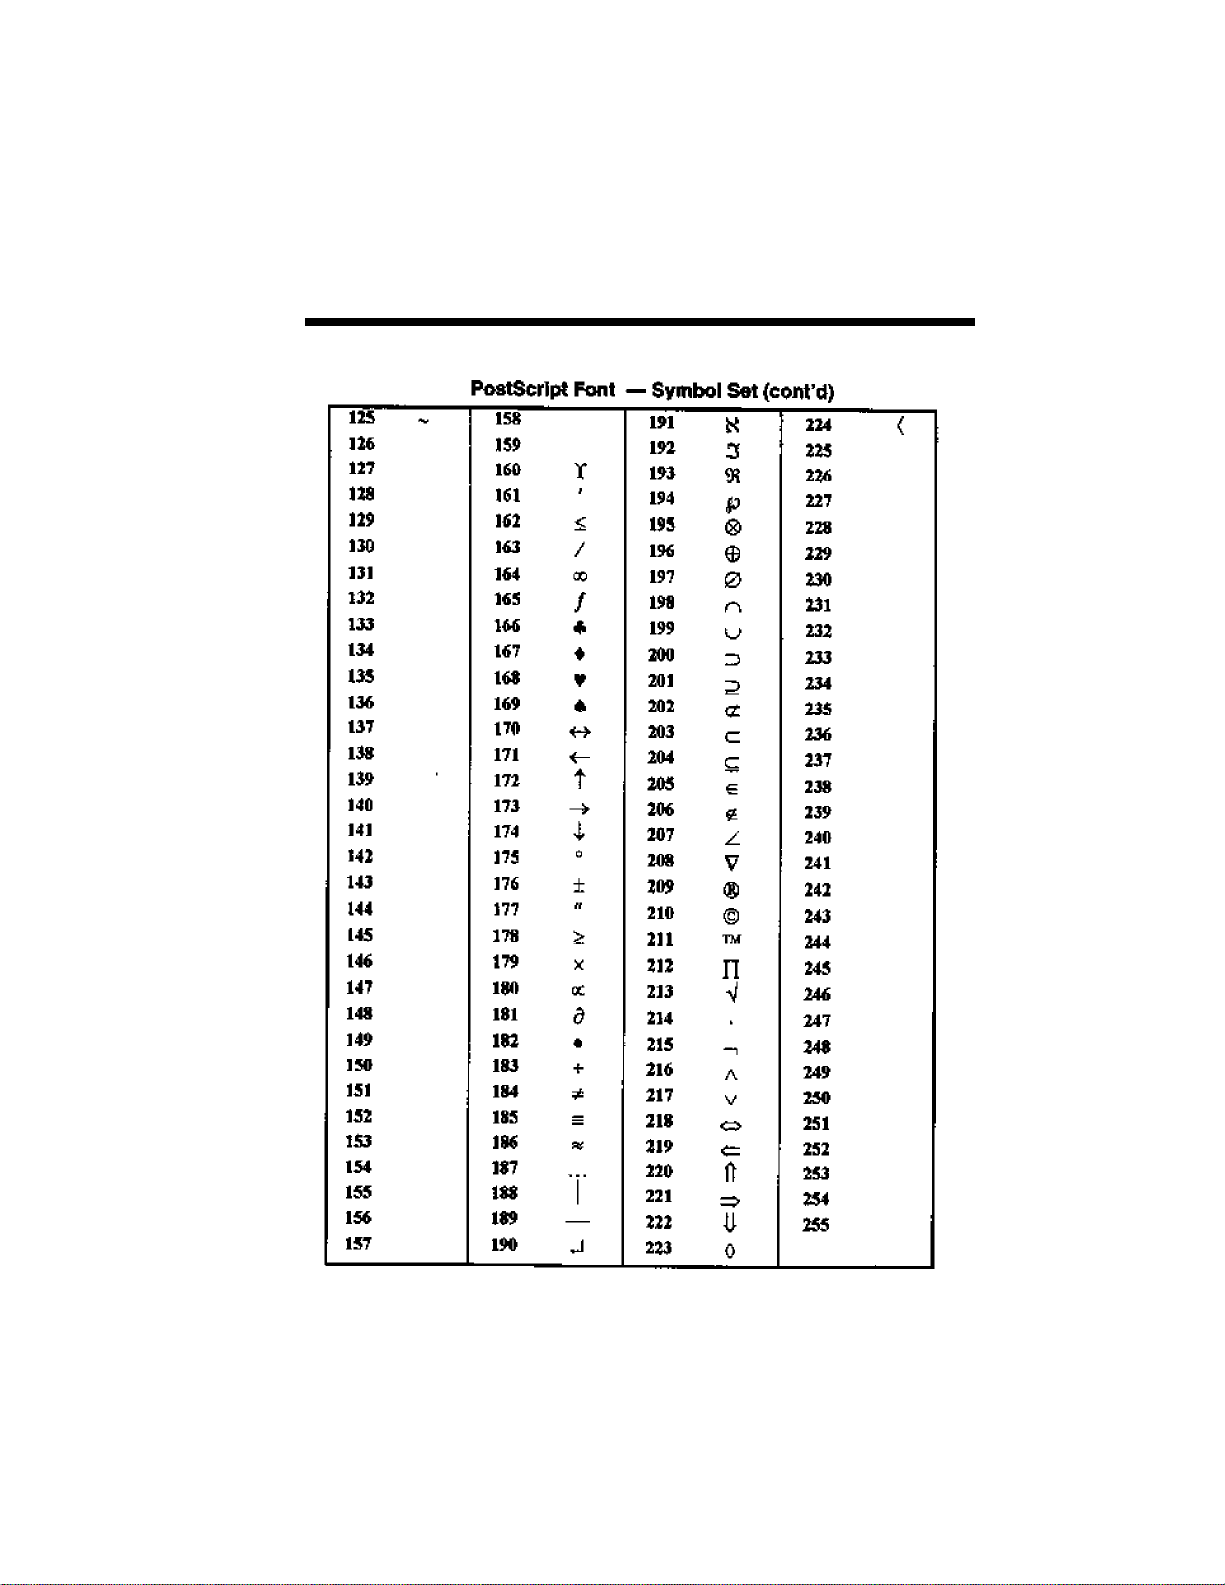
PostScript Character Sets B–5
Page 94

B–6 PostCaript Character Sets
Page 95

PostScript Character Sets B–7
Page 96

B–8 PostCaript Character Sets
Page 97

Glossary–1
Glossary
applications A software program that performs a specific task
such as creating a spreadsheet or graphics.
ASCII American Standard Code for Information Inter-
change. This standard defines character set codes
that are used for data interchange between data
terminal equipment.
attribute Characteristics of a font. These include orientation,
symbol set, spacing, pitch, point size, style, stroke,
and typeface.
back up To make a spare copy of a disk or file on a disk.
Backing up your disks and files ensures that you
won’t lose information if the original is lost or
damaged.
baud The rate of data transmission, measured in bits per
second.
bitmap A checkerboard dot-by-dot representation of a text
character or graphic image.
buffer An electronic memory where text is stored for
processing by the printer.
Client A software configuration of SuperScript for users
whose computers do not have printers directly
connected, but plan to print documents to a Server on
the network.
click To position the pointer at the location you want an
action to take place, and then press and release the
Page 98

Glossary–2
mouse button without moving the mouse.
control panel Sets the system parameters and attributes like the
appearance of windows, the display of data, the
peripherals to be used and the like.
cpi Characters per inch. Also known as pitch.
default A preset setting that is automatically read by the
printer until you change the setting.
density The relative darkness of print or the amount of white
that shows through the printed characters.
desktop publishing
dialog box A box that contains a message requesting informa-
display What appears on your computer screen.
emulation The imitation of all or part of one system by another
file Any named, ordered collection of information stored
firmware Programs stored permanently in read-only memory
font A set of characters of a specific orientation (portrait/
A system that provides you with the ability to produce publication-quality documents.
tion from you.
in such a way that the imitating system accepts the
same data and gives the same results as the imitated
system.
on a disk.
(ROM). Such programs are built into the printer at
the factory. They can be executed at any time, but
cannot be modified or erased from memory.
landscape), symbol set, spacing pitch, point size,
style, stroke weight, and typeface.
font file A specific file used to copy fonts to and from the
Page 99

Glossary–3
system file of the startup disk.
GDI Abbreviation of Graphical Device Interface. This is
a library of core functions in Windows that processes
graphical data for display and printing.
GDI Setup Screen for setting the paper size, number of copies,
Screen and the paper direction when in GDI mode.
GDI Options
Screen manager, reverse printing, and duplex printing when
handshake A protocol that allows devices to exchange informa-
icon An image that graphically represents an object,
initialization A state where all settings return to their default
Job Log This provides a historical log of the last 10 jobs
justification Making all full lines of text the same length in order
(right) to create an even right edge.
Local Queue This is used to review the status of your queued print
lpi Lines per inch.
Screen for selecting between status display, print
in GDI mode.
tion about the connection between them, such as
when to start exchanging data.
concept, or message.
values.
originated by your PC.
job.
monospaced font Any font in which the width of characters is the same
for all font characters.
outline font Outline fonts are collections of font metrics which
can be used by a rasterizer to generate various
bitmap data for target engines on the fly. For
example, TrueType, PostScript Type 1, Intellifont,
Page 100

Glossary–4
etc.
peripheral device Any device (such as a printer) that you attach to your
computer.
Personal A software configuration of SuperScript for users
whose computers do not have network capability or
network connections and have a printer directly
connected.
point A unit of measurement for sizing type. One point
equals 1/72 inch.
port A socket on the connector panel of a computer or
peripheral device where you can plug in a cable to
connect to another computer or device, or to a
network.
PostScript A page description language that controls the place-
ment of text and graphics on a page.
printer driver A software file that translates printer commands.
Print Manager An application program that runs in the background
when printing. Once the print file is sent to the Print
Manager, the Print Manager controls the print queue
and then sends the file to the printer. The user can
then perform other tasks while printing.
Print Status Window that displays any print job currently
Window under way. When printer errors occur, the printer
status is shown in this window, which also includes
the steps that should be taken.
Program When Windows is started, the Program Manager is
Manager executed and it remains running while Windows is
running.
proportional A printing method in which the distance between
spacing characters varies according to the width of the
 Loading...