

Page 1

Silentwriter
SuperScript 610
User's Guide
Page 2

PROPRIETARY NOTICE AND LIABILITY DISCLAIMER
The information disclosed in this document, including all designs and related materials, is the valuable property of NEC Corporation (NEC) and/or its licensers. NEC and/
or its licensers, as appropriate, reserve all patent, copyright and other proprietary rights
to this document, including all design, manufacturing, reproduction, use, and sales
rights thereto, except to the extent said rights are expressly granted to others.
The NEC product(s) discussed in this document are warranted in accordance with the
terms of the applicable NEC product specification. However, actual performance of
each such product is dependent upon factors such as system configuration, customer
data, and operator control. Since implementation by customers of each product may
vary, the suitability of specific product configurations and applications must be
determined by the customer and is not warranted by NEC.
To allow for design and specification improvements, the information in this document
is subject to change at any time, without notice. Reproduction of this document or
portions thereof without prior written approval of NEC is prohibited.
Silentwriter is a U.S. registered trademark of NEC Corporation. All other product, brand, or trade
names used in this publication are the trademarks or registered trademarks of their respective owners.
© Copyright, WinRefs 1993, Destiny Technology Corp. Ver. 1.0
© Copyright, 1992, Microsoft Corporation
First Printing — Oct. 1993
Revised — April 1994
Copyright 1993
NEC Corporation
7-1 Shiba 5-Chome, Minato-ku
Tokyo 108-01, Japan
All Rights Reserved
Page 3

Contents iii
Contents
Using This Guide ............................................................... ix
1. Introduction
How the Printing Process Works.............. 1-2
Standard Features ..................................... 1-3
Optional Features...................................... 1-6
Ordering Supplies and Accessories .......... 1-7
2. Setting Up
Unpacking................................................. 2-1
Unpacking ............................................. 2-1
Locating the Printer Items..................... 2-2
Operating Requirements........................... 2-3
Printer Dimensions................................ 2-5
Printer Dimensions
with 200-sheet Hopper........................ 2-6
System Requirements ............................... 2-7
External Printer Parts................................ 2-8
Internal Printer Parts............................... 2-11
Toner Cartridge ...................................... 2-13
Preparing the Toner Cartridge ............ 2-14
Installing the Toner Cartridge............. 2-17
Installing Paper....................................... 2-20
Interface Cable........................................ 2-23
Power Cord............................................. 2-25
Installing SuperScript Printing Software 2-27
3. Printing with Your Silentwriter SuperScript 610
Silentwriter SuperScript Print Modes....... 3-1
GDI Mode................................................. 3-2
GDI Setup Screen ................................. 3-2
GDI Option Screen ............................... 3-5
Printing Status Option........................... 3-6
Page 4

iv Contents
Manual Duplex Printing........................ 3-6
PCL Print Mode...................................... 3-11
Saving Downloaded Fonts and Macros3-12
Page Ejects - Form Feeds
(PCL Mode).................................... 3-13
Printing from a Windows Application ... 3-14
Printing from DOS Application.............. 3-14
Printing PCL Files from
DOS Command Line........................... 3-14
4. NEC SuperScript Print Manager
5. Print Status Window
6. Selecting Paper and Media
Paper Properties........................................ 6-2
Print Areas ............................................ 6-3
Paper and Media Use ............................ 6-4
Preprinted Forms................................... 6-5
Heavy Print Stock ................................. 6-6
Envelopes.............................................. 6-6
Adhesive Labels.................................... 6-8
Transparency Film ................................ 6-9
Media Purchasing Specifications ............. 6-9
Sheet Paper.......................................... 6-10
Envelopes............................................ 6-12
Adhesive Labels.................................. 6-13
Transparency Film .............................. 6-14
Storage Guidelines.................................. 6-14
7. Using Fonts
Fonts in GDI Mode................................... 7-1
Fonts in PCL Mode .................................. 7-3
8. Choosing Print Options
How to Print Using Various Media .......... 8-2
The Standard Hopper................................ 8-4
Page 5

Multi-sheet Feed and Single-sheet Feed8-4
Loading the Paper ................................. 8-4
The 200-sheet Paper Hopper (Optional)... 8-7
Removing the Standard Hopper............ 8-8
Installing the 200-sheet Paper Hopper.. 8-9
Hopper Feed........................................ 8-10
Manual Feed........................................ 8-13
Removing the 200-sheet Hopper ........ 8-15
Output Paths ........................................... 8-16
Face-up Tray ....................................... 8-17
Face-down Door.................................. 8-17
9. Maintaining Your Printer
Redistributing the Toner........................... 9-2
Cleaning the Printer.................................. 9-7
Replacing the Toner Cartridge ................. 9-8
Cleaning the Printer Mechanism........... 9-8
Cleaning Conditions.......................... 9-9
Parts to Be Cleaned ......................... 9-10
Cleaning Procedure ......................... 9-12
Installing the Toner Cartridge............. 9-16
Transporting the Printer.......................... 9-22
Removing the Toner Cartridge ........... 9-22
Removing the 200-sheet Hopper ........ 9-24
Removing the Interface Cable ............ 9-24
Removing the Power Cord.................. 9-25
Check List Before
Transporting the Printer........................ 9-26
Contents v
10.Troubleshooting
Print Quality Maintenance...................... 10-2
Paper Jam................................................ 10-2
Locations of Potential Paper Jams ...... 10-3
Removing Jammed Paper ................... 10-3
Paper Jams in the Hopper................ 10-4
Paper Jams in the Fuser Unit........... 10-5
Points to Check to Avoid
Paper Jams ........................................ 10-7
Testing the Printer .................................. 10-8
Page 6

vi Contents
Status Messages.................................... 10-10
Installation Problems ........................ 10-10
Operating Problems .......................... 10-14
Output Quality ...................................... 10-26
Light Page ......................................... 10-26
Blank Page ........................................ 10-27
Black Page ........................................ 10-28
Streaked Page.................................... 10-29
Spots on Back of Paper..................... 10-30
Blank Spots ....................................... 10-31
Solid White Vertical Line ................. 10-32
Graphics Appear Coarse
in GDI Mode................................... 10-33
Text Appears Jagged or Low
Resolution in GDI Mode................. 10-33
Unexpected Font in Either GDI or
PCL Mode....................................... 10-34
Unexpected Font in PCL Mode ........ 10-35
Shifted or Broken Image................... 10-35
Allocating Virtual Memory .................. 10-36
Commonly Asked Questions................ 10-38
A Character Sets
B Optimizing Printer Performance
C Specifications
D Interface Cable Specifications
E Removing SuperScript Files from Your System
Glossary
Index
Page 7

List of Tables
Contents vii
1-1 Supplies and Accessories ............... 1-7
6-1 Paper Specifications ..................... 6-10
6-2 Envelope Specifications ............... 6-12
6-3 Label Specifications ..................... 6-13
6-4 Transparency Specifications ........ 6-14
8-1-a Recommended Printing Methods
[The Standard Hopper]................... 8-2
8-1-b Recommended Printing Methods
[Optional 200-sheet Hopper].......... 8-3
10-1 Simple Troubleshooting ............... 10-1
Page 8

viii Contents
Page 9

Using this Guide
This guide provides an introduction to the NEC
Silentwriter SuperScript 610 printer and includes
information about its setting up, features, operation,
and maintenance.
If you are just beginning to use it, you may want to
read this entire user’s guide to familiarize yourself
with the printer. If you have been using the printer
for some time, you can scan the Contents for specific information that you need.
Contents ix
Page 10

x Contents
Page 11

1
Introduction 1–1
Introduction
This guide provides complete instructions for operating your new NEC Silentwriter® SuperScript 610
printer. All printer features are explained and
illustrated in detail.
Silentwriter SuperScript 610 is a new laser printer
that has been developed specially for users of
WindowsTM version 3.1. This printer is provided
with the SuperScript software kit and requires no
special add-in cards, cartridges, or cables.
Silentwriter SuperScript 610 differs from other
printers in that it is directly driven by the CPU of
your computer; hence, it has faster response and
better status information. In addition, by expanding
the memory of your computer or upgrading to a
more powerful PC, the performance of your
SuperScript 610 can also be improved.
NEC SuperScript software supports two printing
modes, namely, GDI mode and PCL emulation
mode. GDI mode offers the full performance of the
total printing system while the PCL emulation mode
offers compatibility with existing PCL print files.
Your computer and Silentwriter SuperScript 610
communicate bi-directionally to exchange the
operating status information (i. e., warm-up, paper
out, paper jam, etc.) of SuperScript 610 to display
messages requiring your attention on your screen, if
necessary. Hence, you can focus on your work
without referring to the printer operator panel
periodically, a benefit brought by the SuperScript
software.
Page 12

1–2 Introduction
The SuperScript 610 is designed as a personal laser
printer to conserve desk space and it features low
power consumption .
HOW THE
PRINTING
PROCESS
WORKS
Whenever you send a job to the printer, an “image”
of the page to be printed is temporarily written to the
rotating surface of an electrophotographic (EP)
drum. This image acts like a magnet that attracts
toner to the drum. (The toner and the drum are
grouped in one self-contained cartridge.)
At the same time, paper (or transparency film or
envelope) passes through the printer and near the
drum. The paper is electrostatically charged as it
reaches the drum.
Toner, previously attracted to the drum as image
areas, is transferred to the charged paper. The paper
then passes between two rollers where a combination
of heat and pressure bonds the toner to the paper.
The paper is then moved to the output tray.
Page 13

Introduction 1–3
STANDARD
FEATURES
The following list highlights Silentwriter SuperScript
610 features.
Host-based Processing
As mentioned in the introduction section,
SuperScript uses your PC power to handle print
tasks.
Two Printing Modes
The Silentwriter SuperScript 610 software allows
you to select from two different modes of
printing:
• GDI mode provides fast, WYSIWYG (What
You See Is What You Get) output.
• PCL emulation mode provides compatibility
with the popular printer language used in the
LaserJet® IIP. Both Windows and DOS
applications running under Windows can use
PCL emulation mode for printing.
Print speed: up to 6 pages per minute.
Print resolution: 300 dots per inch.
Page 14
1–4 Introduction
Sharp Edge Technology
Silentwriter SuperScript 610 features the
patented Sharp Edge Technology (SET). This
feature detects and smoothes jagged edges of
raster images to be printed by dividing one full
dot into several subdots to be set in the appropriate position. The print quality of both text and
graphics will be improved.
Paper input: from a 50-sheet hopper supporting:
Paper:
1 Letter
2 A4
3 Executive
4 A5
Envelope:
1 Monarch
2 Commercial 10
3 DL
4 C5
Page 15

Introduction 1–5
Paper output: face-up tray with a maximum
capacity of 50 sheets (at 64 g/m2), or face-down
door.
Toner cartridge: clean, efficient printer
operation centered around one easily replaceable
cartridge. The Starter Toner Cartridge which is
shipped with your printer will print 2,000 pages
(at 5% coverage). Replacement toner cartridge
will print 4,000 pages (at 5% coverage).
Product quality and support: the design quality
and workmanship shared by all NEC printers,
backed by our total commitment to full product
support.
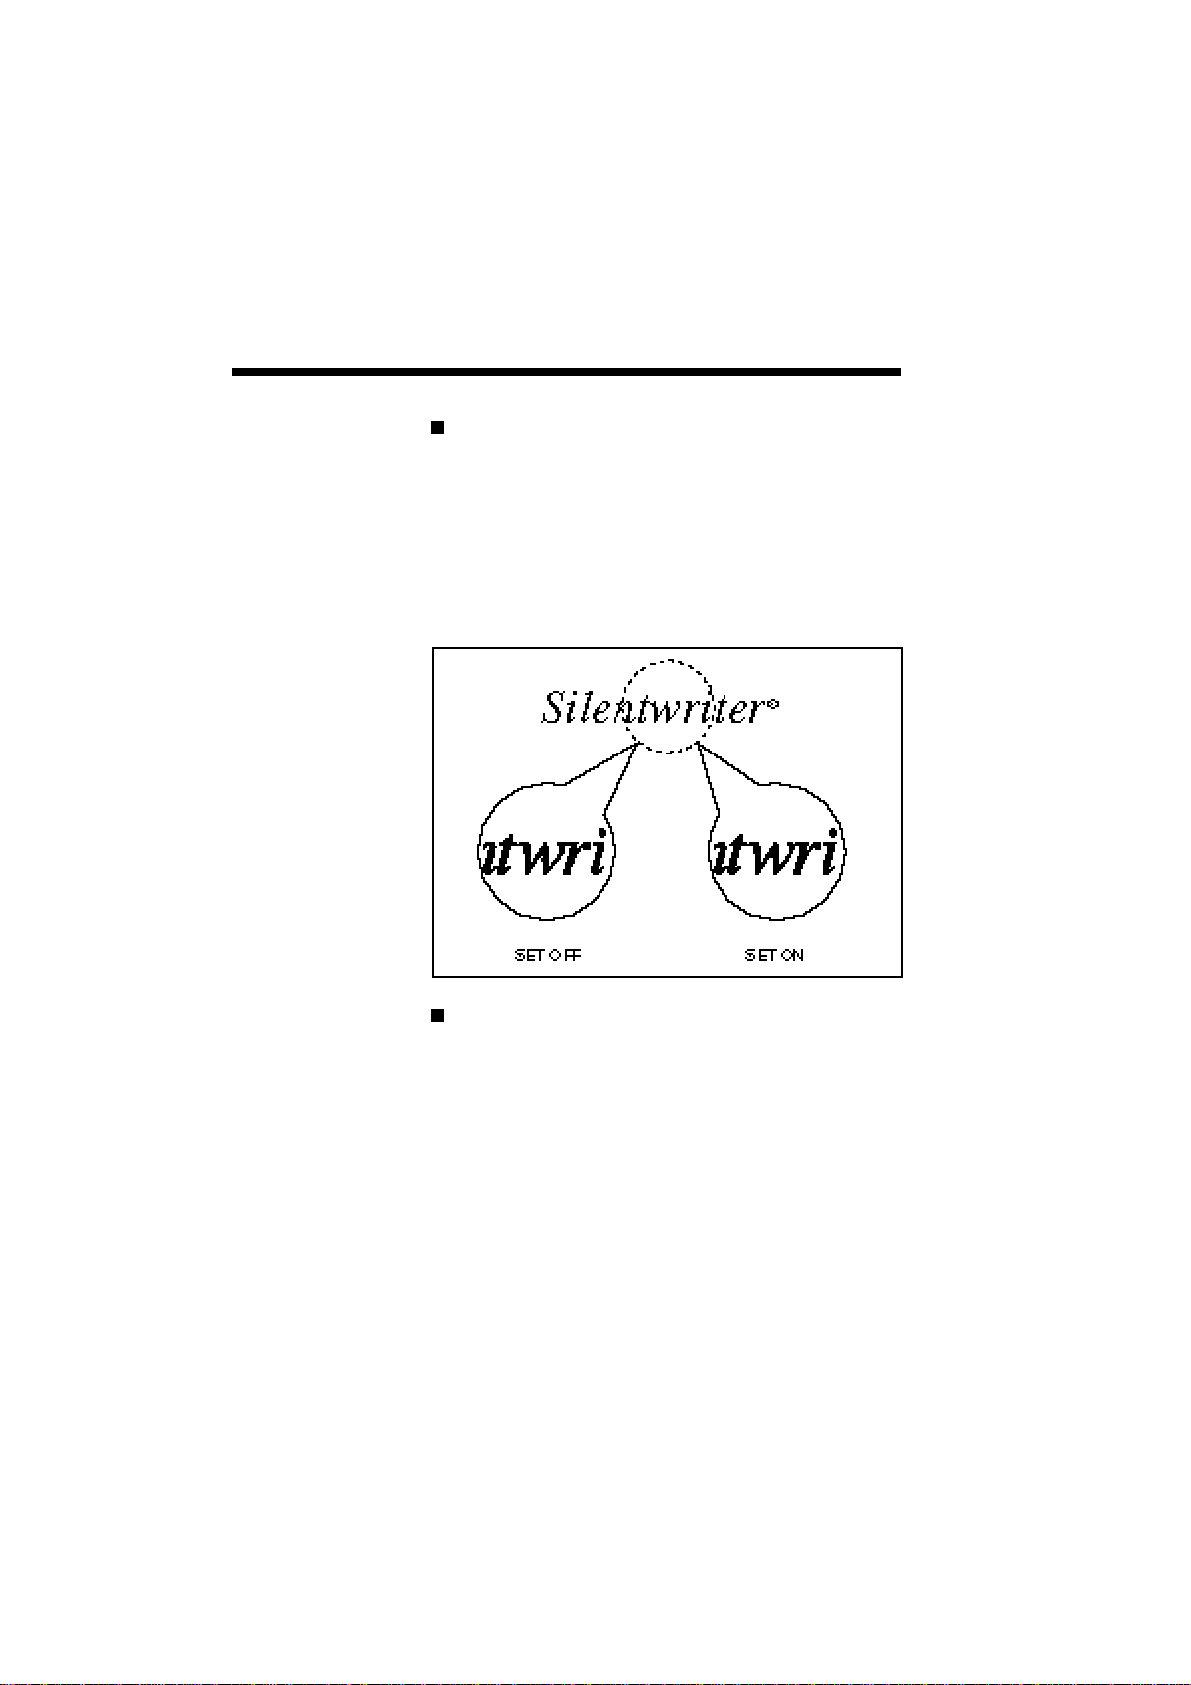
Power Saving Mode
This printer has the Power Saving Mode. In this
mode, if there is no print job within specified
time (default 15 minutes) while printer is idle,
the fuser unit pauses and power consumption
will be decreased. However the next printing
operation needs a certain warming up time.
The printer is in the Power Saving Mode when it
is turned on. You can also select either "Power
Saving Mode ON" or "Power Saving Mode
OFF" in NEC SuperScript Print Manager (See
Chapter 4, NEC SuperScript Print Manager).
Page 16
1–6 Introduction
OPTIONAL
FEATURES
The optional feature available for the Silentwriter
SuperScript 610 include the following.
Optional 200-sheet Paper Hopper supporting:
Paper:
1 Letter
2 A4
3 Executive
4 A5
Envelope:
1 Monarch
2 Commercial 10
3 DL
4 C5
Page 17

Introduction 1–7
ORDERING
SUPPLIES AND
ACCESSORIES
To order any of the following printer supplies or
accessories, contact your NEC printer dealer.
Table 1-1 Supplies and Accessories
PRODUCT
ORDER NUMBER
Toner Cartridge 135-037681-201-A
Optional 200-sheet Hopper 135-006432-201-A
For a detailed description of the PCL’s printer
language, the LaserJet IIP Printer Technical Refer-
ence Manual is available through the Hewlett
Packard Company.
Page 18

1–8 Introduction
Page 19
2
UNPACKING
Setting Up 2–1
Setting Up
Perform the following procedures to set up your
SuperScript 610.
Unpacking
1. Open the box.
2. Take out the documents (including software
diskettes) and the power cord from the box.
3. Take out the Starter Toner Cartridge.
4. Lift the printer together with the packing materi-
als.
Page 20
2–2 Setting Up
Locating the
Printer Items
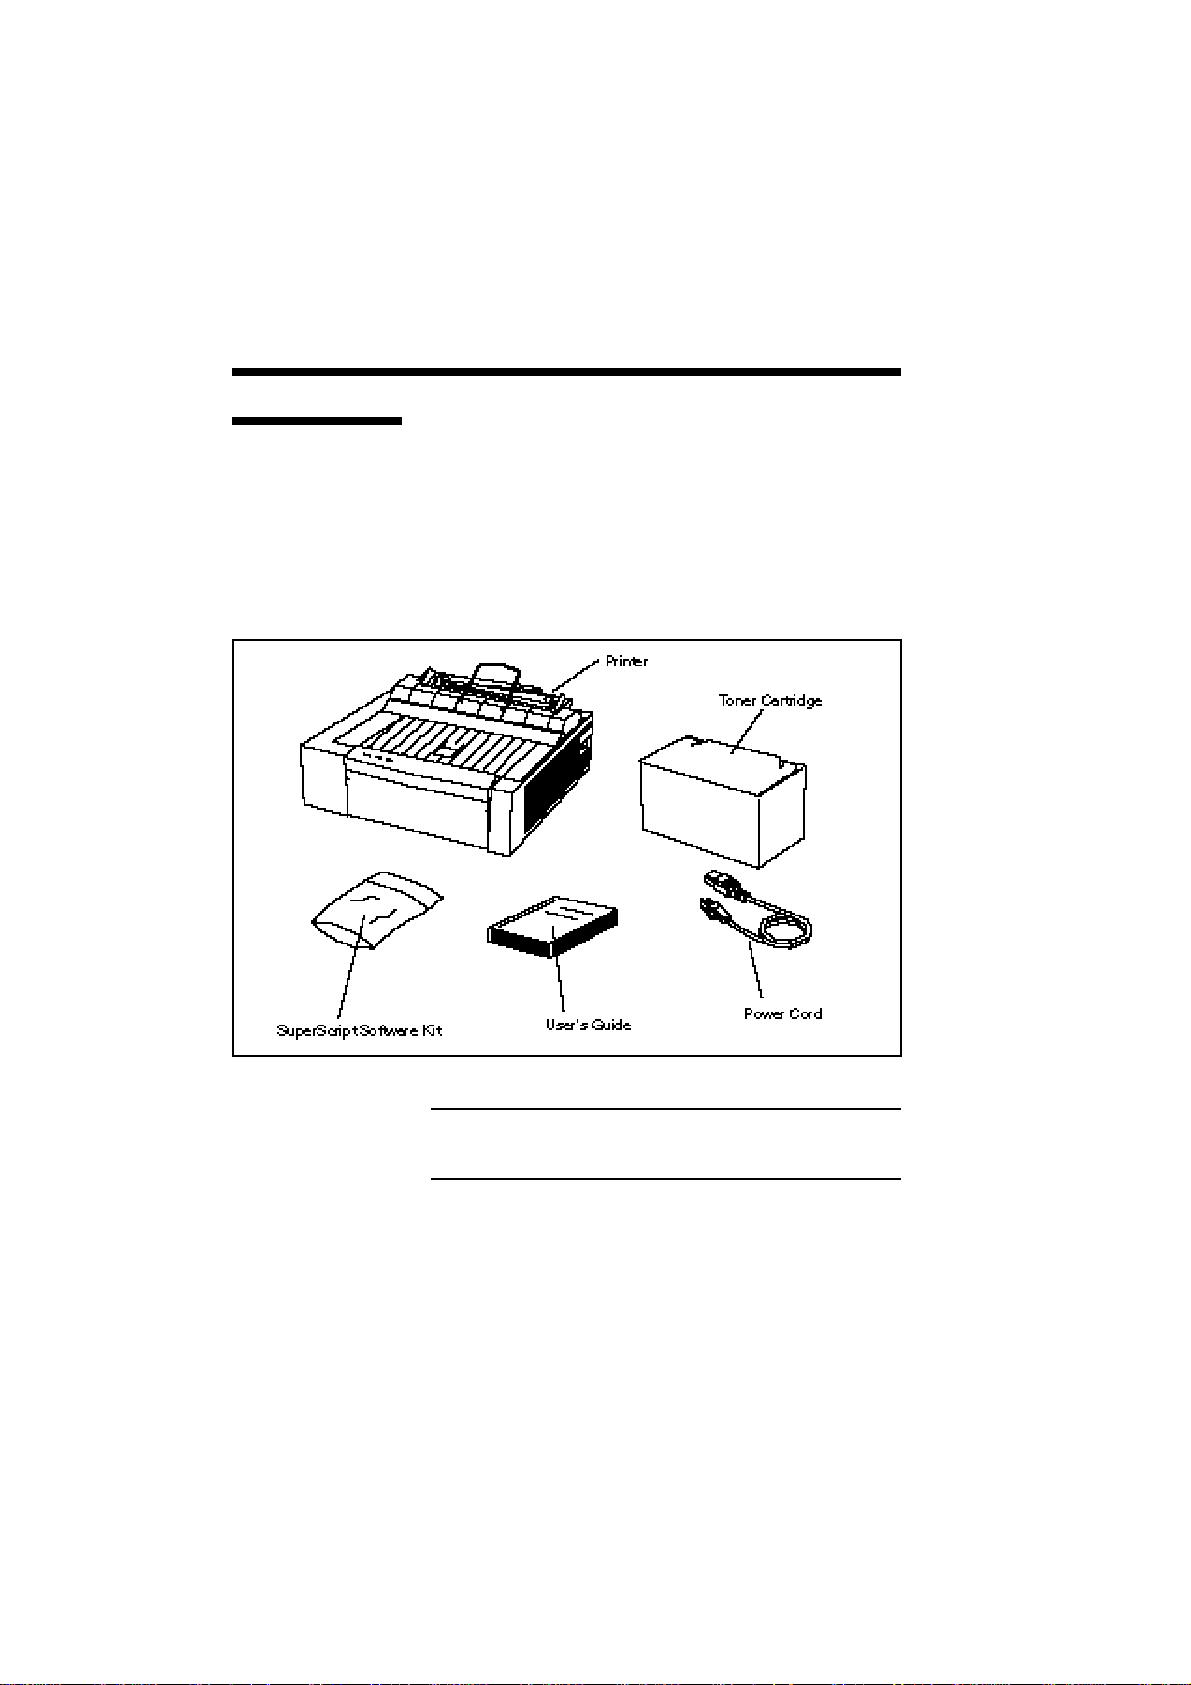
Locate the following items:
• NEC Silentwriter SuperScript 610 Printer
• SuperScript software kit
• User’s guide
• Power cord
• Starter Toner Cartridge
• Packing material (not shown)
NOTE: Save this user’s guide and all packing
materials in case the printer needs to be repacked.
Page 21

Setting Up 2–3
OPERATING
REQUIREMENTS
The following operating requirements should be
satisfied:
Place the printer on a sturdy, flat surface.
Keep the room well ventilated with a relative
humidity between 20% and 80% and temperature
between 50˚F and 90.5˚F (10˚C to 32.5˚C)
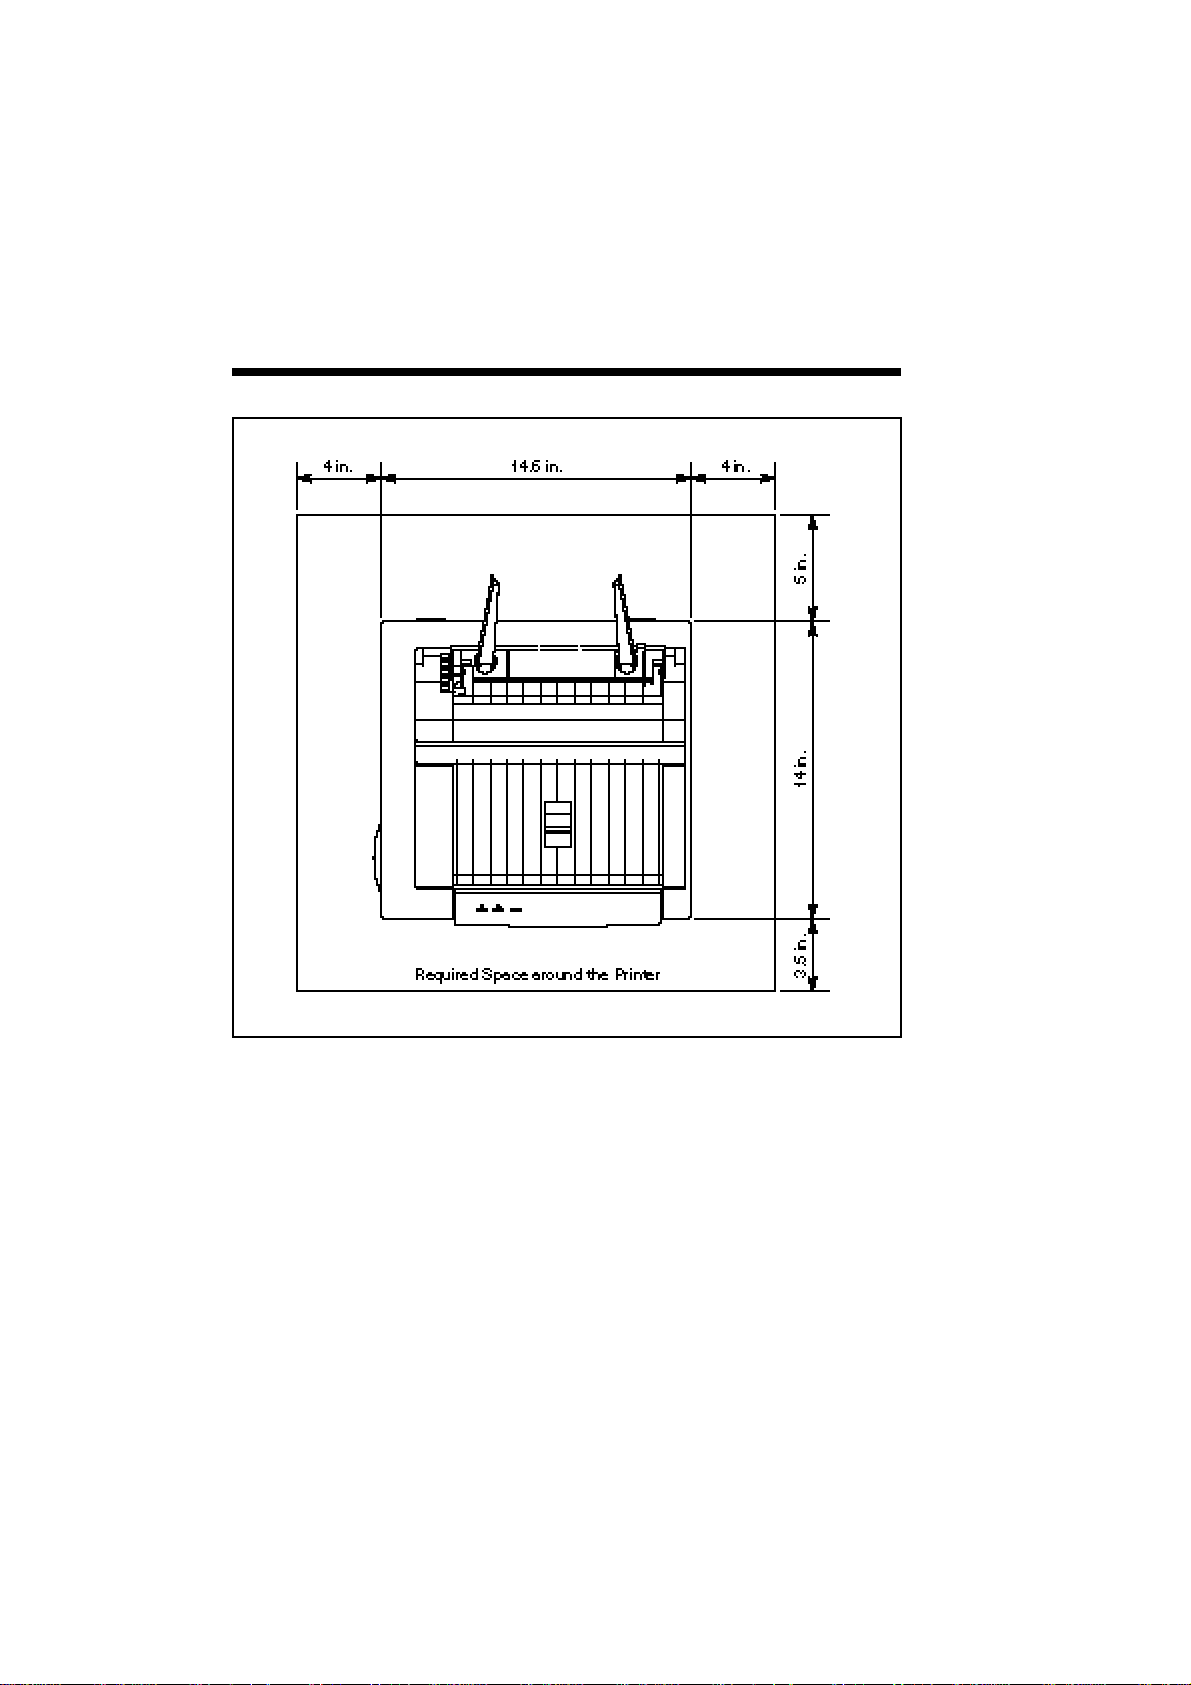
Leave adequate space around the printer for easy
access (See the following figure.)
WARNING: Do not place objects near the printer
that may cover the ventilation holes on its sides.
Page 22
2–4 Setting Up
Page 23
Setting Up 2–5
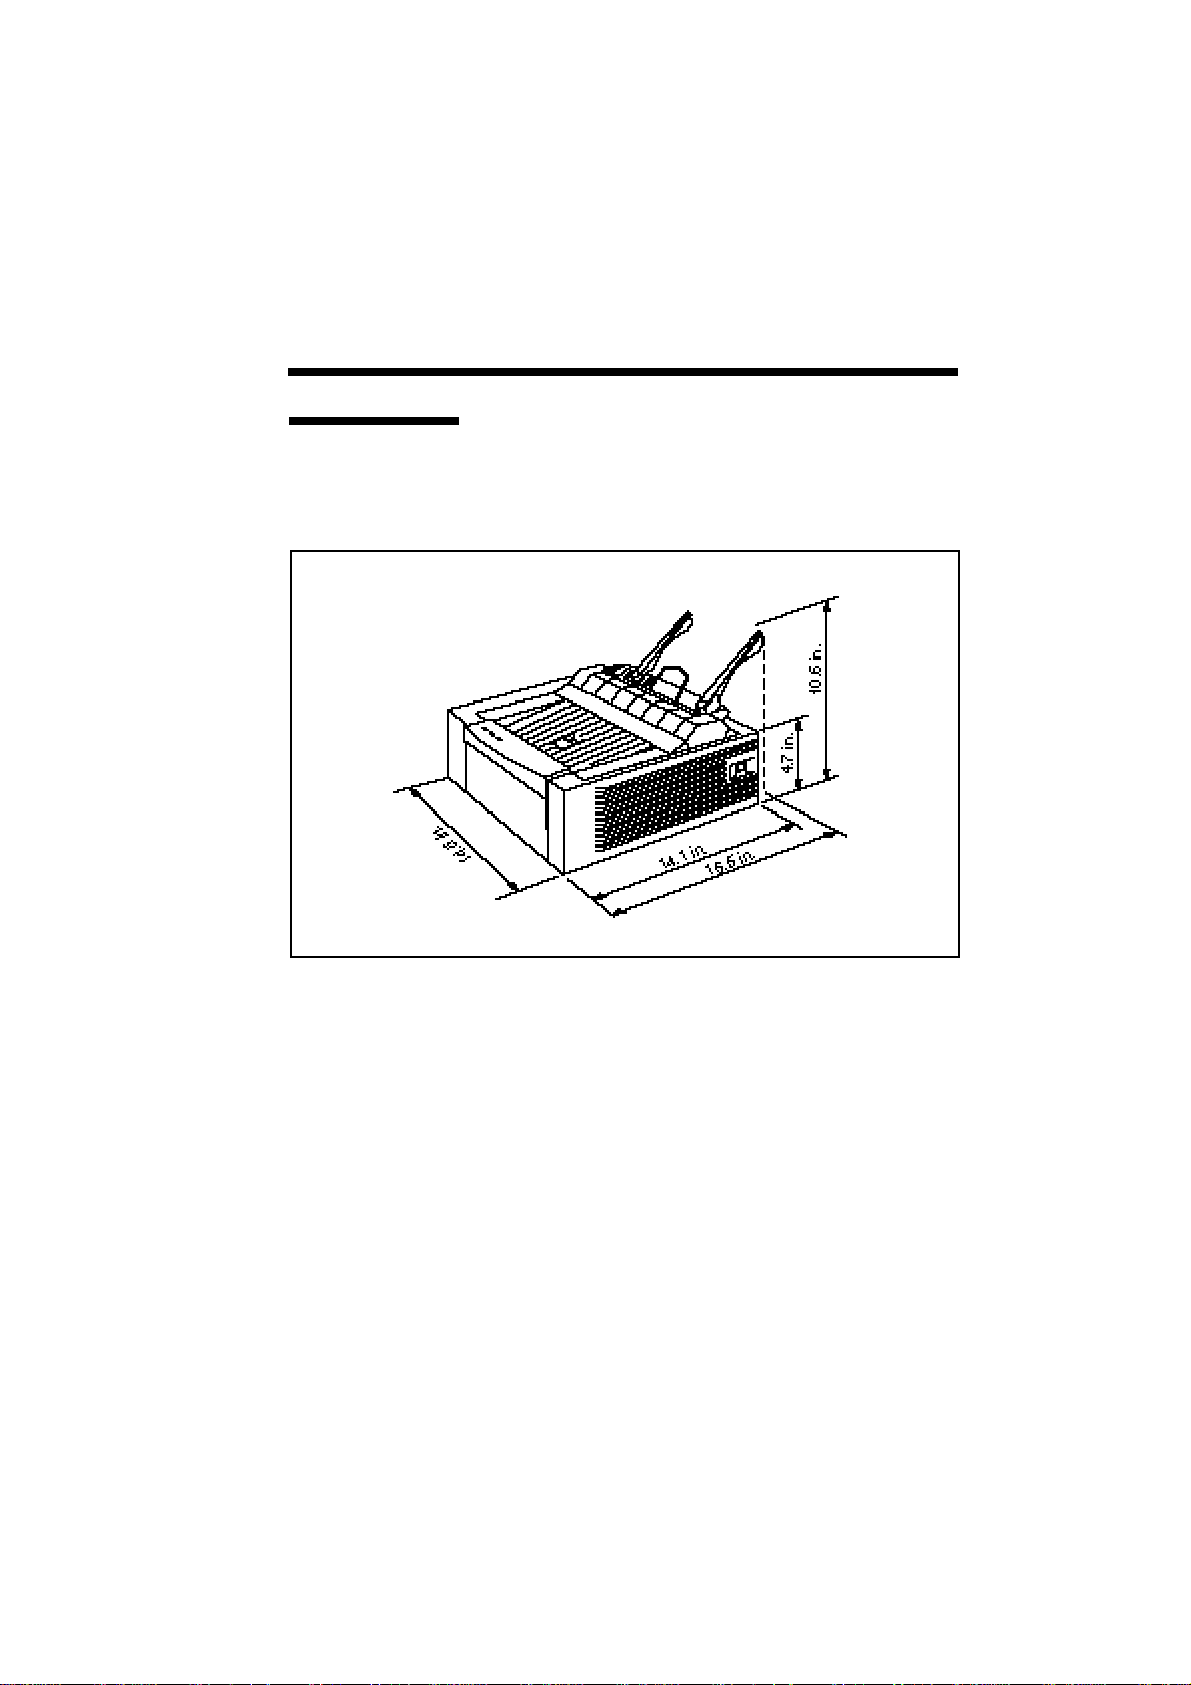
Printer
Dimensions
The following illustration shows the standard dimensions of a Silentwriter SuperScript 610 printer.
Page 24
2–6 Setting Up
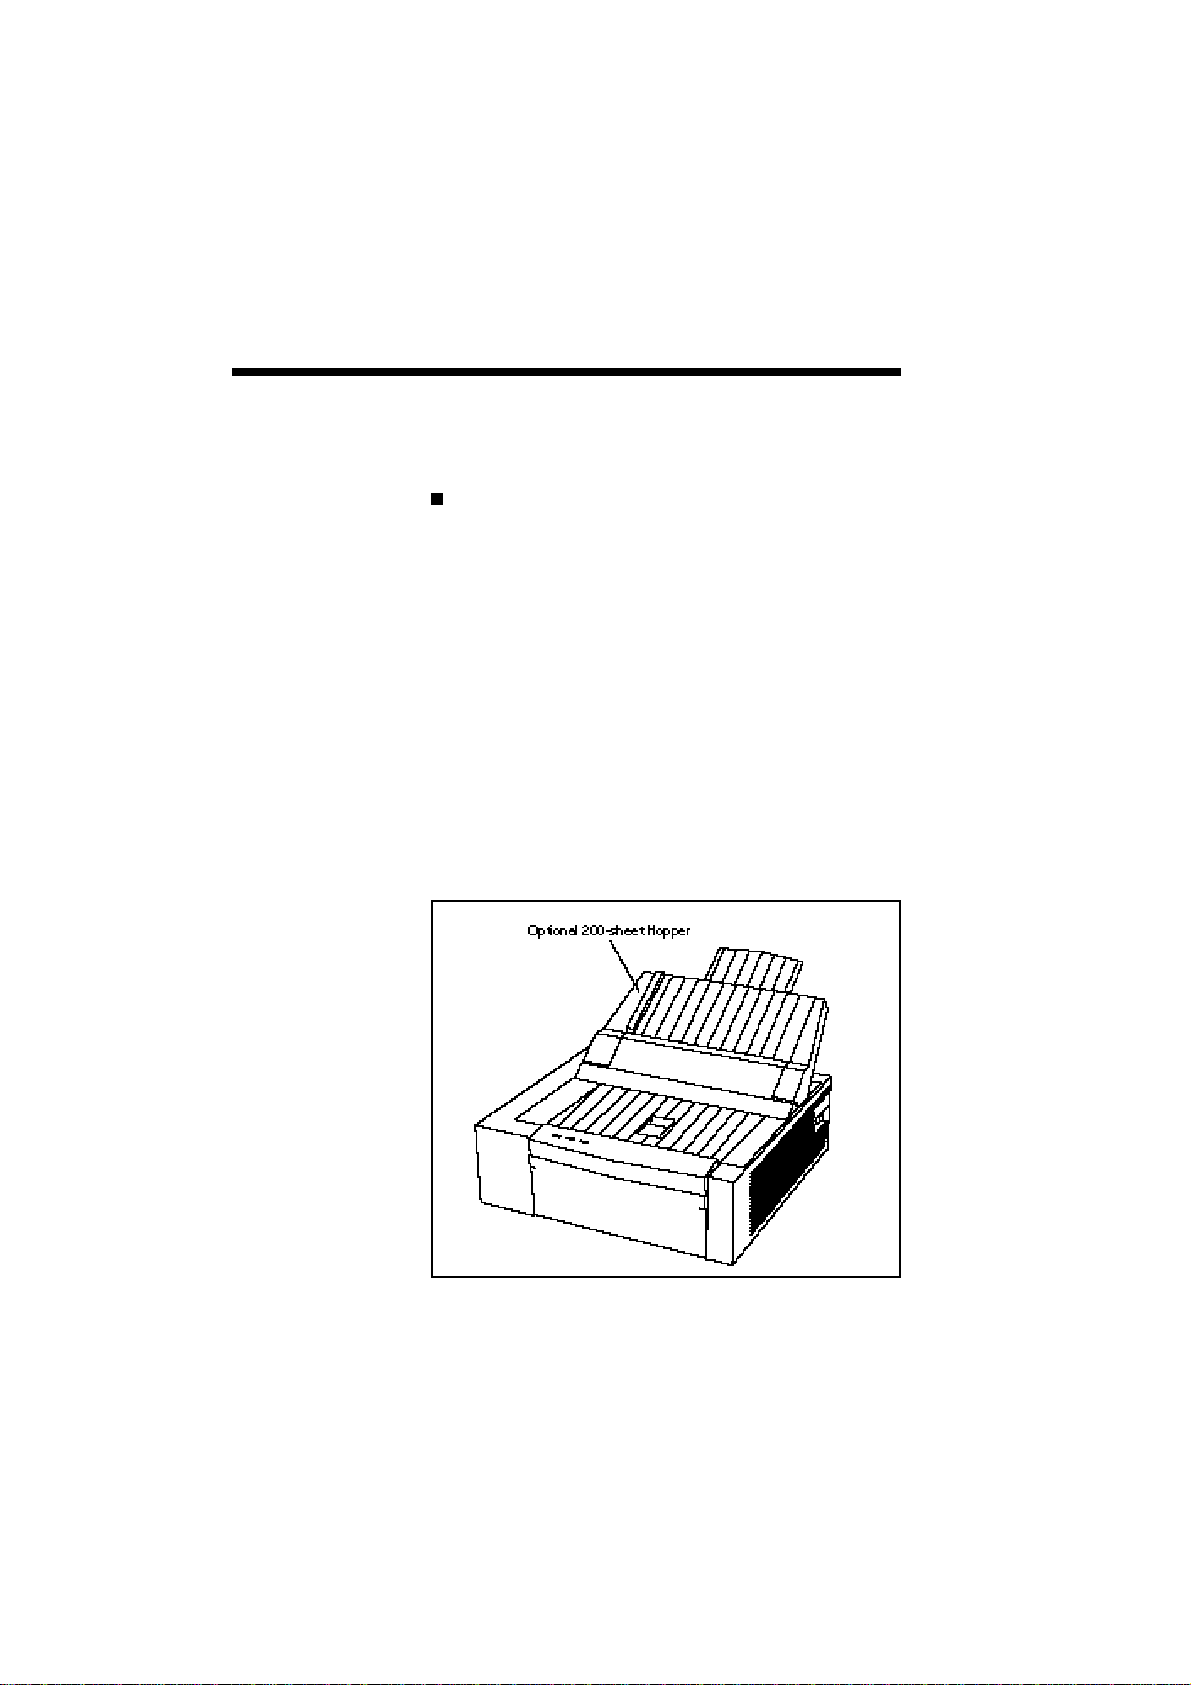
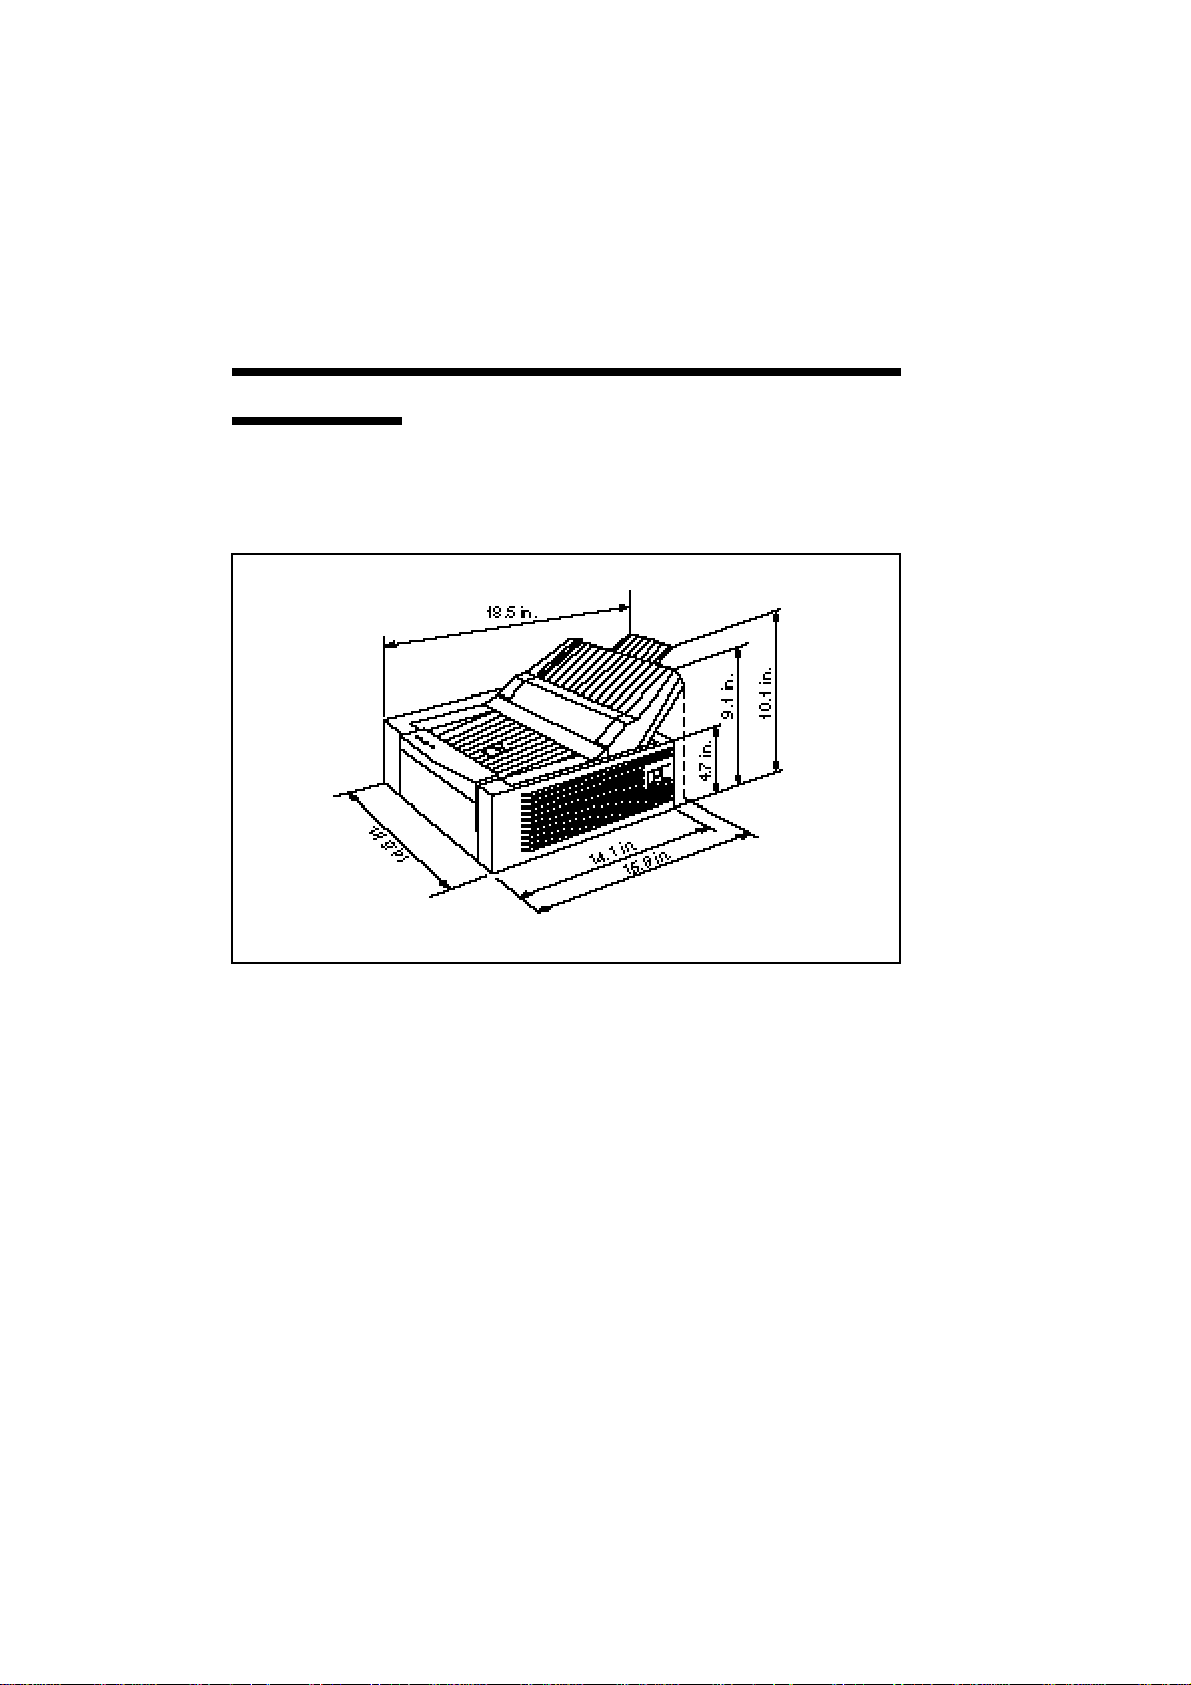
Printer Dimensions with 200sheet Hopper
The following illustration shows the dimensions of a
Silentwriter SuperScript 610 printer when the 50sheet hopper is replaced by the optional 200-sheet
hopper.
Page 25

Setting Up 2–7
SYSTEM REQUIREMENTS
Silentwriter SuperScript 610 works with Windows
3.1, in Enhanced Mode, and requires MS-DOS 3.3 or
later.
To run SuperScript, you will need an IBMcompatible PC with at least a 386SX 16-MHz CPU.
This includes all 486-based and most 386-based PCs.
Some older 386s cannot run in Windows Enhanced
Mode, which means that SuperScript will not work
properly on those systems. SuperScript will not run
on 286-based PCs and other earlier systems. If you
have Windows installed on your PC, you can verify
whether it runs in Enhanced Mode by typing WIN/3
at the MS-DOS prompt. If your PC cannot run
Windows in Enhanced Mode, the system will tell
you.
SuperScript requires at least 4 megabytes PC
memory (RAM), which is the amount of memory
recommended by Microsoft for use with Windows
3.1. Adding more memory to your PC will increase
the overall system and printer performance.
The SuperScript software requires approximately 1.4
megabytes disk space on your system’s hard disk
drive. About 2 megabytes more disk space is needed
to install the SuperScript TrueTypeTM Fonts. In
addition, up to approximately 8.5 megabytes disk
space is required for virtual memory under Windows. (If you have more than 4 megabytes RAM,
you won’t need the entire 8.5 megabytes virtual
memory. The total memory – PC RAM plus virtual
memory – should add up to at least 12.5 megabytes.
See Allocating Virtual Memory, in Chapter 10,
Troubleshooting)
A standard PC parallel printer port is required to
connect with the SuperScript 610 printer through a
standard parallel cable.
Page 26

2–8 Setting Up
NOTE: Because of Silentwriter SuperScript 610’s
high speed interface, it is important to use a properly
manufactured parallel cable. Use of a poor quality
parallel cable may affect your output. See Interface
Cable specification, Appendix D.
EXTERNAL
PRINTER
PARTS
The following two illustrations show external printer
parts.
Page 27
Setting Up 2–9
Upper Cover (also functions as a face-up tray)
Provides access to the inside of the printer and
stacks printed sheets with printed side facing up.
Maximum capacity: 50 sheets.
Lock Release Lever
Unlocks and opens the upper cover.
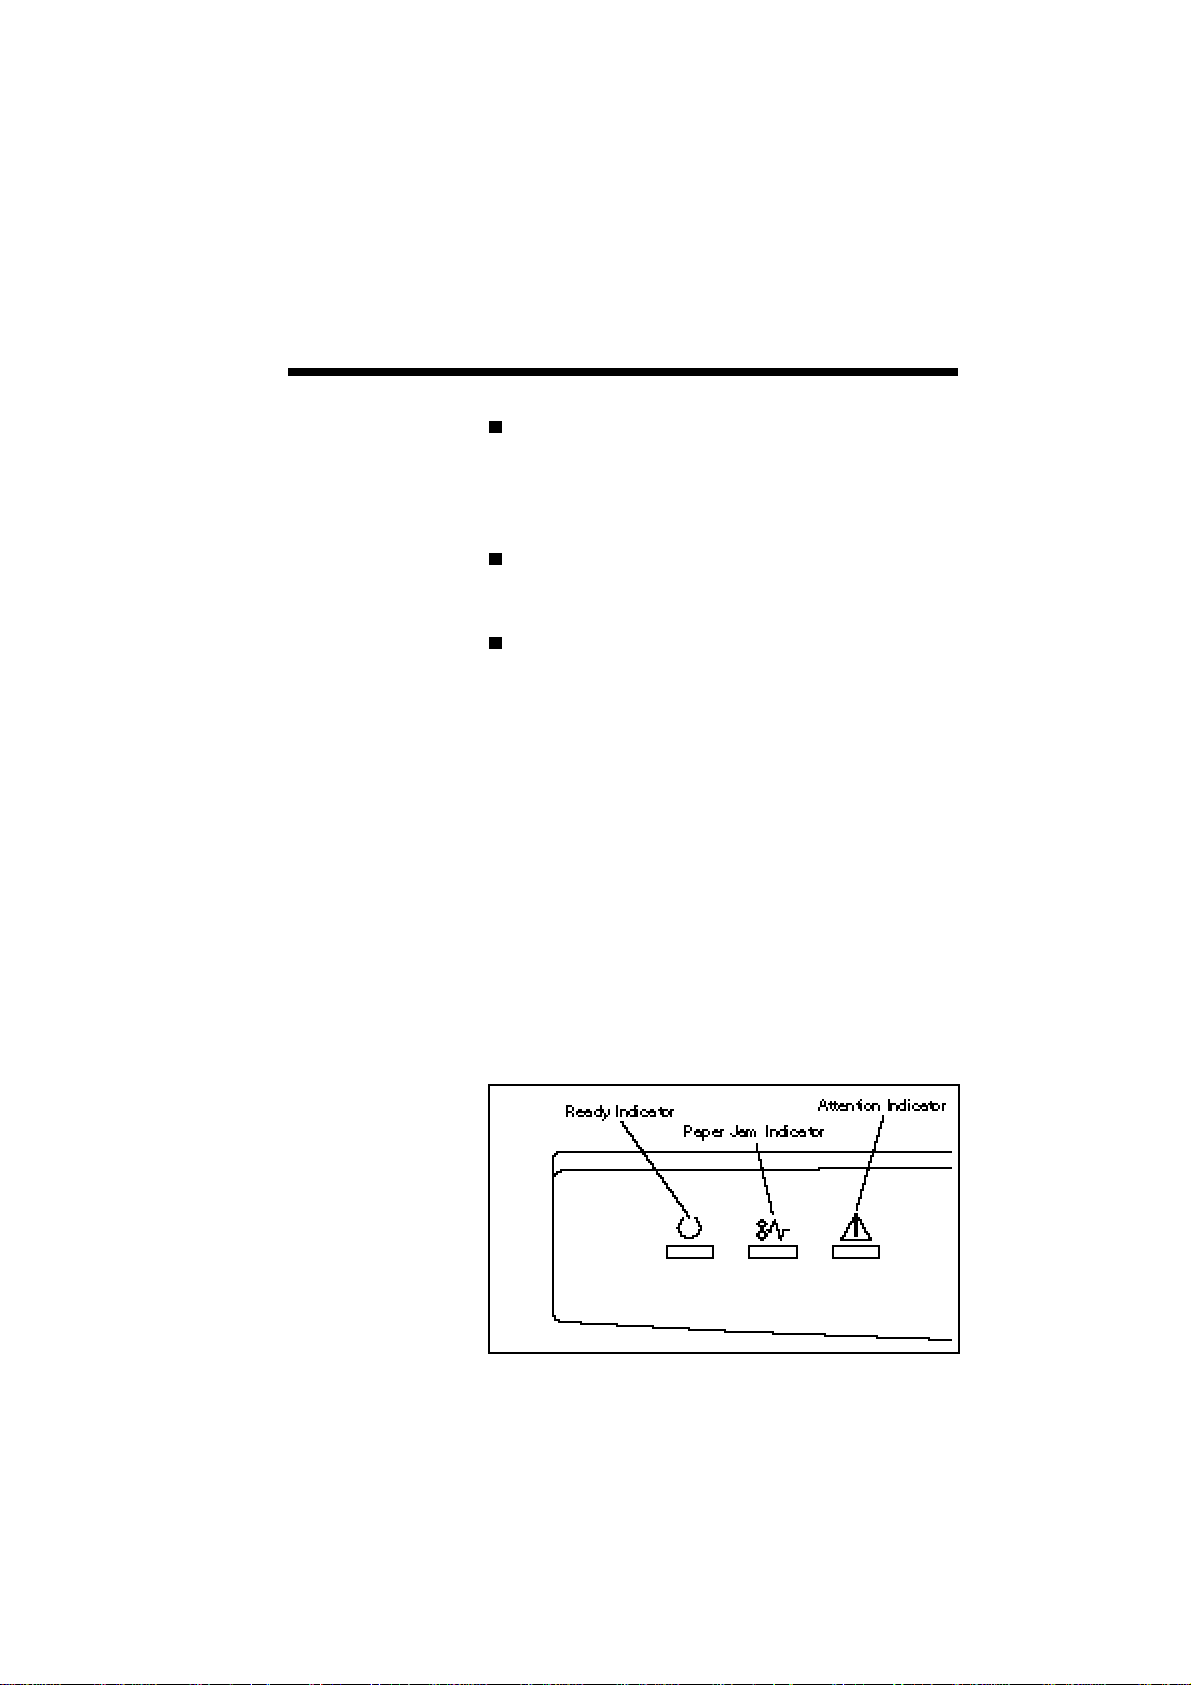
Status Panel
There are three indicator lights to show the
operating status of the printer.
- Ready indicator: the left panel light is used to
show that the printer is ready (steady green),
warming up (rapid blinking), or in power
saving mode (slow blinking).
- Paper Jam indicator: the middle panel light
appears in red when the printer detects a paper
jam.
- Attention indicator: the right panel light appears
in red in error conditions other than the paper
jams. For example, paper out, cover open,
toner cartridge missing, or engine malfunction.
Page 28
2–10 Setting Up
Standard Hopper
Holds up to 50 sheets of paper (at 17 lbs).
Face-down Door
Ejects the printed sheets with printed side facing
down.
Power Switch
Turns the printer off or on.
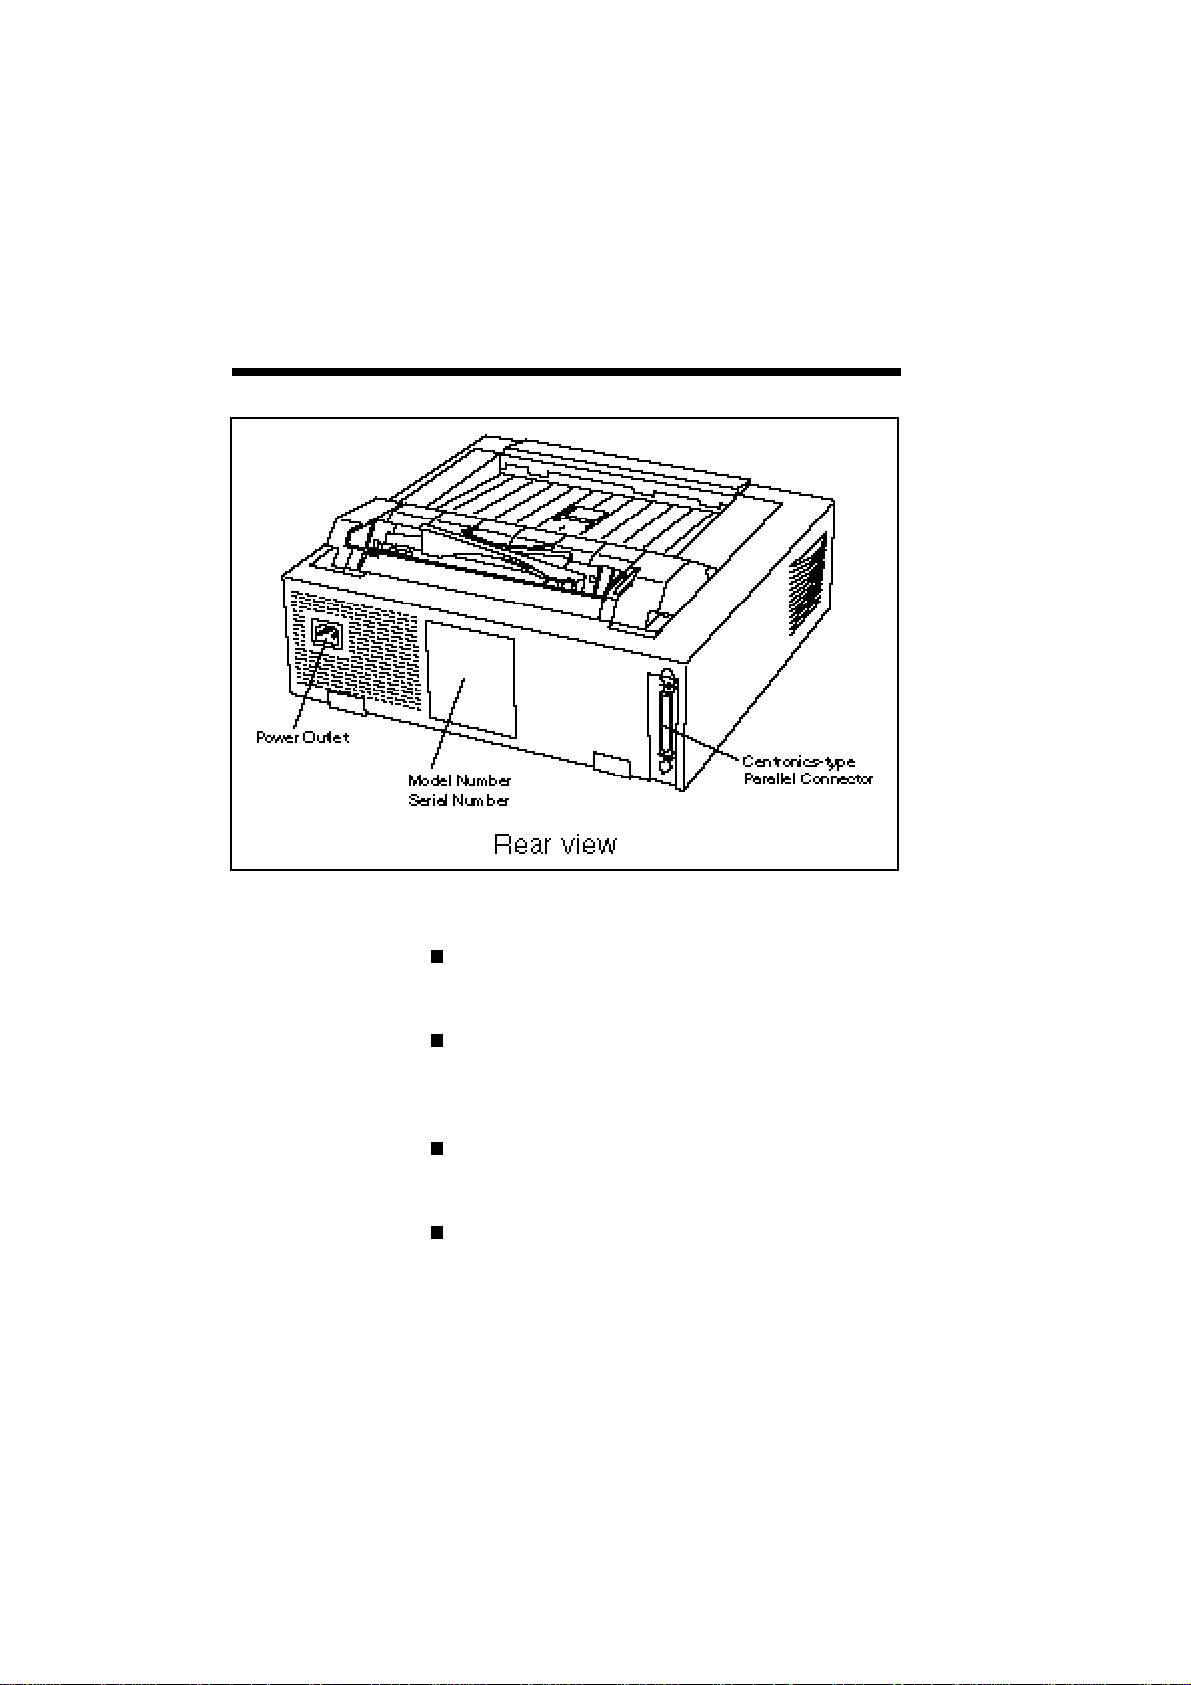
Model Number
Indicates the model number of your printer.
Page 29
Setting Up 2–11
Serial Number
Indicates the serial number of your printer
(You need to enter this number on the warranty
registration)
Parallel Interface
Provides connection to the Centronics-type
parallel interface connector of your computer.
Power Outlet
Connects the power cord to a power outlet.
INTERNAL
PRINTER
PARTS
Page 30
2–12 Setting Up
Toner Cartridge
Contains the toner powder used in the printing
process and the EP drum.
Paper Guide Ribs
Guides the sheets to the fuser unit.
Transfer Roller
A high voltage roller that attracts the toner on the
EP drum.
Laser Diode Unit
Exposes and generates the print image on the EP
drum surface.
Erase Unit
Equalizes the distribution of electric potential on
the EP drum.
Fuser Unit
Fixes the toner to the paper.
Page 31

Setting Up 2–13
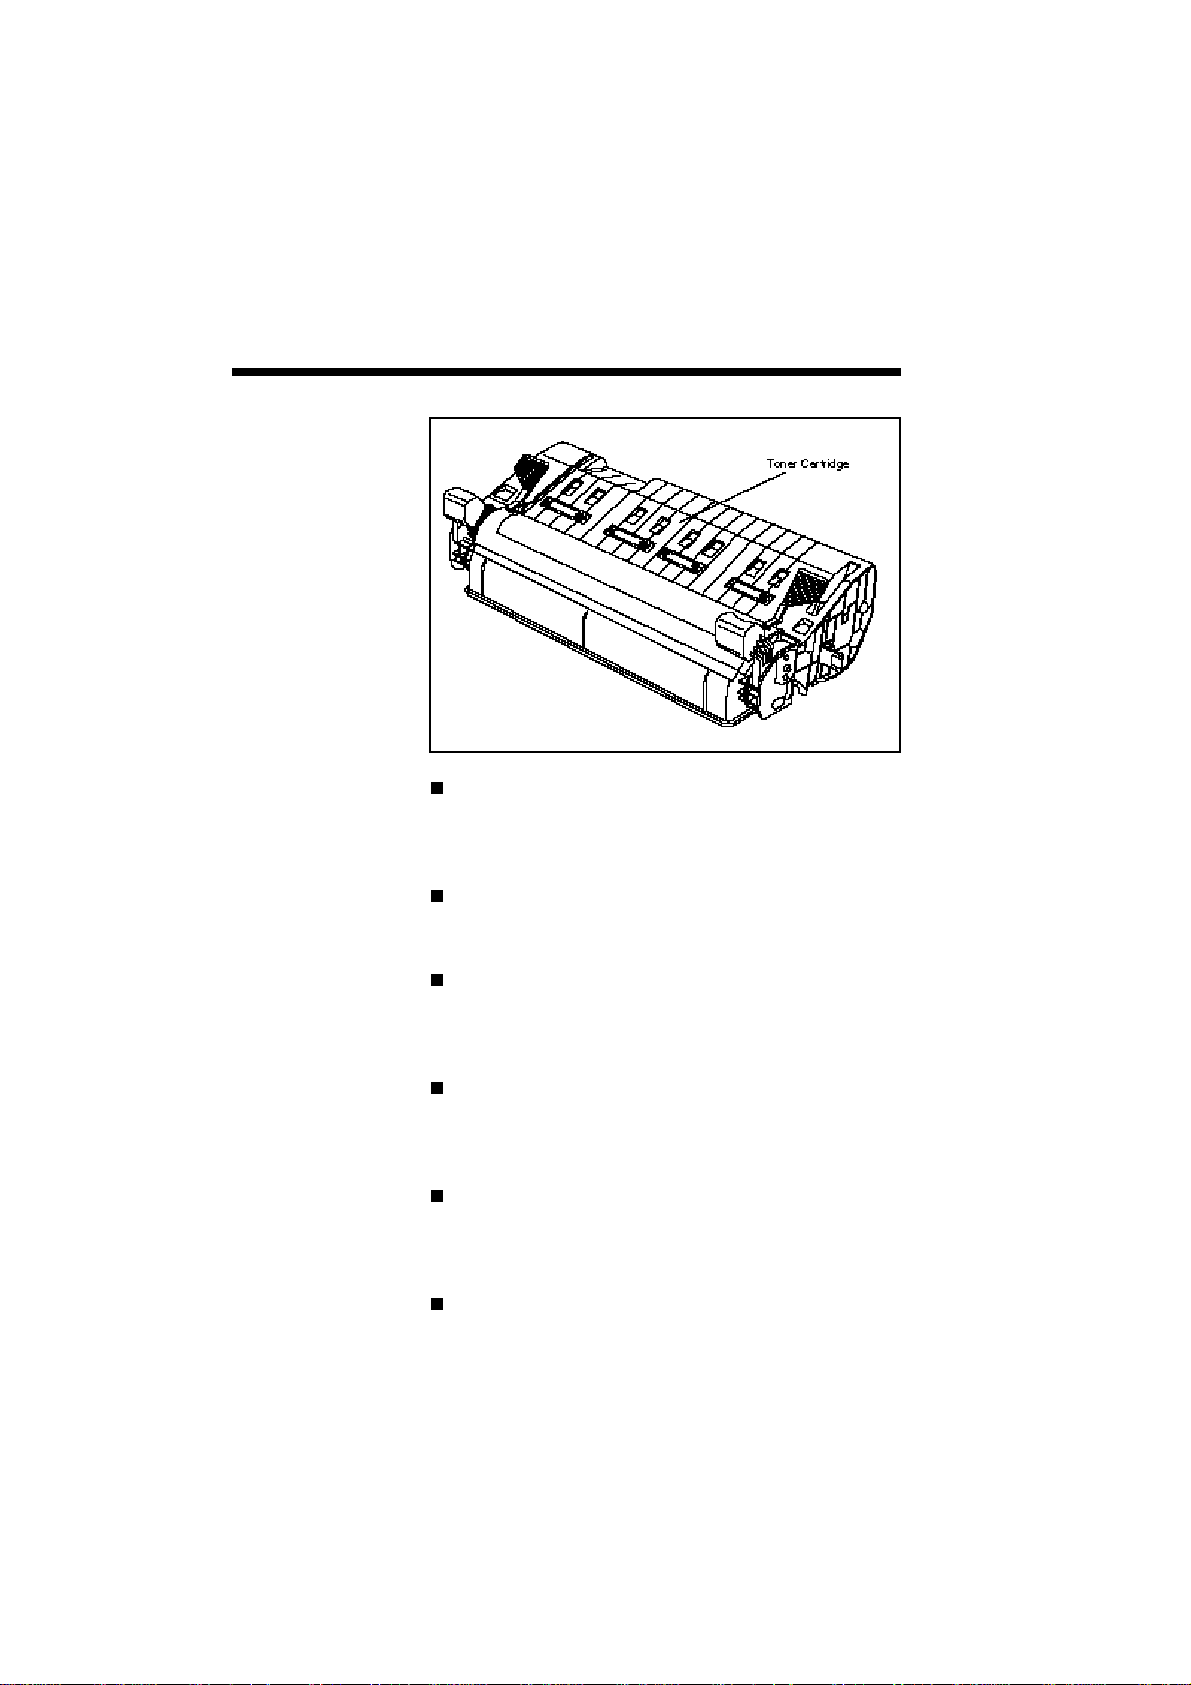
TONER
CARTRIDGE
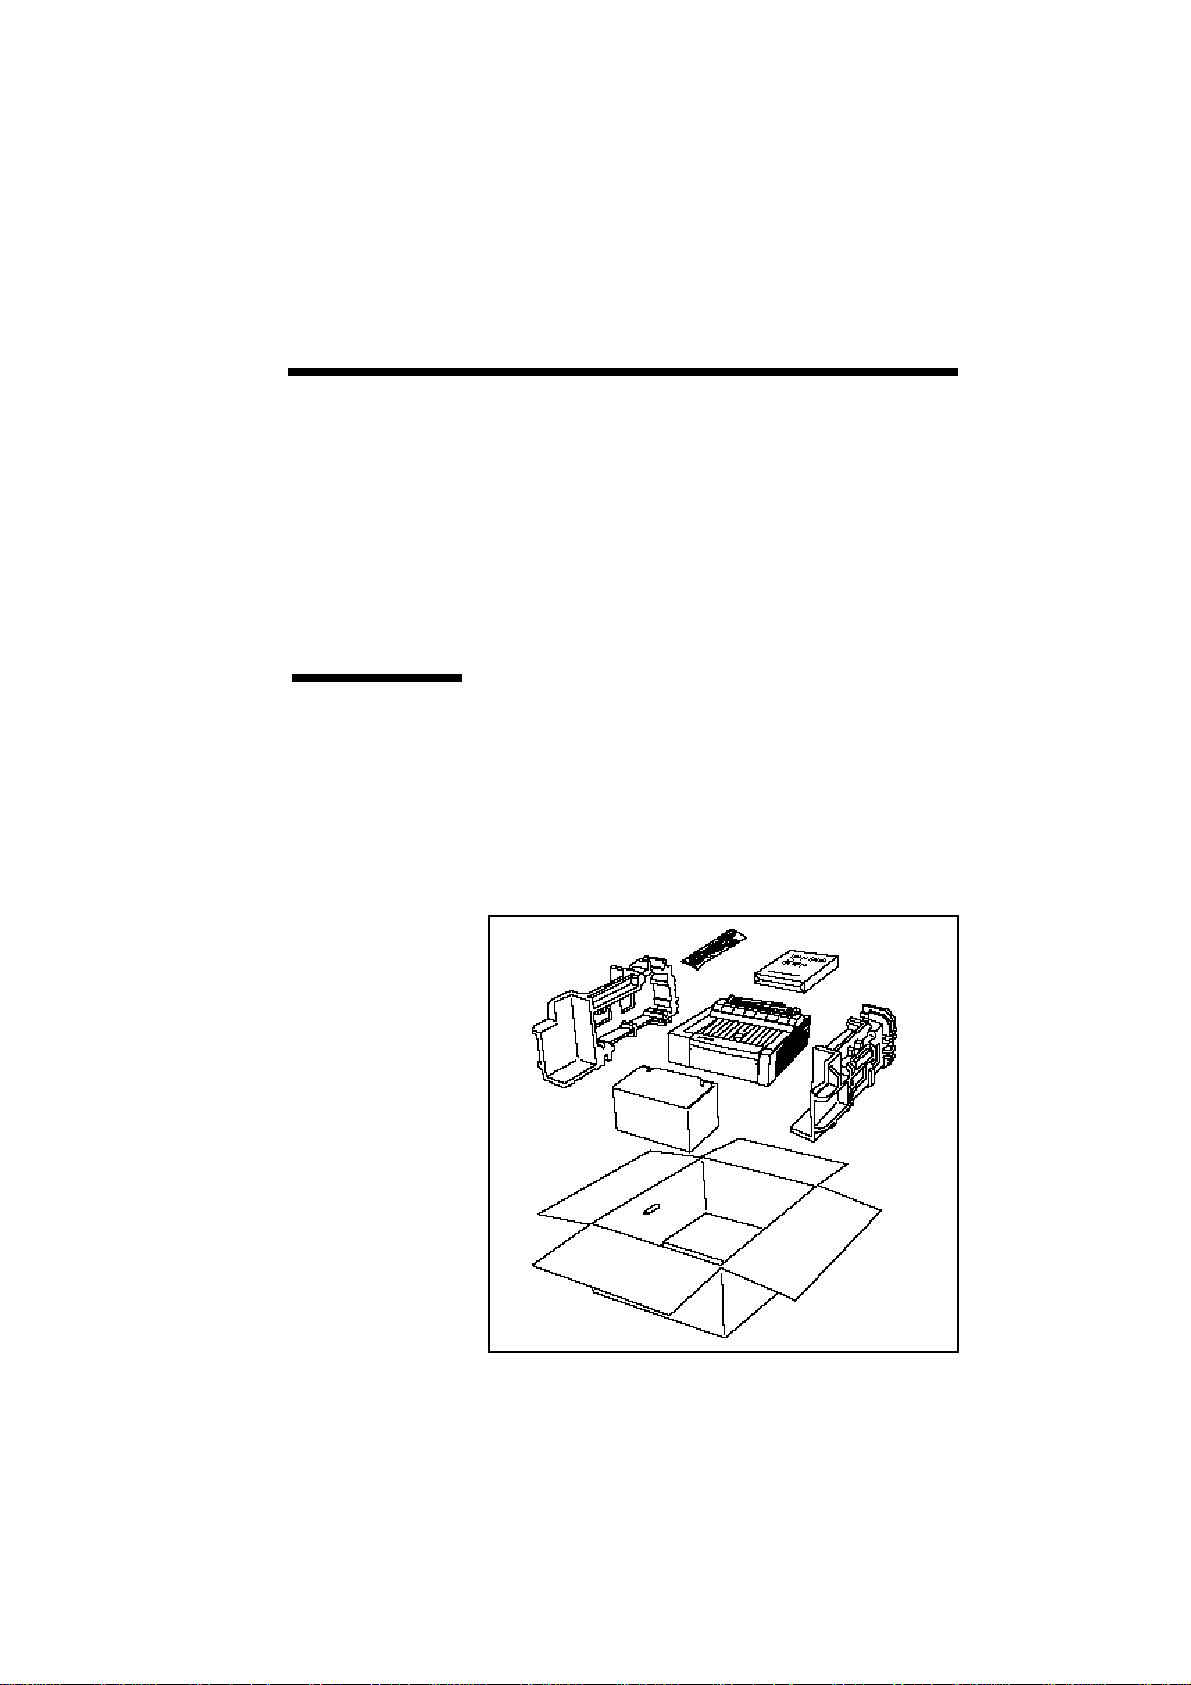
The toner cartridge contains toner (a dry ink substance) and an EP drum that transfers the toner to
paper. Unpack the toner cartridge from its box and
install it in the printer as follows:
Unpack the cartridge box.
The cartridge box consists of a carton box, inserts,
and a toner cartridge.
Unpacking illustration
Page 32

2–14 Setting Up
Preparing
the Toner
Cartridge
1. Remove the new toner cartridge from its bag.
2. Hold the cartridge horizontally and gently shake
it five to six times to distribute the toner evenly.
NOTE: Shake the cartridge in the direction indicated
in the illustration. While shaking, take care not to
touch the drum protection shutter (red transparent
plastic) of the toner cartridge.
Page 33

Setting Up 2–15
3. Grasp the yellow toner sealing tape tab and pull
the tape out. The toner sealing tape is
approximately 20 inches long when completely
removed.
NOTE: Be sure to pull the tape straight and slowly
out of the cartridge to prevent it from being broken
in the middle. Be careful not to get toner from the
tape on your hands. If you get toner on your hands,
wash with cold water.
Page 34

2–16 Setting Up
4. Carefully remove the yellow shutter lock pins of
the toner cartridge (2 pieces).
NOTE: Do not touch the drum protection shutter.
Page 35

Setting Up 2–17
Installing
the Toner
Cartridge
1. Check that the power switch is off.
2. Pull the lock release lever of the upper cover and
carefully open it.
Page 36

2–18 Setting Up
3. Hold the toner cartridge by its two green handles
and gently release it bottom first into the printer.
NOTE: Check that the toner cartridge is securely
seated inside the printer.
Page 37

Setting Up 2–19
4. Carefully push down the upper cover to close it.
NOTE: Check that the lock release lever has securely returned to its locked position.
Page 38

2–20 Setting Up
INSTALLING
PAPER
1. Unfold and lock the paper guides of the hopper
starting with 1 and then 2. Then hold the right
paper holder by its foot and position it to the right
edge 3.
2. Pull the paper setting lever in the direction
indicated by the arrow.
Page 39

Setting Up 2–21
3. Insert paper as far as it will go with its edges
evenly touching the left paper guide.
The hopper can accommodate up to approximately 50 sheets. However, load one sheet at a
time in single-sheet feed mode if you are using
legal size paper, heavier paper, envelopes, labels
and transparencies (refer to Chapter 8). To
protect unused sheets from getting excessively
damp or dry, replace them in their protective
cover.
Page 40

2–22 Setting Up
4. Move the right paper guide until it gently touches
the edge of paper.
5. Return the paper setting lever down to its original
position.
NOTE: Check that edges of paper are even.
Otherwise, sheets may not be fed properly, which
may cause print errors.
Page 41

Setting Up 2–23
INTERFACE
CABLE
Use a parallel cable to connect this printer to a
computer.
Connect the interface cable as described below.
1. Switch off power to the printer and the computer.
NOTE: To protect your printer and computer from
possible damage, make sure they are powered down
prior to connection.
Page 42
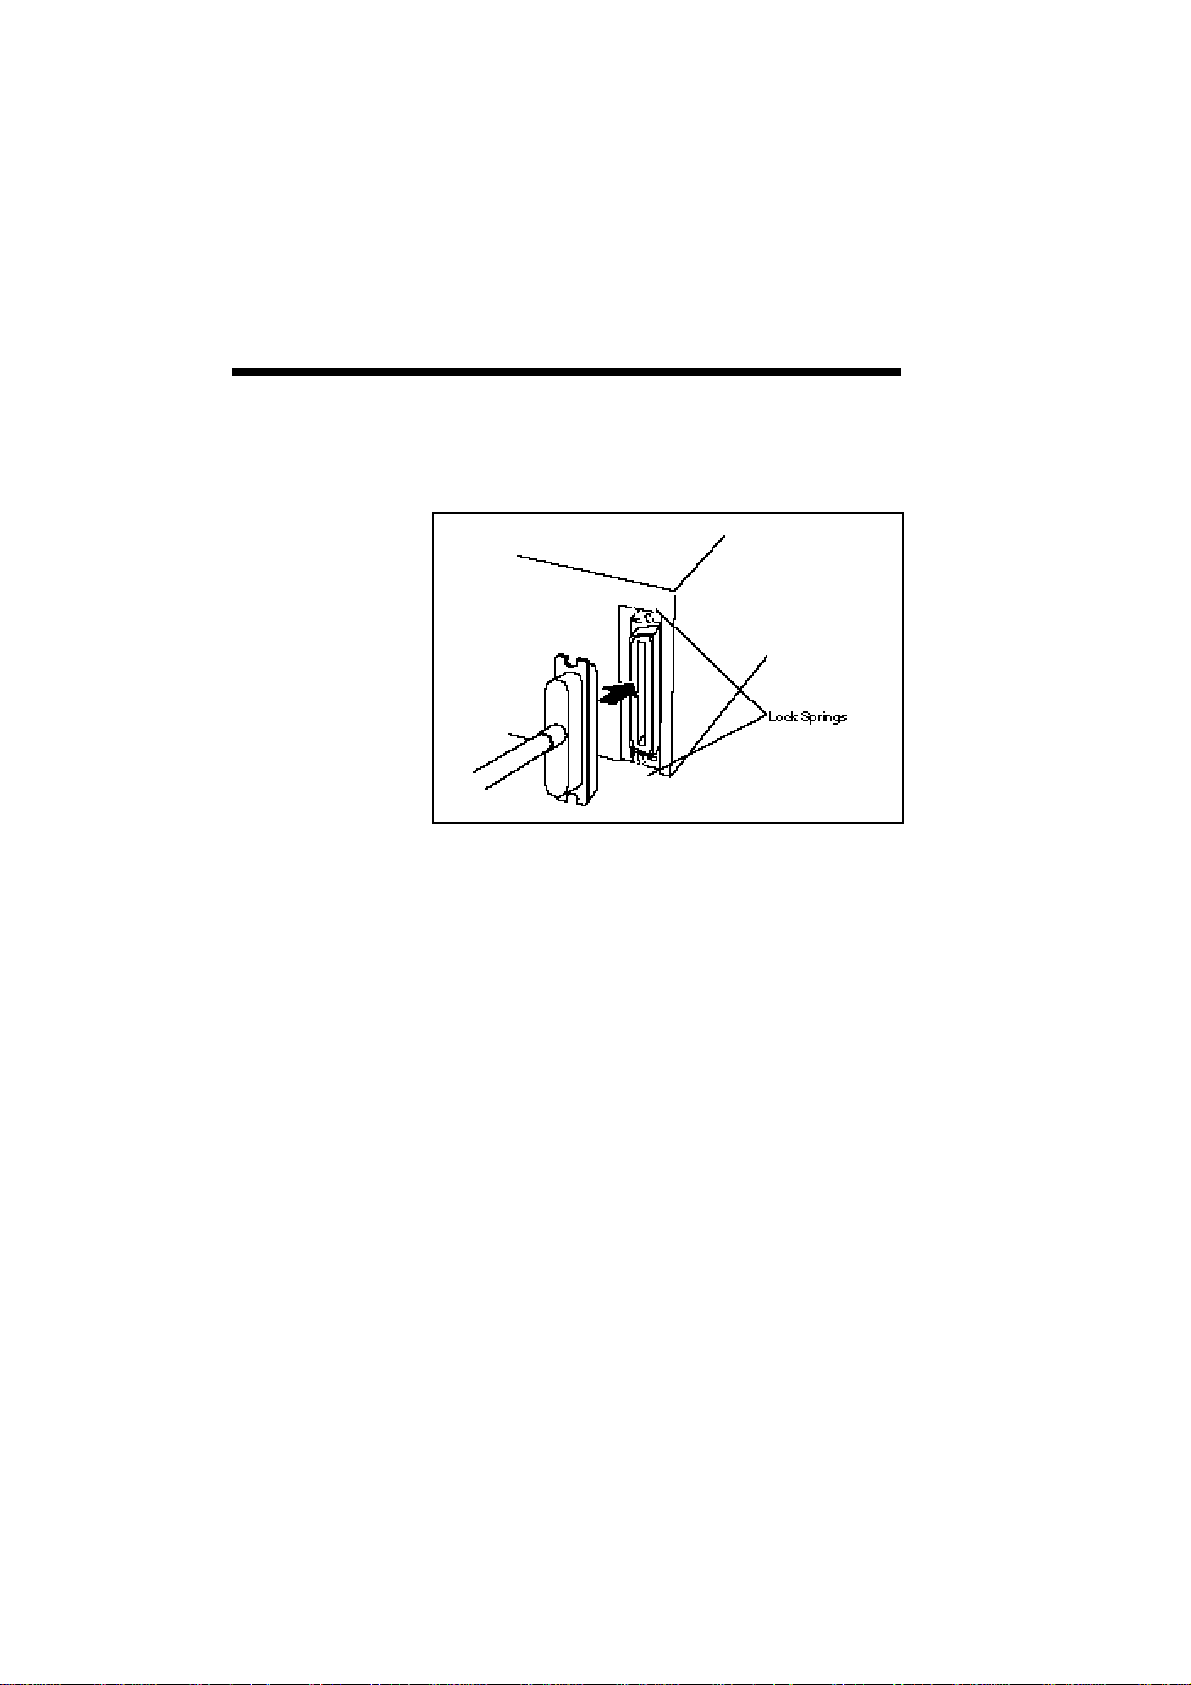
2–24 Setting Up
2. Plug the connector of the interface cable into the
printer and then secure the lock springs.
3. Connect the other end of the cable to the compu-
ter. Refer to the computer manual for details
about selection of a proper connector to interface
your printer to.
Page 43

Setting Up 2–25
POWER CORD
Use the power cord provided and connect it to an
outlet.
NOTE: Do not connect the power cord to the
auxiliary outlet of your computer.
Connect the power cord as described below.
1. Switch off power to the printer.
NOTE: Check that the power switch is off.
Page 44
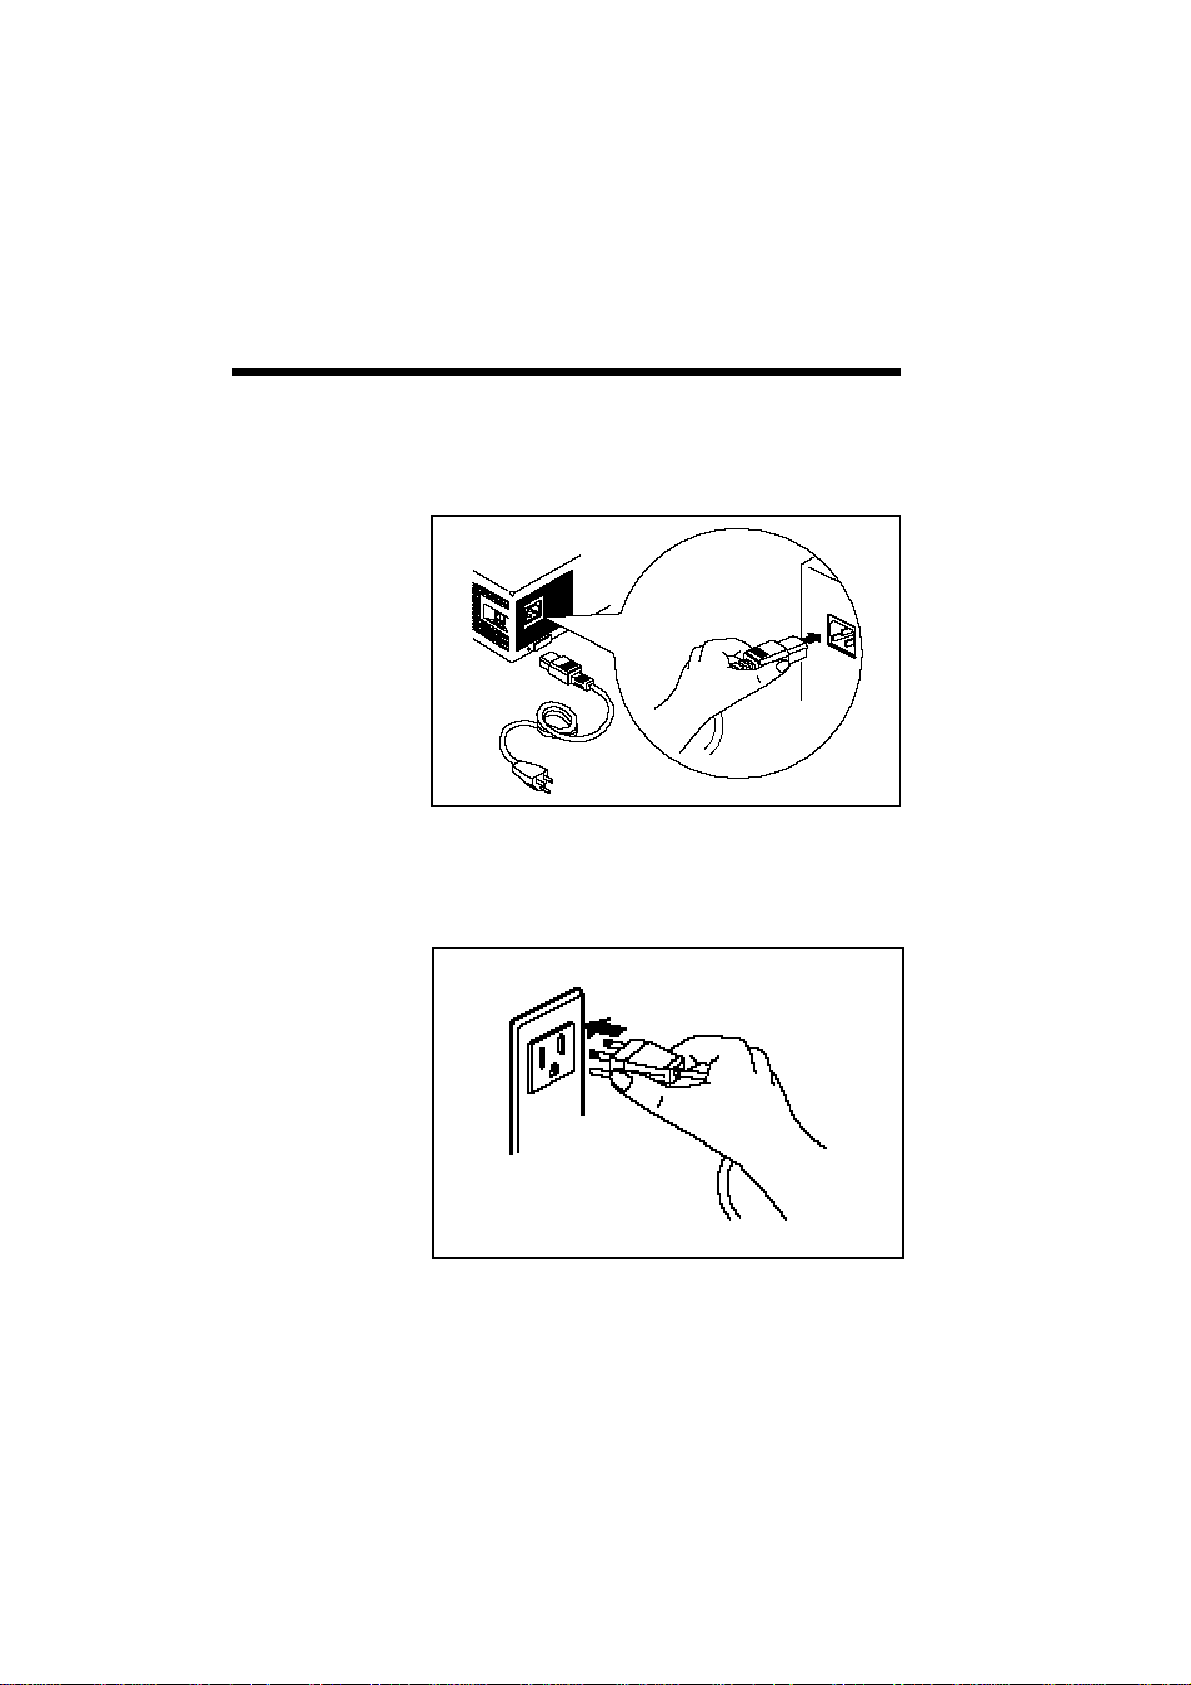
2–26 Setting Up
2. Plug the power cord into the power connector on
the rear panel of the printer.
3. Plug the other end of the power cord into an
outlet.
Page 45

Setting Up 2–27
INSTALLING
SUPERSCRIPT
PRINTING
SOFTWARE
Silentwriter SuperScript 610 includes a software
installation program to make the setup easier. The
installation program analyzes your system configuration, installs the SuperScript software and fonts, and
makes any necessary changes to Windows startup
files.
Once you have started the NEC SuperScript setup
program, you can cancel the installation at any time.
Just click on the Cancel button that appears in the
setup program window.
NOTE: You must have a minimum of 4 megabytes
of RAM and 8.5 megabytes hard disk space. The
following information shows how to identify the
available space on your hard disk. You may skip
this page if you are sure that your system meets both.
To verify your available disk space,you can try the
following:
1. From the C:\ prompt (or whichever drive you
intend to install the SuperScript software), type
DIR.
2. Examine the disk space information given near
the end of the screen.
.
.
.
DOS <DIR> 06-15-93 9:00a
CONFIG SYS 30 06-15-93 9:15a
50 file(s) 12345678 bytes
113483442 bytes free
.
.
.
3. The number appearing in bold here is the relevant
information you need to look for on your screen.
Make sure your number is greater than 8,910,000.
Page 46

2–28 Setting Up
To install the SuperScript software:
1. Place the NEC SuperScript software diskette #1
into the appropriate disk drive of your computer,
say A:. Close the drive door or lever if the drive
has one.
2. Start Microsoft Windows. At the DOS prompt,
type:
WIN/3
Windows will start up as usual, after which the
Program Manager group window should be
displayed on your screen. If the Program Manager group appears as an icon, restore it by
double-clicking on the icon.
3. From the Program Manger menu, click on File.
Then click on the Run... option. The Run Program dialog box appears.
4. At the prompt, type:
[A:] NECSETUP
where [A:] is the letter of the drive containing the
SuperScript software diskette. The first setup
screen appears as shown in the following figure.
Page 47

Setting Up 2–29
Click the mouse or press any key to continue.
Page 48

2–30 Setting Up
5. You will be prompted to choose 50-sheet hopper
or 200-sheet hopper. Unless you have purchased
the optional 200-sheet hopper, select the standard
50-sheet hopper.
6. Tell the setup program which parallel port you
wish to use: LPT1, LPT2, or LPT3. The setup
program only shows you the port names available
on your system. The default is LPT1.
Later, after the installation, you can select a
different port by using the NEC SuperScript
Print Manager (see Chapter 4).
Page 49

Setting Up 2–31
7
. Tell the setup program which drive and directory
you want to install the NEC SuperScript
software on. You can accept the default
supplied by the setup program, or give it the
name of another drive on your PC on which to
install the software. You should select a drive
with at least the amount of free disk space (1.4
megabytes) required for the NEC SuperScript
installation.
As shown in the next figure, “Setup Directory
Selection”, the setup program will create and set
up the directory “C:\SSCRIPT” as the default
installation directory. You can change the
default directory at this time by specifying a
different directory.
Click on the OK button.
The installation program then copies the NEC
SuperScript software to the specified directory.
Page 50

2–32 Setting Up
8. During the installation, NEC SuperScript shows
you progress and status messages, as shown in
the next figure.
Page 51

Setting Up 2–33
9. There are 20 TrueType fonts bundled with your
SuperScript 610 printer. You may choose to
install the fonts now or later. If you select OK
the installation program will copy the fonts to the
Windows System directory and install all 20
fonts automatically. This requires approximately
2 MB of hard disk space. If you select Cancel
you will skip this step and continue with the
SuperScript installation. You can install the
fonts individually later from the standard Windows Control Panel Font Utility. See chapter 7
Installing SuperScript TrueType Fonts
(page 7-4) or your Windows documentation for
more information.
Click on OK to proceed with the font installation.
Page 52

2–34 Setting Up
The installation program modifies the Windows
initialization files so that NEC SuperScript runs
properly when you start Windows.
The setup program also creates the NEC
SuperScript Tools group. This group contains
icons for NEC SuperScript programs, including
the NEC SuperScript Print Manager and the NEC
SuperScript Test Program. Once NEC
SuperScript is active, you will be able to run
these programs by double-clicking on their icons.
Page 53

Setting Up 2–35
10
. The installation program now displays a message
telling you that setup is complete. Choose
Restart Windows to start Windows over again,
or Exit to quit the setup program.
NOTE: You will have to restart Windows before
SuperScript can start running.
11.
When Windows is restarted, NEC SuperScript
Test Program will check to make sure all the
print modes work correctly. The Test program
will print several pages during the test, including
a configuration page containing information
about your system and printer.
NOTE: It is a good idea to save a copy of the most
recent configuration page with your manual. It may
be useful if you ever need to call Customer Support.
Page 54

2–36 Setting Up
12. The following notice will appear:
NOTE: This program performs some timeconsuming test operations. Before continuing, make
sure the printer is ready. The power switch should
be turned on, and the hopper should have paper in it.
Press OK to continue with the print tests, Cancel to
exit to the program's main menu.
13. Before printing starts, you will see the following
message as SuperScript sets up the tests.
Page 55

Setting Up 2–37
14. The Test Program prints a configuration page that
shows information about your PC and printer.
Save a copy of the most recent configuration page
with this manual. You may find it useful if you
ever need to call Customer Support.
Page 56

2–38 Setting Up
15. SuperScript will now ask to print one test page in
each print mode. Click on Yes to continue, No
to bypass the current test.
Page 57

Setting Up 2–39
16. After printing all test pages, the Test Program
will ask if you want to exit. Click OK to quit the
program.
Clicking Cancel instead of OK will return you to the
Test Program's main screen. The File pull-down
menu gives you the choice of repeating the test
sequence or exiting the program.
Page 58

2–40 Setting Up
Once SuperScript software is installed, NEC
SuperScript 610 device names appear in the Printers
window of your Control Panel (see the next figure).
Page 59

Printing with Your SuperScript 610 3–1
Printing with Your
3
SILENTWRITER
SUPERSCRIPT
610 PRINT
MODES
Silentwriter
SuperScript 610
Silentwriter SuperScript 610 lets you choose
between two print modes, GDI and PCL emulation.
GDI mode, which prints what you see on your
screen, is very fast and works well for most users.
However, some applications can create output that is
too complex for Windows to display accurately on
the screen—a file with a sophisticated embedded
graphic image might be an example. Windows may
not always display graphics intensive files
accurately. Therefore, as an alternative, try printing
the file using the SuperScript PCL mode. Printing
with the SuperScript PCL mode will be slower than
the GDI mode because GDI is the language of
Windows with direct access to Windows resources.
PCL emulation also gives you the ability to print
from a DOS application running within Windows,
and from the MS-DOS command line within Windows.
You can select the print mode from many Windows
applications, or through the Windows Control
Panel’s Printers window. To print in GDI mode,
select “NEC SuperScript 610 GDI on NEC.GDI” as
the current printer. To print in PCL emulation mode,
select “NEC SuperScript 610 PCL on NEC.PCL”. If
you have the optional 200-sheet hopper, you should
see “NEC SuperScript 610 GDI 200 on NEC.GDI”
and “NEC SuperScript 610 PCL 200 on NEC.PCL”
instead.
Page 60

3–2 Printing with Your SuperScript 610
GDI MODE
GDI Setup
Screen
GDI mode takes advantage of Windows’ own
internal design to produce documents faster than
most conventional printers can. Other printers
require Windows to translate a document into a
printer language, such as PCL on LaserJet printers.
GDI mode reduces overhead by eliminating this
translation step before starting to print. This results
in faster printing—as much as four times faster for
some files. SuperScript GDI mode includes some
additional features such as manual duplex printing.
You can set options for GDI mode by using the
Control Panel in Windows:
1. Switch to the Program Manager. You should see
a window titled Main. If this window has been
minimized, restore it.
2. Double-click on the Control Panel icon in the
Main window.
3. Double-click on the Printers icon in the Control
Panel window.
4. Select NEC SuperScript 610 GDI on
NEC.GDI
5. Click on the Setup button. You should see a
screen that looks like this:
Page 61

Printing with Your SuperScript 610 3–3
NOTE: Most of the popular Windows applications
also have shortcuts to the setup screen so you don’t
have to go through the Control Panel. For example,
Microsoft Write includes a command called Print
Setup, under the File menu, which allows you to set
up the printer directly, without going through the
Control Panel.
Page 62

3–4 Printing with Your SuperScript 610
The setup screen lets you select
Paper Source: Hopper Feed
Paper Size: Letter 8-1/2 × 11 in
Number of copies: 1 up to 99
Orientation: Portrait
Manual Feed
(Optional 200-sheet Hopper
only)
A4 210 × 297 mm
Executive 7-1/4 × 10-1/2 in
A5 148 × 210 mm
Envelope Monarch
3-7/8 × 7-1/2 in
Envelope #10 4-1/8 × 9-1/2 in
Envelope DL 110 × 220 mm
Envelope C5 162 × 229 mm
Landscape
The OPTIONS button takes you to the Advanced
Options screen, described below.
Press the OK button if you are satisfied with the
selections shown in each box in the Options dialog
window. The changes you have made will take
effect, and you will leave this window. If you press
the CANCEL button, you will leave the window, but
any changes you made will not take effect.
Page 63

GDI Option
Screen
Printing with Your SuperScript 610 3–5
Putting an X in the box marked Use NEC
SuperScript Print Manager turns the NEC
SuperScript Print Manager on when you use GDI
mode. (The NEC SuperScript Print Manager is
always on for PCL compatible mode.) The NEC
SuperScript Print Manager lets you use some additional features in GDI mode, including manual
duplexing and the use of the NEC SuperScript Print
Manager control screen (see Chapter 4).
NOTE: Turn off the NEC SuperScript Print
Manager to get the fastest printing (but not necessarily the fastest return to application).
Page 64

3–6 Printing with Your SuperScript 610
Printing Status Option lets you decide how you want
Printing Status
Option
feedback from the printer when you print.
If you put an X in the box marked Display Status
While Printing, the printer will pop up a Print Status
Window whenever you print to the SuperScript 610
printer. If you leave this box blank, you will only
see this window when the printer needs to inform
you of an error or warning condition, for example, to
let you know that it has run out of paper. (Chapter 5
gives more information on the Printer Status
Window.)
If you put an X in the box marked Beep When
Print Job is Complete, the printer will “beep” to let
you know that it has finished printing. Likewise, if
you put an X in the box marked Beep On Printer
Error, the printer will always beep as a result of an
error condition, such as paper out or paper jam.
Manual Duplex
Printing
If you put an X in the box marked Manual
Duplexing, NEC SuperScript , with a little help
from you, will print your file on both sides of the
paper. You can also choose one of two formatting
options:
• Book Style prints out so that if you opened the
document in the manner of a book, pages 2 and
3 would face each other.
• Report Style prints the even-numbered pages
upside down, so that if you opened the document in the manner of a report bound at the
top, pages 2 and 3 would face the same way.
Here’s how double-sided printing works.
[Using the Standard Hopper] (refer to page 8-4)
1. SuperScript prints every odd-numbered page of
your document, starting with the last oddnumbered page.
Page 65

Printing with Your SuperScript 610 3–7
2. Pick up the printed sheets of paper, straighten*
them, then reinsert them one by one into the
Silentwriter SuperScript 610 printer, starting with
the sheet having the smallest page number.
The reinserting directions are as follows.
3. Set the printed sheets into the hopper as described
on pages 8-4 to 8-6. Click the RESUME button.
Even-numbered pages can then be printed on the
back sides of the previously printed odd pages.
After printing, the printer detects a Paper Out
condition and then pauses. Set the sheet with the
next odd page number into the hopper and click
the RESUME button. The next even-numbered
page will be printed on the back of the sheet.
Page 66

3–8 Printing with Your SuperScript 610
* : Some printed sheets may be curled. Curled
sheets may cause jamming. Straighten the
sheets before reinserting them into the hopper.
Page 67

Printing with Your SuperScript 610 3–9
[Using the Optional 200-sheet Hopper] (refer to page
8-13)
1. Specify "Manual Feed."
2. Open the manual feed cover and insert print
sheets into the printer one by one (refer to
Chapter 8 "Manual Feed"). **
SuperScript prints every odd-numbered page of
your document, starting with the last odd-numbered page.
3. Pick up the printed sheets of paper, straighten*
them, then reinsert them one by one into the
Silentwriter SuperScript 610 printer, starting with
the sheet having the smallest page number. **
The reinserting direction is the same as in [Using
the Standard Hopper].
4. SuperScript prints every even-numbered page on
the backs of the pages already printed.
* : Curled printed sheets may cause jamming.
Straighten the sheets before reinserting them
into the hopper.
** : To feed sheets continuously, you must insert
sheets following the printer’s timing. The next
sheet should be inserted within 5 seconds after
the current sheet has completely entered into
the printer.
If the timing is not satisfied, SuperScript
detects a Paper Out condition and then
pauses. In this case, click the RESUME
button to restart.
Page 68

3–10 Printing with Your SuperScript 610
When finished, you should have a complete,
double-sided document.
You can also put an X in the box marked Print
Instructions. If you do this, then the Silentwriter
SuperScript 610 printer will print out a sheet of
paper giving you detailed instructions every time
you print in manual duplex mode.
NOTE: If an error occurs during duplex printing,
please recover as follows:
• If an error (e.g. paper jam) occurs while printing
the front side of the page (i.e. odd numbered pages),
clear the error as instructed in Print Status Window
and click the Resume button to continue the current
duplex print job as usual.
• If an error occurs while printing the back side of
the page (i.e. even numbered pages), clear the error
as instructed in Print Status Window . If the page
being printed when the error occurs is damaged
insert a new piece of paper in the printer. Click the
Resume button to continue the print job. After all
pages are finished printing, if a new page was
inserted in the printer, re-print the corresponding
odd numbered page on the opposite side to complete
the duplex print job.
Page 69

Printing with Your SuperScript 610 3–11
PCL PRINT
MODE
PCL mode printing is provided to meet specific
printing needs which can not be fully satisfied by the
GDI mode:
1. Compatibility with non-Windows applications.
2. Compatibility with previously saved PCL-format
files.
3. Ability to print text or ASCII formatted files (i.e.
DOS print screen) directly.
4. Ability to print complex graphic files which
Windows may not display well for some applications.
NOTE: If you can not determine which print mode is
best suited for your printing applications under
Windows, we recommend you to always use GDI
mode first. For DOS applications running under the
Windows DOS shell, the PCL mode is automactically
enabled. The next two pages discuss PCL-specific
features. You may skip the pages for now if you
only use Windows applications.
Page 70

3–12 Printing with Your SuperScript 610
Saving Downloaded Fonts
and Macros
( PCL Mode)
By default, when your application prints using
SuperScript's PCL mode, the PCL interpreter will
start up, print the document, and then shut itself off
automatically. This means the PCL interpreter does
not take up memory on your PC except when
needed.
However, when the PCL interpreter turns itself off,
any downloaded fonts or macros will be lost, just as
if you had turned off a regular PCL printer (e.g.
LaserJet IIP).
You can preserve this information by using the NEC
SuperScript Print Manager to keep the PCL interpreter active.
1. From the Windows Program Manager, doubleclick on the NEC SuperScript Printer Manager
icon in the NEC SuperScript Tools group.
2. Minimize the NEC SuperScript Print Manager to
an icon, if desired.
3. Download macros or soft fonts in advance, using
the downloading utility provided by your fonts.
4. Start or return to your application and print your
document.
This will preserve your downloaded fonts and
macros. Also, if your next print job also uses PCL, it
will take less time to print because the SuperScript
PCL interpreter has already been loaded. However,
if you switch from PCL to GDI mode, this information will be lost, just as if you were changing printer
languages in a conventional printer.
Page 71

Printing with Your SuperScript 610 3–13
Page Ejects Form Feeds
( PCL Mode)
Some PCL files do not include a form feed (a command to eject a page) at the end of the file, so if you
are printing to a conventional PCL printer, you have
to press a form feed key to see your output. For
example, if you use the DIR>LPT1: command in the
MS-DOS prompt in Windows, the job sent to the
PCL interpreter will not have a form feed at the end,
so that the last page (or a single page) won't print.
If you turn the conventional printer off, the last page
is lost. Unlike a conventional PCL printer, if the
SuperScript PCL interpreter shuts itself off, as
described above, it will print the last page automatically.
However, if you launch the NEC SuperScirpt Print
Manager, as described above, before printing, then
you will have control over whether the unprinted
page will be saved. The PCL interpreter provides a
form feed function in its program menu, which can
be displayed by clicking once on the PCL icon.
Clicking Form Feed on the program menu will eject
the retained page (just like the form feed key on a
conventional PCL printer).
Besides form feed, a reset feature is also provided for
the user to return the printer to its reset state (just
like the reset key on a conventional PCL printer).
Page 72

3–14 Printing with Your SuperScript 610
PRINTING
FROM A
WINDOWS
APPLICATION
PRINTING
FROM DOS
APPLICATION
Once you have selected your printer mode (GDI or
PCL emulation), just print from your Windows
application as you would to any other printer.
Note: Silentwriter SuperScript 610 is a Windows
printer, designed for use with Windows. In particular, SuperScript’s GDI mode is based on Windows
and does not work with MS-DOS. However,
SuperScript will work in PCL mode if you create an
MS-DOS session from within Windows.
SuperScript will not run if you exit Windows completely.
Enter MS-DOS prompt from Windows by clicking
on the MS-DOS icon in the Main window from the
Program Manager screen.
When ready to print, start your DOS application and
print as you normally would. Set up your application
to print to the parallel port LPT1 (or LPT2 or LPT3
if you have SuperScript set to print to one of these
ports instead). Be sure to select the NEC
SuperScript PCL driver or an HP LaserJet IIP driver.
PRINTING PCL
FILES FROM
DOS COMMAND LINE
If you have a file in PCL or ASCII (text) format, you
can print it from the MS-DOS command line within
Windows. At the command line prompt, type
COPY/B <filename.ext> LPT1
where <filename.ext> is the name of your PCL- or
ASCII-formatted file. (If you have configured
SuperScript to print to a different parallel port, give
its name instead of LPT1.)
Page 73

NEC SuperScript Print Manager 4–1
NEC SuperScript
4
Print Manager
When you use the NEC SuperScript Print Manager,
the program helps you manage the output flow and
operation of your SuperScript 610 printer. You can
see all files waiting to be printed, and change their
order. You also can see how much of the current
print job has been processed. You can control the
priority setting for printing relative to other
applications running at the same time. Furthermore,
when the NEC SuperScript Print Manager is in use,
you can print double-sided pages in GDI mode.
When minimized, the NEC SuperScript Print Manager appears as an icon at the bottom of your screen.
Page 74

4–2 NEC SuperScript Print Manager
Options
1. Priority
Windows lets you run several applications at
the same time. This helps productivity, but it
also means that you are sharing your PC’s
resources among several activities.
SuperScript’s priority settings let you control
the priority of the printing activity relative to
other applications running at the same time.
Page 75

NEC SuperScript Print Manager 4–3
The Options menu lets you select high,
medium, or low priority processing for when
you print. Printing at a high priority produces
output faster, but it may slow down your
system as well. On the other hand, printing at
a lower priority lets your other applications
run faster, but also means your document will
take longer to print. (For more information,
see Appendix B Optimizing Printing
Performance.)
2. Beeps
If Beep on Printer Error is checked, your
system will beep after encountering an error
condition with the printer.
If Beep When Print Job is Complete is
checked, your system will beep when printing
has completed.
3. Display Print Status
If you check this item, the Print Status
Window will pop up on your screen during
printing. If this item is not checked, the Print
Status Window only pops up when an error
occurs. (See Chapter 5 for more information
on the Print Status Window.)
4. Time Format
This option allows you to change the display
format: 12 hour or 24 hour. (01:30 PM is an
example of 12 hour format. The same time
appears as 13:30 in 24 hour format.) The
time stamp is provided by your system clock.
Page 76

4–4 NEC SuperScript Print Manager
5. Sharp Edge Technology (SET)
This option allows you to turn on or off the
Sharp Edge Technology, a resolution
enhancement feature.
6. Connect Port
The Port option lets you select a different
parallel port for your SuperScript 610 printer.
Depending on the ports available on your PC,
you can choose LPT1, LPT2, or LPT3.
7. Power Saving Mode On or Power Saving
Mode Off
Silentwriter SuperScript 610 has a power
saving mode built-in. After idling for 15
minutes (as default), the printer will reduce its
power consumption by shifting into a power
saving mode. This option allow you to select
either “Power Saving Mode On” or “Power
Saving Mode Off”. If you choose the Power
Saving Mode Off option, your printer will
remain active and consume more power.
When you select the Power Saving Mode
On option, you can enter a time interval from
1 to 30 minutes. After the specified time
interval of idling,the printer will shift into the
power saving mode and the left panel light
will blink slowly.
As soon as you send a print job to the printer,
it will shift back into the active mode.
Size
The Size menu lets you change the size of the
display window for the NEC SuperScript Print
Manager. “Normal” shows the full display.
“Minimum” takes up less space on your screen.
Page 77

NEC SuperScript Print Manager 4–5
Help
1. Contents
It gives you a list of subjects available in the
help menu.
2. Search for Help On...
This option opens up a window allowing you
to get information on SuperScript features.
3. How to Use Help
This is the standard Windows Help guide to
show users how to access the help menu.
4. About
The About option provides you with the
information about the version of the NEC
SuperScript software currently running.
Page 78

4–6 NEC SuperScript Print Manager
Queue Information
This part of the NEC SuperScript Print Manager
screen shows jobs in queue waiting to be printed.
JOB NAME The software application and file
that created the print job
FORMAT Either GDI or PCL format
SIZE How large the print job is, in
bytes
TIME Time of day the print job was
created
Page 79

NEC SuperScript Print Manager 4–7
On a color monitor, the job currently printing
will be highlighted in dark blue. A job that you
have selected with the mouse will appear against
a light blue background. On a monochrome
monitor, the current print job will be highlighted.
A paused or selected job will also appear highlighted, but somewhat darker gray than the
current job.
The NEC SuperScript Print Manager will take
the first print job in the queue and send it to be
processed and printed. However, if you have a
mouse, you can change the order of print jobs
that remain in the queue by following a “dragand-drop” procedure:
1. Move the mouse to the entry you want to re-
order.
2. Press down on the left button of your mouse.
Do not lift your finger. The entry will turn
blue to indicate that it has been selected.
3. Without lifting your finger, drag the print job
(in other words, move the mouse) to the
desired new location in the queue.
4. Release your finger from the mouse button.
The print job will now show up in its new
location, and the other print jobs will
subsequently move up or down in the queue.
Page 80

4–8 NEC SuperScript Print Manager
Status Bar
The status bar shows whether SuperScript is
printing, paused, or ready to print. During
printing, the status bar shows the page number
currently being processed.
Progress Bar
The progress bar shows the percentage of the
current print job processed by the SuperScript
software on the PC. Once this processing is
completed, the actual printing starts.
PAUSE
The PAUSE button lets you pause the current
print job. Once the job is paused, you can use
the RESUME button to continue printing, or
cancel the print job by clicking the DELETE
button.
RESUME
RESUME lets you resume printing a job that has
been paused.
ADD
The ADD button lets you select a GDI or PCL
print job file previously stored on your hard disk
and add it to the end of the print queue.
DELETE
DELETE lets you cancel a current print job that
has been paused. You can also select any
pending print job, then click on DELETE to
remove it.
Page 81

NEC SuperScript Print Manager 4–9
Exiting the NEC SuperScript Print Manager
To exit the NEC SuperScript Print Manager,
click on the System menu (the horizontal bar at
the upper left-hand corner of the window), and
select Close. Another way to do this is to press
Alt-F4.
Exiting Windows will also close the NEC
SuperScript Print Manager.
Exiting Before Printing Has Completed
If you try to close the NEC SuperScript Print
Manager, or exit Windows, while there are still
documents waiting to be printed, SuperScript
will display a message asking if you want to save
the remaining print jobs.
If you select “Yes”, the print jobs will be saved
as you exit. When you start up the NEC
SuperScript Print Manager next time, you can
resume printing of the unfinished documents.
If you select “No”, the print jobs will be lost, and
you will exit. (The original application files,
from which the print jobs were created, will not
be affected.)
If you select “Cancel”, you will not exit Windows or the NEC SuperScript Print Manager.
Page 82

4–10 NEC SuperScript Print Manager
Page 83

5
Print Status Window 5–1
Print Status Window
The Print Status Window has two functions. The
first is let you know when something is printing.
For both PCL and GDI modes, you can use the NEC
SuperScript Print Manager to choose whether or not
you want the Print Status Window to display during
printing. (See page 3-5 and Chapter 4.)
The Print Status Window will also alert you in case
of a problem. It displays a warning or error message.
In addition, it points to the problem area on the
printer, and gives instructions for what to do next.
Page 84

5–2 Print Status Window
Please refer to the Print Status Window chart above.
Options
Animate Icon: Lets you decide whether or not
to animate the printer icon that appears in the
Print Status Window or when this window is
minimized to an icon. If Animate Icon is
checked, then the printer will show paper
printing and panel lights blinking.
Help
1. Contents
It gives you a list of subjects available in the
help menu.
2. Search for Help On...
This option opens up a window allowing you
to get information on SuperScript features.
Page 85

Print Status Window 5–3
3. How to Use Help
This is the standard Windows Help guide to
show users how to access the help menu.
4. About
The About option provides you with the
information about the version of the NEC
SuperScript software currently running.
JOB NAME & PAGE NO.
This box shows the name of the application, file,
and page number for the job currently being
printed.
Picture of your printer
This box shows a picture of your SuperScript
610 printer. If a problem has occurred, an arrow
points to where the printer is affected.
STATUS MESSAGE
This box shows an error or status message and
corresponding icon. The display also tells you
what to do for each error or warning message.
The possible messages include:
Cover Open or Toner Cartridge Missing
Either your printer's cover is open, or
there is no toner cartridge in the printer.
Insert a toner cartridge, if necessary, and
then firmly close the printer's cover.
Page 86

5–4 Print Status Window
Duplex Printing
Duplex (double-sided) mode is enabled,
and SuperScript has finished printing on
one side of your document. Turn sheets
over and reinsert them into the paper
hopper to print on the other side. (For
paper insertion details, see page 3-6)
Engine Error
There is a problem with your printer’s
engine. Follow the instructions on the
screen to correct the problem. If the
problem persists, call Customer Support.
Manual Cover Closed
Manual Feed has been selected for the
current print job; however, the Manual
Feed Cover is closed. Open the Manual
Feed Cover to the manual feed position
and insert a sheet of paper. Click the
RESUME button to start again.
Manual Cover Open
Hopper Feed has been selected for the
current print job; however, the Manual
Feed Cover is open. Close the Manual
Feed Cover. Click the RESUME button
to start again.
Manual Feed
Manual Feed has been selected for the
current print job; however, the printer has
run out of paper. Insert one sheet of
paper alongside the edge of the manual
feed guide of the manual feed cover.
Click the RESUME button to start again.
Paper Out
The printer has run out of paper. Add
more paper to the hopper. Click the
RESUME button to start again.
Page 87

Print Status Window 5–5
Paper Jam
Paper has jammed inside the printer,
making it impossible to continue printing. Open the printer’s cover. Remove
all paper. Close the cover.
Silentwriter SuperScript 610 will start up
again automatically once the jam has
been cleared. In most cases, the printer
will reprint the page jammed before
continuing with the rest of your document.
Paper Size Error
The printer is loaded with sheets of a
different paper size than what the
software has been setup to handle. You
need to load a different size paper, or
change paper size selection in your
printer setup screen.
Power Off or Cable Problem
NEC SuperScript software can’t find
your printer. This error may be caused
by:
1. the printer is off.
2. the printer's parallel cable is not
installed properly.
3. a problem exists within the
connection or the parallel cable is
not good.
Verify the printer is powered on and the
left printer status light (LED) is lit or
blinking. Check the parallel cable is
correctly connected to the printer and the
PC.
Warming Up
Wait until the engine has finished warming up.
Page 88

5–6 Print Status Window
Pause
The PAUSE button lets you pause printing while
you do something else. For example, you can
pause in order to delete the print job from the
SuperScript Print Manager.
Resume
The RESUME button lets you continue printing
after you have paused printing, or after the
printer recovers from an error situation.
Delete
The DELETE button lets you delete the current
print job. You must pause the job before you can
delete it. Additionally, you may delete a print
job halted due to an error situation like paper out.
Page 89

Selecting Paper and Media 6–1
Selecting Paper and
6
Media
Your NEC Silentwriter SuperScript 610 printer
supports a wide variety of print media.
Choosing quality paper is your best bet for avoiding
many of the output problems common to heatintensive printing. It is the most wide-ranging
preventative measure you can take to achieve consistently good results from your printer.
Though we do not endorse particular manufacturers,
this chapter notes products that have consistently
demonstrated high quality. This chapter shows you
how to recognize quality media products and gives
detailed specifications for print materials. Recommended handling and storage guidelines are also
given.
You must judge the quality and performance of any
paper. We strongly recommend that you test several
reams of selected paper for Silentwriter SuperScript
610 compatibility before you make a large purchase.
Because we cannot control the quality or manufacturing of your selected media, we cannot warrant the
use or results of any specific media with the NEC
Silentwriter SuperScript 610 printer.
Page 90

6–2 Selecting Paper and Media
Note the following media guidelines.
Check that the media meets all specifications
noted in this chapter.
Order a small quantity to test with your printer
and your work environment. Some paper vendors offer print quality guarantees to insure that
the output meets a predetermined standard when
used with laser printers. If you don’t like the
paper, you may be able to return it for another
type — but test that one, too.
Tell both the supplies buyer and the prospective
seller that you are using this media in a laser
printer.
PAPER
PROPERTIES
Paper manufactured from 100% chemical wood pulp
containing no more than 25% cotton fiber is recommended. Paper should be dust-free and have cleanly
cut edges. Do not use wrinkled, curled, or damp
paper; it often causes misfeeds, paper jams, and
illegible output.
Most writing paper has two sides: top, often called
the “felt” side, and bottom, or “wire” side. The
package label generally has an indicator arrow
showing you how to load paper so that output goes to
the wire side.
NEC tested Xerox® 4024™ (20 lb.) paper and
obtained satisfactory results. Generally, paper
manufactured for photocopying has good print
quality and paper handling characteristics.
Page 91

Selecting Paper and Media 6–3
NOTE: Paper properties can be changed by the
manufacturers. NEC has no control over such
changes. Thus NEC neither warrants nor recommends the use of any particular paper and the user
assumes all responsibility as to the quality and
performance of paper selected.
No matter which manufacturer you select, note the
following considerations.
Smoother surface paper generates sharper output
resolution and detail.
Coated paper can melt, discolor, or release
hazardous emissions at temperatures greater than
200˚C (392˚F).
The acceptable range of media weight for use is
60 to 105 g/m2 (16 to 28 pounds).
Print Areas
Acceptable media sizes and their corresponding print
areas are as follows.
Letter 8.5 in. × 11 in. (216 mm × 279 mm): print
area of 8.1 in. x 10.6 in. (206 mm ×
269 mm)
Envelope
Monarch 3.875 in. × 7.5 in. (98.4 mm ×
190.5 mm): print area of 3.2 in. × 6.9 in.
(82.4 mm × 174.5 mm)
Page 92

6–4 Selecting Paper and Media
Commercial 10 4.125 in. × 9.5 in. (105 mm ×
241 mm): print area of 3.5 in. × 8.9 in.
(89 mm × 225 mm)
Internationl DL 110 mm × 220 mm (4.33 in. ×
8.66 in.): print area of 94 mm × 204 mm
(3.70 in. x 8.03 in.)
Internationl C5 162 mm × 229 mm (6.38 in. ×
9.02 in.): print area of 146 mm × 213 mm
(5.75 in. × 8.39 in.)
NOTE: You should load envelopes in landscape
orientation, with the flap edge to the left.
Paper and
Media Use
Observe the following guidelines for media selection. Do not attempt to print on any of the following
types of paper.
recycled paper
extremely smooth or shiny coated paper
very rough, textured, or embossed paper
multipart forms or carbonless papers
paper coating, dyes, or inks not compatible with
the fusing temperature of 200˚C (392˚F)
paper that produces hazardous emissions when
exposed to 200˚C (392˚F) temperatures for 0.1
seconds
paper that offsets or discolors
damaged, wrinkled, or irregularly shaped paper
paper containing large amounts of clay or talc
paper that does not lie flat
Page 93

Selecting Paper and Media 6–5
preprinted forms with inks containing metallic
substances
perforated feed paper and cutout paper
Preprinted
Forms
During the print operation, heat applied to preprinted
forms can remove ink from the form and leave
residue (called offset) inside the printer.
In addition to offset residue problems, ink residues
may generate harmful gases and emissions. Note the
following considerations.
Forms should be printed with heat-resistant inks
that do not vaporize or generate harmful emissions at temperatures greater than 200˚C (392˚F)
for 0.1 seconds.
Don’t use paper printed with low-temperature
inks.
Inks must not be flammable.
Inks must not be affected by the resin compo-
nents found in toner.
Care must be taken to avoid changing the mois-
ture content of paper being preprinted or using
materials that change the electrical or handling
properties of the paper. Forms should be sealed
in moisture-proof wrapping after preprinting to
prevent moisture changes during storage.
Page 94

6–6 Selecting Paper and Media
Heavy Print
Stock
Envelopes
Heavy (thick) printed stock can generate misfeeds
and paper jams, in addition to causing excessive
wear to the print mechanism.
Bond paper exceeding 82 g/m2 (22 lbs.) must be
placed in and fed from the hopper one sheet at a
time (do not place several sheets in the hopper).
In order to minimize curling, heavy bond paper
must be ejected from the face-down door.
Don’t use paper heavier than 105 g/m2. The
acceptable range of media weight for use is 60 to
105 g/m2 (16 to 28 pounds).
Envelopes must be ejected from the face-down door
in order to minimize curling and wrinkling.
The printer accepts one of four standard envelope
sizes:
Monarch 3.375 in. × 7.5 in. (98.4 mm ×
190.5 mm)
Commercial 10 4.125 in. × 9.5 in. (105 mm ×
241 mm)
DL 110 mm × 220 mm (4.33 in. × 8.66 in.)
C5 162 mm × 229 mm (6.38 in. × 9.02 in.)
NEC tested Eaton 25% Cotton (75 g/m2, diagonal
seamed) and obtained satisfactory results.
NOTE: NEC neither warrants nor recommends the
use of any particular envelope and the user assumes
all responsibility as to the quality and performance of
the envelopes selected.
Page 95

Selecting Paper and Media 6–7
The leading edge of an envelope that feeds into the
printer must be straight. The fold must be firmly
creased and be no thicker than two paper thicknesses. As a rule, the larger the envelope is, the
more difficult it is to feed properly.
The base weight of envelope paper must be 75 g/m
(20 pounds). Commercial envelopes, called regular
or business envelopes, are the most widely used and
are probably the most reliable for your printing
needs.
Neither envelopes with peel-off adhesive strips nor
envelopes that are heavily embossed feed well.
Avoid heavily textured or coated envelopes. In
addition, avoid
envelopes with snaps, clasps, tie strings, cellophane windows, or curved or thick leading paper
edges. (They don’t feed consistently.)
envelopes composed with glues, inks, and
adhesives that could discolor, scorch, or melt
when heat is applied
2
adhesives that generate harmful emissions at
temperatures greater than 200˚C (392˚F) for 0.1
seconds
envelopes made with recycled paper
envelopes that use an adhesive that relies on
pressure for sealing
envelopes that have already been through the
printer once. (Don’t feed envelopes into the
printer a second time.)
envelope seams that do not have a continuous
and even glue line (excluding the envelope flap).
Page 96

6–8 Selecting Paper and Media
Adhesive
Labels
Adhesive labels consist of a top (print surface) sheet,
an adhesive layer, and a liner (peel-away backing).
The top sheet is usually xerographic paper and must
meet the general specifications for that kind of paper.
The liner must be coated for easy release of the top
sheet and adhesive layer sheets, particularly after
being subjected to print head heat.
NEC tested Avery® 5162 labels and obtained
satisfactory results.
NOTE: Label properties can be changed by the
manufacturers. NEC has no control over such
changes. Thus NEC neither warrants nor recommends the use of any particular label and the user
assumes all responsibility as to the quality and
performance of labels selected.
Note the following considerations regarding the
adhesive layer.
Labels must be set on and fed from the paper
hopper one piece at a time (do not place more
than one in the hopper). In order to minimize
curling, labels must be ejected from the facedown door.
The adhesive cannot melt or generate harmful
emissions at temperatures greater than 200˚C
(392˚F) for 0.1 seconds.
Labels should cover the entire surface of the liner
sheet. Labels placed on a liner sheet with interrupting spaces make it difficult for consistent
feeding because one sheet contains multiple
“double-thickness” areas.
Page 97

Selecting Paper and Media 6–9
Adhesive must not “spill over” its paper edge or
any die cuts. Excess adhesive can bond to the
print mechanism to cause poor quality output or
mechanical problems.
To test for excessive adhesive, put a piece of
paper on top of the adhesive-based paper and
press down. The two pieces should not stick
together.
Transparency
Film
MEDIA
PURCHASING
SPECIFICATIONS
When you are printing on transparency film, always
remove the first printed transparency from the output
door before feeding a second one through. This
prevents scratching the film surface of the first
transparency. The transparency must be able to
withstand temperatures of 200˚C (392˚F) for 0.1
seconds.
Transparencies must be tested for satisfactory performance prior to purchase.
Transparent film must be placed in and fed from
the paper hopper one sheet at a time (do not
place several sheets in the paper hopper). In
order to minimize curling, transparent film must
be ejected from the face-down door.
The following purchase specifications are intended
for the person who orders your print media. It is
possible that even when these specifications are met,
operating environment inconsistencies may keep the
paper from measuring up to its optimum capabilities.
Once again, always test a representative sample
before making a large purchase of any print media.
Because we cannot control the quality or manufacturing of your selected media, we cannot warrant the
use or results of any specific media with the NEC
Silentwriter SuperScript 610 printer.
Page 98

6–10 Selecting Paper and Media
Sheet Paper
specifications listed in Table 6-1.
Table 6-1 Paper Specifications
ITEM
Acid content
Ash content
Single-sheet feed*1
Multi-sheet feed*2
Brightness
Caliper
Furnish
Curl
Cut edge condition
Electrical surface resistivity
All sheet paper properties must match the paper
SPECIFICATION
5.5 pH to 8.0 pH.
Cannot exceed 10% or contain large amounts of
clay or talc.
60 to 105 g/m2 (16 to 28 pounds)
60 to 82 g/m2 (16 to 22 pounds)
83% minimum.
0.094 to 0.19 mm (3.7 to 7.5 mils.)
100% chemical wood pulp with up to 25% cotton
fiber recommended.
Zero curl toward image side, minimum 15-inch
radius curl toward opposite side.
Sharp edges, no visible fray.
2.0 to 15 × 1010 ohms/square (conditioned at 22˚C
(71.6˚F ) plus 50% relative humidity).
Electrical volume resistivity
Finishing
Fusing capability
*1 “Single-sheet Feed” refers to the method of placing print media in the hopper
one sheet at a time.
*2 “Multi-sheet Feed” refers to the method of placing print media in the hopper
several sheets at a time for continuous feeding.
1.2 to 15 × 1011 ohm × centimeter (conditioned at
22˚C (71.6˚F ) plus 50% relative humidity).
Cut sheets must be within ±0.8 mm of nominal,
corners at 90˚ ±0.2˚.
Cannot scorch, melt, offset, or release emissions
when heated to 200˚C (392˚F) for 0.1 seconds.
Page 99

Selecting Paper and Media 6–11
Table 6-1 Paper Specifications (Cont’d)
ITEM
Grain
Moisture content
Opacity
Packaging
Smoothness
Stiffness
Wax pick
SPECIFICATION
Long grain.
4% to 6% by weight.
Minimum of 85%.
Polylaminated moisture-proof ream wrap.
100 to 300, Sheffield scale.
1.6 minimum machine direction
0.6 minimum cross direction (Taber).
12 minimum (Dennison).
Page 100

6–12 Selecting Paper and Media
Envelopes
specifications listed in Table 6-2.
Table 6-2 Envelope Specifications
ITEM
Base weight
Caliper
Furnish
Curl
Electrical surface resistivity
Finishing
Fusing capability
All envelope paper properties must match the paper
SPECIFICATION
75 g/m2 (20 pounds), single thickness.
0.14 mm (5.5 mils), single thickness.
100% chemical wood pulp with up to 30% cotton
fiber.
Envelope must lie flat, with no more than 0.25
inch curl across the entire surface.
2.0 to 15 × 1010 ohms/square (conditioned at 22˚C
(71.6˚F) plus 50% relative humidity).
Cannot have adhesive exposed to the printer.
Must be accurately folded (±1 mm) so that there
are no more than two paper thicknesses anywhere
along the envelope surface. All glue lines must be
continuous and all folds must be sharply creased.
Cannot seal, scorch, melt, offset, or release
hazardous emissions when heated to 200˚C
(392˚F) for 0.1 seconds.
Moisture content
Smoothness
4% to 6% by weight.
100 to 250, Sheffield scale.
 Loading...