


MINOLTA
 INSTRUCTION MANUAL
INTRODUCTION
The Minolta DYNAX 7xi is one of the most innovative AF SLRs available For this reason, you are holding a large and rather intimidating owner's manual. However, not everything will pertain to you immediately, so read it in sections.
First, look over the parts diagrams and familiarize yourself with the controls, their names, and their locations. This will be helpful later when they are introduced in the manual and you learn about their functions. Next, read Preparations, beginning on p.8. Follow along and attach the strap, insert a battery, etc. Get used to holding the camera, working the controls, and seeing the displays.
Then, begin where you must with anything new — The Basics. Read it well, and you should then be ready to put the 7xi to work for you in the simplest way possible. As you use the camera, you will begin to realize the power of features such as:
•Expert system programming with fuzzy logic control
•High-Speed, Multi-Dimensional Predictive autofocus
•Expert Program Selection
•Graphic Display Viewfinder
•Creative Program Control
Operations in Detail and the Appendix are there for you to increase your mastery over this unique camera and its innovative technology, and to help you expand your control over the medium of photography.
IMPORTANT INFORMATION
The Minolta DYNAX 7xi was designed to work specifically with lenses, flash units, and other accessories manufactured and distributed by Minolta. We therefore caution users of this camera that the attachment and/or use of incompatible products with the 7xi may result in unsatisfactory performance or damage to the camera or its accessories.
To obtain optimum performance throughout the life of your DYNAX 7xi, we recommend that you use only those lenses, flashes and other accessories distributed by Minolta specifically for use with this camera.
1
TABLE OF CONTENTS
INTRODUCTION |
|
1 |
NAMES OF PARTS |
|
4 |
Neckstrap |
. . . . . . |
8 |
Eyepiece Cap |
|
9 |
Lens |
|
10 |
Attaching |
|
10 |
Removing |
|
11 |
Care of glass surfaces |
|
11 |
Battery |
|
12 |
Inserting |
|
12 |
Battery-condition indicators |
|
13 |
Battery Performance |
|
14 |
Cold-weather operation |
|
14 |
Film |
|
15 |
Loading |
|
15 |
Automatic/manual film speed setting |
|
18 |
Automatic/manual rewind |
|
20 |
Holding the Camera |
|
22 |
Taking Pictures |
|
23 |
Camera-Shake Warning |
|
25 |
Autofocus |
|
26 |
Focus Signals |
|
27 |
Focus Lock |
|
28 |
Programmed Autoexposure |
|
29 |
Creative Program Control |
|
31 |
PA |
|
32 |
Ps |
|
35 |
2

OPERATIONS IN DETAIL |
|
Main Switch and Eye-start |
39 |
Focusing Details |
40 |
Autofocus illuminator |
40 |
Local AF area selection |
41 |
Special focusing situations |
43 |
Manual focus |
44 |
Exposure Details |
46 |
Changing exposure mode |
46 |
Aperture priority |
48 |
Shutter priority |
50 |
Manual exposure |
52 |
Metering modes |
54 |
Exposure compensation |
56 |
AEIock |
58 |
Self-timer |
59 |
Bulb |
60 |
Flash System |
62 |
Flash modes |
62 |
P mode flash |
64 |
A, S, and M mode flash |
65 |
Slow-shutter sync flash |
68 |
Remote off-camera TTL flash |
70 |
Film drive |
74 |
Autozoom |
76 |
Auto stand-by zoom |
76 |
Image-size lock |
78 |
Wide-view mode |
80 |
APPENDIX |
|
Lens Aperture and Depth of Field |
84 |
Shutter Speed and Moving Subjects |
87 |
Composition |
88 |
Accessory Information |
90 |
Care and Storage |
92 |
Troubleshooting |
94 |
Technical Description |
95 |
Quick Reference Guide |
98 |

Names of Parts/Body
1. |
Grip sensor |
13. |
Back-cover release |
2. |
AF illuminator/self-timer light |
14. |
Lens release |
3. |
Wide-view mode button |
15. |
Focus-mode switch |
4. |
Strap eyelet |
16. |
Mounting index |
5. |
Front control dial |
17. |
Mirror* |
6. |
Shutter-release button |
18. |
Lens contacts* |
7. |
Card on/off button |
19. |
Film chamber |
8. |
Body data panel |
20. |
Eyepiece sensor |
9. Accessory shoe |
21 . Eyepiece cup |
||
10. |
Program-reset button |
22. AE Lock button |
|
11 |
Main switch |
23. |
Rear control dial |
12 |
Flash pop-up button |
24. Function button |
|
|
|
25. Film window |
|
4

26.Pressure Plate*
27.Accessory-back contacts*
28.Card door
29. Remote-control terminal |
Card Door |
30.Battery-cover release
31.Film-leader index
32.Sprocket
33.Tripod socket
34.DX contacts*
35.Self-timer/Drive mode button
36.Flash-mode button
37.Rewind button
38.ISO button
39.Card-adjust button
40.Card-eject slide
*Do not touch
5

Names of Parts/Body LCD
1.Exposure-mode indicators
2.Wide/Local focus indicator
3.Flash-mode indicators
4.Self-timer indicator
5.Drive-mode indicators
6.Frame counter
7.Film-transport signals
8.Film-cartridge mark
9.Aperture/Exposure Adjustment/Card setting displays
10.Card indicator
11. Exposure-adjustment indicator
12.Metering-mode indicators
13.Shutter-speed/film-speed/card name displays/ local-AF-area indicators
14.Exposure-adjustment reminder
15.Selectable Setting Pointers
16.Battery-condition indicator
17.Film-speed mark
6

Names of Parts/Viewfinder Screen
1.Image-size-lock indicator
2.Dial-function indicators
3.Wide-view indicator
4.Film-frame indicator
5.AF-area indicator
6.Local-AF-area indicator
7.Spot-metering area
8.Manual-focus indicator
9.Depth index
10.Action index
11.Panorama indicator
12.Image control index
Names of Parts/Viewfinder Data Panel
1.Flash-on indicator
2.Flash-mode indicator
3.Camera-shake warning
4.Focus signals
5.Exposure-mode indicators
6.Shutter-speed/Film-speed display
7.Exposure Signals/Exposure Adjustment indicator
8.Aperture/Exposure Adjustment display
9.AEL indicator
7
NECKSTRAP
A neckstrap is supplied with your camera. Attach it as shown below.
a
EYEPIECE CAP
An eyepiece cap is also included on the strap. It fits over the eyepiece to prevent stray light from entering the camera and affecting the exposure during situations in which you are not looking through the viewfinder when the shutter releases (ie, self-timer photographs or bulb exposures). An accessory shoe cap protects the contacts on the camera's accessory contacts from dust and dirt. When you are using a flash or other accessory, slide the accessory shoe cap into the eyepiece cap for safekeeping.
9
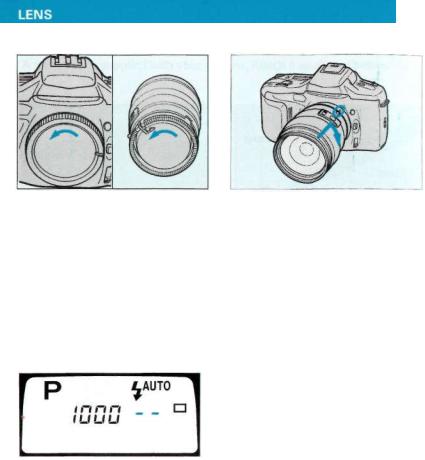
To attach:
1.Remove body cap and rear lens cap as shown.
2.Align the red bead on the lens barrel with the red dot on the camera's lens mount. Gently insert the lens into the mount and turn the lens clockwise until it locks in place with a click.
•If no lens is attached to the camera, if the lens is not attached properly, or if the AZ/MZ switch on an xi-Series lens is set to MZ, "--" will appear in the body data panel and in the aperture display of the viewfinder data panel when Eye-Start activates the camera (below).
10

To remove:
1.While pressing the lens release, turn the lens counterclockwise until it stops. Lift the lens out of the mount.
2.Immediately attach the rear cap to the lens and the body cap or another lens to the camera. This will protect the camera interior, lens contacts, and lens elements.
- |
Be |
carefu! |
• |
Do not to force the lens onto the body if it does not turn smoothly. |
|
• Never touch anything inside the camera, especially the lens contacts and mirror.
Care of Glass Surfaces
•Never touch any lens surfaces (including the eyepiece) with your fingers. If a lens becomes dirty, first gently clean it with a lens brush. Then, if necessary, moisten a sheet of lens tissue with one drop of lens-cleaning fluid and, starting from the center of the lens, wipe the glass in a circular motion.
•Never lift the mirror or touch its surface, as this may impair its alignment or scratch its face. Dust on the mirror's surface will not affect meter readings or picture quality. If it is distracting, have the camera cleaned at an authorized Minolta service facility.
11

The camera uses a 6-volt 2CR5 lithium battery which supplies power for all camera operations. If you are using an xi-Series lens, the camera battery also supplies power to the lens zoom motor.
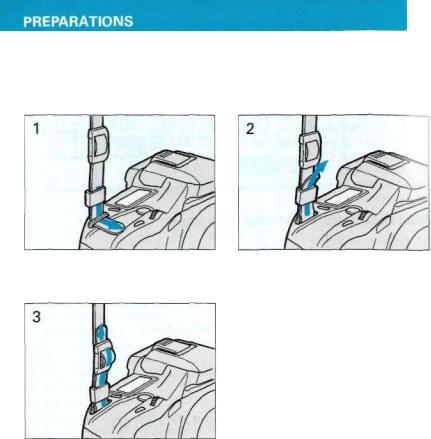
Installation
1.With the main switch in the LOCK position, slide the battery cover release in the direction indicated to open the battery cover.
2.Insert the battery according to the marks on the inside of the chamber cover.
3.Snap the cover closed.
• Sometimes it helps to wipe the battery terminals with a clean, dry cloth in order to ensure proper contact.
CAUTION
•Read and follow all warnings and instructions supplied by the battery manufacturer.
•Do not attempt to disassemble, recharge, or short-circuit the battery. Do not subject it to high temperatures or fire. The battery may explode and cause severe burns.
•Keep batteries away from children.
12

Battery-condition Indicators
At various times during operation, one of the following indicators will appear in the body data panel.
Display |
Indication |
Meaning |
|
|
1. Full-battery |
symbol |
Power is sufficient. |
|
appears for 4 sec. |
|
|
|
after you turn |
camera |
|
|
on. |
|
|
2.Low-battery symbol appears for 4 seconds after you turn camera on.
3.Low-battery symbol blinks while it appears with other operating indicators
at any time during use.
4.Blinking
low-battery symbol and
 appears, or no display appears at
all, and shutter locks
Power is sufficient, but getting low. Keep a fresh battery handy.
Camera can be operated, but power is extremely low. The battery will need to
be changed soon.
Power is insufficient for operation. Replace the battery or check that the battery is inserted correctly.
• If no display appears when the main switch is set to ON, double-check that the battery is inserted correctly before inserting a fresh one.
13
Battery Performance
The 6-volt 2CR5 lithium battery should provide sufficient power for shooting approximately 50 rolls of 24-exposure film without flash. These figures are based on Minolta's standard test method using a fresh battery at 68°F (20°C). Actual battery performance will depend on how you use the camera. If you install a new battery that has been in prolonged storage, battery performance may vary.
Cold-Weather Operation
Lithium batteries provide excellent performance in cold weather.
However, if you plan to shoot many rolls of film outdoors at temperatures near or below 32° F (0°C), we recommend that you carry the camera inside your coat while you are not shooting, to keep it warm . You may also want to carry a spare battery in your pocket so that you can change the camera battery if necessary. Do not discard a cold battery. After it warms up, it will regain some of its charge.
14
Loading Film
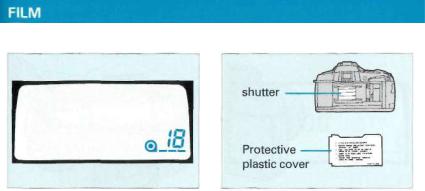
Before you load film, always check the body data panel. If the film cartridge is displayed, do not open the back cover. Check the film window and frame counter to verify the type of film in the camera and the number of frames remaining. (See p. 20 for instructions on rewinding a partially exposed roll of film.)
•Before you load film for the first time, remove and discard the protective plastic cover over the shutter.
•Always load film in subdued or shaded light.
-NEXT PAGE-
15
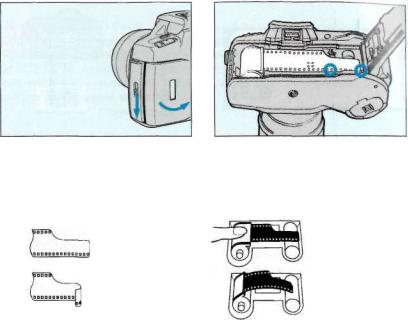
1.Open the back cover by sliding the back-cover release downward.
2.Place the film cartridge into the film chamber as shown above and extend the leader between the guide rails until the tip is just past the film-leader index. Make sure the holes in the film's lower edge are engaged by the sprocket teeth.
RIGHT |
RIGHT |
|
|
WRONG |
WRONG |
• Make sure the film leader is shaped correctly, otherwise the film may not wind properly. Trim a torn or crimped film tip so that it looks like the correct one pictured above left.
• If the film extends too far, gently push the excess back into the cartridge.
• NEVER TOUCH THE SHUTTER CURTAIN WITH YOUR FINGERS OR WITH THE FILM TIP. Its precision design makes it extremely sensitive to pressure.
-NEXTPAGE-
16
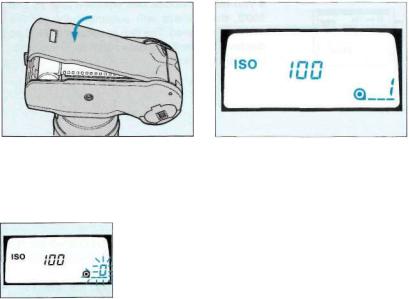
3. Close the back cover and move the main switch to ON. The camera will automatically advance the film to the first frame and 1 will appear in the film counter.
• If the film is loaded incorrectly, 0 will blink in the frame counter and the shutter will remain locked. Open the back cover and repeat steps 2 and 3.
• If you turn the main switch to ON before you load film, to not touch the grip sensor during the above procedures.
17

Automatic Film Speed Setting
If you use DX-coded film between ISO 25 and 5000, the camera will automatically set the correct film speed. The film speed setting will be displayed in the body data panel for 4 sec. after you load the film.
Manual Film Speed Setting
If you are using a non-DX-coded film or if you wish to override the automatic setting, you must manually set the film speed. The camera will initially set non-DX-coded film to the ISO of the previous roll; initially this value is set to 100.
1.Load the film and close the back cover.
2.Open the card door and press the ISO button.
-NEXT PAGE-
18
3. Turn either control dial until the desired film speed setting appears in the body data panel.
• Each click of the dials will change the film speed setting by 1/3-stop between ISO 6 and 6400.
4. Press the ISO button again to enter your selection and return to operating mode, or wait 4 sec. and the setting will be entered automatically.
•To check the film speed setting at any time during operation, press the ISO button. The ISO-speed will appear in the body data panel
•For flash exposures, Minolta recommends that you use film between ISO
25 and 1000.
19
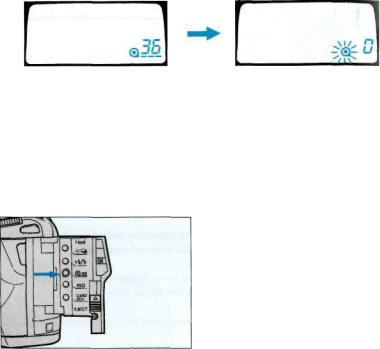
Automatic Rewind
After you have exposed the lastframe, the camera will automatically rewind the film. With a fresh battery, it takes about 9 sec. to rewind a 36-exposure roll, or 6 sec. for a 24-exposure roll. When the film has been completely rewound, the motor will stop and the film-cartridge symbol in the body data panel will blink to indicate that it is safe to open the camera back.
Manual Rewind
To begin rewind at any time, open the card door and press the rewind button.
• If the motor stops before the film is completely rewound, insert a fresh battery.
20
SIMPLE OPERATION
-THE BASICS
This brief section explains the simplest way to use your new camera—with programmed autoexposure, autofocus, autoflash, and single-frame advance. Details on each of the camera's functions begins on page 38 in the section entitled "Operation in Detail".
21
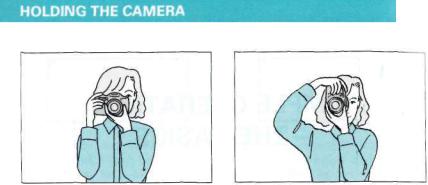
Hold the grip firmly in your right hand and use your left hand to support the camera or lens. Keep your elbows securely against your sides when shooting both horizontal and vertically pictures. Press the shutter-release button gently in a single, steady motion —never with a quick jab. Always keep the camera strap around your neck or wound around one wrist.
•When you pick up the camera, make sure you touch the grip sensor. Otherwise, Eye-Start will not function.
•Do not touch thefocusing ring of an AF lens or the end of the lens barrel of an xi-Series Autozoom lens.
•Do not block the AF illuminator when you are using autofocus.
22

1. Slide the main switch to ON and press the program-reset button to set full-automatic operation.
• Pressing the program-reset button sets the camera to programmed autoexposure mode, honeycomb-pattern metering, autofocus, single-frame film advance, + / - 0 . 0 exposure compensation, wide autofocus area, and auto switchover flash. Many of these default positions can be changed with the Customized Function Card-xi.
-NEXTPAGE-
23

2.Hold the camera as described on p.22.
3.Look through the eyepiece, place your subject somewhere within the autofocus area, and press the shutter-release button down to take the picture.
4.After the exposure has been made, the camera will automatically advance the film to the next frame and increase the film counter by one.
•The focus signal will light in the viewfinder data panel when your subject
is in focus. See p.27 for a list of focus signals.
•If you do not touch the grip sensor you must activate AF and AE by pressing the shutter-release button partway down. Again, the in-focus signal will light when the camera has focused on a subject.
•If the focus signal blink in the viewfinder data panel, you must focus on something else that is the same distance from you as your subject or else focus the lens manually. Refer to p.43 for more information.
24

When your subject or scene is too dark to allow a clear hand-held photograph, the camera-shake warning will blink in the viewfinder data panel. The built-in flash will pop-up automatically, if it is required, when you press the shutter-release button partway down and will fire when you take the picture. You should also consider using a tripod.
• More information on flash operation in all exposure modes can be found beginning on p.62.
25

Autofocus (AF)
The autofocus system uses expert programming and fuzzy logic to determine which of the AF sensors is detecting your main subject. The camera's ultra-wide AF area has four sensors —two vertical and two horizontal. When you hold the camera horizontally, all four sensors are active; when you hold the camera vertically, the top horizontal sensor shuts off and the AF area changes to its vertical mode.
26

Focus Signals
When the camera is activated, either by Eyestart or by pressing the shutter-release button partway down, the AF system immediately begins evaluating the scene to determine the location of your subject within the frame. One of the following focus signals will be displayed in the viewfinder data panel:
Continuous AF mode/focus is confirmed
|
Focus is locked |
|
|
[blinking] |
Focus cannot be confirmed. |
•No indicator will be displayed while the lens is focusing.
•If your subject is moving, the camera will automatically enter continuous autofocus mode. In this mode, the autofocus system will repeatedly check and update focus until you press the shutter-release button all the way down. At that time, the camera will predict where the subject will be when the shutter actually makes the exposure and will set the lens to this point so that even high-speed subjects shot in continuous drive mode will remain in focus.
•If your subject is stationary when Eye-start first activates the autofocus system, the camera will enter continuous mode. It will remain in continuous mode if your subject moves before you press the shutter-release button partway down. Focus will lock if it remains stationary.
•In autofocus mode, if focus cannot be confirmed, the shutter will not release.
27

If, as a result of the composition or framing you have chosen, your subject falls outside the main AF area, use focus lock to lock focus on it, then recompose the scene as desired.
1.Place your subject in the center of the AF area and press the shutter button partway down.
2.Hold the shutter button in this position, recompose the picture, and press the shutter button all the way down to take the picture.
28
 Loading...