


E
QUICK OPERATION
BASIC OPERATION
SUBJECT PROGRAM SELECTION
ADDITIONAL FEATURES
APPENDIX

Thank you for purchasing a Minolta camera. This manual has been designed to help you understand the operation of your Minolta camera more quickly. After familiarizing yourself with the camera, start with Basic Operation and learn to operate the camera in FullAuto mode. Move on to Subject Program selection when you are comfortable with the camera and want to have more control. Here you decide the type of image you want to photograph and leave the exposure details to the camera.
The information in this manual is relevant for products introduced before June, 1999. Contact the nearest authorized Minolta Service facility to obtain compatibility information for products released after this date.
This mark certifies that this product meets the requirements of the EU (European Union) concerning interference causing equipment regulations. CE stands for Conformité Européenne (European Conformity).
This device complies with Part 15 of the FCC Rules. Operation is subject to the following two conditions: (1) This device may not cause harmful interference, and (2) this device must accept any interference received, including interference that may cause undesired operation. Changes or modifications not approved by the party responsible for compliance could void the user's authority to operate the equipment. This equipment has been tested and found to comply with the limits for a Class B digital device, pursuant to Part 15 of the FCC Rules. These limits are designed to provide reasonable protection against harmful interference in a residential installation. This equipment generates, uses and can radiate radio frequency energy and, if not installed and used in accordance with the instructions, may cause harmful interference to radio communications. However, there is no guarantee that interference will not occur in a particular installation. If this equipment does cause harmful interference to radio or television reception, which can be determined by turning the equipment off and on, the user is encouraged to try to correct the interference by one or more of the following measures:
•Reorient or relocate the receiving antenna.
•Increase the separation between the equipment and the receiver.
•Connect the equipment to an outlet on a circuit different from that to which the receiver is connected.
•Consult the dealer or an experienced radio/TV technician for help.
This Class B digital apparatus conplies with Canadian ICES-003.
FOR PROPER AND SAFE USE
Read and understand all warnings and cautions before using this product.
WARNING
Batteries may become hot or explode due to improper use.
•Use only the batteries specified in this instruction manual.
•Do not install the batteries with the polarity (+/-) reversed.
•Do not subject batteries to fire or high temperatures.
•Do not attempt to recharge, short, or disassemble.
•Do not mix batteries of different types, brands, or ages.
•Tape over lithium battery contacts before disposal.
•Follow local regulations for battery disposal.
Keep batteries and other things that could be swallowed away from young children. Contact a doctor immediately if an object is swallowed.
Immediately remove the batteries and discontinue use if…
•the camera is dropped or subjected to an impact in which the interior is exposed.
•the camera emits a strange smell, heat, or smoke.
Do not disassemble. Electric shock may occur if a high voltage circuit inside the camera is touched. Take your camera to a Minolta Service Facility when repairs are required.
Do not look directly at the sun through the viewfinder.
CAUTION
Do not allow a camera lens to point directly at the sun. Fire may occur if sunlight comes to focus on a flammable surface. Replace the lens cap when the product is not being used.
1

TABLE OF CONTENTS |
|
NAMES OF PARTS .............................................................. |
4 |
QUICK OPERATION ............................................................ |
8 |
BASIC OPERATION |
|
Attaching the Strap................................................................ |
11 |
Batteries ................................................................................ |
12 |
Lens....................................................................................... |
14 |
Loading Film.......................................................................... |
16 |
Handling the Camera ............................................................ |
18 |
Taking Pictures in Full-Auto .................................................. |
19 |
Focus |
|
Focus signals.................................................................. |
20 |
Special focus situations .................................................. |
21 |
Focus hold ...................................................................... |
22 |
Using the Built-in Flash |
|
Flash signals................................................................... |
23 |
Flash range..................................................................... |
23 |
Changing the flash mode................................................ |
24 |
Auto flash........................................................................ |
24 |
Auto flash with red-eye reduction ................................... |
25 |
Fill flash........................................................................... |
25 |
Fill flash with red-eye reduction...................................... |
26 |
Flash cancel.................................................................... |
26 |
Lens shadowing.............................................................. |
27 |
Rewinding the Film |
|
Automatic........................................................................ |
28 |
Manual ............................................................................ |
29 |
2
SUBJECT PROGRAM SELECTION |
|
Portrait Mode .............................................................................. |
32 |
Landscape Mode ........................................................................ |
33 |
Close-up Mode...................................................................... |
34 |
Sports Mode.......................................................................... |
35 |
Night Portrait Mode ............................................................... |
36 |
Photographing Night Scenes ................................................ |
37 |
Self-timer ............................................................................... |
38 |
Continuous Advance ............................................................. |
39 |
For Owners of the date model. ............................................. |
40 |
Exposing the Date/Time .................................................. |
41 |
Setting the Date/Time ...................................................... |
42 |
Replacing the Battery ...................................................... |
43 |
ADDITIONAL FEATURES |
|
Manual Focus ...................................................................... |
45 |
AF Illuminator........................................................................ |
46 |
Wireless/Remote Flash ........................................................ |
48 |
APPENDIX |
|
Accessory Information........................................................... |
53 |
Trouble Shooting ................................................................... |
56 |
Care and Storage.................................................................. |
58 |
Specifications ........................................................................ |
60 |
3
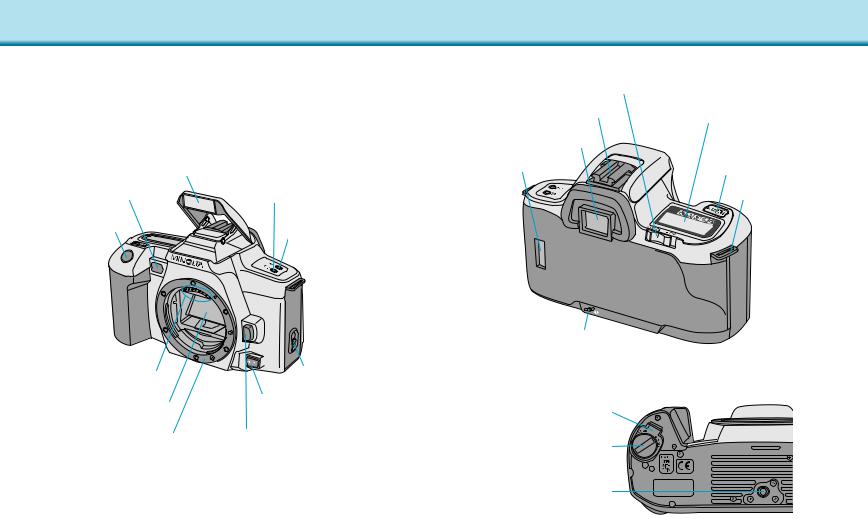
NAMES OF PARTS
For information on specific parts, refer to the page numbers shown in parenthesis.
Body
Built-in flash (23 ~ 27)
Self-timer lamp (38)
Shutter-release button (9)
Lens contacts *
Mirror *
Lens mount (14)
Self-timer / Drive-mode button (38 ~ 39)
Flash-mode button (24)
Back-cover release (16 ~ 28)
Focus-mode button (45)
Lens release (15)
* Do not touch.
4
Main switch (19)
Accessory shoe
Viewfinder (7) *
Film window (16)
Manual-rewind button (29)
Battery-chamber door (12)
Battery-chamber lock (12)
Tripod socket
Data panel (6)
Subject program button (31)
Strap eyelet (11)
5

NAMES OF PARTS
Data Panel
Flash-mode indicators (24)

 - Auto flash

 - Auto flash with red-eye reduction
 - Fill flash

 - Fill flash with red-eye reduction
 - Flash cancel
Red-eye reduction indicator (25)
Wireless/Remote flash indicator (48)
Self-timer indicator (38)
Drive-mode indicaor (39)
Program-mode indicator (31)
Subject-program indicators (31)
Portrait Mode
Landscape Mode
Close-up Mode
Sports Mode
Night Portrait Mode
Frame counter (17)
Film-transport signals (17)
Cartridge mark (17)
Battery-condition indicator (13)
Manual-focus indicator
(45)
6
Viewfinder
Focus frame (19)
Focus signals (20)
Flash signal (23)
Focus signals
Focus is confirmed
Continous focus is confirmed
Focus cannot be confirmed
Flash signals
Flash is charged
(Blinks fast)- Flash is charging and the shutter cannot be released
(Blinks slowly - after picture is taken) - Previous exposure was correct
7

QUICK OPERATION
1. Insert batteries.
• This camera uses two CR2 lithium batteries.
2. Attach lens.
• Align the red mounting dot on the lens with the one on the camera. Gently insert the lens into the mount and turn it clockwise until it clicks into the locked position.
3. Turn on power.
• Slide the main switch to ON.
8 |
4.Load film.
•Align the film tip with the red mark, then close the back cover.
5If using a zoom lens, rotate the zooming ring to frame your subject as desired.
6Center your subject in the focus frame, then press the shutter release button partway down.
•The camera will focus and set exposure automatically.
7Take the picture.
•Gently press the shutter-release button all the way down to take the picture.
9

ATTACHING THE STRAP
BASIC OPERATION
This section provides the information necessary to operate your camera in most photographic situations.
This section covers:
• Battery Installation
• Attaching and Removing the Lens
• Loading the Film
•Camera Handling
•Fully Automatic Camera Operation
•Special Focus Situations
•Basic Flash Operation
•Rewinding the Film
Once you fully understand the instructions in this section, proceed to Subject Program Selection and Additional Features to obtain more enjoyment from your camera.
Attach the strap through the strap eyelets as shown. Pull firmly on the strap to make sure it is secure.
Repeat for the other side.
10 |
11 |

BATTERIES
Installing the Batteries
Your camera uses two 3V CR2 lithium batteries to supply power for all camera operations.
1. Using a coin or similar object, turn the batterychamber lock to OPEN, then open the battery-chamber door.
2. Insert the batteries as indicated by the + and – marks.
3. Close the battery-chamber door, then turn the batterychamber lock to CLOSE.
• Setting the camera down with the battery-chamber door open may damage the camera.
12
Checking Battery Power
Each time the main switch is set to ON, a battery symbol appears in the data panel indicating the power status of the batteries.
Full-battery symbol
Power is sufficient for all camera operations.
•  will only appear for five seconds.
Blinking low-battery symbol
Power is extremely low. All functions are operational, but the batteries will need to be replaced soon. Flash recycling time may be slow.
Blinking low-battery symbol appears alone and the shutter locks.
Power is insufficient for camera operation. Replace the batteries.
No display
Power is too low for the camera to operate. Replace the batteries or make sure they have been inserted correctly.
13

LENS
Attaching the Lens
1. Remove the body and rear lens caps.
2. Align the red mounting dots on the lens and camera body.
Caution |
3.Gently insert the lens into the mount, then turn it clockwise until it clicks into the locked position.
•Do not insert the lens at an angle.
•Do not press the lens release when attaching the lens.
•Do not force the lens if it does not turn smoothly.
•Do not touch the inside of the camera, especially the lens contacts and mirror.
14
Removing the Lens
1. Press the lens release and turn the lens counterclockwise until it stops.
2. Gently remove the lens and replace caps, or attach another lens.
15

LOADING FILM
Check the film window before loading film. If film is loaded, do not open the back cover. Refer to Manual Rewind on page 29 for instructions on removing a partially exposed roll.
•Load film in the shade to reduce the chances of fogging the film.
•Do not use Polaroid Instant 35mm film. Winding problems may occur.
•If DX-coded film is used, the camera automatically sets the correct ISO (film speed).
•If non DX-coded film is used, the camera will use the previous roll’s ISO setting.
•Do not use infrared film in this camera. The camera’s frame counter sensor will fog infrared film.
1. Slide the back-cover release down to open the back cover.
2. Insert a film cartridge into the film chamber.
shutter curtain
The shutter curtain’s precision design makes it extremely sensitive to pressure. Never touch it with your fingers or the film tip.
16
3. Extend the leader between |
the guide rails to the index |
mark. |
• If the film tip extends beyond the index |
mark, push the excess film back into |
the cartridge. |
4. Close the back cover.
• The camera automatically advances the film to the first frame. 1 will appear in the frame counter.
• 
 blinks in the frame counter and the shutter locks when the film is loaded incorrectly. Open the back cover and repeat steps 2 – 4.
If film is loaded with the power off
An 
 appear in the data panel for approx. five seconds to indicate successful loading, then the camera shuts down.
•If the film did not load, 
 will blink in the data panel before the camera shuts down. Reload the film.
17
 Loading...