

Page 1
Quick Reference Guide
BeneVision TD60
Display Telepack
Page 2

Note: The TD60 Quick Reference Guide is not intended
as a replacement to the Operating Instructions. Prior
to operating equipment, the user must be familiar
with the Operating Instructions Manual contents. This
document is a guideline only to be used as an aid to
comprehensive Inservice Training.
Page 3

TD60 Physical View .................................................1
General Navigation .................................................3
Swipe for More Data ....................................................3
View More Data ........................................................4
Quick Key/Screen Menu Bar Deployment ................................5
Patient Setup .......................................................6
Admit ..................................................................6
Discharge ..............................................................6
Adjust Patient Category ................................................6
Standby .............................................................7
Enter Standby ..........................................................7
Resume Monitoring ....................................................8
Printing .............................................................8
Nurse Call ...........................................................8
Activate a Nurse Call ...................................................8
Acknowledge the Nurse Call ............................................8
ECG ..................................................................9
Select ECG Leadwire ....................................................9
Lead Placement ........................................................9
Enable Pacer ..........................................................10
Resp ............................................................... 11
Set NCM Alarm Delay ..................................................11
SpO2 (OPTIONAL) ................................................. 12
Connect the SpO2 Module .............................................12
Initiate the SpO2 Measurement ........................................13
NIBP (OPTIONAL) ................................................. 14
Table of Contents
P/N: H-046-007060-00 Rev 3.0
Page 4

Pair a TD60 with a BP10 ................................................14
Pair a TD60 with a New BP10 ...........................................14
Unpair a TD60 with a BP10 via the TD60 ................................15
Unpair a TD60 with a BP10 via the BP10 ................................15
Technical Alarms .................................................. 15
Alarm Reset ...........................................................15
Screen Display . ...................................................16
Switch Orientation. . . . . . . . . . . . . . . . . . . . . . . . . . . . . . . . . . . . . . . . . . . . . . . . . . . . .16
Flip the Landscape Display .............................................16
Adjust Display Order ...................................................17
Screen Lock/View Only Mode . ...................................17
Enable the Screen Lock . . . . . . . . . . . . . . . . . . . . . . . . . . . . . . . . . . . . . . . . . . . . . . . .17
Unlock the Screen in Locked Mode .....................................18
Unlock the Screen in View Only Mode .................................18
Adjust Volumes ...................................................18
Parameter Colors ................................................. 19
Clean/Disinfect the TD60 ......................................... 19
Clean the TD60 .......................................................19
Disinfect the TD60 .....................................................23
Clean/Disinfect Reusable Accessories ............................23
Sterilization .......................................................23
P/N: H-046-007060-00 Rev 3.0
Table of Contents (cont'd)
Page 5
P/N: H-046-007060-00 Rev 3.0
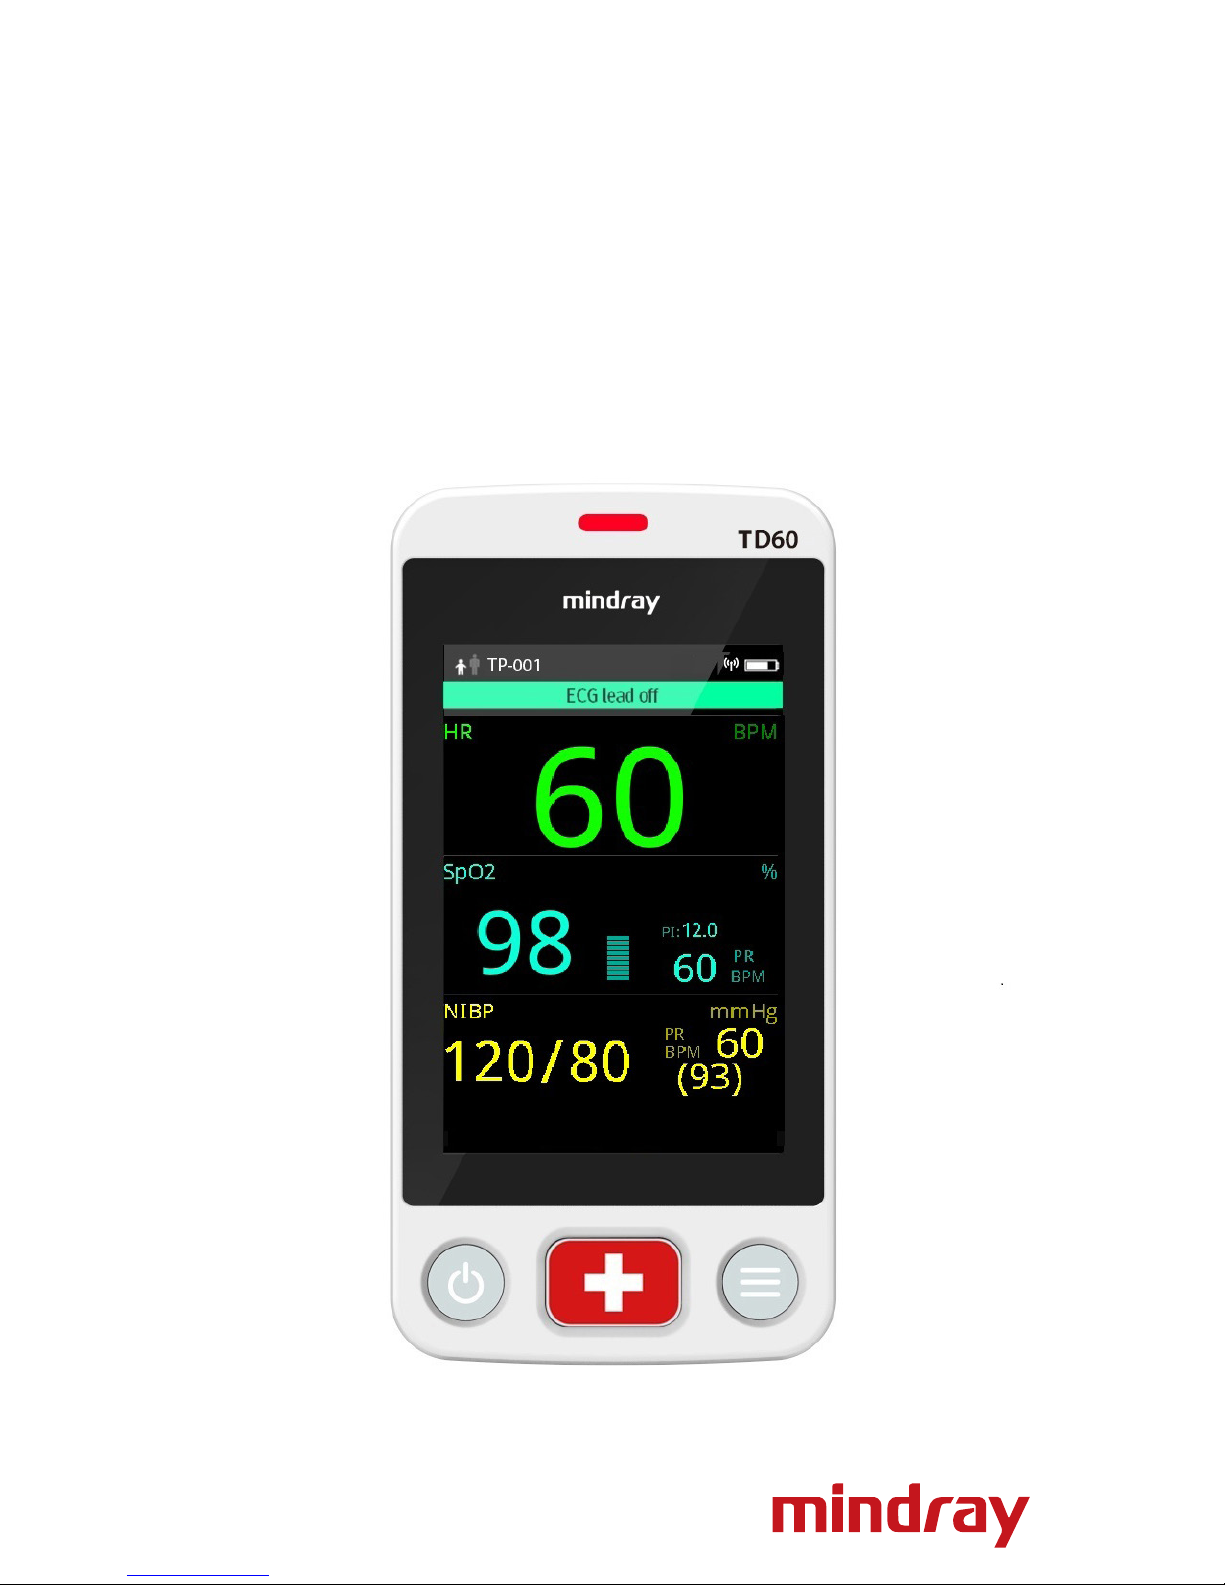
1
BeneVision TD60 Quick Reference Guide
TD60 PHYSICAL VIEW
1. Display Activation (Power On/Off ) key
When the TD60 is powered off
• Pressing this key will turn the TD60 on.
When the TD60 is powered on
• And the screen display is on, pressing this key will turn the display off.
• And the screen display is off, pressing this key will turn the display on.
• Press and hold this key for two seconds to display the power off
confirmation menu.
2. Nurse Call key
Nurse call key activates nurse call message at the Central Monitoring
System (CMS).
3. Main Menu key
• Pressing this key when on the main screen will open the main menu.
• Pressing this key when a menu is open will return to the main screen.
• Pressing this key when the display is off will turn the display on.
• Pressing this key when the screen lock mode is configured for View Only
will display the Screen Locked menu.
5
4
3
1 2
6 8
7
9
10
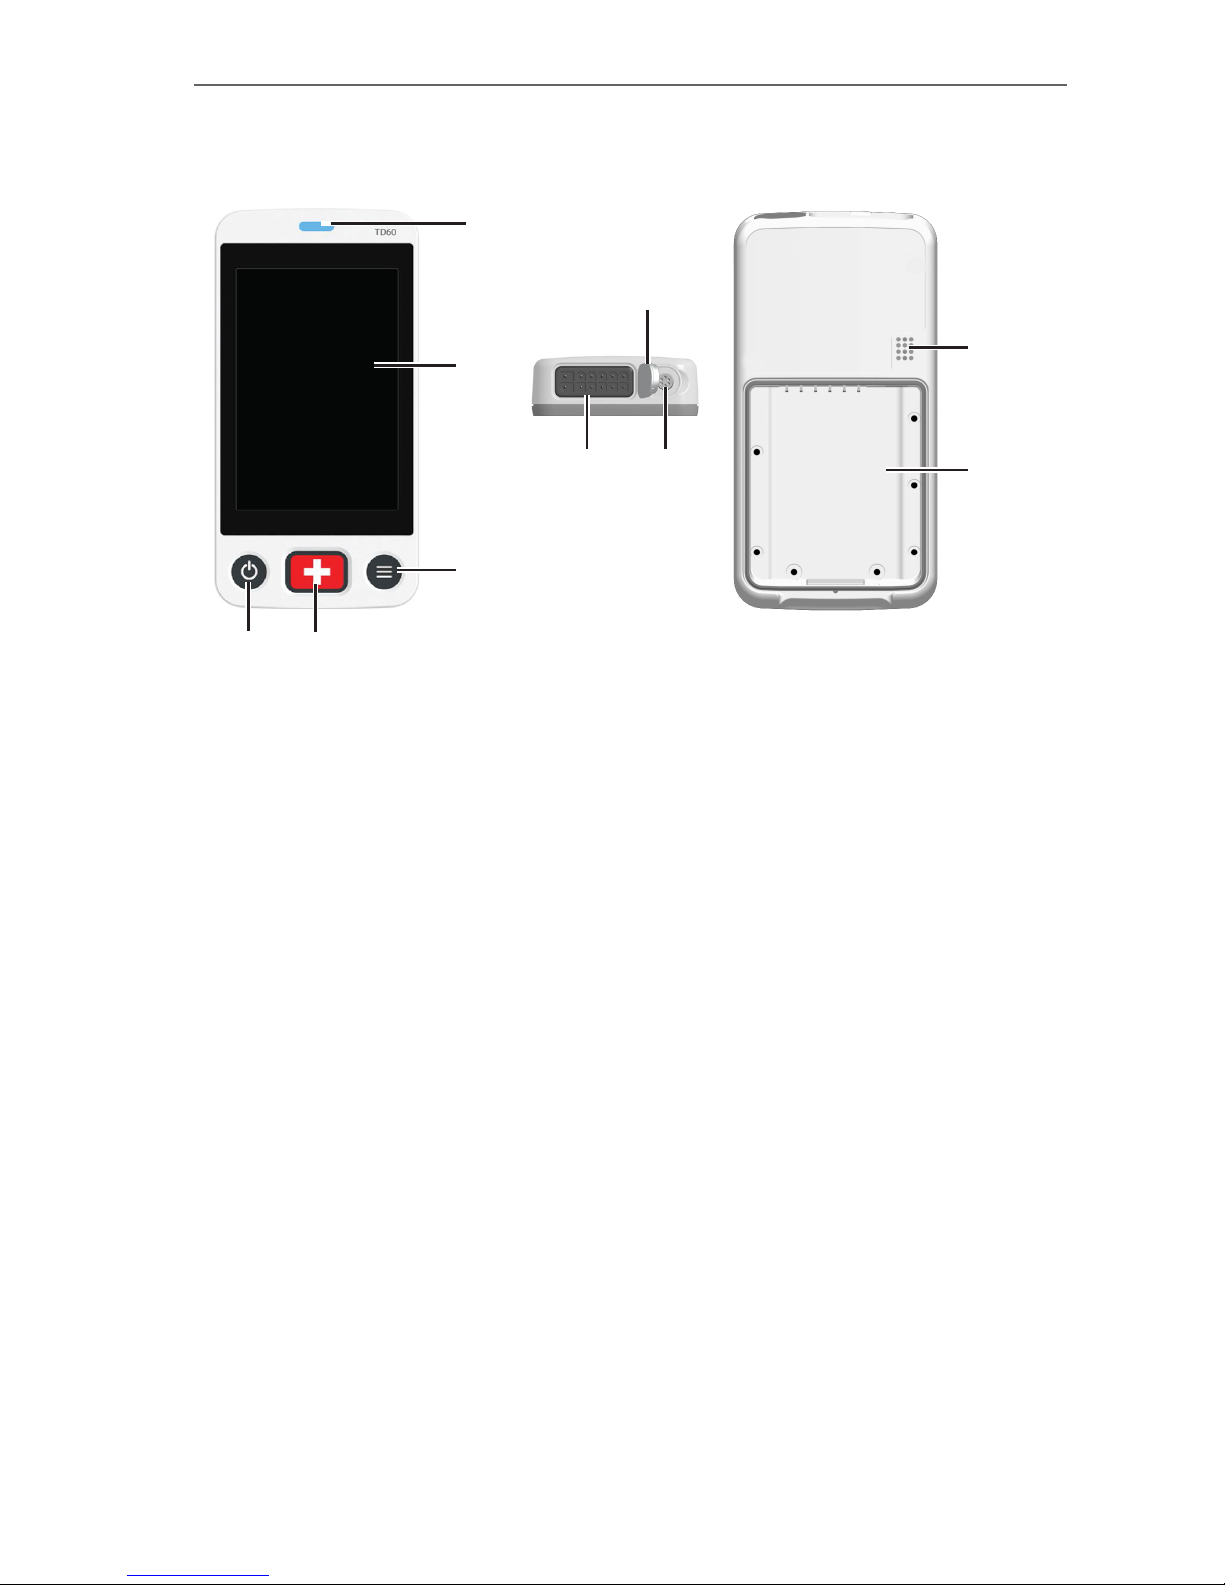
Page 6

P/N: H-046-007060-00 Rev 3.0
2
BeneVision TD60 Quick Reference Guide
4. Display
Touch screen display for viewing patient information and adjusting patient
settings.
5. Patient alarm light indicator
6. ECG lead connector
7. SpO2 cap
Covers SpO2 connector when SpO2 is not in use.
8. SpO2 connector
Connects the SpO2 module.
9. Speaker
10. Battery compartment
Contains the lithium-ion battery pack or AA battery tray.
Page 7
P/N: H-046-007060-00 Rev 3.0
3
BeneVision TD60 Quick Reference Guide
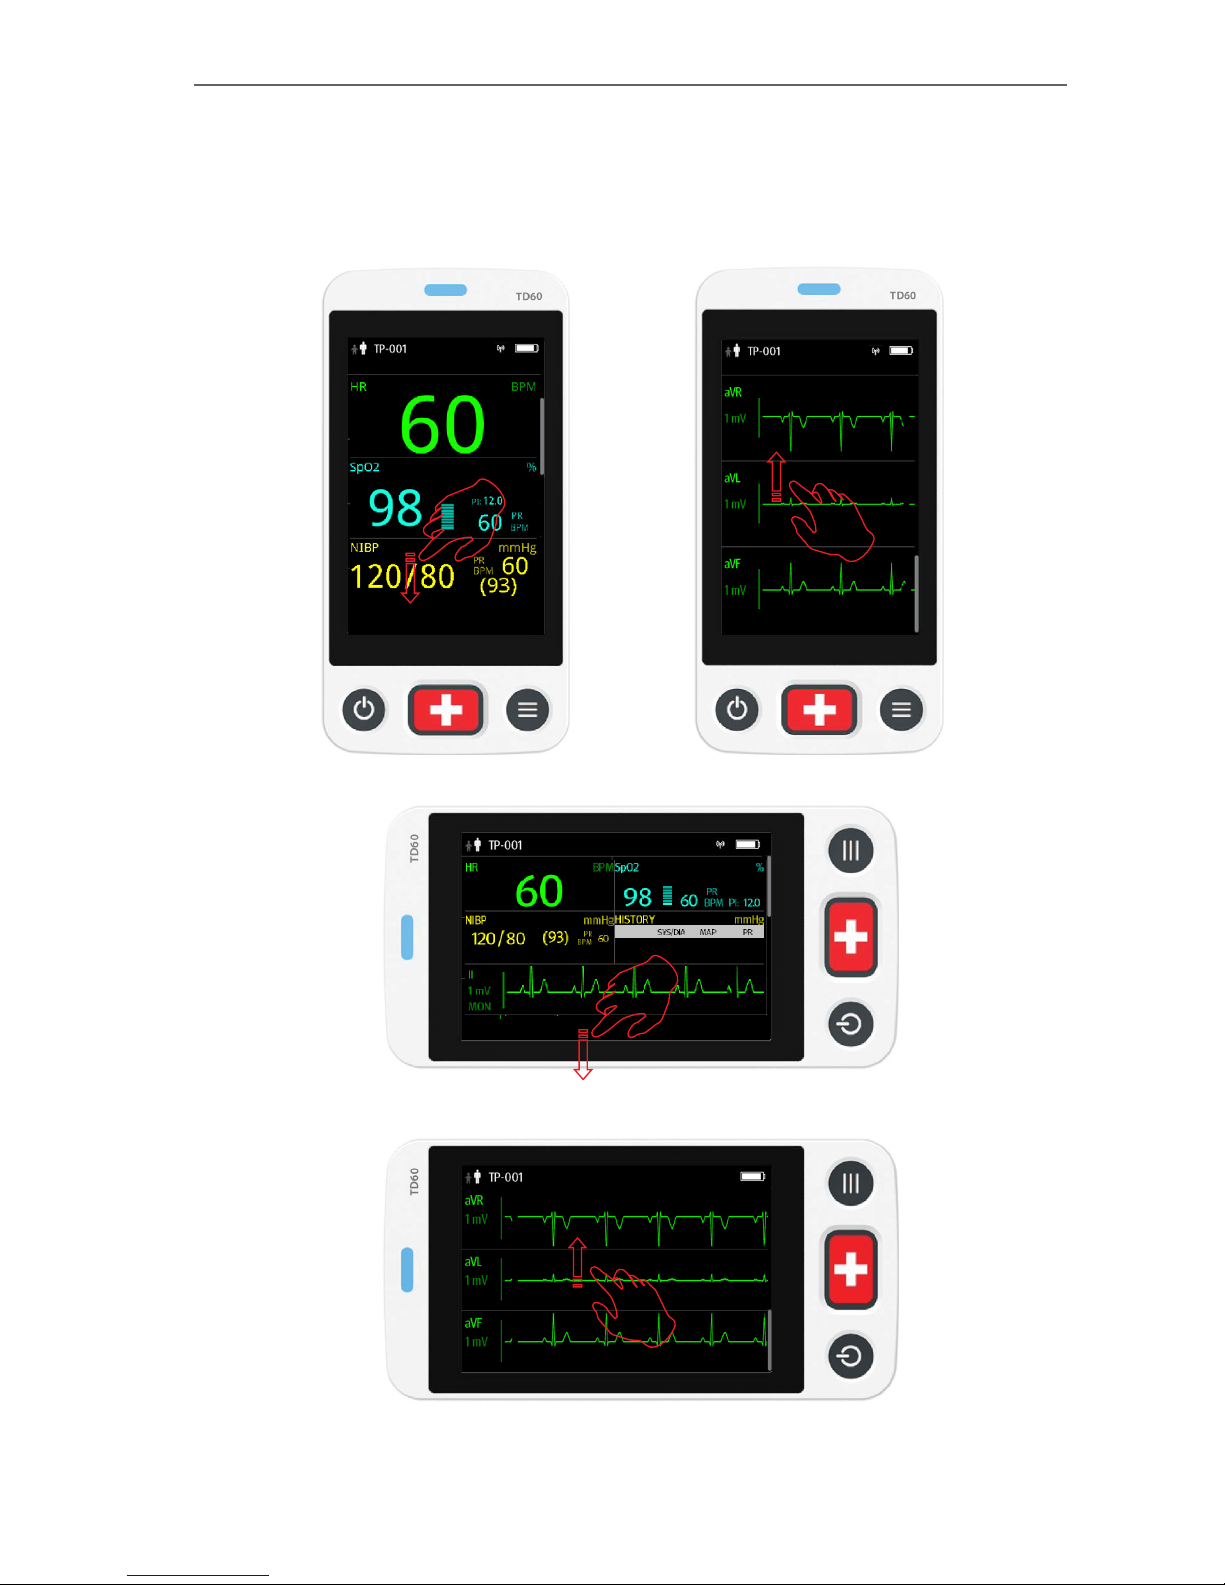
GENERAL NAVIGATION
Swipe for More Data
Swipe
Swipe
Swipe
Swipe
Page 8

P/N: H-046-007060-00 Rev 3.0
4
BeneVision TD60 Quick Reference Guide
View More Data
The TD60 provides the following shortcuts to access additional information, as
shown in the following figure:
• Tap to enter the Patient Info menu
• Tap to to view the MPAN info
• Tap to enter the System Info menu to view Battery Information
Page 9

P/N: H-046-007060-00 Rev 3.0
5
BeneVision TD60 Quick Reference Guide
Quick Key/Screen Menu Bar Deployment
Note: The quick keys are configurable. This image is just representative.
Swipe up
Press
Page 10

P/N: H-046-007060-00 Rev 3.0
6
BeneVision TD60 Quick Reference Guide
PATIENT SETUP
Admit
When admitting a TD60 for the first time, the device must be admitted to the
system through the CMS.
After first admitting the device to the CMS, you can directly admit the next
patient on the TD60 by discharging the previous patient, and then pressing
to admit a new patient.
Discharge
Discharging the patient will stop monitoring, clear patient information, and
restore default (preset) settings on the TD60.
A patient can be discharged by selecting the Discharge Patient menu, and
then selecting that a new patient is on the TD60.
Note: Discharging the patient on the TD60 discharges the patient from the
CMS.
Select the Discharge Patient menu
1. Press to enter the main menu.
2. Tap Discharge Patient.
3. Select Ye s .
• The patient is discharged from both the TD60 and the CMS.
• The patient's configuration is cleared and the configuration is restored
to the saved user configuration or factory default configuration.
• The patient will be added to the discharged patients list at the CMS.
4. Press to admit a new patient.
Adjust Patient Category
The Patient Info menu allows the clinician to adjust the patient category.
Note: Ensure the patient category selection is appropriate for the patient
before monitoring begins. The supported patient categories are Adult
and Pediatric.
Page 11

P/N: H-046-007060-00 Rev 3.0
7
BeneVision TD60 Quick Reference Guide
To adjust the patient category:
1. Press to enter the main menu.
2. Tap Patient Info.
3. Tap Patient Category to select the patient category.
4. Select Ye s to confirm that the patient category should be changed
The selected patient category displays to the right of Patient Category.
5. Press to return to the main screen.
Note: The patient category can only be changed on the TD60.
Note: Adjusting patient category restores the TD60 to the default (preset)
settings but does not clear patient information or data.
Note: When the device is connected to the CMS, the patient
category at the CMS is updated if the patient category is changed
on the TD60.
STANDBY
Enter Standby
Placing a device into Standby:
• Suspends patient monitoring.
• Alarms are suspended.
• Displays Standby on the screen.
• The screen display automatically turns off after the device enters the
Standby mode for 30 seconds.
Note: When connected to the CMS, and a device enters or exits Standby mode,
the CMS is also notified to enter or exit Standby mode.
To enter Standby mode:
1. Press to enter the main menu.
2. Tap Standby.
3. Select Yes to confirm the device should enter Standby mode.
Page 12

P/N: H-046-007060-00 Rev 3.0
8
BeneVision TD60 Quick Reference Guide
Resume Monitoring
• Restores patient's settings, resumes alarm notification on the TD60 and
the CMS.
• Alarm system is activated.
• The TD60 notifies the CMS of returning to Monitoring mode.
To exit Standby mode:
Press to exit Standby mode.
PRINTING
The clinician is able to print a strip from the TD60 to the CMS.
To print a strip:
Select Print from the quick key area or Command section in the main menu.
NURSE CALL
Activate a Nurse Call
Press to activate a nurse call request to the CMS. The alarm light/indicator
will flash cyan, and a “Nurse Call Initiated” message will display in the message
area if the display is active.
Acknowledge the Nurse Call
The clinician can acknowledge the nurse call on the TD60.
To acknowledge the nurse call alarm:
1. Press to enter the main menu.
2. Tap Attendant Present.
The “Nurse Call Cancelled” message will display in the message area.
Page 13

P/N: H-046-007060-00 Rev 3.0
9
BeneVision TD60 Quick Reference Guide
ECG
Select ECG Leadwire
The TD60 allows the clinician to set the ECG Leadwire Type being used. To
configure the ECG Leadwire Type:
• On the main screen, tap the HR digital area or ECG waveform area to
enter the ECG menu.
OR
1. Press to enter the main menu.
2. Tap Parameter Setup.
3. Tap ECG.
4. Select Cable Type.
5. Select
• Auto: the device automatically sets the leadwire type according to the
leads connected.
• 3 Lead: to select 3-leadwire set
If the leadwire type is set to 3-lead, the Smart Lead option becomes
Monitored Lead. The clinician can select the preferred lead from the
Monitored Lead.
• 5 Lead: to select 5-leadwire set
All ECG leads display on the main screen.
6. Press to return to the main screen.
Lead Placement
The TD60 Lead Placement menu allows the clinician to check the ECG Lead
Status and troubleshoot Lead Fault messages. To enter the Lead Placement
menu:
• Tap the lead off message on the main screen.
OR
• Press to enter the main menu, and then tap Lead Placement.
Page 14

P/N: H-046-007060-00 Rev 3.0
10
BeneVision TD60 Quick Reference Guide
The Lead Placement window indicates the lead status.
When any of the leads are off, the indications are as follows:
• The lead off message displays on the information bar.
The background color of the information bar corresponds to the alarm
level.
• A flashing circle indicates the disconnected lead.
The color of the flashing circle is based on the alarm level.
Enable Pacer
The TD60 allows the clinician to enable pacemaker detection. The symbol
displays in the waveform area on the CMS when the pacemaker detection in
enabled.
To enable the pacemaker detection on the TD60:
• On the main screen, select the HR digital area or ECG waveform area to
enter the ECG menu.
OR
1. Press to enter the main menu.
2. Tap Patient Info.
3. Tap Paced to enable Pacer by selecting Yes.
4. Press to return to the main screen.
Information bar
Lead off indicator
Lead on indicator
Page 15

P/N: H-046-007060-00 Rev 3.0
11
BeneVision TD60 Quick Reference Guide
RESP (OPTIONAL)
Set NCM Alarm Delay
The TD60 allows configuring the desired time for NCM Alarm Delay. When
the patient has stopped breathing for longer than the set NCM Alarm Delay
time, the TD60 will trigger the "No Chest Movement" alarm.
To set NCM Alarm Delay:
• On the main screen, tap the Resp digital area or Resp waveform area to
enter the Resp menu.
OR
1. Press to enter the main menu.
2. Tap Parameter Setup.
3. Tap Resp.
4. Set NCM Alarm Delay.
Note: The "No Chest Movement" alarm is displayed on the Central Monitoring
System only.
Note: The Resp functionality for the TMS60 telemetry monitoring system is
available at the CMS whose version is 03.00 and above only.
Page 16

P/N: H-046-007060-00 Rev 3.0
12
BeneVision TD60 Quick Reference Guide
SpO2 (OPTIONAL)
The TD60 allows continuous pulse oximetry.
Connect the SpO2 Module
Connect the SpO2 module to the TD60 as shown in the following figure.
Connecting the Masimo SpO2 module
SpO2 module
SpO2 sensor connector
SpO2 sensor
Page 17

P/N: H-046-007060-00 Rev 3.0
13
BeneVision TD60 Quick Reference Guide
Connecting the Nonin SpO2 module
Initiate the SpO2 Measurement
1. Connect the sensor to the SpO2 module and the SpO2 module to the
TD60.
2. Select an appropriate sensor according to the patient size, and weight.
3. Prepare the SpO2 site in accordance with hospital policy.
3. Apply the sensor to the patient.
The SpO2 measurement will display when the SpO2 module acquires a
signal from the patient.
SpO2 module
SpO2 sensor connector
SpO2 sensor
Page 18

P/N: H-046-007060-00 Rev 3.0
14
BeneVision TD60 Quick Reference Guide
NIBP (OPTIONAL)
The TD60 allows non-invasive blood pressure (NIBP) monitored by a BP10 NIBP
module.
Pair a TD60 with a BP10
1. Press the MPAN key on the right panel of the BP10. The“Pairing...”
message will display in the message area of the BP10.
2. Press to enter the main menu.
3. Tap Wireless Modules.
4. Enable MPAN.
The TD60 starts searching the BP10 devices in the vicinity and
displays the devices that can be connected under Devices. Make sure
that the device you wish to connect appears in the list of devices. If not,
repeat Steps 1 to 4.
5. In the list of devices, select your desired device and tap Connect. Once
the device is connected successfully, the status will be changed from
Disconnect to Connected.
6. Tap anywhere in the NIBP digital area on the main screen to access the
NIBP menu.
7. Tap Start to start NIBP measurement. Verify that the NIBP measurement
results displayed at the BP10 are consistent with that displayed on the
main screen of the TD60 and are the data for the same patient.
Pair a TD60 with a New BP10
1. Unpair the TD60 with the BP10 already connected by following steps in
Unpair a TD60 with a BP10 via the TD60 or Unpair a TD60 with a
BP10 via the BP10.
2. Pair the TD60 with your desired BP10 by following steps in Pairing a
TD60 with a BP10.
Page 19

P/N: H-046-007060-00 Rev 3.0
15
BeneVision TD60 Quick Reference Guide
Unpair a TD60 with a BP10 via the TD60
Option 1:
1. Press to enter the main menu.
2. Tap Wireles Modules.
3. Select the device you wish to disconnect from the TD60 from the
devices list under Devices and tap Disconnect.
The connected device is disconnected from the TD60.
Option 2:
1. Press to enter the main menu.
2. Tap Wireles Modules.
3. Disable MPAN.
Unpair a TD60 with a BP10 via the BP10
1. Press the MPAN key on the BP10.
2. Select Ye s when the prompt message “Are you sure you want to close
MPAN and unpair BP10?” appears.
Caution: Before moving a TD60 or BP10 to another area, unpair them first.
Caution: Before admitting a new patient at a BP10, you need to unpair it with
a TD60 first.
TECHNICAL ALARMS
Alarm Reset
To silence an alarm for the duration of the alarm on the TD60 and the CMS:
1. Press to enter the main menu.
2. Tap Alarm Reset from the Commands section.
OR
Page 20

P/N: H-046-007060-00 Rev 3.0
16
BeneVision TD60 Quick Reference Guide
When Alarm Reset is configured as a Quick key, you can
1. Swipe up your finger at the bottom of the main screen to display the
quick keys area.
2. Tap the Alarm Reset quick key.
After the alarm system is reset, depending upon the system configuration, the
alarm system responds as follows:
For the technical alarm:
• The alarm sound will be silenced .
• The alarm light will continue to indicate the alarm .
• A √ will appear before the alarm message .
• The symbol appears on the top of the main screen.
For the technical alarm:
• The alarm sound will be silenced.
• The alarm light will continue to indicate the alarm.
• The alarm will be changed to the prompt message .
For the technical alarm:
• The alarm will be cleared.
• No alarm indications.
SCREEN DISPLAY
Switch Orientation
1. Swipe your finger down from the top of the main screen to display the
drop-down menu
2. Tap the desired option to switch the screen display orientation
Flip the Landscape Display
1. Swipe your finger down from the top of the main screen to display the
drop-down menu.
2. Tap Flip Display to horizontally flip the landscape display.
Page 21

P/N: H-046-007060-00 Rev 3.0
17
BeneVision TD60 Quick Reference Guide
Adjust Display Order
The TD60 allows the clinician to adjust the parameter order on the main
display. To adjust the display order:
1. Press to enter the main menu.
2. Tap Display Setup.
3. To set portrait display orientation, tap Portrait Order.
To set landscape display orientation, tap Landscape Order.
4. Tap a parameter or waveform.
The parameter icon displays to the right.
5. Drag the selected parameter to the desired position and release.
6. Repeat steps 4 and 5 as needed.
7. Press to return to the main screen.
SCREEN LOCK/VIEW ONLY MODE
The TD60 provides the ability to lock the touch screen display to restrict user
access, options for View Only and Locked are available. View Only allows
patient data to be viewed but prevents access to settings without a passcode.
Locked requires a passcode for any access to the TD60.
Enable the Screen Lock
After the first time screen lock is enabled, a passcode is required.
To enable the screen lock:
1. Press to enter the main menu.
2. Tap Maintenance.
3. Enter maintenance password.
4. Tap Accept.
5. Tap Screen Lock to select a screen lock mode: Locked or View Only.
6. Enter the screen lock passcode.
The selected lock mode is displayed to the right of Screen Lock.
7. Press to return to the main screen.
Page 22

P/N: H-046-007060-00 Rev 3.0
18
BeneVision TD60 Quick Reference Guide
Unlock the Screen in Locked Mode
1. If the display is off, press or to activate the display and access the
Screen Locked menu.
2. Enter the passcode to unlock the screen.
Once the passcode is entered the screen is temporarily unlocked. If the
clinician turns off the TD60 or the display times out, the passcode will
need to be re-entered.
Unlock the Screen in View Only Mode
1. If the display is off, press or to activate the display.
2. Press to display the Screen Locked menu.
3. Enter the passcode to unlock the screen.
Once the passcode is entered the screen is temporarily unlocked. If the
clinician turns off the TD60 or the display times out, the passcode will
need to be re-entered.
ADJUST VOLUMES
The clinician is able to adjust alarm volumes, key volumes, and QRS volume on
the TD60.
To adjust the volume settings:
1. Press to enter the main menu.
2. Tap Audio Volume.
3. Select the category to adjust and drag the slider to the appropriate
volume.
4. Press to return to the main screen.
Page 23

P/N: H-046-007060-00 Rev 3.0
19
BeneVision TD60 Quick Reference Guide
PARAMETER COLORS
The TD60 provides the ability to adjust the parameter's numeric and waveform
(if applicable) color.
To adjust the parameter's color at the TD60:
1. Press to enter the main menu.
2. Tap Parameter Setup.
3. Tap the parameter.
4. Tap Color.
5. Select the color.
6. Press to return to the main screen.
Note: The parameter color configuration on the TD60 and the CMS
are independent.
CLEAN/DISINFECT THE TD60
Clean the TD60
Clean your equipment on a regular basis. Before cleaning, consult your
hospital's regulations for cleaning the equipment.
Caution: Never immerse the lithium-ion battery pack, AA battery tray and AA
batteries in any fluids.
Before cleaning your TD60, make the following preparation:
•Install the battery pack or battery tray and firmly close to seal the battery
compartment.
•Insert the SpO2
cover in the SpO2 connector when SpO2 is not in use.
•Insert the ECG leadwire plug into the ECG connector.
Page 24

P/N: H-046-007060-00 Rev 3.0
20
BeneVision TD60 Quick Reference Guide
The following table lists approved cleaning and disinfecting agents.
Product Name Product Type Ingredients
Sodium hypochlorite
bleach*
Liquid Sodium hypochlorite bleach 10%
Hydrogen peroxide* Hydrogen peroxide 3%
Isopropanol* Isopropanol 70%
1-Propanol* 1-Propanol 50%
CIDEX OPA Solution Ortho-Phthalaldehyde 0.55%
Metrex CaviCide1™ Diisobutylphenoxyethoxyethyl
dimethyl benzyl ammonium
chloride 0.28%,
Isopropanol 17.2%
Virex® II 256 Didecyl dimethyl ammonium
chloride 8.704%,
n-Alkydimethyl benzyl ammonium
chloride 8.190%
Virex®TB n-Alkyl dimethyl benzyl
ammonium chlorides 0.105%,
n-Alkyl dimethyl ethylbenzyl
ammonium chlorides 0.105%
Rely+On™
Virkon®Powder *(Used
as 1% solution)
Powder Used as 1% solution
Biocidal active:
Pentapotassium bis
(peroxymonosulphate) bis
(sulphate)(500g/kg),
Contains dipotassium
peroxodisulphate.
Page 25

P/N: H-046-007060-00 Rev 3.0
21
BeneVision TD60 Quick Reference Guide
Product Name Product Type Ingredients
Alpet® D2 Surface
Sanitizing Wipes
Wipes Isopropyl Alcohol 58.6000%®
Octyl Decyl Dimethyl Ammonium
chloride 0.0075%,
Dioctyl Dimethyl Ammonium
Chloride 0.0030%
Clorox Dispatch®
Hospital Cleaner
Disinfectant Towels
with Bleach
Sodium Hypochlorite 0.65%
Clorox
Healthcare®Bleach
Germicidal Wipes
Sodium Hypochlorite 0.55%
Clorox Healthcare®
Hydrogen Peroxide
Cleaner Disinfectant
Wipes
Hydrogen Peroxide 1.4%
Diversey Oxivir®TB
Wipes
Hydrogen Peroxide 0.5%
Metrex CaviWipes™ Diisobutylphenoxyethoxyethyl
dimethyl benzyl ammonium
chloride 0.28%,
Isopropanol 17.2%
PDI Sani-Cloth® AF3
Germicidal Disposable
Wipe
n-Alkyl dimethyl ethylbenzyl
ammonium chlorides 0.14%,
n-Alkyl dimethyl benzyl
ammonium chlorides 0.14%
PDI Sani-Cloth®Bleach
Germicidal Disposable
Wipe
Sodium Hypochlorite 0.63%,other
ingredients 99.37%
PDI Sani-Cloth® HB
Germicidal Disposable
Wipe
n-Alkyl dimethyl ethylbenzyl
ammonium chlorides 0.07%,
n-Alkyl dimethyl benzyl
ammonium chlorides 0.07%
Page 26

P/N: H-046-007060-00 Rev 3.0
22
BeneVision TD60 Quick Reference Guide
Product Name Product Type Ingredients
PDI Sani-Cloth® Plus
Germicidal Disposable
Cloth
Wipes n-Alkyl dimethyl ethylbenzyl
ammonium chlorides 0.125%,
n-Alky dimethyl benzyl ammonium
chlorides 0.125%
PDI Super SaniCloth®Germicidal
Disposable Wipe*
n-Alkyl dimethyl ethylbenzyl
ammonium chlorides 0.25%,
n-Alkyl dimethyl benzyl
ammonium chlorides 0.25%,
Isopropyl Alcohol 55.0%,
VIRAGUARD Hospital
Surface Disinfectants
Isopropanol 70%,Other ingredients
30%
Note: For equipment with the symbol , all the listed cleaning and
disinfecting agents are available for use. For equipment without the symbol
, only the cleaning and disinfecting agents marked with “*” are available for
use.
To clean the equipment:
1. Shut down the device.
2. Clean the display screen with wipes or a soft cloth moistened with one of
the cleaning agents listed in the table above.
3. Clean the exterior surface of the telemetry monitor main unit and lithiumion battery pack with wipes or a soft cloth moistened with one of the
cleaning agents listed in the table above.
4. Wipe off all the residue with a dry cloth.
6. Dry your equipment in a ventilated, cool place.
Disinfect the TD60
Disinfect your equipment as required in your hospital's servicing schedule
using one of the disinfecting agents listed in the table above. Cleaning the
equipment before disinfecting is recommended.
Page 27

P/N: H-046-007060-00 Rev 3.0
23
BeneVision TD60 Quick Reference Guide
CLEAN/DISINFECT REUSABLE ACCESSORIES
To clean and disinfect reusable ECG leadwires and SpO2 sensors, refer to the
instructions for use delivered with the accessory.
STERILIZATION
Sterilization is not recommended for this equipment, related products,
accessories or supplies unless otherwise indicated in the instructions for use
delivered with the products, accessories or supplies.
Page 28

Mindray DS USA, Inc.
800 MacArthur Boulevard, Mahwah, New Jersey 07430 USA
Tel: 1.800.288.2121, 1.201.995.8000
www.mindray.com
0 4 6 - 0 0 7 0 6 0 - 0 0 ( 3 . 0 )
 Loading...