

Mindray BeneVision N22, BeneVision N17, BeneVision N19, BeneVision N15, BeneVision N12 Quick Reference Manual
Page 1
BeneVision N22/N19/N17/N15/
N12
Quick Reference Guide
Page 2

Note: The BeneVision N22/N19/N17/N15/N12 Quick
Reference Guide is not intended as a replacement to the
Operating Instructions. This document is a guideline only
to be used as an aid to comprehensive Inservice Training.
Page 3

Table of Contents
QUICK KEYS . . . . . . . . . . . . . . . . . . . . . . . . . . . . . . . . . . . . . . . . . . . . . . . . . . . . . . . . 1
GESTURES . . . . . . . . . . . . . . . . . . . . . . . . . . . . . . . . . . . . . . . . . . . . . . . . . . . . . . . . . 4
PATIENT SETUP . . . . . . . . . . . . . . . . . . . . . . . . . . . . . . . . . . . . . . . . . . . . . . . . . . . . . 4
Admit Patient And Enter Demographics (Manual Entry) . . . . . . . . . . . . . . . . . . . .4
Enter Demographics from the CMS . . . . . . . . . . . . . . . . . . . . . . . . . . . . . . . . . . . . . . . .5
Enter Demographics from the ADT Database . . . . . . . . . . . . . . . . . . . . . . . . . . . . . . . 5
Discharge a Patient . . . . . . . . . . . . . . . . . . . . . . . . . . . . . . . . . . . . . . . . . . . . . . . . . . . . . . .6
STANDBY . . . . . . . . . . . . . . . . . . . . . . . . . . . . . . . . . . . . . . . . . . . . . . . . . . . . . . . . . . 7
Enter Standby . . . . . . . . . . . . . . . . . . . . . . . . . . . . . . . . . . . . . . . . . . . . . . . . . . . . . . . . . . . . . 7
Resume Monitoring . . . . . . . . . . . . . . . . . . . . . . . . . . . . . . . . . . . . . . . . . . . . . . . . . . . . . . .7
Realtime Waveforms . . . . . . . . . . . . . . . . . . . . . . . . . . . . . . . . . . . . . . . . . . . . . . . . . . . . . .7
Adjust Recorder’s Waveforms . . . . . . . . . . . . . . . . . . . . . . . . . . . . . . . . . . . . . . . . . . . . . .7
PRINT . . . . . . . . . . . . . . . . . . . . . . . . . . . . . . . . . . . . . . . . . . . . . . . . . . . . . . . . . . . . . . 8
Realtime Waveforms (Laser printer connection required) . . . . . . . . . . . . . . . . . . .8
Adjust Printed Waveforms . . . . . . . . . . . . . . . . . . . . . . . . . . . . . . . . . . . . . . . . . . . . . . . . .8
End Case Report . . . . . . . . . . . . . . . . . . . . . . . . . . . . . . . . . . . . . . . . . . . . . . . . . . . . . . . . . .9
ECG . . . . . . . . . . . . . . . . . . . . . . . . . . . . . . . . . . . . . . . . . . . . . . . . . . . . . . . . . . . . . . . . 9
Adjust ECG Lead . . . . . . . . . . . . . . . . . . . . . . . . . . . . . . . . . . . . . . . . . . . . . . . . . . . . . . . . . .9
Enable Pacemaker Detection . . . . . . . . . . . . . . . . . . . . . . . . . . . . . . . . . . . . . . . . . . . . . . 9
Initiate ECG Relearn . . . . . . . . . . . . . . . . . . . . . . . . . . . . . . . . . . . . . . . . . . . . . . . . . . . . . .10
Initiate ST Analysis . . . . . . . . . . . . . . . . . . . . . . . . . . . . . . . . . . . . . . . . . . . . . . . . . . . . . . .10
Initiate QT Analysis . . . . . . . . . . . . . . . . . . . . . . . . . . . . . . . . . . . . . . . . . . . . . . . . . . . . . . .10
Selecting Leads for QT Calculation . . . . . . . . . . . . . . . . . . . . . . . . . . . . . . . . . . . . . . . .10
Initiate and Print a 12-lead ECG Report . . . . . . . . . . . . . . . . . . . . . . . . . . . . . . . . . . . .11
NIBP . . . . . . . . . . . . . . . . . . . . . . . . . . . . . . . . . . . . . . . . . . . . . . . . . . . . . . . . . . . . . .11
Initiate A Non-Invasive Blood Pressure Measurement (NIBP) . . . . . . . . . . . . . . .11
Page 4

Table of Contents (cont'd)
Stop Non-Invasive Blood Pressure Measurement (NIBP) . . . . . . . . . . . . . . . . . . .11
Set A Non-Invasive Blood Pressure Measurement Interval . . . . . . . . . . . . . . . . .12
Configure A Custom Sequence . . . . . . . . . . . . . . . . . . . . . . . . . . . . . . . . . . . . . . . . . . .13
Factors that Affect Blood Pressure Measurement Accuracy . . . . . . . . . . . . . . . . .13
INVASIVE BLOOD PRESSURES (OPTIONAL) . . . . . . . . . . . . . . . . . . . . . . . . . . 15
Adjust Invasive Blood Pressure Label . . . . . . . . . . . . . . . . . . . . . . . . . . . . . . . . . . . . . .15
Zero Invasive Blood Pressure. . . . . . . . . . . . . . . . . . . . . . . . . . . . . . . . . . . . . . . . . . . . . . . .
15
CONTINUOUS CARDIAC OUTPUT (OPTIONAL) . . . . . . . . . . . . . . . . . . . . . . . 16
Adjust the Displayed Parameters . . . . . . . . . . . . . . . . . . . . . . . . . . . . . . . . . . . . . . . . . .16
CENTRAL VENOUS OXYGEN SATURATION (OPTIONAL) . . . . . . . . . . . . . . . 16
Print Oxygenation Parameters . . . . . . . . . . . . . . . . . . . . . . . . . . . . . . . . . . . . . . . . . . . .16
BISPECTRAL INDEX (OPTIONAL) . . . . . . . . . . . . . . . . . . . . . . . . . . . . . . . . . . . . 17
Adjust BIS Waveform Area . . . . . . . . . . . . . . . . . . . . . . . . . . . . . . . . . . . . . . . . . . . . . . . .17
BIS Expand View (Bilateral Sensor Required) . . . . . . . . . . . . . . . . . . . . . . . . . . . . . . .17
Adjust Parameters . . . . . . . . . . . . . . . . . . . . . . . . . . . . . . . . . . . . . . . . . . . . . . . . . . . . . . . .18
ALARMS . . . . . . . . . . . . . . . . . . . . . . . . . . . . . . . . . . . . . . . . . . . . . . . . . . . . . . . . . . 18
Setting Parameter Alarm Properties . . . . . . . . . . . . . . . . . . . . . . . . . . . . . . . . . . . . . .18
Changing Arrhythmia Alarm Settings(Arrhythmia Option Required) . . . . . . .18
Disable Non-Lethal Arrhythmia Alarms (Arrhythmia Option Required) . . . . . .19
Accessing Help When Technical Alarms Occur . . . . . . . . . . . . . . . . . . . . . . . . . . . . .19
RESET ALARMS . . . . . . . . . . . . . . . . . . . . . . . . . . . . . . . . . . . . . . . . . . . . . . . . . . . 20
PAUSE ALARMS/PAUSE ALARM TONES . . . . . . . . . . . . . . . . . . . . . . . . . . . . .20
HEMODYNAMIC MONITORING . . . . . . . . . . . . . . . . . . . . . . . . . . . . . . . . . . . . . 21
Initiate A Cardiac Output Measurement . . . . . . . . . . . . . . . . . . . . . . . . . . . . . . . . . . .21
Initiate Pulmonary Artery Wedge Pressure (PAWP) . . . . . . . . . . . . . . . . . . . . . . . . .22
Page 5

Table of Contents (cont'd)
Initiate Hemodynamic Calculations . . . . . . . . . . . . . . . . . . . . . . . . . . . . . . . . . . . . . . .22
SCREEN DISPLAY . . . . . . . . . . . . . . . . . . . . . . . . . . . . . . . . . . . . . . . . . . . . . . . . . . 23
REVIEW . . . . . . . . . . . . . . . . . . . . . . . . . . . . . . . . . . . . . . . . . . . . . . . . . . . . . . . . . . . 24
Tabular Trends . . . . . . . . . . . . . . . . . . . . . . . . . . . . . . . . . . . . . . . . . . . . . . . . . . . . . . . . . . .24
Arrhythmia and Alarm Events . . . . . . . . . . . . . . . . . . . . . . . . . . . . . . . . . . . . . . . . . . . . .25
Full Disclosure . . . . . . . . . . . . . . . . . . . . . . . . . . . . . . . . . . . . . . . . . . . . . . . . . . . . . . . . . . .26
OxyCRG . . . . . . . . . . . . . . . . . . . . . . . . . . . . . . . . . . . . . . . . . . . . . . . . . . . . . . . . . . . . . . . . . .26
VIEWING OTHER BEDS . . . . . . . . . . . . . . . . . . . . . . . . . . . . . . . . . . . . . . . . . . . . . 27
Entering the Remote View Screen . . . . . . . . . . . . . . . . . . . . . . . . . . . . . . . . . . . . . . . . .27
Adding a Bed . . . . . . . . . . . . . . . . . . . . . . . . . . . . . . . . . . . . . . . . . . . . . . . . . . . . . . . . . . . .27
Resetting Alarms for Remote Devices . . . . . . . . . . . . . . . . . . . . . . . . . . . . . . . . . . . . .27
Removing a Bed . . . . . . . . . . . . . . . . . . . . . . . . . . . . . . . . . . . . . . . . . . . . . . . . . . . . . . . . . .28
Saving a Manual Event . . . . . . . . . . . . . . . . . . . . . . . . . . . . . . . . . . . . . . . . . . . . . . . . . . .28
Displaying the Alarm Watch Tile on the Main Screen . . . . . . . . . . . . . . . . . . . . . . .28
VOLUMES . . . . . . . . . . . . . . . . . . . . . . . . . . . . . . . . . . . . . . . . . . . . . . . . . . . . . . . . . 28
Alarm Volume . . . . . . . . . . . . . . . . . . . . . . . . . . . . . . . . . . . . . . . . . . . . . . . . . . . . . . . . . . . .28
Key Volume . . . . . . . . . . . . . . . . . . . . . . . . . . . . . . . . . . . . . . . . . . . . . . . . . . . . . . . . . . . . . .29
Beat Tone . . . . . . . . . . . . . . . . . . . . . . . . . . . . . . . . . . . . . . . . . . . . . . . . . . . . . . . . . . . . . . . .29
DATE AND TIME . . . . . . . . . . . . . . . . . . . . . . . . . . . . . . . . . . . . . . . . . . . . . . . . . . . 30
PARAMETER COLORS . . . . . . . . . . . . . . . . . . . . . . . . . . . . . . . . . . . . . . . . . . . . . . 30
LOAD DEFAULT (PRESET) SETTINGS . . . . . . . . . . . . . . . . . . . . . . . . . . . . . . . . . 30
LOCK/UNLOCK TOUCHSCREEN DISPLAY . . . . . . . . . . . . . . . . . . . . . . . . . . . . 31
PAIR THE TM80 TELEMETRY MONITOR . . . . . . . . . . . . . . . . . . . . . . . . . . . . . . 31
Pair the TM80 . . . . . . . . . . . . . . . . . . . . . . . . . . . . . . . . . . . . . . . . . . . . . . . . . . . . . . . . . . . .31
Unpair the TM80 Telemetry Monitor from the N Series Bedside Monitor . . . .32
Unpair the N Series Bedside Monitor from the TM80 Telemetry Monitor . . . .32
Page 6

Table of Contents (cont'd)
PAIR BP10 NIBP MODULE . . . . . . . . . . . . . . . . . . . . . . . . . . . . . . . . . . . . . . . . . . 33
Pair the BP10 Module with the N Series Bedside Monitor . . . . . . . . . . . . . . . . . .33
Unpair BP10 Module from the N Series Bedside Monitor . . . . . . . . . . . . . . . . . . .33
CLEANING/DISINFECTING . . . . . . . . . . . . . . . . . . . . . . . . . . . . . . . . . . . . . . . . . . 34
Cleaning the Main Unit/Module/SMR . . . . . . . . . . . . . . . . . . . . . . . . . . . . . . . . . . . . .34
Disinfecting the Main Unit/Module/SMR . . . . . . . . . . . . . . . . . . . . . . . . . . . . . . . . . .34
Cleaning and Disinfecting the Accessories . . . . . . . . . . . . . . . . . . . . . . . . . . . . . . . .34
STERILIZATION . . . . . . . . . . . . . . . . . . . . . . . . . . . . . . . . . . . . . . . . . . . . . . . . . . . . 34
Changes made from the N Series bedside monitor effecting the BeneVision Central
Monitoring System and changes made from the BeneVision Central Monitoring
System effecting N Series bedside monitor are indicated with the
symbol.
Page 7
BeneVision N22/N19/N17/N15/N12
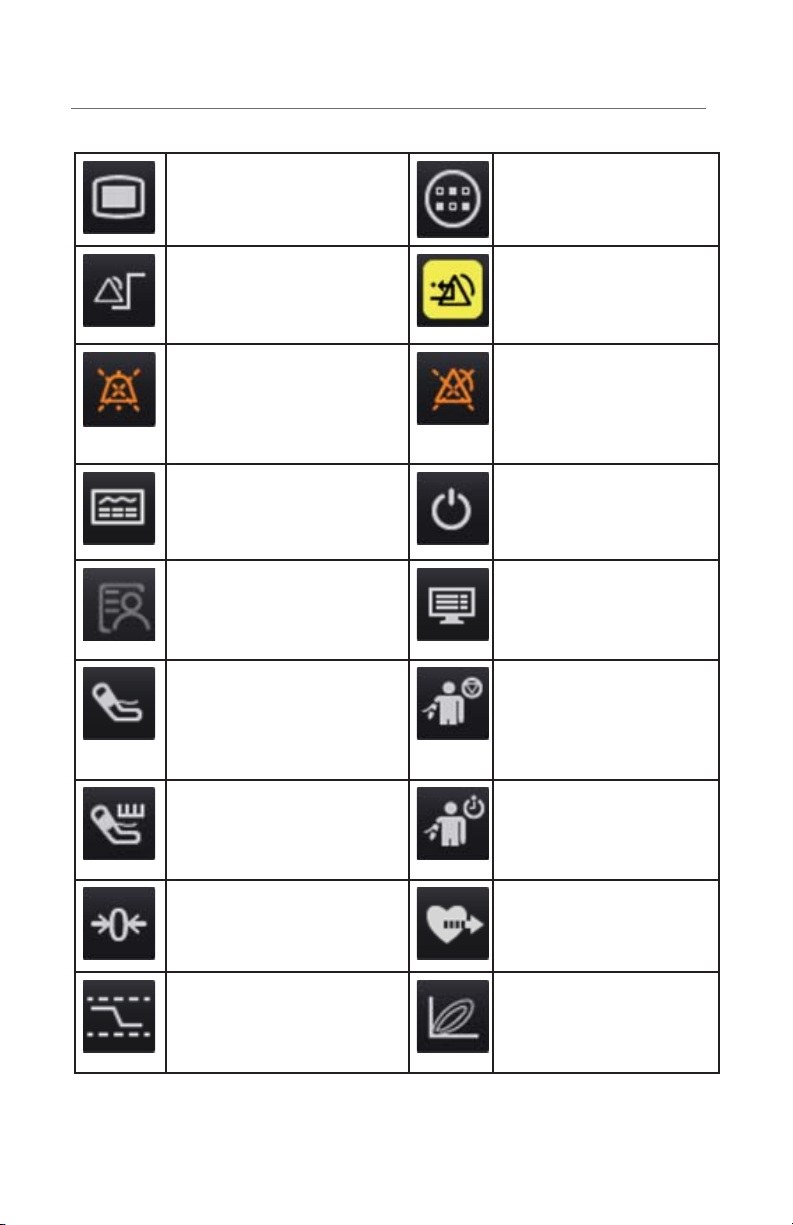
QUICK KEYS
Quick Reference Guide
Main Menu
Opens the main menu.
Alarm Setup
Opens the Alarm dialog.
Audio Pause
Pauses alarm tone.
Review
Opens Review dialog for the
patient’s historical data.
Patient Management
Opens the Patient
Management dialog.
NIBP Start/Stop
Starts an NIBP measurement
or stops the current NIBP
measurement.
NIBP
More
Shows more quick keys.
Alarm Reset
Acknowledges alarms.
Alarm Pause
Pauses the current
and future alarms for a
preconfigured time.
Standby
Opens Standby mode.
Screen Setup
Opens the Screen Setup
dialog.
Stop All
Stops all NIBP
measurements.
NIBP Measure
Starts NIBP STAT
measurement.
Zero IBP
Zeros all IBPs.
PAW P
Opens the PAWP screen.
Opens the NIBP Measure
dialog.
C.O. Measure
Starts cardiac output
procedure.
Loops
Opens the respiratory
Loops screen.
1
Page 8

BeneVision N22/N19/N17/N15/N12
Quick Reference Guide
Venipuncture
Opens the Venipuncture
dialog.
Parameters Setup
Opens the Parameters Setup
dialog.
Manual Event
Triggers a manual event.
OxyCRG
Opens the OxyCRG screen.
Privacy Mode
Enters the privacy mode.
CPB Mode
Enters the CPB mode.
Start TOF
Starts/stops TOF
measurement.
Remote View
Opens the split-screen
view of another patient(s).
Minitrends
Opens the Minitrends
screen.
ECG Full- Screen
Opens the 12-lead ECG full
screen.
Night Mode
Enters the night mode.
Intubation Mode
Enters the intubation
mode.
Volume
Opens the Volume dialog.
Calculations
Opens the Calculations
dialog.
Print
Initiates a real-time report.
2
Freeze
Freezes waveforms.
Load Config
Opens the Load
Config dialog to load
preconfigured settings.
Record
Starts/Stops a recording.
Page 9
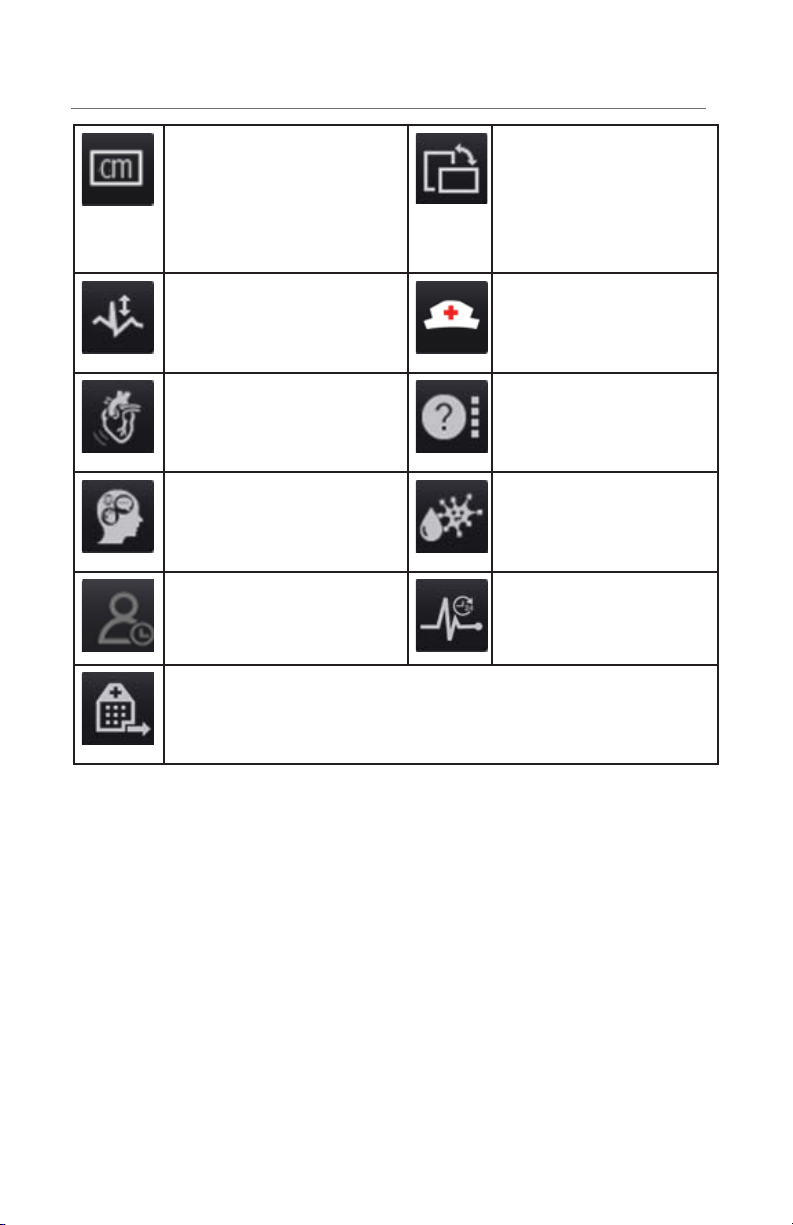
BeneVision N22/N19/N17/N15/N12
Quick Reference Guide
Unit
Opens the Unit dialog.
ECG Lead/Gain
Opens the ECG Lead/Gain
dialog.
HemoSight
Opens the HemoSight
dialog.
GCS
Opens the GCS dialog.
Enters the Discharged
Patients dialog.
Discharge Patient
Opens the Discharge Patient dialog to discharge the patient and
restore default settings.
Rotate Screen (for N22/
N19)
Changes the screen
orientation (between
portrait and landscape).
Call Help
Calls for help.
EWS
Opens the EWS screen.
SepsisSight
Opens the SepsisSight
dialog.
ECG 24h Sum
Views the 24-hour ECG
summary.
3
Page 10
BeneVision N22/N19/N17/N15/N12
Quick Reference Guide
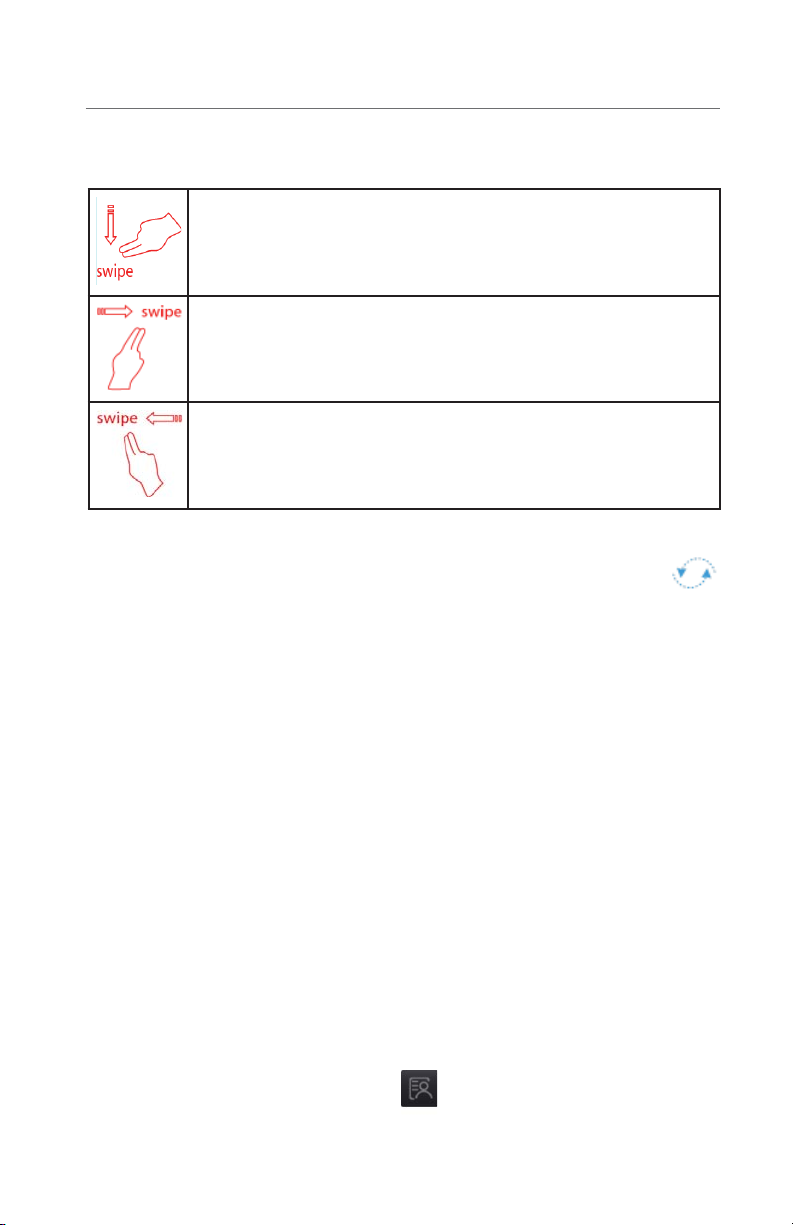
GESTURES
The following gestures on the touchscreen are enabled:
Swipe down the touchscreen with two fingers to access the
Discharge Patient dialog box.
Swipe from left to right on the touchscreen with two fingers to
change the screen from normal screen, to minitrends screen, to
big numerics screen, to normal screen.
Swipe from right to left on the touchscreen with two fingers to
change the screen from normal screen, to big numerics screen, to
mini trends screen, to normal screen.
PATIENT SETUP
Admit Patient And Enter Demographics (Manual Entry)
The Patient Management dialog allows the clinician to admit a patient and enter
patient demographics. Admitting also restores default (preconfigured) settings
and clears the previous patient’s information.
After a patient is manually discharged, the monitor automatically admit a new
patient. To manually admit a patient on the N Series bedside monitor:
a. The monitor prompts to admit a new patient in the following situations:
• After being switched o for the selected time period*, the monitor
automatically discharge the previous patient and admit a new patient at
startup.
• If the monitor has not detected certain patient vital signs (ECG, SpO
RR, NIBP) for 30 minutes, the clinician will be prompted to admit a new
patient once continuous monitoring is detected.
*Time period configurable.
b. To open the Patient Management dialog:
• Select the patient information area at the top left corner of the screen.
• Select the Patient Management
4
quick key.
, PR,
2
Page 11

BeneVision N22/N19/N17/N15/N12
• Select the Main Menu quick key, and select Patient Management
from the Patient Management column.
• Select Patient Management from the discharge screen.
c. Select Patient Category and select OK to confirm.
d. Select patient field(s) and enter patient information as required using the
onscreen keyboard.
Quick Reference Guide
e. Select
f. Select OK to confirm and return to the main screen.
Note: If the patient’s barcode is scanned, the medical number and associated
information is entered into the monitor.
button to accept the information.
Enter Demographics from the Central Monitoring System (CMS)
If the N Series bedside monitor is connected to the CMS, entering patient
information at the CMS will enter the patient information into the N Series
bedside monitor. In addition, entering demographic information into the N
Series monitor will automatically enter information into the CMS.
Enter Demographics from the ADT Database
If the N Series bedside monitor is connected to a hospital’s ADT server the patient
demographic information can be imported into the N Series bedside monitor. To
import patient information from the Hospital’s ADT server:
a. Enter the Find Patient dialog in either of the following ways:
• Select the Main Menu
Patient Management column.
• Select Find Patient from the Patient Management dialog.
b. Verify the ADT tab is selected.
quick key, and select Find Patient from the
c. Enter search field such as patient ID.
d. Select Search to display a list of the search results.
e. Select a patient from the patient list.
f. Select
import that patient’s information and return to patient management.
adjacent to the patient information N Series bedside monitor to
5
Page 12

BeneVision N22/N19/N17/N15/N12
g. Select OK to confirm and return to the main screen.
Note: Find patient from the ADT server is only enabled if ADT Query is
supported.
Note: Loading patient information from the ADT server updates only patient
information in the N Series bedside monitor. The patient’s monitoring data is
unaffected.
Quick Reference Guide
Discharge a Patient
The Discharge function clears all patient information and restores default
(preconfigured) settings.
• Swipe down the touchscreen with two ngers, and select Discharge to
con rm.
• Select the Discharge Patient
con rm.
• Select the Patient Management
Patient.
• Select the Main Menu
Patient Management column.
• Select Discharge patient from the standby screen.
And select Discharge to confirm.
quick key, and select Discharge to
quick key, and select Discharge
quick key, and select Discharge from the
STANDBY
Enter Standby
The Standby function allows the clinician to suspend monitoring on a patient.
While in standby, the patient is not being monitored; however, all data and
settings are preserved.
To place a patient into Standby on the N Series bedside monitor:
a. Select the Standby quick key.
Or
a. Select the Main Menu
Management column.
quick key, and select Standby from the Patient
b. Set Location from the drop down list to define where the patient is when
the monitor enters the standby mode.
6
Page 13

BeneVision N22/N19/N17/N15/N12
c. Select OK to confirm.
Quick Reference Guide
Resume Monitoring
To remove a patient from Standby and resume monitoring on the N Series
bedside monitor, select Resume Monitor.
Once a patient is discharged the monitor automatically enters the Standby
mode. To resume monitoring select Resume Monitor.
RECORD
Realtime Waveforms
To record a waveform on a patient with the recorder:
• Press the
• Select
• Select Record
hardkey on front of the recorder.
at the top left corner of a currently opened dialog if available.
quick key.
Adjust Recorder’s Waveforms
To adjust recorded waveforms on a patient with the recorder:
a. Select Main Menu
b. Select Record Setup from the Report column.
c. Select Waveform 1.
d. Select the desired waveforms from drop down list or select off to turn off
the waveform recording.
e. Repeat steps c and step d for remaining waveforms as necessary.
f. Select the Main Menu
quick key.
quick key or to return to the main display.
PRINT
Realtime Waveforms (Laser printer connection required)
To print a real time report for a patient on the N Series bedside monitor:
a. Select
Or
quick key.
a. Select Report Setup from Main Menu
b. Select Realtime Reports tab.
quick key.
7
Page 14

BeneVision N22/N19/N17/N15/N12
c. Select Print.
Quick Reference Guide
Adjust Printed Waveforms
To adjust the waveforms printed for a patient on the N Series bedside monitor:
a. Select the Main Menu
Report column.
b. Select Realtime Reports tab.
c. Select Current Waveforms.
d. Select Print.
To print selected waveforms for a patient on the N Series bedside monitor:
a. Select the Main Menu
Report column.
b. Select Realtime Reports tab.
c. Select Selected Waveforms.
d. Select the desired waveforms to add/delete from the selected list.
e. Select
f. Select Print.
to return to the previous page
quick key, and select Report Setup from the
quick key, and select Report Setup from the
End Case Report
The following reports can be set as end case reports:
• ECG Report
• Realtime Report
• Tabular Trends Report
• Graphic Trend Report
If Print End Case Report are enabled, the N Series bedside monitor will
automatically print the selected reports when a patient is discharged.
To set reports to print as an End Case Report:
a. Select the Main Menu
Report column.
b. Select the desired report tab.
c. Enable Set As End Case Report.
8
quick key, and select End Case Report from the
Page 15

BeneVision N22/N19/N17/N15/N12
d. Select the Main Menu quick key or to return to the main display.
Quick Reference Guide
ECG
Adjust ECG Lead
The N Series bedside monitor allows the clinician to adjust the leads being
viewed on the main display. To adjust the ECG Lead:
a. Select the ECG numeric area or waveform area to enter the ECG dialog.
b. Select the Setup tab.
c. Set Lead Set according to the lead type you will be used.
d. Select ECG1 to adjust first lead.
e. Repeat step d or remaining displayed leads.
f. Select the Main Menu
quick key or to return to the main display.
Enable Pacemaker Detection
The N Series bedside monitor allows the clinician to enable pacemaker detection.
The
To enable the pacemaker detection on the N Series bedside monitor:
symbol is displayed when the pacemaker detection is enabled.
a. Select the ECG numeric area or waveform area to enter the ECG dialog.
b. Select the Pacer tab.
c. Set Paced to Yes .
d. Select the Main Menu
quick key or to return to the main display.
Initiate ECG Relearn
To initiate ECG relearning manually on the N Series bedside monitor:
a. Select the ECG numeric area or waveform area to enter the ECG dialog.
b. Select Relearn at the bottom left corner of the dialog.
c. Select the Main Menu
iate ST Analysis
Init
To initiate ST analysis on the N Series bedside monitor:
a. Select the ECG numeric area or waveform area to enter the ECG dialog.
quick key or to return to the main display.
b. Select the ST tab
.
9
Page 16

BeneVision N22/N19/N17/N15/N12
c. Select the Setup tab.
d. Enable ST Analysis.
Quick Reference Guide
e. Select the Main Menu
quick key or to return to the main display.
Initiate QT Analysis
To enable the QT monitoring on the N Series bedside monitor:
a. Select the ECG numeric area or waveform area to enter the ECG dialog.
b. Select the QT tab
c. Select the Setup tab.
d. Enable QT Analysis.
e. Select the Main Menu
.
quick key or to return to the main display.
Selecting Leads for QT Calculation
To select one lead or all leads for QT calculation:
a. Select the QT numerics area, ECG numeric area, or ECG waveform area to
enter the ECG dialog.
b. Select the QT tab.
c. Select the Setup tab.
d. Set QT Leads.
e. Select the Main Menu
quick key or to return to the main display.
Initiate and Print a 12-lead ECG Report
To perform a Resting 12-lead ECG Analysis on the N Series bedside monitor:
a. Select the ECG Full-Screen
b. Select Setup to enter patient information or adjust Report options.
c. Select Analyze.
d. Select Print to print out the 12-lead ECG report.
Or
a. Select the ECG numeric area or waveform area to enter the ECG dialog.
b. Select the Setup tab.
c. Verify Lead Set to 12-Lead.
10
quick key.
Page 17

BeneVision N22/N19/N17/N15/N12
d. Select 12-Lead button.
e. Select Setup to enter patient information or adjust Report options.
f. Select Analyze.
g. Select Print to print out the 12-lead ECG report.
Quick Reference Guide
NIBP
Initiate A Non-Invasive Blood Pressure Measurement (NIBP)
To initiate a NIBP measurement:
a. Press the NIBP Start/Stop
Or
a. Select NIBP tile on the main screen to access the NIBP dialog
b. Select Start NIBP.
c. Select the Main Menu
quick key.
.
quick key or to return to the main display.
Stop Non-Invasive Blood Pressure Measurement (NIBP)
To stop the current NIBP measurements,
a. Press the NIBP Start/Stop
Or
a. Select NIBP tile on the main screen to access the NIBP dialog
b. Select Stop NIBP.
c. Select the Main Menu
To stop all NIBP measurements on a patient on the N Series bedside monitor:
a. Press the Stop All
Or
a. Select NIBP parameter area to access the NIBP dialog.
b. Select Stop All.
quick key.
quick key during the NIBP measurement.
.
quick key or to return to the main display.
c. Select the Main Menu
quick key or to return to the main display.
Select NIBP Start Mode
Start mode defines how NIBP auto mode works. To set the start mode,
a. Select the NIBP tile on the main screen to enter the NIBP dialog.
11
Page 18

BeneVision N22/N19/N17/N15/N12
b. Set Start Mode.
• Clock: after the first measurement, the monitor automatically
synchronizes NIBP automatic measurements with the real time clock.
• Interval: after the first measurement, the monitor automatically repeats
measurements at set interval.
Quick Reference Guide
c. Select the Main Menu
quick key or to return to the main display.
Set A Non-Invasive Blood Pressure Measurement Interval
The N Series bedside monitor allows the clinician to set a pre-configured interval
for a NIBP measurement to be obtained automatically. To set an automatic
interval on the N Series bedside monitor:
a. Select the NIBP Measure
b. Select the desired interval.
Or
a. Select NIBP tile on the main screen to access the NIBP dialog.
b. Select Interval to select the desired interval from the dropdown list.
• Intervals include: 1 min, 2 min, 2.5 min, 3 min, 5 min, 10 min, 15 min,
20 min, 30 min, 1 h, 1.5 h, 2h, 3h, 4h, 8h: The monitor automatically
measures NIBP based on the specified time interval.
• Select Sequence to automatically measure NIBP based on the sequence
customized by the user in the Sequence tab.
c. Select the Main Menu
quick key.
quick key or to return to the main display.
Configure A Custom Sequence
To configure a custom sequence:
a. Select NIBP tile on the main screen to access the NIBP dialog.
b. Set Interval to Sequence.
c. Select Sequence tab.
d. Set Duration and Interval for each phase in the measurement cycle.
e. Select the Main Menu
quick key or to return to the main display.
Factors that Affect Blood Pressure Measurement Accuracy
The accuracy of non-invasive blood pressure (BP) measurement has been shown
12
Page 19

BeneVision N22/N19/N17/N15/N12
to be affected by numerous factors. Some of the more important aspects (based
on published literature) to consider while measuring BP are:
• The cuff should fit snugly, but with enough room for two fingers to be
placed between the cuff and the patient’s arm (on adults), and loosely on
neonates with little or no air present within the cuff.
• Use the Guidance Table provided to select the proper size cuff. Too small
a cuff has been shown to result in the overestimation of BP (systolic and
diastolic) while too large a cuff results in the underestimation of BP.
Ensure that the cuff is wrapped directly over the patient’s skin. BP measurement
could be 10 to 40 mmHg higher or lower than actual when the cuff is applied
over clothing.
• The cuff should be applied so that the center of the bladder in the cuff is
over the brachial artery. Use the reference marker for ver.
• For best results, the cuff should be placed on the arm at heart level and
the lower arm supported passively. Published data indicates that BP can
increase about 2 mmHg for every inch that the cuff is below heart level and
decrease by the same amount if above heart level.
• Avoid compression or restriction of the pressure hose. Do not place the NIBP
cuff on a limb that is being utilized for any other medical procedure, for
example, an I.V. catheter.
Quick Reference Guide
• Have the patient sit quietly for several minutes before BP measurement and
remain still during measurement to avoid unnecessary motion artifact. If the
patient has not rested before measurement, BP could be elevated by 10 to
20 mmHg.
• Do not talk to the patient during BP measurement as talking has been
shown to result in a 10 to 15 mmHg overestimation of BP.
• The patient’s back and feet should be properly supported with the legs
kept uncrossed. Unsupported back and feet could increase BP by up to 15
mmHg, while crossed legs could result in a 4 to 12 mmHg increase.
• Other factors that have been shown to result in an overestimation of BP are
labored breathing (5 to 8 mmHg), full bladder (10 to 15 mmHg), pain (10 to
30 mmHg).
Guidance Table
13
Page 20

BeneVision N22/N19/N17/N15/N12
Cuff Description Limb Circumference
Child 10 - 19 cm
Small Adult 18 - 26 cm
Adult 25 - 35 cm
Large Adult 33 - 47 cm
Thigh 46 - 66 cm
Adult Long 25 - 35 cm
Large Adult Long 33 - 47 cm
Quick Reference Guide
References:
1. American Association on Critical-Care Nurses (AACN): Practice Alert,
Non-Invasive Blood Pressure Monitoring (April 2010)- http://www.
aacn.org/wd/practice/docs/practicealerts/non-invasive-bp-monitoring.
pdf?menu=aboutus
2. Pickering Thomas G, Hall John E, Appel Lawrence J, Falkner Bonita E, Graves
John, Hill Martha N, Jones Daniel W, Kurtz Theodore, Sheps Sheldon G,
Roccella Edward J. Recommendations for blood pressure measurement in
humans and experimental animals: Part 1: Blood pressure measurement
in humans: A statement for professionals from the Subcommittee of
Professional and Public Education of the American Heart Association
Council on High Blood Pressure Research. J Hypertens 2005; 45: 142-161.
3. O’Brien Eoin, Asmar Roland, Beilin Lawrie, Imai Yutaka, Mallion Jean-Michel,
Mancia Giuseppe, Mengden Thomas, Myers Martin, Padfield Paul, Palatini
Paolo, Parati Gianfranco, Pickering
Thomas, Redon Josep, Staessen Jan,
Stergiou George, Verdecchia Paolo. European Society of Hypertension
recommendations for conventional, ambulatory and home blood
pressure measurement. J Hypertens 2003; 21: 821-848.
INVASIVE BLOOD PRESSURES (OPTIONAL)
The N Series bedside monitor allows a clinician to monitor up to 8 invasive blood
pressures (IBP) simultaneously.
Adjust Invasive Blood Pressure Label
To adjust the label on an invasive blood pressure:
a. Insert IBP Module as needed.
14
Page 21

BeneVision N22/N19/N17/N15/N12
b. Select the IBP parameter by:
• Main Menu
Quick Reference Guide
-Select the Main Menu
Parameters column.
-Select the Invasive Blood Pressure (ART, CVP, etc.).
• Waveform/Numeric tile
-Select the IBP waveform/numeric tile.
-Select the Setup tab.
c. Select IBP Label and adjust the label.
d. Select the Main Menu
quick key and select Setup from the
quick key or to return to the main display.
Zero Invasive Blood Pressure
To zero an invasive blood pressure transducer on the N Series bedside monitor:
a. Insert IBP Module as needed.
b. Connect the invasive blood pressure cable to the invasive blood pressure
transducer set.
c. Position transducer and open the invasive line in accordance with hospital
policy.
d. Open the Zero IBP dialog:
• Select the
key on the IBP module.
• Select the Zero IBP
• Select IBP waveform or numeric tile to open IBP dialog and select Zero.
e. Select the Main Menu
quick key.
quick key or to return to the main display.
CONTINUOUS CARDIAC OUTPUT (OPTIONAL)
The N Series bedside monitor allows a clinician to interface with the Edwards
Vigilance II, Vigileo and EV1000 monitors for continuous cardiac output and SvO
monitoring. Refer to the operations manual for complete instructions.
Adjust the Displayed Parameters
To adjust the parameters displayed with the CCO parameter on the N Series
bedside monitor:
2
15
Page 22

BeneVision N22/N19/N17/N15/N12
a. Select CCO numeric tile on the main screen to enter the CCO dialog.
Or
Quick Reference Guide
a. Select Parameter Setup
Setup dialog.
Or
a. Select the Main Menu
column, and select CCO from Parameters Setup dialog.
b. Select Select Parameter tab.
c. Select tile and select desired parameters from adjacent list.
d. Select the Main Menu
quick key, and select CCO from Parameters
quick key, select Setup from the Parameters
quick key or to return to the main display.
CENTRAL VENOUS OXYGEN SATURATION (OPTIONAL)
The N Series bedside monitor allows a clinician to monitor ScvO2 through the
use of a fiberoptic probe and a CeVOX optical module. Refer to the operations
manual for complete instructions.
Print Oxygenation Parameters
To print the oxygenation parameters on the N Series bedside monitor:
a. Select the HemoSight
Or
a. Select ScvO
select HemoSight.
2 numeric tile on the main screen to enter the ScvO2 dialog, and
quick key.
Or
a. Select ScvO
HemoSight.
b. Select
c. Select the Main Menu
2 from Parameters Setup dialog ( quick key), and select
to print oxygenation parameters through the printer.
quick key or to return to the main display.
BISPECTRAL INDEX (OPTIONAL)
The N Series bedside monitor allows a clinician to monitor the depth of awareness
during anesthesia and sedation administration.
Adjust BIS Waveform Area
16
Page 23

BeneVision N22/N19/N17/N15/N12
To adjust the display in the BIS waveform area to include EEG, BIS Trends, or
Superimposed BIS Trends on the N Series bedside monitor:
a. Select BIS waveform or numeric tile on the main screen to enter the BIS
dialog.
Or
Quick Reference Guide
a. Select BIS from Parameters Setup dialog (
b. Select Setup tab.
c. Select Display.
d. Scroll and select option.
e. Select the Main Menu
quick key or to return to the main display.
quick key).
BIS Expand View (Bilateral Sensor Required)
To expand the BIS view on the N Series bedside monitor:
a. Select BIS waveform or numeric tile on the main screen to enter the BIS
dialog.
b. Select BIS Expand.
Adjust Parameters
To adjust the parameters displayed in the BIS numeric tile on the N Series bedside
monitor:
a. Select BIS waveform or numeric tile on the main screen to enter the BIS
dialog.
Or
a. Select BIS from Parameters Setup dialog (
quick key).
b. Select Select Parameter tab.
c. Select tile and select desired parameter from adjacent list.
d. Select the Main Menu
quick key or to return to the main display.
ALARMS
Setting Parameter Alarm Properties
The Alarm dialog allows the clinician to configure alarm properties on the N
Series bedside monitor.
17
Page 24

BeneVision N22/N19/N17/N15/N12
To adjust the alarm properties of parameters on the N Series bedside monitor:
Quick Reference Guide
a. Select the Alarm Setup
Or
a. Select the Main Menu
column.
b. Select parameter and select
• On/Off – to enable or disable parameter's alarm responses.
• Select High or Low limit and adjust value using the drop down value list
• Priority– to adjust the audio and visual alarm indicators. Level options
include High (Red), Medium (Yellow), Low (Yellow) and Prompt (audio
absent).
• Alarm Output – to activate an automatic recording/printing when the
alarm occurs.
c. Select the Main Menu
quick key.
quick key, and select Limits from the Alarm
quick key or to return to the main display.
Changing Arrhythmia Alarm Settings
To adjust a patient’s arrhythmia alarm on the N Series bedside monitor:
a. Select Alarm Setup
Menu
b. Select Arrhythmia tab.
quick key.
quick key, ECG waveform/numeric tile or Main
c. Scroll and select individual arrhythmia.
d. Select
• On/Off – to enable or disable arrhythmia's alarm responses.
• Priority– to adjust the audio and visual alarm indicators. Level options
include High (Red), Medium (Yellow), Low (Yellow) and Prompt (audio
absent).
Note: If alarm is locked, alarm cannot be turned off or priority altered.
• Alarm Output – to activate an automatic recording when the alarm
occurs.
e. Select the Main Dialog
To adjust a patient arrhythmia threshold setting on the N Series bedside monitor:
18
quick key or to return to the main display.
Page 25

BeneVision N22/N19/N17/N15/N12
a. Select Alarm Setup quick key, ECG waveform/numeric tile or Main
Menu
b. Select Arrhythmia tab.
c. Select Threshold tab.
d. Select arrhythmia threshold and adjust value using the drop down value list.
quick key.
Quick Reference Guide
e. Select the Main Menu
quick key or to return to the main display.
Disable Non-Lethal Arrhythmia Alarms
To disable all arrhythmia alarms except lethal arrhythmias on the N Series bedside
monitor:
a. Select Alarm Setup
Menu
b. Select Arrhythmia tab.
c. Select Lethals Only.
d. Select the Main Menu
quick key.
quick key, ECG waveform/numeric tile or Main
quick key or to return to the main display.
Accessing Help When Technical Alarms Occur
In the technical alarm list, alarm messages followed by Detail includes help
information.
a. Select the technical alarm information area to enter the Alarms dialog.
b. Select the Technical Alarms tab.
c. Select the desired alarm.
d. Select the Main Menu
quick key or to return to the main display.
RESET ALARMS
To reset an alarm for the duration of the alarm on the N Series bedside monitor,
select the Alarm Reset
quick key.
PAUSE ALARMS/PAUSE ALARM TONES
To pause alarms or alarm tones on the N Series bedside monitor, select Alarm
Pause
to pause audible alarm tones.
WARNING: Selecting alarm pause or audio pause may affect current and future
quick key to pause all the alarms, or select Audio Pause quick key
19
Page 26

BeneVision N22/N19/N17/N15/N12
alarms, including arrhythmias, depending on your department’s configuration.
Quick Reference Guide
TRANSFER
The N Series bedside monitor has the ability to transfer patient data through the
MPM (Multi-Parameter Module), N1 or T1 patient monitor.
To transfer patient data from one patient monitor to another patient monitor:
a. Remove MPM/N1/T1 from the original patient monitor.
b. Insert MPM/N1/T1 into a new patient monitor.
c. Select from the Select Patient dialog:
• Continue Patient in Monitor to continue with the patient data and
settings in the new monitor and delete all patient data in the original
MPM/N1/T1. All patient data from the new monitor will copy into the
MPM/N1/T1.
• Continue Patient in MPM or Continue Patient in Transfer Module to
continue with the patient data and settings in the original MPM/N1/T1,
and clears all patient data in the new monitor. All patient data from the
original MPM/N1/T1 will copy into the new monitor.
• New Patient to delete all patient data in the original MPM/N1/T1, and in
the new monitor as well as restore default settings.
• Same Patient to merge the patient data from the original MPM/N1/T1
with the patient data in the new monitor.
d. Select the Main Menu
quick key or to return to the main display.
HEMODYNAMIC MONITORING
Initiate A Cardiac Output Measurement
Cardiac Output (C.O.) is the amount of blood ejected from the left ventricle each
minute, expressed in liters per minute (l/min). Cardiac Index (CI) is the Cardiac
Output divided by the patient's body surface area.
To initiate a Cardiac Output measurement on the N Series bedside monitor:
a. Insert the C.O. Module.
b. Connect the C.O. cable to the C.O. connector on the monitor and
Interconnect the C.O. cable, thermodilution catheter, and injectate.
c. Select C.O. tile on the main screen to enter the C.O. dialog.
20
Page 27

BeneVision N22/N19/N17/N15/N12
Or
Quick Reference Guide
c. Select the
d. Verify the computation constant or adjust the computation constant in the
C.O. dialog.
e. Inject solution when Inject Now message is displayed (Auto measuring
mode is enabled in the C.O. dialog).
Or
e. Select Start and inject solution within 4 seconds to perform a cardiac
output measurement when Ready for new set of measurement is displayed
(Manual measuring mode is enabled in the C.O. dialog)
Note: Cardiac index is calculated if height/weight has been entered in the
Patient Setup dialog.
f. Wait 1 minute between injections to allow baseline stabilization.
g. Perform additional Cardiac Output measurements as needed.
h. Select Stop to stop the current measurement as needed.
i. Select measurement to include/exclude in the Cardiac Output average (a
in the box indicates cardiac output measurement is selected).
j. Select HemoSight to access the HemoSight dialog.
k. Select the Main Menu
quick key to enter the C.O. dialog.
quick key or to return to the main display.
Note: Blood temperature alarms are inactive when a cardiac output
measurement is initiated.
Initiate Pulmonary Artery Wedge Pressure (PAWP)
Pulmonary Artery Wedge Pressure (PAWP) is a pressure measurement obtained
from a PA catheter when the PA distal balloon is inflated and the catheter
advances and occludes a distal pulmonary artery. PAWP pressure is a reflection of
the pressure in the left ventricle at end-diastole.
To initiate a PAWP measurement on the N Series bedside monitor:
a. Insert IBP Module as needed.
b. Select PAW P
Or
quick key .
21
Page 28

BeneVision N22/N19/N17/N15/N12
b. Select PA from Parameters Setup dialog ( quick key), and select PAWP.
c. Select Setup to adjust PA sweep speed, PA scale, or reference waveforms (as
needed).
d. Inflate balloon to obtain wedge waveform.
e. Select Freeze to freeze the waveform.
f. Select Accept to save the PAWP value.
g. Select Hemo Calcs to access the Hemodynamic page of the Calculations
dialog.
Quick Reference Guide
h. Select the Main Menu
Note1: PA alarms are inactive when a PAWP measurement is initiated.
Note2: Follow manufacturer’s suggested procedures and hospital policy for
PAWP balloon inflation.
quick key or to return to the main display.
Initiate Hemodynamic Calculations
Hemodynamic calculations are a set of values that are used to determine the
hemodynamic status of the patient.
To initiate hemodynamic calculations on the N Series bedside monitor:
a. Select Hemo Calcs from the PAW P screen or Hemodynamic tab from
Calculations dialog (Calculations
b. HR, Art (Mean), PA (Mean), CVP, and average CO measurements are
automatically entered from the current values along with height and weight
if previously entered.
c. Select remaining parameter and enter value.
d. Select Calculate to complete calculation.
e. Select
through the printer.
f. Select the Main Menu
to print the currently displayed Hemodynamic Calculations
quick key or to return to the main display.
or Main Menu quick key).
SCREEN DISPLAY
To enter the screen selection dialog and adjust the main screen’s layout on the N
Series bedside monitor:
a. Select the Screen Setup
22
quick key.
Page 29

BeneVision N22/N19/N17/N15/N12
Or
Quick Reference Guide
a. Select the Main Menu
Display column.
b. Select the desired screen.
• Normal Screen: Real time waveforms and numeric parameters on the main
display (Configurable).
• Big Numerics: Up to 6 waveforms and numeric parameters in an
expandable view on the main display (Configurable).
• Minitrends: Split screen with continuously displayed graphic minitrends on
left side beside real time waveforms and numeric parameters on the main
display (Configurable).
• OxyCRG: Split screen with OxyCRG (HR trend, SpO
RR waveform) on the lower portion of the display with real time waveforms
and numeric parameters.
• Remote View (Optional): Split screen with viewing information from
another bed(s) on the lower portion of the display with real time waveforms
and numeric parameters on the host monitoring device.
• ECG Half-Screen: (5, 6, or 12 lead wire set): 7 Leads or 8 leadsof ECG on the
upper portion with real time waveforms and numeric parameters on the
main display.
quick key, and select Choose Screen from the
trend, and RR trend/
2
• ECG Full Screen: (5, 6, or 12 lead wire set): 7 leads or 8 leads of ECG with
numeric parameters on the main display.
• ECG 12-Lead (Optional): 12 leads of ECG with numeric parameters on the
main display.
• PAWP (Optional): Split screen with PAWP measurement screen on the
lower portion of the main display with real time waveforms and numeric
parameters.
• Respiratory Loops(Optional): Split screen with Respiratory loop screen on
the left side with real time waveforms and numeric parameters on the main
display.
• Integrated Devices (Optional): Split screen with viewing information from
external device, such as a ventilator and anesthesia machine, on the left
portion of the display with real time waveform and numeric parameters. on
23
Page 30

BeneVision N22/N19/N17/N15/N12
the main display.
• EWS (Optional): Split screen with EWS scoring tool on left side of display
with real time waveform and numeric parameters on the main display.
Quick Reference Guide
c. Select the Main Menu
Note1: The first waveform is always an ECG lead and HR is always located in the
first digital tile in the Normal Screen selection.
Note2: Digital and waveform display selections on the N Series bedside monitor
and Central Monitoring System are independent.
quick key or to return to the main display.
REVIEW
Tabular Trends
To display Tabular trends on a patient:
a. Select Review
b. Select Tabular Trends tab from the Review column.
c. Select Trend Group and specify trend category or select Custom for user
defined parameters to be displayed.
d. Select Interval to specify the time interval tabular trends are to be
displayed.
e. Select the Main Menu
To record Tabular trends on a patient on the N Series bedside monitor to the
integrated or independent recorder:
a. Select Review
quick key, or select the Main Menu quick key.
quick key or to return to the main display.
quick key, or select the Main Menu quick key.
b. Select Tabular Trends tab from the Review column.
c. Select
d. Select Record to print to the integrated recorder.
e. Select the Main Menu
To print Tabular trends on a patient on the N Series bedside monitor to the
printer:
a. Select Review
b. Select Tabular Trends tab from the Review column.
24
and confirm specified time period.
quick key or to return to the main display.
quick key, or select the Main Menu quick key.
Page 31

BeneVision N22/N19/N17/N15/N12
c. Select and confirm specified settings.
d. Select Print to the independent printer.
Quick Reference Guide
e. Select the Main Menu
quick key or to return to the main display.
Arrhythmia and Alarm Events
The Events page stores 1000 physiological and arrhythmia events on a patient
based on the Alarm Setup dialog.
To view and print an alarm event on a patient on the N Series bedside monitor:
a. Select Review
b. Select Events tab from the Review column.
c. Scroll and select event.
d. Select Detail to view the details of selected events.
e. Select
•
•
f. Select the Main Menu
Note: The waveforms printed are determined by the Record Setup and Print
Setup dialogs on the N series bedside monitor.
to print to the integrated or independent recorder.
to print to the independent printer.
quick key, or select the Main Menu quick key.
quick key or to return to the main display.
Full Disclosure
The N series bedside monitors have the ability to store configured waveforms and
associated numeric information for up to 48 hours.
To adjust waveforms to be stored and print waveforms stored on a patient:
a. Select Review
b. Select Full Disclosure tab from the Review column.
c. Select Setup.
d. Select the Storage tab and set the desired waveforms to be stored in the
monitor.
e. Select the Display(Maximum: 3) tab and set the desired waveforms to be
displayed on the Full Disclosure page.
f. Select
quick key, or select the Main Menu quick key.
to return to the Full Disclosure page.
25
Page 32

BeneVision N22/N19/N17/N15/N12
g. Select
Quick Reference Guide
•
•
h. Select the Main Menu
to print to the integrated or independent recorder.
to print to the independent printer.
quick key or to return to the main display.
OxyCRG
The OxyCRG page stores up to 48 hours' trend curves. To view and print an
OxyCRG alarm event on a patient on the N Series bedside monitor:
a. Select Review
b. Select OxyCRG tab from the Review column.
c. Scroll and select event.
d. Select Zoom to set the resolution of trend curves.
e. Select Waveform to set the resolution of trend curves.
f. Select and confirm specified settings.
g. Select Print to the independent printer.
h. Select the Main Menu
quick key, or select the Main Menu quick key.
quick key or to return to the main display.
VIEWING OTHER BEDS
Entering the Remote View Screen
The clinician can observe alarm conditions and view real time physiological data
from patients on other networked monitoring devices. To enter Remote View
screen:
a. Select the Remote View
Or
a. Select the Main Menu
Display column.
b. Select Remote View and select
screen.
quick key.
quick key, and select Choose Screen from the
to return to display the Remote View
Adding a Bed
To add a remote bed (device):
a. Select Select Bed from the Remote View screen.
26
Page 33

BeneVision N22/N19/N17/N15/N12
b. Select a desired department. All the beds under this department will be listed.
c. Select a desired tile from the A-W1, A-W2 or A-W3 group. A-Wx indicates an
Alarm Watch group. These beds can be displayed on the main screen in the
Alarm Watch tiles.
d. Select a bed from the bed list. The selected bed will appear in the previously
selected tile.
e. Repeat the step as necessary for A-W1, A-W2, and A-W3 groups.
Quick Reference Guide
f. Select the Main Menu
Note: A √ check mark at the left of the bed list indicates the bed has been included
in an Alarm Watch bed.
quick key or to return to the main display.
Resetting Alarms for Remote Devices
To reset (acknowledge) the alarms on the remote devices, select Alarm Reset in the
Remote View screen if enabled.
WARNING: Selecting Alarm Reset for the Remote View device will reset the alarms
on the remote device and the CMS if enabled.
Removing a Bed
To remove a remote device,
a. Select Select Bed from the Remote View screen.
b. Select a desired bed at the A-W1, A-W2 or A-W3 areas.
c. Select Clear Bed to remove the selected bed, or select Clear All Beds to
remove all beds.
b. Select the Main Menu
quick key or to return to the main display.
Saving a Manual Event
To save a manual event,
a. Select the desired device to view from the Remote View screen.
b. Select Manual Event.
c. Select
to return to the main display.
Displaying the Alarm Watch Tile on the Main Screen
The alarm watch function provides the alarm notification by color and sound. To
display the alarm watch tile on the main screen,
27
Page 34

BeneVision N22/N19/N17/N15/N12
a. Select the Main Menu quick key.
b. Select Tile Layout from the Display column.
c. Select the numeric tile.
d. Select Alarm Watch from the drop down list and select A-W1, A-W2, or
A-W3.
Quick Reference Guide
e. Select the Main Menu
quick key or to return to the main display.
VOLUMES
The alarm volume, key volume, and QRS volume can be adjusted on the N Series
bedside monitor.
Alarm Volume
To adjust the alarm volume on the N Series bedside monitor:
a. Select Volume
key.
b. Select Alarm Volume.
c. Select volume ranging from X*-10 (0=Off 10=Max).
d. Select the Main Menu
quick key or select Setup tab in Alarm Setup quick
quick key or to return to the main display.
*The minimum volume range(X) is configurable.
Key Volume
To adjust the key volume on the N Series bedside monitor:
a. Select Volume
b. Select Key Volume.
c. Select volume ranging from 0-10 (0=Off 10=Max).
quick key.
d. Select the Main Menu
quick key or to return to the main display.
Beat Tone
To adjust the beat tone (QRS tone) volume on the N Series bedside monitor:
a. Select Volume
b. Select QRS Volume.
c. Select volume ranging from 0-10 (0=Off 10=Max).
28
quick key.
Page 35

BeneVision N22/N19/N17/N15/N12
d. Select the Main Menu quick key or to return to the main display.
Or
a. Select ECG waveform or ECG numeric tile to enter ECG dialog.
b. Select Setup tab.
c. Select QRS Volume.
d. Select volume ranging from 0-10 (0=Off 10=Max)
Quick Reference Guide
e. Select the Main Menu
Or
a. Select SpO
b. Select PR Setup tab.
c. Select QRS Volume.
d. Select volume ranging from 0-10 (0=Off 10=Max).
e. Select the Main Menu
Note: The QRS tone is derived from either the HR or PR, depending on which is
the selected source of the QRS tone. When monitoring SpO
pitch tone changes as the patient’s saturation level changes. The pitch of the
tone rises as the saturation level increases and falls as the saturation level
decreases.
waveform or SpO2 numeric tile to enter SpO2 dialog.
2
quick key or to return to the main display.
quick key or to return to the main display.
* The minimum volume range (X) is configurable.
, there is a variable
2
DATE AND TIME
The N Series bedside monitor allows the clinician to adjust the date and time if the
N Series bedside monitor is not connected to the network. To adjust the system
time, date, and format:
a. Select the Main Menu
column.
quick key and select Time from the System
b. Set Date and Time.
c. Set Date Format.
d. Enable 24 Hour Time if desired.
e. Enable Daylight Saving Time if desired.
29
Page 36

BeneVision N22/N19/N17/N15/N12
f. Select the Main Menu quick key or to return to the main display.
If the monitor is connected to a central monitoring system (CMS) or hospital
clinical system (HIS), the date and time are automatically obtained from the
network.
Quick Reference Guide
PARAMETER COLORS
The N Series bedside monitor provides the ability to adjust the parameter’s
numeric and waveform (if applicable) color.
To adjust the parameter’s color on the N Series bedside monitor:
a. Select Main Menu
b. Select Param Color from the Parameters colume.
c. Select parameter.
d. Select color.
e. Select the Main Menu
quick key.
quick key or to return to the main display.
LOAD DEFAULT (PRESET) SETTINGS
The N Series bedside monitor settings are automatically restored either when the
patient size is adjusted or when Discharge is performed.
A clinician may restore default settings on a patient currently being monitored on
the N Series bedside monitor by:
a. Select Main Menu
column.
Or
a. Select Load Config
b. Select preset configuration from displayed list.
c. Select Load.
d. Select OK to confirm.
quick key, and select Load from the Configuration
quick key.
Note: All patient data preserved.
LOCK/UNLOCK TOUCHSCREEN DISPLAY
To lock the touchscreen, hold and press the Main Menu quick key and slide to the
left as directed by the arrow. A padlock symbol displays at the top of the Main
30
Page 37

BeneVision N22/N19/N17/N15/N12
Menu quick key if the touchscreen is disabled.
To manually unlock the touchscreen, hold and press the Main Menu quick key
and slide to the right as directed by the arrow.
The touchscreen can be unlocked automatically when the lock period is over if
enabled. To set a preconfigured lock period,
Quick Reference Guide
a. Select the Screen Setup
Or
a. Select the Main Menu
column.
b. Select Screen Lock Duration and set duration from drop down list.
c. Select the Main Menu
quick key, and select the Display tab.
quick key, and select Display from the Display
quick key or to return to the main display.
PAIR THE TM80 TELEMETRY MONITOR
Pair the TM80
The N Series bedside monitor allows the TM80 telemetry pack to be displayed on
the main screen when they are paired.
To pair the TM80 with the N Series bedside monitor,
a. Select the Main Menu
b. Select Wireless Module, if detected, from the Parameters column.
c. Select the desired TM80 under the Device Name column. If the desired
TM80 is not displayed, select Update List.
d. Select Add adjacent to the desired TM80.
e. Select
quick key.
• Continue Patient in Monitor to use the patient information and
parameters settings from the monitor.
• Continue Patient in Telemetry to use the patient information and
parameters settings from the TM80 and CMS.
f. Select the Main Menu
quick key or to return to the main display.
Unpair the TM80 Telemetry Monitor from the N Series Bedside Monitor
To unpair the TM80 and the N Series bedside monitor:
31
Page 38

BeneVision N22/N19/N17/N15/N12
a. Select the Main Menu quick key.
b. Select Wireless Module, if detected, from the Parameters column.
a. Select the desired TM80 under the Device Name.
b. Select Remove.
c. Select
• Continue Patient in Monitor to disconnect the patient from the TM80 and
continue with the patient monitor. The patient will be discharged from
the TM80.
• Continue Patient in Telemetry to disconnect the patient from the N
Series bedside monitor and continue with the TM80. The patient will be
discharged from the N series bedside monitor.
Quick Reference Guide
d. Select the Main Menu
quick key or to return to the main display.
Unpair the N Series Bedside Monitor from the TM80 Telemetry Monitor
To unpair the N Series bedside monitor from the TM80 telemetry monitor:
a. Press the main menu button
b. Enter the password for the screen lock dialog if enabled.
c. Select
• Ye s : the TM80 telemetry monitor disconnects from the N Series bedside
monitor but does not discharge the patient. The TM80 remains admitted
on the Central Monitoring System to continue patient monitoring.
• No: the TM80 telemetry monitor disconnects from the N Series bedside
monitor and discharges the patient. The patient remains admitted on the
N Series bedside monitor and Central Monitoring System.
on the front panel of the TM80.
PAIR BP10 NIBP MODULE
Pair the BP10 Module with the N Series Bedside Monitor
To pair a BP10 with the N Series bedside monitor:
a. Press the MPAN button on the right panel of the BP10.
b. Select the Main Menu
quick key.
c. Select Wireless Module, if detected, from the Parameters column.
32
Page 39

BeneVision N22/N19/N17/N15/N12
d. Select Device Name column.
e. Select the desired BP10 module.
Note: If the desired BP10 is not displayed, select Update List.
f. Select Add adjacent to the BP10.
Quick Reference Guide
g. Select the NIBP Start/Stop
Verify the NIBP measurement on the N Series bedside monitor screen and
BP10 module are consistent.
quick key to start an NIBP measurement.
Unpair BP10 Module from the N Series Bedside Monitor
Method 1:
To unpair the BP10 from the N Series bedside monitor:
a. Select the Main Menu
a. Select Wireless Module, if detected, from the Parameters column.
b. Select the desired BP10 module.
c. Select Remove.
Method 2:
To unpair the BP10 from the N Series bedside monitor, press the MPAN button on
the right side of the BP10 module.
quick key
CLEANING/DISINFECTING
Cleaning the Main Unit/Module/SMR
Clean your equipment in accordance with the hospital’s equipment cleaning
policy.
To clean the equipment:
a. Dampen a soft lint-free cloth with one of the recommended cleaning and
disinfecting agents listed in the Operator's Manual.
b. Wipe the display screen.
c. Wipe the external surface of the monitor, modules, or SMR with the damp
cloth, avoiding the connectors and metal parts.
d. Dry the surface with a clean cloth. Allow the equipment to air dry in a
ventilated and cool place.
33
Page 40

BeneVision N22/N19/N17/N15/N12
Note: Lock the touchscreen before cleaning the monitor screen.
Quick Reference Guide
Disinfecting the Main Unit/Module/SMR
Disinfect your equipment as required in your hospital's servicing schedule using
one of the recommended disinfecting agents listed in the Operator's Manual.
Cleaning equipment before disinfecting is recommended. Always dilute and use
disinfectants according to the manufacturer's instructions.
Note: Lock the touchscreen before cleaning the monitor screen.
Cleaning and Disinfecting the Accessories
For information regarding cleaning and disinfecting accessories, please refer to
the manufacturer's packaging or the Operator's Manual.
STERILIZATION
Sterilization is not recommended for this equipment, related products,
accessories, or supplies unless otherwise indicated in the Instructions for Use
documentation accompanying the products, accessories or supplies.
Mindray DS USA, Inc.
800 MacArthur Blvd., Mahwah, NJ 07430
Tel: 800.288.2121 or 201.995.8000
www.mindray.com
046-011260-00(2.0)
 Loading...