


M18 FFN
Original instructions Originalbetriebsanleitung Notice originale
Istruzioni originali Manual original
Oorspronkelijke gebruiksaanwijzing
Original brugsanvisning Original bruksanvisning
Bruksanvisning i original
Alkuperäiset ohjeet
Πρωτότυπο οδηγιών χρήσης |
Algupärane kasutusjuhend |
|
Orijinal işletme talimatı |
Оригинальное руководство |
|
Původním návodem k |
по эксплуатации |
|
používání |
Оригинално ръководство за |
|
Pôvodný návod na použitie |
експлоатация |
|
Instrukcją oryginalną |
Instrucţiuni de folosire |
|
Eredeti használati utasítás |
originale |
|
Оригинален прирачник за |
||
Izvirna navodila |
||
работа |
||
Originalne pogonske upute |
||
Оригінал інструкції з |
||
Instrukcijām oriģinālvalodā |
експлуатації |
|
Originali instrukcija |
ﺔﯾﻠﺻﻷا تﺎﻣﯾﻠﻌﺗﻟا |
470 200 - M18FFN.indd 1 |
13.05.2020 10:41:43 |

ENGLISH |
1 |
2 |
3 |
Picture section |
|
|
|
with operating description and functional description |
|
DEUTSCH |
1 |
2 |
3 |
Bildteil |
|
|
|
mit Anwendungsund Funktionsbeschreibungen |
|
FRANÇAIS |
1 |
2 |
3 |
Partie imagée |
|
|
|
avec description des applications et des fonctions |
|
ITALIANO |
1 |
2 |
3 |
Sezione illustrata |
|
|
|
con descrizione dell'applicazione e delle funzioni |
|
ESPAÑOL |
1 |
2 |
3 |
Sección de ilustraciones |
|
|
|
con descripción de aplicación y descripción funcional |
|
PORTUGUES |
1 |
2 |
3 |
Parte com imagens |
|
|
|
explicativas contendo descrição operacional e funcional |
|
NEDERLANDS |
1 |
2 |
3 |
Beeldgedeelte |
|
|
|
met toepassingsen functiebeschrijvingen |
|
DANSK |
1 |
2 |
3 |
Billeddel |
|
|
|
med anvendelsesog funktionsbeskrivelser |
|
NORSK |
1 |
2 |
3 |
Bildedel |
|
|
|
med bruksog funksjonsbeskrivelse |
|
SVENSKA |
1 |
2 |
3 |
Bilddel |
|
|
|
med användningsoch funktionsbeskrivning |
|
SUOMI |
1 |
2 |
3 |
Kuvasivut |
|
|
|
käyttöja toimintakuvaukset |
|
ΕΛΛΗΝΙΚΑ |
1 |
2 |
3 |
Τμήμα εικόνων |
|
|
|
με περιγραφές χρήσης και λειτουργίας |
|
TÜRKÇE |
1 |
2 |
3 |
Resim bölümü |
|
|
|
Uygulama ve fonksiyon açıklamaları ile birlikte |
|
ČESKY |
1 |
2 |
3 |
Obrazová část |
|
|
|
s popisem aplikací a funkcí |
|
SLOVENSKY |
1 |
2 |
3 |
Obrazová časťs popisom aplikácií a funkcií |
|
|
|
|
|
POLSKI |
1 |
2 |
3 |
Część rysunkowa z opisami zastosowania i działania |
|
|
|
|
|
MAGYAR |
1 |
2 |
3 |
Képes részalkalmazásiés működési leírásokkal |
|
|
|
|
|
SLOVENSKO |
1 |
2 |
3 |
Del slikez opisom uporabe in funkcij |
|
|
|
|
|
HRVATSKI |
1 |
2 |
3 |
Dio sa slikamasa opisima primjene i funkcija |
|
|
|
|
|
LATVISKI |
1 |
2 |
3 |
Attēla daļa ar lietošanas un funkciju aprakstiem |
|
|
|
|
|
LIETUVIŠKAI |
1 |
2 |
3 |
Paveikslėlio dalissu vartojimo instrukcija ir funkcijų aprašymais |
|
|
|
|
|
EESTI |
1 |
2 |
3 |
Pildiosa kasutusjuhendi ja funktsioonide kirjeldusega |
|
|
|
|
|
РУССКИЙ |
1 |
2 |
3 |
Раздел иллюстрацийс описанием эксплуатации и функций |
|
|
|
|
|
БЪЛГАРСКИ |
1 |
2 |
3 |
Част със снимки с описания за приложение и функции |
|
||||
ROMÂNIA |
1 |
2 |
3 |
Secvenţa de imagine cu descrierea utilizării şi a funcţionării |
|
|
|
|
|
МАКЕДОНСКИ |
1 |
2 |
3 |
Дел со сликисо описи за употреба и функционирање |
|
|
|
|
|
УКРАЇНСЬКА |
1 |
2 |
3 |
Частина з зображеннями з описом робіт та функцій |
|
|
|
|
|
ﻲﺑرﻋ |
1 |
2 |
3 |
ﻲﻔﯾظوﻟاو ﻲﻠﯾﻐﺷﺗﻟا فﺻوﻟا ﮫﺑ دﺟوﯾ روﺻﻟا مﺳﻗ |
|
|
|
|
2
4
4
4
4
4
4
4
4
4
4
4
4
4
4
4
4
4
4
4
4
4
4
4
4
4
4
4
4
470 200 - M18FFN.indd 2 |
13.05.2020 10:41:43 |

Text section with Technical Data, important Safety and Working Hints and description of Symbols
Textteil mit Technischen Daten, wichtigen Sicherheitsund Arbeitshinweisen und Erklärung der Symbole.
Partie textuelle avec les données techniques, les consignes importantes de sécurité et de travail ainsi que l’explication des pictogrammes.
Sezione testo con dati tecnici, importanti informazioni sulla sicurezza e sull‘utilizzo, spiegazione dei simboli.
Sección de texto con datos técnicos, indicaciones importantes de seguridad y trabajo y explicación de los símbolos.
Parte com texto explicativo contendo Especificações técnicas, Avisos de segurança e de operação e a Descrição dos símbolos.
Tekstgedeelte met technische gegevens, belangrijke veiligheidsen arbeidsinstructies en verklaring van de symbolen.
Tekstdel med tekniske data, vigtige sikkerhedsog arbejdsanvisninger og symbolforklaring.
Tekstdel med tekniske data, viktige sikkerhetsog arbeidsinstruksjoner og forklaring av symbolene.
Textdel med tekniska informationer, viktiga säkerhetsoch användningsinstruktioner samt symbolförklaringar.
Tekstisivut: tekniset tiedot, tärkeät turvallisuusja työskentelyohjeet sekä merkkien selitykset.
Τμήμα κειμένου με τεχνικά χαρακτηριστικά, σημαντικές υποδείξεις ασφαλείας και εργασίας και εξήγηση των συμβόλων.
Teknik bilgileri, önemli güvenlik ve çalışma açıklamalarını ve de sembollerin açıklamalarını içeren metin bölümü.
Textová část s technickými daty, důležitými bezpečnostními a pracovními pokyny a s vysvětlivkami symbolů
Textová časť s technickými dátami, dôležitými bezpečnostnými a pracovnými pokynmi a s vysvetlivkami symbolov
Część opisowa z danymi technicznymi, ważnymi wskazówkami dotyczącymi bezpieczeństwa i pracy oraz objaśnieniami symboli.
Szöveges rész műszaki adatokkal, fontos biztonságiés munkavégzési útmutatásokkal, valamint a szimbólumok magyarázata.
Del besedila s tehničnimi podatki, pomembnimi varnostnimi opozorili in delovnimi navodili in pojasnili simbolov.
Dio štiva sa tehničkim podacima, važnim sigurnosnim i radnim uputama i objašnjenjem simbola.
Teksta daļa ar tehniskajiem parametriem, svarīgiem drošības un darbības norādījumiem, simbolu atšifrējumiem.
Teksto dalis su techniniais duomenimis, svarbiomis saugumo ir darbo instrukcijomis bei simbolių paaiškinimais.
Tekstiosa tehniliste näitajate, oluliste ohutusja tööjuhenditega ning sümbolite kirjeldustega.
Текстовый раздел, включающий технические данные, важные рекомендации по безопасности и эксплуатации, а также описание используемых символов.
Част с текст с технически данни, важни указания за безопасност и работа и разяснение на символите.
Porţiune de text cu date tehnice, indicaţii importante privind siguranţa şi modul de lucru şi descrierea simbolurilor.
Текстуален дел со Технички карактеристики, важни безбедносни и работни упатства и објаснување на симболите.
Текстова частина з технічними даними, важливими вказівками з техніки безпеки та експлуатації і поясненням символів.
زوﻣرﻟا فﺻوو لﻣﻌﻟاو ﺔﻣﻼﺳﻠﻟ ﺔﻣﺎﮭﻟا ﺢﺋﺎﺻﻧﻟاو ﺔﯾﻧﻔﻟا تﺎﻧﺎﯾﺑﻟﺎﺑ دوزﻣﻟا ﻲﺻﻧﻟا مﺳﻘﻟا
28
32
36
40
44
48
52
56
60
64
68
72
76
80
84
88
92
96
100
104
108
112
116
120
124
128
135
139
3
470 200 - M18FFN.indd 3 |
13.05.2020 10:41:45 |

|
|
|
|
|
|
|
|
26 |
|
|
20 |
|
|
||
|
|
|
|
|
|
|
|
14
15 


24
8
4
470 200 - M18FFN.indd 4 |
13.05.2020 10:41:46 |

16
18
10
12
27
6
5
470 200 - M18FFN.indd 5 |
13.05.2020 10:41:46 |
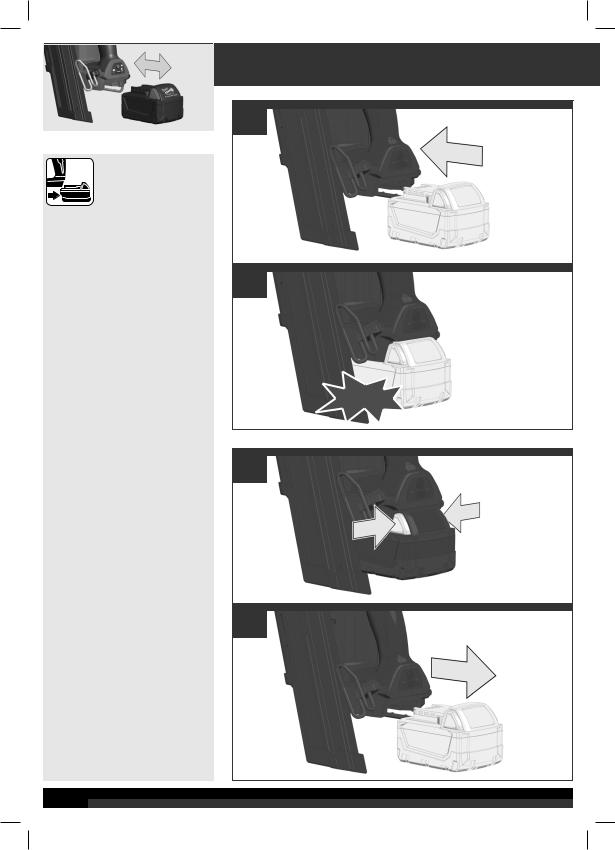
Remove the battery pack before starting any work on
the machine.
Vor allen Arbeiten an der
Maschine den Wechselakku herausnehmen
Avant tous travaux sur la machine retirer l’accu interchangeable.
Prima di iniziare togliere la batteria dalla macchina.
Retire la batería antes de comenzar cualquier trabajo en la máquina.
Antes de efectuar qualquer intervenção na máquina retirar o bloco acumulador.
Voor alle werkzaamheden aan de machine de akku verwijderen.
Ved arbejde inden i maskinen, bør batteriet tages ud.
Ta ut vekselbatteriet før du arbeider på maskinen
Drag ur batteripaket innan arbete utföres på maskinen.
Tarkista pistotulppa ja verkkojohto mahdollisilta vauriolta. Viat saa korjata vain alan erikoismies.
Рсйн брь кЬие есгбуЯб уфз мзчбнЮ бцбйсеЯфе фзн бнфбллбкфйкЮ мрбфбсЯб.
Aletin kendinde bir çalışma yapmadan önce kartuş aküyü çıkarın.
Před zahájením veškerých prací na vrtacím šroubováku vyjmout výměnný akumulátor.
Pred každou prácou na stroji výmenný akumulátor vytiahnuť.
Przed przystąpieniem do jakichkolwiek prac na elektronarzędziu należy wyjąć wkładkę akumulatorową.
Karbantartás, javítás, tisztítás, stb. előtt az akkumulátort ki kell venni a készülékből.
Pred deli na stroju izvlecite izmenljivi akumulator.
Prije svih radova na stroju izvaditi bateriju za zamjenu.
Pirms mašīnai veikt jebkāda veida apkopes darbus, ir jāizņem ārā akumulātors.
Prieš atlikdami bet kokius darbus įrenginyje, išimkite keičiamą akumuliatorių.
Enne kõiki töid masina kallal võtke vahetatav aku välja.
Bыньте аккумулятор из машины перед проведением с ней каких-либо манипуляций.
Преди започване на каквито е да е работи по машината извадете акумулатора.
Scoateţi acumulatorul înainte de a începe orice intervenţie pe maşină.
Отстранете ја батеријата пред да започнете да ја користите машината.
Перед будь-якими роботами на машині вийняти змінну акумуляторну батарею.
.زﺎﮭﺟﻟا ﻰﻠﻋ لﺎﻣﻋأ يأ ﻲﻓ ءدﺑﻟا لﺑﻗ ﺔﯾرﺎطﺑﻟا ﺔﻣزﺣ ﺔﻟازﺈﺑ مﻗ
6
470 200 - M18FFN.indd 6
1
2
click
1
2
13.05.2020 10:41:46
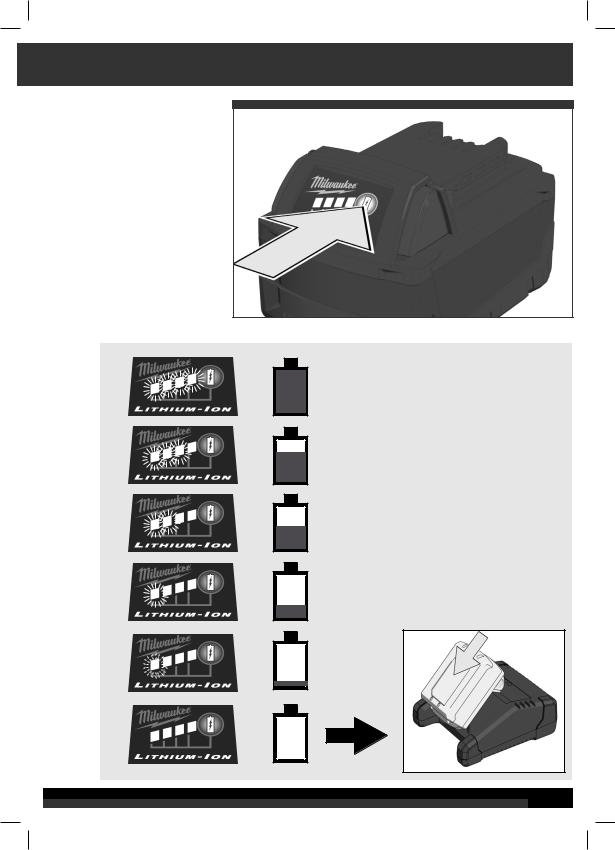
78-100 %
55-77 %
33-54 %
10-32 %
< 10 %
7
470 200 - M18FFN.indd 7 |
13.05.2020 10:41:47 |
1
2
8
470 200 - M18FFN.indd 8 |
13.05.2020 10:41:47 |
3
9
470 200 - M18FFN.indd 9 |
13.05.2020 10:41:47 |

2 sec
10
470 200 - M18FFN.indd 10 |
13.05.2020 10:41:47 |
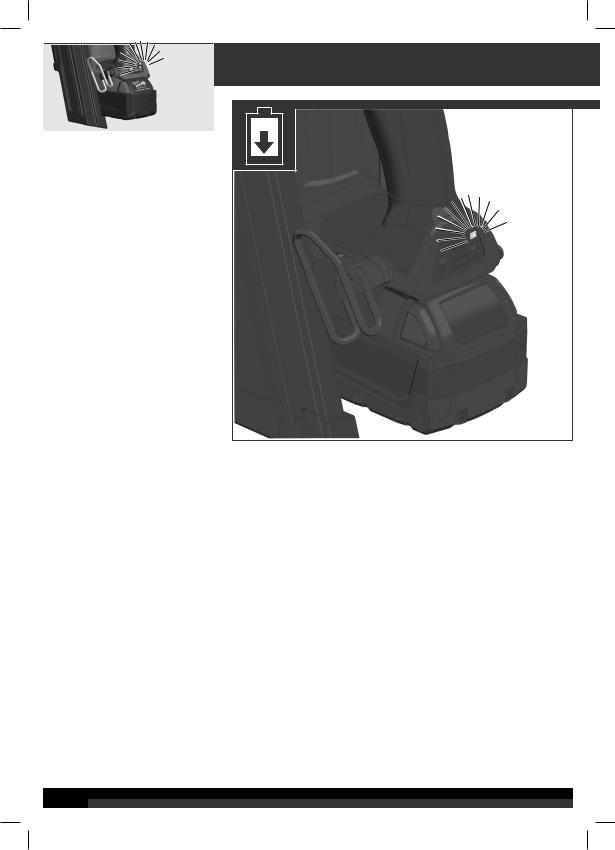
Press and hold the Power/Actuation button to turn on the tool. Die Power-Taste gedrückt halten, um die Maschine einzuschalten. Maintenir enfoncée la touche Power pour activer l'outil
Tenere premuto il tasto Power per accendere l'utensile.
Pulse y mantenga pulsado el botón de encendido/accionamiento para encender la herramienta.
Mantenha a tecla Power pressionada para ativar a ferramenta. Houd de Power-toets ingedrukt om het gereedschap te bedienen. Hold power-tasten nede for at aktivere værktøjet.
Hold Power-tasten trykt for å starte verktøyet.
Håll Power-knappen intryckt för att aktivera verktyget.
Pidä "Power"-näppäin painettuna työkalun toimentamiseksi.
Για να ενεργοποιήσετε το εργαλείο, κρατάτε το πλήκτρο Power πατημένο.
Aleti tetiklemek için Power tuşunu basılı tutun.
Držte stisknuté tlačítko Power, aby se nářadí aktivovalo. Držte zatlačené tlačidlo Power, aby sa náradie aktivovalo.
Aby uruchomić narzędzie, należy trzymać wciśnięty przycisk zasilania. Tartsa nyomva a Power gombot a szerszám működtetéséhez.
Držite pritisnjeno tipko Power, za uporabo orodja Tipku Power držati pritisnutom da bi se alat aktivirao. Darbarīka iedarbināšanai turiet nospiestu Power-pogu.
Laikykite nuspaustą galios mygtuką, kad įjungtumėte prietaisą. Tööriista käivitamiseks hoidke all käivitusnuppu.
Удерживать нажатой кнопку питания для включения инструмента.
Натиснете и задръжте бутона за включване/задействане на инструмента.
Apăsați continuu butonul de alimentare/funcționare pentru pornirea uneltei.
Притиснете го и држете го копчето за напојување, за да ја вклучите алатката
Утримувати натиснутою кнопку живлення для увімкнення інструменту.
ةادﻷا لﯾﻐﺷﺗﺑ مﺎﯾﻘﻠﻟ قﻼطﻹا / لﯾﻐﺷﺗﻟا رز ﻰﻠﻋ طﻐﺿﻟا ﻲﻓ رﻣﺗﺳاو طﻐﺿا
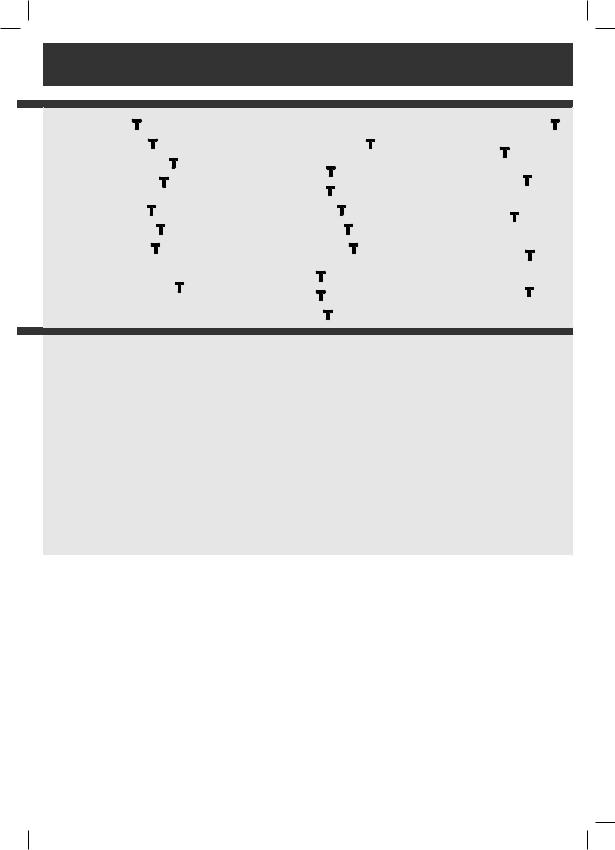
Single Sequential Actuation |
Jednotlivý nástrel |
|
Einzelbetätigung |
Tryb pojedynczy |
|
Actionnement individuel |
Egyedi működtetés |
|
Azionamento singolo |
Posamična aktivacija |
|
Accionamiento individual secuencial |
Pojedinačno aktiviranje |
|
Acionamento individual |
Autonomā darbināšana |
|
Enkele bediening |
Vienkartinis įjungimas |
|
Enkel aktivering |
Üksikkäivitus |
|
Enkelt skudd |
Раздельное срабатывание |
|
Enkelspik |
Последователно задействане |
|
Yksittäistoimennus |
Acționare succesivă simplă |
|
Μεμονωμένη ενεργοποίηση |
Индивидуално активирање |
|
Tek tetikleme |
Роздільне спрацьовування |
|
Jednotlivý nástřel |
يدرﻔﻟا ﻲﻟﺎﺗﺗﻣﻟا ءادﻷا |
|
|
|
|
|
|
|
Contact (Bump) Actuation |
Kontaktný nástrel |
|
Kontaktbetätigung |
Tryb kontaktowy |
|
Actionnement à contact |
Érintéses működtetés |
|
Azionamento a contatto |
Kontaktna aktivacija |
|
Accionamiento por contacto |
Kontaktno aktiviranje |
|
Acionamento de contato |
Darbināšana ar kontaktu |
|
Contactbediening |
Kontaktinis įjungimas |
|
Kontaktaktivering |
Kontaktkäivitus |
|
Kontakt skudd |
Контактное срабатывание |
|
Kontakspikning |
Контактно задействане |
|
Kosketustoimennus |
Acționare prin contact |
|
Ενεργοποίηση επαφής |
Контактно активирање |
|
Temas tetikleme |
Контактне спрацьовування |
|
Kontaktní nástřel |
سﻣﻠﻟﺎﺑ (ﺔﻣدﺻ) ءادﻷا |
|
|
|
|
|
|
|
|
|
11 |
|
|
|
470 200 - M18FFN.indd 11 |
13.05.2020 10:41:48 |
12
470 200 - M18FFN.indd 12 |
13.05.2020 10:41:48 |

Low Battery LED
If the red light will on, the battery is low. The tool will not be able to fire nails. To continue work, charge the battery.
LED Akkuladung gering
Wenn die rote LED leuchtet ist ist die Akkuladung zu gering. Der Nagler kann keine Nägel mehr einschlagen. Um weiter zu arbeiten den Akku laden.
LED Charge de batterie faible
Lorsque la LED rouge est allumée, la charge de la batterie est trop faible.
La cloueuse ne peut plus enfoncer de clous. Pour continuer de travailler, charger la batterie.
LED batteria scarica
Se la luce rossa si accende, la batteria è scarica. Il dispositivo non sarà in grado di sparare chiodi. Per continuare il lavoro, caricare la batteria.
Carga de batería de LED baja
Si se ilumina el LED rojo es porque la carga de batería es demasiado baja. Por lo tanto, la clavadora no podrá clavar más clavos. Recargue la batería si desea seguir trabajando.
LED carga da bateria fraca
Quando o LED vermelho se acender, a carga da bateria estará muito fraca. A ferramenta não pode mais cravar pregos. Carregue a bateria para continuar o trabalho.
Led 'Acculading gering'
Als de rode led brandt, is de acculading te gering. Het spijkerpistool kan geen spijkers meer inslaan. Om door te kunnen werken, moet u eerst de accu opladen.
Lavt batteri LED
Hvis indikatoren lyser rødt, er batteriet for lavt. Maskinen vil ikke længere være i stand til at skyde søm i. Batteriet skal oplades, hvis arbejdet skal fortsættes.
Lavt nivå på LED oppladbart batteri
Når den røde LED-en lyser er batterinivået for lavt Spikrepistolen kan ikke slå inn spikre lenger. Lad opp batteriet for å arbeide videre.
Lysdiod för låg batterinivå
När den röda lysdioden lyser är batterinivån låg. Spikpistolen kan inte längre slå i spikar. Ladda batteriet för att fortsätta arbetet.
LED Akun lataus vähäinen
Kun punainen LED palaa, niin akun lataus on liian alhainen. Naulain ei voi enää lyödä nauloja sisään. Jatkaaksesi työtä lataa akku.
Φωτοδίοδος χαμηλού φορτίου μπαταρίας
Εάν φωτίζει η κόκκινη φωτοδίοδος, τότε είναι το φορτίο μπαταρίας πολύ χαμηλό. Ο ηλωτήρας δεν μπορεί πλέον να καρφώσει. Για να συνεχίσετε την εργασία, πρέπει να φορτίσετε την μπαταρία.
LED Akü şarjı yetersiz
Kırmızı LED yandığında akü şarjı yetersizdir. Çivi çakma makinesi artık çivi çakamıyor. Çalışmaya devam etmek için aküyü şarj ettiriniz.
LED nízkého nabití akumulátoru
Když svítí červená LED, je nabití akumulátoru příliš nízké. Hřebíkovačka už nemůže zatloukat hřebíky. Abyste mohli dále pracovat, nabijte akumulátor.
LED nízkeho nabitia akumulátora
Keď svieti červená LED, je nabitie akumulátora príliš nízke. Klincovačka už nemôže zatĺkať klince. Aby ste mohli ďalej pracovať, nabite akumulátor.
LED Niski poziom naładowania akumulatora
Jeśli świeci się czerwona dioda LED, oznacza to, że poziom naładowania akumulatora jest zbyt niski. Gwoździarka nie jest już w stanie wbijać gwoździ. Aby kontynuować pracę, należy naładować baterię.
LED alacsony akkumulátor töltés
Ha világít a piros LED, alacsony az akkumulátor töltése. A szögbelövő nem tud több szöget belőni. Ahhoz, hogy tovább tudjon dolgozni, töltse fel az akkumulátort!
LED lučka za nizko napolnjenost akumulatorske baterije
Čer sveti rdeča LED lučka, je akumulatorska baterija premalo napolnjena. Žebljalnik ne more več zabijati žebljev. Če želite nadaljevati delo, napolnite akumulatorsko baterijo.
LED punjenje akumulatora nisko
Kada svjetli crveni LED, punjenje akumulatora je prenisko. Uređaj za zabijanje čavala više ne može zabijati čavle. Da bi se moglo dalje raditi, napuniti akumulator.
Nepietiekama uzlādes līmeņa LED
Ja spīd sarkanā LED, tad akumulatora uzlādes līmenis ir nepietiekams. Ar naglotāju vairs nevar iedzīt naglas. Uzlādējiet akumulatoru, lai turpinātu darbu.
Šviesadiodis maža akumuliatoriaus įkrova
Kai šviečia raudonas šviesadiodis, per maža akumuliatoriaus įkrova. Vinių kaltuvas daugiau nebekala vinių. Kad galėtumėte tęsti darbą, įkraukite akumuliatorių.
Madala aku laetusastme LED
Kui põleb punane LED, on aku laetusaste madal. Naeluti ei suuda rohkem naelu sisse lüüa. Edasi töötamiseks laadige akut.
Светодиод Низкий заряд батареи
Красный светодиод указывает на то, что заряд аккумулятора слишком низкий. Гвоздезабивной пистолет больше не может вбивать гвозди. Для продолжения работы зарядить аккумулятор.
LED за нисък заряд на акумулаторната батерия
Когато червеният LED свети, зарядът на акумулaторната батерия е прекалено нисък. Пистолетът за пирони вече не може да забива пирони. За да продължите работа, заредете акумулаторната батерия.
LED acumulator descărcat
Dacă se aprinde LED-ul roșu, atunci acumulatorul nu este suficient de încărcat. Mașina de bătut cuie nu mai poate să bată cuie. Pentru a lucra în continuare trebuie să încărcați acumulatorul.
LED-светло за празна батерија
Ако свети црвеното LED-светло, батеријата е празна. Пиштолот не може да исфрла повеќе клинови. Наполнете ја батеријата, за да продолжите со работа.
Світлодіод: низький заряд акумулятора
Якщо світиться червоний світлодіод, це означає низький заряд акумулятора. Цвяхозабивний пістолет не забиває цвяхи. Для подальшої роботи зарядити акумулятор.
ﺔﻠﯾﺋﺿ LED ـﻟا ﺔﯾرﺎطﺑ ﺔﻧﺣﺷ
.ًادﺟ ﺔﻠﯾﺋﺿ ﺔﯾرﺎطﺑﻟا ﺔﻧﺣﺷ نﺈﻓ ،ءارﻣﺣﻟا LED ـﻟا ﺔﺑﻣﻟ تءﺎﺿأ اذإ
.ﺔﯾرﺎطﺑﻟا نﺣﺷﺑ مﻗ ،لﻣﻌﻟا ﻲﻓ رﻣﺗﺳﺗ ﻲﻛﻟ .دﻌﺑ رﯾﻣﺎﺳﻣ قرط ﻊﯾطﺗﺳﯾ ﻻ رﯾﻣﺎﺳﻣﻟا قرط زﺎﮭﺟ
13
470 200 - M18FFN.indd 13 |
13.05.2020 10:41:48 |

14 |
|
|
|
470 200 - M18FFN.indd |
14 |
13.05.2020 |
10:41:48 |
1
2
9 sec
15
470 200 - M18FFN.indd 15 |
13.05.2020 10:41:48 |
1
Single Sequential Actuation Einzelbetätigung Actionnement individuel Azionamento singolo
Accionamiento individual secuencial Acionamento individual
Enkele bediening Enkel aktivering Enkelt skudd Enkelspik Yksittäistoimennus
Μεμονωμένη ενεργοποίηση
Tek tetikleme
Jednotlivý nástřel 2 Jednotlivý nástrel
Tryb pojedynczy Egyedi működtetés Posamična aktivacija Pojedinačno aktiviranje Autonomā darbināšana Vienkartinis įjungimas Üksikkäivitus
Раздельное срабатывание Последователно задействане
Acționare succesivă simplă
Индивидуално активирање Роздільне спрацьовування
|
|
يدرﻔﻟا ﻲﻟﺎﺗﺗﻣﻟا ءادﻷا |
|
|
|
3 |
|
|
|
clack |
|
16 |
|
|
|
470 200 - M18FFN.indd |
16 |
13.05.2020 |
10:41:48 |
|
Switch to single sequential actiation: |
||
|
|||
|
Press MODE Button - LED |
will light. |
|
|
Auf Einzelbetätigung umschalten: |
||
|
MODE Taste drücken - Die LED |
leuchtet. |
|
|
Sélectionner sur Actionnement individuel: |
||
Appuyez sur le bouton MODE - le DEL |
s‘allume. |
Commutare su Azionamento singolo: |
|
Premere il pulsante MODE – Il LED |
si accende |
con luce. |
|
Cambie a accionamiento individual secuencial:
Presione el botón MODE - LED |
luz. |
Comutar ao acionamento individual: |
|
Pressione o botão MODE - O LED |
acende-se. |
Omschakelen naar enkele bediening: |
|
Druk op de MODE-knop – de led |
brandt. |
Skift til enkel aktivering:
Tryk på MODE knappen – LED-lampen  lyser.
Koble om til enkel skudd:
Trykk på MODE-knappen – LED-lampen lyser hele.
Ställ om till enkelspik:
Tryck på MODE-knappen – lysdioden  lyser.
Vaihda kytkennäksi yksittäistoimennus:
Paina MODE-painiketta - LED  palaa jatkuvasti.
Μεταγωγήστημεμονωμένηενεργοποίηση:
ΠατήστετοπλήκτροMODE – Ηφωτοδίοδος είναιαναμμένη.
Tek tetiklemeye ayarlama: |
yanmakta. |
|
MODE Düğmesine Basın - LED |
||
Přepněte na jednotlivý nástřel: |
|
|
Stiskněte tlačítko MODE – LED |
dioda svítí. |
|
Prepnite na jednotlivý nástrel: |
|
svieti. |
Stlačte tlačidlo MODE – LED dióda |
||
Przełączenie na tryb pojedynczy: |
świeci się. |
|
Naciśnij przycisk MODE – dioda LED |
||
Kapcsoljon át egyedi működtetésre: |
|
|
Nyomja meg a MODE gombot – a LED |
|
|
folyamatosan. |
|
|
Preklop na posamično aktivacijo: |
|
|
Pritisnite tipko MODE – LED |
sveti. |
|
Preklopiti na pojedinačno aktiviranje: |
||
Pritisnite tipku MODE – LED |
svjetli. |
|
Pārslēdziet autonomās darbināšanas režīmā: |
||
Nospiediet pogu MODE – LED |
lampiņa spīd. |
|
Perjungti vienkartinio įjungimo režimą:
Paspauskite MODE mygtuką– šviesos diodas dega.
Üksikkäivitusele ümberlülitamine: |
|
Vajutage nuppu MODE – LED põleb. |
|
Переключитьсянарежимраздельного |
|
срабатывания: |
горит |
НажмитекнопкуMODE - светодиод |
|
светом. |
|
Превключванекъмпоследователно |
|
задействане: |
светещ. |
НатиснетебутонаMODE – LED |
|
Comutați la acționarea succesivăsimplă:
Apăsați butonul MODE - ledul luminează .
.
Преминетенаиндивидуалноактивирање:
ПритиснетегокопчетоMODE – ЛЕД светилкатасвети
Перемкнутисянарежимроздільного спрацьовування:
НатиснітькнопкуMODE - світлодіод горить світлом.
:يدرﻔﻟاﻲﻟﺎﺗﺗﻣﻟاءادﻷاﻰﻟإلﯾوﺣﺗﻟا
رﻣﺗﺳﻣءوﺿ يديألأﺔﺑﻣﻟءوﺿMODE رزﻰﻠﻋطﻐﺿا
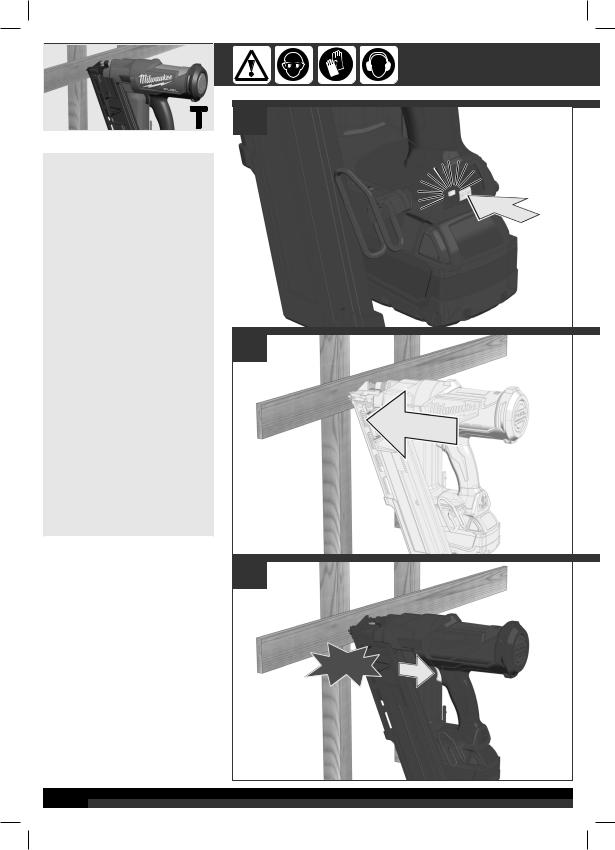
Push the tool against the work surface, compressing the workpiece contact.
Die Maschine gegen das Werkstück drücken. Dabei wird der Arbeitskontakt betätigt.
Appuyer l‘outil sur la pièce à usiner. De cette façon le palpeur sera actionné.
Premere l‘utensile contro il pezzo da lavorare. In questo modo si aziona il contatto di lavoro
Presione la herramienta contra la superficie de trabajo, accionando el contacto de la pieza de trabajo.
Pressione a ferramenta contra a peça. Assim, o contato de trabalho é ativado.
Druk het gereedschap op het werkstuk. Daarbij wordt het arbeidscontact bediend.
Tryk værktøjet imod emnet. Herved aktiveres arbejdskontakten.
Trykk verktøyet mot arbeidsemnet. Arbeidskontakten blir derved aktivert. Tryck verktyget mot arbetsstycket. Det gör att arbetskontakten aktiveras. Paina työkalu työkappaleeseen kiinni. Tällöin työkontakti toimentuu
Πιέζονταςτοεργαλείοπάνωσεένακατεργαζόμενοτεμάχιο, ενεργοποιείταιη επαφήεργασίας.
Aleti işparçasına bastırın. Bu sırada çalışma kontağı tetiklenir.
Nářadí zatlačte proti opracovávané součásti. Přitom se aktivuje pracovní kontakt.
Náradie zatlačte proti obrobku. Pri tom sa aktivuje pracovný kontakt.
Wsunąćnarzędzie w kierunku obrabianego przedmiotu. Tym samym kontakt roboczy zostanie wciśnięty.
Nyomja a szerszámot a munkadarabhoz. Ennek során a munkadarab-érintkező működtetésre kerül.
Pritisnite orodje ob surovec. Pri tem se sproži delovni stik. Pritisnite alat prema izratku. Kod toga se aktivira radni kontakt.
Piespiediet darbarīku pret apstrādājamo detaļu. Tādāveidātiek iedarbināts darba kontakts.
Prispauskite prietaisąprie ruošinio. Taip pasiekiamas darbinis kontaktas. Suruge tööriist detaili vastu. Seejuures käivitatakse püstoli ots.
Прижатьинструменткзаготовке. Такосуществляетсярабочийконтакт.
Натиснетеинструментакъмработнатаповърхност, докатопритискането къмдетайлазадействаосвобождаващияотвор.
Apăsați unealta pe suprafața de lucru, comprimând piesa de contact.
Притиснетејаалаткатанапарчетоштогоработите. Притоасеактивира работниотконтакт
Притиснутиінструментдозаготовки. Такздійснюєтьсяробочийконтакт.
.لﻣﻌﻟاءادﺄﺑصﺎﺧﻟاءزﺟﻟاطﻐﺿأ،لﻣﻌﻟاﺢطﺳدﺿةادﻷاﻊﻓدإ
|
|
|
|
|
|
|
Pull the trigger to drive the fastener. |
Nyomja meg a kioldót a szög belövéséhez. |
|
|
|
Den Auslöser betätigen, um den Nagel einzuschlagen. |
Sprožite sprožilec, da zabijete žeblje. |
|
|
|
Activer l‘actionneur pour enfoncer le clou. |
Aktivirati okidač za zabijanje čavla. |
|
|
|
Attivare l‘azionatore per inserire il chiodo. |
Iedarbiniet slēdzi naglas iedzīšanai. |
|
|
|
Tire del disparador para insertar el clavo. |
Įjunkite jungiklį, kad iššautumėte vinis. |
|
|
|
Ative o disparador para cravar o prego. |
Vajutage päästikule, et nael sisse lüüa. |
|
|
|
Druk op de trigger om de spijker in te slaan. |
Для забивания гвоздя, нажать спусковой крючок. |
|
|
|
Aktivér udløseren for at slå sømmet i. |
Изтеглете спусъка, за да освободите пирон. |
|
|
|
Trekk i avtrekkeren for å skyte inn spiker. |
Apăsați trăgaciul pentru împușcarea cuiului. |
|
|
|
Tryck in utlösaren för att slå i spiken. |
Притиснете го прекинувачот за да ја забиете шајката |
|
|
|
Paina liipaisinta lyödäksesi naulan. |
Для забивання цвяха натиснути спусковий гачок. |
|
|
|
Για να καρφώσετε ένα καρφί, πιέζετε τη σκανδάλη. |
.رﺎﻣﺳﻣﻟا قﻼطﻹ قﻼطﻹا رز بﺣﺳا |
|
|
|
Çiviyi çakmak için tetiğe basın. |
|
|
|
|
Stiskněte spoušť, aby se mohl nastřelit hřebík. |
|
|
|
|
Stlačte spúšť, aby sa mohol nastreliť klinec. |
|
|
|
|
Aby wbić gwóźdź, należy wcisnąć przycisk wyzwalacza. |
|
|
|
|
|
|
|
|
|
|
|
|
|
|
|
|
17 |
|
|
|
|
|
|
|
|
|
|
470 200 - M18FFN.indd 17 |
13.05.2020 10:41:49 |

Contact (Bump) Actuation Kontaktbetätigung Actionnement à contact Azionamento a contatto Accionamiento por contacto Acionamento de contato Contactbediening Kontaktaktivering
Kontakt skudd Kontakspikning Kosketustoimennus
Ενεργοποίηση επαφής
Temas tetikleme Kontaktní nástřel Kontaktný nástrel Tryb kontaktowy Érintéses működtetés Kontakta aktivacija Kontaktno aktiviranje
Darbināšana ar kontaktu Kontaktinis įjungimas Kontaktkäivitus
Контактное срабатывание Контактно задействане
Acționare prin contact
Контактно активирање Контактне спрацьовування
(طﻐﺿ) سﻣﻠﻟﺎﺑ ءادﻷا
1 |
2 |
3
18
470 200 - M18FFN.indd 18 |
13.05.2020 10:41:49 |

|
Switch to Contact Actuation: |
will light. |
|
Vaihda kytkennäksi kosketustoimennus: |
||
|
|
|||||
|
Press MODE Button - LED |
|
|
|
||
|
Auf Kontaktbetätigung umschalten: |
|
|
|
|
|
|
Press MODE Button - die LED |
leuchtet. |
|
|
||
|
Sélectionner l‘actionnement à contact: |
s‘allume. |
Temas tetiklemeye ayarlama: |
|
||
|
Appuyez sur le bouton MODE - le DEL |
|
|
|||
|
Commutare su Azionamento a contatto: |
|
MODE Düğmesine Basın - LED |
|
||
|
Premere il pulsante MODE – Il LED |
|
si accende con luce. |
Přepněte na kontaktní nástřel: |
|
|
|
Cambie a accionamiento por contacto: |
|
Stiskněte tlačítko MODE – LED |
|
||
|
Presione el botón MODE - LED |
luz. |
|
Prepnite na kontaktný nástrel: |
|
|
|
Comute para o acionamento de contato: |
|
Stlačte tlačidlo MODE – LED dióda |
|
||
|
Pressione o botão MODE - O LED |
|
acende-se. |
Przełączenie na tryb kontaktowy: |
|
|
|
Omschakelen naar contactbediening: |
brandt. |
Naciśnij przycisk MODE – dioda LED |
|||
|
Druk op de MODE-knop – de led |
|
Kapcsoljon át érintéses működtetésre: |
|||
|
Skift til kontaktaktivering: |
|
|
lyser. |
Nyomja meg a MODE gombot – a LED |
|
|
Tryk på MODE knappen – LED-lampen |
|
Preklop na kontaktno aktivacijo: |
|
||
|
Koble om til kontakt skudd: |
|
|
lyser hele. |
Pritisnite tipko MODE – LED |
sveti. |
|
Trykk på MODE-knappen – LED-lampen |
Preklapanje na kontaktno aktiviranje: |
||||
|
Ställ om till kontaktspikning: |
|
|
lyser. |
Pritisnite tipku MODE – LED |
svjetli. |
|
Tryck på MODE-knappen – lysdioden |
|
|
|
||
Pārslēdziet darbināšanas režīmāar kontaktu:
|
Nospiediet pogu MODE – LED |
lampiņa spīd. |
||
|
Perjungti kontaktinio įjungimo režimą: |
dega. |
||
|
Paspauskite MODE mygtuką– šviesos diodas |
|||
|
Kontaktkäivitusele ümberlülitamine: |
|
||
|
Vajutage nuppu MODE – LED |
põleb. |
|
|
|
Переключитьсянарежимконтактногосрабатывания: |
|||
|
НажмитекнопкуMODE - светодиод |
горитсветом. |
||
|
Превключваненаконтактнозадействане: |
|
||
svieti. |
НатиснетебутонаMODE – LED |
светещ. |
|
|
Comutați la acționarea prin contact: |
. |
|||
świeci się. |
Apăsați butonul MODE - |
ledul luminează |
||
Преминетенаконтактноактивирање: |
|
|||
folyamatosan. |
ПритиснетегокопчетоMODE – ЛЕД |
светилкатасвети |
||
Перемкнутисянарежимконтактногоспрацьовування: |
||||
|
НатиснітькнопкуMODE - світлодіод |
горитьсвітлом. |
||
|
رﻣﺗﺳﻣءوﺿ |
|
: سﻣﻠﻟﺎﺑءادﻷاﻰﻟإلﯾوﺣﺗﻟا |
|
|
يديألأﺔﺑﻣﻟءوﺿMODE رزﻰﻠﻋطﻐﺿا |
|||
|
|
|
|
|
|
|
|
Pull and hold the trigger |
Pidä liipaisinta painettuna. |
Laikykite jungiklį nuspaustą. |
|
|
|
Den Auslöser gedrückt halten. |
Κρατάτε τη σκανδάλη πατημένη. |
Hoidke päästikut all. |
|
|
|
Maintenir enfoncé l‘actionneur. |
Tetiği basılı tutun. |
Удерживать спусковой крючок нажатым. |
|
|
|
Tenere premuto l‘azionatore. |
Spoušť podržte zatlačenou. |
Изтеглете и задръжте спусъка |
|
|
|
Tire del disparador y manténgalo |
Spúšť podržte zatlačenú. |
Apăsați continuu trăgaciul. |
|
|
|
presionado |
Trzymać przycisk wyzwalacza wciśnięty. |
Прекинувачот држете го притиснат. |
|
|
|
Mantenha o disparador pressionado. |
|||
|
|
Tartsa nyomva a kioldót. |
Утримувати спусковий гачок натиснутим. |
||
|
|
Houd de trigger ingedrukt. |
|||
|
|
Sprožilec držite pritisnjen. |
قﻼطﻹا رز ﻰﻠﻋ طﻐﺿﻟا ﻲﻓ رﻣﺗﺳاو بﺣﺳا |
||
|
|
Hold udløseren nede. |
|||
|
|
Okidač držati pritisnutim. |
|
|
|
|
|
Hold avtrekkeren trykket. |
|
|
|
|
|
Turiet slēdzi nospiestu. |
|
|
|
|
|
Håll utlösaren intryckt. |
|
|
|
|
|
|
|
|
|
|
|
|
|
|
|
|
|
Push the tool against the work surface, |
slås i. |
iedarbināts un iedzīta nagla. |
|
|
|
compressing the workpiece contact to drive |
Paina työkalu työkappaleeseen kiinni. |
Prispauskite prietaisą prie ruošinio. Taip |
|
|
|
the fastener. |
|||
|
|
Tällöin työkontakti toimentuu ja naula |
pasiekiamas darbinis kontaktas ir iššaukite |
||
|
|
Die Maschine gegen das Werkstück |
lyödään. |
vinį. |
|
|
|
drücken. Dabei wird der Arbeitskontakt |
Πιέζοντας το εργαλείο πάνω σε ένα |
Suruge tööriist detaili vastu. Seejuures |
|
|
|
betätigt und der Nagel eingeschlagen. |
|||
|
|
κατεργαζόμενο τεμάχιο, ενεργοποιείται η |
käivitatakse püstoli ots ja nael lüüakse |
||
|
|
Appuyer l‘outil sur la pièce à usiner. De |
επαφή εργασίας και καρφώνεται το καρφί |
sisse. |
|
|
|
cette manière, le palpeur s‘activera et le |
Aleti iş parçasına bastırın. Bu sırada |
Прижать инструмент к заготовке. При |
|
|
|
clou sera enfoncé. |
|||
|
|
çalışma kontağı tetiklenir ve çivi çakılır. |
этом осуществляется рабочий контакт, и |
||
|
|
Premere l‘utensile contro il pezzo da |
Nářadí zatlačte proti opracovávané |
гвоздь забивается. |
|
|
|
lavorare. In questo modo si aziona il |
|
|
|
|
|
součásti. Přitom se aktivuje pracovní |
Натиснете инструмента към работната |
||
|
|
contatto di lavoro e viene inserito il chiodo. |
|||
|
|
kontakt a nastřelí se hřebík |
повърхност, докато притискането към |
||
|
|
Presione la herramienta contra la superficie |
Náradie zatlačte proti obrobku. Pri tom |
детайла освободи пирона. |
|
|
|
de trabajo, accionando el contacto de la |
Apăsați unealta pe suprafața de lucru, |
||
|
|
sa aktivuje pracovný kontakt a nastrelí sa |
|||
|
|
pieza de trabajo para insertar el clavo. |
|||
|
|
klinec. |
comprimând piesa de contact pentru |
||
|
|
Pressione a ferramenta contra a peça. |
Wsunąć narzędzie w kierunku obrabianego |
împușcarea cuiului. |
|
|
|
Nisso, o contato de trabalho é ativado e o |
|
|
|
|
|
przedmiotu. Tym samym nastąpi |
Притиснете ја алатката на парчето |
||
|
|
prego é cravado. |
|||
|
|
uruchomienie kontaktu roboczego i wbicie |
што го работите. Притоа се активира |
||
|
|
Druk het gereedschap op het werkstuk. |
gwoździa. |
работниот контакт и се забива шајката |
|
|
|
Daarbij wordt het arbeidscontact bediend |
Nyomja a szerszámot a munkadarabhoz. |
Притиснути інструмент до заготовки. При |
|
|
|
en de spijker ingeslagen. |
|||
|
|
Ennek során a munkadarab-érintkező |
цьому здійснюється робочий контакт та |
||
|
|
Tryk værktøjet imod emnet. Herved |
működésbe lép, és megtörténik a |
цвях забивається. |
|
|
|
aktiveres arbejdskontakten og sømmet |
szögbelövés. |
ءادﺄﺑ صﺎﺧﻟا ءزﺟﻟا طﻐﺿأ ،لﻣﻌﻟا ﺢطﺳ دﺿ ةادﻷا ﻊﻓدإ |
|
|
|
slås i |
Orodje pritisnite ob surovec. Pri tem se |
||
|
|
.رﺎﻣﺳﻣﻟا قﻼطﻹ لﻣﻌﻟا |
|||
|
|
Trykk verktøyet mot arbeidsemnet. |
sproži delovni stik in žebelj se zabija. |
|
|
|
|
Arbeidskontakten blir derved aktivert og |
Alat pritisnite prema izratku. Kod toga će |
|
|
|
|
spikeren skutt inn. |
|
|
|
|
|
biti aktiviran radni kontakt i čavao se zabija. |
|
|
|
|
|
Tryck verktyget mot arbetsstycket. Det gör |
|
|
|
|
|
Piespiediet darbarīku pret apstrādājamo |
|
|
|
|
|
att arbetskontakten aktiveras och spiken |
|
|
|
|
|
detaļu. Tādā veidā darba kontakts tiek |
|
|
|
|
|
|
|
|
|
|
|
|
|
|
|
|
|
|
|
|
|
|
|
|
|
|
19 |
|
|
|
|
|
|
|
|
|
|
|
|
470 200 - M18FFN.indd 19 |
13.05.2020 10:41:49 |

Retract a dropped striker.
Zurücksetzen eines verklemmten Schlagkörpers.
Retrait d‘un élément de frappe coincé. Ripristino del percussore inceppato. Retirada de un impactador atascado.
Retração dum corpo de impacto emperrado.
Het terugzetten van een vastgelopen slagpen.
Udtrækning af et fastklemt slagemne.
Tilbaketrekking av en fastklemt slaglegeme.
Återställning av en fastklämd slagkropp.
Kiinnijuuttuneen iskurin vapauttaminen.
Επαναφορά ενός μπλοκαρισμένου, κρουστικού σώματος.
Sıkışmış olan bir darba parçasının geri çekilmesi.
Vysunutí zaseknutého nastřelovacího tělesa.
Vysunutie zaseknutého nastreľovacieho telesa.
Wyjmij zakleszczoną zszywkę.
A megszorult beütőtest visszaállítása.
Namestitev zataknjenega udarnega nastavka v izhodiščni položaj.
Vraćanje jednog zaglavljenog udarnog tijela na početak.
Ieķīlēta skavotāja belžņa atiestatīšana. Užstrigusio smūgiuotuvo atstatymas.
Akuga klammerdaja vabastamine kinnikiilumise korral.
Возврат заклинившего корпуса ударника в исходное положение.
Изтегляне на заседнал ударник. Retragerea percutorului înţepenit.
Вовлекување на заглавен ударен дел.
Повернення корпусу ударника, що заклинив, в початкове положення.
.روﺷﺣﻣﻟا قﻼطﻹا مﺳﺟ بﺣﺳ
1
2
3
20
470 200 - M18FFN.indd 20 |
13.05.2020 10:41:49 |
4
5
6
max.
21
470 200 - M18FFN.indd 21 |
13.05.2020 10:41:50 |

7
8
9
22
470 200 - M18FFN.indd 22 |
13.05.2020 10:41:50 |
10
11
12
23
470 200 - M18FFN.indd 23 |
13.05.2020 10:41:50 |

|
|
1 |
|
|
|
STOP |
|
|
click |
|
|
|
|
2 |
|
|
click |
|
|
|
|
3 |
|
24 |
|
|
|
470 200 - M18FFN.indd |
24 |
13.05.2020 |
10:41:50 |

!
!
25
470 200 - M18FFN.indd 25 |
13.05.2020 10:41:50 |

Attach the protective cap to protect sensitive surfaces.
Die Schutzkappe aufstecken, um empfindliche Oberflächen zu schützen.
Mettre en place le cache de protection afin de protéger les surfaces sensibles.
Inserire il cappuccio di protezione per proteggere le superfici sensibili.
Coloque la tapa de protección para proteger las superficies sensibles.
Coloque a tampa de proteção para proteger superfícies delicadas.
Plaats de beschermkap ter bescherming van gevoelige oppervlakken.
Sæt beskyttelseshætten på for at beskytte sarte overflader.
Sett på vernekappen for å beskytte ømfintlige flater.
Sätt på skyddshättan för att skydda omtåliga ytor.
Pane suojakappa paikalleen arkojen pintojen suojaamiseksi.
Για την προστασία ευαίσθητων επιφανειών να τοποθετείτε το προστατευτικό κάλυμμα.
Hassas yüzeyleri korumak için koruyucu başlığı takınız.
Nasaďte ochranný kryt, abyste chránili citlivé plochy.
Nasaďte ochranný kryt, aby ste chránili citlivé plochy.
Nałożyć nasadkę, aby chronić wrażliwe powierzchnie.
Érzékeny felületek védelmére helyezze fel a védősapkát.
Nataknite zaščitni pokrovček, da zaščitite občutljive površine.
Nataknuti zaštitnu kapu zbog zaštite osjetljivih površina.
Uzlieciet aizsargvāku, lai pasargātu trauslas virsmas.
Kad apsaugotumėte pažeidžiamus paviršius, uždėkite apsauginį dangtį.
Pange kork peale, et kaitsta tundlikku pinda.
Установите защитный колпак для защиты чувствительных поверхностей.
Поставете защитното капаче, за да предпазите чувствителните повърхности.
Atașați capacul protector pentru a proteja suprafețele sensibile.
Поставете го заштитното капаче, за да ги заштитите осетливите површини.
Надіньте захисний ковпак для захисту чутливих поверхонь.
.ﺔﺳﺎﺳﺣﻟا ﺢطﺳﻷا ﺔﯾﺎﻣﺣﻟ ،ﺔﯾﺎﻣﺣﻟا ءﺎطﻏ بﯾﻛرﺗﺑ مﻗ
26
470 200 - M18FFN.indd 26
1
2
click
13.05.2020 10:41:51
1
2
27
470 200 - M18FFN.indd 27 |
13.05.2020 10:41:51 |

TECHNICAL DATA |
CORDLESS NAILER |
|
M18 FFN |
|
...........................................................................Production code |
|
.......................4741 16 01 |
||
Collation angle |
|
...000001-999999 |
||
|
...........................30 ° |
|||
Fastener type: brad |
|
|
2,9 - 3,32 mm |
|
Diameter ................................................................................... |
|
................ |
||
Length min./max. ...................................................................... |
|
...................... |
50/90 mm |
|
Magazine capacity (number of nails)........................................... |
|
...........................51 |
||
Cycle rate .................................................................................... |
|
............................. |
3 /sec |
|
Battery voltage............................................................................. |
|
........................... |
18 V |
|
Weight according EPTA-Procedure 01/2014 (2.0 Ah ... 12.0 Ah) |
........... |
4,7 kg ... 5,8 kg |
||
Recommended ambient operating temperature.......................... |
................... |
-18°C ... |
+50 °C |
|
Recommended battery types....................................................... |
|
.................. |
M18B... |
M18HB... |
Recommended charger............................................................... |
|
.............. |
M12-18 C... |
M1418 C6 |
Noise/vibration information |
|
|
|
|
Measured values determined according to EN 60 745. |
|
|
|
|
Typically, the A-weighted noise levels of the tool are: |
|
90,1 dB (A) |
||
Sound pressure level (Uncertainty K=3dB(A)) ............................ |
........................ |
|||
Sound power level (Uncertainty K=3dB(A))................................. |
...................... |
101,1 dB (A) |
||
Wear ear protectors! |
|
|
|
|
Total vibration values (vector sum in the three axes) determined |
|
|
|
|
according to EN 60 745. |
|
|
5,9 m/s2 |
|
Vibration emission value ah ...................................................... |
|
.......................... |
||
Uncertainty K=.......................................................................... |
|
.......................... |
1,5 m/s2 |
|
|
|
|
|
|
WARNING
The vibration and noise emission level given in this information sheet has been measured in accordance with a standardized test given in EN 60745 and may be used to compare one tool with another. It may be used for a preliminary assessment of exposure.
The declared vibration and noise emission level represents the main applications of the tool. However if the tool is used for di erent applications, with di erent accessories or poorly maintained, the vibration and noise emission may di er. This may significantly increase the exposure level over the total working period.
An estimation of the level of exposure to vibration and noise should also take into account the times when the tool is switched o or when it is running but not actually doing the job. This may significantly reduce the exposure level over the total working period.
Identify additional safety measures to protect the operator from the e ects of vibration and/or noise such as: maintain the tool and the accessories, keep the hands warm, organization of work patterns.
 WARNING Read all safety warnings, instructions, illustrations and specifications provided with this power tool. Failure to follow all instructions listed below may result in electric shock, fire and/or serious injury.
Save all warnings and instructions for future reference.

 CORDLESS NAILER SAFETY WARNINGS
Always assume that the tool contains fasteners.
Careless handling of the nailer can result in unexpected firing of fasteners and personal injury.
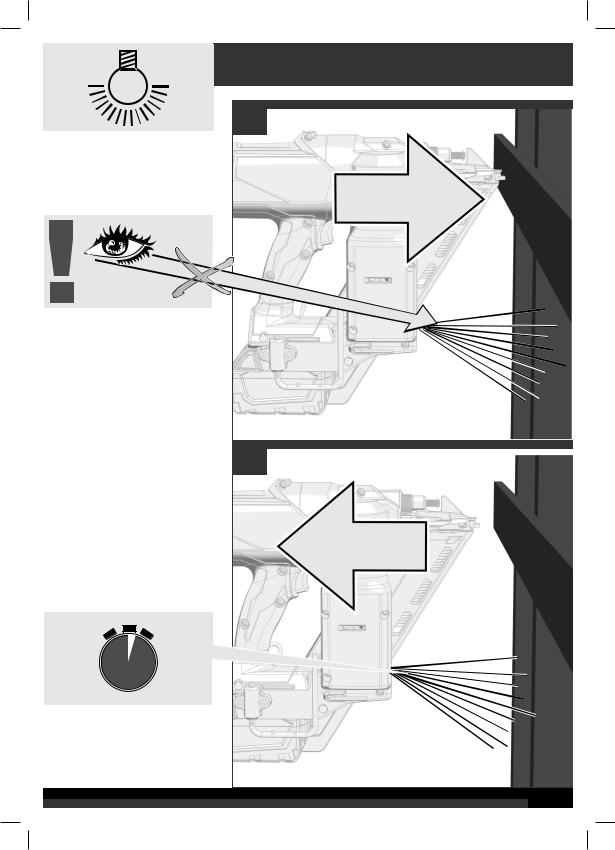
Do not point the tool towards yourself or anyone nearby. Unexpected triggering will discharge the fastener causing an injury.
Do not actuate the tool unless the tool is placed firmly against the workpiece. If the tool is not in contact with the workpiece, the fastener may be deflected away from your target.
Disconnect the tool from the power source when the fastener jams in the tool. While removing a jammed fastener, the nailer may be accidentally activated if it is plugged in.
Use caution while removing a jammed fastener. The mechanism may be under compression and the fastener may be forcefully discharged while attempting to free a jammed condition.
Do not use this nailer for fastening electrical cables. It is not designed for electric cable installation and may damage
the insulation of electric cables thereby causing electric shock or fire hazards.
Wear ear protectors. Exposure to noise can cause hearing loss.
Hold power tool by insulated gripping surfaces, when performing an operation where the nail may contact hidden wiring. Nails contacting a “live” wire may make exposed metal parts of the power tool “live” and could give the operator an electric shock.
Always wear eye protection with side shields. Everyday glasses have only impact resistant lenses. They are not safety glasses. Following this rule will reduce the risk of serious personal injury.
Eye protection provides protection against flying particles both from the FRONT and SIDE should ALWAYS be worn by the operator and others in the work area when loading, operating or servicing this tool. Eye protection is required to guard against flying fasteners and debris, which could cause severe eye injury.
Always remove the battery before adjusting the depth of drive wheel.
Do not pull back on the adjustment wheel, the wheel is designed to be rotated.
Do not press the trigger while adjusting the depth of drive wheel.
Always select full sequential firing mode before adjusting the depth of drive.
Do not point the tool towards yourself or anyone nearby when adjusting the depth of drive.
28 ENGLISH
470 200 - M18FFN.indd 28 |
13.05.2020 10:41:51 |

ADDITIONAL SAFETY INSTRUCTIONS
Always be aware that misuse and improper handling of this tool can cause injury to yourself and others.
The tool is designed for single-hand use. Do not hold the tool by the front of the magazine. Do not put hands, head, or other parts of your body near the bottom of the magazine where the nail exits the tool, as serious personal injury could be caused.
Always ensure that the workpiece contact is fully positioned above the workpiece. Positioning the workpiece contact only partially above the workpiece could cause the nail to miss the workpiece completely and result in serious personal injury.
Do not drive nails near edge of material. The workpiece may split causing the nail to ricochet, injuring you or a coworker. Be aware that the nail may follow the grain of the wood, causing it to protrude unexpectedly from the side of the work material or deflect, possibly causing injury.
Keep hands and body parts clear of immediate work area. Hold workpiece with clamps when necessary to keep hands and body out of potential harm. Be sure the workpiece is properly secured before pressing the fastener against the material. The workpiece contact may cause the work material to shift unexpectedly. Keep face and body parts away from back of the tool cap when working in restricted areas. Sudden recoil can result in impact to the body, especially when nailing into hard or dense material.
During normal use the tool will recoil immediately after driving a fastener. This is a normal function of the tool. Do not attempt to prevent the recoil by holding the nailer against the work. Restriction to the recoil can result in a second fastener being driven from the nailer. Grip the handle firmly, let the tool do the work and do not place second hand on top of tool or near exhaust at any time. Failure to heed this warning can result in serious personal injury.
Do not drive fasteners on top of other fasteners or with the tool at an overly steep angle as this may cause deflection of fasteners which could cause injury.
Always check the work area for hidden wiring, gas lines, water lines, etc., before using the product on such work area.
After using the product in the contact actuation mode, switch it back to the full sequential mode.
The driving depth of the nail may be adjusted beyond air pressure. It is advisable to test the depth on a scrap workpiece to determine the required depth for the application.
Only fasteners matching the description in the Technical Data can be used with this tool. Using incorrect fasteners may lead to jamming or other malfunctions.
Do not select contact actuation mode when working on sca olds, ladders or platforms where you may need to move your body position. You may unintentionally fire a nail by inadvertent activation of the workpiece contact while moving about if the contact actuation mode is selected. When moving positions, select full sequential activation or deactivate the product completely by removing the battery pack. This will reduce the potential for injury to yourself and others.
Do not dispose of used battery packs in the household refuse or by burning them. Milwaukee Distributors o er to retrieve old batteries to protect our environment.
Do not store the battery pack together with metal objects (short circuit risk).
No metal parts must be allowed to enter the battery section of the charger (short circuit risk).
Use only 18 V chargers for charging 18 V battery packs. Do not use battery packs from other systems.
Never break open battery packs and chargers and store only in dry rooms. Keep dry at all times.
Battery acid may leak from damaged batteries under extreme load or extreme temperatures. In case of contact with battery acid wash it o immediately with soap and water. In case of eye contact rinse thoroughly for at least 10 minutes and immediately seek medical attention.
Warning! To reduce the risk of fire, personal injury, and product damage due to a short circuit, never immerse your tool, battery pack or charger in fluid or allow a fluid to flow inside them. Corrosive or conductive fluids, such as seawater, certain industrial chemicals, and bleach or bleach containing products, etc., can cause a short circuit.
SPECIFIED CONDITIONS OF USE
The nailer is intended for driving nails into wood or similar soft materials from a magazine containing a strip of suitable nails. The nails which can be safely loaded into the magazine for the product are described in the product specification table in this manual. Do not use any other type of nail or fixing with the nailer. Do not operate in contact actuation mode while working on sca old, ladder or other platform where a change in working position is required. Use only full sequential mode in this case. The nailer should not be used for fixing electric cables.
Do not use this product in any other way as stated for normal use.
EC-DECLARATION OF CONFORMITY
We declare under our sole responsibility that the product described under “Technical Data” fulfills all the relevant provisions of the directives 2011/65/EU (RoHS), 2014/30/ EU, 2006/42/EC and the following harmonized standards have been used:
EN 60745-1:2009+A11:2010 EN 60745-2-16:2010
EN 55014-1:2017+A11:2020 EN 55014-2:2015
EN IEC 63000:2018
Winnenden, 2020-05-12
Alexander Krug Managing Director
Authorized to compile the technical file.
Techtronic Industries GmbH Max-Eyth-Straße 10
71364 Winnenden Germany
BATTERIES
Battery packs which have not been used for some time should be recharged before use.
Temperatures in excess removeof 50°C (122°F) reduce the performance of the battery pack. Avoid extended exposure to heat or sunshine (risk of overheating).
The contacts of chargers and battery packs must be kept clean.
For an optimum life-time, after use, the battery packs have to be fully charged.
ENGLISH 29
470 200 - M18FFN.indd 29 |
13.05.2020 10:41:51 |

To obtain the longest possible battery life remove the battery pack from the charger once it is fully charged.
"For battery pack storage longer than 30 days:
Store the battery pack where the temperature is below 27°C and away from moisture
Store the battery packs in a 30% - 50% charged condition Every six months of storage, charge the pack as normal.
TRANSPORTING LITHIUM BATTERIES
Lithium-ion batteries are subject to the Dangerous Goods Legislation requirements.
Transportation of those batteries has to be done in accordance with local, national and international provisions and regulations.
•The user can transport the batteries by road without further requirements.
•Commercial transport of Lithium-Ion batteries by third parties is subject to Dangerous Goods regulations. Transport preparation and transport are exclusively to be carried out by appropriately trained persons and the process has to be accompanied by corresponding experts.
When transporting batteries:
•Ensure that battery contact terminals are protected and insulated to prevent short circuit.
•Ensure that battery pack is secured against movement within packaging.
•Do not transport batteries that are cracked or leak.
Check with forwarding company for further advice
OPERATION
There are two ways for working with this nailer (see also picture section):
Single Sequential Actuation:
Drive the fastener by pulling the trigger.
Contact (Bump) Actuation:
Hold the trigger and drive the fastener by pushing the nailer against the workpiece.
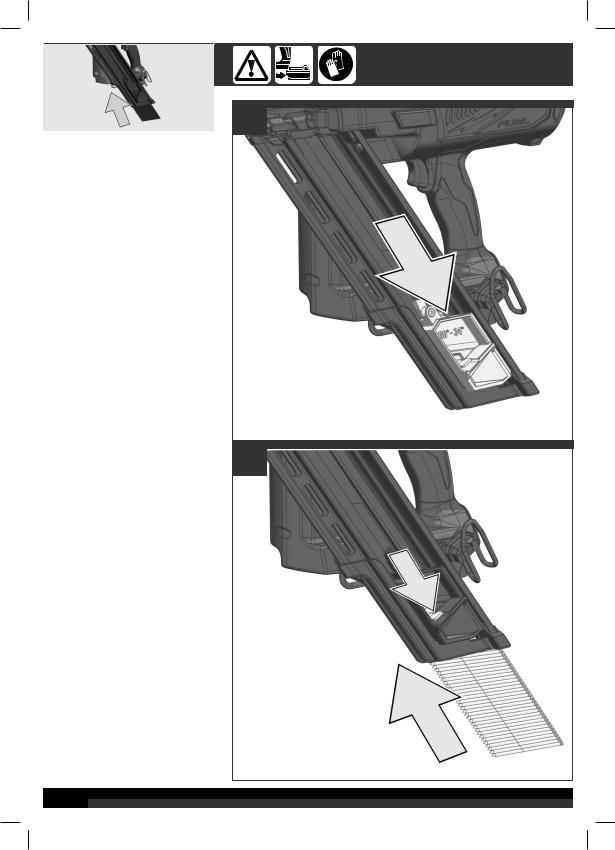
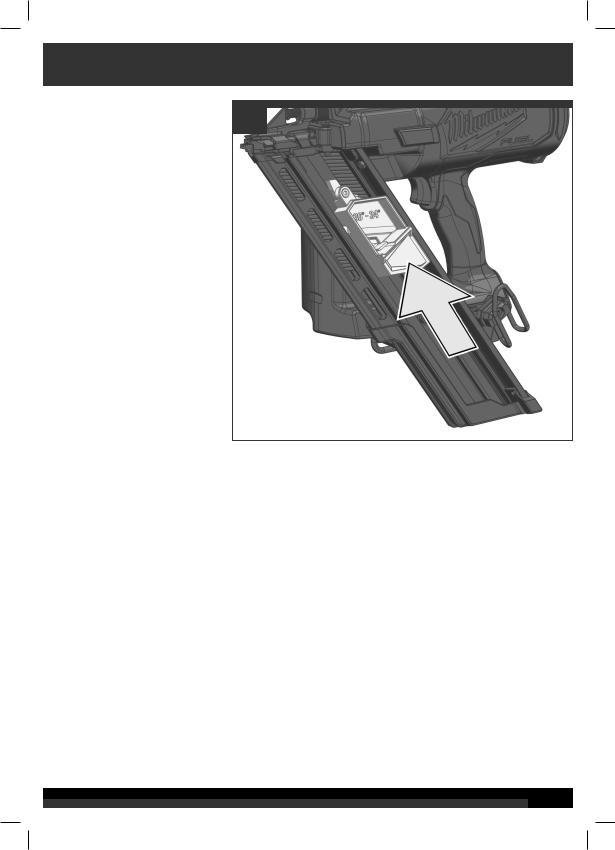
Reload Indicator
To indicate that the magazine is almost empty of fasteners (about 4-5 left), the workpiece contact will not compress, preventing operation under usual pressure. Install more fasteners to continue working.
Setting the Depth of Drive (see picture section)
Know what is behind your workpiece. A fastener could travel through the workpiece and out the other side, striking a bystander and causing serious injury. Lower the depth of drive to prevent the fastener from being pushed all the way through the workpiece.
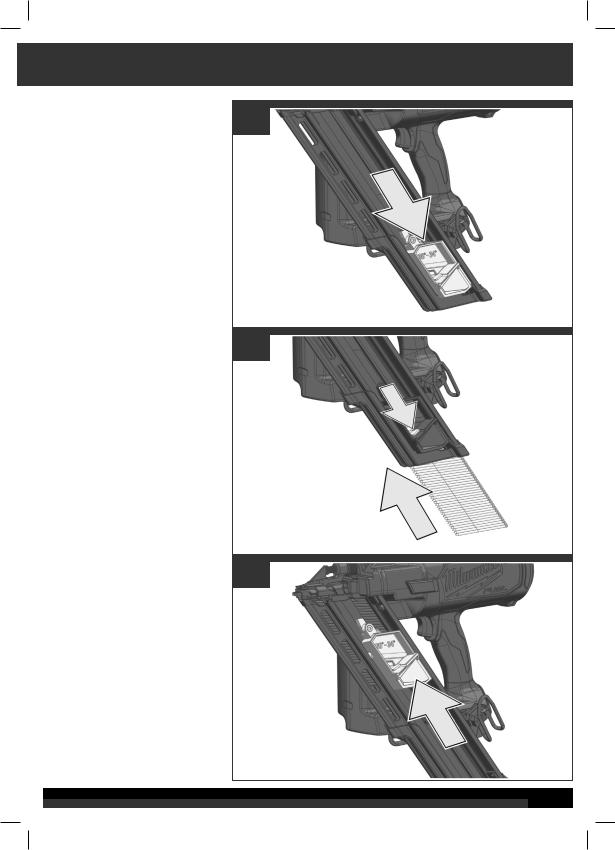
CLEARING A JAMMED FASTENER
Most jams are caused by a fastener or part of a fastener wedging between the driver blade and the nail guide. Fastener strips with an incorrect collation angle or the wrong fastener gauge may cause continuous jamming.
To clear the jam:
1.Remove battery pack.
2.WARNING! Always point the tool away from yourself and others when installing or removing fasteners. Failure to do so could result in injury.
3.Remove fastener strip from magazine.
4.Remove the fastener using needle-nose pliers. If necessary, remove magazine from tool.
30 ENGLISH
5.Follow the steps under "Required Daily Testing" before restarting the work.
REQUIRED DAILY TESTING
 WARNING: To reduce the risk of injury to yourself and others, test the tool before beginning work each day or if the tool is dropped, received a sharp blow, been run over, etc. Complete the following checklist IN ORDER. If the tool does not work as it should, contact a MILWAUKEE service facility immediately.
Always point tool away from yourself and others.
1.Remove battery pack.
WARNING! Always point the tool away from yourself and others when installing fasteners. Failure to do so could result in injury.
2.Check all screws, bolts, nuts, and pins on the tool. Any loose fasteners must be tightened.
3.Pull back the fastener pusher on the magazine (to override the Reload Indicator) and press the workpiece contact against a workpiece. It must move smoothly.
4.With the workpiece contact pressed against the workpiece, pull the trigger. It must move smoothly.
5.Insert battery pack.
6.Select the Single Sequential Actuation Operation. Without pulling the trigger, pull back the fastener pusher on the magazine (to override the Reload Indicator) and press the workpiece contact against a workpiece. The tool must not operate. Holding the workpiece contact away from the workpiece, pull back the fastener pusher on the magazine (to override the Reload Indicator). Pull and hold the trigger for 5 seconds. The tool must not operate. Continue to pull and hold the trigger and push the workpiece contact against a workpiece. The tool must not operate. Without pulling the trigger, pull back the fastener pusher on the magazine (to override the Reload Indicator) and press the workpiece contact against a workpiece. Pull the trigger. The tool must operate. Release the trigger. The driver must move up.
7.Select the Contact Actuation Operation. Holding the workpiece contact away from the workpiece, pull back the fastener pusher on the magazine (to override the Reload Indicator) and pull the trigger. The tool must not operate. Continue to pull and hold the trigger and push the workpiece contact against a workpiece. The tool must operate.
8.If all previous tests work properly, set the tool for your work. Select the operation and load fastener strips.
9.Set the depth of drive according to the "Setting the Depth of Drive" section and see picture section.
10.If all tests operate properly, the tool is ready for use. Repeat these tests before use each day or if the tool is dropped, received a sharp blow, been run over, jammed, etc.
MAINTENANCE
The ventilation slots of the machine must be kept clear at all times.
Use only Milwaukee accessories and Milwaukee spare parts. Should components need to be replaced which have not been described, please contact one of our Milwaukee service agents (see our list of guarantee/service addresses).
If needed, an exploded view of the tool can be ordered. Please state the machine type printed as well as the six-digit No. on the label and order the drawing at your local service agents or directly at: Techtronic Industries GmbH, Max-Eyth-Straße 10, 71364 Winnenden, Germany.
470 200 - M18FFN.indd 30 |
13.05.2020 10:41:51 |
 Loading...