


OPERATOR'S MANUAL
MANUEL de L'UTILISATEUR
MANUAL del OPERADOR
Cat. No. No de Cat. 2280-20
Laser Distance Meter
Appareil de mesure de la distance au laser
Telémetro láser
TO REDUCE THE RISK OF INJURY, USER MUST READ AND UNDERSTAND OPERATOR'S MANUAL.
AFIN DE RÉDUIRE LE RISQUE DE BLESSURES, L'UTILISATEUR DOIT LIRE ET BIEN COMPRENDRE LE MANUEL DE L'UTILISATEUR.
PARA REDUCIR EL RIESGO DE LESIONES, EL USUARIO DEBE LEER Y ENTENDER EL MANUAL DEL OPERADOR.

IMPORTANT SAFETY
INSTRUCTIONS
WARNING READ ALL SAFETY WARNINGS AND INSTRUCTIONS.
Failure to follow the warnings and instructions may result in electric shock, fire and/or serious injury. Save these instructions - This operator’s manual contains important safety and operating instructions for the MILWAUKEE Laser Distance Meter. Before using the Laser Distance Meter, read this operator’s manual and all labels on the Laser Distance Meter.
LASER SAFETY
•Laser light - Do not stare into beam or view directly with optical instruments. Do not point laser light at others.
Laser light can cause eye damage.
•Avoid exposure to laser radiation.
Laser may emit hazardous radiation.
•Do not point laser at reflective surfaces. Unpredictable results may occur.
WORK AREA SAFETY
•Keep children and bystanders away while operating Laser Distance Meter. Store idle Laser Distance Meter out of the reach of children and do not allow persons unfamiliar with the tool or these instructions to operate it.
•Avoid dangerous environments. Do not use in rain, snow, damp or wet locations. Do not use in the presence of explosive atmospheres (gaseous fumes, dust or flammable materials) because sparks may be generated when inserting or removing batteries, possibly causing fire.
PERSONAL SAFETY
•Stay alert, watch what you are doing and use common sense when operating Laser Distance Meter. Do not use while you are tired or under the influence of drugs, alcohol or medication. A moment of inattention may result in serious personal injury.
•Do not overreach. Keep proper footing and balance at all times. This enables better control in unexpected situations.
BATTERY USE AND CARE
•This tool is designed to be powered by 2-AAA batteries properly inserted into the MILWAUKEE Laser Distance Meter. Do not attempt to use with any other voltage or power supply.
•Do not leave batteries within the reach of children.
•Do not mix new and used batteries. Do not mix brands (or types within brands) of batteries.
•Do not mix rechargeable and nonrechargeable batteries.
•Install batteries according to polarity (+ / –) diagrams.
•Properly dispose of used batteries immediately.
•Do not incinerate or dismantle batteries.
•Under abusive conditions, liquid may be ejected from the battery, avoid contact. If contact accidentally occurs, flush with water. If liquid contacts eyes, additionally seek medical help. Liquid ejected from the battery may cause irritation or burns.
SERVICE
•Have your Laser Distance Meter serviced by a qualified repair person
2 using only identical replacement
parts. This will ensure that the safety of the tool is maintained.
•Do not disassemble. Incorrect reassembly may result in the risk of electric shock or fire. If it is damaged, take it to a MILWAUKEE service facility.
•Store in a cool, dry place. Do not store where temperatures may exceed 158°F (70°C) such as in direct sunlight, a vehicle or metal building during the summer.
HAZARDS OF USE
•Do not remove or deface labels. Maintain labels and nameplates.
These carry important information.
If unreadable or missing, contact a
MILWAUKEE service facility for a free replacement.
•Watch out for erroneous distance measurements if the meter is defective or if it has been dropped or has been misused or modified. Carry out periodic test measurements.Particularly after the meter has been subject to abnormal use, and before, during and after important measurements. Make sure the optic is kept clean and that there is no mechanical damage to the bumpers.
•In using the meter for distance measurements or for positioning moving objects (e.g. cranes, building equipment, platforms, etc.) unforeseen events may cause erroneous measurements. Only use this product as a measuring sensor, not as a control device. Your system must be configured and operated in such a way, that in case of an erroneous measurement, malfunction of the device or power failure due to installed safety measures (e.g. safety limit switch), it is assured that no damage will occur.
•Target Surfaces- Measuring errors can occur when measuring toward colourless liquids (e.g. water) or 3
dust free glass, Styrofoam or similar semi-permeable surfaces. Aiming at high gloss surfaces may deflect the laserbeam and lead to measurement errors.
TECHNICAL
SPECIFICATIONS
Range |
0.16' to 197' * |
|
(0.05 m to 60 m) * |
Measuring accuracy |
typically 0.059" * |
|
(1.5 mm) * |
Smallest unit displayed |
1/16" (1 mm) |
Laser type |
Class 2 |
Max power |
< 1 mW |
Laser wavelength |
632 nm |
Protection level |
IP 54, dust-proof, |
|
splash-proof |
Automatic power OFF- |
after 1 min |
Laser |
|
Automatic power OFF- |
after 3 min |
Display |
|
Display Backlight |
yes |
Fold out end bracket |
yes |
Battery usage |
2 AAA |
Battery life |
up to 5000 |
|
measurements |
Dimension |
4.5" x 2" x 1.1" |
|
(114 x 51 x 27 |
|
mm) |
Weight |
4.2 oz (120 g) |
Storage |
-13°F to 158°F |
Temperature range |
(25°C to 70°C) |
Operation |
32°F to 104°F |
Temperature range |
(0°C to 40°C) |
*In difficult conditions, with intense sunshine, a poorly reflecting target surface or at high temperatures, the deviation over distances about 32' (10 m) can increase by +0.006" (+0.15 mm) per meter.

FUNCTIONAL DESCRIPTION
1 |
|
|
|
2 |
|
|
|
|
|
|
6 |
|
4 |
|
5 |
|
|
|
|
3 |
9 10 |
11 |
12 13 |
7 |
|
|
14 |
8 |
|
|
|
|
|
15 |
|
19 |
|
|
|
|
|
|
|
18 |
|
|
16 |
20 |
|
|
17 |
|
|
|
|
|
|
6 |
|
21 |
28 |
|
|
22 |
27 |
|
|
23

 26
26
24

 25
25


 Made In Hungary
 READ OPERATOR’S MANUAL
MAXIMUM POWER <1mW WAVE LENGTH 630-670nm CLASS II LASER PRODUCT COMPLIES WITH 21 CFR 1040.10 AND 1040.11
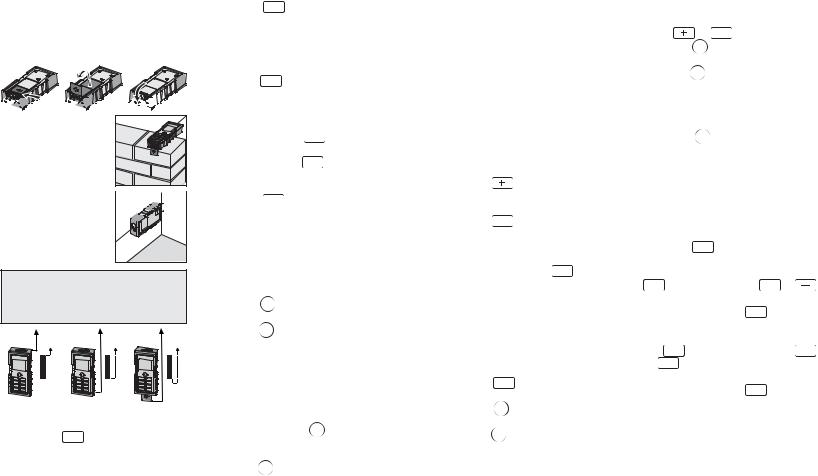
1.Laser window
2.Display
3.Keypad
4.Battery compartment
5.End bracket
6.Nameplate
7.Laser "ON"
8.Reference (front/rear/end bracket)
9.Pythagorean
10.Timer
11.Historical memory
12.Area/Volume
13.Battery status
14.Units with exponents (2/3)
15.Intermediate line 2
16.Intermediate line 1
17.Main targets
18.Min/Max display
19.Display notice symbol
20.On/Measure button
21.Add (+) button
22.Function button
23.Memory button
24.Backlight button
25.Clear/Off button
26.Timer/Units button
27.Reference button
28.Subtract (-) button
SYMBOLOGY
Laser product
Volts Direct Current  Avoid Exposure: Laser Radiation Is Emitted From This Aperture
CAUTION Laser Light - |
To reduce the risk of injury, user |
Do Not Stare Into Beam |
must read operator’s manual. |
|
4 |
ASSEMBLY
Loading/Changing the batteries |
2. |
Insert two (2) AAA batteries, as |
Replace the batteries when the symbol |
|
displayed. |
flashes permanently in the display. Only |
3. |
Replace compartment lid securely. |
use alkaline batteries. If the meter will not |
|
|
be used for a long time, remove the bat- |
|
|
teries as a protection against corrosion. |
|
|
1. To open the compartment lid, twist a coin pressed into compartment slot.
OPERATION
Button use
For some buttons, the way it is pressed determines its function. These terms appear throughout the operation section:
PRESS - press and release the button briefly.
PRESS and HOLD - press in and hold the button for 2 seconds.
Switching on/off
Press the  button once to turn on the meter and laser.
The  symbol is displayed until the next button is pressed.
Press and hold the  button to turn off the meter.
The meter turns off automatically after three minutes of non-use.
Backlight 
Press the  button to turn the display backlight on or off.
Selecting the units 
Press and hold the  button to change the measurement units. Repeat to scroll through the settings. Possible units:
Setting Distance Area Volume
- - - m 0.000 m 0.000 m² 0.000 m³
- -' -" |
0'0'' 1/16 |
0.00 ft² |
0.00 ft³ |
|
- - - in |
0 in 1/16 |
0.00 ft² |
0.00 ft³ |
|
- - - ft |
0.00 ft |
0.00 ft² |
0.00 ft³ |
5 |
|
|
|
|
Timer 
1. Press the  button to set the timer
  to 5 seconds. Use the
  or
or
buttons to change the time lapse.
2.On the first measurement, the countdown begins immediately. For addi-
tional measurements, press the  button to begin the count-down.
3.When the timer reaches 5 seconds, it will begin to beep.
4.When the timer reaches 0, the measurement is taken.
Clearing last entry 
Press the  button to clear the last action.
Turning the beep on and off
1.Press and hold the  and
and  buttons together for 5 seconds.
2.The beep is turned on or off.
Memory  recall
1.Press the  button to display the latest value (measured or calculated).
2. Use the |
or |
|
|
buttons to scroll |
|
|
|||
through the last |
10 values (measured |
|||
and calculated). The values can also be used in functions.
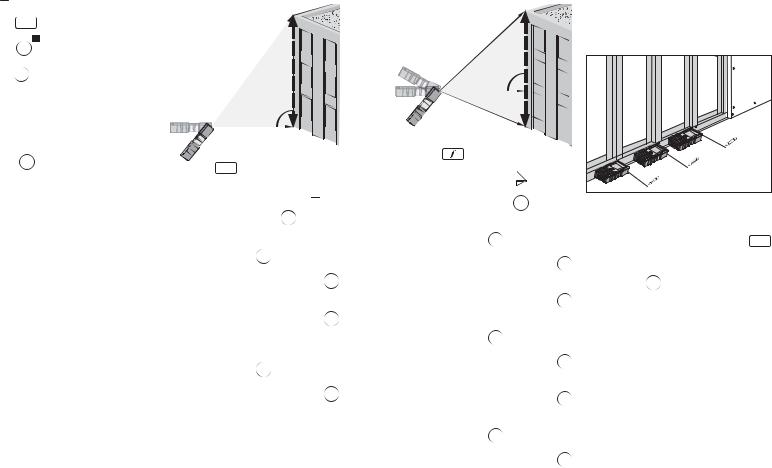
Reference 
The default reference setting is from the rear of the meter (A). An edge measurement with a partially unfolded end bracket (B) will work in default mode.


 A
A 


 B
B 


 C
C
To measure from an edge (B), fold out the end bracket until it snaps in for the first time.
To measure out of a cor-  ner (C), fold out the end


 bracket, then continue


to push it to the right and down until it opens completely.
CAUTION Make sure that when measuring from the unfolded end bracket, the measuring reference is set to "End bracket" (C).
A |
B |
C |
To set the measuring reference for a single measurement:
1.Press the  button once to measure from the front edge (A). After one measurement, the reference returns automatically to the default setting (B) (rear reference).
2.Press the  button two times to measure from the completely unfolded end bracket (C). After one measurement, the reference returns automatically to the default setting (B) (rear reference).
3.Press the  button three times to return to the rear reference setting.
To set and hold the measuring reference until the meter is turned off:
1.Press and hold the  button once to measure from the front edge (A).
2.Press and hold the  button again to measure from the completely unfolded end bracket (C).
3.Press the  button return to the default setting, measuring from the rear of the meter (B).
Measuring 
Single Distance Measurement
1.Press the  button once to turn on the laser.
2.Press the  button again to make a distance measurement.
3.The result is displayed in the Main Targets line. Previous measurements are displayed in the Intermediate Lines.
Continuous measurement with Minimum/Maximum-Measuring
1.Press and hold the  button. The meter will begin to beep and take measurements continuously.
2.Press the  button again to stop the continuous measurements.
3.The most recent measured value is displayed in the Main Targets line. The maximum and minimum measurements are displayed in the Intermediate Lines.
Use this function to determine the minimum or maximum distance from a specific measuring point (e.g. the determination of room diagonals (maximum value) or horizontal distance (minimum value)).
Functions
Addition  / Subtraction
1. |
Press the |
button once. The next |
||
|
measurement is added to the previous |
|||
|
measurement. |
|
||
2. |
Press the |
|
|
button once. The next |
|
||||
|
measurement is subtracted from the |
|||
|
previous measurement. |
|||
3.Repeat this procedure as many times
as required. Press the  button to cancel the last step.
4.The result is displayed in the Main Targets line, the most recent measurement is displayed in Intermediate
Line 1, the previous value is displayed in Intermediate Line 2.
Area 

1.Press the  button once to determine area
  .
.
2.Press the  button to take the first measurement (e.g. length).
3.Press the  button again to take the second measurement (e.g. width).
4.The resulting area is displayed in the Main Targets line and the individual measurements are displayed in Intermediate Line 1 and Intermediate Line 2.
Adding and subtracting areas
1. Determine the first Area (see above)
2. Press |
or |
|
. |
|
3.Press the  button to take the first measurement (e.g. length).
4.Press the  button again to take the second measurement (e.g. width).
5.The second area measurement is displayed, along with a flashing "+" or "-".
6.Press the  button to display the resulting added or subtracted area in the Main Targets line. The individual area measurements are displayed in Intermediate Line 1 and Intermediate Line 2.
Example of using stored measurements in a function
1.Press the  button once to determine area
  .
.
2.For the first measurement, press the
 button, then use the
  or buttons to find the desired value.
3.Press and hold the  button to enter the value into the function.
4.For the second measurement, press the  button, then use the
or |
|
buttons to find the desired |
|
||
value. |
|
|
5.Press and hold the  button to enter the value into the function.
6.The resulting area is displayed in the Main Targets line and the individual measurements from memory are displayed in Intermediate Line 1 and Intermediate Line 2.
6 |
7 |
Volume 


1.Press the  button twice to determine volume
  .
.
2.Press the  button to take the first measurement (e.g. length).
3.Press the  button again to take the second measurement (e.g. width).
4.The resulting area is displayed in the Main Targets line and the individual measurements are displayed in Intermediate Line 1 and Intermediate Line 2.
5.Press the  button again to take the third measurement (e.g. height). The value is displayed in Intermediate Line 1.
6.The resulting volume is displayed in the Main Targets line. The third measurement is displayed in Intermediate Line 1 and the second measurement is displayed in Intermediate Line 2.
Indirect measurement
The meter can measure distances using the Pythagorean method. Use this function to measure distances in areas difficult to access.
•All target points must be vertical or horizontal on the surface of the wall.
•The best results are achieved when the meter is rotated around a fixed point (e.g. the end bracket is fully extended and placed against a wall).
•Use the minimum/maximum function to determine the largest distances (maximum height) and smallest distance (right-angle) to be used in the calculation.
Indirect measurement – the third leg of a triangle
1st
90°
2nd
1.Press the  button three times to use the Pythagorean method to determine the third leg of a triangle
  .
.
2.The distance to be measured flashes
on the display. Press the  button to take the first measurement.
To determine the maximum distance,
press and hold the  button. A continuous measurement is taken, saving
the maximum distance. Press the  button again to stop.
3.The second distance to be measured
flashes on the display. Press the  button to take the second measurement.
To determine the minimum distance,
press and hold the  button. A continuous measurement is taken, saving
the minimum distance. Press the  button again to stop.
4.The resulting third leg of the triangle is displayed in the Main Targets line. The second measurement is displayed in Intermediate Line 1 and the first measurement is displayed in Intermediate Line 2.
8
Indirect measurement – measuring a length with three points
|
1st |
||||
|
90° |
|
|
|
|
|
|
|
|
|
|
|
|
|
|
|
|
|
|
|
|
|
|
|
2nd |
|
|
|
|
|
|
|
|
||
1.Press the |
3rd |
|
|
|
|
|
|
|
|
||
|
|
|
|
||
|
|
|
|
||
|
|||||
|
|
|
|
||
|
|
||||
|
|
||||
button four times to use |
|||||
the Pythagorean method to measure a length using three points  .
.
2.The distance to be measured flashes on the display. Press the  button to take the measurement.
To determine the maximum distance, press and hold the  button. A continuous measurement is taken, saving the maximum distance. Press the
  button again to stop.
3.The second distance to be measured flashes on the display. Press the  button to take the measurement.
To determine the minimum distance, press and hold the  button. A continuous measurement is taken, saving the minimum distance. Press the
  button again to stop.
4.The third distance to be measured flashes on the display. Press the  button to take the measurement.
To determine the maximum distance, press and hold the  button. A continuous measurement is taken, saving the maximum distance. Press the
  button again to stop.
5.The resulting length is displayed in the Main Targets line. The third measurement is displayed in Intermediate Line 2 and the second measurement is displayed in Intermediate Line 2.
Stake out
Use this function to stake out equal distances, such as locating studs on 16" centers.
|
1st |
2nd |
16" |
3rd |
16" |
16" |
|
1.Press the  button five times.
2.The the stake out distance and the 


 symbol are displayed. To adjust the stake out distance, use the
  and
and  buttons.
3.Point the meter at the first stake.
4.Press the  button to start the continuous measurement.
5.The next approximate multiple of the staking distance (e.g., 64" for a staking distance of 16") is displayed in Intermediate Line 1. The distance to the next stake point is displayed in the Main Targets line (e.g., 1-3/4").
6.Begin sliding the meter away from the first stake. As the next stake out point is neared, the meter starts to beep.
7.When the next stake out point is reached, the beep sound changes and the top line of the display starts to flash.
Take note of the meter Reference; the stake out point is the set reference - front, rear, or end bracket.
9

Appendix
Display notices - All display notices are either displayed with  or "Error". The following errors can be corrected.
Code |
Cause |
Correction |
204 |
Calculation error |
Repeat procedure |
252 |
Temperature too high |
Let meter cool down |
253 |
Temperature too low |
Warm up meter |
255 |
Received signal too weak, time |
Create solid color target plate |
|
for a measurement too long |
|
256 |
Received signal too strong |
Create solid color target plate (gray) |
257 |
Faulty measurement, too much |
Create solid color target plate (brown) |
|
background light |
|
258 |
Outside the range of |
Select measurement distance within the range of |
|
measurement |
measurement |
Error |
Hardware error |
Should this message remain active after switching |
|
|
the meter off and on several times, please contact a |
|
|
MILWAUKEE service facility |
Electromagnetic Compatibility (EMC)
The term "electromagnetic compatibility" is taken to mean the capability of the product to function smoothly in an environment where electromagnetic radiation and electrostatic discharges are present, and without causing electromagnetic interference to other equipment.
WARNING The MILWAUKEE
Laser Distance Meter conforms to the most stringent requirements of the relevant standards and regulations. Yet the possibility of the product causing interference in other equipment cannot be fully excluded.
WARNING Looking directly into the laser beam with optical aids (e.g. binoculars, telescopes) can be hazardous.
Laser classification
The MILWAUKEE Laser Distance Meter produces a visible laser beam which emerges from the front of the meter.
The product is a Class 2 Laser Product in accordance with IEC60825-1 : 2007 "Radiation safety of laser products"
Class 2 Laser Products:
Do not stare into the beam or direct it unnecessarily at other persons. Eye protection is normally afforded by aversion responses including the blink reflex.
CAUTION Looking into the laser beam may be hazardous to the eyes. Do not stare into beam. Do not look into the laser beam. Make sure the laser is aimed above or below eye level (particularly with fixed installations, in machines, etc.).
Federal Communications Commission
WARNING: Changes or modifications to this unit not expressly approved by the party responsible for compliance could void the user’s authority to operate the equipment.
This equipment has been tested and found to comply with the limits for a Class B digital device, pursuant to Part 15 of the FCC Rules. These limits are designed to provide reasonable protection against harmful interference in a residential installation. This equipment generates, uses and can radiate radio frequency energy and, if not installed and used in accordance with the instructions, may cause harmful interference to radio communications.
However, there is no guarantee that interference will not occur in a particular installation. If this equipment does cause harmful interference to radio or television reception, which can be determined by turning the equipment off and on, the user is encouraged to try to correct the interference by one or more of the following measures:
•Reorient or relocate the receiving antenna.
•Increase the separation between the equipment and receiver.
•Connect the equipment into an outlet on a circuit different from that to which the receiver is connected.
•Consult the dealer or an experienced radio/ TV technician for help.
MAINTENANCE
WARNING To reduce the risk of injury, always remove the batteries from the tool before performing any maintenance. Never disassemble the tool. Contact a MILWAUKEE service facility for ALL repairs.
Maintaining tool
Keep your tool in good repair by adopting a regular maintenance program. After six months to one year, depending on use, return the tool to a MILWAUKEE service facility for service.
If the tool does not start or operate at full power with fully charged batteries, clean the contacts on the battery door. If the tool still does not work properly, return the tool to a MILWAUKEE service facility for repairs.
Cleaning the laser windows
Clean the laser windows with a soft, moist cloth to keep them clean and clear. Remove batteries before cleaning.
WARNING To reduce the risk of personal injury and damage, never immerse your tool in liquid or allow a liquid to flow inside it.
Cleaning
Clean dust and debris from tool. Keep tool handles clean, dry and free of oil or grease. Use only mild soap and a damp cloth to clean the tool since certain cleaning agents and solvents are harmful to plastics and other insulated parts. Some of these include gasoline, turpentine, lacquer thinner, paint thinner, chlorinated cleaning solvents, ammonia and household detergents containing ammonia. Never use flammable or combustible solvents around tools.
Repairs
For repairs, return the tool to the nearest service center listed on the back cover of this operator's manual.
10 |
11 |

ACCESSORIES
WARNING Always remove batteries before changing or removing accessories. Only use accessories specifically recommended for this tool. Others may be hazardous.
For a complete listing of accessories refer to your MILWAUKEE Electric Tool catalog or go online to www.milwaukeetool.com. To obtain a catalog, contact your local distributor or a service center.
FIVE YEAR TOOL LIMITED WARRANTY
MILWAUKEE Test & Measurement Products (including bare tool, li-ion battery pack(s) and battery charger but excluding alkaline batteries) are warranted to the original purchaser only to be free from defects in material and workmanship. Subject to certain exceptions, MILWAUKEE will repair or replace any part on this product which, after examination, is determined by MILWAUKEE to be defective in material or workmanship for a period of five (5) years* after the date of purchase. Return the Test & Measurement tool and a copy of proof of purchase to the nearest Milwaukee Electric Tool Corporation - factory Service Center. This warranty does not apply to damage that MILWAUKEE determines to be from repairs made or attempted by anyone other than MILWAUKEE authorized personnel, misuse, alterations, abuse, normal wear and tear, lack of maintenance, or accidents.
*The warranty period for the LITHIUM-ION battery pack that ships with the Test & Measurement tool is two (2) years from the date of purchase. *Alkaline battery that ships with Test & Measurement tool is separately warranted by the battery manufacturer. *The warranty period for a NON-CONTACT VOLTAGE DETECTOR – 2201 20 is one (1) year from the date of purchase.
Warranty Registration is not necessary to obtain the applicable warranty on MILWAUKEE product. The manufacturing date of the product will be used to determine the warranty period if no proof of purchase is provided at the time warranty service is requested.
ACCEPTANCE OF THE EXCLUSIVE REPAIR AND REPLACEMENT REMEDIES DESCRIBED HEREIN IS A CONDITION OF THE CONTRACT FOR THE PURCHASE OF EVERY MILWAUKEE PRODUCT. IF YOU DO NOTAGREE TO THIS CONDITION, YOU SHOULD NOT PURCHASE THE PRODUCT. IN NO EVENT SHALL MILWAUKEE BE LIABLE FORANY INCIDENTAL, SPECIAL, CONSEQUENTIALOR PUNITIVE DAMAGES, OR FORANY COSTS,ATTORNEY FEES, EXPENSES, LOSSES OR DELAYS ALLEGED TO BE AS A CONSEQUENCE OF ANY DAMAGE TO, FAILURE OF, OR DEFECT IN ANY PRODUCT INCLUDING, BUT NOT LIMITED TO, ANY CLAIMS FOR LOSS OF PROFITS. THIS WARRANTY IS EXCLUSIVE AND IN LIEU OF ALL OTHER WARRANTIES OR CONDITIONS, WRITTEN OR ORAL, EXPRESSED OR IMPLIED. WITHOUT LIMITING THE GENERALITY OF THE FOREGOING, MILWAUKEE DISCLAIMS ANY IMPLIED WARRANTY OF MERCHANTABILITY OR FITNESS FOR A PARTICULAR USE OR PURPOSE, AND ALL OTHER WARRANTIES.
This warranty applies to product sold in the U.S.A., Canada and Mexico only.
12
RÈGLES IMPORTANTES
DE SÉCURITÉ
AVERTISSEMENT LIRE TOUTES LES RÈGLES ET INSTRUCTIONS DE SÉCURITÉ. Ne pas suivre l’ensemble des règles et instructions peut entraîner une électrocution, un incendie ou des blessures graves. Conserver ces instructions – Ce manuel contient des instructions importantes de sécurité et de fonctionnement pour l’appareil de mesure de la distance au laser MILWAUKEE. Avant d’employer l’appareil de mesure de la distance au laser, lire le présent manuel d’utilisation ainsi que toutes les étiquettes se
trouvant sur le produit.
SÉCURITÉ RELATIVES AU
LASER
•Lampe laser - Ne pas fixer directement le faisceau ou l’examiner directement au moyen d’instruments d’optique. Ne pas diriger la lampe laser vers les autres personnes. La lampe laser peut provoquer des lésions oculaires.
•Éviter de s’exposer au rayonnement laser. Cela peut s’avérer dangereux.
•Ne pas diriger le laser vers des surfaces réfléchissantes. Cela peut entraîner des conséquences imprévisibles.
SÉCURITÉ DU LIEU DE
TRAVAIL
•S’assurer que les enfants et les curieux se trouvent à une bonne distance au moment d’utiliser l’appareil de mesure de la distance au laser.
Entreposer l’instrument hors de la portée des enfants et en interdire l’utilisation à quiconque ne connaît pas bien l’outil ou ces instructions.
•Éviter les environnements dangereux. Ne pas exposer l’unité à la pluie ou à la neige et ne pas l’utiliser dans un endroit humide ou mouillé.
Ne pas utiliser l’unité dans un endroit propice aux explosions (fumées gazeuses, poussières ou matériaux13
inflammables); l’insertion ou le retrait du bloc-piles pouvant créer des étincelles, un incendie pourrait alors éclater.
SÉCURITÉ INDIVIDUELLE
•Rester vigilant, se concentrer sur son travail et faire preuve de bon sens au moment d’utiliser l’appareil. Ne pas utiliser cet appareil en cas de fatigue ou sous l’influence de l’alcool, de drogues ou de médicaments. Un moment d’inattention pendant l’utilisation de ce produit peut résulter en une blessure grave.
•Ne pas travailler hors de portée. Se tenir bien campé et en équilibre en tout temps. Cela permet un meilleur contrôle en cas d’imprévus.
UTILISATION ET ENTRETIEN
DE LA BATTERIE
•Cet outil Milwaukee fonctionne avec 2 piles AAA qui doivent être installées correctement. Ne pas tenter d’utiliser le produit à une autre tension ou avec un autre type d’alimentation.
•Ne pas laisser les piles à la portée des enfants.
•Ne pas mélanger des piles neuves et usées. Ne pas mélanger des piles de marques différentes (ou des piles de même marque mais de types différents).
 Loading...