

Gebrauchsanweisung
Waschschleuderautomat
Operating Instructions
Washer Extractor
Mode d’emploi
Machines à laver à superessorage
Istruzione d’uso
Lavacentrifughe
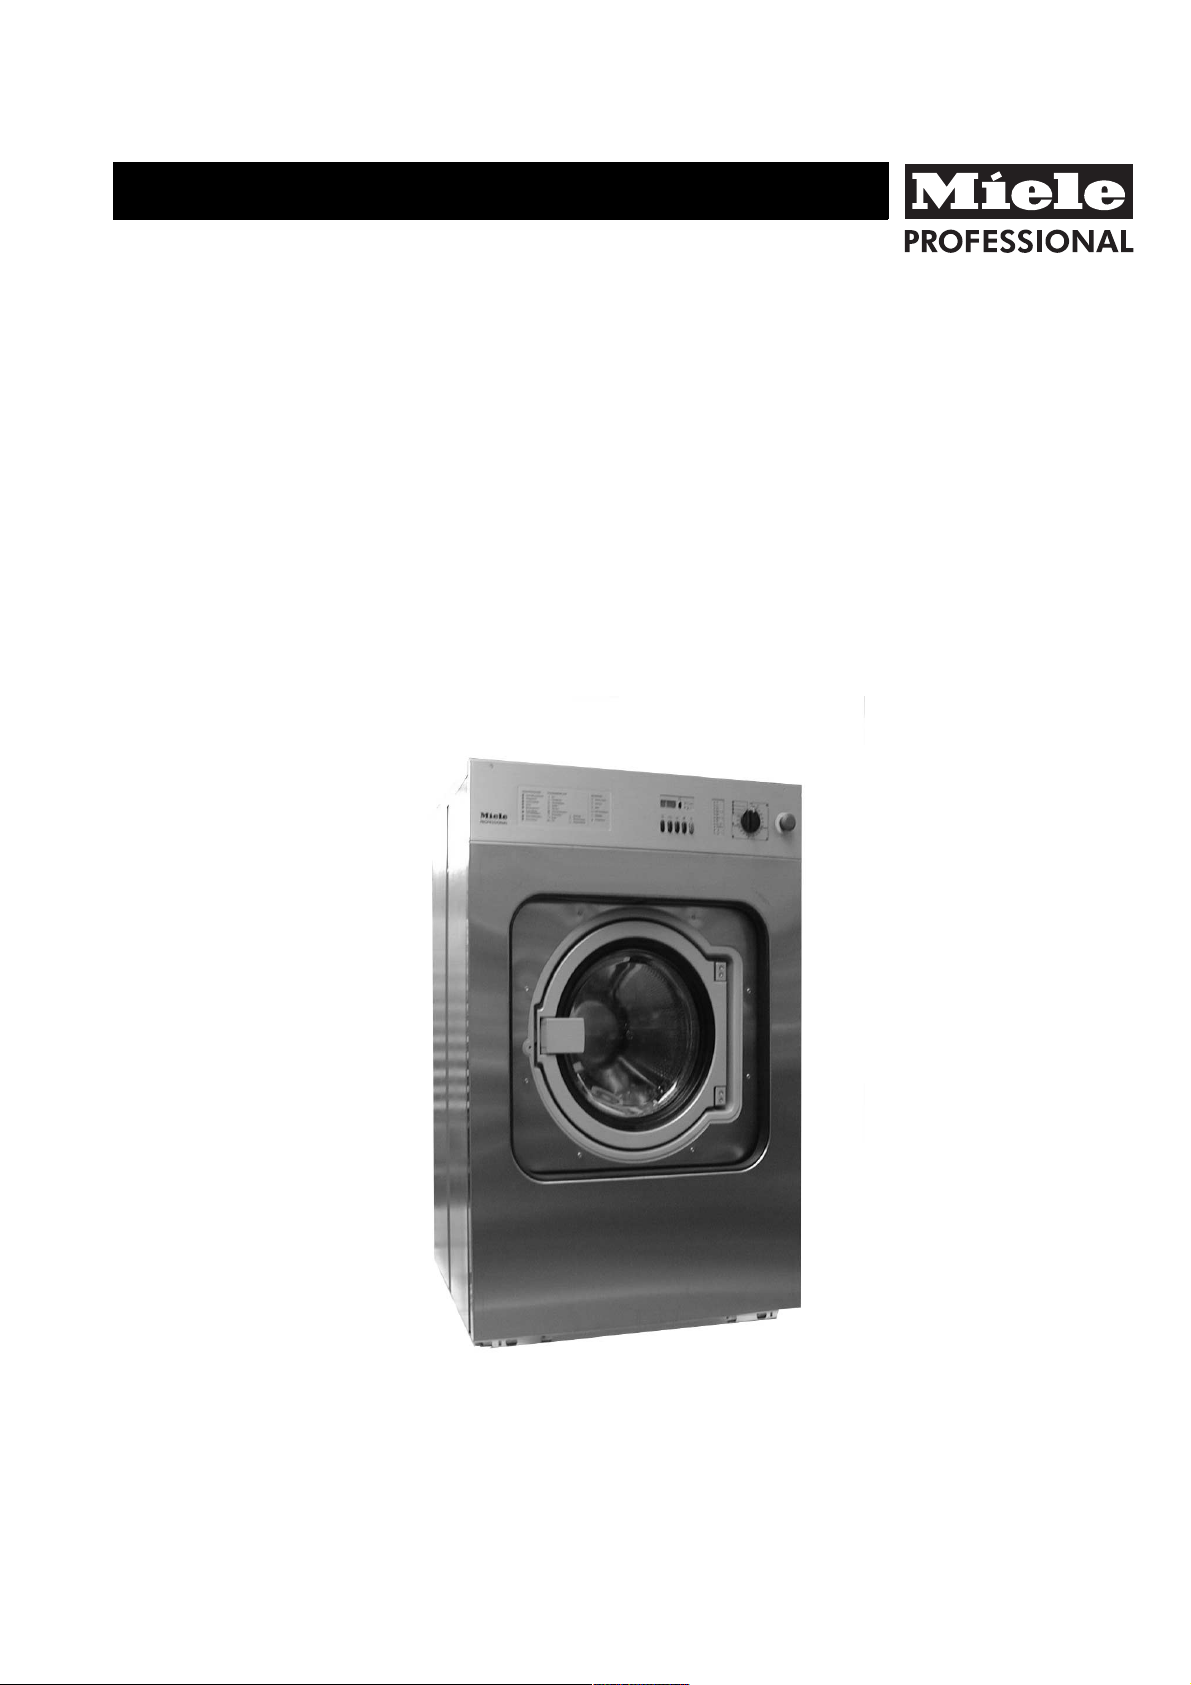
WS 5080 / WS 5100 / WS 5140
Lesen Sie unbedingt die Gebrauchsanweisung vor de, en, fr, it
Aufstellung - Installation - Inbetriebnahme.
Dadurch schützen Sie sich und vermeiden Schäden an Ihrem Gerät.
M.-Nr. 04 506 752

2 M.-Nr. 04 506 752

Inhaltsverzeichnis Table des matires
Contents Indice
Sicherheitshinweise und Warnungen . . . . . . . . . . . . . . . . . . . . . . . . . . 4
Ihr Beitrag zum Umweltschutz . . . . . . . . . . . . . . . . . . . . . . . . . . . . . . 8
Gerätebeschreibung . . . . . . . . . . . . . . . . . . . . . . . . . . . . . . . . . . . . 9
- Erklärung der Bedienungselemente . . . . . . . . . . . . . . . . . . . . . . . . . . . 10
- Fehlermeldungen . . . . . . . . . . . . . . . . . . . . . . . . . . . . . . . . . . . . 11
Gebrauch . . . . . . . . . . . . . . . . . . . . . . . . . . . . . . . . . . . . . . . . . 13
- Füllgewichte . . . . . . . . . . . . . . . . . . . . . . . . . . . . . . . . . . . . . . . 13
- Programm und Temperatur wählen . . . . . . . . . . . . . . . . . . . . . . . . . . . 13
- Waschmittelzugabe . . . . . . . . . . . . . . . . . . . . . . . . . . . . . . . . . . . 13
- Waschmittel-Dosierung . . . . . . . . . . . . . . . . . . . . . . . . . . . . . . . . . 14
- Störungsmeldung "Zündstörung" und "Flusenfilter reinigen" . . . . . . . . . . . . . . 14
- Tür öffnen und Wäscheentnahme . . . . . . . . . . . . . . . . . . . . . . . . . . . . 15
Hinweise . . . . . . . . . . . . . . . . . . . . . . . . . . . . . . . . . . . . . . . . . 15
- Bleichmittel . . . . . . . . . . . . . . . . . . . . . . . . . . . . . . . . . . . . . . . 15
- Mit Vorwäsche . . . . . . . . . . . . . . . . . . . . . . . . . . . . . . . . . . . . . . 15
- Ohne Schleudern . . . . . . . . . . . . . . . . . . . . . . . . . . . . . . . . . . . . 15
- Schleuderzeiten . . . . . . . . . . . . . . . . . . . . . . . . . . . . . . . . . . . . . 16
- Mini Programm . . . . . . . . . . . . . . . . . . . . . . . . . . . . . . . . . . . . . 16
- Stärken . . . . . . . . . . . . . . . . . . . . . . . . . . . . . . . . . . . . . . . . . 16
- Programm raffen . . . . . . . . . . . . . . . . . . . . . . . . . . . . . . . . . . . . . 16
- Programmabbruch bei aktiver Spitzenlastabschaltung . . . . . . . . . . . . . . . . . 16
- Spannungsausfall während des Waschvorganges / Manuelle
Entleerung des Laugenbehälters und Entriegelung der Fülltür . . . . . . . . . . . . . 17
- Programmabbruch . . . . . . . . . . . . . . . . . . . . . . . . . . . . . . . . . . . . 17
- Startvorwahl . . . . . . . . . . . . . . . . . . . . . . . . . . . . . . . . . . . . . . . 18
- Waschprogramm-Umprogrammierung . . . . . . . . . . . . . . . . . . . . . . . . . 19
- Zusatz-Programme . . . . . . . . . . . . . . . . . . . . . . . . . . . . . . . . . . . 22
- Mögliche Ursachen der erhöhten Schaumbildung . . . . . . . . . . . . . . . . . . . . 22
Reinigung und Pflege . . . . . . . . . . . . . . . . . . . . . . . . . . . . . . . . . . 24
Bedeutung der Symbole auf dem Typenschild . . . . . . . . . . . . . . . . . . . . 26
Hinweise für den Aufsteller
Transportsicherung . . . . . . . . . . . . . . . . . . . . . . . . . . . . . . . . . . . . 27
Schraubfüße . . . . . . . . . . . . . . . . . . . . . . . . . . . . . . . . . . . . . . . 27
Wasseranschlüsse . . . . . . . . . . . . . . . . . . . . . . . . . . . . . . . . . . . . 27
Wasserzulauf / -ablauf . . . . . . . . . . . . . . . . . . . . . . . . . . . . . . . . . . 27
Elektroanschluss . . . . . . . . . . . . . . . . . . . . . . . . . . . . . . . . . . . . . 28
Elektroheizung . . . . . . . . . . . . . . . . . . . . . . . . . . . . . . . . . . . . . . 28
Gasanschluss . . . . . . . . . . . . . . . . . . . . . . . . . . . . . . . . . . . . . . . 29
Dampfanschluss . . . . . . . . . . . . . . . . . . . . . . . . . . . . . . . . . . . . . 29
EG-Konformitätserklärung . . . . . . . . . . . . . . . . . . . . . . . . . . . . . . . 30
Seite / Page / Pagina
Der Waschschleuderautomat darf nur vom
Werkkundendienst oder einem autorisierten
Fachhändler aufgestellt werden.
QContents . . . . . . . . . . . . . . . . . . . . . . . . . . . . . . . . . . . . . . 33
RTable des matires . . . . . . . . . . . . . . . . . . . . . . . . . . . . . . . . . 61
SIndice . . . . . . . . . . . . . . . . . . . . . . . . . . . . . . . . . . . . . . . 89
M.-Nr. 04 506 752 3
Sicherheitshinweise und Warnungen
Lesen Sie bitte die Gebrauchsanweisung,
bevor Sie Ihren Waschschleuderautomaten
in Betrieb nehmen. Dadurch schützen Sie
sich und vermeiden Schäden an Ihrem
Waschschleuderautomaten.
Bestimmungsgemäße Verwendung des
Waschschleuderautomaten
Dieser Waschschleuderautomat ist nur
zur Anwendung für Wäsche, die nicht mit
gefährlichen oder entzündlichen Arbeitsstoffen durchsetzt ist, bestimmt.
Waschen Sie in diesem Waschschleuder-
automaten ausschließlich Textilien, die
vom Hersteller im Pflegeetikett als maschinenwaschbar deklariert sind.
Den Desinfektionsstandard, thermischer
sowie chemothermischer Verfahren (aus
der Liste, gemäß § 18 IFSG) hat der Betreiber in der Routine durch entsprechende Prüfungen sicherzustellen. Die Verfahren sollten
periodisch, thermoelektrisch mittels Loggern
oder bakteriologisch mittels Bioindikatoren
überprüft werden. Auf die Einhaltung des Verfahrensparameter, Temperatur und bei chemisch thermischen Programmen auch der
Konzentration hat der Betreiber insbesondere
zu achten. Desinfektionsprogramme dürfen
nicht unterbrochen werden, da sonst das Desinfektionsergebnis eingeschränkt sein kann.
Technisch elektrische Sicherheit
Die elektrische Sicherheit dieser Maschi-
ne ist nur dann gewährleistet, wenn sie an
ein Schutzleitersystem angeschlossen wird.
Es ist sehr wichtig, dass diese grundlegende
Sicherheitsvorkehrung vorhanden ist. Im Zweifelsfall die Hausinstallation durch einen Fachmann überprüfen lassen.
Der Hersteller kann nicht verantwortlich gemacht werden für Schäden, die durch eine
fehlende oder unterbrochene Schutzleitung
verursacht werden.
Beschädigen, entfernen oder umgehen
Sie nicht die Sicherheitseinrichtungen und
Bedienungselemente des Waschschleuderautomaten.
Maschinen bei denen Bedienungselemen-
te oder die Isolierung von Leitungen beschädigt sind, dürfen vor einer Reparatur
nicht mehr betrieben werden.
Benutzen Sie den Waschschleuderauto-
maten nur, wenn alle abnehmbaren
Außenverkleidungsteile montiert sind und
somit kein Zugriff zu stromführenden oder
sich drehenden Maschinenteilen besteht.
Der Waschschleuderautomat ist nur dann
elektrisch vom Netz getrennt, wenn der
Hauptschalter oder die Sicherung ausgeschaltet ist.
Auf keinen Fall in diesem Waschschleu-
derautomaten chemisch reinigen! Bei den
meisten Reinigungsmitteln - z.B. Benzin - besteht Brand-/ Explosionsgefahr!
Lagern oder verwenden Sie in der Nähe
des Waschschleuderautomaten kein Benzin, Petroleum oder sonstige leicht entzündliche Stoffe. Benutzen Sie den Maschinendeckel nicht als Ablagefläche.
Brand- und Explosionsgefahr!
4 M.-Nr. 04 506 752
Reparaturen an elektro-, gas- oder dampf-
beheizten Maschinen dürfen nur von
Fachkräften durchgeführt werden. Durch unsachgemäße Reparaturen können erhebliche
Gefahren für den Benutzer entstehen.
Versuchen Sie nie, die Fülltür des Wasch-
schleuderautomaten gewaltsam zu öffnen.
Um die Sicherheitsfunktion des Türschlosses
zu gewährleisten, ist der Türgriff mit einer
Überreißsicherung versehen.
Defekte Bauteile dürfen nur gegen Miele
Original-Ersatzteile ausgetauscht werden.
Nur bei diesen Teilen gewährleisten wir, dass
sie im vollen Umfang die Sicherheitsanforderungen erfüllen, die wir an unsere Maschinen
stellen.
Sicherheitshinweise und Warnungen
Die Verwendung bester Materialien und
alle angewandte Sorgfalt bei der Herstellung schützt die Zulaufschläuche nicht vor alterungsbedingten Schäden.
Durch Risse, Knicke, Beulen oder ähnliche
Merkmale können Undichtigkeiten entstehen,
aus denen Wasser ausfließt.
Kontrollieren Sie deshalb die Zulaufschläuche
in regelmäßigen Abständen. Sie können sie
dann rechtzeitig austauschen und Wasserschäden verhindern.
Für diese Waschmaschine gelten die Be-
rufsgenossenschaftlichen Regeln (BGR).
Es wird empfohlen die Überprüfungen gemäß
der Berufsgenossenschaftlichen Regeln BGR 500 /Kapitel 2.6/Abschnitt 4 durchzuführen.
Das für die Prüfdokumentation erforderliche
Prüfbuch ist beim Miele Kundendienst erhältlich.
Vorsichtsmaßnahmen bei Gasgeruch
Gelten nur in Verbindung mit gasbeheizten Waschschleuderautomaten.
Sofort alle Flammen löschen!
Sofort alle Fenster und Türen öffnen!
Sofort die Absperreinrichtungen am Gas-
zähler oder die Hauptabsperreinrichtung
schließen!
Räume, in denen sich Gasgeruch bemerkbar macht, nicht mit offenem Licht betreten!
Kein Streichholz oder Feuerzeug anzünden!
Nicht rauchen!
Keine elektrischen Funken erzeugen:
z.B. durch das Herausziehen von elektrischen Steckern oder das Betätigen von
elektrischen Schaltern und Klingeln.
Das für den Waschschleuderautomaten
bauseitig installierte Gas-Absperrventil
schließen.
Kann die Ursache des Gasgeruches nicht
gefunden werden, obwohl alle Gasarmaturen geschlossen sind, dann ist das zuständige Gas-Versorgungs-Unternehmen sofort anzurufen.
Achtung! Vor Abschluß der Arbeiten bei Inbetriebnahme, Wartung, Umbau und Reparatur
sind sämtliche gasführenden Bauteile,
vom Handabsperrventil bis zur Brennerdüse,
auf Dichtigkeit zu überprüfen.
Meßstutzen am Gasventil, am Anschlußdruckwächter und am Brenner sind besonders zu
beachten.
Die Überprüfung ist bei eingeschaltetem und
bei ausgeschaltetem Brenner durchzuführen.
M.-Nr. 04 506 752 5

Sicherheitshinweise und Warnungen
Gerätebenutzung
Personen, die aufgrund ihrer physischen,
sensorischen oder geistigen Fähigkeiten
oder ihrer Unerfahrenheit oder Unkenntnis
nicht in der Lage sind, die Waschmaschine sicher zu bedienen, dürfen die Waschmaschine
nicht ohne Aufsicht oder Anweisung durch
eine verantwortliche Person benutzen.
Erlauben Sie Kindern nie, im, auf oder in
der Nähe des Waschschleuderautomaten
zu spielen oder sogar selbst den Waschschleuderautomaten zu bedienen.
Wenn Sie mit hohen Temperaturen wa-
schen, denken Sie daran, dass das
Schauglas heiß wird. Hindern Sie deshalb Kinder daran, während des Waschvorganges
das Schauglas zu berühren.
Überzeugen Sie sich vor der Wäscheent-
nahme stets davon, dass die Trommel
stillsteht. Beim Hineingreifen in eine noch drehende Trommel besteht erhebliche Verletzungs- gefahr.
Das beim Waschen anfallende Wasser ist
Lauge und kein Trinkwasser!
Leiten Sie diese Lauge in ein entsprechend
dafür ausgelegtes Abwassersystem.
Der Waschschleuderautomat sollte ohne
Aufsicht nur dann betrieben werden,
wenn sich ein Bodenablauf (Gully) in direkter
Nähe des Gerätes befindet.
Desinfektions- und Reinigungsmittel ent-
halten häufig chlorhaltige Verbindungen.
Trocknen solche Mittel auf Edelstahl-Oberflächen an, können die entstehenden Chloride
den Edelstahl angreifen und Rost erzeugen.
Durch Verwendung chlorfreier Mittel zum Waschen/Desinfizieren sowie zum Reinigen der
Edelstahlflächen schützen Sie ihr Gerät vor
Rostschäden.
Lassen Sie sich im Zweifelsfall die Unbedenklichkeit des Mittels durch den Hersteller bestätigen.
Versehentlich auf die Edelstahl-Oberfläche
geratene chlorhaltige Mittel mit Wasser abwaschen, danach die Oberfläche mit einem
Tuch trockenreiben.
Achten Sie bei der Anwendung und Kom-
bination von Waschhilfsmitteln und Spezialprodukten unbedingt auf die Verwendungshinweise der Hersteller. Setzen Sie das
jeweilige Mittel nur für den vom Hersteller vorgesehenen Anwendungsfall ein um Materialschäden und heftigste chemische Reaktionen
zu vermeiden.
Lassen Sie sich die Unbedenklichkeit des
Einsatzes dieser Mittel in Waschmaschinen
durch den Waschmittelhersteller bestätigen.
Die anwendungstechnische Empfehlung
chemischer Waschhilfsmittel bedeutet
nicht, dass der Gerätehersteller die Einflüsse
dieser Hilfsmittel auf das Waschgut und die
Waschmaschine verantwortet.
Beachten Sie, dass Produktveränderungen
die vom Hersteller dieser Hilfsmittel nicht bekanntgegeben wurden, die Qualität des Waschergebnisses beeinträchtigen können.
Färbe- / Entfärbemittel sowie Entkalkungs-
mittel müssen für den Einsatz in Waschschleuderautomaten geeignet sein. Beachten
Sie unbedingt die Verwendungshinweise des
Herstellers.
Prüfen Sie das Waschergebnis bei Wä-
sche, die mit biologischen Ölen oder Fetten verschmutzt ist. Nicht ausreichend gewaschene Wäsche kann beim Trockenprozeß
zur Selbstentzündung führen. Setzen Sie für
solche Wäsche spezielle Waschmittel oder
Waschprogramme ein.
Zur Reinigung des Waschschleuderauto-
maten darf kein Hochdruckreiniger und
kein Wasserstrahl benutzt werden.
6 M.-Nr. 04 506 752

Sicherheitshinweise und Warnungen
Benutzung von Zubehör
Zubehörteile dürfen nur dann eingebaut
werden, wenn sie ausdrücklich von Miele
freigegeben sind. Wenn andere Teile anoder eingebaut werden, gehen Ansprüche
aus Garantie, Gewährleistung und / oder Produkthaftung verloren.
Chlor und Bauteilschäden
Hinweise zur Behandlung mit Chlorbleichen und Perchlorethylen
Mit steigendem Einsatz von Chlor steigt
die Wahrscheinlichkeit von Bauteilschäden.
Der Einsatz von chlorhaltigen Mitteln, wie beispielsweise Natrium-Hypochlorit und pulverförmigen Chlorbleichen, kann, abhängig von
der Chlor-Konzentration, der Einwirkzeit und
der Temperatur die Schutzschicht von Edelstahl zerstören und zu Korrosion an Bauteilen
führen. Aus diesem Grund sollte auf den Einsatz solcher Mittel verzichtet werden und stattdessen möglichst Bleichmittel auf Sauerstoffbasis eingesetzt werden.
Die genauen Einsatzmengen der Hilfsmittel
und die Behandlungstemperaturen müssen
vor Ort entsprechend der Dosierungsempfehlungen der Wasch- und Hilfsmittelhersteller
eingestellt und überprüft werden. Auch muss
getestet werden, ob kein Rest-Aktivchlor in
der Wäsche verbleibt.
Entsorgung des Altgerätes
Sollten Sie einen alten Waschschleuder-
automaten ausrangieren (zur Verschrottung geben), dann machen Sie vorher das
Türschloß unbrauchbar. Sie verhindern damit,
dass spielende Kinder sich einsperren und in
Lebensgefahr geraten.
Werden weitere Personen in die Handhabung
des Waschschleuderautomaten eingewiesen,
so sind ihnen diese wichtigen Sicherheitshinweise zugängig zu machen und/oder vorzutragen.
Bewahren Sie diese Gebrauchsanweisung
auf!
Werden dennoch bei speziellen Verschmutzungen chlorhaltige Bleichmittel verwendet,
muss unbedingt immer ein Antichlorierungsschritt durchgeführt werden. Andernfalls können die Bauteile der Waschmaschine und die
Wäsche nachhaltig und irreparabel geschädigt werden.
Antichlor-Behandlung
Die Antichlor-Behandlung muss direkt im Anschluss an die Chlorbleiche stattfinden. Am
besten unter Verwendung von Wasserstoffperoxid oder eines Wasch- bzw. Bleichmittels
auf Sauerstoffbasis und ohne das Bad zwischendurch abzulassen.
Mit Thiosulfat kann sich, besonders beim Einsatz von hartem Wasser, Gips bilden, der zu
Inkrustationen auf der Wäsche oder zu Ablagerungen in der Waschmaschine führen
kann. Da die Behandlung mit WasserstoffPeroxid den Neutralisationsprozess von Chlor
unterstützt, ist diese Anwendung vorzuziehen.
M.-Nr. 04 506 752 7
Ihr Beitrag zum Umweltschutz
Entsorgung der Transportverpackung
Die Verpackung schützt die Maschine vor
Transportschäden. Die Verpackungsmaterialien sind nach umweltverträglichen und entsorgungstechnischen Gesichtspunkten ausgewählt und deshalb recycelbar. Das
Rückführen der Verpackung in den Materialkreislauf spart Rohstoffe und verringert
das Abfallaufkommen. Ihr Fachhändler nimmt
die Verpackung zurück.
Entsorgung des Altgerätes
Elektrische und elektronische Altgeräte enthalten vielfach noch wertvolle Materialien. Sie
enthalten aber auch schädliche Stoffe, die für
ihre Funktion und Sicherheit notwendig waren. Im Restmüll oder bei falscher Behandlung können diese der menschlichen Gesundheit und der Umwelt schaden. Geben Sie Ihr
Altgerät deshalb auf keinen Fall in den Restmüll.
Bitte sorgen Sie dafür, dass Ihr Altgerät entsprechend den regionalen Entsorgungsvorschriften entsorgt wird. Miele bietet ein Recyclingsystem an. Hierüber informiert Sie Ihr
Fachhändler oder Vertriebszentrum.
Bitte sorgen Sie dafür, dass Ihr Altgerät bis
zum Abtransport kindersicher aufbewahrt
wird. Hierüber informiert Sie diese Gebrauchsanweisung im Kapitel "Sicherheitshinweise
und Warnungen".
8 M.-Nr. 04 506 752
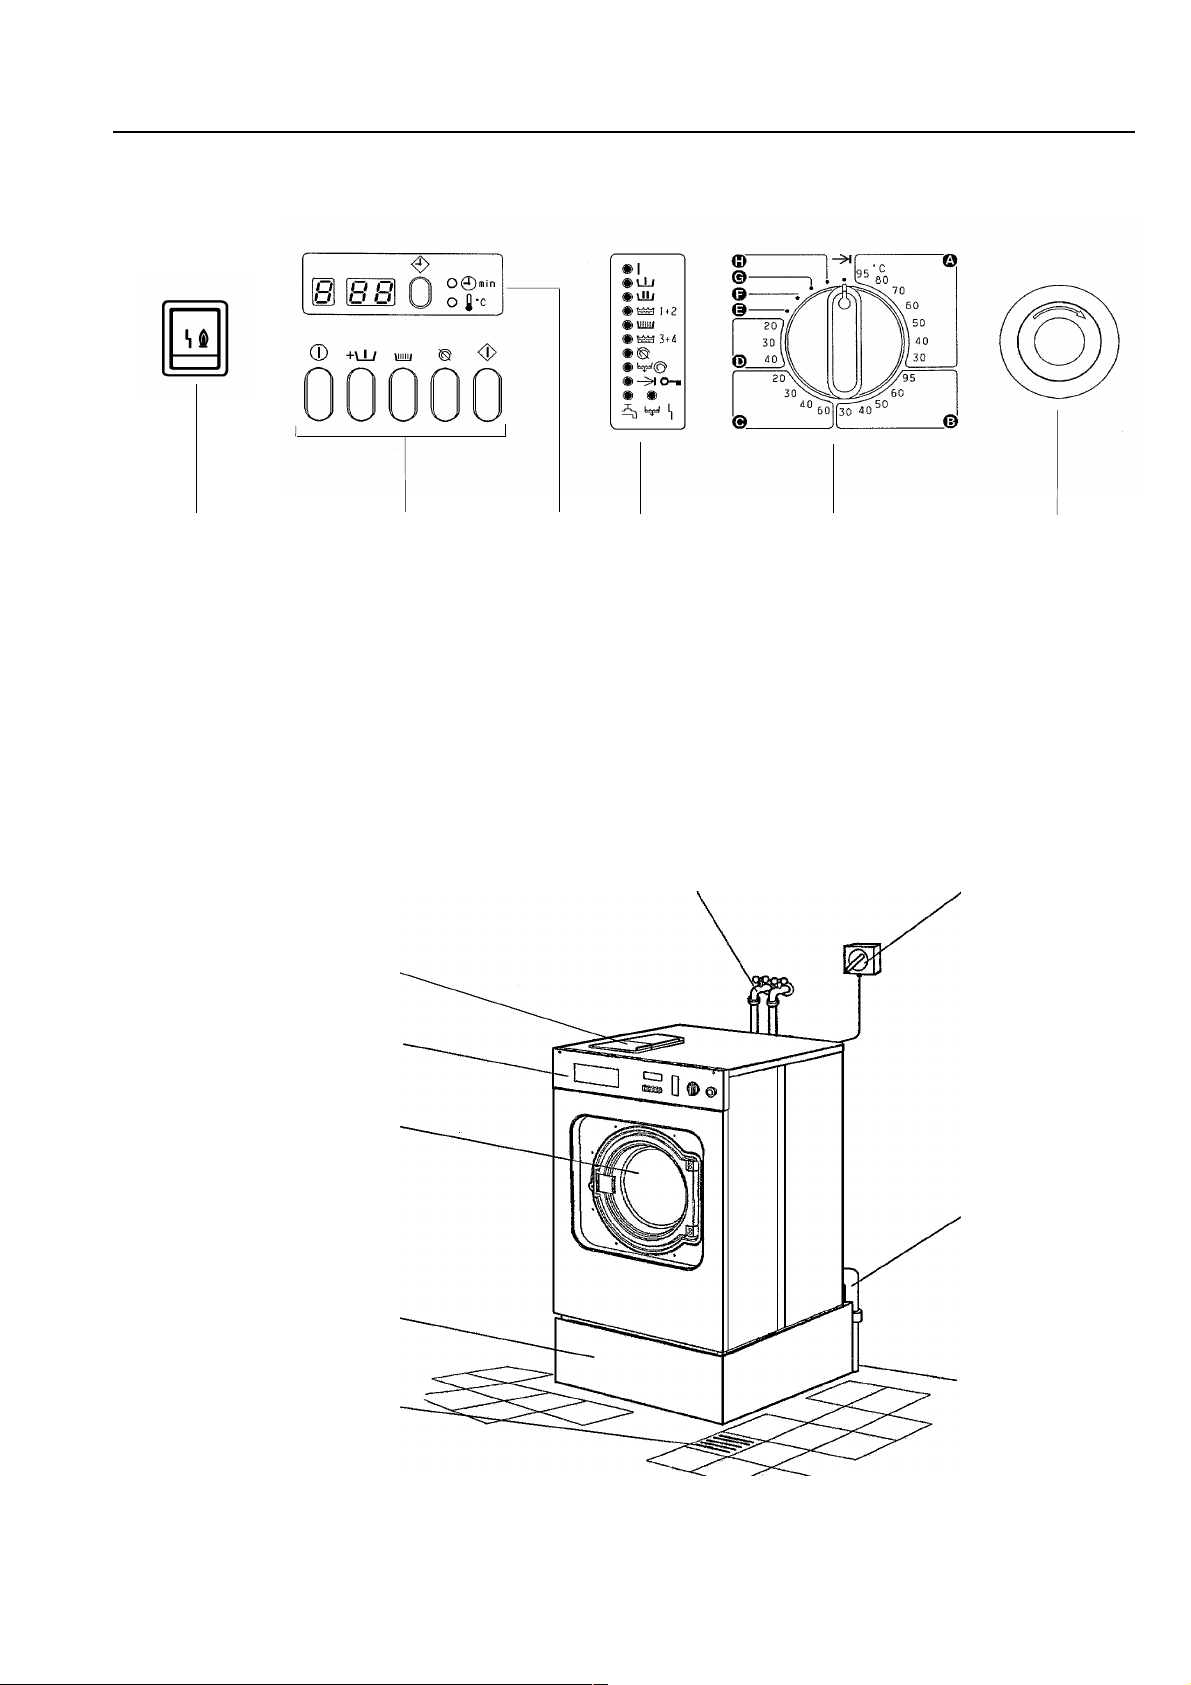
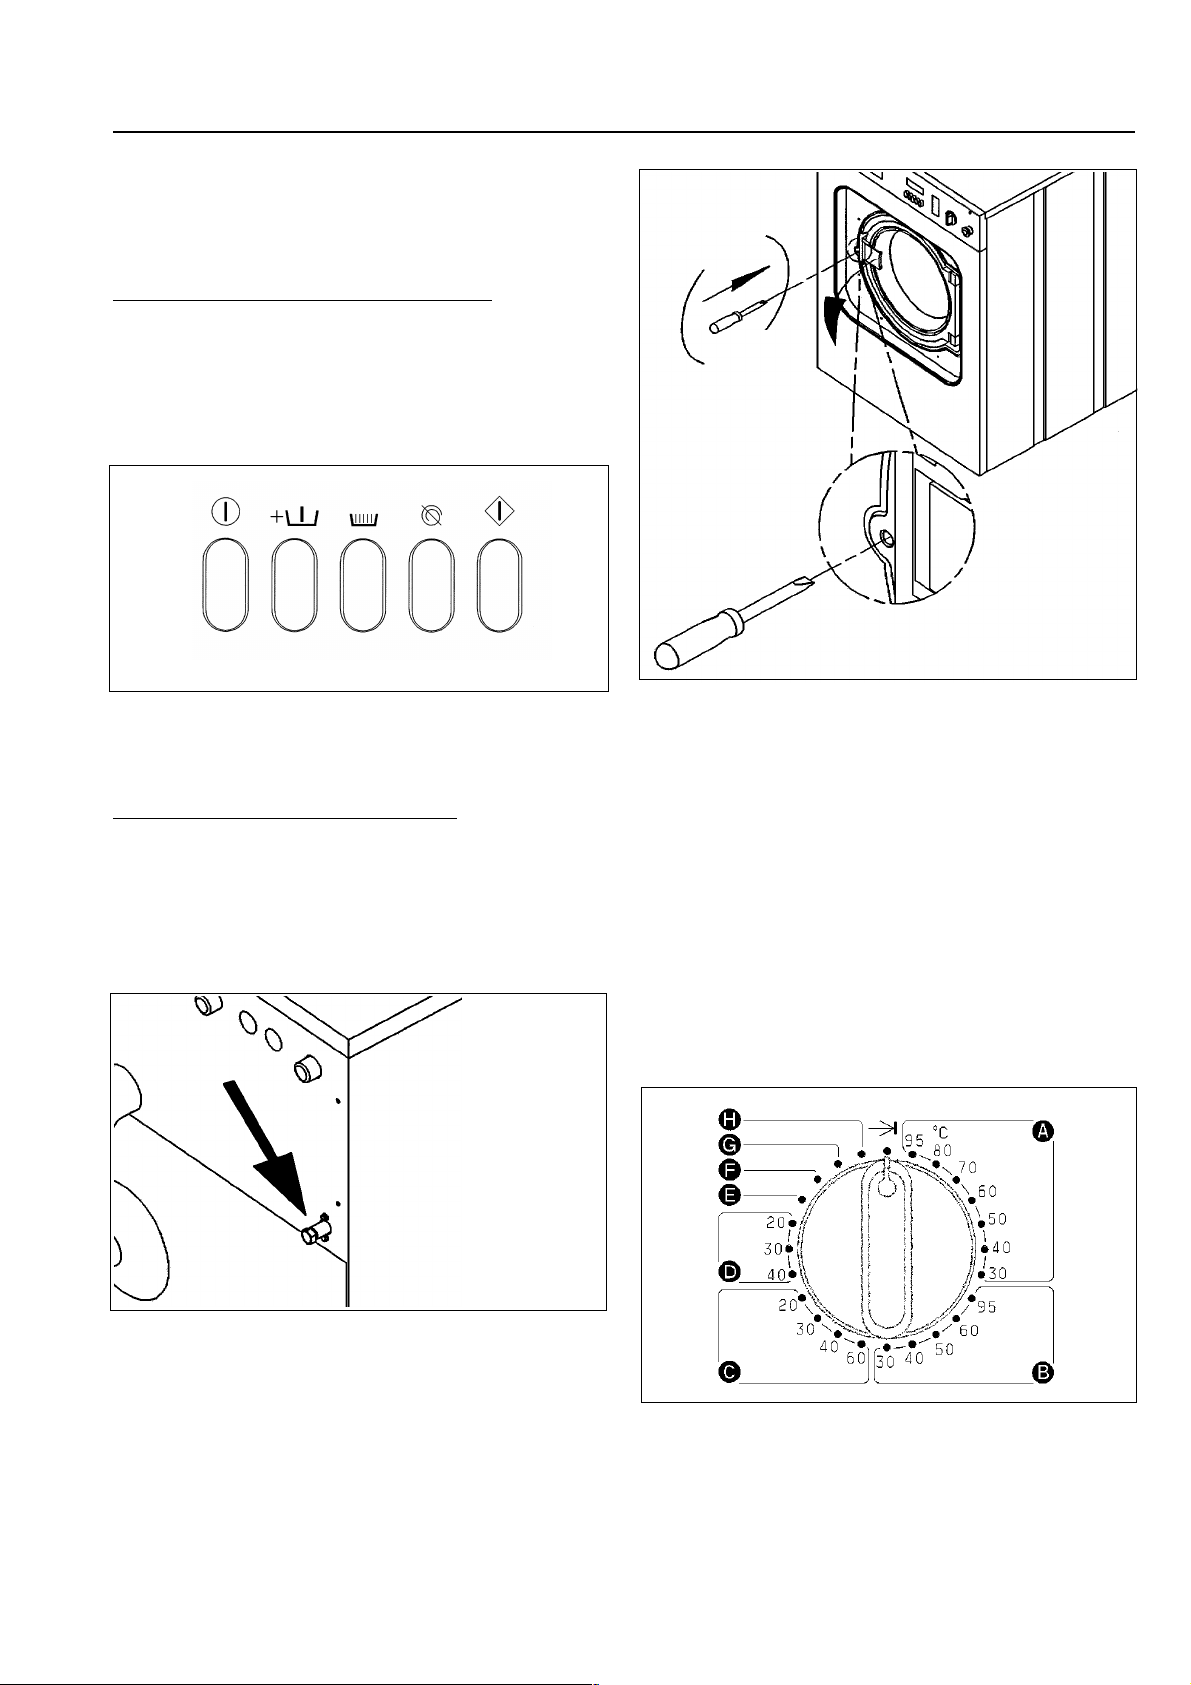
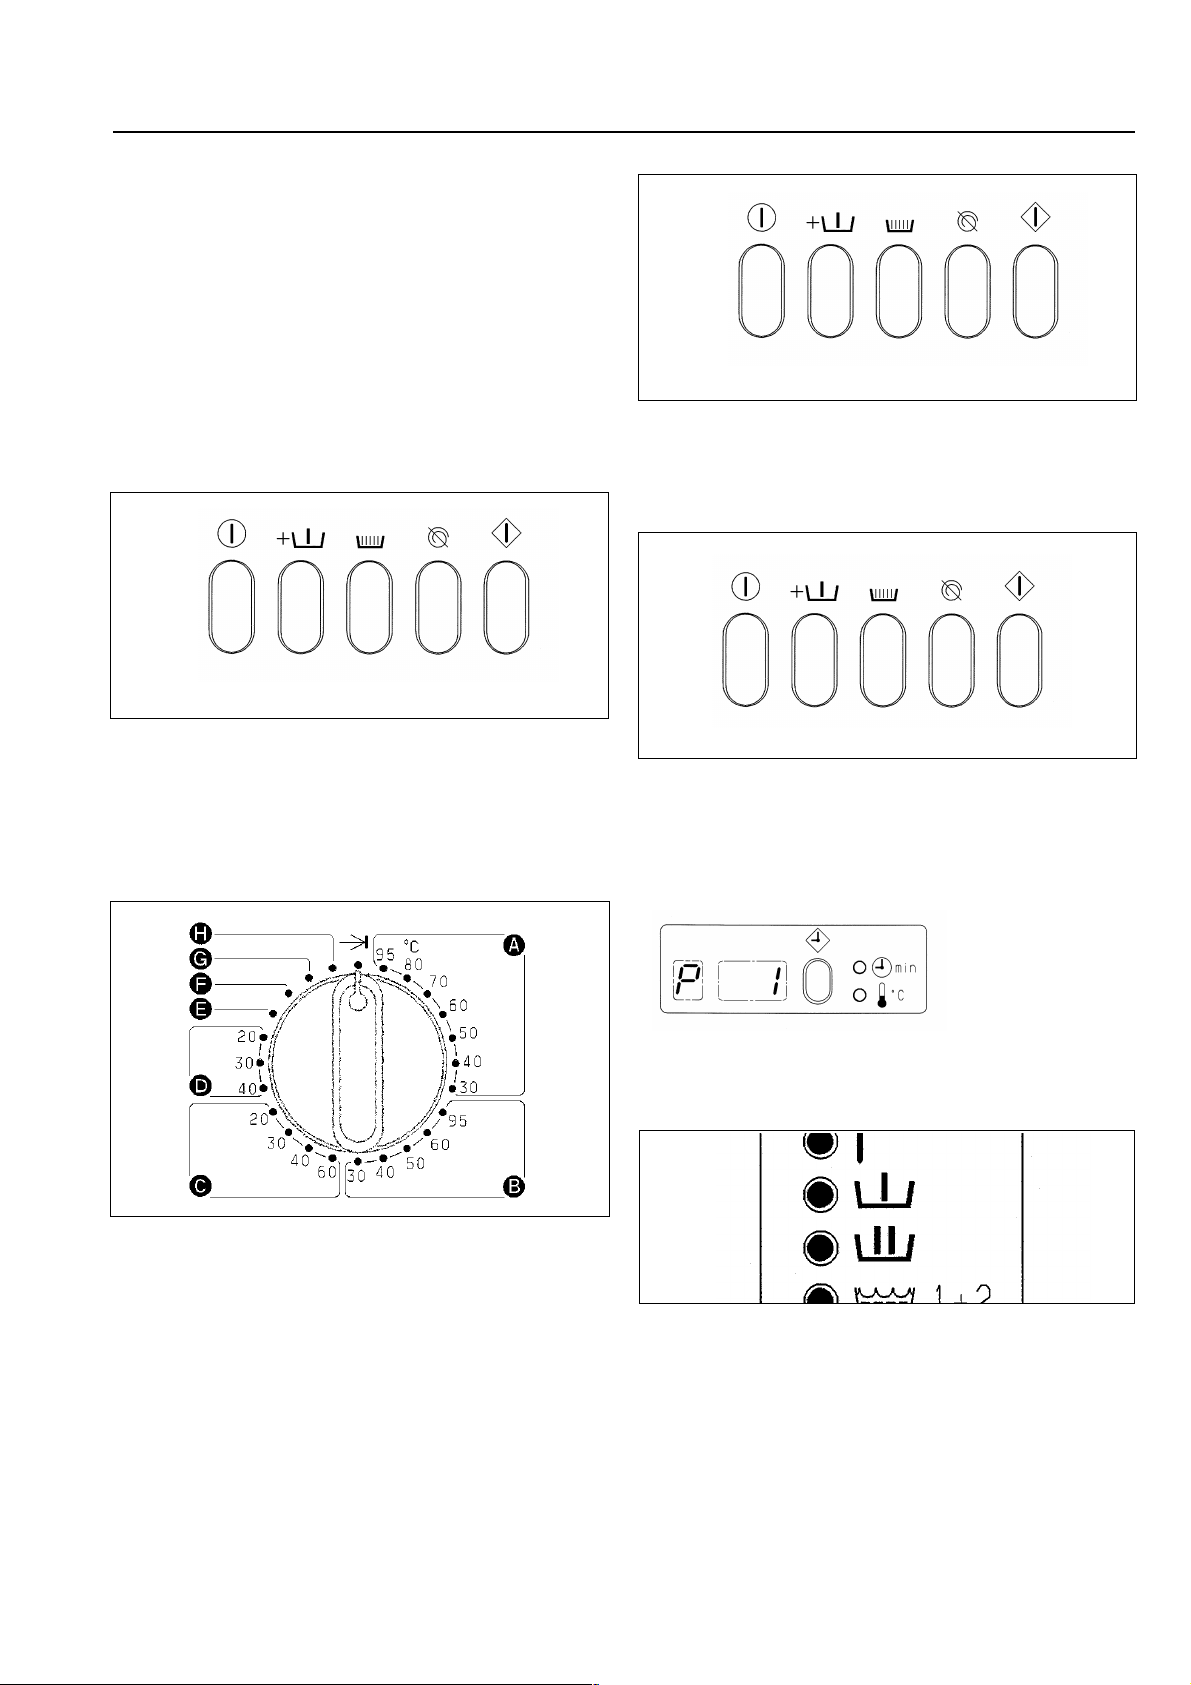
Gerätebeschreibung
Schalterblende
12345 6
1 Taste "Entstörung" 4 Programmablauf-Anzeigeleuchten
(nur bei Waschschleuderautomaten mit Gasheizung)
2 Drucktasten-Schalter 6 Not-Aus-Schalter
3 Temperatur- und Restlaufanzeige
5 Programm- und Temperaturwähler
Die konstruktive Ausführung der Maschine entspricht IEC 60204-1:2005
Wasserabsperrventile
Waschmitteleinspülkasten
Schalterblende
Fülltür
Unterbau (Option)
Hauptschalter
Wasserablauf
Bodenablauf (Gully)
WS 5080/5100/5140
M.-Nr. 04 506 752 9
Gerätebeschreibung
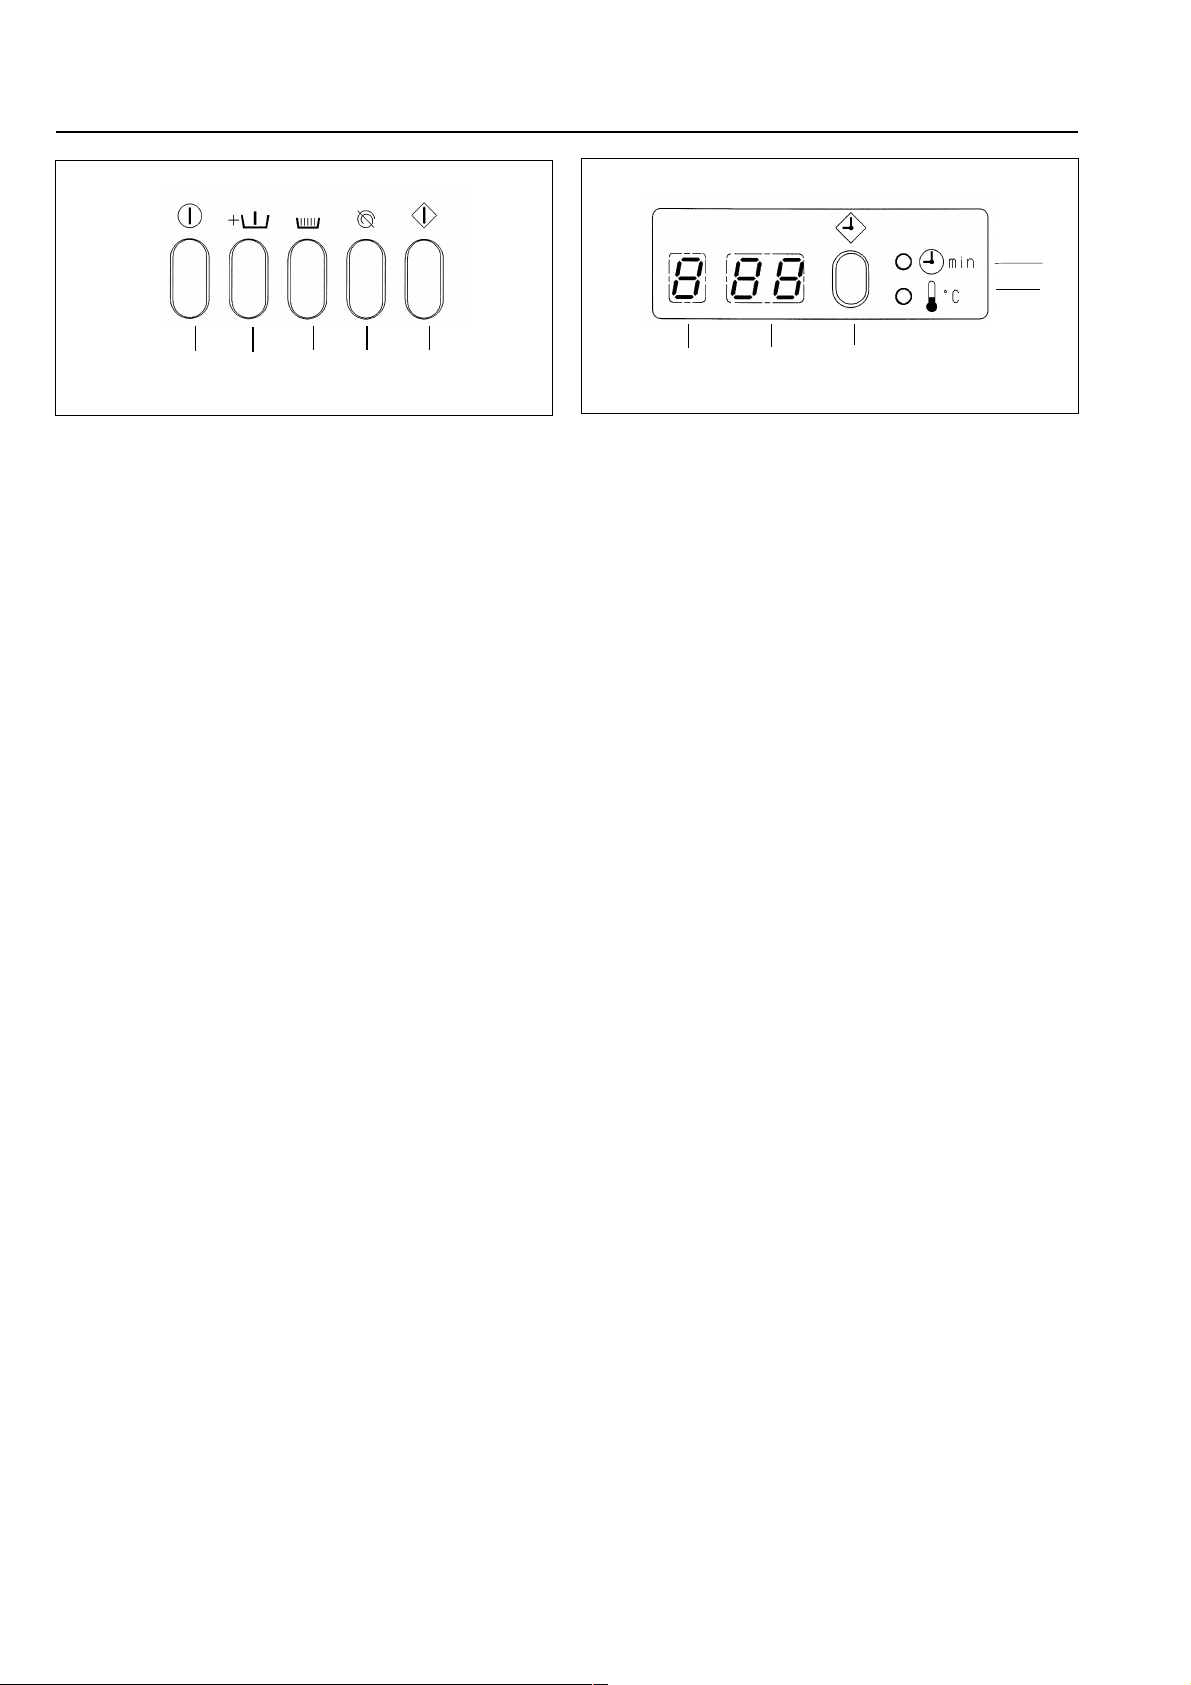
9
10
12345
1 = Schalter "Ein-Aus"
2 = Schalter "Mit Vorwäsche"
Für stark verschmutzte Wäsche.
- Nur bei den Programmen A,B und
C,wenn gewünscht hinzuwählen. -
3 = Schalter "Stärken"
Soll die Wäsche gestärkt werden, so ist
der Schalter einzudrücken. Der Schalter
hat nur Funktion in den Programmen A
und E.
4 = Schalter "Ohne Schleudern"
Soll im Anschluss an das Spülen nicht
geschleudert werden, ist der Schalter einzudrücken.
5 = Taste "Start"
Um das Waschprogramm zu starten, ist
die Taste einzudrücken.
678
6 = Anzeige "Zeit h"
7 = Anzeige "Zeit min"
Es wird angezeigt, wie lange das
Waschprogramm noch dauert bzw. bei
Startvorwahl, nach welcher Zeit der Start
des Programmes erfolgt.
oder "Temperatur oC"
Die Temperatur wird ab 20 oC aufwärts
in 5 oC-Stufen angezeigt.
8 = Taste "Startvorwahl"
Zur Startvorwahl eines Programmes
von maximal 9 Stunden und 30 Minuten.
- Ausführliche Beschreibung siehe
Seite 18.-
9 = Anzeigeleuchte "Zeit"
Signalisiert die Zeit in der Anzeige 6
und 7.
10 = Anzeigeleuchte "Temperatur oC"
Signalisiert die Temperatur in der Anzeige 7.
10 M.-Nr. 04 506 752
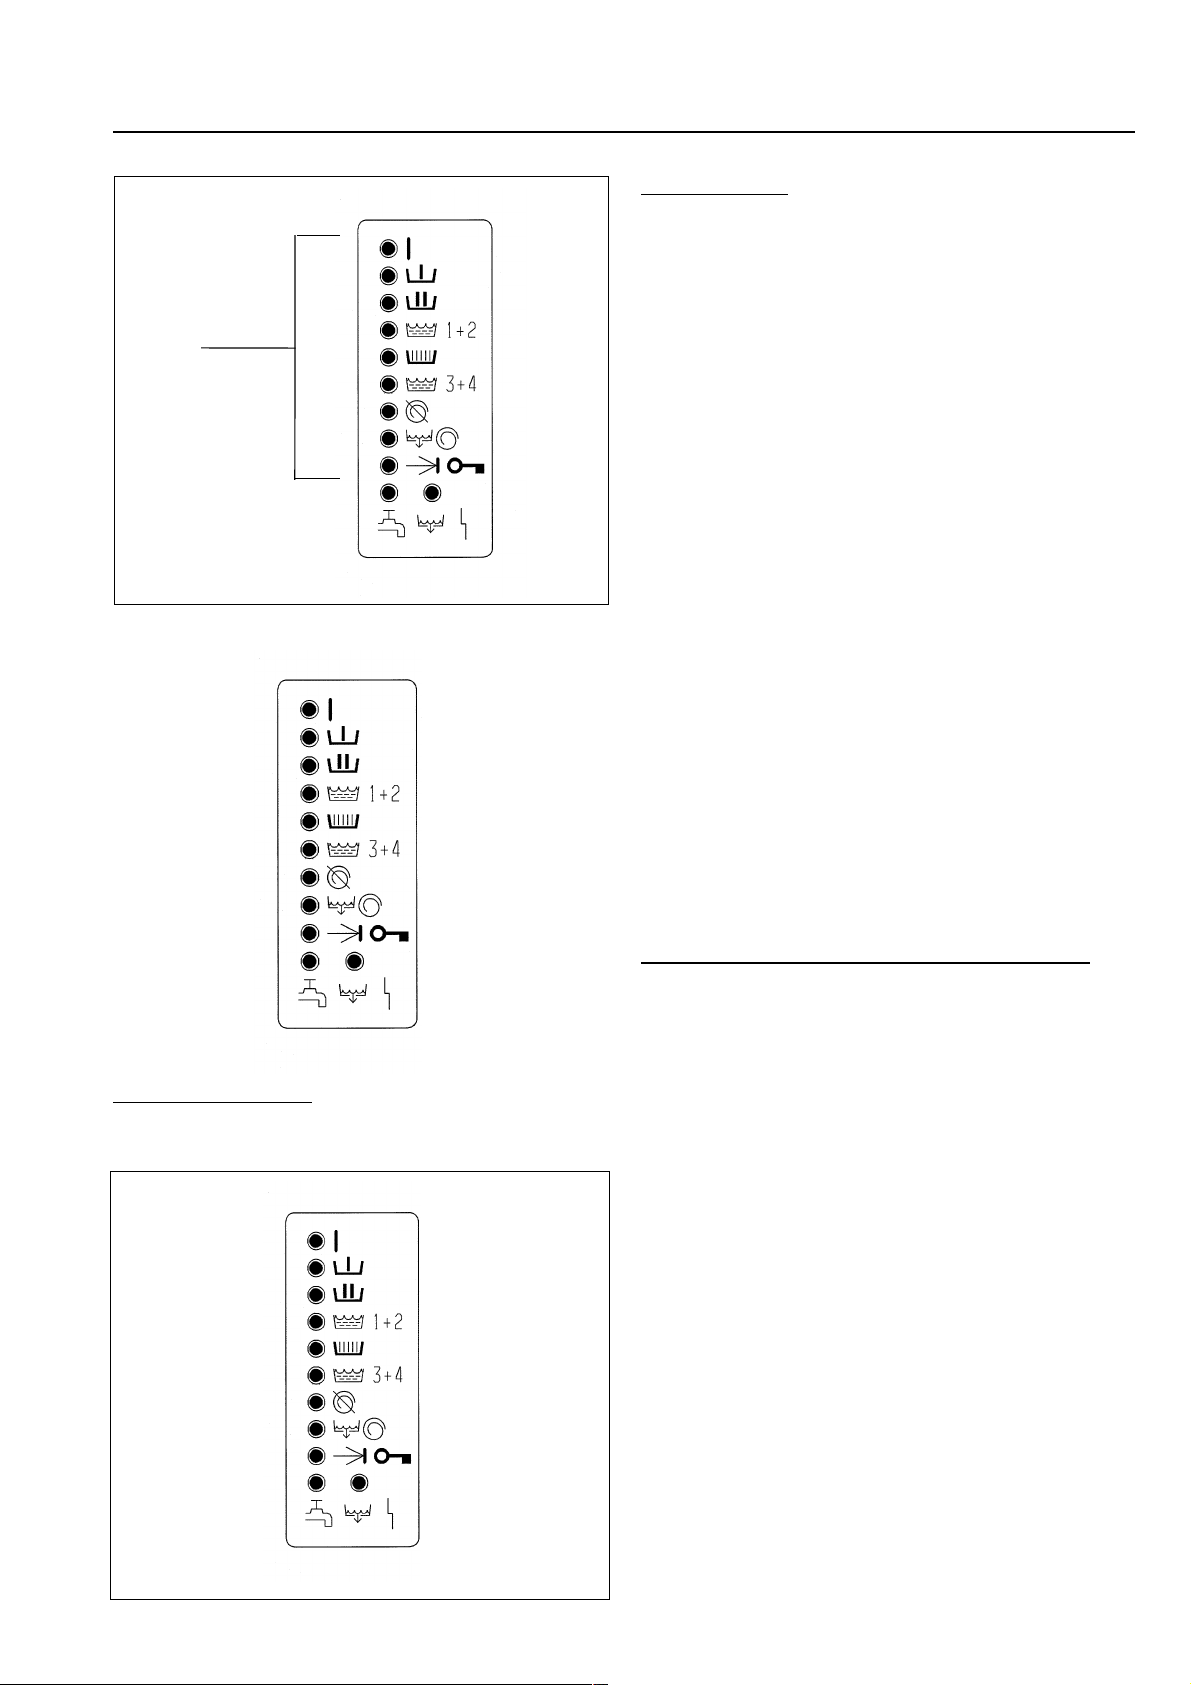
Gerätebeschreibung
11
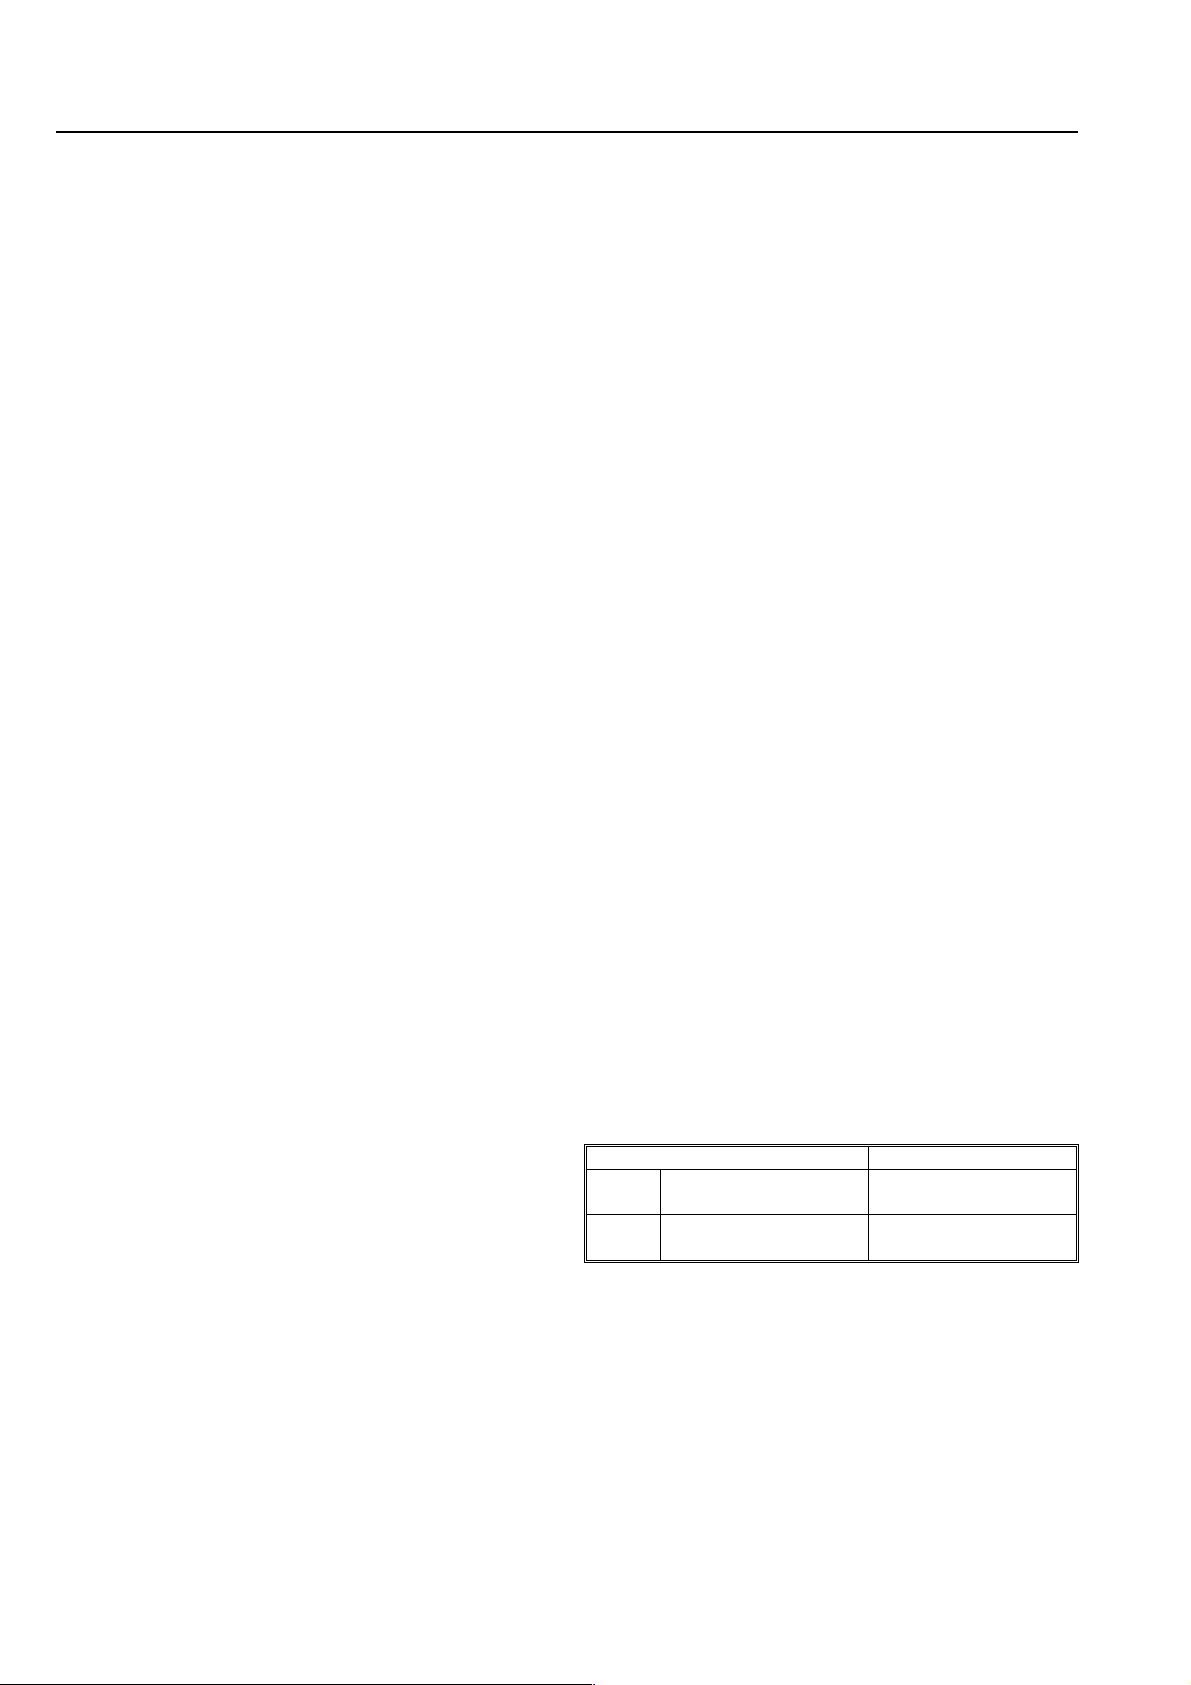
11= Programmablauf-Anzeigeleuchten
Ein
Vorwäsche
Hauptwäsche
Spülen
Stärken
Spülen
Ohne Schleudern
Schleudern
Ende/Tür
Störung
Wasserzulauf
Fehlermeldungen
Fehler bzw. Störungen werden durch blinkende Anzeigeleuchten angezeigt.
Wasserablauf
Sie bedeuten:
"Niveau"
Fehler im Niveausystem (Wasserstand).
"Heizung"
Fehler im Heizsystem.
"Antrieb"
Fehler im Antriebssystem.
"Tür"
Fehler im Verriegelungssystem.
Manuelle Entriegelung vornehmen (beschrieben unter "Spannungsausfall während des
Waschvorganges").
Diese bisher aufgeführten Fehler bzw. Störungen dürfen nur vom Kundendienst behoben
werden.
"Wasserzulauf"
Die Wasserabsperrventile (bauseitig) wurden
bei Inbetriebnahme nicht geöffnet bzw. die
Siebe in den Wasserdruckschläuchen oder in
den Einlaufventilen sind verschmutzt.
"Wasserablauf"
Der Ablauf des Waschschleuderautomaten ist
verstopft bzw. das Ablaufventil* ist defekt.
Nach Beseitigung der Fehler bzw. Störungen
muss das Waschprogramm neu gestartet werden.
*) Ein defektes Ablaufventil darf nur vom Kundendienst
repariert werden.
Gilt nur für WS 5100/5140 mit Gasheizung
Fehlermeldung "Heizung"
Die Anzeigeleuchte "Heizung" blinkt, wenn
zum Beispiel die bauseitige Gaszufuhr zum
Waschschleuderautomaten, durch ein nicht
geöffnetes Gas-Absperrventil, unterbrochen
ist.
Blinken weitere Anzeigeleuchten auf, so ist
dies eine Folgeerscheinung und ohne Bedeutung.
Das Gas-Absperrventil öffnen, und den
Niveau
Heizung
Antrieb
Waschschleuderautomaten durch Herausund Hereindrücken des "Ein-Aus" Schalters
und Betätigung der Taste "Start" erneut starten.
Blinkt die Anzeigeleuchte "Heizung" nach
dieser Maßnahme dennoch weiter, so ist zur
Tür
Wasserzulauf
M.-Nr. 04 506 752 11
Wasserablauf
Fehlerbeseitigung der Kundendienst anzufordern.
Gerätebeschreibung
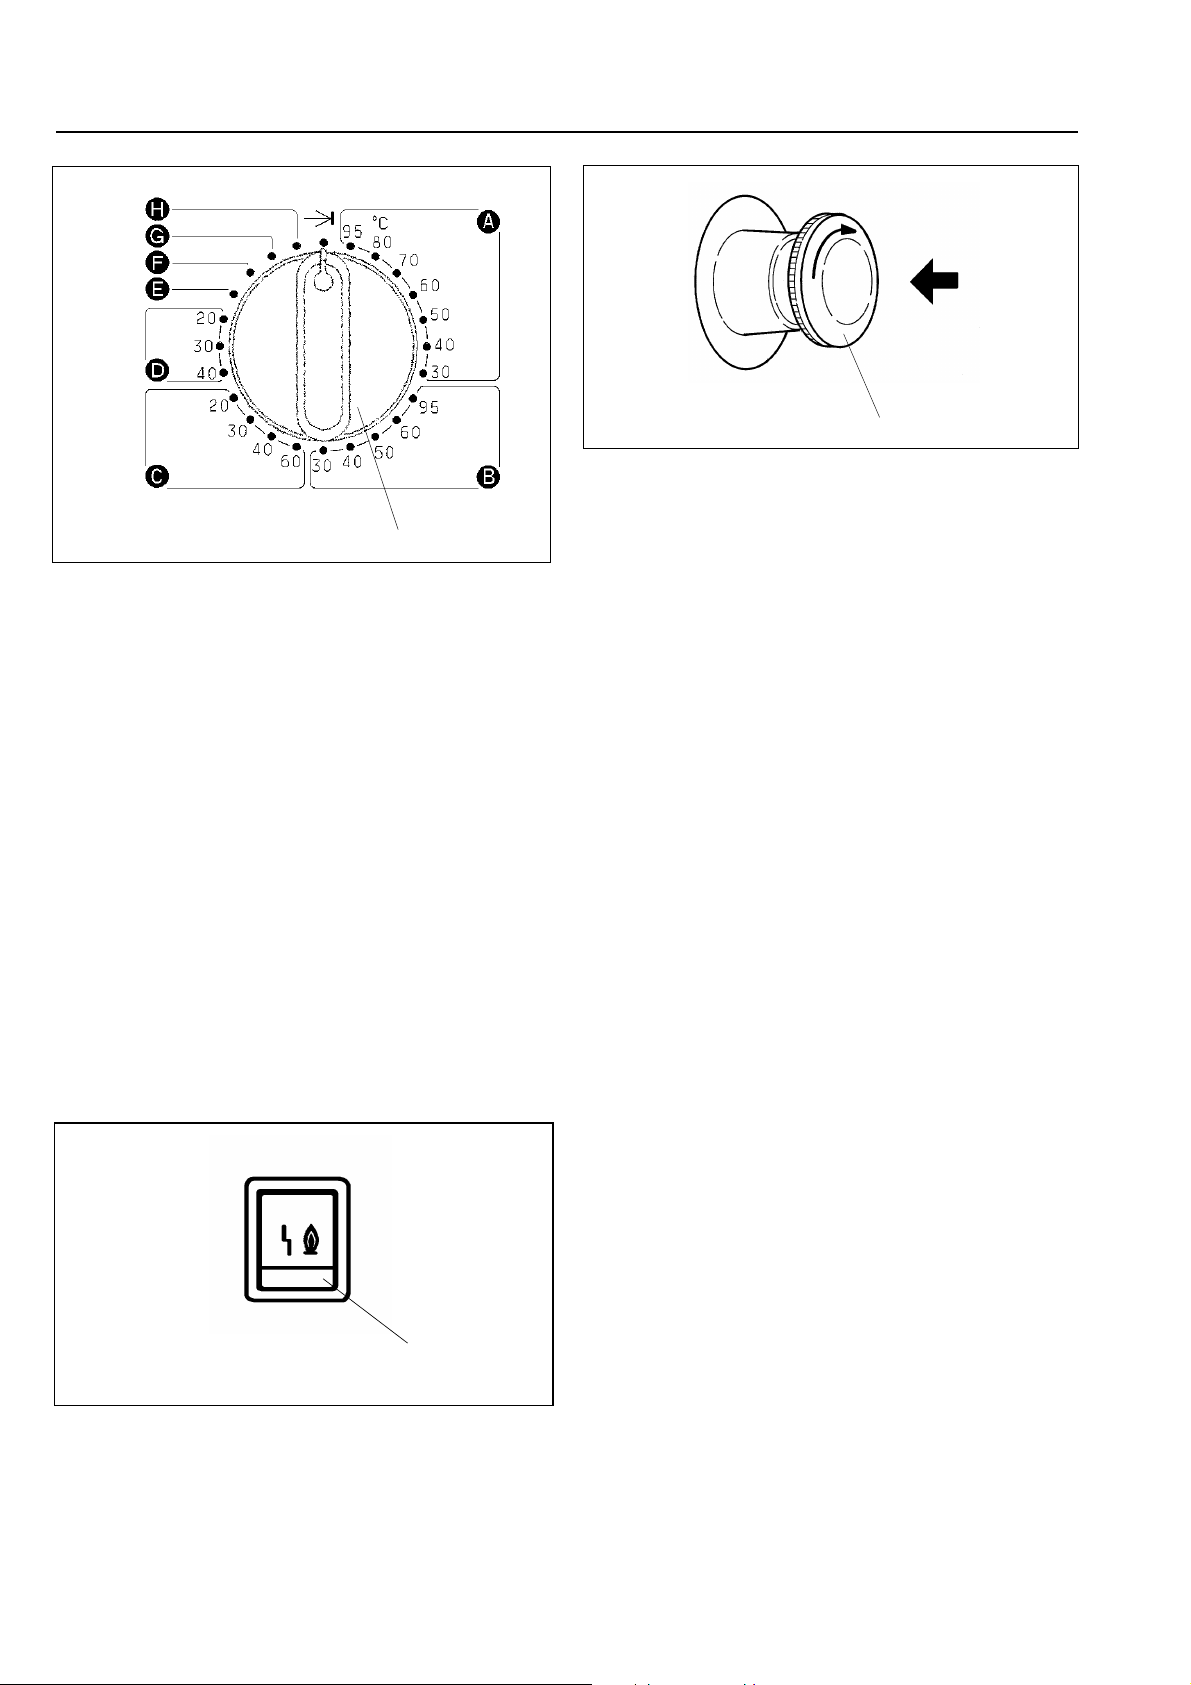
12
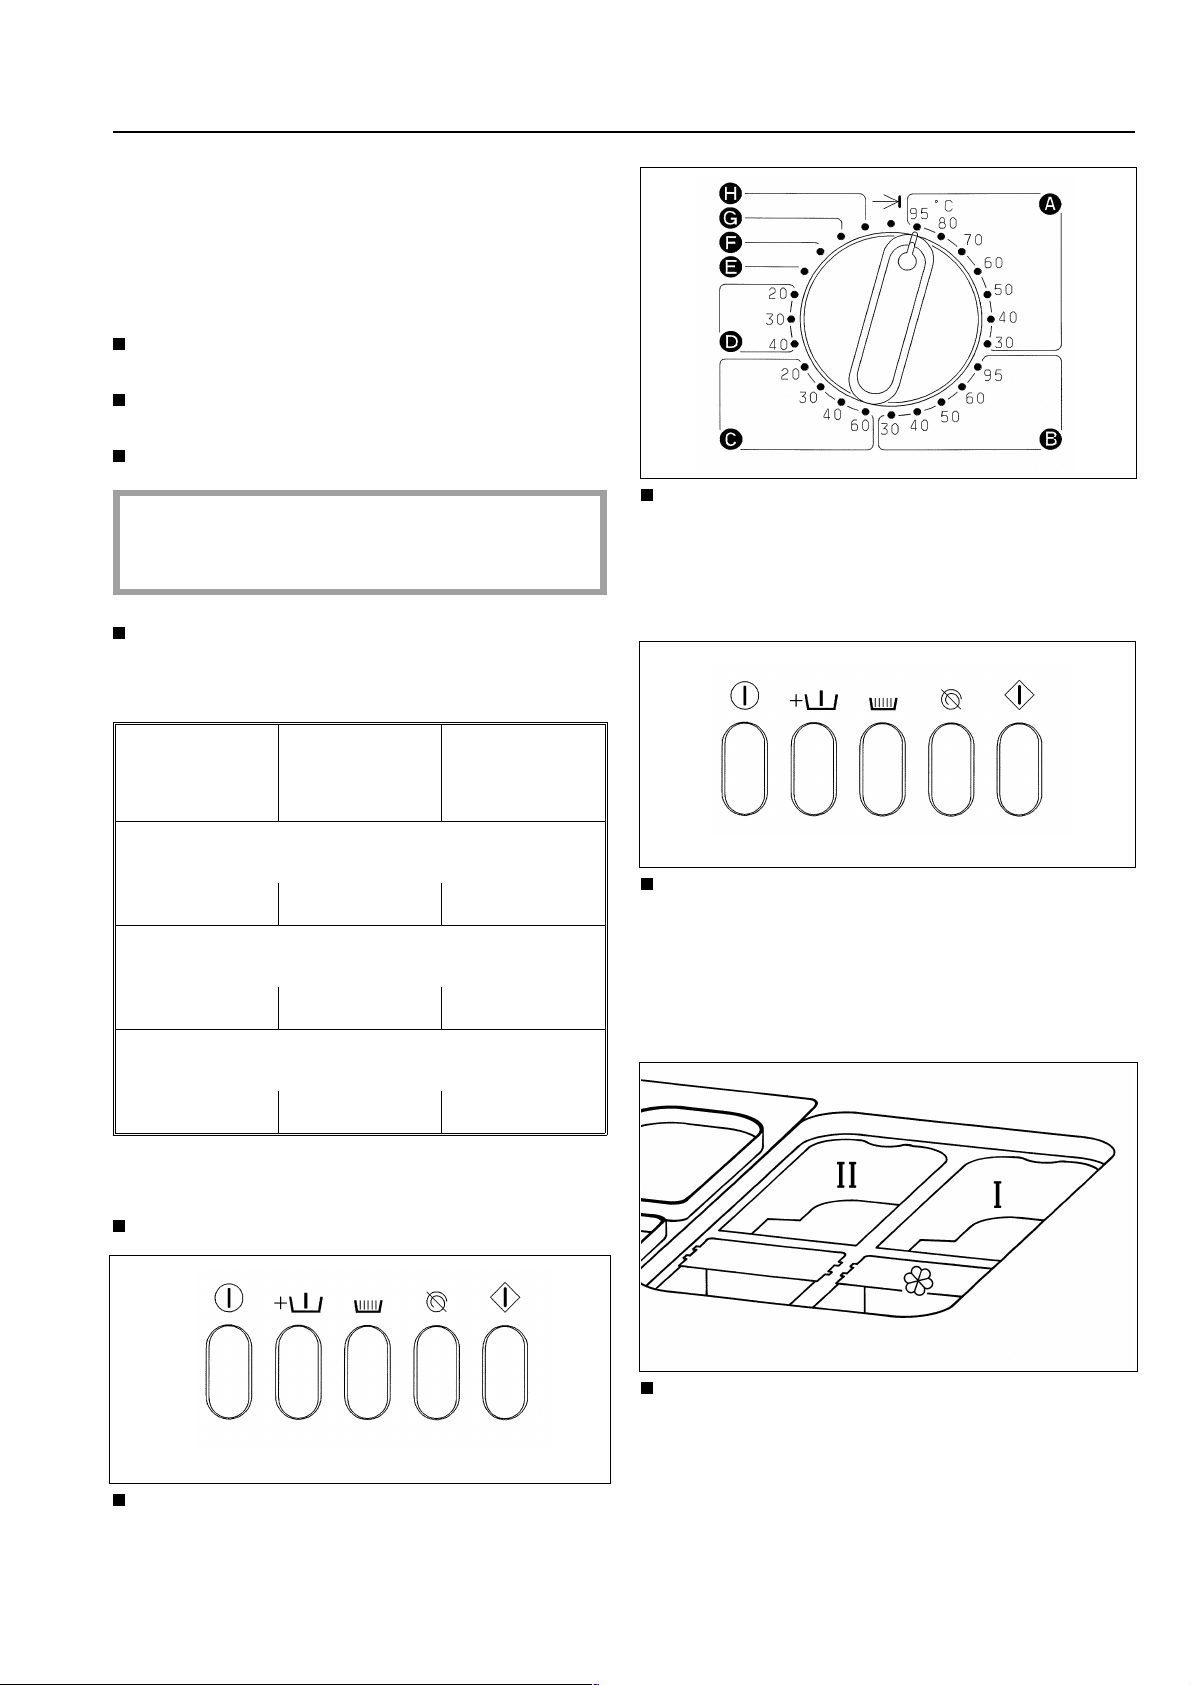
12 = Programm- und Temperaturwähler
Mit dem Programmwähler wird das
Waschprogramm angewählt.
Koch-/ Buntwäsche
A
Pflegeleicht
B
14
14 = Not-Aus-Schalter
Betätigung nur bei Gefahr.
Nach Gefahrenbeseitigung wird der
Schalter durch Rechtsdrehung der gerändelten Scheibe entriegelt.
Nach der Entriegelung blinkt die Anzeige
"Zeit" oder "Temperatur". Es ist erneut
die Taste "Start" einzudrücken, damit
das unterbrochene Programm fortgesetzt
wird.
C
D
E
F
G
H
r
Fein/ Synthetik
Wolle
Mini Programm
Extra Spülen und Schleudern
Extra Schleudern
Extra Ablauf
Ende
13
13 = Taste "Entstörung"
(nur bei WS 5100 / WS 5140 mit Gasheizung)
Bei einer Zündstörung ist die Taste
-frühestens nach 1 Minute- zu betätigen.
12 M.-Nr. 04 506 752
Gebrauch
INBETRIEBNAHME
Der Waschschleuderautomat darf nur durch
den Kundendienst oder einen autorisierten
Fachhändler in Betrieb genommen werden.
Wasserabsperrventile (bauseitig) öffnen.
Hauptschalter (bauseitig) einschalten.
Taschen leeren
Fremdkörper (z.B. Nägel, Münzen, Büroklammern) können Textilien und Bauteile
beschädigen.
Wäsche einfüllen.
Füllgewichte (Trockenwäsche)
Programm und Temperatur wählen
(z.B. Programm A Koch- / Buntwäsche
95 oC).
WS 5080 WS 5100 WS 5140
Programm A,E,F,
max. 8 kg max. 10 kg max. 14 kg
Programm
max. 2,5 kg max. 3,5 kg max. 5 kg
Programm C,
max. 1,5 kg max. 2 kg max. 3 kg
Fülltür schließen.
B
G
D
*
Vorwäsche nur bei den Programmen
A,B,C, wenn gewünscht,
hinzuwählen. Hierzu Schalter "Mit Vorwäsche" eindrücken.
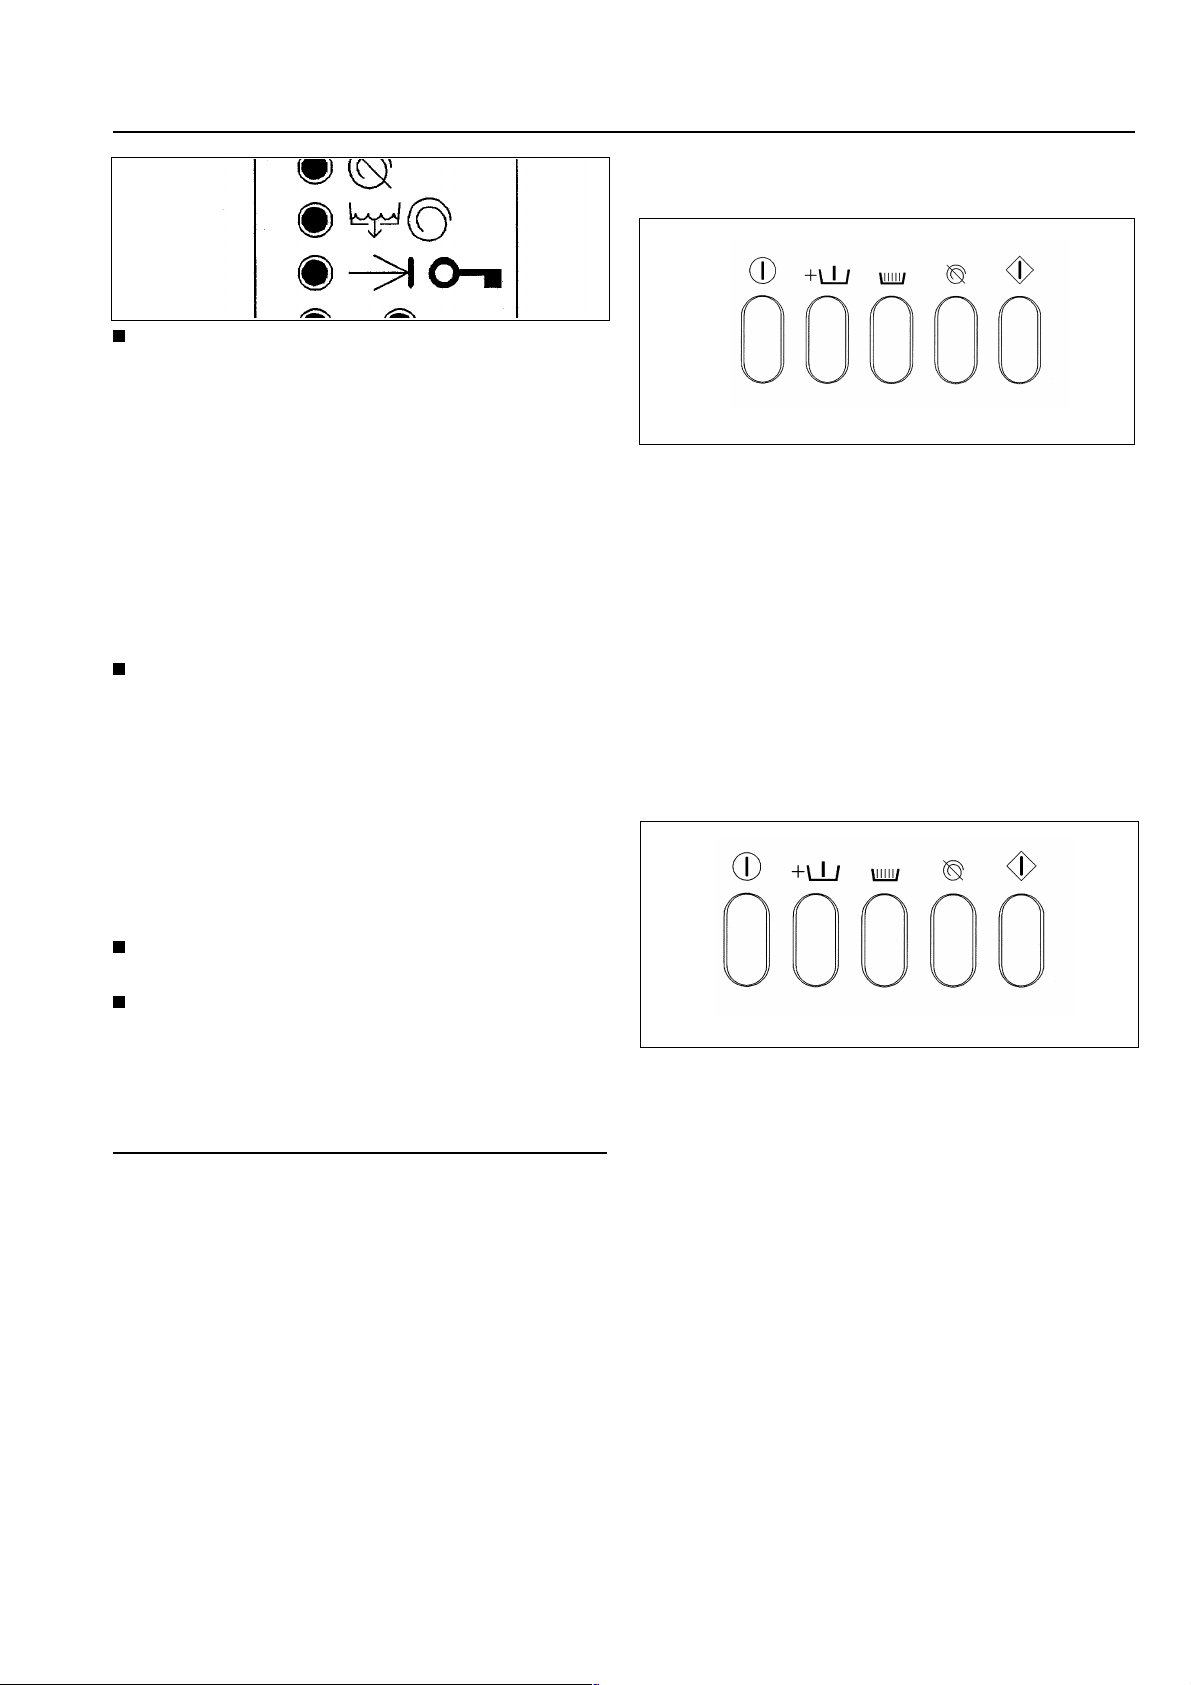
Waschmittel für das Hauptwaschen in
*
Schalter "Ein-Aus" eindrücken.
- Die Anzeigeleuchte "Ein" leuchtet auf
und die Anzeigeleuchte "Zeit" blinkt. -
M.-Nr. 04 506 752 13
Kammer II - und falls gewünscht - Waschmittel für Vorwäsche in Kammer I, Schö-
nungsmittel in Kammer § und Bleichmittel in die Kammer ohne Symbol eingeben.
Gebrauch
Waschmitteldosierung
Eine Überdosierung ist grundsätzlich zu vermeiden, da sie zur erhöhten Schaumbildung
führt.
Keine stark schäumenden Waschmittel verwenden.
Achtung! Um bei gasbeheizten Waschschleuderautomaten ein schnelles Zusetzen der Heizungsrohre zu vermeiden, wird empfohlen,
nur hochwertige Waschmittel zu verwenden.
Dosiermenge:
Es sind die Angaben des Herstellers zu berücksichtigen.
Wurde der Schalter "Ohne Schleudern" betätigt, wird das Waschprogramm im letzten Spülgang unterbrochen. Die Anzeigeleuchte "Ohne Schleudern" leuchtet auf.
- Die Wäsche bleibt schwimmend im
Wasser liegen. Schalter "Ohne Schleudern" erneut betätigen. - Es folgt Wasserablauf mit Endschleudern! -
– Soll das Programm ohne Schleudern
beendet werden, Programmwähler auf
(Extra Ablauf) stellen.
H
Gilt nur für WS 5100/5140 mit Gasheizung
Hinweise:
Das Schönungsmittel bzw. Bleichmittel darf
nicht über die Markierung hinaus eingefüllt
werden.
Bei Einsatz von Bleichmittel sind mindestens
4 Spülgänge zu programmieren ( siehe
Waschprogramm-Umprogrammierung und
Tabelle "Programmveränderungen").
*
Taste "Start" eindrücken. - Die Anzeige
"Zeit" erlischt und die Anzeige "Temperatur" leuchtet auf. -
- Das Waschprogramm läuft ab. -
Störungsmeldung "Zündstörung"
Wird auf der Anzeige "Zeit h" das Symbol
" y " angezeigt, dann liegt eine Zündstörung vor.
Den Zündvorgang -frühestens nach
1 Minute- durch Betätigung der Taste
"Entstörung" wiederholen.
Bleibt die durchgeführte Maßnahme ohne
Erfolg, dann ist zur Fehlerbeseitigung der
Kundendienst anzufordern.
Störungsmeldung "Flusenfilter verstopft"
Ertönt während eines Waschprogrammablaufs ein Dauerton, so ist der Flusenfilter zu reinigen (beschrieben unter Reinigung und Pflege "Flusenfilter reinigen").
14 M.-Nr. 04 506 752
Gebrauch Hinweise
Mit Vorwäsche
*
Öffnen der Fülltür nach Programmende.
Nach Aufleuchten der Anzeigeleuchte
"Ende" Tür durch Ziehen des Türgriffes
öffnen.
Hinweis:
Lässt sich die Fülltür nicht öffnen, ist gegen den Türgriff zu drücken und anschließend nochmals der Türgriff zu ziehen.
- Die Fülltür nie mit Gewalt öffnen! -
Wäsche entnehmen.
- Keine Wäschestücke in der Trommel
lassen. Diese Textilien können sonst beim
nächsten Waschprogramm einlaufen oder
andere Textilien verfärben. -
Sind keine weiteren Waschprogramme
mehr vorgesehen:
Hauptschalter (bauseitig) ausschalten.
*
Für stark verschmutzte Wäsche kann eine
Vorwäsche hinzugewählt werden.
Der Schalter ist nur dann wirksam, wenn das
Programm Koch- / Buntwäsche, Pflegeleicht
oder Fein / Synthetik gewählt wurde.
Nach einem Programmstart ist der Schalter
"Mit Vorwäsche" nicht mehr wirksam.
Ohne Schleudern
Wasserabsperrventile (bauseitig)
schließen.
Hinweise
Bleichmittel
Bleichen Sie nur Textilien, die mit dem Pflegesymbol y gekennzeichnet sind.
Die Zugabe von flüssigem Bleichmittel darf
nur in die dafür vorgesehene Einspülkammer
(ohne Symbol) erfolgen. Nur dann ist gewährleistet, dass das Mittel automatisch wäschegerecht zum 2. Spülgang eingespült wird (Kaltbleiche). Die Zugabe flüssiger Bleichmittel bei
Buntwäsche ist nur dann unbedenklich, wenn
der Textilhersteller in der Pflegekennzeichnung auf die Farbechtheit hinweist und das
Bleichen ausdrücklich erlaubt.
*
"Ohne Schleudern" kann in allen Programmen hinzugewählt werden.
Nach Programmwahl ist der Schalter "Ohne
Schleudern" einzudrücken.
Die Anzeigeleuchte "Ohne Schleudern" fordert durch Leuchten im Schritt "Ohne Schleudern" zur Programmfortführung auf. Das
Programm wird durch Herausdrücken des
Schalters "Ohne Schleudern" mit Schleudern
fortgesetzt.
Sollen die Programme ohne Schleudern ausgeführt werden, wird das Programm "H" (Extra Ablauf) angewählt. Das Ablaufventil wird
1 Minute geöffnet, ohne die Taste "Start" zu
betätigen.
M.-Nr. 04 506 752 15
Hinweise
Schleuderzeiten
- Nach dem letzten Spülgang und nicht betätigter Taste "Ohne Schleudern". -
Programm:
A = 7 Minuten
B, C und D= 1 Minute
E und F = 7 Minuten
Bei Überschreiten der zulässigen Unwucht
wird der Schleudervorgang unterbrochen. Der
Wiederanlauf geschieht automatisch bei Unterschreiten der zulässigen Unwucht.
Das nach Herstellerangabe aufbereitete
Stärkemehl dem einfließenden Wasser über
Kammer I zugeben.
Programm raffen
Mini Programm
Dieses Programm ist nur für leicht verschmutzte Wäsche gedacht. Setzen Sie bitte
eine entsprechend geringere Menge Waschmittel ein. Das Programm besteht aus einer
Hauptwäsche (Waschtemperatur) 40 oC, umprogrammierbar auf kalt, 50 oC oder 60 oC),
2 Spülgängen und dem Endschleudern.
Stärken
*
Stärken kann in den Programmen Koch- /
Buntwäsche und dem Mini Programm hinzugewählt werden.
Nach Programmwahl ist der Schalter
"Stärken" einzudrücken.
Wird der Programmpunkt "Stärken" erreicht,
leuchtet die Anzeigeleuchte "Stärken" auf.
Das Programm wird durch Herausdrücken
des Schalters "Stärken" fortgesetzt.
Soll ein Programm gerafft werden, so ist der
Programmwähler auf Position "Ende" zu
stellen. Die Programmablauf-Anzeigeleuchten
zeigen blinkend den jeweiligen Stand der
Programmraffung an. Eine erneute Programmanwahl bewirkt die Fortführung des Programmes.
Programmabbruch
bei aktiver Spitzenlastfunktion
Bleibt die Heizung im Thermostopschritt länger als 45 Minuten abgeschaltet, dann wird
das Waschprogramm abgebrochen.
Der Programmabbruch wird durch die Fehlermeldung "Heizung" angezeigt (die Anzeigeleuchte "Hauptwäsche" blinkt).
Schalter "Ein-Aus" heraus- und hereindrücken
(die Anzeigeleuchte "Hauptwäsche" erlischt).
Taste "Start" betätigen, das Programm wird
somit neu gestartet.
16 M.-Nr. 04 506 752
Hinweise
Spannungsausfall während des Waschvorganges / Manuelle Entleerung des Laugenbehälters und Entriegelung der Fülltür
Bei kurzzeitigem Spannungsausfall:
Das Programm bleibt in der zuletzt eingenommenen Position stehen.
Nach Spannungswiederkehr signalisiert die
Anzeige "Zeit" oder "Temperatur" durch
Blinken, dass eine Programmunterbrechung
vorlag.
*
Taste "Start" betätigen, das Programm wird
fortgesetzt.
Bei längerem Spannungsausfall:
Hauptschalter (bauseitig) ausschalten.
Programmwähler auf "Ende" stellen.
Zum Entnehmen der Wäsche muss zuerst
das Ablaufventil manuell geöffnet und danach
die Fülltür manuell entriegelt werden.
Wasserabsperrventile (bauseitig) schließen.
Fülltür öffnen und die Wäsche entnehmen.
Hinweis:
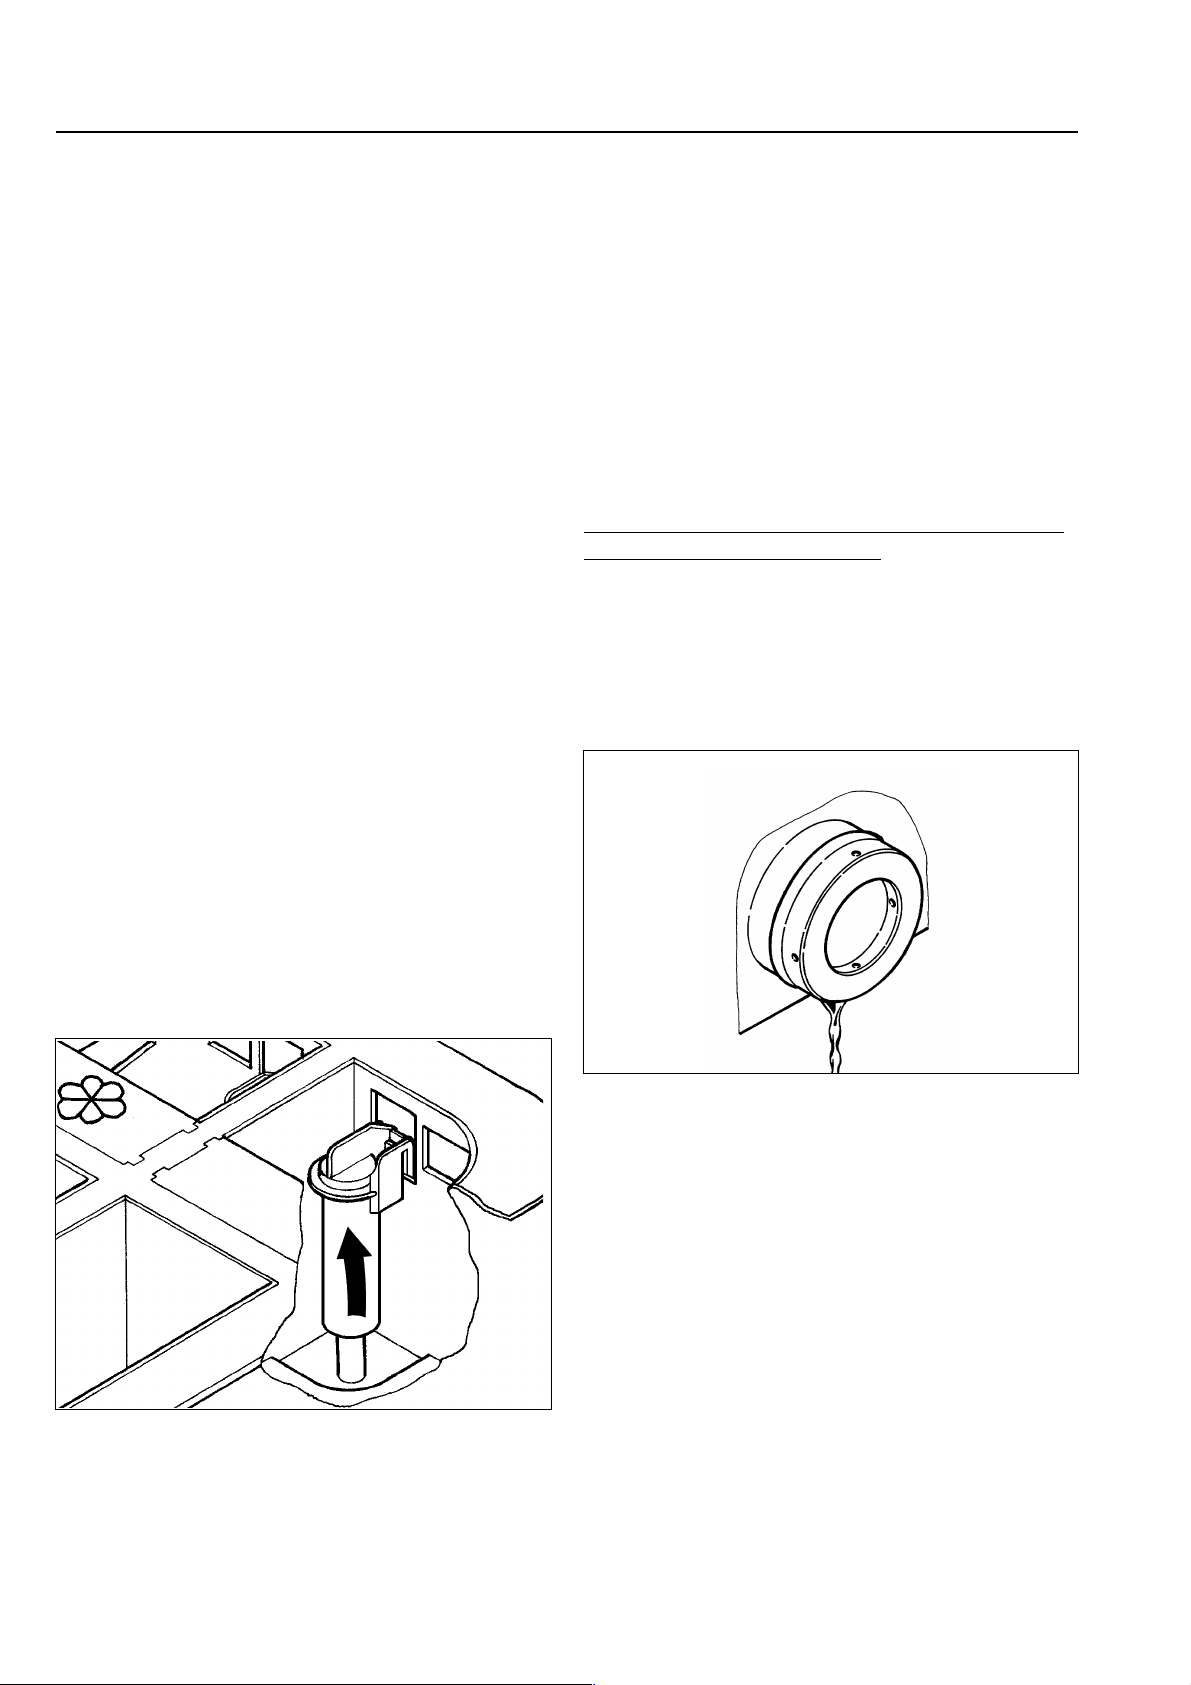
1. Den Schraubendreher zuerst in die Öffnung
(siehe Abbildung) stecken, hineindrücken und
festhalten.
2. Mit der rechten Hand gegen den Türgriff
drücken und anschließend durch Ziehen des
Türgriffes die Fülltür öffnen.
- Die Fülltür nie mit Gewalt öffnen! -
Programmabbruch
Ablaufventil durch Lösen der Entlüftungsschraube (Schlüsselweite 17) öffnen -nicht
ganz herausdrehen- und die Lauge ablaufen
lassen. Achtung! Aus der Schraubenöffnung
tritt geringfügig Wasser aus (ca. 100 ccm),
das mit einem geeigneten Behältnis aufgefangen werden sollte.
Entlüftungsschraube anschließend wieder
festschrauben und auf Dichtigkeit überprüfen.
M.-Nr. 04 506 752 17
Soll das Programm abgebrochen werden, so
ist der Programmwähler auf Position "Ende"
zu stellen und die Taste "Start" zu betätigen.
Hinweise
Die Tür läßt sich nicht öffnen
Gegen den Türgriff drücken, die Maschine
aus- und einschalten und anschließend nochmals den Türgriff ziehen.
Die Sicherung des Türgriffes ist ausgerastet.
Der Türgriff hat seine Funktion verloren. Die
Tür kann jetzt weder geöffnet noch geschlossen werden.
Das Ausrasten der Sicherung soll eine Beschädigung des Türgriffes und Schlosses
bei gewaltsamer Öffnung der Tür verhindern.
Startvorwahl
*
Nach dem Schließen der Fülltür und Eindrükken des "Ein-Aus" Schalters signalisiert ein
Blinken der Anzeigeleuchte "Zeit" die Möglichkeit der Startvorwahl.
Mit der Taste "Startvorwahl" kann in Schritten
von 30 Minuten, vor oder auch nach einer Programmwahl, eine Startvorwahl bis zu 9 Stunden und 30 Minuten eingegeben werden.
Wird bei der Anzeige 9 Stunden und 30 Minuten die Taste "Startvorwahl" nochmals betätigt, dann erlischt die Anzeige. Mit einer
weiteren Tastenbetätigung erscheint wieder
30 Minuten.
Nach Einstellung der Startvorwahl wird der
Vorgang mit der Taste "Start" abgeschlossen.
Aus der abnehmenden Zeitanzeige ist ersichtlich, wie lange es noch bis zum automatischen Programmstart dauert.
Kräftig gegen den Türgriff drücken, bis die Sicherung deutlich hörbar wieder einrastet.
- Die Tür kann wieder geöffnet oder geschlossen werden.
Vor Betätigung der Taste "Start" ist das Löschen der Startvorwahl durch Heraus- und
Hereindrücken des "Ein-Aus" Schalters möglich.
Nach dem Start kann nur über die Programmwähler-Stellung "Ende" und Betätigen der Taste "Start", die Startvorwahl und das vorher
gewählte Programm gelöscht werden.
Nach Ablauf der eingestellten Startvorwahl
startet das Programm, die Anzeigeleuchte
"Zeit" erlischt. Die Anzeige "Zeit min." / "Temperatur oC" zeigt die Wassertemperatur bis
zum Öffnen des Ablaufventils am Ende der
Hauptwäsche an. Danach Restzeitanzeige
bis Programmende.
18 M.-Nr. 04 506 752
Hinweise
Verändern einzelner Waschprogramme
durch Umprogrammierung
Einzelne Waschprogramme lassen sich individuell verändern und somit an unterschiedlichste Waschgewohnheiten und Waschverfahren anpassen.
Beispiel einer Umprogrammierung
*
Voraussetzungen:
Der Waschschleuderautomat muss ausgeschaltet und die Fülltür geschlossen sein.
Alle übrigen Drucktasten müssen ebenfalls
auf "Aus" stehen, also herausgedrückt sein.
Schalter "Ein-Aus" hereindrücken.
- Die Anzeigeleuchte "Ein" leuchtet auf und
die Anzeigeleuchte "Zeit" blinkt. -
*
Taste "Mit Vorwäsche" innerhalb von 4 Sekunden 2x herein- und herausdrücken.
Nach wenigen Sekunden:
Der Programmwähler muss auf Position
"Ende" stehen.
leuchtet auf der Anzeige "Zeit h" der Buchstabe "P" auf.
- Die Programmablauf-Anzeigeleuchten "Vorwäsche" und "Hauptwäsche" blinken. -
- Eine Umprogrammierung kann durchgeführt werden; siehe Beispiel nächste Seite. -
M.-Nr. 04 506 752 19
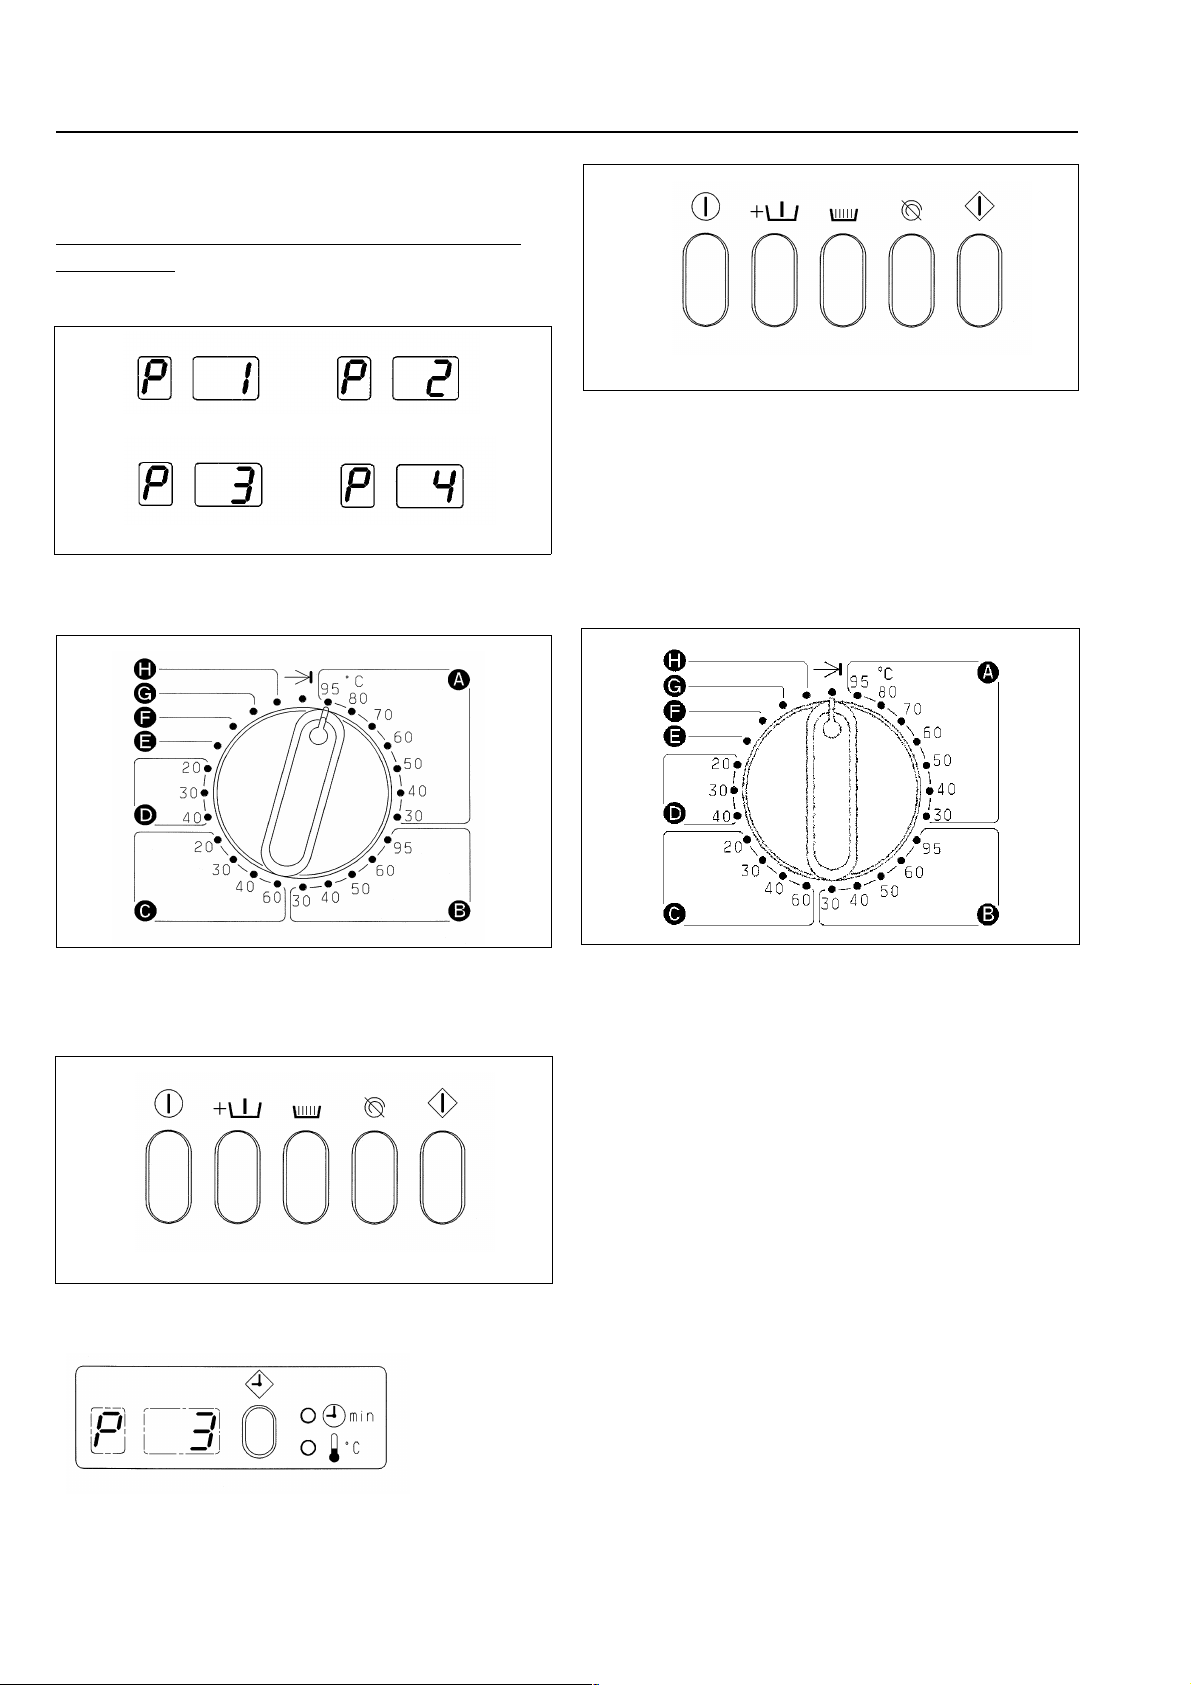
Hinweise
Beispiel:
Veränderung der Temperaturhaltezeit in der
Vorwäsche
von 4 Minuten auf 2 bzw. 8 oder 20 Minuten.
*
4 Minuten 2 Minuten
8 Minuten 20 Minuten
Gewählt werden 8 Minuten.
- Die Veränderung der Temperaturhaltezeit in
der Vorwäsche ist gespeichert, der Programmiervorgang beendet.-
Programmierung bitte in die Liste auf der
nächsten Seite eintragen.
Den Programmwähler auf Programm
/ 95 oC" stellen.
A
*
Die Taste "Start" so lange betätigen, bis auf
den Anzeigen “P 3" erscheint.
Programmwähler auf Position "Ende" stellen.
Weitere Möglichkeiten zur Programmveränderung auf nächster Seite.
Schalter "Ein-Aus" herausdrücken.
20 M.-Nr. 04 506 752

Hinweise
Programm-
veränderungen
Temperaturhaltezeit in der
Vorwäsche
Temperaturhaltezeit in der
Zusatzvorwäsche
Temperatur in der
Vorwäsche
Temperatur in der
Vorwäsche
Zusatzvorwäsche
Niveau in der
Vorwäsche
Niveau in der
Zusatzvorwäsche
Zwischenschleudern nach
der letzten Vorwäsche
Temperaturhaltezeit in der
Hauptwäsche
Niveau in der
Hauptwäsche
Reaktivieren
(Abkühlung der Flotte)
Hauptwäsche
Spülen
Sonderfunktionen
1)
Der zeitliche Wasserzulauf wird immer nur beim ersten Wasserzulauf ausgeführt. Zusätzlich muss Niveau I in der Vorwäsche, Zusatzvorwäsche und Hauptwäsche programmiert sein. Der zeitliche Wasserzulauf wird begrenzt auf Niveau III.
2)
Spezieller Wasserzulauf in der Vorwäsche bzw. in der Hauptwäsche (nur 1. Wasserzulauf). Bis Niveau I keine Waschbewegung. Von
Niveau I bis Niveau II Schongang. Ab Niveau II Normalgang und nachgetankt wird nur mit dem Rückschaltpunkt Niveau I auf Niveau I.
3)
Diese Funktion wird nur ohne Vorwäsche ausgeführt. Mit einer Vorwäsche wird in der Hauptwäsche immer nur auf Niveau I begrenzt.
4)
Eine Änderung der Standardoption - insbesondere, wenn die Standardoptionen der drei mit 4)gekennzeichneten Funktionen gleichzeitig
geändert werden sollen - ist nur nach vorheriger Absprache mit dem Kundendienst vorzunehmen.
Cool Down
(Zeitliche Abkühlung der
Flotte)
Spülzeit
Anzahl der Spülgänge
Niveau in den
Spülgängen 1 - 5
1 Minute Waschen
mit Ablauf
Letzter Spülgang mit
Warmwasser
Zeitlicher Wasserzulauf
Temperaturhaltezeit im
Miniprogramm
Temperatur im
Miniprogramm
Spülgänge im
Miniprogramm
Endschleuderzeit
Endschleuderzeit
Endschleuderzeit
3)
4)
4)
Position des
Programmwahl-
A
B
4)
C
D
E
F
G
H
*
schalters
Koch- / Bunt-
wäsche 95
Koch- / Bunt-
wäsche 80
Koch- / Bunt-
wäsche 70
Koch- / Bunt-
wäsche 60 oC
Koch- / Bunt-
wäsche 50
Koch- / Bunt-
wäsche 40
Koch- / Bunt-
wäsche 30
Pflegeleicht
o
95
C
Pflegeleicht
o
C
60
Pflegeleicht
o
50
C
Pflegeleicht
o
C
40
Pflegeleicht
o
30
C
Fein/Synthetik
o
60
C
Fein/Synthetik
o
40
C
Fein/Synthetik
o
C
30
Fein/Synthetik
o
C
20
Wolle 40 oC 0 30 Sek 45 Sek 90 Sek
Wolle 30
Wolle 20
Standard
1 *234
4 Min 2 Min 8 Min 20 Min
o
C
0 Min 4 Min 6 Min 10 Min
o
C
40
o
C
40
I
o
C
IIII
o
C
ja nein
o
C
6 Min 4 Min 12 Min 20 Min
2)
I
ja nein
ja nein
3 Min 3,5 Min 4 Min 4,5 Min
3452
II III I
nein ja
nein ja
o
C 6 Min 4 Min 2 Min 1 Min
o
C 40 oC kalt 50 oC 60 oC
2345
7 Min 5 Min 3 Min 11 Min
7 Min 5 Min 3 Min 14 Min
7 Min 5 Min 3 Min 1 Min
Optionen
o
C kalt 50 °C 60 oC
o
C kalt 50 °C 60 oC
2)
II I III
2)
II I III
Bemerkungen Programmierte
mit "0" keine Zusatzvorwäsche
nur für Koch- / Buntwäsche
und Pflegeleicht
nur für Koch- / Buntwäsche
III
und Pflegeleicht
nur für Koch- / Buntwäsche
o
≥60
C
nur für Koch- / Buntwäsche,
Pflegeleicht u. Fein/Synthetik
nur für Koch- / Buntwäsche,
Mini und Pflegeleicht
nur Koch- / Buntwäsche
o
C
≥60
nur für Spülgang 2 - 5
nur für Koch- / Buntwäsche,
Pflegeleicht, Fein/Synthetik
und Wolle
nur für Koch- / Buntwäsche,
Mini und Pflegeleicht
nur für Spülgang 2 - 5
Warmwasser Ventil I,
Warmwasser Ventil II und
Kaltwasser Ventil III
nur für den 1. Wasserzulauf
nur für Koch- / Buntwäsche
und Mini
nur für Extra Schleudern
nur für Extra Spülen und
Schleudern
Optionen
eintragen
1)
M.-Nr. 04 506 752 21

Hinweise
Zusatz-Programme
Die Programmierung dieser Programme darf
nur durch den Kundendienst vorgenommen
werden.
Programm "Sluice" (gilt für Großbritannien)
[2 x Vorspülen, Vorwäsche,
Hauptwäsche, 3 Spülgänge,
Endschleudern]
Programm "Thermische Desinfektion ohne
Vorwäsche"
[letztes Spülen mit 70 oC]
Programm "Chemothermische Desinfektion
ohne Vorwäsche"
[Hauptwäsche 60 oC (+2, -1 oC),
Haltezeit 10 Minuten und letztes
Spülen mit 70 oC]
Programm "Fäkal"
[3 x Vorspülen, Vorwäsche,
Vorspülen, Hauptwäsche,
3/4/5 Spülgänge, Endschleudern]
Mögliche Ursachen der erhöhten Schaumbildung:
– Waschmittelsorte
Verwenden Sie Waschmittel, die für gewerbliche Waschmaschinen geeignet
sind. Haushaltswaschmittel sind nicht geeignet.
– Überdosierung des Waschmittels
Beachten Sie die Dosierangaben des
Waschmittelherstellers und dosieren Sie
entsprechend der örtlichen Wasserhärte*.
– stark schäumendes Waschmittel
Setzen Sie ein weniger stark schäumendes Waschmittel ein oder ziehen Sie
einen Waschmittelanwendungstechniker
hinzu.
– sehr weiches Wasser
Programm "Thermische Desinfektion mit
Vorwäsche"
[Vorwäsche mit 95 oC (+2, -1 oC)
und Haltezeit 10 Minuten]
Programm "Prüfverfahren nach Sanfor"
[Hauptwäsche,
Haltezeit 40 Minuten,
2 Spülgänge
1. Spülen 60 oC, Haltezeit 6 Min.
2. Spülen 60 oC, Haltezeit 9 Min.,
Endschleudern]
Bei Wasser im Härtebereich 1 entsprechend den Angaben des Waschmittelherstellers weniger dosieren.
– Verschmutzungsgrad des Waschgutes
Bei leicht verschmutztem Waschgut entsprechend den Angaben des Waschmittelherstellers weniger dosieren.
– Rückstände im Waschgut wie z.B. Rei-
nigungsmittel
Zusätzliches Vorspülen ohne Temperatur,
ohne Waschmittel.
Mit Einweichmittel vorbehandelte
Wäsche vor dem Waschen gut spülen.
– geringe Beladungsmenge
Die Waschmitteldosierung entsprechend
verringern.
22 M.-Nr. 04 506 752

Hinweise
– Gasbeheizte Maschinen
Bei gasbeheizten Maschinen wird die Waschlauge über das Heizregister umgepumpt. Diese zusätzliche Bewegung der Lauge nutzt
das Waschmittel optimal aus, fördert aber die
Schaumbildung.
Beachten Sie die zuvor genannten Punkte.
Verwenden Sie ein schaumreduziertes
Waschmittel.
Bis zu 30 % unterdosieren je nach Waschmittel (nicht bei der Desinfektion).
Wasserhärten
Härte-
bereich
I weich 0 - 1,3 0 - 7
II mittel 1,3 - 2,5 7 - 14
III hart 2,5 - 3,8 14 - 21
IV sehr hart über 3,8 über 21
*) Wenn Sie den Härtebereich nicht kennen,
informieren Sie sich bei Ihrem Wasserversorgungsunternehmen.
Wasser-
eigen-
schaften
Gesamt-
härte in
mmol/l
deutsche
Härte
°d
M.-Nr. 04 506 752 23
Reinigung und Pflege
Reinigung und Pflege möglichst nach Gebrauch des Waschautomaten vornehmen.
Zur Reinigung des Waschautomaten darf kein
Hochdruckreiniger und kein Wasserstrahl benutzt werden.
Fremdrostbildung
Die Trommel und der Laugenbehälter sind
aus rostfreiem Edelstahl hergestellt. Eisenhaltiges Wasser oder eisenhaltige Fremdkörper
(z.B. Büroklammern, Eisenknöpfe oder Eisenspäne) die mit dem Waschgut eingebracht
werden, können zu Fremdrostbildung in der
Trommel bzw. dem Laugenbehälter führen.
Reinigen Sie in diesem Fall die Trommel bzw.
den Laugenbehälter regelmäßig und unmittelbar nach Auftreten des Fremdrostes mit handelsüblichen Edelstahlpflegemittel.
Die Türdichtungen sind auf eisenhaltige Rückstände zu kontrollieren und mit oben genannten Mitteln gründlich zu reinigen. Diese
Maßnahmen sind vorbeugend regelmäßig
durchzuführen.
Flusenfilter reinigen
- Gilt nur für WS 5100/5140 mit Gasheizung Das Sieb im Flusenfilter ist regelmäßig auf
Verflusung zu kontrollieren und nötigenfalls
zu reinigen. Die Kontrolle bzw. Reinigung
darf nur nach beendetem Waschprogramm
und entleertem Laugenbehälter durchgeführt
werden.
- Ein verstopfter Flusenfilter wird durch
einen Dauersummton während des
Waschprogrammablaufs angezeigt.-
Für die Reinigung des Flusenfilters ist folgende Reihenfolge einzuhalten:
1.Programmwähler auf "Extra Ablauf" stellen.
2.Nach Entleerung des Laugenbehälters den
Programmwähler auf "Ende" stellen.
Stellen Sie eine Schüssel oder ein ähnliches
Gefäß zur Aufnahme von etwa 2 Liter Lauge
unter den Flusenfilter.
Der Waschmitteleinspülkasten ist nach Gebrauch mit warmem Wasser gründlich von
Waschmittelrückständen und Verkrustungen
zu säubern.
Reinigen Sie ebenfalls die Saugheber der
Kammern für Waschhilfsmittel.
Öffnen Sie durch Linksdrehung des Deckels
- etwa eine halbe bis ganze Umdrehung - den
Flusenfilter.
Die im Flusenfilter verbliebene Lauge läuft
aus. - Vorsicht bei heißer Lauge! Falls erforderlich, ist das Auffanggefäß mehrmals zu entleeren.
Saugheber herausziehen, mit warmem
Wasser reinigen und anschließend in umgekehrter Reihenfolge wieder einsetzen (Saugheber muss eingehängt sein).
24 M.-Nr. 04 506 752
Reinigung und Pflege
Läuft keine Lauge mehr aus, dann schrauben
Sie den Deckel vom Flusenfilter ab. Sie entfernen damit gleichzeitig auch das Flusensieb
aus dem Flusenfilter.
Reinigen Sie das Flusensieb und das Gehäuseinnere des Flusenfilters.
Flusensieb wieder einsetzen und Deckel
durch Drehen nach rechts fest verschließen.
Bei einer längeren Stillstandzeit der Maschine
(ab 4 Wochen), ist die Trommel einige Umdrehungen zu drehen. Wiederholen Sie alle 4
Wochen die Drehung der Trommel, um Lagerschäden vorzubeugen.
Bei Störungen benachrichtigen Sie bitte den
Kundendienst.
Der Kundendienst benötigt Typ, Fabrikationsnummer (Fabr.-Nr.) und Materialnummer(M.Nr.). Alle Angaben finden Sie auf den Typenschildern:
Bei geöffneter Tür,
oder:
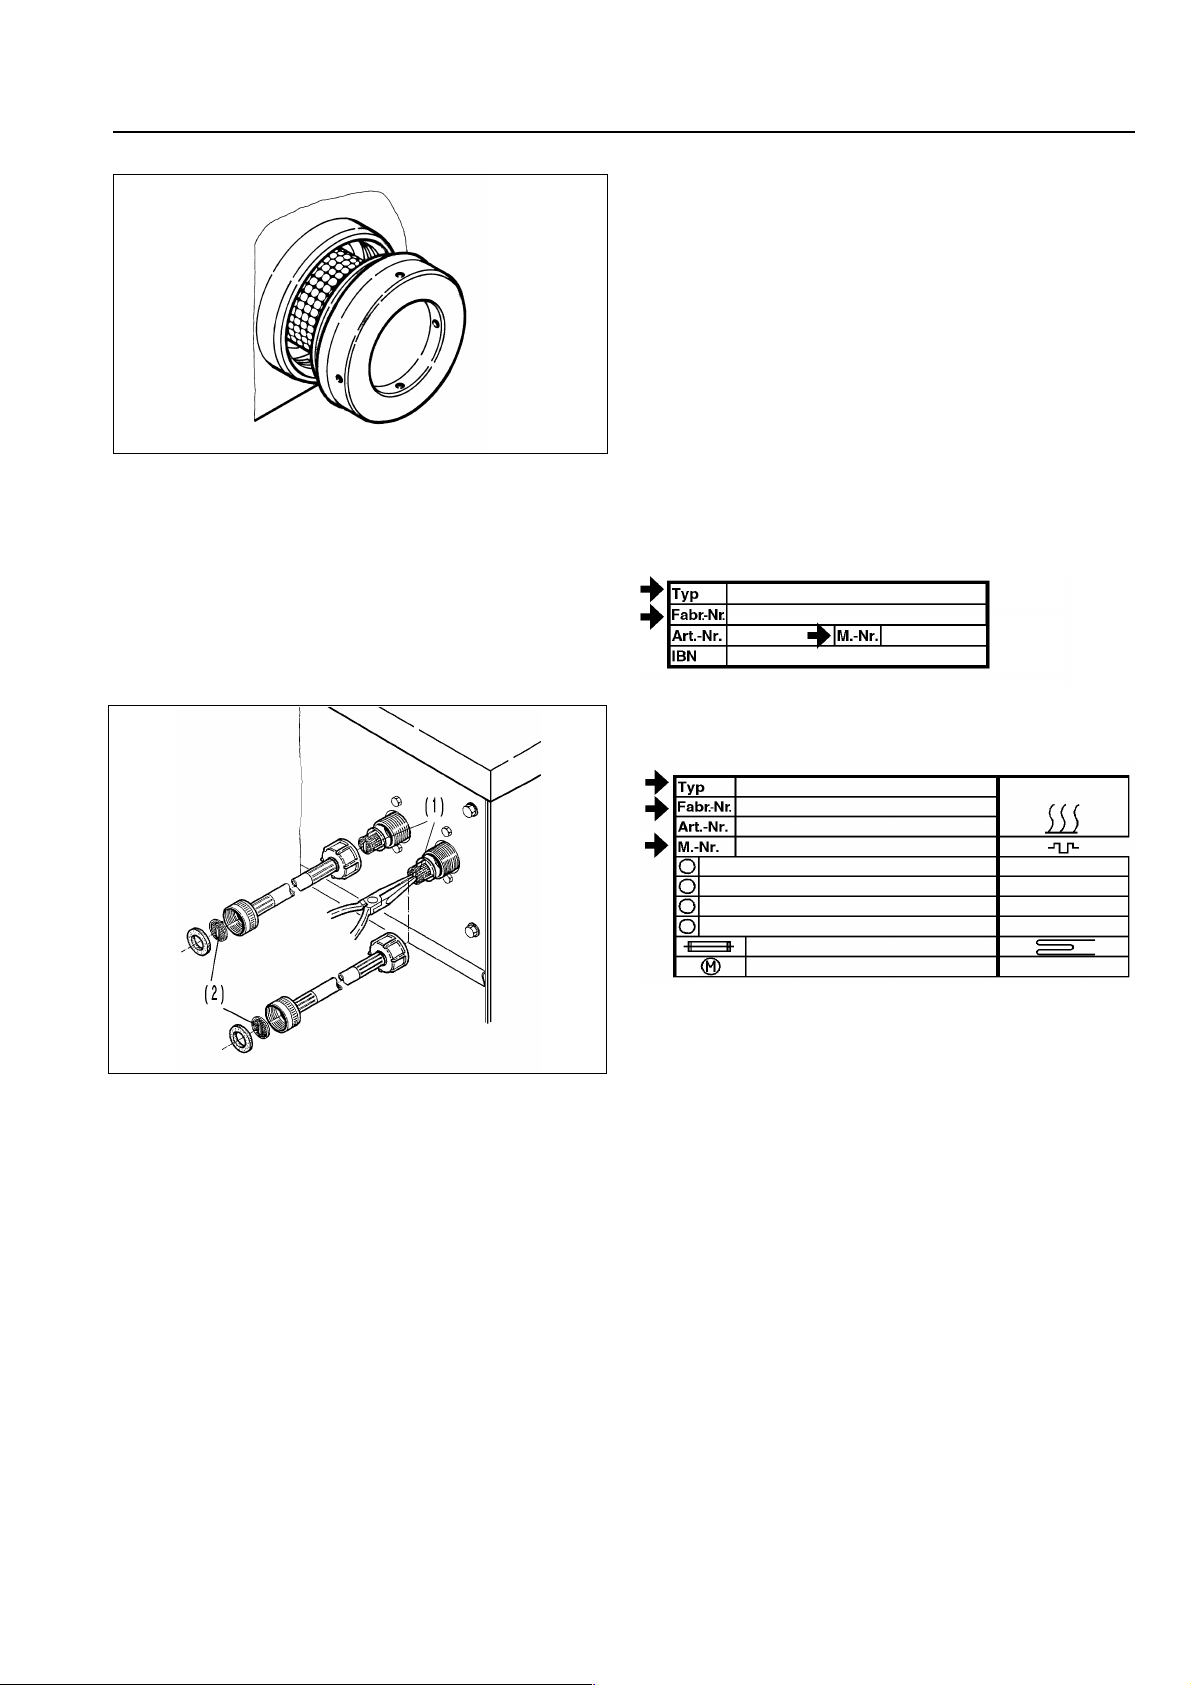
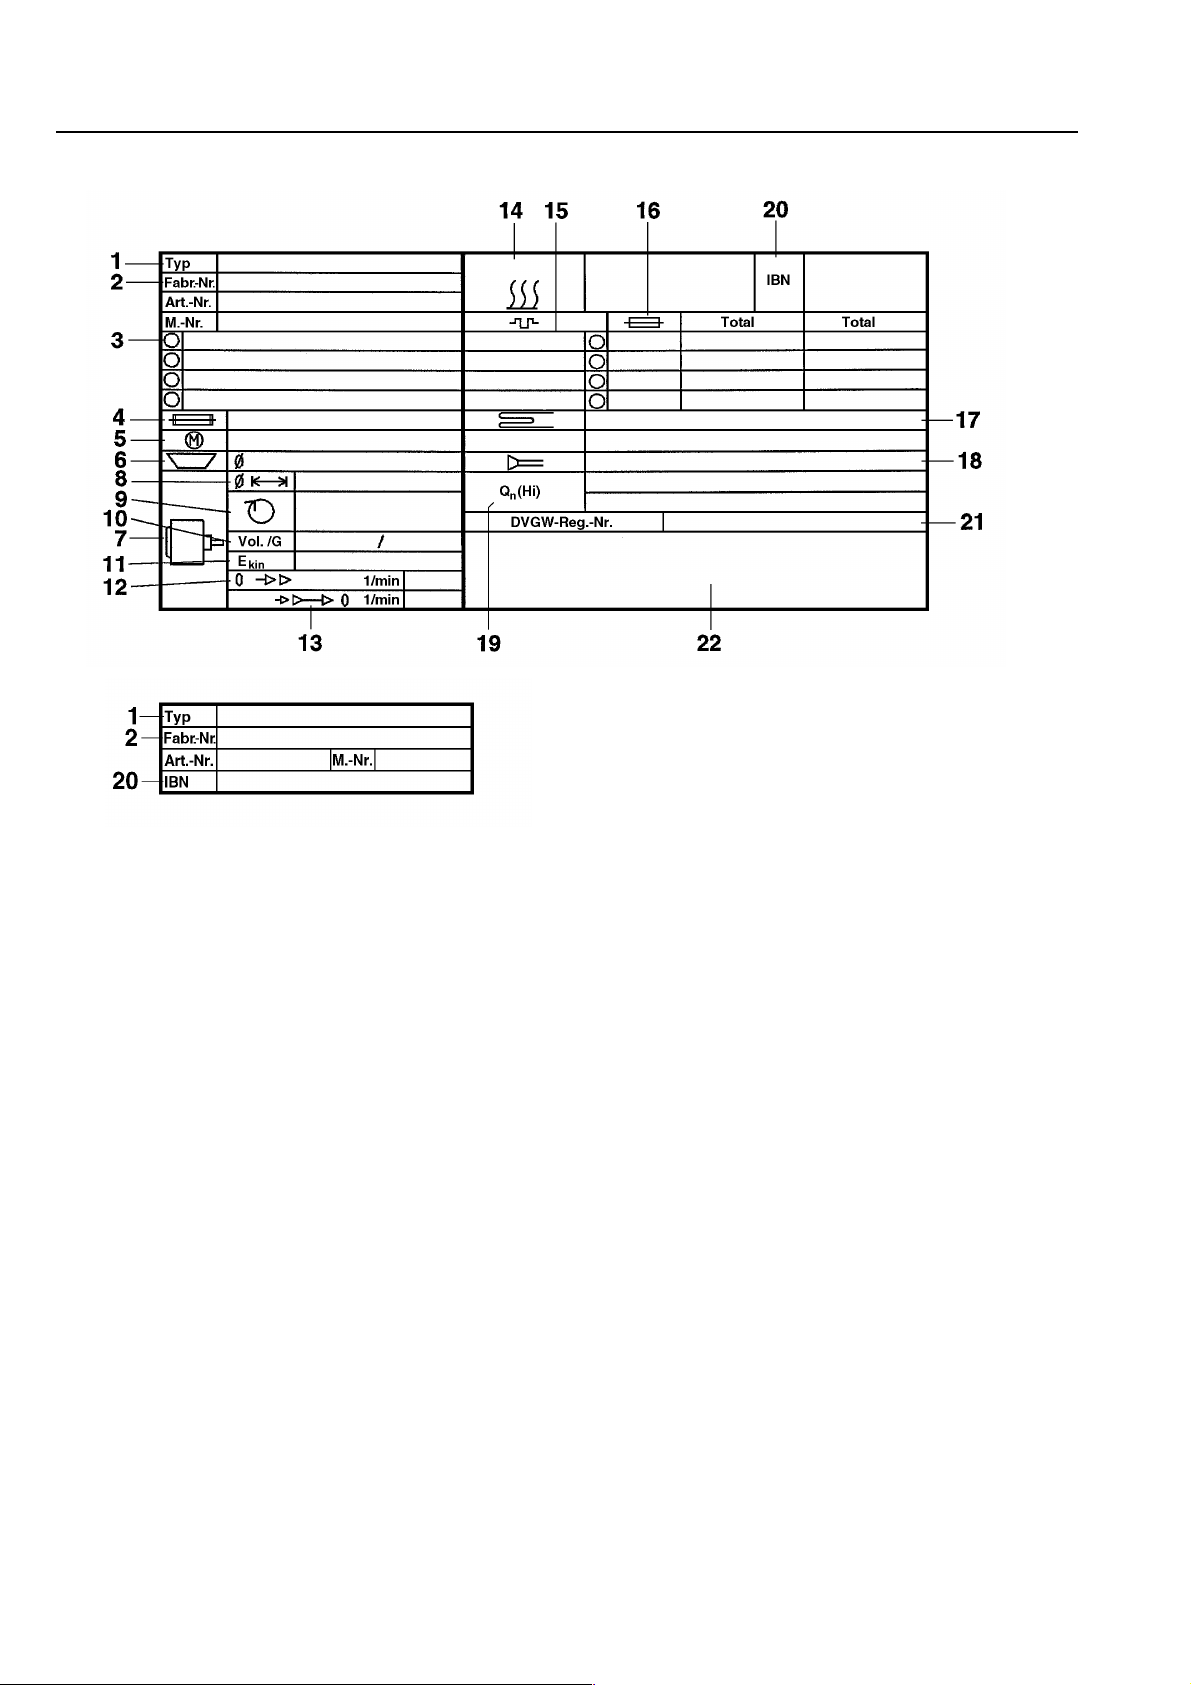
Die Siebe (1) und (2) sind von Zeit zu Zeit auf
Verschmutzung zu kontrollieren und gegebenenfalls zu reinigen.
Waschmaschinengehäuse, Schalterblende
und Kunststoffteile nur mit einem milden Reinigungsmittel oder einem weichen, feuchten
Tuch reinigen und anschließend trockenreiben.
Zur Reinigung der Gehäuseteile aus Edelstahl ist ein handelsübliches Edelstahlpflegemittel zu verwenden.
Scheuermittel zerkratzen die Oberfläche.
Damit der Waschautomat nach Gebrauch
austrocknen kann, ist die Fülltür nicht zu
schließen, sondern nur anzulehnen.
oben an der Maschinenrückseite.
Im Ersatzfall dürfen ausschließlich Original-Ersatzteile verwendet werden (auch in diesem
Fall benötigt der Kundendienst Typ, Fabrikationsnummer (Fabr.-Nr.) und Materialnummer
(M.-Nr.).
M.-Nr. 04 506 752 25
Bedeutung der Symbole auf dem Typenschild
1 Maschinentyp
2 Fabrikationsnummer/Baujahr
3 Spannung/Frequenz
4 Steuersicherung
5 Antriebsmotor
6 Tellerdurchmesser/Telleranzahl **
7 Trommeldaten
8 Trommeldurchmesser/Trommeltiefe
9 Schleuderdrehzahl
10 Trommelinhalt/Wäschetrockengewicht
11 Kinetische Energie
12 Hochlaufzeit
13 Bremszeit
14 Heizung
15 Elektroheizung
16 Sicherung (bauseitig)
17 Dampfheizung indirekt *
18 Dampfheizung direkt *
19 Gasheizung *
20 Inbetriebnahmedatum
21 DVGW-Reg.-N° (Wasser)
22 Feld für Prüfzeichen /
CE - 0085 (Gas)*
*) gilt nicht für WS 5080
**) gilt nicht für WS 5080 /5100 /5140
Geräuschemission
A-bewerteter Schalleistungspegel
Waschen Schleudern
WS 5080 65,6 dB 80,7 dB
WS 5100 63,0 dB 77,7 dB
WS 5140 69,3 dB 73,5 dB
gemessen nach DIN (IEC) 45 635
Kennzeichnung nach Maschinen-Lärmverordnung 3. GSGV § 1 1.a
26 M.-Nr. 04 506 752
Hinweise für den Aufsteller
Dieser Waschautomat ist nur zur Anwendung
für Wäsche, die nicht mit gefährlichen oder
entzündlichen Arbeitsstoffen durchsetzt ist,
bestimmt.
Um eventuelle Frostschäden zu vermeiden,
sollte der Waschautomat auf keinen Fall in
frostgefährdeten Räumen aufgestellt werden.
Die rot gekennzeichneten Transportsicherungen "A" und "B"
Waschautomaten durch Verstellen der
Schraubfüße waagerecht aufstellen. Der
Grundrahmen darf nicht aufliegen.
Maschinenbefestigung ist erforderlich.
Bei Sockelaufstellung muss der Waschautomat grundsätzlich befestigt werden (siehe beiliegenden Installationsplan).
Den Waschautomaten nicht auf Teppichboden stellen, wenn der Teppichboden die Ventilationsöffnungen am Gehäuseboden verschließen kann.
Wasseranschlüsse
Der Anschluss an die nach DIN 1988 erstellte
Versorgungsleitung muß über ein Wasserabsperrventil erfolgen. Diese Montage darf nur
ein zugelassener Installateur unter Einhaltung
der länderspezifischen Vorschriften vornehmen.
A
"A" (2 Stück),
B
"B" (2 Stück)
sind erst am Aufstellungsort zu entfernen.
Hierzu müssen Vorderwand und Rückwand
abgenommen werden.
- DVGW (Deutschland)
- ÖVGW (Österreich)
- SVGW (Schweiz)
- Vorschriften des zuständigen Wasserversorgungsunternehmens oder regionale Bauordnungen.
Wasserzulauf / -ablauf anschließen (siehe beiliegenden Installationsplan).
Für den Wasseranschluss müssen grundsätzlich die mitgelieferten Zulaufschläuche verwendet werden.
Damit der mit 90 oC gekennzeichnete
Warmwasserschlauch noch lange Jahre
druckfest bleibt, darf er nur an eine Warmwasserleitung mit maximal 70 oC angeschlossen
werden.
Verwenden Sie im Falle eines Austausches
nur Schlauchqualitäten mit einem Platzdruck
von mindestens 70 bar Überdruck und für
eine Wassertemperatur von mindestens 90
o
C.
Dieses gilt auch für die eingebundenen Anschlussarmaturen. Original-Ersatzteile erfüllen diese Anforderung.
M.-Nr. 04 506 752 27
Hinweise für den Aufsteller
Um einen störungsfreien Programmablauf zu
gewährleisten, ist ein Wasserdruck
(Fließdruck) von mindestens 1 bar / maximal
10 bar erforderlich.
Einlaufendes Warmwasser darf eine Temperatur von maximal 70 oC nicht überschreiten.
Anschluss nur an Kaltwasser
-Siehe beiliegenden Installationsplan.-
Vorschrift für Österreich
Für die Verbindungsleitung von der Anschlussstelle am Gerät mit der Innenanlage
sind nur die im § 12 Abs. 1 der Verordnung
zur Durchführung des Wasserversorgungsgesetzes 1960 aufgezählten Rohre zu verwenden.
Die Verwendung von Gummi- oder Kunststoffschläuchen als Druckverbindungsleitung zwischen Innenanlage und Gerät ist nur dann gestattet, wenn sie
– samt den eingebundenen Anschluss-
armaturen einem Mindestdauerdruck
von 15 bar standhält,
Elektroanschluss
Der Waschautomat darf nur an die auf dem
Typenschild angegebene Spannung und Frequenz angeschlossen werden.
Dieser Anschluss ist nur von einem zugelassenen Elektroinstallateur unter Beachtung der
VDE-Vorschriften und Sonderbestimmungen
der örtlichen Elektrizitätswerke vorzunehmen.
Die elektrische Ausrüstung der Maschine entspricht IEC 335-1, IEC 335-2-4, IEC 335-2-7.
Achtung!
Auf richtige Drehrichtung der Trommel beim
Schleudern - von vorne gesehen links herum achten. Bei falscher Drehrichtung sind 2 Phasen zu tauschen.
Gegen Überlastung sind die Motoren durch
Wicklungsschutz gesichert.
Die Elektroheizung ist werkseitig auf
- 9 kW (WS 5080)
- 9 kW (WS 5100)
-15 kW (WS 5140) eingestellt.
Der Waschautomat ist auf
– während der Inbetriebnahme des Gerä-
tes hinreichend beaufsichtigt und
– nach der jeweiligen Verwendung des
Gerätes durch Sperrung des Wasserzuflusses vor dem Gummi- oder Kunststoffschlauch zuverlässig außer Betrieb gesetzt oder überhaupt von der
Innenanlage getrennt wird.
- 6 kW (WS 5080)
- 6 kW (WS 5100)
-10 kW (WS 5140)
durch Abklemmen eines Heizkörpers einstellbar.
Umschaltbare Varianten
Variante Werkseitig geschaltet auf:
Elektro 3 AC 220-230 V 50 Hz /
3 N AC 380-400 V 50 Hz
Dampf 3 AC 220-230 V 50 Hz /
3 N AC 380-400 V 50 Hz
3 AC 220-230 V 50 Hz
3 N AC 380-400 V 50 Hz
Diese Einstellungen sind nur durch den Kundendienst vorzunehmen und die eingestellte
Heizleistung oder Spannung dauerhaft mit einem D auf dem Typenschild zu kennzeichnen.
Das Mindestflottenniveau zum Aktivieren der
Heizung beträgt 30 mm Wassersäule.
28 M.-Nr. 04 506 752

Hinweise für den Aufsteller
Gasanschluss
Den Gasanschluss darf nur ein zugelassener
Installateur unter Einhaltung der länderspezifischen Vorschriften wie zum Beispiel:
- DVGW-TRGI, DVGW-TRF (Deutschland)
- ÖVGW-TR Gas, ÖVGW-TRF (Österreich)
- SVGW-Gas (Schweiz) sowie
- Vorschriften des zuständigen Gasver sorgungsunternehmens
- regionale Bauordnungen und
- Feuerungsverordnungen vornehmen.
Beachten Sie den beiliegenden Installationsplan und die Installationsanweisungen, sie
sind wichtig für den Gasanschluss.
Die Gasheizung ist werkseitig entsprechend
der gastechnischen Angaben auf dem Gerät
(siehe Aufkleber auf der Maschinenrückseite)
eingestellt.
Bei Wechsel der Gasfamilie ist ein Umbausatz
beim Kundendienst anzufordern (Maschinentyp und Maschinennummer, sowie die Gasfamilie, Gasgruppe, den Gasanschlussdruck
und das Aufstellungsland angeben).
Beachten Sie bitte die Installationsanweisung
für gasbeheizte Geräte. Diese Umstellung
darf nur von einem zugelassenen Fachmann
vorgenommen werden.
Nach erfolgtem Gasanschluss sind unbedingt
alle demontierten Außenverkleidungsteile wieder zu montieren.
Reparaturen an Gasgeräten nicht selbst
durchführen! Schäden dürfen nur durch Fachleute behoben werden.
Wenden Sie sich bitte umgehend an den
Werkkundendienst oder an einen autorisierten Fachhändler.
Dampfanschluss
Den Dampfanschluss darf nur ein zugelassener Installateur vornehmen.
Beachten Sie den beiliegenden Installationsplan und die Installationsanweisung, sie
sind wichtig für den Dampfanschluss.
Nach erfolgtem Dampfanschluss sind unbedingt alle demontierten Außenverkleidungsteile wieder zu montieren.
M.-Nr. 04 506 752 29

EG-Konformitätserklärung
Dokument-Nr.: 07133950
Monat.Jahr: 07.2007
Hersteller: Miele & Cie. KG
Anschrift: Industriestrasse 3
D - 31275 Lehrte
Produktbezeichnung: Waschautomat
Typenbezeichnung: WS 5080 / 5100 / 5140
Warenzeichen: Miele
Das bezeichnete Produkt stimmt mit den Vorschriften folgender Europäischer Richtlinien
überein:
Nummer:-Beschreibung 2006/42/EG: Maschinenrichtlinie mit Änderungen
89/336/EWG: EMV Richtlinie mit Änderungen
Harmonisierte Europäische Norm: EN ISO 10472-1 :1997
EN ISO 10472-2 :1997
EN 60204-1 :2006
EN 61770 :1999 + Corrigendum December 2005
+ A1 :2004 + A2 :2006
EN 55014–1 :2006
EN 55014–2 :1997 + A1:2001
EN 61000–3–2 :2006
EN 61000–3–3 :2006
Anbringung der CE-Kennzeichnung: 2007
Ort, Datum: Lehrte, 10.07.2007
Rechtsverbindliche Unterschrift:
Leitung Konstruktion u. Entwicklung Leitung Gerätefertigung
Hr. Dr. Köckerling Hr. Krimpmann
30 M.-Nr. 04 506 752

M.-Nr. 04 506 752 31

M.-Nr. 04 506 752 31

32 M.-Nr. 04 506 752

Contents
Warning and safety instructions . . . . . . . . . . . . . . . . . . . . . . . . . . . . 34
Caring for the environment . . . . . . . . . . . . . . . . . . . . . . . . . . . . . . . 37
Description of the machine . . . . . . . . . . . . . . . . . . . . . . . . . . . . . . . 38
- Description of the control panel . . . . . . . . . . . . . . . . . . . . . . . . . . . . . 40
- Fault indicator lights . . . . . . . . . . . . . . . . . . . . . . . . . . . . . . . . . . . 40
Operation . . . . . . . . . . . . . . . . . . . . . . . . . . . . . . . . . . . . . . . . . 42
- Loading the machine . . . . . . . . . . . . . . . . . . . . . . . . . . . . . . . . . . 42
- Programme and temperature selection . . . . . . . . . . . . . . . . . . . . . . . . . 42
- Adding detergent . . . . . . . . . . . . . . . . . . . . . . . . . . . . . . . . . . . . 42
- Detergent dispensing . . . . . . . . . . . . . . . . . . . . . . . . . . . . . . . . . . 43
- Fault message "ignition fault" and "blocked filter" . . . . . . . . . . . . . . . . . . . . 43
- Opening the door and removing laundry . . . . . . . . . . . . . . . . . . . . . . . . 44
Notes . . . . . . . . . . . . . . . . . . . . . . . . . . . . . . . . . . . . . . . . . . . 44
- Bleaching agents . . . . . . . . . . . . . . . . . . . . . . . . . . . . . . . . . . . . 44
- With pre-wash . . . . . . . . . . . . . . . . . . . . . . . . . . . . . . . . . . . . . . 44
- No spin (Rinse hold) . . . . . . . . . . . . . . . . . . . . . . . . . . . . . . . . . . . 44
- Spin times . . . . . . . . . . . . . . . . . . . . . . . . . . . . . . . . . . . . . . . . 44
- Short programme . . . . . . . . . . . . . . . . . . . . . . . . . . . . . . . . . . . . 45
- Starching . . . . . . . . . . . . . . . . . . . . . . . . . . . . . . . . . . . . . . . . 45
- Skip programme stage . . . . . . . . . . . . . . . . . . . . . . . . . . . . . . . . . 45
- Programme cancellation during peak load cut-out . . . . . . . . . . . . . . . . . . . 45
- Power cut during a wash programme / Manually emptying
the suds container and unlocking the drum door . . . . . . . . . . . . . . . . . . . . 46
- Programme cancellation . . . . . . . . . . . . . . . . . . . . . . . . . . . . . . . . . 46
- Delay start . . . . . . . . . . . . . . . . . . . . . . . . . . . . . . . . . . . . . . . . 47
- Re-programming a wash programme . . . . . . . . . . . . . . . . . . . . . . . . . . 49
- Additional programmes . . . . . . . . . . . . . . . . . . . . . . . . . . . . . . . . . 51
- Possible reasons for increased levels of foaming . . . . . . . . . . . . . . . . . . . . 51
Page
Cleaning and care . . . . . . . . . . . . . . . . . . . . . . . . . . . . . . . . . . . . 53
Symbols on the data plate . . . . . . . . . . . . . . . . . . . . . . . . . . . . . . . 55
For the installer/electrician
Removing the transit fitting . . . . . . . . . . . . . . . . . . . . . . . . . . . . . . . . 56
Screw feet . . . . . . . . . . . . . . . . . . . . . . . . . . . . . . . . . . . . . . . . . 56
Plumbing . . . . . . . . . . . . . . . . . . . . . . . . . . . . . . . . . . . . . . . . . 56
Water inlet/drainage . . . . . . . . . . . . . . . . . . . . . . . . . . . . . . . . . . . . 56
Electrical connection . . . . . . . . . . . . . . . . . . . . . . . . . . . . . . . . . . . 57
Electric heating . . . . . . . . . . . . . . . . . . . . . . . . . . . . . . . . . . . . . . 57
Gas connection . . . . . . . . . . . . . . . . . . . . . . . . . . . . . . . . . . . . . . 58
Steam connection . . . . . . . . . . . . . . . . . . . . . . . . . . . . . . . . . . . . . 58
EU Declaration of Conformity . . . . . . . . . . . . . . . . . . . . . . . . . . . . . . 59
Guarantee . . . . . . . . . . . . . . . . . . . . . . . . . . . . . . . . . . . . . . . . . 60
The washer-extractor must be installed by
an approved service technician or
authorized Service Dealer.
M.-Nr. 04 506 752 33

Warning and Safety instructions
To avoid the risk of accidents or damage to
the machine read the operating instructions
through before using it for the first time.
Appropriate use of the machine
This washer extractor is only intended for
items of laundry which have not been impregnated with dangerous or inflammable substances.
Only machine wash articles which pos-
sess a care label announcing they are suitable for machine washing.
It is the operator’s responsibility to ensure
that the standard of disinfection in thermal
as well as chemo thermal procedures is maintained (in accordance with § 18 IFSG) by carrying out suitable validation tests. These
procedures should be checked on a regular
basis, either thermo-electrically using loggers,
or bacteriologically with bio indicators.
The operator must pay particular attention to
maintaining the correct parameters in the
procedure, including temperature and with
chemo thermal programmes the chemical concentration used. Disinfection programmes
must not be interrupted, as this can have a limiting effect on the disinfection result.
On no account must solvents of the kind
used for dry cleaning be used in this
machine. There may be the danger of fire or
explosion.
Never use or store petrol or petroleum ba-
sed substances or any easily inflammable
substances near the machine. Do not use the
machine lid as a resting place.
Danger of fire or explosion.
Technical and electrical safety
The electrical safety of this appliance can
only be guaranteed when continuity is
complete between the appliance and an effective earthing system which complies with
local and national regulations.It is most important that this basic safety requirement is regularly tested by a qualified electrician. The manufacturer cannot be held liable for the
consequences of an inadequate earthing system.
Do not damage, remove or bypass the safety features and controls on the machine.
Where there is any damage to the machine
or to the cable insulation the machine must
not be used until it has been repaired.
Any removable outer panels must be in
place, and all moving or electrical parts
shielded before the machine is operated.
The machine is only completely isolated
from the electricity supply either when
switched off at the wall isolator, or the mains
fuse is withdrawn from the socket.
Repairs to machines operating with
electricity, gas or steam should only be undertaken by a suitably qualified service engineer to ensure safety. Unauthorised repairs
could be dangerous.
Never attempt to force the machine door
open.To ensure the correct functioning of
the door lock safety mechanism the handle is
fitted with a break line.
Faulty components should only be exchan-
ged for Miele original spare parts. Only
when these parts are fitted can the safety
standards of the machine be guaranteed.
The very best materials are used in the
manufacture of this machine, and every
care is taken in its manufacture. However,
with time, deterioration of parts can occur,
especially with rubber components such as
hoses. This should be borne in mind if operating the machine without supervision. Check
the inlet hoses regularly for signs of deterioration and replace in good time, to avoid leaks
and subsequent damage.
Safety precautions to take if you smell
gas - applies only to gas-heated washer
exractors.
N.B.: Natural gas usually has no smell of its
own. In the U.K. a smell is added by British
Gas for safety reasons.
If you smell gas you must act immediately.
Extinguish any flames.
34 M.-Nr. 04 506 752

Warning and Safety instructions
Do not create any electrical sparks: e.g.
do not insert or withdraw any electrical
plugs or operate electrical switches such
as lights and door bells.
Do not enter a room holding a torch or
candle etc. if there is a smell of gas in the
room.
Do not light cigarette lighter or matches.
Do not smoke.
Open all windows and doors.
Close any shut-off valves at the gas connection or mains supply immediately.
Shut off the gas-valve next to the machine.
If all gas valves are closed but there is still
the smell of gas in the room you should
call your local gas supplier immediately.
Important
Before signing off any commissioning, maintenance, conversion or repair work as finished, all gas pipework from the manual isolating valve to the burner nozzles must be
checked for soundness. Pay special attention
to the test points on the multifunction control,
the connection pressure monitor and the burner setting pressure. The tests must be carried out with the burner switched on and switched off.
Use of the machine
This washer extractor is not intended for
use by persons (including children) with
reduced physical, sensory or mental capabilities, or lack of experience or knowledge, unless they have been given supervision or instruction concerning its use by a person
responsible for their safety.
Never allow children to play in, on or near
the washer extractor, or to operate it themselves. Please supervise its use by the elderly or infirm.
Remember that the door porthole glass
can become hot during the operation of
the machine. Do not let children touch it.
When washing with high temperatures hot
steam will come out of the Air gap at the
side of the machine.
Always make sure the drum is stationary
before reaching in to remove washing. Reaching into a moving drum is extremely dangerous.
Water used for washing and rinsing must
not be used as drinking water. It must be
discharged into a proper sewerage system.
The machine should only be operated un-
supervised when there is a floor drain
(gully) in the direct vicinity of the machine.
Disinfecting and cleaning agents often
have compounds containing chlorides in
them. If these agents dry on to stainless steel
surfaces, the residual chlorides will attack the
steel and can cause rusting. To protect your
machine from rust damage, we recommend
only using chloride free disinfecting and cleaning agents for washing and disinfecting programmes and for cleaning stainless steel surfaces of the machine itself. If you are not sure
about a particular agent, contact the manufacturer of that agent for advice. If you accidentally spill an agent containing chlorides on
the machine it should be rinsed off with water
and dried using a soft cloth.
Proprietary dyes, dye removers and de-
scaling agents may only be used in this
machine if the manufacturer expressly states
that they are suitable for use in a washing
machine. There may be the danger of fire or
explosion.
Always follow the instructions of the che-
mical manufacturer when using cleaning
agents and special application chemicals.
Only use such chemicals for the purpose and
in the situation specified by the manufacturer
in order to avoid the danger of adverse chemical reactions and material damage. If in doubt
check the suitability of the product for use in
this machine with the manufacturer before
using it.
M.-Nr. 04 506 752 35

Warning and Safety instructions
Where a chemical cleaning agent is re-
commended on technical application
grounds, this does not imply that the manufacturer of the machine takes responsibility for
the effect of the chemical on the material of
the items being cleaned or on the machine.
Please be aware that changes in formulation,
storage conditions etc., which may not be publicised by the chemical producer, can have a
negative effect on the cleaning result.
Laundry that was soiled with biological
oils or fat should be washed using a suitable detergent and/or wash programme. It
must also be inspected after washing. If oils
or fat are not sufficiently removed they could
cause the laundry to self ignite during the
drying process.
On no account use high pressure clea-
ners or hose down the machine.
Use of accessories
Accessory parts may only be fitted when
expressly approved by Miele. If other
parts are used, guarantee, performance and
product liability claims may be invalidated.
Anti-chlorine treatment
Anti-chlorine treatment has to be carried out
immediately after chlorine bleach has been
used. Hydrogen peroxide and oxygen based
cleaning and bleaching agents must only be
used in programmes specified for their use.
Any wash performance problems should be
discussed with the manufacturer of the cleaning / bleaching product in the first instance.
With thiosulfate, especially when used with
hard water, gypsum can form, which can lead
to incrustations on laundry or deposits in the
machine.
The exact quantity of additives and the treatment temperatures required must be set and
tested on site in accordance with the dosage
recommendations of the detergent and additive manufacturers. The laundry must also be
tested to make sure it contains no active chlorine residues after processing.
Disposal of old machines or appliances
Chlorine and component damage
Notes on using chlorine bleach and perchlorethylene
Frequent use of chlorine increases the
risk of component damage.
The use of agents containing chlorine, such
as sodium hypochlorite and chlorine bleach in
powder form, can damage the protective surface of stainless steel and cause corrosion.
Factors affecting this are chlorine concentration levels, contact time and temperature. It is
therefore advisable to avoid the use of such agents. Oxygen based bleaching agents
should be used instead.
If, however, chlorine based bleaching agents
have to be used for particular types of soiling,
then anti-chlorine measures must also be carried out. If this is not done irreparable damage can occur to components in the machine and to laundry.
When disposing of an old washer extrac-
tor first make it unusable. Disconnect from
all services, cut off the cable and the plug
from the cable. Make the door lock inoperative, so that children cannot accidentally shut
themselves in. Make appropriate arrangements for the safe disposal of the appliance.
All personnel working with this machine
must be fully trained in all aspects of its use
and safety.
Keep these instructions in a safe place.
36 M.-Nr. 04 506 752

Caring for the environment
Disposal of the packing material
The transport and protective packing has
been selected from materials which are environmentally friendly for disposal and can normally be recycled. Packaging e.g. cling film,
polystyrene and plastic wrappings must be
kept out of the reach of babies and young
children. Danger of suffocation. Rather than
just throwing these materials away, please ensure that they are recycled.
Disposal of your old machine
Electrical and electronic machines often contain materials which, if handled or disposed of
incorrectly, could be potentially hazardous to
human health and to the environment. They
are, however, essential for the correct functioning of your machine. Please do not therefore dispose of it with your household waste.
Please dispose of it at your local community
waste collection/recycling centre, and ensure
that it presents no danger to children while
being stored for disposal.
It should be unplugged or disconnected from
the mains electricity supply by a competent
person. See the "Warning and Safety" section
of this booklet for further details.
M.-Nr. 04 506 752 37

Description of the machine
Control panel
12345 6
1 "Reset" button 4 Programme sequence indicator lights
(only on washer-extractors with gas heating)
2 Pushbutton switches 6 Emergency cut-off switch
3 Temperature and remaining time display
and selector button
5 Programme and temperature selector switch
Detergent dispenser box
Control panel
Drum door
Plinth
(optional)
Floor drain
(gully)
Stopcocks Mains switch (isolator)
Water outlet
WS 5080/5100/5140
This machine is constructed in accordance with IEC 60204-1:2005.
38 M.-Nr. 04 506 752

Description of the machine
9
10
12345
1 = “On/Off” button
2 = “With pre-wash” button
For heavily soiled washing
- only use with programmes A,B and
C if required.
3 = "Starch" button
Press this button to select the starch
function. It can only be used with pro-
grammes A and E .
4 = "No spin" button (Rinse hold)
Press this button if the washing is not to
be spun (after the final rinse).
67 8
6 = Display “Time hours”
7 = Display “Time minutes”
This displays the remaining length of the
selected programme or how much time
is left before a programme starts if “Delay start” was selected.
or “Temperature in °C”
Temperatures above 20°C are displayed
in 5°C steps.
8 = "Delay start"
This is used to delay the start time of a
programme by up to 9 hours and 30 minutes. See page 47 for a detailed explanation.
5 = "Start" button
Press this button to start the programme.
9 = "Time" indicator light
Indicates a time in display 6 and 7.
10 = "Temperature °C" indicator light
Indicates a temperature in °C in display 7.
M.-Nr. 04 506 752 39

Description of the machine
11
11 =Programme sequence indicator lights
On
Pre-wash
Main wash
Rinse
Starch
Rinse
Without spin*
Spin
End/Door
Fault
Water inlet Drain
Explanation:
“Level”
Fault in the water level system (water level)
“Heating”
Fault in the heating up system
“Operation”
Operation fault
“Door”
Fault in the locking mechanism. Open the
door manually (see “Power cut during a wash
process”).
If one of the fault indicator lights listed above
flashes an approved Service Engineer must
be called to remedy the fault.
“Water inlet”
Indicates an insufficient/inadequate water
supply eg. stopcocks turned off, or water inlet
filters blocked.
“Drain”
The drain outlet from the machine is blocked
or the drain valve is defective.**
After rectifying the fault or error the wash programme will need to be started from the beginning again.
**) a defective drain valve should only be repaired by an approved Service Engineer.
*) rinse-hold
Fault indicator lights
A fault or malfunction is indicated by a
flashing indicator light.
Level
Heating
Operation
Door
Water inlet Water outlet
Only refers to WS 5100 and WS 5140
with gas heating
Fault message "Heating"
The "Heating" indicator light flashes if there is
an interruption to the on-site gas supply to the
machine, for example if the gas stop valve is
not open. If any other lights blink at the same
time, this is of no further significance.
Turn on the gas stop valve. Restart the
machine by first releasing the On-Off button
and then pushing it in again, and pressing the
"Start" button.
If the "Heating" indicator light still flashes after
this, call your Service engineer to remedy the
fault.
40 M.-Nr. 04 506 752

Description of the machine
12
12 = Programme and temperature selector
switch
The programme selector switch is used
to select the required wash programme.
A
Cottons
B
Minimum iron
14
14 = Emergency cut-off switch
To be operated only in an emergency.
After removing the cause of danger this
switch can be re-set by turning the
knurled disc in a clockwise direction.
After re-setting, the display for “Time” or
“Temperature” will flash. The “Start” button
needs to be pressed again to continue the interrupted programme.
C
Delicates/synthetics
D
Woollens
E
G
H
Short programme
F
Separate rinse and spin*
Separate spin*
Separate drain*
r End
*) Please note
Switch settings F, G and H
These settings have also been described
elsewhere as:
F - Extra rinse and spin
G - Extra spin
H - Extra drain
The respective functions are the same.
13
13 = "Reset" button
(only on WS 5100 / WS 5140 with gas heating)
After an ignition fault wait for at least
1 minute before operating this button.
M.-Nr. 04 506 752 41

Operation
Commissioning
The washer-extractor must be installed by
an approved Customer Service Engineer or
authorized Dealer.
Open the stopcocks (on site)
Switch on at the mains (on site)
Empty all pockets
Foreign objects, (eg nails, coins, paper
clips etc) can cause damage to textiles and
components in the machine.
Load the drum
Select the required programme and tempe-
rature (eg. programme A Cottons 95°C).
Laundry - Weight of load (Dry laundry)
WS 5080 WS 5100 WS 5140
Programmes A , E , F ,
max. 8 kg max. 10 kg max. 14 kg
Programme B
max. 2,5 kg max. 3,5 kg max. 5 kg
Programmes
max. 1,5 kg max. 2 kg max. 3 kg
Close the drum door
C
, D
G
*
Select pre-wash if more intensive treatment is required. This can only be se-
lected with programmes A , B or C.
Press the "Pre-wash” button.
Add detergent for the main wash into com-
*
Press the “On/Off” button in
- The “On” indicator light illuminates and
the “Time” indicator light flashes.
42 M.-Nr. 04 506 752
partment II and, if required into compartment I for the pre-wash. Fabric conditioner
is put into compartment
bleach is put into the compartment without
a symbol.
§
and liquid

Operation
Detergent dispensing
Avoid dispensing more than the required amount as this can cause excessive foaming.
Use only low lather detergents.
Important: With gas heated machines use
only high quality detergents to avoid the
heater pipe furring up quickly.
Amount dispensed:
Follow the detergent manufacturer’s instructions.
If the “Without Spin” (Rinse hold) button
was pressed the programme will be interrupted after the last rinse. The “Rinse
hold” indicator light will illuminate.
- Washing remains suspended in water.
If washing is to be spun:
Press the “Without spin (Rinse hold)” button again. The water in the drum will drain
followed by a final spin.
Otherwise:
– - If the programme is to finish without
spinning turn the programme selector
switch to position H(Separate drain).
Only refers to WS 5100 and WS 5140
with gas heating
Notes:
Do not fill fabric conditioner or bleaching
agent higher than the level mark in the dispenser.
For bleaching at least 4 rinse cycles must be
programmed (see "Re-programming" and the
"Programme changes" chart).
*
Press the “Start” button in. The “Time”
display will go out and the “Temperature”
display will illuminate.
- the wash programme then progresses.
Fault message "ignition fault"
If the symbol " y " appears in the time (hrs)
display this indicates an ignition fault.
Wait for at least 1 minute before operating
the "Reset" button to repeat the ignition
process.
If this measure is not successful call your
Service engineer to remedy the fault.
Fault message "blocked filter"
A continuous humming tone during a
wash programme indicates that the fluff filter needs to be cleaned.
M.-Nr. 04 506 752 43

Operation Notes
With pre-wash
*
To open the drum door at the end of the
programme:
When the “End” indicator light illuminates
pull the handle to open the door.
Note:
If the drum door does not open, press
against the door handle and then pull on
it again.
- Never use force to open the door.
Remove the laundry.
Make sure the drum is empty, otherwise
when the machine is next used items
could shrink, or cause other laundry to
discolour.
A pre-wash can be selected for heavily soiled
laundry.
This button is only effective with Cottons,
Minimum iron and Delicates/synthethics programmes.
The “With pre-wash” button does not operate
after a programme has commenced.
*
At the end of the day’s washing:
Switch the electricity mains supply off at
the on-site wall switch (isolator).
Turn off the water stopcock (on site).
Notes
Bleaching agents
Only use bleaching agents on textiles with the
symbol y on the wash care label.
Liquid bleaching agents must only be added
to the compartment without a symbol. The
agent will then be dispensed automatically
during the 2nd rinse (cold bleaching).
Liquid bleaching agents should only be used
with coloureds if the textile manufacturer’s
wash care label states that the textile is colour fast and suitable for bleaching.
Without spin
*
Without spin can be selected with all programmes.
After selecting the programme press in the
“without spin” button.
At the “without spin” stage in the programme
the without spin indicator light in the sequence will come on as a reminder that the programme needs to be continued. It can be
continued in either of two ways.
Either press and release the “without spin”
button, and the programme will continue by
draining and spinning.
Or, if the programme is to finish without spinning turn the programme selector switch to
(H) (Separate drain). The drain valve is
opened for 1 minute, without needing to press
the “Start” button.
44 M.-Nr. 04 506 752

Notes
Spin times
After the last rinse, and if the “without spin”
button has not been activated
Programme:
A = 7 minutes
B , C and D = 1 minute
and F = 7 minutes
E
If the load is unevenly balanced in the drum
the spin will be interrupted. Run-up to spin resumes automatically once the imbalance has
been redressed.
Note: The “Separate spin” setting can be used
for textiles that have been handwashed
and can be spun.
Press and release the “Starch” button to continue the programme adding starch to water as
it flows into compartment (I) according to manufacturer’s instructions.
Skip a programme stage
Short programme
This programme is intended for dealing with
lightly soiled laundry only. Reduce the amount of detergent according to the load reduction. The programme consists of a main wash
(wash temperature 40°C - this can be reprogrammed to 50°C or 60°C), 2 rinses and a final spin.
Starching
*
Starching can take place in the Cottons programmes and in the Short programme.
After selecting the programme press in the
“Starch” button.
When the programme gets to the “Starch” position it pauses, the “Starch” indicator light will
illuminate.
If a programme stage is to be skipped turn the
programme selector switch to the “End r”
position. The programme sequence lights
flash down through the stages. Reselect the
programme when the appropriate stage is lit
up. The programme then continues.
Programme cancellation during peak load
cut-out
If the heater elements are shut down for longer than 45 minutes the programme is cancelled. A programme cancellation is indicated
by the display of the error message “Heating”
(the “Main wash” indicator light flashes).
Press and release the “On-Off” button (the
“Main wash” indicator light will go out). Press
the “Start” button to re-start the programme.
M.-Nr. 04 506 752 45

Notes
Power cut during a wash programme /
Manually emptying the suds container and
unlocking the drum door
During a short power cut:
The programme remains in the position it has
reached.
When the power is resumed the “Time” or
“Temperature” display will flash to indicate
that the programme has been interrupted.
*
Press the “Start” button to continue the programme.
During an extended power cut:
Switch the mains supply off at the mains
switch (isolator).
Turn the programme selector switch to “End”.
To remove the laundry the drain valve will
need to be manually opened and the drum
door released manually. Close the stopcocks.
Open the drum door and remove the laundry.
Note:
1. First insert the screwdriver into the opening
(see illustration) push in and hold firm.
2. Press on the door handle with the right
hand and then pull the door handle to open
the door.
- Never use force to open the door.
Programme cancellation
Open the drain valve by opening the venting
screw, but do not unscrew completely,
(spanner size 17 mm) and draining off the
suds. Take care, some water will seep out of
the screw opening (approx. 100 ml). This
should be caught in a suitable container.
Tighten up the venting screw again and check
that there is no leak.
46 M.-Nr. 04 506 752
If a programme is to be cancelled turn the programme selector switch to “End” and press
the “Start” button.

Notes
Delay Start
*
After closing the drum door and pressing in
the “On/Off” button the “Time” indicator light
flashes to indicate that the Delay Start Option
can be selected.
The “Delay Start” button can be used before
or after selecting a programme to delay the
start of a programme by up to 9 hours and 30
minutes. It works in 30 minute steps. If the
button is pressed in when 9 hours 30 mins.
shows in the display, the display will clear.
Press the button once more and 30 minutes
will appear.
Delay Start is confirmed by pressing the
“Start” button. The display then shows how
much time is left before the programme will
start.
It is possible to cancel the Delay Start option
before the “Start” button has been pressed in
by releasing the “On/Off” button and pressing
it in again.
If “Start” has already been pressed it is only
possible to cancel the programme selected
and the Delay Start option by turning the Programme Selector Switch to “End” and releasing the “Start” button.
Once the Delay Start period selected has
elapsed the programme will commence automatically. The indicator light “Time” goes out.
The display “Time min” / “Temperature °C”
shows the water temperature until the drain
valve is opened at the end of the main wash
and then shows the time left until the end of a
programme.
M.-Nr. 04 506 752 47

Notes
To change an individual wash programme
by re-programming
Individual wash programmes can be tailored
to suit different requirements.
Example of re-programming
*
Important
The machine must be switched off and the
drum door closed.
All other buttons must be in the “Off” position,
ie. released, not pressed in.
Press in the “On/Off” button.
- The “On” indicator light illuminates and the
“Time” indicator light will flash.
*
Press the “With pre-wash” button in and out
twice within a period of 4 seconds.
A few seconds later:
The programme selector switch must be at
the “End” position.
The letter “P” will illuminate in the “Time h” display field.
- The programme sequence indicator lights
“Pre-wash” and “Main wash” will flash.
- Re-programming can now be carried out.
See example on next page.
48 M.-Nr. 04 506 752

Notes
Example:
Changing the temperature holding time in the
pre-wash
from 4 minutes to 2, 8 or 20 minutes
4 Minutes 2 Minutes
8 Minutes 20 Minutes
*
Release the “On/Off” button.
- The change to the temperature holding time
in the pre-wash is stored. Programming is
complete.
To select 8 minutes holding time:
Set the programme selector switch to A/95°C.
Make a note of the programme change in the
list on the next page.
Set the programme selector switch to the
“End” position.
*
Keep pressing the “Start” button until
"P3" shows in the display.
M.-Nr. 04 506 752 49
For further programme change possibilities
see next page.

Notes
Programme
changes
Temperature holding
time in the pre-wash
Temperature holding
time in the extra pre-wash
Pre-wash temperature Cottons 70 C 40 C cold 50 C 60 C
Temperature in the extra
Pre-wash
Main wash
pre-wash
Pre-wash level
Extra pre-wash level
Interim rinse after the last
extra pre-wash
Temperature holding
time in the main wash
Main wash level
Top-up rinse
(suds cooling)
3)
Position of pro-
gramme selector
switch
Cottons
95 C
Cottons
80 C
Cottons
A
B
60 C
Cottons
50 C
Cottons
40 C
Cottons
30 C
Min. Iron
95 C
Min. Iron
60 C
Min. Iron
50 C
*
Standard
1 *234
4 Mins 2 Mins 8 Mins 20 Mins
40 C cold 50 C 60 C
2)
I
IIII
yes no
6 Mins 4 Mins 12 Mins 20 Mins
2)
I
yes no
Options
4 Mins 6 Mins 10 Mins
II I III
II I III
Comments Enter
Only for Cottons and
Minimum iron
2)
Only for Cottons and
III
Minimum iron
Only for Cottons
>60 C
Only for Cottons,
Minimum iron &
Delicates/synthetics
Only for Cottons, Short
and Minimum iron
Only for Cottons
>60 C
programme
changes here
Cool down
(timed suds cooling)
Rinse time
Number of rinses
4)
Rinses
Level of rinses 1 - 5
4)
C
1 minute wash with drain
Final rinse with hot water
Timed water intake
Temperature holding
time in short programme
Temperature in short
programme
No. of rinses in short
Special functions
1)Timed water intake is only ever done for the initial intake of water. Level I in the pre-wash, extra pre-wash and main wash must also be
programmed. Timed water intake is limited to Level III.
2)Special water intake in the pre-wash or main wash (only 1 water intake). No wash rhythm up to Level I. Gentle action between Level I and II.
Normal action above Level II. Water is topped up only when Level I is switched back to Level I.
3)This function is only done without a pre-wash. The main wash is always limited to Level I if there is a pre-wash.
4) A change to the standard option, especially when it is intended to change the standard options of the three functions marked 4) at the same
time, must only ever be carried out in consultation with the Service Engineer.
programme
Final spin time
Final spin time
Final spin time
D
E
4)
F
G
H
Min. Iron
40 C
Min. Iron
30 C
Delicates
60 C
Delicates
40 C
Delicates
30 C
Delicates
20 C
Woollens 40 C 0 30 secs 45 secs 90 secs Only for first water intake
Woollens 30 C 6 Mins 4 Mins 2 Mins 1 Mins
Woollens 20 C 40 C cold 50 C 60 C
yes no
3 Mins 3.5 Mins 4 Mins 4.5 Mins
3452
II III I
no yes
no yes
2345
7 Mins 5 Mins 3 Mins 11 Mins
7 Mins 5 Mins 3 Mins 14 Mins
7 Mins 5 Mins 3 Mins 1 Mins
Only for rinses 2 - 5
Only for Cottons,
Minimum iron, Delicates &
Woollens
Only for Cottons, Short &
Minimum iron
Only for rinses 2 - 5
Hot water inlet I,
Hot water inlet II and
Cold water inlet III
Only for Cottons and
Short programme
Only for separate spin
Only for separate rinse
and spin
1)
50 M.-Nr. 04 506 752

Notes
Additional programmes
The following programme changes may only
be carried out by an authorized service engineer
Programme "Sluice" (For Great Britain)
[2 pre-rinses, pre-wash,
main wash, 3 rinses, final spin]
Programme "Thermal disinfection without
pre-wash"
[final rinse at 70°C]
Programme "Chemo-thermal disinfection
without pre-wash"
[main wash 60°C (+2,-1°C),
10 minutes holding time and
final rinse at 70°C]
Programme "Incontinent laundry"
[3 pre-rinses, pre-wash, rinse,
main wash, 3/4/5 rinses, final
spin]
Programme "Thermal disinfection with
pre-wash"
[pre-wash at 95°C (+2, -1°C),
10 minutes holding time]
Possible reasons for increased levels of
foaming:
– detergent type
Only use detergent formulated for use in
commercial washer extractors. Domestic
laundry detergent is not suitable.
– overdosing of detergent
Dispense detergent following the detergent manufacturer’s instructions on the
packaging and in accordance with local
water hardness levels*.
– detergent creates too much foam
Use a lower foaming detergent or contact
your detergent application specialist.
– very soft water
In areas with hardness level 1 dispense
less detergent in accordance with the detergent manufacturer’s instructions.
– soiling level of the laundry
Programme "Sanfor test wash
[main wash,
holding time 40 minutes,
2 rinses:
1st rinse at 60°C, 6 minutes
holding time
2nd rinse at 60°C, 9 minutes
holding time,
final spin]
For lightly soiled laundry dispense less detergent in accordance with the detergent
manufacturer’s instructions.
– residues, e.g. detergent are left on
laundry
Run an additional pre-wash without detergent and without selecting a temperature.
Laundry which has been soaked before
washing must be thoroughly
rinsed before running a wash programme.
– small loads
Reduce the amount of detergent dispensed according to the size of the load.
M.-Nr. 04 506 752 51

Notes
– Gas heated machines
With gas heated machines the circulating
suds are pumped over the heater element.
This additional movement of the suds can produce extra foam.
Follow the dispensing instructions given
above.
Use a low lather detergent.
Depending on the type of detergent used
up to 30% less may be dispensed (not
with disinfection programmes).
Water hardness levels
Hardness
range
Water
quality
Hardness
level in
mmol/l
German
hardness
level °d
The door will not open
Press against the door, switch the machine
off and then on again and then try and open
the door again.
If you still cannot open the door:
The door handle safety mechanism has disengaged itself.
The door handle cannot be opened or closed.
I soft 0 – 1.3 0 - 7
II medium 1.3 – 2.5 7 - 14
III hard 2.5 – 3.8 14 - 21
IV very hard over 3.8 over 21
*) If you do not know the hardness level of the
water in your area you should contact your
local water authority for information.
The safety mechanism is designed to protect the handle and the lock from damage,
for instance, if too much force is being used
in an attempt to open the door.
Press firmly against the door handle until you
clearly hear the safety mechanism engage.
- You will now be able to open and close the
door again.
52 M.-Nr. 04 506 752

Cleaning and Care
Cleaning and care of the machine should be
carried out, wherever possible, immediately
after use.
On no account use high pressure cleaners or
hose down the machine.
Build-up of rust
The drum and suds container are manufactured from rust-free stainless steel. It is, however, possible that water with a high iron content or foreign bodies in the wash, (e.g. paper
clips or metal buttons), may lead to the formation of superficial rust spots in the drum
and/or suds container, especially if the machine is not used for a long time. Stainless steel
components should be cleaned regularly with
a proprietary cleaning agent for stainless
steel. This must be done if rust appears!
Door seals should also be regularly checked
to make sure that nothing has got trapped in
them. Clean them regularly.
To clean the fluff filter
- This only applies to WS 5100 and WS 5140
with gas heating.The fluff filter should be checked regularly
for build-up of fluff and cleaned when
necessary. Carry out this check only after a
programme has finished and the suds container has been emptied.
- A blocked filter is indicated by a continuous
humming tone during a programme.-
Clean the filter as follows:
1.Turn the programme selector to "Separate
Drain".
2.Once the suds container is empty turn the
programme selector to "End".
Place a two litre capacity dish under the fluff
filter.
After use the detergent box should be cleaned with warm water to remove any detergent residues.
The siphon tubes in the dispenser
compartments should also be cleaned.
Pull the siphon tubes upwards to remove for
cleaning in warm water. Replace in the reverse order (the siphon tubes must be hooked
in correctly).
Turn the lid anti-clockwise to open - a half
turn to a complete turn.
The water in the drain filter will drain out.
Take care, the water may be very hot.
Empty the dish and repeat as many times as
is necessary.
M.-Nr. 04 506 752 53

Cleaning and Care
Once the flow of suds stops, completely remove the filter lid together with the filter.
Clean the filter and the inside of the filter
housing, taking care in case there are any
sharp objects.
Put the filter back in place and secure by
turning the lid in a clockwise direction.
These agents can have a corrosive effect on
stainless steel. Aggressive vapours containing chlorine bleach can also be corrosive.
Do not store open containers of these agents
near the machine.
After use do not shut the machine door, but
leave it slightly ajar, to allow the machine to
dry out.
If the machine is not going to be used for a
longer period of time (4 weeks or more) the
drum should be rotated several times after
the last use. The drum should be rotated
every 4 weeks to prevent damage to the bearings.
Should a fault occur please contact your nearest Customer Service Dept.
When contacting the Customer Service Department please give both the model type and
the serial number (Fabr.-Nr.) of the machine.
These can be found on the data plate:
The filters (1) and (2) should be checked from
time to time and cleaned if necessary.
The housing, plastic parts, such as buttons,
knobs etc. and the facia panel should only be
cleaned with appropriate mild cleaners or with
a damp cloth and wiped dry. Any scouring
agents will scratch the surface.
To clean casing parts made of stainless steel,
use an appropriate stainless steel cleaner.
Any scouring agents will scratch the surface.
Avoid contact of stainless steel surfaces with
liquid cleaning and disinfecting agents which
contain chlorine or sodium hypochlorite.
with the door open, or:
at the rear of the machine towards the top.
Only use genuine spare parts, when order-ing
spare parts the Spare Parts Dept will also
need to know the model type and the serial
number (Fabr.-Nr.) and Part No. (M.-Nr.).
Guide to the data plate
Typ Model type
Fabr.-Nr. Serial number
Art.-Nr. Article number
M.-Nr. Part number
IBN Commissioning date
54 M.-Nr. 04 506 752

Explanation of the symbols on the data plate
1. Machine type
2. Serial number of the machine/year of
manufacture
3. Voltage/Frequency
4. Control fusing
5. Drive motor
6. Plate diameter/Plate qty. **
7. Drum data
8. Drum diameter/Drum depth
9. Spin speeds
10. Drum volume/Laundry dry weight
11. Kinetic Energy
12. Ex. time to top speed
13. Braking time
14. Heating
15. Electric heating
16. Fusing (on site)
17. Steam heating indirect *
18. Steam heating direct *
19. Gas heating *
20. Commissioning date
21. Water-Registration
22. Space for test certificate /
e.g. CE - 0085 (Gas)*
or country certificate
*) not valid for WS 5080
**) not valid for WS 5080/5100/5140
Noise emission
registered on the “A” scale.
During wash During spin
WS 5080 65.6 dB 80.7 dB
WS 5100 63.0 dB 77.7 dB
WS 5140 69.3 dB 73.5 dB
(measured in Germany in accordance with
DIN (IEC) 45 635, machine noise regulations
3. GSGV p1. 1.a)
M.-Nr. 04 506 752 55

Installation
This machine should not be used for articles
which have been treated with dangerous or inflammable substances.
To avoid the possibility of frost damage on no
account install the machine in a room which is
exposed to frost.
When the machine has been installed in its final position, only then remove the red transit
fittings marked “A” and “B”.
The screw feet may be adjusted to compensate for any unevenness in the floor surface.
The base frame should not be resting on the
floor. If installed on a plinth the machine must
be secured to the plinth and the plinth bolted
to the floor (see enclosed installation diagram). Bolts are provided with the machine.
Electric heated washer extractors installed
without plinth, with their feet directly on the
floor do not need to be secured.
Do not install the machine on carpeted flooring if the carpet pile blocks the ventilation gap
at the base of the machine.
Plumbing
Connection must be made to the water supply
via a stopcock which conforms to current
local and national regulations. This work must
be carried out by an authorised person.
A
“A” (2 pieces)
B
“B” (2 pieces)
To remove them detach the front and the rear
panel.
Water Supply (Water Fittings) Regulations
1999 and Water Byelaws 2000, Scotland
The Type A air gap fitted to the machine provides Category 5 protection thereby enabling
connection to mains water. The air gap is located upstream of the detergent box and to
provide protection against the possibility of
backflow of cleaning agents the machine is
supplied with 3 double check valves which
should be connected to the inlet hoses.
See the installation diagram for instructions
on connection to the water supply and for
drainage.
The inlet pressure hoses supplied with the
machine must be used for connection to the
water supply.
To ensure the hot water inlet hose (marked
90°C) lasts for many years it is advised not to
use it on a hot water connection supplying water hotter than 70°C.
If replacing inlet hoses only use a hose able
to withstand a burst pressure of at least 70
bar, and a water temperature of at least 90°C.
This also applies to all connection parts. Use
spare parts recommended by the manufacturer.
56 M.-Nr. 04 506 752

Installation
A water pressure flow rate of at least 1 bar,
static water pressure max. 10 bar is essential
to ensure smooth operation of this machine.
Water taken into the machine must not exceed a temperature of 70°C.
Connection to cold water only
-See enclosed Installation Diagram.-
Electrical connection
All electrical work must be carried out by a suitably competent person in compliance with national and local regulations.
The electrical safety of this machine is in
accordance with IEC 335-1, IEC 335-2-4, IEC
335-2-7.
The machine must only be connected to the
voltage and frequency shown on the data
plate.
The machine is supplied as standard for connection to a 415 V 3 phase + N electricity
supply, rated load and fusing as shown on the
data plate.
Connection should be made via a suitable isolator, with an on-off switch which is easily accessible for servicing.
This should only be done by an authorized
Service Engineer.
When the machine is commissioned the heater rating and fuse rating should be permanently marked on the data plate with the follo-
wing symbol
In countries other than G.B. check with your
local agent for conversion possibilities.
The minimum suds level required for activating the heating given in mm column of water
is 30 mm.
D.
WARNING
THIS APPLIANCE MUST BE EARTHED.
Warning
Make sure that the drum turns in the correct
direction when spinning - viewed from the
front this is anti-clockwise. 2 phases need to
be changed if it turns the wrong way.
The motors are fitted with overload protection
switches.
The electrical heating is set ex-works at:
- 9 kW (WS 5080)
- 9 kW (WS 5100)
- 15 kW (WS 5140)
The machine can be converted to:
- 6 kW (WS 5080)
- 6 kW (WS 5100)
- 10 kW (WS 5140)
by disconnecting one heater.
M.-Nr. 04 506 752 57

Installation
Gas connection
The gas connection may only be carried out
by a suitably qualified (e.g. Corgi registered)
engineer, in accordance with local and national safety regulations. The enclosed installation diagram and the installation instructions
for gas must be followed to ensure correct
gas connection.
The gas group to which the machines have
been set at the factory is given on the Gas
Data sticker affixed to the rear of the machine.
When converting to another gas group, or to
liquid gas, a conversion kit is required,available from the Spare Parts department, (give
the model and serial number of the machine
as well as the gas type, group and connection
pressure in the country of installation when
ordering). The installation instructions for gas
heated machines must be followed. Conversion may only be carried out by suitable competent persons.
All removable outer housing parts must be refitted after the gas connection has been made.
Do not attempt to undertake any repairs to
gas heated machines yourself. Repairs must
only be carried out by suitably competent persons to ensure safety, e.g. gas engineers
must be registered. Please consult the Miele
Customer Service department or an authorized Service dealer.
Steam connection
Steam connection must only be undertaken
by an authorized installer.
For steam connection it is essential to follow
the Installation Plan and instructions provided.
When connection to steam has been completed, ensure that all removable outer housing
parts have been put back in place.
58 M.-Nr. 04 506 752

EU Declaration of Conformity
Document No.: 07133950
Month, year: 07.2007
Manufacturer: Miele Company Ltd.,KG
Address: Industriestrasse 3
D - 31275 Lehrte
Product designation: Washer-extractor
Model no.: WS 5080 / 5100 / 5140
Brand: Miele
The product listed above complies with the conditions of the following European Directives:
EU Directive 2006/42/EG: Machinery directive
89/336/EC: EMC directive
European Standard: EN ISO 10472-1 :1997
EN ISO 10472-2 :1997
EN 60204-1 :2006
EN 61770 :1999 + Corrigendum December 2005 + A1 :2004 + A2 :2006
EN 55014–1 :2006
EN 55014–2 :1997 + A1:2001
EN 61000–3–2 :2006
EN 61000–3–3 :2006
Introduction of the CE mark: 2007
Place, date: Lehrte, 10.07.2007
Signed:
Construction & Development Management Appliance Production Management
Hr. Dr. Köckerling Hr. Krimpmann
M.-Nr. 04 506 752 59

Guarantee
Please contact your Miele Sales Office for
details concerning guarantee terms and
conditions.
See the back cover for contact details.
60 M.-Nr. 04 506 752

Table des matières
Prescriptions de sécurité et mises en garde . . . . . . . . . . . . . . . . . . . . . 62
Votre contribution à la protection de l’environnement . . . . . . . . . . . . . . . . 65
Description de l’appareil . . . . . . . . . . . . . . . . . . . . . . . . . . . . . . . . 66
- Explication des éléments de commande . . . . . . . . . . . . . . . . . . . . . . . . 67
- Messages d’erreurs . . . . . . . . . . . . . . . . . . . . . . . . . . . . . . . . . . . 68
Utilisation . . . . . . . . . . . . . . . . . . . . . . . . . . . . . . . . . . . . . . . . 70
- Capacités . . . . . . . . . . . . . . . . . . . . . . . . . . . . . . . . . . . . . . . . 70
- Sélection des programmes et des températures . . . . . . . . . . . . . . . . . . . . 70
- Adjonction de détergents . . . . . . . . . . . . . . . . . . . . . . . . . . . . . . . . 70
- Dosage de détergents . . . . . . . . . . . . . . . . . . . . . . . . . . . . . . . . . 71
- Message d’erreur "Anomalie allumage" et "Nettoyage du filtre" . . . . . . . . . . . . . 71
- Ouverture de porte et déchargement du linge . . . . . . . . . . . . . . . . . . . . . 71
Remarques . . . . . . . . . . . . . . . . . . . . . . . . . . . . . . . . . . . . . . . . 72
- Avec prélavage . . . . . . . . . . . . . . . . . . . . . . . . . . . . . . . . . . . . . 72
- Sans essorage . . . . . . . . . . . . . . . . . . . . . . . . . . . . . . . . . . . . . . 72
- Temps d’essorage . . . . . . . . . . . . . . . . . . . . . . . . . . . . . . . . . . . 73
- Miniprogramme . . . . . . . . . . . . . . . . . . . . . . . . . . . . . . . . . . . . . 73
- Amidonnage . . . . . . . . . . . . . . . . . . . . . . . . . . . . . . . . . . . . . . . 73
- Arrêt de programme en cas d’utilisation d’un délesteur . . . . . . . . . . . . . . . . . 73
- Panne de courant en cours de lavage / Vidange manuelle de la
cuve et déverrouillage de la porte . . . . . . . . . . . . . . . . . . . . . . . . . . . . 74
- Interruption de programme . . . . . . . . . . . . . . . . . . . . . . . . . . . . . . . 74
- Départ différé . . . . . . . . . . . . . . . . . . . . . . . . . . . . . . . . . . . . . . 75
- Changement de programmation . . . . . . . . . . . . . . . . . . . . . . . . . . . . 76
- Programmes additionnels . . . . . . . . . . . . . . . . . . . . . . . . . . . . . . . . 77
- Causes possibles d’une formation importante de mousse . . . . . . . . . . . . . . . 80
Page
Entretien . . . . . . . . . . . . . . . . . . . . . . . . . . . . . . . . . . . . . . . . . 81
Signification des symboles de la plaque signalétique . . . . . . . . . . . . . . . . 83
Informations destinées à l’installateur
Sécurités de transport . . . . . . . . . . . . . . . . . . . . . . . . . . . . . . . . . . 84
Pieds à vis . . . . . . . . . . . . . . . . . . . . . . . . . . . . . . . . . . . . . . . . 84
Raccordements d’eau . . . . . . . . . . . . . . . . . . . . . . . . . . . . . . . . . . 84
Arrivée d’eau/vidange . . . . . . . . . . . . . . . . . . . . . . . . . . . . . . . . . . 84
Branchement électrique . . . . . . . . . . . . . . . . . . . . . . . . . . . . . . . . . 85
Chauffage électrique . . . . . . . . . . . . . . . . . . . . . . . . . . . . . . . . . . . 85
Raccordement gaz . . . . . . . . . . . . . . . . . . . . . . . . . . . . . . . . . . . . 85
Raccordement vapeur . . . . . . . . . . . . . . . . . . . . . . . . . . . . . . . . . . 85
Déclaration de conformité aux normes européennes . . . . . . . . . . . . . . . . . 87
Garantie . . . . . . . . . . . . . . . . . . . . . . . . . . . . . . . . . . . . . . . . . 88
Ces machines à laver à superessorage
doivent être installèes exclusivement
par un revendeur agréé de la marque ou
par le Service Après Vente Miele.
M.-Nr. 04 506 752 61

Prescriptions de sécurité et mises en garde
Lisez le mode d’emploi avant de mettre votre machine à laver en service. Vous vous
protégerez ainsi et éviterez des détériorations sur votre lave-linge.
Utilisation de la machine conforme aux
prescriptions
Cette machine à laver est prévue exclusivement pour du linge non imprégné de
produits dangereux ou inflammables.
Lavez dans cette machine à laver unique-
ment des textiles indiqués sur l’étiquette
d’entretien comme étant lavables en machine
par le fabricant.
L’exploitant est tenu de garantir les condi-
tions de désinfection nécessaires aux procédés thermiques et chimicothermique (de la
liste RKI , suivant § 18 IFSG) dans l’utilisation
quotidienne par des contrôles. Les procédés
doivent être contrôlés périodiquement, thermoélectriquement par des sondes et bactériologiquement par des indicateurs biologiques.
L’exploitant doit également respecter les paramètres des procédés, à savoir la température
et en cas de procédé chimico-thermique, la
concentration de produit. Les programmes de
désinfection ne doivent pas être interrompus,
sans quoi la désinfection pourrait être imparfaite.
N’utilisez en aucun cas cette machine à
laver pour effectuer un nettoyage chimique. La plupart des produits de nettoyage essence par ex. - entraînent des risques d’incendie/d’explosion.
Ne stockez, ni n’utilisez d’essence, de
pétrole ou autre produit inflammable.
Ne déposez rien sur le couvercle de la machine.
Risque d’incendie et d’explosion.
Sécurité électrique
La sécurité électrique de cet appareil
n’est garantie que s’il est raccordé à un
système de mise à la terre homologué. Il est
très important que cette condition de sécurité
élémentaire et en cas de doute toute l’installation domestique soient contrôlées par un professionnel. Le fabricant ne peut être tenu responsable de dommages causés par une terre
manquante ou défectueuse.
N’endommagez, n’enlevez ou ne modifiez
pas les dispositifs de sécurité et éléments
de commande de la machine.
Ne faites pas fonctionner la machine, si
les éléments de commande ou l’isolation
des fils électriques sont endommagés avant
de la faire réparer.
Utilisez la machine à laver uniquement
lorsque toutes les pièces d’habillage extérieur démontables sont remontées et qu’il n’y
a ainsi aucun accès aux pièces électriques ou
d’entraînement.
La machine à laver n’est déconnectée du
réseau que lorsque l’interrupteur principal
est débranché ou que le fusible est ôté.
Les interventions techniques sur les appa-
reils à chauffage électrique, gaz ou vapeur doivent être exécutées uniquement par
des professionnels. Des réparations incorrectes peuvent entraîner de graves dangers pour
l’utilisateur.
N’essayez jamais de forcer la porte de la
machine à laver.
Afin de garantir son fonctionnement en toute
sûreté, la poignée de la porte est équipée
d’une sécurité.
Ne remplacez les pièces défectueuses
que par des pièces d’origine Miele que
nous garantissons répondre totalement aux
exigences de sécurité en vigueur.
62 M.-Nr. 04 506 752

Prescriptions de sécurité et mises en garde
L’utilisation des meilleurs matériaux et
tout le soin apporté à la fabrication ne protège pas le tuyau d’arrivée d’eau des détériorations dues au vieillissement.
Fissures, coudes, hernies ou autres anomalies peuvent provoquer des fuites d’eau.
Vérifiez par conséquent les tuyaux d’arrivée
d’eau régulièrement. Vous pourrez ainsi les
changer en temps voulu et empêchez des dégâts des eaux.
Mesures de précaution en cas de déga-
gement d’odeurs de gaz
Valables uniquement pour machines à laver à
chauffage gaz
Eteignez immédiatement toutes les
flammes.
Ouvrez immédiatement toutes les fenêtres
et portes.
Fermez immédiatement les robinets d’arrêt sur le compteur à gaz ou le dispositif
de coupure général.
N’allumez pas la lumière dans les pièces
dans lesquelles vous avez constaté une odeur de gaz.
N’allumez ni allumette ni briquet.
mesure à la vanne gaz, au pressostat et au
brûleur. Effectuez le contrôle brûleur ouvert et
brûleur fermé.
Utilisation de l’appareil
Les personnes qui ne sont pas en mesure
d’utiliser ce lave-linge en toute sécurité en
raison de déficiences physiques, sensorielles
ou mentales ou d’un défaut d’expérience ou
de connaissance ne doivent pas l’utiliser sans
la surveillance ou les instructions d’une personne responsable.
Interdisez toujours aux enfants de jouer à
l’intérieur, au-dessus ou à proximité de la
machine à laver ou même d’utiliser seul l’appareil.
Lorsque vous lavez à hautes tempéra-
tures pensez que le hublot chauffe.
Empêchez par conséquent les enfants de
toucher au hublot en cours de lavage.
Assurez-vous toujours que le tambour est
à l’arrêt lors du déchargement du linge.
Vous risquez de vous blesser en introduisant
les mains dans un tambour qui tourne encore.
L’eau utilisée au lavage est un bain lessi-
viel non potable.
Evacuez ce bain dans un système de vidange
prévu à cet effet.
Ne fumez pas.
Ne provoquez pas d’étincelles électriques :
en débranchant des fiches électriques ou
en actionnant interrupteurs ou sonnettes...
Fermez la vanne d’arrêt de gaz servant au
lave-linge.
Appelez immédiatement la compagnie distributrice de gaz si vous ne décelez pas la
cause de l’odeur de gaz, bien que tous les
robinets de gaz soient fermés.
Attention ! Vérifiez l’étanchéité de toutes les
pièces d’alimentation de gaz d’un robinet d’arrêt à l’injecteur du brûleur à la fin des travaux
de mise en service, d’entretien, d’adaptation
et de réparation.
Contrôlez particulièrement le raccord de
Ne faites fonctionner la machine à laver
sans surveillance que s’il se trouve une
vidange au sol (regard) à proximité directe de
l’appareil.
Les produits de désinfection et de net-
toyage contiennent souvent du chlore.
Si de tels produits sèchent sur des surfaces
en acier inoxydable, le chlore peut attaquer
l’acier inoxydable et provoquer la formation
de rouille.
Pour protéger votre appareil contre l’oxydation, utilisez des produits non chlorés pour le
lavage/ la désinfection ainsi que pour le nettoyage des surfaces en acier inox.
En cas de doute, faites préciser au fabricant
que le produit ne contient pas de chlore.
Si un produit contenant du chlore est accidentellement répandu sur la surface en inox, rincer immédiatement avec de l’eau puis sécher
avec un tissu.
M.-Nr. 04 506 752 63

Prescriptions de sécurité et mises en garde
Lors de l’utilisation et de l’association de
lessives et de produits spéciaux, respectez impérativement les indications du fabricant. Pour éviter des dommages matériels et
de vives réactions chimiques, n’employez les
produits en question que pour les cas indiqués par le fabricant. Vérifiez auprès du fabricant la compatibilité des produits avec une utilisation en machine à laver.
Même si certains produits lessiviels chimi-
ques sont recommandés, cela ne signifie
pas que le fabricant de l’appareil se porte responsable des impacts de ce produit sur le
linge et la machine à laver. Si des modifications ont été effectuées sur le produit et
qu’elles n’ont pas été signalées par le fabricant, assurez-vous qu’elles ne risquent pas
d’influer sur les résultats de lavage.
Les teintures/décolorants et les détar-
trants doivent être appropriés à une utilisation en machine. Observez impérativement
les prescriptions d’utilisation indiquées par le
fabricant.
Vérifiez le résultat de lavage en cas de
souillure avec des huiles ou des graisses
biologiques. Le linge insuffisamment débarrassé de ce type de traces peut s’enflammer
au sèche-linge. Pour ce type de linge, utilisez
un détergent ou un programme spécial.
N’utilisez pas de nettoyeur haute pression
ni de jet d’eau pour nettoyer la machine.
Utilisation d’accessoires
C’est pourquoi il faut renoncer à utiliser ces
produits et utiliser des produits blanchissants
à base d’oxygène à la place.
Si cependant du produit blanchissant chloré
est utilisé pour des salissures spéciales, il
faut toujours effectuer un traitement antichlore. Sinon les composants du lave-linge et
le linge pourraient être abîmés irrémédiablement.
Le traitement antichlore
Le traitement antichlore doit être effectué
juste après le lavage avec chlore. Le mieux
est d’utiliser du peroxyde d’hydrogène ou une
lessive ou un produit blanchissant à base
d’oxygène, sans vidanger le bain lessiviel.
Avec le thiosulfate, en particulier si l’eau est
dure, il peut se former une sorte de plâtre qui
s’incruste sur le linge ou laisse des dépôts
dans le lave-linge. Le traitement au peroxyde
d’hydrogène participant au processus de neutralisation du chlore, il faut mieux utiliser cette
méthode.
La quantité de produits à utiliser ainsi que la
température doivent être déterminés et vérifiés sur place, en fonction des recommandations du dosage des fabricants de lessive et
de produit additif. Il faut également vérifier
qu’il n’y a pas de reste de chlore actif dans le
linge.
Ne montez que des accessoires expressé-
ment autorisés par Miele. Le montage
d’autres pièces exclut le bénéfice de la garantie.
Plus le chlore est utilisé, plus le risque
que les pièces soient endommagées augmente.
L’utilisation de produits contenant du chlore
comme l’hypochlorite de sodium et les produits blanchissants en poudre peuvent détruire cette couche protectrice en fonction de
la concentration de chlore, du temps d’action
et de la température et entraîner la corrosion
de certaines pièces.
64 M.-Nr. 04 506 752
Elimination d’un ancien appareil
Si vous devez vous débarrasser d’une an-
cienne machine à laver, détruisez la serrure de porte au préalable.
Vous éviterez que des enfants ne s’y
enferment en jouant et ne soient en danger
de mort.
Si d’autres personnes sont formées pour utiliser la machine à laver, il est impératif de
leur donner accès et/ou de les informer de
ces prescriptions de sécurité.
Conservez ce mode d’emploi.

Votre contribution à la protection de l’environnement
Enlèvement de l’emballage
L’emballage protège votre machine à laver
des avaries de transport. Les matériaux utilisés sont choisis en fonction de critères écologiques de façon à en faciliter le recyclage.
Le recyclage de l’emballage économise les
matières premières et réduit le volume des déchets à éliminer. En principe, votre revendeur
reprend l’emballage.
Enlèvement de l’ancien appareil
Les anciens appareils contiennent souvent encore des matériaux recyclables. Ils contiennent également des matériaux nocifs,
nécessaires au bon fonctionnement et à la sécurité de l’appareil. Ces matériaux peuvent
être dangereux pour les hommes et l’environnement s’ils restent dans la collecte de déchets ou s’ils sont mal manipulés. Ne jetez
par conséquent en aucun cas votre appareil
avec les déchets.
Veuillez faire en sorte que votre ancien appareil soit évacué conformément aux réglements locaux sur les déchets.
Gardez l’ancien appareil hors de portée des
enfants jusqu’à son enlèvement, pour éviter
tout accident.
M.-Nr. 04 506 752 65

Description de l’appareil
Tableau de commande
12345 6
1 Touche "Réenclenchement allumage" 4 Afficheur de déroulement de programme par
(uniquement sur WS5100/WS5140 avec chauffage gaz)
2 Clavier à touches 5 Sélecteur de programme et de température
3 Afficheur de température et de temps 6 Bouton d’arrêt d’urgence
restant
diodes
La construction de la machine correspond à IEC 60204-1:2005.
Robinets d’eau
Boîte à produits
Tableau de commande
Porte de chargement
Socle (en option)
Interrupteur principal
Vidange
Vidange au sol (regard)
WS 5080/5100/5140
66 M.-Nr. 04 506 752

Description de l’appareil
9
10
12345
1 = Touche “Marche-Arrêt”
2 = Touche “Avec prélavage”
Pour linge très sale
A ajouter si désiré uniquement en
programmes
3 = Touche “Amidonnage”
Enfoncez cette touche, si le linge doit
être amidonné. Elle ne fonctionne qu’en
programmes A et E .
4 = Touche “Sans essorage”
Enfoncez cette touche, si le rinçage ne
doit pas être suivi d’un essorage.
A , B et C .
678
6 = Afficheur “Temps h”
7 = Afficheur “Temps mn”
Affichage du temps de programme
restant ou du temps précédant le
démarrage du programme en cas de départ différé.
ou “Température °C”
Affichage ascendant de la température
par palier de 5 °C à partir de 20 °C.
8 = Touche “Départ différé”
Départ de programme différé de
9 heures et 30 minutes max.
Voir description détaillée page 75.
5 = Touche “Start”
Enfoncez cette touche pour faire démarrer
le programme.
9 = Diode “Temps”
Signale le temps sur les afficheurs 6 et 7.
10 = Diode “Température °C”
Signale la température sur l’afficheur 7.
M.-Nr. 04 506 752 67
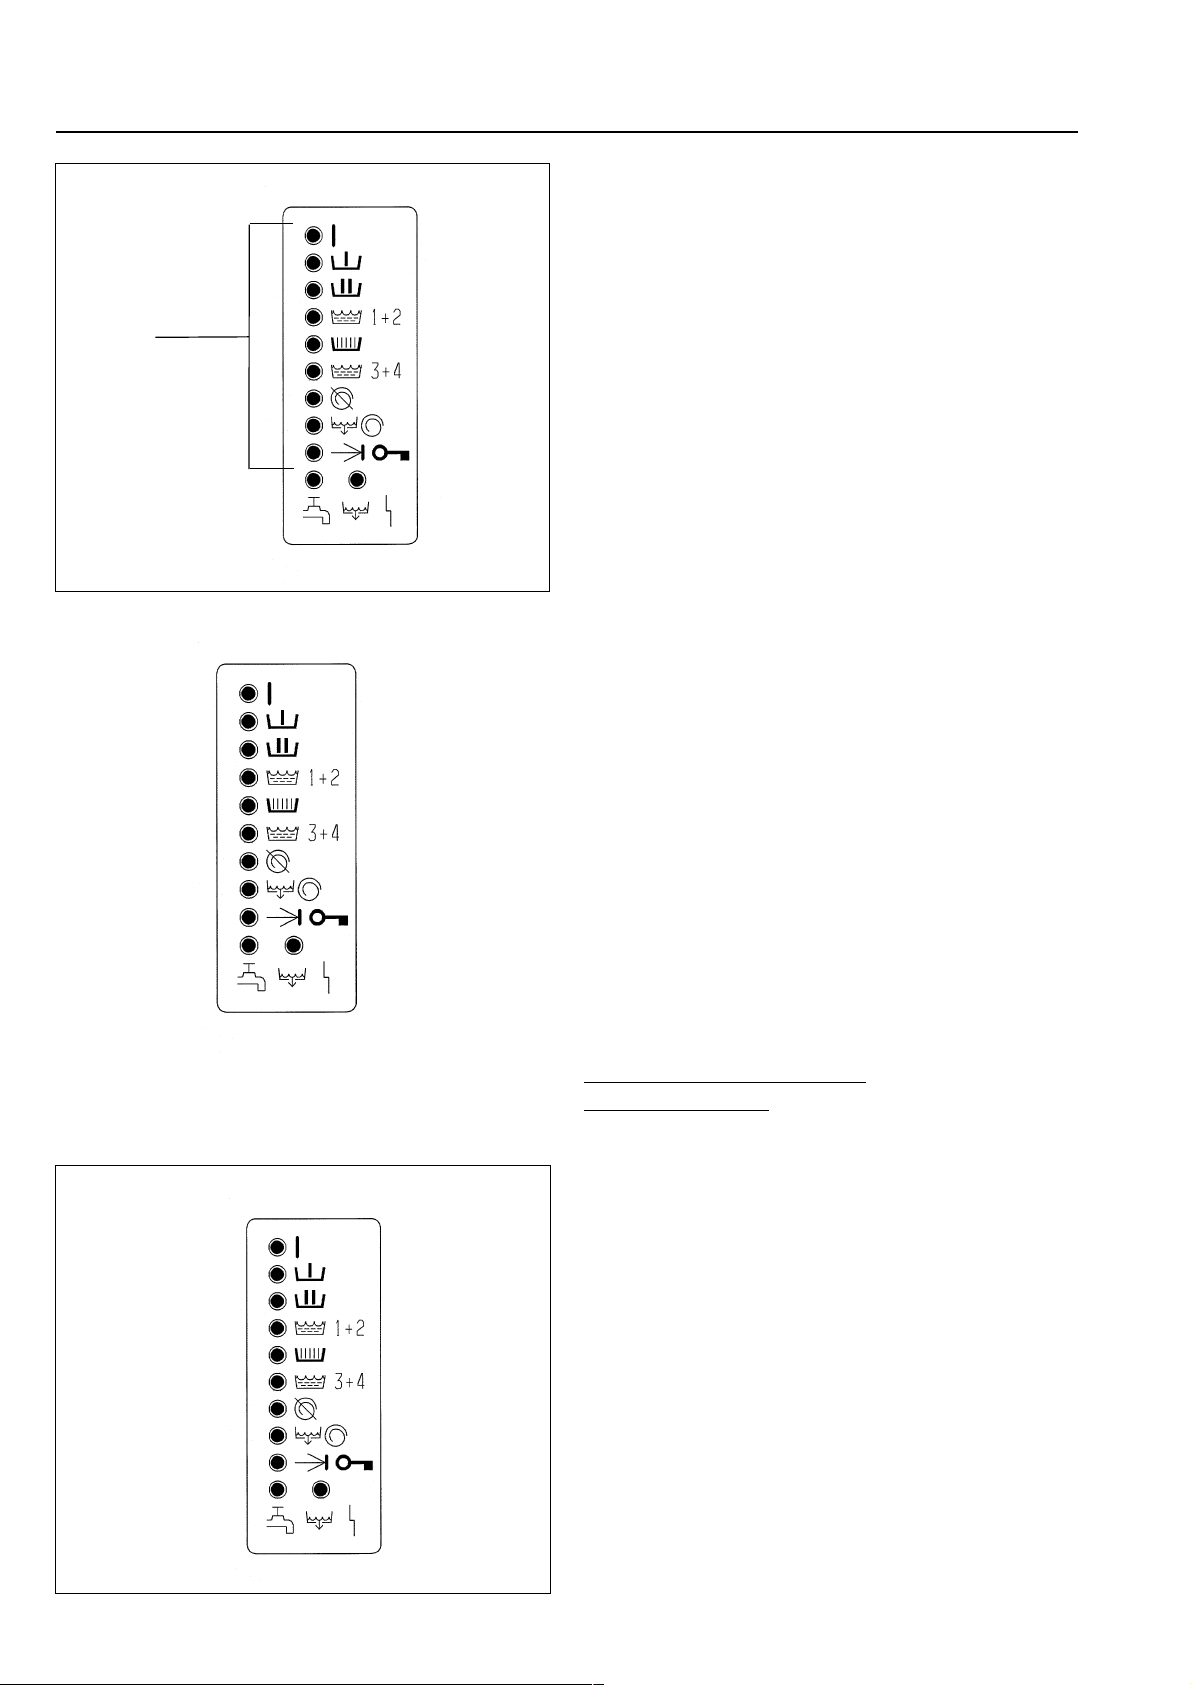
Description de l’appareil
11
Signification :
“Niveau”
Erreur dans le système de contrôle de niveau
d’eau
“Chauffage”
Erreur dans le système de chauffage
“Entraînement”
Erreur dans le système d’entraînement
“Porte”
Erreur dans le système de verrouillage
Effectuez le déverrouillage manuel (décrit au
chapitre “Panne de courant en cours de lavage”).
Seul le SAV doit intervenir pour les erreurs ou
anomalies énumérées ci-dessus.
11 = Diodes de déroulement du programme
Marche
Prélavage
Lavage
Rinçages
Amidonnage
Rinçages
Sans essorage
Essorage
Arrêt/Porte
Anomalie
Arrivée d’eau Vidange
Messages d’erreurs
Les erreurs et anomalies sont indiquées par
des diodes clignotantes.
“Arrivée d’eau”
Les robinets d’eau (à prévoir par l’utilisateur)
n’ont pas été ouverts lors de la mise en service
et/ou les filtres placés dans les tuyaux et les
électrovannes d’arrivée d’eau sont encrassés.
“Vidange”
La vidange de la machine est obstruée ou le
clapet de vidange* est défectueux.
Faites redémarrer le programme de lavage après élimination des erreurs ou anomalies.
*)Un clapet de vidange défectueux ne doit
être réparé que par le Service après Vente.
- Pour WS 5100/ WS 5140
à chauffage gaz -
Message d’erreur "Chauffage"
La diode "Chauffage" clignote lorsque la
fermeture du robinet empêche l’alimentation
Niveau
Chauffage
Entraînement
Arrivée d’eau
68 M.-Nr. 04 506 752
Porte
Vidange
en gaz.
D’autres diodes peuvent clignoter, c’est sans
importance.
Ouvrez le robinet d’arrêt gaz et remettez la
machine en marche : à cet effet enfoncez et
relâchez la touche Marche-Arrêt et actionnez
la touche Départ.
Si la diode "Chauffage" clignote encore,
appelez le Service Après Vente.

Description de l’appareil
12
12 = Sélecteur de programme et de température
Permet de sélectionner le programme.
A
Blanc/Couleurs
B
Non repassable
14
14 = Bouton d’arrêt d’urgence
A actionner uniquement en cas de danger.
Après avoir éliminé la cause du danger
déverrouillez le bouton en tournant la rondelle moletée vers la droite.
L’afficheur “Temps” ou “Température”
clignote après le déverrouillage.
Réenfoncez la touche “Start” afin de poursuivre le programme interrompu.
C
Fin/Synthétique
D
Laine
E
Miniprogramme
F
Rinçages et essorage seuls
G
Essorage seul
H
Vidange seule
r Arrêt
13
13 = Touche "Réenclenchement allumage"
(uniquement sur WS5100/WS5140 avec chauffage gaz)
En cas de panne d’allumage actionnez la
touche au plus tôt une minute après.
M.-Nr. 04 506 752 69

Utilisation
Mise en service
Seul le Service Après Vente Miele ou un revendeur agréé doit mettre la machine en service.
Ouvrez les robinets d’eau (à prévoir par
l’utilisateur).
Enclenchez l’interrupteur principal
(à prévoir par l’utilisateur)
Videz les poches
Les corps étrangers métalliques (pièces de
monnaie, trombones, clous, etc.) peuvent
endommager le linge et certaines pièces de
la machine.
Chargez le linge.
Capacités (linge sec)
WS 5080 WS 5100 WS 5140
Programmes A,E,F,
max. 8 kg max. 10 kg max. 14 kg
Programme
B
G
Sélectionnez le programme et la tempéra-
ture (Programme A Blanc/Couleurs 95 °C
par ex.).
*
Ajoutez le prélavage si désiré uniquement
en programmes A,B,C. A cet
effet enfoncez la touche “Avec prélavage”.
max. 2,5 kg max. 3,5 kg max. 5 kg
Programmes C,
max. 1,5 kg max. 2 kg max. 3 kg
Fermez la porte.
*
Enfoncez la touche “Marche-Arrêt”.
Le voyant “Marche” s’allume et l’afficheur
“Temps” clignote.
70 M.-Nr. 04 506 752
D
Versez le détergent pour le lavage dans le
compartiment II - et selon le cas - le détergent pour le prélavage dans le compartiment I, l’assouplissant dans le comparti-
ment
§ et le produit de blanchiment
dans le compartiment ne portant pas de
symbole.

Utilisation
Dosage de détergents
Il faut en principe éviter un surdosage qui
entraîne une forte formation de mousse.
N’utilisez pas de détergents très moussants.
Attention ! Il est recommandé d’utiliser exclusivement des détergents de qualité sur les machines à laver à chauffage gaz pour éviter un
entartrage rapide des résistances.
Dosage :
Conformez-vous aux indications du fabricant.
Le programme de lavage est interrompu
au dernier rinçage, si la touche “Sans
essorage” est actionnée. Le voyant “Sans
essorage” s’allume.
Le linge reste en suspension dans l’eau.
Réenfoncez la touche “Sans essorage”.
Il s’ensuit une vidange avec essorage final.
– Positionnez le sélecteur de programme
sur H(Vidange seule) si celui-ci s’a-
chève sans essorage.
- Uniquement WS 5100/ WS 5140
à chauffage gaz -
Remarques :
Ne dépassez pas le repère en versant l’assouplissant ou le produit de blanchiment.
Si vous utilisez un produit de blanchiment,
programmez au moins 4 rinçages (voir reprogrammation des programmes de lavage et tableau "Modification de programme").
*
Enfoncez la touche “Start”. L’afficheur
“Temps” s’éteint et l’afficheur “Température” s’allume.
Le programme démarre.
Message d’erreur à l’allumage
Le symbole " y " apparaît sur l’afficheur
"Temps h" signalant une anomalie à l’allumage.
Répétez l’opération d’allumage - au plus
tôt une minute après - en appuyant sur la
touche "Réenclenchement".
Si l’allumage n’a pas lieu, appelez le
Service aprês Vente.
Message d’erreur "Filtre obstrué"
Si un signal acoustique retentit en cours
de programme, il faut procéder au nettoyage du filtre comme décrit ci-dessous.
M.-Nr. 04 506 752 71

Utilisation Remarques
Avec prélavage
*
Ouvrez la porte en fin de programme.
Tirez sur la poignée de porte après que la
diode “Arrêt” s’allume.
Remarque:
Si la porte ne s’ouvre pas, appuyez sur la
poignée de porte, puis tirez-la vers vous.
- N’ouvrez jamais la porte violemment.
Déchargez le linge.
- Ne laissez pas de pièces de linge dans
le tambour. Sinon elles peuvent rétrécir ou
déteindre au prochain lavage.
On peut ajouter un prélavage pour le linge
très sale.
Cette touche ne fonctionne qu’avec les
programmes Blanc/Couleurs, Non repassable
ou Fin/Synthétique.
La touche “Avec prélavage” ne fonctionne
qu’au démarrage du programme.
*
Si l’on ne prévoit plus de faire d’autres
programmes de lavage :
Arrêtez l’interrupteur principal (à fournir
par l’utilisateur).
Fermez les robinets d’eau (à prévoir par
l’utilisateur).
Remarques
Produit de blanchiment
Utilisez des produits de blanchiment uniquement pour les textiles portant le symbole d’en-
tretien y .
Il ne faut verser de produit de blanchiment liquide que dans le compartiment sans symbole prévu à cet effet. C’est à cette seule
condition que les produits sont entraînés automatiquement au 2ème rinçage (à froid) pour
garantir un bon traitement du linge. L’utilisation de produit de blanchiment pour les couleurs est sans risque uniquement si le fabricant indique que les textiles couleurs sont
garantis grand teint sur l’étiquette d’entretien
et s’il autorise expressement le blanchiment.
Sans essorage
*
La fonction “Sans essorage” peut être ajoutée
à tous les programmes.
Enfoncez la touche “Sans essorage” après la
programmation.
La diode “Sans essorage” s’allume en position “Sans essorage” et appelle à la poursuite
du programme. Faites ressortir la touche
“Sans essorage” pour poursuivre le programme.
Sélectionnez le programme H(Vidange
seule) pour les programmes sans essorage.
Le clapet de vidange s’ouvre pendant
1 minute sans actionner la touche “Start”.
72 M.-Nr. 04 506 752
Remarques
Temps d’essorage
- Après le dernier rinçage et en cas de non
sélection de la touche “Sans essorage”.
Programme
A = 7 minutes
B,C et D = 1 minute
E et F = 7 minutes
L’essorage est interrompu en cas de dépassement du balourd autorisé.
Le redémarrage se fait automatiquement
lorsque le balourd est inférieur à celui autorisé.
Miniprogramme
Ce programme est conçu uniquement pour
le linge peu sale. Utilisez une quantité de détergents réduite en conséquence.
Ce programme comporte un lavage (température de lavage 40 °C, possibilité de modifier
la programmation sur froid, 50 °C ou 60 °C),
2 rinçages et l’essorage final.
Amidonnage
Versez l’amidon préparé suivant les indications du fabricant dans le compartiment I
lors de l’entrée d’eau.
Dépassement de programme
Positionnez le sélecteur de programme sur
“Arrêt” pour effectuer un dépassement de
programme. Les diodes de l’afficheur de
déroulement clignotent au fur et à mesure du
dépassement de programme. Il faut resélectionner un programme pour continuer.
*
On peut ajouter un amidonnage aux programmes Blanc/Couleurs et au miniprogramme.
Enfoncez la touche “Amidonnage” après la
programmation.
La diode “Amidonnage” s’allume lorsque le
programme atteint le point “Amidonnage”.
Le programme se poursuit lorsqu’on réenfonce la touche “Amidonnage” pour la faire
ressortir.
M.-Nr. 04 506 752 73
Arrêt de programme en cas d’utilisation
d’un délesteur
Le programme de lavage est interrompu si le
chauffage est arrêté plus de 45 minutes en
phase de thermosélection.
L’arrêt du programme est signalé par le message d’erreur “Chauffage” (la diode “Lavage”
clignote).
Faites ressortir et réenfoncez la touche
Actionnez la touche “Start” pour faire redémarrer
le programme.“Marche-Arrêt” (la diode
“La.vage” s’éteint)

Remarques
Panne de courant en cours de
lavage / Vidange manuelle de la
cuve et déverrouillage de la porte
Panne de courant brève
Le programme reste en position occupée
précédemment.
Après rétablissement du courant l’afficheur
“Temps” ou “Température” clignote et signale
qu’il y a interruption de programme.
*
Enfoncez la touche “Start”, le programme
redémarre.
Panne de courant relativement longue :
Coupez l’interrupteur principal (à prévoir par
l’utilisateur).
Amenez le sélecteur de programme sur
“Arrêt”.
Ouvrez le clapet de vidange et déverrouillez la
porte manuellement pour décharger le linge.
Fermez les robinets d’eau (à prévoir par l’utilisateur).
Ouvrez la porte et déchargez le linge.
Remarque:
1. Placez tout d’abord le tournevis dans
l’orifice (voir croquis), appuyez et maintenez.
2. Appuyez sur la poignée de porte avec la
main droite, puis ouvrez la porte en tirant sur
la poignée.
- N’ouvrez jamais la porte violemment.
Arrêt de programme
Ouvrez le clapet de vidange en desserrant la
vis de mise à l’air (clé de 17) - ne la dévissez
pas complètement - et vidangez le bain.
Attention! Un peu d’eau (env. 100 cm3) s’écoule par l’orifice de la vis, recueillez-la dans
un récipient approprié.
Resserrez ensuite la vis de mise à l’air et
contrôlez l’étanchéité.
74 M.-Nr. 04 506 752
Positionnez le sélecteur de programmes sur
“Arrêt” et actionnez la touche “Start” pour
arrêter le programme.

Remarques
Impossible d’ouvrir la porte
Presser la poignée, arrêter la machine et la réenclencher puis tirer à nouveau sur la poignée.
La sécurité de la poignée est déclenchée.
La poignée ne fonctionne plus.
La porte ne peut être ni ouverte ni fermée.
Le déclenchement de la sécurité permet
d’éviter d’abîmer la poignée et la serrure en
cas d’ouverture forcée de la porte.
Départ différé
*
Après fermeture de la porte et enfoncement
de la touche “Marche-Arrêt” le clignotement
de l’afficheur “Temps” signale la possibilité de
programmer le départ différé.
La touche “Départ différé” permet de décaler
le démarrage du programme de 9 heures et
30 minutes max. par phases de 30 minutes avant ou après la sélection du programme.
L’afficheur s’éteint si vous réenfoncez la
touche “Départ différé”, alors qu’il affiche
9 heures et 30 minutes. Une nouvelle pression
sur la touche fait réapparaître 30 minutes.
Terminez l’opération, après avoir programmé
le départ différé, en enfonçant la touche
“Start”.
Le temps restant se décompte sur l’afficheur
jusqu’au démarrage automatique du programme.
Presser fortement contre la porte ; la sécurité
s’enclenche avec un déclic.
La porte peut de nouveau être ouverte ou fermée.
Il est possible d’effacer la programmation du
départ différé en appuyant deux fois sur la
touche “Marche-Arrêt” (position enfoncée) avant d’actionner la touche “Start”.
Le départ différé et le programme présélectionné ne peuvent s’effacer après le démarrage du cycle qu’en positionnant le sélecteur
de programme sur “Arrêt” et en enfonçant la
touche “Start”.
Le programme démarre après écoulement du
temps programmé en départ différé, la diode
“Temps” s’éteint.
L’afficheur “Temps mn”/"Température °C"
indique la température de l’eau jusqu’à
l’ouverture du clapet de vidange en fin de
lavage. Il affiche ensuite le temps restant
jusqu’à la fin du programme.
M.-Nr. 04 506 752 75

Remarques
Reprogrammation pour modifications de
certains programmes
Certains programmes peuvent être modifiés
individuellement pour les adapter aux différentes
habitudes et procédés de lavage.
*
Exemple de reprogrammation
Conditions :
La machine à laver doit être arrêtée et la
porte de chargement fermée.
Toutes les autres touches doivent être sur
“Arrêt”, donc ressorties.
Enfoncez la touche “Marche-Arrêt”.
La diode “Marche” s’allume et la diode
“Temps” clignote.
*
Enfoncez et ressortez la touche “Avec
prélavage” 2 fois en 4 secondes.
Quelques secondes après:
Le sélecteur de programmes doit se trouver
en position “Arrêt”.
La lettre "P" s’allume sur l’afficheur "Temps h".
Les diodes de déroulement de programme
“Prélavage” et “Lavage” clignotent.
Il est possible d’effectuer un changement de
programmation; voir exemple à la page
suivante.
76 M.-Nr. 04 506 752

Remarques
Exemple :
Temps de maintien en température au prélavage modifié de 4 à 2, 8 ou 20 minutes.
4 Minutes 2 Minutes
8 Minutes 20 Minutes
Nous choisissons 8 minutes.
*
Faites ressortir la touche “Marche-Arrêt”.
La modification du temps de maintien en
température au prélavage est mémorisée, la
programmation est terminée.
Veuillez noter la programmation sur la liste de
la page suivante.
Tournez le sélecteur sur “Programme A/95
°C”.
*
Actionnez la touche “Start” jusqu’à ce que
"P 3" apparaisse sur l’afficheur.
Positionnez le sélecteur sur “Arrêt”.
Vous trouverez toutes les possibilités de
changement de programmation à la page
suivante.
M.-Nr. 04 506 752 77

Remarques
Modifications
de programme
Temps de maintien en
température au prélavage
Temps de maintien en
température au prélavage
additionnel
Température au prélavage
Prélavage
Lavage
Rinçage
Température au
prélavage additionnel
Niveau d’eau au prélavage
Niveau d’eau
au prélavage additionnel
Essorage intermédiaire après
le dernier prélavage
Temps de maintien en
température au lavage
Niveau d’eau au lavage
Réactivation (Refroidissement
progressif du bain)
Cool Down (Refroidissement
progressif du bain)
Temps de rinçage
Nombre de rinçages
Niveau d’eau aux
rinçages 1 - 5
1 minute de lavage
avec vidange
Dernier rinçage
en eau chaude
Entrée d’eau temporisée
Temps de maintien en
température au
miniprogramme
Température
en miniprogramme
Position du
sélecteur de
programme
Blanc / Couleurs
95 °C
Blanc / Couleurs
80 °C
Blanc / Couleurs
A
3)
B
4)
4)
C
70 °C
Blanc / Couleurs
60 °C
Blanc / Couleurs
50 °C
Blanc / Couleurs
40 °C
Blanc / Couleurs
30 °C
Non repassable
95 °C
Non repassable
60 °C
Non repassable
50 °C
Non repassable
40 °C
Non repassable
30 °C
Fin/Synthétique
60 °C
Fin/Synthétique
40 °C
Fin/Synthétique
30 °C
Fin/Synthétique
20 °C
Laine 40 °C
Laine 30 °C
*Standard
4 mn 2 mn 8 mn 20 n
0 mn 4 mn 6 mn 10 mn
40 °C
40 °C
6 mn 4 mn 12 mn 20 mn
3 mn
non oui
non oui
6 mn 4 mn 2 mn 1 mn
Options
1 *234
froid
50 °C60 °C
froid
50 °C60 °C
2)
I
II I III
IIII
oui non
2)
I
oui non
oui nein
3,5
mn
3452
II III I
0 30 s 45 s 90 s
2)
II I III
4,5
4 mn
mn
III
Remarques Noter
Pour “0" mn pas de
prélavage additionnel
Uniquement Blanc/Couleurs
et Non repassable
Uniquement Blanc/Couleurs
et Non repassable
Uniquement Blanc/Couleurs
≥60 °C
Uniquement pour Blanc/Couleurs, Non repassable et
Fin /Synthétique
Uniquement pour Blanc/Couleurs, Miniprogramme et
Non repassable
Uniquement pour
Blanc/Couleurs ≥60 °C
Uniquement pour rinçage 2 - 5
Uniquement pour Blanc/Couleurs, Non repassable,
Fin/Synthétique et Laine
Uniquement pour Blanc/Couleurs, Miniprogramme et
Non repassable
Uniquement pour rinçage 2 - 5
Electrovanne I eau chaude,
électrovanne II eau chaude et
électrovanne III eau froide
Uniquement pour
ère
entrée d’eau
1
1)
les options
programmées
D
Laine 20 °C40 °C
froid
50 °C60 °C
Fonctions spéciales
Rinçages en miniprogramme
Temps d’essorage final
Temps d’essorage final
Temps d’essorage final
1) L’entrée d’eau temporisée s’effectue toujours uniquement à la première entrée d’eau. Il faut programmer en plus le niveau d’eau I au
prélavage, prélavage additionnel et lavage. L’entrée d’eau temporisée est limitée au niveau III.
2) Entrée d’eau spéciale au prélavage et au lavage (uniquement 1
niveau II rythme de brassage délicat. A partir du niveau II rythme de brassage normal et si le niveau I est à nouveau atteint, entrée d’eau
complémentaire jusqu’au niveau II.
3) Cette fonction intervient uniquement sans prélavage. Avec un prélavage niveau d’eau toujours limité au niveau I au lavage.
4) Effectuez une modification de l’option standard - en particulier lorsque les options standards des 3 fonctions signalées par
modifiées simultanément - uniquement après accord préalable du SAV.
E
4)
F
G
H
2345
7 mn 5 mn 3 mn 11 mn
7 mn 5 mn 3 mn 14 mn
7 mn 5 mn 3 mn 1 mn
ère
entrée d’eau). Jusqu’au niveau I pas de brassage du linge. Du niveau I au
Uniquement pour Blanc/Cou leurs et Miniprogramme
Uniquement pour essorage
seul
Uniquement pour rinçage et
essorage seuls
4)
doivent être
78 M.-Nr. 04 506 752

Remarques
Programmes additionnels
La programmation de ces programmes est
exclusivement réservée au SAV.
Programme "Sluice" (valable pour la
Grande Bretagne)
[2 x prérinçages, prélavage,
lavage, 3 rinçages,
essorage final]
Programme "Désinfection thermique sans
prélavage"
[dernier rinçage à 70 °C]
Programme "Désinfection chimique
sans prélavage"
[Lavage à 60 °C (+2, -1 °C),
temps de maintien en
température de 10 minutes
et dernier rinçage à 70 °C]
Programme "Matières fécales"
[3 x prérinçages, prélavage,
prérinçage, lavage,
3/4/5 rinçages, essorage final]
Programme "Désinfection thermique
avec prélavage"
[Prélavage à 95 °C (+2, -1 °C)
et maintien en température
de 10 minutes]
Programme "Procédé de contrôle Sanfor"
[Lavage, temps de maintien en
température 40 minutes,
2 rinçages 1er rinçage à 60 °C,
temps de maintien en
température 6 minutes,
ème
2
rinçage à 60 °C,temps
de maintien en température
9 minutes, essorage final]
M.-Nr. 04 506 752 79

Remarques
Causes possibles d’une formation importante de mousse :
- Types de lessive
Utilisez des lessives adaptées aux machines professionnelles. Les lessives pour
appareils ménagers ne conviennent pas.
- Surdosage de lessive
Respectez les conseils de dosage du fabricant de lessive et adaptez le dosage à la
dureté d’eau locale*.
- Lessive très moussante
Utilisez une lessive moins moussante ou
faites appel à un conseiller.
- Eau très douce
Machines à chauffage gaz
Sur les machines à chauffage gaz, le bain de
lavage est amené par une pompe dans la batterie de chauffe avant de retourner dans la
cuve. Ce mouvement supplémentaire du bain
de lavage développe toutes les propriétés de
la lessive mais favorise également la formation de mousse.
Respectez les points cités précédemment.
Utilisez une lessive peu moussante.
Diminuez le dosage jusqu’à 30 % selon la
lessive utilisée (pas pour la désinfection).
Duretés d’eau
Pour une eau se situant dans la zone de
dureté 1, diminuez la quantité de lessive
selon les indications du fabricant.
- Degré de salissure du linge
Pour un linge peu sale, diminuez la quantité de lessive selon les indications du fabricant.
- Résidus sur le linge (détergent par ex.)
Prérinçage supplémentaire sans température, sans lessive. Si vous avez préalablement traité le linge avec un produit de
trempage, rincez-le bien avant de le laver.
- Charge réduite
Diminuez le dosage de lessive en conséquence.
Zone de
dureté
I douce 0 - 1,3 0 - 7
II moyenne 1,3 - 2,5 7 - 14
III dure 2,5 - 3,8 14 - 21
IV très dure >3,8 >21
*) Si vous ne connaissez pas la zone de dureté de votre installation, contactez la compagnie distributrice d’eau.
Propriété
de l’eau
Dureté
totale en
mmol/l
Dureté
allemande
°d
80 M.-Nr. 04 506 752

Entretien
Effectuez le nettoyage et l’entretien de la
machine dans la mesure du possible après utilisation.
N’utilisez pas de nettoyeur haute pression ni
de jet d’eau pour nettoyer la machine.
Corrosion
Le tambour et la cuve sont en acier inoxydable.Une eau ferrugineuse ou des corps étrangers restés dans le linge (trombones ou
boutons en métal par ex.) peuvent dans certains cas former des taches de rouille sur le
tambour ou la cuve. Dans ce cas nettoyer régulièrement le tambour et la cuve avec du produit d’entretien pour inox disponible dans le
commerce dès l’apparition de traces de corrosion. Vérifier que les joints de porte ne
contiennent pas de traces ou d’objets en métal et les nettoyer de la manière évoquée plus
haut. Recommencer ces opérations régulièrement à titre préventif.
Nettoyage du filtre
- uniquement pour WS 5100/WS 5140
à chauffage gaz Contrôlez régulièrement le filtre et nettoyez-le
si nécessaire. A cet effet, attendez la fin du
programme et vidangez la cuve au préalable.
- Le signal acoustique retentit pendant le
programme lorsque le filtre est obstrué.
Procédez au nettoyage comme suit:
1. Amenez le sélecteur de programme sur
"Vidange seule"
2. Après avoir vidangé la cuve, amenez le
sélecteur sur "Arrêt".
Placez un récipient sous le filtre pour recueillir
env. 2 litres d’eau.
Nettoyez la boîte à produits après utilisation à
l’eau chaude pour éliminer les résidus de
détergents.
Nettoyez également le petit siphon des
compartiments pour produits lessiviels.
Sortez les tubes d’aspiration, nettoyez-les à
l’eau chaude puis remontez-les dans l’ordre
inverse (Accrochez les tubes d’aspiration).
Ouvrez le filtre en tournant le couvercle vers
la gauche - un demi à un tour complet.
Le bain de la cuve se vidange. Attention au
bain de lessive chaud.
Videz le récipient plusieurs fois si nécessaire.
Dévissez le couvercle du filtre lorsque la
vidange est terminée. Vous sortez ainsi le tamis du filtre.
M.-Nr. 04 506 752 81

Entretien
Nettoyez le tamis et le carter du filtre.
Remettez le tamis en place et fermez le
couvercle à fond tournant vers la droite.
Contrôlez l’état des filtres (1) et (2) régulièrement et les nettoyez-les le cas échéant.
Avertissez le SAV en cas d’anomalies.
Le Service Après Vente doit être informé du
type, du numéro de machine (Fabr.-Nr.) et de
la référence de la pièce (M.-Nr.). Ces deux indications figurent sur les plaques signalétiques :
Porte ouverte, ou :
Nettoyez la carrosserie, le tableau de commande et les pièces en plastique uniquement
avec un détergent doux ou un chiffon doux
humide, puis séchez.
Nettoyez les pièces de carrosserie inox avec
produit spécial inox vendu dans le commerce.
Les produits abrasifs rayent la surface.
Laissez la porte entr’ouverte afin que la
machine puisse sécher après utilisation.
Périodes d’immobilisation
Si la machine ne fonctionne pas pendant une
période longue (à partir de 4 semaines) faire
décrire quelques tours au tambour avant l’immobilisation. Faire tourner le tambour toutes
les 4 semaines pour éviter que les paliers
soient abîmés.
en haut sur la paroi arrière de la machine.
Utilisez uniquement des pièces détachées d’origine en cas d’échange (indiquez également
le type, le numéro de machine (Fabr.-Nr.) et
la référence (M.-Nr.) au SAV.
82 M.-Nr. 04 506 752

Signification des symboles de la plaque signalétique
1. Type de machine
2. Numéro de fabrication/Année de
construction
3. Tension/Fréquence
4. Fusible de commande
5. Moteur d’entraînement
6. Diamètre/Nombre d’assiettes**
7. Caractéristiques du tambour
8. Diamètre/Profondeur du tambour
9. Vitesse d’essorage
10. Volume du tambour/Poids de linge sec
11. Energie cinétique
12. Temps d’accélération
13. Temps de freinage
14. Chauffage
15. Chauffage électrique
16. Fusible (à prévoir par l’utilisateur)
17. Chauffage vapeur indirect*
18. Chauffage vapeur direct*
19. Chauffage gaz*
20. Date de mise en service
21. Enregistrement eau
22. Zone pour labels de conformité / Label
CE-.... (N° d’identification produit / gaz)*
Niveau sonore
Niveau de puissance acoustique classé A
Lavage Essorage
WS 5080 65,6 dB 80,7 dB
WS 5100 63,0 dB 77,7 dB
WS 5140 69,3 dB 73,5 dB
mesurée suivant norme DIN (CEI) 45 635
*) Non valable pour WS 5080
**) Non valable pour WS 5080/5100/5140
M.-Nr. 04 506 752 83

Remarques destinées à l’installateur
Cette machine est prévue uniquement pour
laver le linge non imprégné de produits dangereux ou inflammables.
N’installez en aucun cas la machine dans des
locaux exposés au gel afin d’éviter des dégâts
éventuels.
Enlevez les sécurités de transport “A” et “B”
marquées d’un repère rouge
Installez la machine de niveau en réglant les
pieds à vis. Le châssis ne doit pas toucher le
sol.
Fixez la machine en cas d’installation sur socle (voir plan d’installation fourni). Il n’est pas
nécessaire de fixer les machines à chauffage
électrique lorsqu’elles sont installées directement sur le sol.
N’installez pas la machine à laver sur une moquette, si celle-ci risque d’obturer les orifices
de ventilation sous la carrosserie.
Raccordements d’eau
Le raccordement à la conduite d’alimentation
exécutée suivant la norme DIN 1988 doit s’effectuer par un robinet. Le montage doit être
exécuté exclusivement par un installateur agréé en respectant les prescriptions spécifiques en vigueur suivant les pays.
A
"A“ (2 pièces)
B
B“ (2 pièces)
sur le lieu d’installation uniquement.
Les prescriptions de la compagnie distributrice d’eau compétente ou les ordonnances régionales en matière de réglementations sur
les constructions.
Raccordez l’arrivée d’eau/la vidange (voir
plan d’installation fourni).
Utilisez les tuyaux d’arrivée d’eau fournis.
Ne raccordez le tuyau d’arrivée d’eau chaude
qu’à 70 °C, bien qu’il soit marqué d’un repère
autorisant 90 °C afin qu’il conserve longtemps
sa résistance haute pression.
N’utilisez que des qualités de flexibles supportant une pression d’au moins 70 bar et une
température d’eau moins 90 °C en cas d’échange. Cela vaut également pour les
robinetteries, qui y sont reliées.
Une pression d’eau minimale de 1 bar et une
pression d’eau maximale de 10 bar est indispensable pour garantir un déroulement de
programme satisfaisant.
L’entrée d’eau chaude ne doit pas dépasser
"
une température de 70 °C.
Raccordement uniquement en eau froide
A cet effet déposez la façade et la paroi arrière.
84 M.-Nr. 04 506 752
-Voir plan d’installation fourni.-

Remarques destinées à l’installateur
Branchement électrique
Ne branchez cette machine qu’à la tension et
la fréquence indiquées sur la plaque d’identification.
Le branchement doit être effectué uniquement par un électricien agréé et être
conforme aux normes EDF.
L’équipement électrique de la machine
correspond à la norme CEI 335-1,
CEI 335-2-4, CEI 335-2-7.
Attention
Veillez à ce que le tambour tourne dans le
bon sens à l’essorage - à gauche vu de l’avant. Echangez 2 phases en cas de rota-tion
dans le mauvais sens.
Protégez les moteurs contre la surcharge par
un disjoncteur.
Le chauffage électrique est réglé à l’arrière
sur
- 9 kW (WS 5080)
- 9 kW (WS 5100)
- 15 kW (WS 5140)
La machine est commutable sur
- 6 kW (WS 5080)
- 6 kW (WS 5100)
- 10 kW (WS 5140)
en déconnectant une résistance.
Le niveau moyen du bain nécessaire à l’activation du chauffage est de 30 mm à la colonne d’eau.
Variantes commutables
Variante Branché à l’usine sur :
Electricité 3 AC 220-230 V 50 Hz /
3 N AC 380-400 V 50 Hz
Vapeur 3 AC 220-230 V 50 Hz /
3 N AC 380-400 V 50 Hz
3 AC 220-230 V 50 Hz
3 N AC 380-400 V 50 Hz
A effectuer uniquement par le service Après
Vente.
Marquez d’une D la puissance de chauffe
ou la tension sélectionnée sur la plaque
signalétique.
Raccordement gaz
Ce raccordement ne doit être effectué que
par un installateur agréé en respectant les
prescriptions de la compagnie distributrice de
gaz.
Conformez-vous au plan d’installation et
notices fournis, ils sont importants pour le
raccordement gaz.
Le chauffage gaz est réglé à l’usine suivant
les indications concernant le raccordement
gaz portées sur l’appareil (voir autocollant à
l’arrière de l’appareil).
En cas de changement de famille de gaz demander le jeu d’adaptation correspondant auprès du revendeur ou du SAV Miele. (Indiquer
le type, le numéro de machine, la famille, le
groupe de gaz, la pression du gaz et le pays
où la machine est installée).
Observez la notice d’installation pour appareils à chauffage gaz. Cette adaptation ne
doit être effectuée que par un professionnel.
Remontez impérativement toutes les pièces
d’habillage après avoir effectué le raccordement gaz.
N’effectuez pas vous-même les réparations
sur les appareils à gaz. Seuls des professionnels sont autorisés à réparer les détériorations.
Adressez-vous immédiatement à votre revendeur ou au SAV Miele.
Raccordement vapeur
Ce raccordement ne doit être effectué que
par un installateur agréé.
Conformez-vous au plan d’installation et à la
notice fournis, ils sont importants pour le
raccordement vapeur.
Remontez impérativement toutes les pièces
d’habillage après avoir effectué le raccordement vapeur.
M.-Nr. 04 506 752 85

86 M.-Nr. 04 506 752

Déclaration de conformité aux normes européennes
Document n° : 07133950
Mois.année : 07.2007
Fabricant : Miele & Cie. KG
Adresse : Industriestrasse 3
D - 31275 Lehrte
Désignation du produit : Lave-linge
Dénomination : WS 5080 / 5100 / 5140
Marque déposée : Miele
Le produit désigné est conforme aux prescriptions des directives européennes suivantes :
Numéro :-Description 2006/42/CE : Directive CE sur les machines avec
amendements
89/336/CEE : Directive compatibilité électromagnétique CEM
avec amendements
Norme européenne harmonisée : EN ISO 10472-1 :1997
EN ISO 10472-2 :1997
EN 60204-1 :2006
EN 61770 :1999 + Corrigendum December 2005
+ A1 :2004 + A2 :2006
EN 55014–1 :2006
EN 55014–2 :1997 + A1:2001
EN 61000–3–2 :2006
EN 61000–3–3 :2006
Application du marquage CE : 2007
Lieu, date : Lehrte, 2007-07-10
Signature obligatoire :
Direction construction et développement Direction fabrication
Hr. Dr. Köckerling Hr. Krimpmann
M.-Nr. 04 506 752 87

Garantie
Pour connaître les conditions de garantie
veuillez vous adresser à la filiale MIELE
compétente. Vous trouverez son adresse
au dos.
88 M.-Nr. 04 506 752

Indice
Indicazioni per la sicurezza ed avvertenze . . . . . . . . . . . . . . . . . . . . . . 90
Il Vostro contributo alla tutela dell’ambiente . . . . . . . . . . . . . . . . . . . . . 93
Descrizione macchina . . . . . . . . . . . . . . . . . . . . . . . . . . . . . . . . . . 94
- Spiegazione degli elementi di comando . . . . . . . . . . . . . . . . . . . . . . . . . 95
- Segnalazione guasti . . . . . . . . . . . . . . . . . . . . . . . . . . . . . . . . . . . 96
Uso . . . . . . . . . . . . . . . . . . . . . . . . . . . . . . . . . . . . . . . . . . . . 98
- Capacità di carico . . . . . . . . . . . . . . . . . . . . . . . . . . . . . . . . . . . . 98
- Scelta programma e temperatura . . . . . . . . . . . . . . . . . . . . . . . . . . . . 98
- Aggiunta del detersivo . . . . . . . . . . . . . . . . . . . . . . . . . . . . . . . . . . 98
- Dosaggio del detersivo . . . . . . . . . . . . . . . . . . . . . . . . . . . . . . . . . 99
- Segnalazione "Guasto d’accensione" e "Pulire il filtro" . . . . . . . . . . . . . . . . . 99
- Aprire lo sportello e scaricare la biancheria . . . . . . . . . . . . . . . . . . . . . . . 99
Indicazioni . . . . . . . . . . . . . . . . . . . . . . . . . . . . . . . . . . . . . . . . 100
- Con prelavaggio . . . . . . . . . . . . . . . . . . . . . . . . . . . . . . . . . . . . . 100
- Senza centrifugazione . . . . . . . . . . . . . . . . . . . . . . . . . . . . . . . . . . 100
-Tempi di centrifugazione . . . . . . . . . . . . . . . . . . . . . . . . . . . . . . . . . 101
- Programma Mini . . . . . . . . . . . . . . . . . . . . . . . . . . . . . . . . . . . . . 101
- Inamidare . . . . . . . . . . . . . . . . . . . . . . . . . . . . . . . . . . . . . . . . 101
- Avanzamento rapido del programma . . . . . . . . . . . . . . . . . . . . . . . . . . 101
- Interruzione programma in caso di disinserzione carico massimo di punta attiva . . . . 101
- Interruzione di corrente durante il programma di lavaggio / Svuotamento manuale
della vasca e sbloccaggio dello sportello di carico . . . . . . . . . . . . . . . . . . . 102
- Interruzione del programma . . . . . . . . . . . . . . . . . . . . . . . . . . . . . . . 102
- Preselezione dell’avvio . . . . . . . . . . . . . . . . . . . . . . . . . . . . . . . . . 103
- Modifica di programmazione per programma di lavaggio . . . . . . . . . . . . . . . . 104
- Programmi supplementari . . . . . . . . . . . . . . . . . . . . . . . . . . . . . . . . 107
- Formazione eccessiva di schiuma. Possibili cause . . . . . . . . . . . . . . . . . . . 108
Pagina
Cura e pulizia . . . . . . . . . . . . . . . . . . . . . . . . . . . . . . . . . . . . . . 109
Significato dei simboli sulla targhetta dati . . . . . . . . . . . . . . . . . . . . . . . 111
Indicazioni per il tecnico
Sicurezza trasporto . . . . . . . . . . . . . . . . . . . . . . . . . . . . . . . . . . . . 112
Piedini macchina regolabili . . . . . . . . . . . . . . . . . . . . . . . . . . . . . . . . 112
Allacciamenti idrici . . . . . . . . . . . . . . . . . . . . . . . . . . . . . . . . . . . . 112
Afflusso/scarico acqua . . . . . . . . . . . . . . . . . . . . . . . . . . . . . . . . . . 112
Allacciamento elettrico . . . . . . . . . . . . . . . . . . . . . . . . . . . . . . . . . . 113
Riscaldamento elettrico . . . . . . . . . . . . . . . . . . . . . . . . . . . . . . . . . . 113
Allacciamento gas . . . . . . . . . . . . . . . . . . . . . . . . . . . . . . . . . . . . . 113
Allacciamento vapore . . . . . . . . . . . . . . . . . . . . . . . . . . . . . . . . . . . 113
Dichiarazione di conformità CE . . . . . . . . . . . . . . . . . . . . . . . . . . . . . 114
Garanzia . . . . . . . . . . . . . . . . . . . . . . . . . . . . . . . . . . . . . . . . . 115
La lavacentrifuga può essere installata solo
dal servizio di assistenza Miele oppure da
un rivenditore autorizzato.
M.-Nr. 04 506 752 89

Indicazioni di sicurezza ed avvertenze
Leggere le istruzioni d’uso prima di mettere
in funzione la lavacentrifuga. In questo
modo ci si protegge e si evitano danni alla
macchina.
Corretto impiego della macchina
La macchina è predisposta solo per il lavaggio di capi che non siano impregnati di
sostanze pericolose o infiammabili .
E’ adatta esclusivamente al lavaggio di
tessuti, dichiarati idonei al trattamento in
macchina dalla casa produttrice nelle etichette trattamento tessuti.
L’utente deve garantire lo standard di di-
sinfezione dei procedimenti termici e termochimici (dall’elenco, secondo § 18 IFSG)
mediante relativi controlli di routine. I procedimenti devono essere testati periodicamente,
in ambito termoelettrico mediante logger oppure in ambito batteriologico mediante bioindicatori. L’utente deve prestare particolare attenzione al rispetto dei parametri procedurali,
alla temperatura e, nei programmi termochimici, anche alla concentrazione. I programmi di
disinfezione non possono essere interrotti altrimenti viene pregiudicato l’esito della disinfezione stessa.
Non lavare in nessun caso con sostanze
chimiche! Con la maggior parte di detergenti, p. es. benzina, sussiste pericolo di incendio ed esplosione!
Non conservare o utilizzare benzina, pe-
trolio o altre sostanze facilmente infiammabili vicino alla lavacentrifuga. Non utilizzare il
coperchio macchina quale superficie d’appoggio.
Pericolo d’incendio ed esplosione!
Sicurezza elettrica
Non danneggiare, togliere o ignorare i dispositivi di sicurezza e gli elementi di co-
mando della lavacentrifuga.
Non avviare la macchina se gli elementi di
comando o l’isolamento delle condutture
sono danneggiati. E’ necessario eseguire prima le relative riparazioni.
Utilizzare la macchina solo quando tutte
le parti di rivestimento esterno asportabili
sono montate e non è possibile alcun accesso a parti della macchina in movimento o conduttrici di tensione.
La macchina è staccata dalla rete elettrica
solo se l’interruttore generale dell’impianto
elettrico o il fusibile sono disinseriti.
Riparazioni a macchine con riscaldamen-
to elettrico, a gas o vapore possono essere eseguite solo da personale qualificato.
Eventuali riparazioni, non correttamente eseguite, possono causare pericoli per l’utente.
Non cercare di aprire lo sportello di carico
con forza. Per garantire il sicuro funzionamento della chiusura sportello, la maniglia è
dotata di una sicurezza antirottura.
Eventuali pezzi difettosi possono essere
sostituiti solo con pezzi di ricambio originali Miele. Solo in questo modo si adempie
pienamente alle richieste di sicurezza da noi
poste per le nostre macchine.
L’impiego dei migliori materiali e l’accura-
ta lavorazione degli stessi non proteggono i tubi d’afflusso da eventuali danni causati
da usura.
Possono apparire piccoli tagli, piegature o simili, che provocano perdite d’acqua.
Controllare quindi a regolari intervalli i tubi,
onde poterli tempestivamente sostituire ed
evitare così danni, causati da fuoriuscita d’acqua.
La sicurezza elettrica della macchina è ga-
rantita solo se questa viene allacciata ad
un regolamentare conduttore a terra.
E’ molto importante verificare questa premessa basilare di sicurezza e, in caso di dubbio,
è opportuno far controllare l’impianto elettrico
da un elettricista qualificato. La casa produttrice non può essere ritenuta responsabile di
danni, causati dalla mancanza o dall’interruzione della conduttura di messa a terra.
90 M.-Nr. 04 506 752

Indicazioni di sicurezza ed avvertenze
Misure cautelative in caso di perdita di
gas
-Valide solo per lavacentrifughe con riscaldamento a gas.-
Spegnere immediatamente eventuali fiam-
me!
Aprire porte e finestre!
Bloccare immediatamente i dispositivi di
chiusura del contatore gas o il dispositivo
di chiusura principale!
Non entrare con fiamme vive negli ambienti in cui si sono riscontrate perdite di gas!
Non accendere fiammiferi o accendini!
Non fumare!
Non produrre scintille elettriche:
p. es. estraendo prese elettriche o premendo interruttori o campanelli elettrici.
Chiudere il rubinetto del gas, installato da
parte del committente per la lavacentrifuga.
Se non si dovesse scoprire la causa della
perdita di gas, nonostante tutti i rubinetti
del gas siano chiusi, è necessario richiedere l’intervento dell’azienda del gas.
Attenzione! Prima di terminare i lavori di messa in funzione, manutenzione, modifica e riparazioni, controllare la tenuta ermetica delle
parti conduttrici di gas, dal rubinetto di chiusura manuale fino all’ugello del bruciatore.
Fare particolare attenzione al bocchettone di
misurazione al rubinetto del gas, del pressostato di allacciamento e del bruciatore.
Eseguire i controlli a bruciatore inserito ovvero disinserito.
Impiego della macchina
Coloro, che per incapacità fisica, sensoria-
le o psichica, per inesperienza, nonché
non conoscenza non siano in grado di utilizzare autonomamente con sicurezza questa lavatrice, possono metterla in funzione solo se
sorvegliati e istruiti da persone competenti,
che se ne assumono la responsabilità.
Non permettere ai bambini di giocare all’in-
terno, sopra o nelle vicinanze della macchina o addirittura di metterla in funzione.
Se il lavaggio viene effettuato a tempera-
ture elevate, l’oblò diventa caldo. Impedire dunque ai bambini di toccarlo durante il funzionamento della macchina.
Prima di estrarre la biancheria, accertarsi
sempre che il tamburo si sia fermato. Non
infilare mai le mani nel tamburo ancora rotante. Pericolo di ferimenti!.
L’acqua impiegata nel lavaggio è lisciva,
non acqua potabile!
Scaricare la lisciva in un apposito sistema di
scarico.
La lavacentrifuga può essere messa in
funzione solo se nelle immediate vicinanze dell’apparecchio vi è uno scarico a pavimento (pozzetto) .
Detersivi e disinfettanti contengono spes-
so composti al cloro. Se questi si essiccano su superfici in acciaio inossidabile, i cloruri
generatisi possono intaccare l’acciaio e produrre ruggine.
Usando prodotti senza cloro per il lavaggio/la
disinfezione nonché per la pulizia delle superfici in acciaio inossidabile, consente di proteggere la macchina da danni causati da ruggine.
In caso di dubbio, farsi confermare l’idoneità
del prodotto dalla casa produttrice. Eliminare
con acqua i prodotti contenenti cloro, giunti
inavvertitamente sulla superficie in acciaio
inossidabile, e asciugare poi accuratamente
la superficie stessa.
Prodotti coloranti, decoloranti e decalcifi-
canti devono essere idonei all’impiego in
lavacentrifughe. Attenersi assolutamente alle
indicazioni delle case produttrici.
M.-Nr. 04 506 752 91

Indicazioni di sicurezza ed avvertenze
Nell’impiego e nella combinazione di addi-
tivi e prodotti speciali per il lavaggio rispettare scrupolosamente le indicazioni d’uso riportate sulla confezione.
Utilizzare ogni prodotto solamente per gli scopi previsti e indicati dal produttore, in modo
da evitare danni ai materiali e violente reazioni chimiche.
In caso di dubbi rivolgersi alle case produttrici
e verificare se il prodotto è adatto all’impiego
in lavacentrifuga.
La raccomandazione di un determinato
additivo chimico non implica che il produttore della macchina sia responsabile per gli effetti del prodotto sui capi e sull’apparecchio
stesso.
Si tenga presente che cambiamenti nel prodotto non resi noti dal produttore possono interferire nella qualità del risultato di lavaggio.
Verificare il risultato di lavaggio su bian-
cheria precedentemente sporca di oli o
grassi naturali. Risultati di lavaggio non soddisfacenti potrebbero essere causa di incendio
durante l’asciugatura della biancheria in essiccatoio.
ti non dovrebbero quindi essere utilizzati; in alternativa si possono utilizzare sbiancanti a
base di ossigeno.
Se tuttavia fosse necessario, in presenza di
particolari tipi di sporco, utilizzare candeggine
al cloro, effettuare sempre e assolutamente
una fase di trattamento anticloro. Altrimenti
sia la macchina, sia la biancheria possono subire danni permanenti e irreparabili.
Trattamento anticloro
Il trattamento anticloro deve avvenire subito
dopo la fase di candeggio. Possibilmente utilizzando perossido di idrogeno oppure un detersivo o un candeggiante a base di ossigeno,
senza far scaricare il liquido di ammollo.
Il tiosolfato, soprattutto se l’acqua è dura, può
formare delle incrostazioni gessose sulla biancheria o causare depositi nella lavatrice. Poiché il trattamento con il perossido di idrogeno
favorisce il processo di neutralizzazione del
cloro, preferire questa applicazione.
Non impiegare apparecchi a vapore o
getti d’acqua per la pulizia della lavacentrifuga.
Impiego degli accessori
Il montaggio o l’incasso di accessori è
soggetto ad espressa autorizzazione della
Miele. Per gli accessori non autorizzati è
escluso il diritto alla garanzia ed a prestazioni
in garanzia e/o per vizi e difetti del prodotto.
Cloro e possibili danni ai componenti
Indicazioni sull’uso di sbiancanti al cloro e
percloroetilene
L’uso del cloro (candeggina) aumenta la
probabilità di danneggiare alcuni componenti della macchina.
L’uso di prodotti contenenti cloro (ad es. l’ipoclorito di sodio o le candeggine in polvere), a
seconda della concentrazione, del tempo di
azione e della temperatura può distruggere lo
strato protettivo dell’acciaio e corrodere i componenti della macchina. Questo tipo di prodot-
La quantità precisa di prodotto e le temperature devono essere valutate e verificate in loco
a seconda delle indicazioni di dosaggio fornite dal produttore del detersivo e dell’additivo.
Inoltre deve essere verificato che non rimangano residui di cloro attivo nella biancheria.
Smaltimento di vecchie apparecchiature
In caso di eliminazione di una vecchia la-
vacentrifuga, rendere inservibile la chiusura dello sportello. Si impedisce così che i bambini, giocando si chiudano all’interno. Pericolo
di ferimenti!
Qualora la macchina venisse utilizzata anche da altre persone, è necessario sottoporre alla loro attenzione queste importanti indicazioni di sicurezza.
Conservare l’istruzione d’uso!
92 M.-Nr. 04 506 752

Il Vostro contributo alla tutela dell’ambiente
Smaltimento rifiuti apparecchiature elettriche ed elettroniche (RAEE)
ai sensi del Decr. Legisl. 25 luglio 2005, n.
151 in attuazione delle Direttive
2002/95/CE, 2002/96/CE e 2003/108/CE sullo smaltimento dei rifiuti di apparecchiature elettriche ed elettroniche.
Il simbolo del cassonetto barrato indica che il
prodotto alla fine della propria vita utile deve
essere raccolto separatamente dagli altri rifiuti.
Smaltimento dell’imballaggio
L’imballaggio ha lo scopo di proteggere la
merce da eventuali danni che potrebbero verificarsi durante le operazioni di trasporto.
I materiali utilizzati per l’imballaggio sono riciclabili, per cui selezionati secondo criteri di rispetto dell’ambiente e di facilità di smaltimento finalizzata alla reintegrazione dei materiali
nei cicli produttivi.
Restituire gli imballaggi al circuito di raccolta
dei materiali consente da una parte di risparmiare materie prime e dall’altra di ridurre il volume degli scarti. Tale meccanismo permette
da un lato di ridurre il volume degli scarti mentre dall’altro rende possibile un utilizzo più razionale delle risorse non rinnovabili.
La raccolta differenziata della presente apparecchiatura giunta a fine vita è organizzata e
gestita dal produttore dell’eventuale nuova apparecchiatura acquistata in sostituzione della
presente, in tutti gli altri casi è a carico del detentore. L’utente che vorrà disfarsi della presente apparecchiatura e che ha disposto di
acquistarne una nuova equivalente in sostituzione della medesima, quindi, dovrà contattare il produttore della nuova apparecchiatura e
seguire il sistema che questo ha adottato per
consentire la raccolta separata dell’apparecchiatura giunta a fine vita.
L’adeguata raccolta differenziata per l’avvio
successivo dell’apparecchiatura dismessa al
riciclaggio, al trattamento e allo smaltimento
ambientalmente compatibile contribuisce a
evitare possibili effetti negativi sull’ambiente e
sulla salute e favorisce il riciclo dei materiali di
cui è composta l’apparecchiatura.
Lo smaltimento abusivo del prodotto da parte
del detentore comporta l’applicazione di sanzioni amministrative previste dalla normativa
vigente.
M.-Nr. 04 506 752 93

Descrizione macchina
Pannello comandi
12345 6
1 Tasto "Guasti" 4 Spie svolgimento programma
(solo per lavacentrifughe con riscaldamento a gas)
2 Interruttore a tasti 6 Interruttore d’emergenza avvio-arresto
3 Indicatore temperatura e tempo residuo
5 Selettore programma e temperatura
La costruzione della macchina rispetta la norma IEC 60204-1:2005.
Rubinetti di chiusura acqua
Vaschette detersivi
Pannello comandi
Sportello
Zoccolo
(optional)
Interruttore principale
Scarico acqua
Scarico a pavimento
(pozzetto)
WS 5080/5100/5140
94 M.-Nr. 04 506 752

Descrizione macchina
9
10
12345
1 = Interruttore “Avvio-Arresto”
2 = Interruttore “con prelavaggio”
Per biancheria molto sporca.
-Selezione solo per i programmi A,B e
Cse desiderato.-
3 = Interruttore “Inamidare”
Premere l’interruttore se la biancheria
deve essere inamidata. L’interruttore fun-
ziona solo per i programmi AeE.
4 = Interruttore “Senza centrifugazione”
Premere l’interruttore se non si desidera
centrifugare la biancheria al termine del
risciacquo.
5 = Tasto “Avvio”
Premere il tasto per avviare il programma.
67 8
6 = Indicazione “Tempo h”
7 = Indicazione “Tempo min”
Viene indicato quanto dura ancora il programma di lavaggio ovvero, in caso di
preselezione dell’avvio, dopo quanto tempo il programma verrà avviato,
oppure “Temperatura oC”
La temperatura viene indicata in aumento, a livelli di 5°C, a partire da 20°C.
8 = Tasto “Preselezione avvio”
Consente di preselezionare con max. 9
ore e 30 minuti l’avvio di un programma.
- Descrizione dettagliata ved. pagina 103.
9 = Spia d’indicazione “Tempo”
Segnala il tempo nell’indicazione 6 e 7.
10 =Spia d’indicazione “Temperatura
Segnala la temperatura
nell’indicazione 7.
o
C”
M.-Nr. 04 506 752 95

Descrizione macchina
11
11= Spie d’indicazione svolgimento program-
ma
Avvio
Prelavaggio
Lavaggio principale
Risciacquo
Inamidare
Risciacquo
Senza centrifugazione
Centrifugazione
Fine/Sportello
Guasto
Afflusso Scarico
acqua acqua
Queste significano:
“Livello”
Guasto nel sistema livello d’acqua.
“Riscaldamento”
Guasto nel sistema riscaldante.
“Avviamento”
Guasto nel sistema d’avviamento.
“Sportello”
Guasto nel sistema di chiusura.
Procedere allo sbloccaggio manuale, descritto al capoverso “Interruzione di corrente durante il programma di lavaggio”).
I guasti finora descritti possono essere eliminati solo dal servizio di assistenza tecnica.
“Afflusso acqua”
I rubinetti dell’acqua (predisposti dal
committente) non sono stati aperti oppure i filtri nei tubi d’afflusso in pressione o nelle valvole d’afflusso sono sporchi.
“Scarico acqua”
Lo scarico della lavacentrifuga è intasato oppure è difettosa la valvola di scarico*.
Una volta eliminato il disturbo ovvero il guasto, il programma di lavaggio deve essere
nuovamente avviato.
*) Una valvola di scarico difettosa può essere riparata
solo dal servizio di assistenza tecnica.
Vale solo per WS 5100/WS 5140 con riscaldamento a gas
Segnalazione guasto "Riscaldamento"
Segnalazione guasti
Disturbi ovvero guasti vengono segnalati tramite spie lampeggianti.
La spia "Riscaldamento" lampeggia, p. es. se
è interrotta l’alimentazione di gas alla lavacentrifuga, magari a causa della mancata apertu-
ra del rubinetto del gas.
Livello
Riscaldamento
Avviamento
Se dovessero lampeggiare altre spie, si tratta
di una conseguenza, alla quale non va attri-
buita alcuna importanza.
Aprire il rubinetto del gas e avviare nuova-
mente la macchina, facendo fuoriuscire e pre-
mendo l’interruttore "Avvio-Arresto" e premen-
Sportello
do il tasto "Avvio".
Afflusso acqua Scarico acqua
Se la spia "Riscaldamento" dovesse lampeg-
giare ancora dopo questa procedura, richiede-
re l’intervento del servizio di assistenza tecni-
ca per eliminare il guasto.
96 M.-Nr. 04 506 752

Descrizione macchina
12
12 = Selettore programma e temperatura
Con il selettore programma viene selezionato il programma di lavaggio.
A
Bollitura/Colorata
B
Lava/Indossa
14
14 =Interruttore arresto d’emergenza
Da azionare solo in caso di pericolo.
Eliminato il pericolo, l’interruttore viene
sbloccato mediante rotazione destrorsa
del disco zigrinato.
Dopo lo sbloccaggio lampeggia l’indicazione “Tempo” oppure “Temperatura”.
Premere nuovamente il tasto “Avvio”per
proseguire il programma interrotto.
C
Delicata/sintetica
D
Lana
E
Programma Mini
F
Risciacquo e centrifugazione extra
G
Centrifugazione extra
H
Scarico extra
r Fine
13
13 = Tasto "Guasti"
(solo per WS5100/WS5140 con riscaldamento a gas)
In caso di guasto d’accensione, il tasto
deve essere azionato dopo minimo 1
minuto.
M.-Nr. 04 506 752 97

Uso
MESSA IN FUNZIONE
La lavacentrifuga può essere messa in funzione solo dal servizio di assistenza tecnica oppure da un rivenditore autorizzato.
Aprire i rubinetti di chiusura acqua (predisposti dal committente).
Inserire l’interruttore principale (predisposto dal committente).
Svuotare le tasche
Corpi estranei (p.es. chiodi, monete, graffette, ecc.) possono danneggiare biancheria e macchina.
Selezionare programma e temperatura
(p.es. programma A Bollitura/Colorata
95 oC).
Caricare la biancheria.
Capacità di carico (biancheria asciutta)
WS 5080 WS 5100 WS 5140
Programma A,E,F,
max. 8 kg max. 10 kg max. 14 kg
Programma
max. 2,5 kg max. 3,5 kg max. 5 kg
Programma C,
max. 1,5 kg max. 2 kg max. 3 kg
Chiudere lo sportello.
B
G
D
*
Selezionare il prelavaggio, se desiderato,
solo per i programmi A,B,C
premendo l’interruttore “con prelavaggio”.
Versare il detersivo per il lavaggio principale nella vaschetta II e, se desiderato, il de-
*
Premere l’interruttore “Avvio-Arresto”.
- Si accende la spia “Avvio”e lampeggia la
spia “Tempo”. -
98 M.-Nr. 04 506 752
tersivo per il prelavaggio nella vaschetta I,
l’ammorbidente nella vaschetta § ed il
candeggiante nella vaschetta senza simbolo.

Uso
Dosaggio detersivo
Evitare il dosaggio eccessivo, perchè causa
troppa schiuma.
Non impiegare detersivi che producono molta
schiuma.
Attenzione! Per evitare eccessivi depositi sulle
resistenze di riscaldamento, si consiglia di impiegare solo detersivi di marca.
Quantità di dosaggio:
Tenere sempre presenti le indicazioni delle
case produttrici.
Se è stato azionato l’interruttore “Senza
centrifugazione”, il programma di lavaggio
viene interrotto nell’ultimo ciclo di risciacquo. Si accende la spia “Senza centrifugazione”.
- La biancheria rimane immersa
nell’acqua. Azionare nuovamente l’interruttore “Senza
centrifugazione”. - Segue lo scarico dell’acqua con centrifugazione finale! -
– Se si desidera terminare il programma
senza centrifugazione, portare il selet-
tore programma su H (Scarico extra).
Vale solo per WS 5100/WS 5140 con riscaldamento a gas
Indicazioni:
L’ammorbidente ovvero il candeggiante non
devono essere versati oltre la marcatura.
Impiegando candeggianti, è necessario programmare almeno 4 cicli di risciacquo (vedasi
modifica programmazione programma di lavaggio e tabella "Modifiche di programma").
*
Premere il tasto “Avvio”. - L’indicazione
“Tempo” si spegne e si accende l’indicazione “Temperatura”. -
- Il programma di lavaggio inizia a svolgersi. -
Segnalazione "Guasto d’accensione"
Se nell’indicazione "Tempo h" appare il
simbolo " y ", c’è un guasto nell’accensione.
Dopo minimo 1 minuto, ripetere il procedimento d’accensione, azionando il tasto
"Guasto".
Se questa procedura rimanesse senza esito, richiedere l’intervento dell’assistenza
per eliminare il guasto.
Segnalazione guasto "Filtro intasato"
Se durante lo svolgimento del programma
si mette in funzione il suono continuo del
cicalino, pulire il filtro come qui di seguito
descritto.
M.-Nr. 04 506 752 99
 Loading...