


T 4224 C
Operating instructions
for condenser tumble dryer
T 4224 C
It is essential to read these
operating instructions before
installing or using the machine
to avoid the risk of accidents or
damage to the machine.
WO
M.-Nr. 06 436 260

Disposal of the packing
material
The transport and protective packing
has been selected from materials which
are environmentally friendly for disposal
and can normally be recycled.
Ensure that any plastic wrappings,
bags etc. are disposed of safely and
kept out of the reach of babies and
young children. Danger of suffocation!
Rather than just throwing these
materials away, please ensure they are
offered for recycling.
Disposal of your old appliance
Electrical and electronic appliances
often contain materials which, if
handled or disposed of incorrectly,
could be potentially hazardous to
human health and to the environment.
They are, however, essential for the
correct functioning of your appliance.
Please do not therefore dispose of your
appliance with your household waste.
Please dispose of it at your local
community waste collection / recycling
centre and ensure that it presents no
danger to children while being stored
for disposal.
It should be unplugged or disconnected
from the mains electricity supply by a
competent person. The plug must be
rendered useless and the cable cut off
directly behind it to prevent misuse.
See the "Warning and Safety" section of
this booklet for further details.
Energy saving tips
To avoid unnecessarily long drying
times and high consumption of energy:
–
Make sure that your laundry is
thoroughly spun before drying.
The higher the spin, the greater the
savings that can be made in energy
and time during drying.
– Load according to the optimum
amount of laundry recommended for
the programme being used (see
Programme chart).
Underloading is uneconomical.
Overloading gives a poorer quality of
drying and may cause unnecessary
creasing.
–
Make sure the room in which the
dryer is located is well ventilated.
–
Make sure the fluff filters are clean
before using the dryer.
–
Check the condenser unit from time
to time and clean it when necessary.
Caring for the environment
2

Caring for the environment . . . . . . . . . . . . . . . . . . . . . . . . . . . . . . . . . . . . . . . . . . 2
Disposal of the packing material . . . . . . . . . . . . . . . . . . . . . . . . . . . . . . . . . . . . . . . 2
Disposal of your old appliance . . . . . . . . . . . . . . . . . . . . . . . . . . . . . . . . . . . . . . . . 2
Energy saving tips . . . . . . . . . . . . . . . . . . . . . . . . . . . . . . . . . . . . . . . . . . . . . . . . . . 2
Warning and Safety instructions . . . . . . . . . . . . . . . . . . . . . . . . . . . . . . . . . . . . . 5
Control panel . . . . . . . . . . . . . . . . . . . . . . . . . . . . . . . . . . . . . . . . . . . . . . . . . . . . . 9
Notes on laundry care . . . . . . . . . . . . . . . . . . . . . . . . . . . . . . . . . . . . . . . . . . . . . 10
Care symbols. . . . . . . . . . . . . . . . . . . . . . . . . . . . . . . . . . . . . . . . . . . . . . . . . . . . . 10
Tips on drying . . . . . . . . . . . . . . . . . . . . . . . . . . . . . . . . . . . . . . . . . . . . . . . . . . . . 10
How to dry correctly . . . . . . . . . . . . . . . . . . . . . . . . . . . . . . . . . . . . . . . . . . . . . . 11
Brief instructions . . . . . . . . . . . . . . . . . . . . . . . . . . . . . . . . . . . . . . . . . . . . . . . . . . 11
Low temperature. . . . . . . . . . . . . . . . . . . . . . . . . . . . . . . . . . . . . . . . . . . . . . . . 12
Changing the programme sequence. . . . . . . . . . . . . . . . . . . . . . . . . . . . . . . . . . . 13
Programme chart . . . . . . . . . . . . . . . . . . . . . . . . . . . . . . . . . . . . . . . . . . . . . . . . . 14
Cleaning and care . . . . . . . . . . . . . . . . . . . . . . . . . . . . . . . . . . . . . . . . . . . . . . . . 17
Emptying the condensed water container. . . . . . . . . . . . . . . . . . . . . . . . . . . . . . . 17
Cleaning the fluff filters . . . . . . . . . . . . . . . . . . . . . . . . . . . . . . . . . . . . . . . . . . . . . 18
Cleaning them whilst dry . . . . . . . . . . . . . . . . . . . . . . . . . . . . . . . . . . . . . . . . . 18
Cleaning them with water . . . . . . . . . . . . . . . . . . . . . . . . . . . . . . . . . . . . . . . . . 19
Cleaning the tumble dryer . . . . . . . . . . . . . . . . . . . . . . . . . . . . . . . . . . . . . . . . . . . 19
Cleaning the condenser unit . . . . . . . . . . . . . . . . . . . . . . . . . . . . . . . . . . . . . . . . . 20
Removing the condenser unit. . . . . . . . . . . . . . . . . . . . . . . . . . . . . . . . . . . . . . 20
Checking the condenser unit . . . . . . . . . . . . . . . . . . . . . . . . . . . . . . . . . . . . . . 21
Cleaning the condenser unit. . . . . . . . . . . . . . . . . . . . . . . . . . . . . . . . . . . . . . . 21
Replacing the condenser unit. . . . . . . . . . . . . . . . . . . . . . . . . . . . . . . . . . . . . . 22
Contents
3

Problem solving guide. . . . . . . . . . . . . . . . . . . . . . . . . . . . . . . . . . . . . . . . . . . . . 23
General problems . . . . . . . . . . . . . . . . . . . . . . . . . . . . . . . . . . . . . . . . . . . . . . . . . 23
Check indicator lamps . . . . . . . . . . . . . . . . . . . . . . . . . . . . . . . . . . . . . . . . . . . . . 26
To change the interior drum lamp . . . . . . . . . . . . . . . . . . . . . . . . . . . . . . . . . . . . . 28
After sales service . . . . . . . . . . . . . . . . . . . . . . . . . . . . . . . . . . . . . . . . . . . . . . . . . 29
Repairs . . . . . . . . . . . . . . . . . . . . . . . . . . . . . . . . . . . . . . . . . . . . . . . . . . . . . . . 29
PC indicator lamp (Interface for service technicians) . . . . . . . . . . . . . . . . . . . 29
Optional accessories . . . . . . . . . . . . . . . . . . . . . . . . . . . . . . . . . . . . . . . . . . . . 29
Installation . . . . . . . . . . . . . . . . . . . . . . . . . . . . . . . . . . . . . . . . . . . . . . . . . . . . . . 30
Front view. . . . . . . . . . . . . . . . . . . . . . . . . . . . . . . . . . . . . . . . . . . . . . . . . . . . . . . . 30
Installation site . . . . . . . . . . . . . . . . . . . . . . . . . . . . . . . . . . . . . . . . . . . . . . . . . . . . 31
Transporting the machine to its installation site . . . . . . . . . . . . . . . . . . . . . . . . 31
Building under a continous worktop / in a row of kitchen units . . . . . . . . . . . . 31
Replacing the lid. . . . . . . . . . . . . . . . . . . . . . . . . . . . . . . . . . . . . . . . . . . . . . . . 31
Aligning the machine . . . . . . . . . . . . . . . . . . . . . . . . . . . . . . . . . . . . . . . . . . . . 32
Room in which the dryer is located . . . . . . . . . . . . . . . . . . . . . . . . . . . . . . . . . 32
Washer-dryer stack. . . . . . . . . . . . . . . . . . . . . . . . . . . . . . . . . . . . . . . . . . . . . . 32
Before moving the machine again . . . . . . . . . . . . . . . . . . . . . . . . . . . . . . . . . . 32
External condensed water outlet . . . . . . . . . . . . . . . . . . . . . . . . . . . . . . . . . . . . . . 33
Pulling out the drain hose . . . . . . . . . . . . . . . . . . . . . . . . . . . . . . . . . . . . . . . . . 33
Connection to a sink drain outlet . . . . . . . . . . . . . . . . . . . . . . . . . . . . . . . . . . . 34
If you no longer wish to use an external condensed water outlet . . . . . . . . . . 34
Electrical connection . . . . . . . . . . . . . . . . . . . . . . . . . . . . . . . . . . . . . . . . . . . . . . . 35
Consumption data . . . . . . . . . . . . . . . . . . . . . . . . . . . . . . . . . . . . . . . . . . . . . . . . 36
Technical data . . . . . . . . . . . . . . . . . . . . . . . . . . . . . . . . . . . . . . . . . . . . . . . . . . . 37
Programmable functions. . . . . . . . . . . . . . . . . . . . . . . . . . . . . . . . . . . . . . . . . . . 40
Altering the residual moisture level in the Cottons programmes. . . . . . . . . . . . . . 40
Altering the residual moisture level in the Minimum iron programmes . . . . . . . . . 41
Activating and deactivating the buzzer . . . . . . . . . . . . . . . . . . . . . . . . . . . . . . . . . 42
Extending the cooling down time . . . . . . . . . . . . . . . . . . . . . . . . . . . . . . . . . . . . . 43
Changing the standard drying level in the Minimum iron - Normal programme . . 44
Changing the standard drying level in the Automatic programme . . . . . . . . . . . . 45
Contents
4

Read the operating instructions
carefully before using this appliance
for the first time. They contain
important information about the
safety, use and maintenance of the
appliance. This way you will avoid
the risk of accidents and damage to
the appliance.
Keep these operating instructions in
a safe place and ensure that new
users are familiar with the content.
Pass them on to any future owner of
the machine.
Correct use
The tumble dryer is only intended
for drying fabrics which have been
washed in a water solution, marked on
the manufacturer’s wash care label as
being suitable for tumble drying.
Any other applications may be
dangerous. The manufacturer is not
liable for damage resulting from
improper use or operation.
This appliance is not intended for
use by young children or infirm
persons unless they have been
adequately supervised by a
responsible person to ensure that they
can use the appliance safely.
Young children should be supervised to
ensure that they do not play with the
appliance.
Technical safety
Before setting up the machine
check it for any externally visible
damage. Do not install or use a
damaged machine.
Before connecting the machine,
ensure that the connection data on
the data plate (fusing, voltage and
frequency) matches the mains
electricity supply. If in any doubt,
consult a qualified electrician.
The electrical safety of this
machine can only be guaranteed
when continuity is complete between
the appliance and an effective earthing
system which complies with local and
national regulations. It is most important
that this basic safety requirement is
regularly tested by a qualified
electrician. The manufacturer cannot be
held responsible for the consequences
of an inadequate earthing system (e.g.
electric shock).
Do not connect the machine to the
mains electricity supply by an
extension lead. Extension leads do not
guarantee the required safety of the
machine (e.g. danger or overheating).
The machine is built in accordance
with current safety requirements.
Unauthorised repairs could result in
unforeseen dangers for the user, for
which the manufacturer cannot accept
responsibility. Repairs should only be
undertaken by a Miele approved
engineer.
Ensure current is not supplied to the
appliance while maintenance or repair
work is being carried out.
Faulty components must only be
exchanged for Miele original spare
parts. Only when these parts are fitted
can the safety standards of the
machine be guaranteed.
Warning and Safety instructions
5

If the appliance is supplied from a
cord extension set or electrical
portable outlet device the cord
extension set or electrical portable
outlet device should be positioned so it
is not subject to splashing or ingress of
moisture.
If the connection cable is faulty it
must only be replaced by a Miele
approved service technician to protect
the user from danger.
In the event of a fault or for
cleaning purposes, the machine is
only completely isolated from the
electricity supply when:
– it is switched off at the wall socket
and the plug is withdrawn, or
– it is switched off at the mains, or
– the mains plug is withdrawn.
Operation
This equipment is not designed for
maritime use or for use in mobile
installations such as caravans, aircraft
etc. However it may be suitable for
such usage subject to a risk
assessment of the installation being
carried out by a suitably qualified
engineer.
The dryer must not be used without
the fluff filters in place or if the fluff
filters are damaged in any way.
The dryer must not be used without
the condenser unit in place.
Do not install the machine in a
room where the temperature may
drop down to or below freezing. At very
cold temperatures the machine may be
difficult to start.
There is a risk of damage if the
condensed water is allowed to freeze in
the pump, hoses and / or condensed
water container.
If the water is drained externally
through the drain hose instead of
being collected in the condensed water
container, make sure the drain hose is
securely attached if you hang it in a
sink or basin to avoid the hose slipping
and the water causing damage.
Condensed water is not drinking
water. It can cause health
problems in both people and animals.
Always keep the area around the
machine free of dust and fluff.
Warning and Safety instructions
6

Always close the door after use.
This way you will avoid the danger
of:
–
anyone sitting or leaning on the door,
which can cause the machine to tip
up,
–
children climbing onto or into the
dryer or hiding things in it.
There is danger of fire with fabrics
which:
–
contain a large proportion of rubber,
foam rubber or rubber like materials.
– have been treated with inflammable
cleaning agents.
– have been splashed with hair
lacquer, hair spray, nail varnish
remover or similar substances.
– which contain padding or fillings
(e.g. pillows, jackets). If these were
damaged the filling could leak with
the risk of igniting in the dryer.
–
are soiled with oil or grease.
In areas which may be subject to
infestation by cockroaches or other
vermin, pay particular attention to
keeping the appliance and its
surroundings in a clean condition at all
times. Any damage which may be
caused by cockroaches or other vermin
will not be covered by the appliance
guarantee.
To minimize the risk of fire in a
tumble dryer, the following
should be observed:
–
Items that have been spotted or
soaked with vegetable or cooking oil
constitute a fire hazard and should
not be placed in a tumble dryer.
Oil-affected items can ignite
spontaneously, especially when
exposed to heat sources such as in a
tumble dryer. The items become
warm, causing an oxidation reaction
in the oil. Oxidation creates heat. If
the heat cannot escape, the items
can become hot enough to catch
fire. Pilling, stacking or storing
oil-affected items can prevent heat
from escaping and so create a fire
hazard.
If it is unavoidable that fabrics that
contain vegetable or cooking oil or
have been contaminated by hair care
products be placed in a tumble dryer
they should first be washed in hot
water with extra detergent - this will
reduce, but not eliminate, the hazard.
The "cool down" cycle of tumble
dryers should be used to reduce the
temperature of the items. They
should not be removed from the
tumble dryer or piled or stacked
while hot.
Warning and Safety instructions
7

–
Items that have been previously
cleaned in, washed in, soaked in or
spotted with petrol/gasoline,
dry-cleaning solvents or other
flammable or explosive substances
should not be placed in a tumble
dryer.
Highly flammable substances
commonly used in a domestic
environments include acetone,
denatured alcohol, petrol/gasoline,
kerosene, spot removers (some
brands), turpentine, waxes and wax
removers.
– Items containing foam rubber (also
known as latex foam) or similarly
textured rubber like materials should
not be dried in a tumble dryer on a
heat setting.
Foam rubber materials can, when
heated, produce fire by spontaneous
combustion.
– Fabric softeners or similar products
should not be used in a tumble dryer
to eliminate the effects of static
electricity unless this practice is
specifically recommended by the
manufacturer of the fabric softener or
product.
–
Undergarments that contain metal
reinforcements should not be placed
in a tumble dryer.
Damage to the tumble dryer can
result if metal reinforcements come
loose during drying. When available
a drying rack could be used for such
items.
–
Plastic articles such as shower caps
or babies’ waterproof napkin covers
should not be placed in a tumble
dryer.
–
Rubber-backed articles, clothes
fitted with foam rubber pads, pillows,
galoshes and rubber-coated tennis
shoes should not be placed in a
tumble dryer.
Using accessories
Accessory parts may only be fitted
when expressly approved by Miele.
If other parts are used, guarantee,
performance and product liability
claims may be invalidated.
Warning and Safety instructions
8
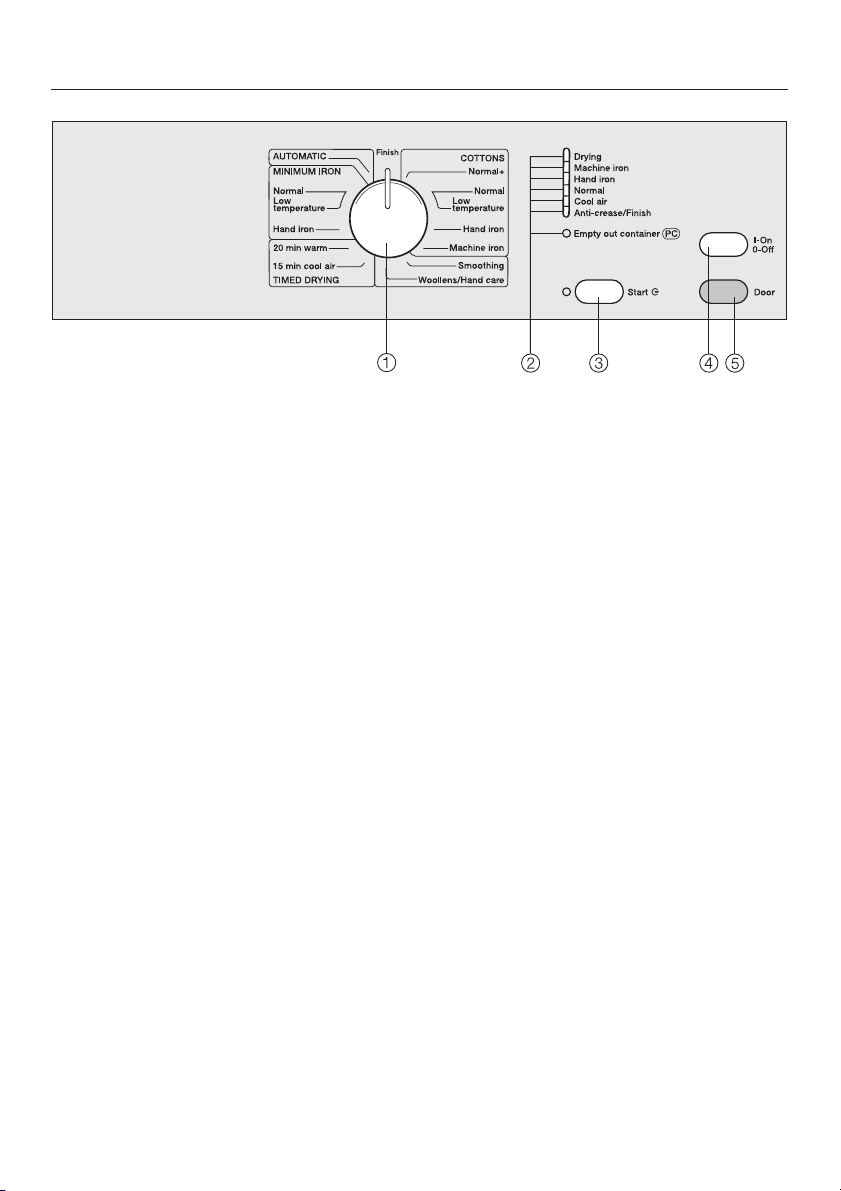
a Programme selector
The programme selector can be
turned clockwise or anti-clockwise.
b Programme sequence and check
lamps
c Start button
Press the
Start
button to start a
programme.
The
Start
indicator lamp will flash as
soon as a programme can be
started. It lights up constantly once
the programme has started.
d I-On/0-Off button
To switch the machine on or off / to
interrupt a programme.
The Anti-crease/Finish lamp will light
up as confirmation that the machine
has been switched on.
e Door Button
To open the door / to cancel a
programme.
Pressing this button will open the
door even when the machine is
switched off at the mains.
If the machine is switched on at the
mains and the door is opened the
drum lighting will come on. It will go
out a few minutes later to save
energy.
Control panel
9

Care symbols
Before drying check the drying symbol
on the care label. If there are no
symbols, dry at your own risk!
q . . . . . . . . . Dry at normal temperature
r . . . . . . . . . . Dry at a low temperature
s . . . . . . . . . . . . . . . Do not tumble dry
–
For delicates and fabrics with the
following care label r select
Low
temperature
.
Tips on drying
– Always observe the maximum
recommended loads given in the
"Programme chart". Never overload
the drum.
Overloading can cause unnecessary
wear and tear to the laundry, give a
disappointing drying result and
cause more creasing.
– Do not put soaking wet items into the
tumble dryer. Spin them thoroughly
after washing using the appropriate
spin speed.
–
Use the
Automatic
programme for
drying mixed loads of cottons and
minimum iron fabrics.
–
Open jackets
so that they can dry
evenly.
–
Woollens and wool blends
tend to
become matted and shrink if dried in
a tumble dryer. They can, however,
be partially dried using the
Woollens
hand care
programme.
–
Down-filled garments
have linings
which have a tendency to shrink,
depending on the quality of the item.
They can be partially dried using the
Smoothing
programme.
–
Pure linen
should only be machine
dried if specified as suitable by the
manufacturer on the care label, as
the surface of the fabric may
otherwise become rough. They can
be partially dried using the
Smoothing
programme.
–
Loopknit garments
(e.g. T-shirts and
underwear) tend to shrink depending
on their quality. Do not over-dry these
textiles. When purchasing these
garments it is advisable to take their
shrinkage properties into account.
– Minimum iron fabrics
and 100%
cotton shirts or blouses tend to
crease more, the greater the load.
This is especially true of very fine
weaves.
Reduce the load or use the
Minimum
iron - Hand iron
programme.
–
Starched laundry
can be dried in the
tumble dryer. To achieve the usual
finish, double the amount of starch
should be used.
–
New dark coloured garments
should
be washed and dried separately
from light coloured garments to avoid
the danger of colours running and
discolouring other garments or even
plastic components in the machine.
Dark coloured fibres can also settle
on light coloured garments and vice
versa.
Notes on laundry care
10
Brief instructions
The headings numbered (A, B, C ...)
show the operating sequence and can
be used as a brief guide to using your
machine.
A Sort the laundry
To ensure even drying results sort
washed laundry according to:
. . . the drying level required
. . . the type of fibre or weave
. . . size
. . . the moisture content after spinning.
,
Make sure that objects e.g.
detergent dispensing balls have
been removed from the laundry.
They could melt, and cause damage
to the dryer or the laundry.
– Check seams and stitching to ensure
that padding and linings are intact.
– Fasten duvet covers and pillow
cases to prevent small items from
being trapped inside them.
–
Fasten zips, hooks and eyes etc.
–
Tie fabric belts and apron strings.
–
Sew in or remove underwiring from
bras.
B Turn on the tumble dryer
^
Switch the dryer on by pressing the
I-On/0-Off
button in.
The tumble dryer may be switched on
after loading, saving energy as the light
will not come on.
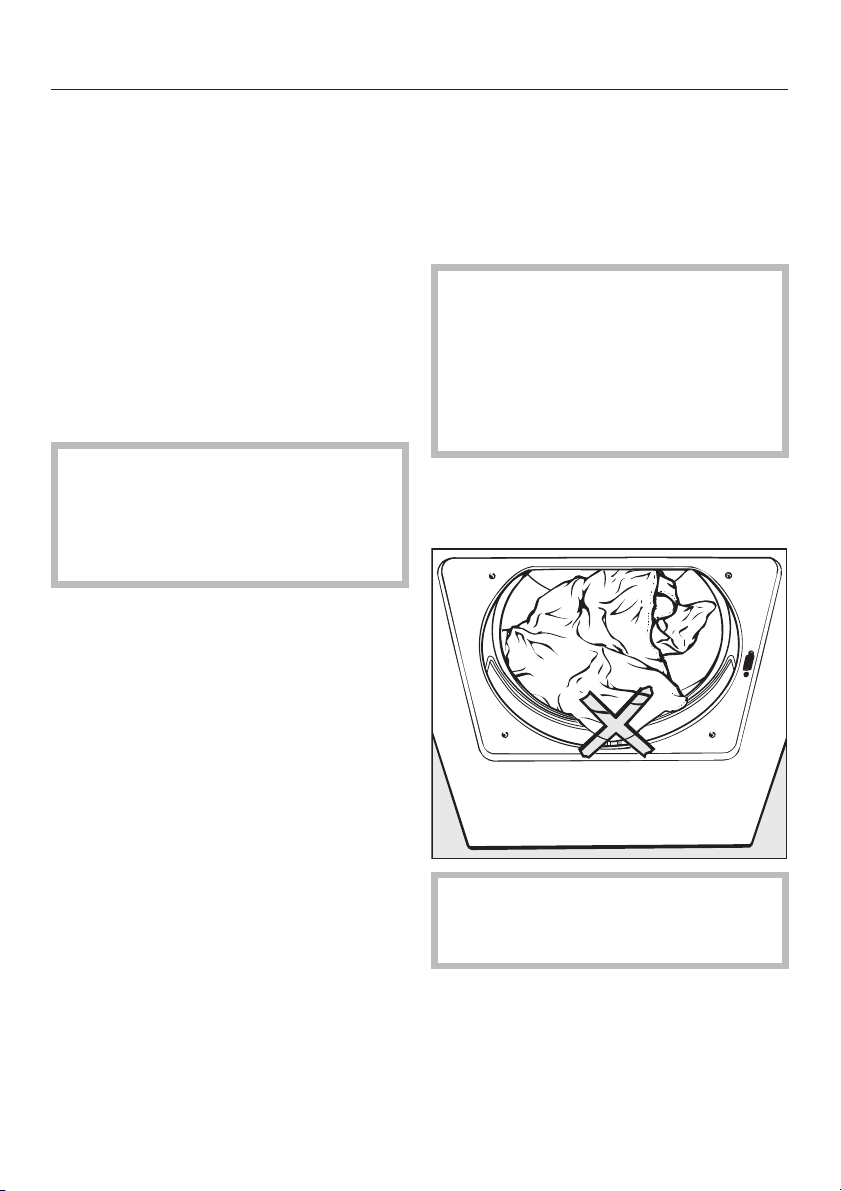
C Load the tumble dryer
^
Press the
door
button to open the
door.
^
Load the laundry loosely into the
drum.
Do not overload the drum. See the
"Programme chart" for
recommended loads for each
programme.
Overloading can cause unnecessary
wear and tear to the laundry and
give a disappointing drying result.
^ Before closing the door make sure
the fluff filter is correctly positioned in
the door.
Check the laundry is right inside the
drum so that it cannot get trapped or
damaged when the door is shut.
^
Shut the door either with a gentle
swing, or lean against it and push it
shut.
How to dry correctly
11
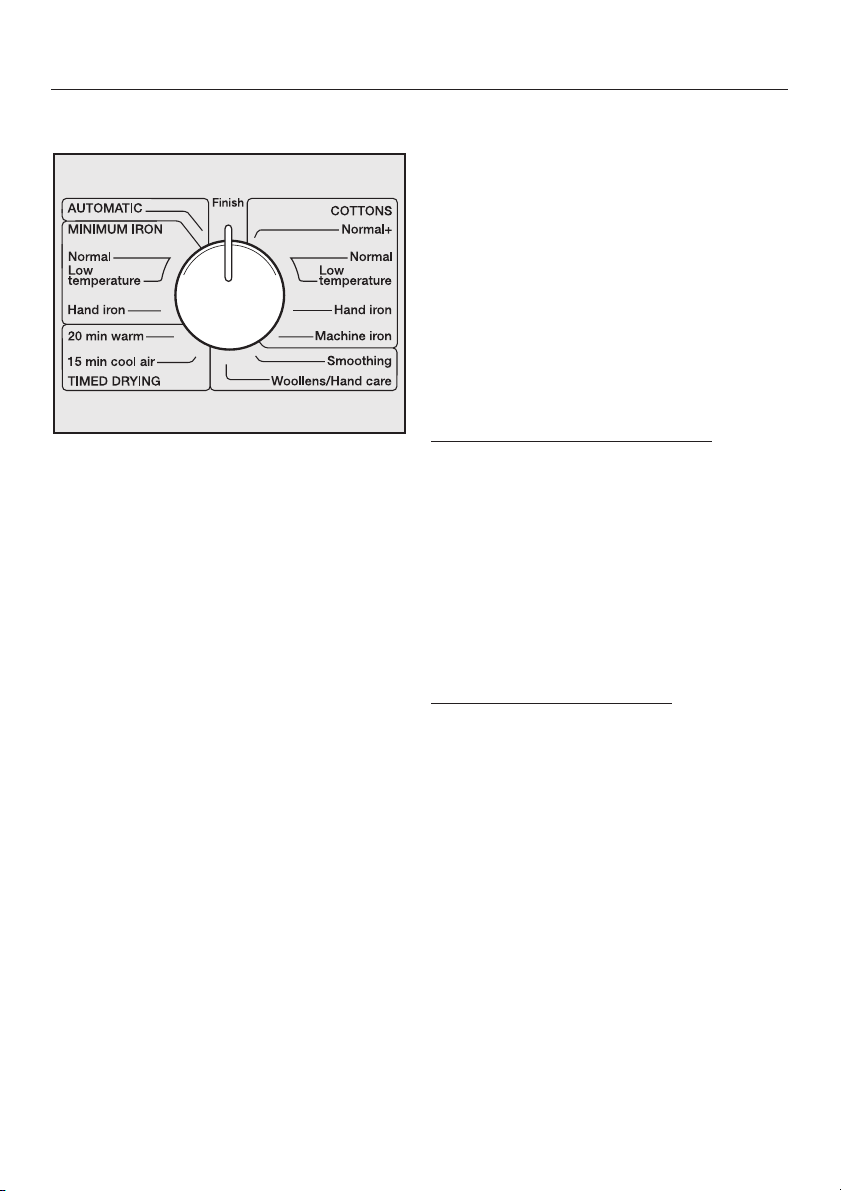
D Select a programme
^ Turn the programme selector to the
required programme.
Low temperature
^ For drying particularly sensitive
fabrics (care symbol r) e.g. acrylics
turn the programme selector to the
Low temperature
position.
Because the heater rating is reduced
for the
Low temperature
setting clothes
dry more slowly thus lengthening drying
times.
E Start the programme
^
Press the
Start
button.
The indicator lamp for the
Start
button
will then change from flashing to being
on constantly.
The drying cycle begins.
Depending on the programme
selected, the drying stage reached is
shown by the sequence indicator lamps
on the right hand side of the control
panel.
Before the end of a programme
The cooling down phase takes place
before the end of a programme so that
the garments are not too hot to handle
(the
Cool air
indicator lamp will come
on). The programme is not finished until
the cooling down phase is complete.
The
Woollens handcare
and
Smoothing
programmes do not include a cooling
down phase.
At the end of a programme
The
Anti-crease/Finish
indicator lamp
comes on.
The drum will continue to rotate at
intervals to prevent laundry creasing, if
you do not wish to remove it immediate
-
ly. The anti-crease phase lasts for an
hour. There is no anti-crease phase on
the
Woollens handcare
programme.
During the anti-crease phase . . .
. . . (depending on the programme
selected) the indicator lamp for the
drying stage reached will also light up.
. . . the buzzer will sound at intervals.
How to dry correctly
12

F Remove the laundry
^
Press the
Door
button.
^
Open the door.
^
Remove the laundry.
Make sure that the drum is empty. If
items are left in the dryer, they could
be damaged by overdrying when
the dryer is next used.
^
Switch the dryer off by pressing the
l-On/0-Off
button.
^
Clean the fluff filters.
^ Close the door.
^ Empty the condensed water
container (where there is no external
drainage of the water).
^ The condenser unit should be
checked and cleaned on a regular
basis.
Changing the programme
sequence
Changing a programme while it is
running
As long as the cooling down phase or
the anti-crease phase has not been
reached, it is possible to change a
programme after it has started by
turning the programme selector to a
different programme position.
To interrupt a programme
^
Switch the machine off with the
I-On/0-Off
button.
To continue drying:
^
Switch the dryer on with the
I-On/0-Off
button.
The programme will continue (only with
the
Cottons, Minimum iron and Auto
-
matic
programmes).
Other programmes:
^
Press the
Start
button.
To cancel a programme
^
Turn the programme selector to
Finish
or open the door.
Adding or removing laundry after a
programme has started
^ Press the
Door
button.
^ Open the door.
,
Do not touch the back of the
drum when adding or removing
items. The drum could be very hot -
danger of burning.
^
Add or remove items.
^
Close the door.
^
Press the
Start
button.
How to dry correctly
13

Programmes Fabric type Notes
Cottons Max. load: 5 kg*
Normal + Single and multi-layered
fabrics, e.g. mixed load of
cotton fabrics such as
towelling, jerseywear,
underwear.
–
Normal ** Load of similar cotton items,
e.g. underwear, flannelette
bed linen, towelling.
If laundry is still too damp,
then finish drying using the
Warm air programme and
use the
Normal+
programme next time.
Low temperature For all delicate or minimum
iron fabrics with the r
symbol on the care label
(e.g. acrylic garments).
For drying delicate fabrics at
a lower temperature (using
the
normal
programme).
Hand iron ** Cottons and linen fabrics,
e.g. table linen, bedlinen,
starched laundry etc.
–
Machine iron Cotton and linen fabrics,
including starched laundry
for machine ironing.
To prevent laundry from
drying out it should be rolled
up until you are ready for
ironing.
* Weight of dry laundry
** Note for test institutes:
Use this programme without Extras when testing according to EN 61121
Standard.
Programme chart
14

Programmes Fabric type Notes
Minimim iron Max. load: 2.5 kg*
Normal ** Minimum iron shirts,
blouses, skirts, table cloths
etc. made of mixed fibres,
e.g. cottons / synthetics.
Minimum iron cottons.
–
Low temperature For all delicate or minimum
iron fabrics with the r
symbol on the care label
(e.g. acrylic garments).
For drying delicate fabrics at
a lower temperature (using
the
normal
programme).
Hand iron Minimum iron blended
fabrics such as cottons /
synthetics e.g. shirts,
blouses, skirts and table
cloths which are still to be
hand ironed.
For extra special care of
delicate fabrics and to
reduce creasing even more,
reduce the load to 1 kg*.
Items are dried with very
little creasing, depending on
fabric type and amount of
load.
* Weight of dry laundry
** Note for test institutes:
Use this programme without Extras when testing according to EN 61121
Standard.
Programme chart
15
 Loading...