


T 490
Operating instructions
for vented tumble dryer
T 490
It is essential to read these
operating instructions before
installing or using the machine
to avoid the risk of accident,
or damage to the machine. M.-Nr. 04 939 831
Q\}

Contents
Contents
Guide to the appliance. . . . . . . . . . . . . . . . . . . . . . . . . . . . . . . . . . . . . . . . . . . . . . 4
Caring for the environment . . . . . . . . . . . . . . . . . . . . . . . . . . . . . . . . . . . . . . . . . 6
Warning and safety instructions . . . . . . . . . . . . . . . . . . . . . . . . . . . . . . . . . . . . . 7
Brief instructions . . . . . . . . . . . . . . . . . . . . . . . . . . . . . . . . . . . . . . . . . . . . . . . . . 10
Notes on laundry care . . . . . . . . . . . . . . . . . . . . . . . . . . . . . . . . . . . . . . . . . . . . . 11
How to dry correctly
Hints on saving energy . . . . . . . . . . . . . . . . . . . . . . . . . . . . . . . . . . . . . . . . . . . . . 12
1 Switching on and loading . . . . . . . . . . . . . . . . . . . . . . . . . . . . . . . . . . . . . . . . . 12
2 Selecting a programme . . . . . . . . . . . . . . . . . . . . . . . . . . . . . . . . . . . 13
3 Selecting additional option(s) . . . . . . . . . . . . . . . . . . . . . . . . . . . . . . . . . . . . . . 13
4 Starting a programme . . . . . . . . . . . . . . . . . . . . . . . . . . . . . . . . . . . . . . . . . . . . 13
After drying . . . . . . . . . . . . . . . . . . . . . . . . . . . . . . . . . . . . . . . . . . . . . . . . . . . . . . 14
Altering a programme . . . . . . . . . . . . . . . . . . . . . . . . . . . . . . . . . . . . . . . . . . . . . 15
Programme chart . . . . . . . . . . . . . . . . . . . . . . . . . . . . . . . . . . . . . . . . . . . . . . . . . 16
Programmable functions
Notes . . . . . . . . . . . . . . . . . . . . . . . . . . . . . . . . . . . . . . . . . . . . . . . . . . . . . . . . . . . 18
Correcting the drying level . . . . . . . . . . . . . . . . . . . . . . . . . . . . . . . . . . . . . . . . 18
Buzzer. . . . . . . . . . . . . . . . . . . . . . . . . . . . . . . . . . . . . . . . . . . . . . . . . . . . . . . . 18
Memory . . . . . . . . . . . . . . . . . . . . . . . . . . . . . . . . . . . . . . . . . . . . . . . . . . . . . . . 18
Anti-crease . . . . . . . . . . . . . . . . . . . . . . . . . . . . . . . . . . . . . . . . . . . . . . . . . . . . 18
Activating and storing in the memory . . . . . . . . . . . . . . . . . . . . . . . . . . . . . . . . . . 19
2

Contents
Cleaning and care
Fluff filter. . . . . . . . . . . . . . . . . . . . . . . . . . . . . . . . . . . . . . . . . . . . . . . . . . . . . . . . . 20
Tumble dryer . . . . . . . . . . . . . . . . . . . . . . . . . . . . . . . . . . . . . . . . . . . . . . . . . . . . . 20
Problem solving guide
What to do if ... . . . . . . . . . . . . . . . . . . . . . . . . . . . . . . . . . . . . . . . . . . . . . . . . . . . 21
After sales service
Repairs. . . . . . . . . . . . . . . . . . . . . . . . . . . . . . . . . . . . . . . . . . . . . . . . . . . . . . . . . . 25
Future updates. . . . . . . . . . . . . . . . . . . . . . . . . . . . . . . . . . . . . . . . . . . . . . . . . . . . 25
Installation . . . . . . . . . . . . . . . . . . . . . . . . . . . . . . . . . . . . . . . . . . . . . . . . . . . . . . 26
Installation - venting . . . . . . . . . . . . . . . . . . . . . . . . . . . . . . . . . . . . . . . . . . . . . . 27
Electrical connection. . . . . . . . . . . . . . . . . . . . . . . . . . . . . . . . . . . . . . . . . . . . . . 33
Consumption data . . . . . . . . . . . . . . . . . . . . . . . . . . . . . . . . . . . . . . . . . . . . . . . . 34
Technical data . . . . . . . . . . . . . . . . . . . . . . . . . . . . . . . . . . . . . . . . . . . . . . . . . . . 35
3
Guide to the appliance
Guide to the appliance
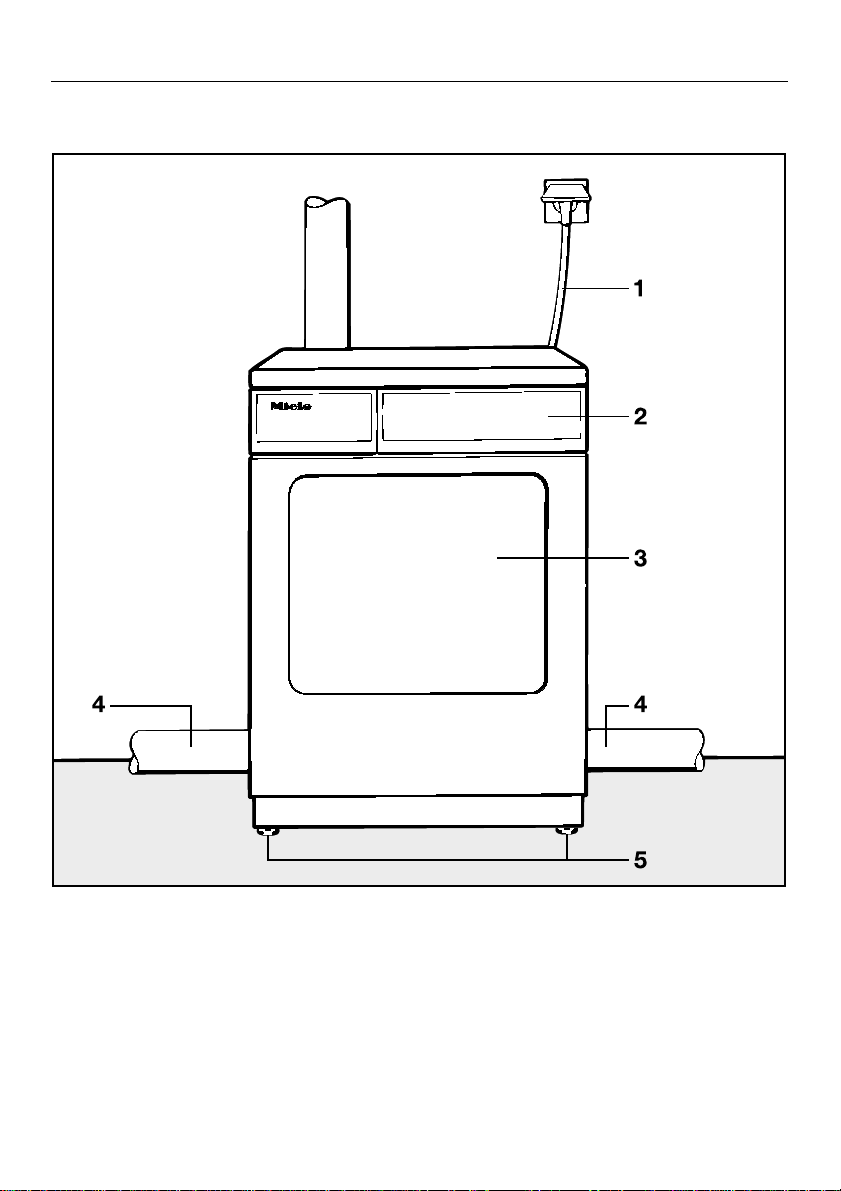
General view
1 Supply cable for electrical connection
2 Control panel
3 Door
4 Venting connection, rear, right or left (supplied with the rear socket open)
5 Four height-adjustable screw feet
4
Control panel
Guide to the appliance
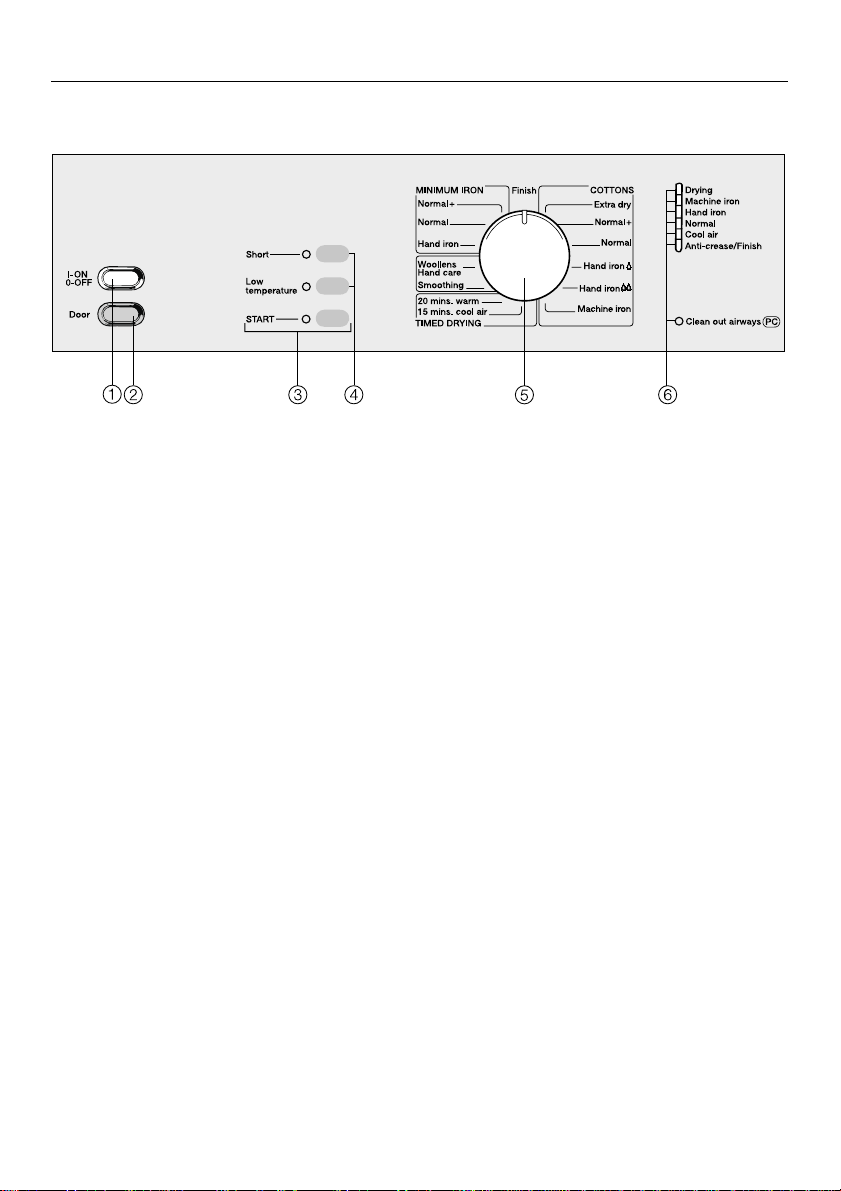
b“I-On/0-Off” button
for switching the appliance on and off.
When the machine is switched on, the
drum light will come on as you open
the door.
c“Door” button
to open the door/cancel a programme.
This button does not stay pressed in.
d“START” button
starts a drying programme.
The indicator light:
– flashes to indicate that the pro-
gramme can be started;
– remains on once the programme has
commenced.
eAdditional option buttons
Indicator lights: on= option selected
off= option not selected
fProgramme selector
can be turned clockwise or anti-clockwise.
gSequence indicator and check
lights
Please consult the section “Problem
solving guide” for the check lights.
5

Caring for the environment
Caring for the environment
Disposal of packing
The transport and protective packing
has been selected from materials
which are environmentally friendly for
disposal and can normally be recycled.
Rather than just throwing these materials away, please ensure they are offered for recycling.
Disposal of your old
machine/appliance
Old machines/appliances contain materials which can be recycled. Please
contact your dealer, your local waste
collection centre or scrap merchant
about potential recycling schemes. Ensure that the machine/appliance presents no danger to children while being
stored for disposal. See the appropriate advice in the “Warning and safety”
instructions.
6
Warning and safety instructions
Warning and safety instructions
Please read the operating instructions before using the tumble dryer
for the first time. They contain important information about the safety,
use and maintenance of the
machine. This will avoid the risk of
accidents and damage to the machine. Keep these operating instructions in a safe place and ensure that new users are familiar with
the content. Pass them on to any future owners of the machine.
Correct usage
The tumble dryer is only intended
for drying fabrics which have been
washed in a water solution and are
marked on the manufacturer’s wash
care label as being suitable for tumble
drying.
Any other applications may be dangerous. The manufacturer is not liable
for damage resulting from improper
use or operation.
Do not let small children play with
the machine and its controls or
operate it. Please supervise its use by
the elderly or infirm.
Technical safety
Check for visible external damage
before installation.
Do not install or operate a damaged
machine or appliance.
Before connecting the machine,
ensure that the connection data on
the data plate (fusing, voltage and frequency) matches the mains electricity
supply. If in any doubt, consult a qualified electrician.
The electrical safety of this ma-
chine can only be guaranteed
when continuity is complete between
the appliance and an effective earthing
system which complies with local and
national regulations. It is most important that this basic safety requirement is
regularly tested by a qualified electrician. The manufacturer cannot be held
responsible for the consequences of
an inadequate earthing system.
The machine is built in accordance
with current safety requirements.
Unauthorised repairs could result in unforeseen dangers for the user, for which
the manufacturer cannot accept responsibility. Repairs should only be undertaken by a Miele approved engineer.
Adequate ventilation is essential,
especially where another appliance
which also uses the room air (eg gas, oil
or coal fired heater, continuous flow or
other water heater) is installed in the same
or an adjacent room. To ensure safe operation, and to prevent gases given off by
these appliances being drawn back into
the room, an underpressure of 0.04 mbar
is the maximum permissible. Ventilation
can be maintained by air inlets which cannot be blocked, in windows, doors and
outside wall vents, or by an automatic window opening arrangement when the
tumble dryer is switched on. If in doubt,
the advice of a competent builder, or for
gas, a “Corgi” installer (in UK) must be
sought.
7

Warning and safety instructions
For safety reasons, do not use an extension cable. There is a danger of
overheating.
In the event of a fault, or for clean-
ing purposes, the machine is only
completely isolated from the electricity
supply when:
– the plug is withdrawn, or
– it is switched off at the mains, or
– the mains fuse is withdrawn.
Faulty components must only be
exchanged for Miele original spare
parts. Only when these parts are fitted
can the safety standards of the machine be guaranteed.
Use
Do not install the machine in a
room where the temperature may
drop below freezing, as temperatures
below zero could damage the machine.
A suitable ducting system must be
installed before operating this
vented dryer.
The exhaust air must not be
vented into a chimney or vent flue
which is in use, nor should it be connected to ducting which ventilates
rooms with fireplaces. It would be dangerous if smoke or exhaust fumes were
drawn back into the room.
Always close the door after use to
avoid the danger of:
– someone leaning on the door which
could cause the machine to tip;
– children climbing into the machine or
hiding objects in it.
There is a danger of fire with fab-
rics which:
– contain rubber, foam rubber or rub-
ber-like materials;
– have been treated with inflammable
cleaning agents;
– have been splashed with hair lac-
quer, hair spray, nail varnish
remover or similar;
– also padded items (eg cushions,
jackets) which have been damaged,
as the padding could fall out and
catch fire;
– are soiled with grease or oil.
8

Warning and safety instructions
In countries where there are areas
which may be subject to infestation by cockroaches or other vermin,
pay particular attention to keeping the
appliance and its surroundings in a
clean condition at all times. Any damage which may be caused by cockroaches or other vermin will not be
covered by the appliance guarantee.
Using accessories
Accessory parts may only be fitted
when expressly approved by
Miele. If other parts are used, guarantee, performance and product liability
claims may be invalidated.
Disposing of your old machine
Before discarding an old machine,
unplug it and render the plug useless. Cut off the cable directly behind
the appliance to prevent misuse.
9

Brief instructions
Brief instructions
Brief description
Programmes are selected by turning
the programme selector and can be
supplemented by pressing the addi-
tional option buttons.
Press the “START” button to begin a
programme.
The indicator lights in the sequence display (on the right hand side of the control panel) show which stage has been
reached in the programme.
The Sensitive system automatically adjusts drying to suit the water quality
and ensure more precise results.
The Novotronic controls measure and
register the conductivity of the water
and compensate for variations to
achieve a uniform residual moisture
level.
The automatic reversing action turns
the drum clockwise and anti-clockwise
to loosen the laundry and prevent
uneven drying, ensuring good results.
Once the required degree of dryness is
achieved, the laundry is allowed to cool
down.
Please read the sections on “Warning and safety” and “Notes on
laundry care”.
1 Switching the machine on and
loading the laundry
Switch on by pressing the “I-On/0Off” button.
Press the “Door” button to open the
door.
Place the laundry loosely in the drum.
Close the door.
2 Selecting a programme
Turn the programme selector to the
drying level you require.
3 Selecting additional options
Press the buttons to switch additional options on or off as required.
4 Starting the programme
Press the “START” push button.
At the end of the programme the anti-
crease action period begins. The drum
turns intermittently to reduce the formation of creases and folds.
Programmable functions can be used
to select or de-select some of the additional options and introduce further
functions. These combinations can be
stored in the machine’s memory and
called up.
10
Notes on laundry care
Notes on laundry care
Before drying, check the drying symbol on the textile care label.
Significance of symbols:
q = Dry at normal temperature
r = Dry at low temperature
(also push in the “Low temperature”
button if required)
s = Do not tumble dry
t = Can be tumble dried
If no symbol is featured, dry at your own
risk applying the following principles:
Cotton and minimum iron items should
be dried in the appropriate programme
(see programme charts).
For delicate fabrics, eg acrylic, select
"Minimum iron" and also press the "Low
temperature" button.
Never overload the drum. Always
observe the maximum recommended loads given in the “Programme chart”. Overloading can
cause unnecessary wear and tear
to the laundry, give a disappointing
drying result and cause more creasing.
The following fabrics should not be
dried in a tumble dryer:
– Woollens and wool blends
These fabrics tend to become matted
and shrink. These fabrics can, however,
be partially dried using the “Woollens
hand care” programme.
– Pure linen*
These items should only be machine
dried if specified as suitable by the
manufacturer on the textile care label,
as the surface of the fabric may otherwise “roughen”.
* Linen and down-filled items can, however, be partially dried using the
“Smoothing” programme.
Notes:
Some woven and loopknit materials
(eg T-shirts, cotton jersey material)
have a tendency to shrink, depending
on their quality, and this is often made
worse by over-drying. When purchasing woven materials, it is advisable to
take their shrinkage properties into account.
Starched washing can be dried in the
tumble dryer. In order to achieve the
usual finish, double the amount of
starch should be used.
Minimum iron fabrics and 100% cotton
shirts or blouses tend to crease more,
when larger loads being dried, particulary when the weave of the fabric is
very fine. Reduce the load or use the
Special care “Minimum iron – Hand
iron” programme. If this is unsatisfactory use the “Smoothing” setting, then
hang the garments on a hanger to dry.
New dark-coloured fabrics should be
dried separately from light-coloured
fabrics to avoid colours running.
– Down-filled items*
The fine fabric interior tends to shrink,
depending on the quality.
11
 Loading...