


Operating Instructions
Vacuum Cleaner |
S 8000 |
Only Miele dustbags, filters and accessories with the "Original Miele" logo can be used with this vacuum. Only then can the suction power of the vacuum cleaner reach its optimum potential creating the best possible cleaning results.
To prevent accidents |
|
en - US, CA |
and machine damage, |
HS15 |
|
read these instructions |
|
|
before |
|
|
installation and use. |
|
M.-Nr. 09 257 881 |
Only Miele dustbags, filters and accessories with the "Original Miele" logo can be used with this vacuum. Only then can the suction power of the vacuum cleaner reach its optimum potential creating the best possible cleaning results.
USE OF NON-MIELE COMPONENTS MAY VOID THE WARRANTY.
The use of dustbags made of paper or a similar material, or dustbags with a cardboard retaining plate can lead to serious damage to the vacuum cleaner and may void the warranty, just as with the use of dustbags without the "Original Miele" logo.
The "Original Miele" Logo will appear on the packaging or directly on the dustbag.
Purchasing new dustbags and filters
Original Miele dustbags and filters can be purchased from an authorized Miele vacuum dealer or by visiting the Miele store at www.mieleusa.com.
2

Contents
IMPORTANT SAFETY INSTRUCTIONS. . . . . . . . . . . . . . . . . . . . . . . . . . . . . . . . . 4
Guide to the vacuum . . . . . . . . . . . . . . . . . . . . . . . . . . . . . . . . . . . . . . . . . . . . . . . 8
Before using the vacuum cleaner . . . . . . . . . . . . . . . . . . . . . . . . . . . . . . . . . . . 10
Using the included accessories . . . . . . . . . . . . . . . . . . . . . . . . . . . . . . . . . . . . . 15
Use . . . . . . . . . . . . . . . . . . . . . . . . . . . . . . . . . . . . . . . . . . . . . . . . . . . . . . . . . . . . 17
Power cord. . . . . . . . . . . . . . . . . . . . . . . . . . . . . . . . . . . . . . . . . . . . . . . . . . . . . . . 17 Turning the vacuum cleaner on and off . . . . . . . . . . . . . . . . . . . . . . . . . . . . . . . . . 18 Selecting the suction power . . . . . . . . . . . . . . . . . . . . . . . . . . . . . . . . . . . . . . . . . 18 Opening the auxiliary air regulator . . . . . . . . . . . . . . . . . . . . . . . . . . . . . . . . . . . . 20
Parking, transport and storage. . . . . . . . . . . . . . . . . . . . . . . . . . . . . . . . . . . . . . 22
Maintenance and care . . . . . . . . . . . . . . . . . . . . . . . . . . . . . . . . . . . . . . . . . . . . . 24
Purchasing new filter bags and filters . . . . . . . . . . . . . . . . . . . . . . . . . . . . . . . . . . 24 Which filter bags and filters are the right ones? . . . . . . . . . . . . . . . . . . . . . . . . . . 24 When to change the filter bag . . . . . . . . . . . . . . . . . . . . . . . . . . . . . . . . . . . . . . . . 25 How to change the filter bag . . . . . . . . . . . . . . . . . . . . . . . . . . . . . . . . . . . . . . . . . 26 When should I change the dust compartment filter? . . . . . . . . . . . . . . . . . . . . . . . 27 How to change the dust compartment filter . . . . . . . . . . . . . . . . . . . . . . . . . . . . . 27 When should I change the exhaust filter? . . . . . . . . . . . . . . . . . . . . . . . . . . . . . . . 28 Filter change indicator . . . . . . . . . . . . . . . . . . . . . . . . . . . . . . . . . . . . . . . . . . . . . . 28 How to replace the Air Clean exhaust filter? . . . . . . . . . . . . . . . . . . . . . . . . . . . . . 29 How do I change the Active Air Clean or the Active HEPA exhaust filter? . . . . . . 30 Exchanging exhaust filters. . . . . . . . . . . . . . . . . . . . . . . . . . . . . . . . . . . . . . . . . . . 31 When to change the thread catcher of the standard floor brush . . . . . . . . . . . . . 33 How to change the thread catcher . . . . . . . . . . . . . . . . . . . . . . . . . . . . . . . . . . . . 33
Cleaning and care . . . . . . . . . . . . . . . . . . . . . . . . . . . . . . . . . . . . . . . . . . . . . . . . 34
Frequently asked questions / Technical service . . . . . . . . . . . . . . . . . . . . . . . 35
Optional accessories. . . . . . . . . . . . . . . . . . . . . . . . . . . . . . . . . . . . . . . . . . . . . . 36
Caring for the environment. . . . . . . . . . . . . . . . . . . . . . . . . . . . . . . . . . . . . . . . . 38
3

IMPORTANT SAFETY INSTRUCTIONS
When using an electrical appliance, basic precautions should always be followed, including the following:
READ ALL INSTRUCTIONS BEFORE USING THIS APPLIANCE
Keep these operating instructions in a safe place and pass them on to any future user.
WARNING-
To reduce the risk of fire, electric shock or injury:
Before using
Check the voltage rating of the vacuum cleaner before connecting the power cord to an electrical outlet. Your power source should correspond with the voltage rating plate located on the underside of the vacuum. Use only household AC outlets. Never use DC power sources. If you are not sure of your home’s voltage supply, consult a qualified electrician. Connecting the vacuum cleaner to a higher voltage than indicated in these instructions may result in damage to the vacuum cleaner or injury.
To reduce the risk of electric shock, this appliance has a polarized plug (one blade is wider than the other.) This plug will fit in a polarized outlet only one way. If the plug does not fit fully in the outlet, reverse the plug. If it still does not fit, contact a qualified electrician to install the proper outlet. Do not alter the plug in any way.
A damaged vacuum cleaner can be dangerous. Check the packaging, vacuum cleaner and accessories for any signs of damage. Do not use a damaged appliance.
Do not use with a damaged cord or plug. If the appliance is not working as it should, has been dropped, damaged, left outdoors or submerged in water, bring it to a service center.
The electrical outlet must be fitted with a 15 A fuse.
4

IMPORTANT SAFETY INSTRUCTIONS
Use
Do not use on people or animals.
Do not use outdoors or on wet surfaces. Only dry surfaces should be vacuumed.
Use only as described in this manual. Use only Miele recommended accessories.
Do not alter or modify the vacuum cleaner.
This appliance is intended for household use only.
Do not allow the vacuum cleaner to be used as a toy. Close attention is necessary when used near children.
Keep batteries out of the reach of children.
Important information on the handling of batteries:
- Do not short circuit or recharge batteries, or throw them into a fire.
- Disposing of batteries: Remove the batteries from the LED handle
and dispose of them in your recycling bin. Do not dispose of them
with the normal household waste.
Never use the vacuum cleaner without the filter bag or filters in place. Otherwise it could be damaged.
If a filter bag is not inserted, the dust compartment lid will not close. Do not force it shut.
Do not leave the vacuum plugged in. Unplug it from the outlet when not in use and before servicing.
On the underside of the vacuum handpiece is a metal insert designed to absorb static electricity. Please make certain that your hand remains around this metal insert when vacuuming.
Persons which lack physical, sensory or mental abilities or experience with the machine should not use it without supervision or instruction by a responsible person.
Unwind the cord completely to aid the vacuum cleaner in dissipating heat.
This vacuum should not be used to entrap or retain any hazardous materials.
Do not use the vacuum cleaner to pick up liquids or damp dirt. This could impair the electrical safety of the vacuum cleaner. Wait for freshly shampooed carpets to dry.
Do not vacuum anything that is burning or smoking such as cigarettes, matches or hot ashes. The vacuum cleaner could catch fire.
Do not vacuum toner dust. Toner, such as that used in printers and photocopiers can conduct electricity.
Do not use to pick up any flammable or combustible liquids, such as gasoline, or use in areas where they may be present. The vacuum cleaner could explode.
Do not vacuum up items which are heavy, hard or have sharp edges. They could cause a blockage and damage the appliance.
5

IMPORTANT SAFETY INSTRUCTIONS
Do not pull or carry by the cord, use the cord as a handle, close a door on the cord, or pull the cord around sharp edges or corners. Do not run the appliance over the cord. Keep the cord away from heated surfaces.
Do not unplug by pulling on the cord. To unplug, grasp the plug, not the cord.
Do not handle the plug or vacuum with wet hands.
Keep the power cord, hair, loose clothing, fingers and all parts of the body away from openings and moving parts.
Do not place anything into the openings of the vacuum cleaner. Do not use if any openings are blocked; keep them free of dust, lint, hair, or anything that may reduce air flow.
This appliance is equipped with a power cord reel. Hold plug when rewinding onto cord reel. Do not allow plug to whip when rewinding.
Turn off all controls before unplugging.
Use extra care when cleaning on stairs.
Floor attachments, accessories and wands must not be used at head level to avoid injury to eyes and ears.
Monitor the filter bag change indicator and inspect all filters regularly. For best performance, the filter bag and filters should be replaced when necessary. A full bag or blocked filter will reduce the vacuum cleaner’s suction power. A temperature limiter automatically switches the vacuum cleaner off if it gets too hot, see "Frequently asked questions".
Using accessories
The socket on the vacuum cleaner is only to be used with the Miele Powerbrush.
Unplug the vacuum when changing accessories, especially when using the Powerbrush.
The Miele Powerbrush is a
motor-driven accessory for use only with Miele vacuum cleaners. The vacuum must not be used with another manufacturer's Powerbrush.
Do not use the vacuum without an accessory attached. The rim could be damaged and injuries could result from sharp edges.
Miele filter bags are disposable and intended to be used only once. Do not attempt to reuse them. An over stuffed filter bag will reduce the efficiency of the vacuum cleaner.
6

IMPORTANT SAFETY INSTRUCTIONS
Only use genuine Miele filter bags with the Miele quality signet and original Miele filters and accessories. Only then will the manufacturer guarantee its safety. Only use genuine Miele filter bags with the Miele quality signet and original Miele filters and accessories. Only then will the manufacturer guarantee its safety.
The hose contains electrical wires. Do not use when damaged, cut, or punctured. Avoid picking up sharp objects.
Always turn off this appliance before connecting or disconnecting either hose or motorized nozzle.
Cleaning, maintenance and repairs
Turn the vacuum cleaner off after each use and before every cleaning / maintenance. Pull the plug from the outlet.
Never submerge the vacuum cleaner in water. Clean only with a dry cloth or slightly damp cloth when disconnected from the mains supply. If moisture gets into the appliance there is a risk of electric shock.
Repairs must only be performed by an authorized service agent in accordance with national and local safety regulations. Unauthorized repairs could cause injury or machine damage.
If the power cord is damaged it should be replaced along with a new cable reel by Miele Technical Service.
Disposing of an old appliance
Before discarding an old vacuum cleaner, please cut off the power cord and render the plug useless. Ensure the appliance presents no danger to children while being stored for disposal.
SAVE THESE
INSTRUCTIONS
7

Guide to the vacuum
The illustrations show the vacuum cleaner and all available options.
8

Guide to the vacuum
Suction hose *
Accessory compartment lid release
Airflow indicator
Display panel *
Foot switch for automatic cord rewind
Park-System for breaks in vacuuming
Foot switch On/Off
Power cord *
Swivel casters *
Exhaust filter *
Park-System for storage (on both sides of the vacuum)
Dust compartment filter (motor protection)
Bracket cover for the Powerbrush outlet
Original Miele filter bag
Carrying handle
Floor tool *
Lock release button
Telescopic wand *
Dust compartment lid release
Telescopic wand release buttons *
Powerbrush outlet
Elbow *
LED *
Standby button for brief breaks in vacuuming *
Suction power buttons + / - *
Handpiece (depending on model with auxiliary air regulator) *
Thermo indicator light § *
Reset button *
Standby indicator *
Filter change indicator and reset button *
The features marked * may vary or not be available on your model.
9
Before using the vacuum cleaner
Attaching the suction hose
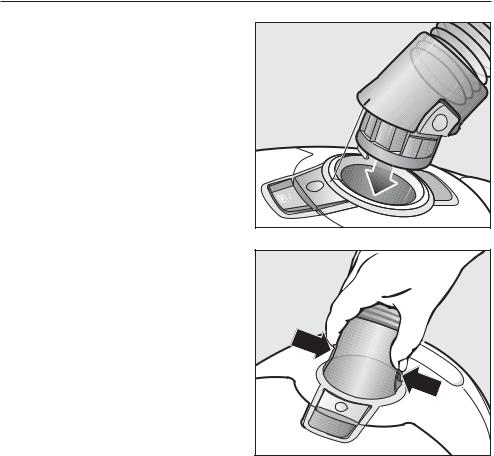
Insert the elbow into the suction socket until it clicks into place.
Disconnecting the hose
Press the release buttons on the sides of the elbow and lift the hose from the socket.
10
Before using the vacuum cleaner
Connecting the suction hose and handpiece
Depending on the model, the handpiece is already pre-fitted at the other end of the hose at the factory. If the handpiece of your model is separate, it just needs to be connected to the hose.
Insert the hose into the handpiece until it clicks into place.
Connecting the telescopic wand and handpiece
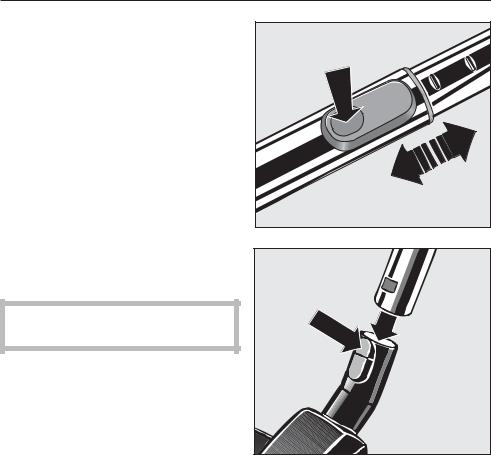
Insert the handpiece into the telescopic wand until it clicks into place. Use the inlet guides of both parts to direct insertion.
To separate the parts from each other, press the wand release button and pull the handpiece away from the telescopic wand with a slight rotation.
11
Before using the vacuum cleaner
Adjusting the two-piece telescopic wand
This telescopic wand is composed of two interlocking tube sections that can be adjusted to the desired length.
Press the adjustment button and slide the tubes to the desired length.
Attaching the standard floor brush
Observe the cleaning instructions of the floor manufacturer.
Place the floor brush on the telescopic wand and twist back and forth until it clicks into place.
To remove the floor brush from the telescopic wand, press the release button.
The floor brush is intended for everyday use on carpets, rugs, and hard flooring that is not susceptible to scratching.
For other floor coverings, we recommend using the special Miele brushes (see the section on "Optional accessories").
12
 Loading...