


Service
Manual
DV7600 /F N/K1G/L1G/S1G
/N1B/U1B/N1S
Super Audio CD / DVD Player
|
TABLE OF CONTENTS |
|
SECTION |
PAGE |
|
1. |
TECHNICAL SPECIFICATIONS ........................................................................................... |
1 |
2. |
SERVICE HINTS AND TOOLS ............................................................................................. |
4 |
3. |
WARNING AND LASER SAFETY INSTRUCTIONS............................................................. |
5 |
4. |
EMERGENCY DISC EJECT ................................................................................................. |
6 |
5. |
CAUTION (Optical pick up and Servo Board) ....................................................................... |
7 |
6. |
BACK END / FRONT END SOFTWARE (Firmware) VERSION CHECK.............................. |
8 |
7. |
THE UPDATE DISC CREATION PROCEDURE ................................................................... |
9 |
8. |
UPDATES BACK END FIRMWARE PROCEDURE .............................................................. |
9 |
9. |
UPDATES FRONT END FIRMWARE PROCEDURE.......................................................... |
10 |
10. |
WIRING DIAGRAM ............................................................................................................. |
11 |
11. |
BLOCK DIAGRAM .............................................................................................................. |
13 |
12. |
SCHEMATIC DIAGRAM...................................................................................................... |
15 |
13. |
PARTS LOCATION.............................................................................................................. |
35 |
14. |
MICROPROCESSOR AND IC DATA................................................................................... |
43 |
15. |
EXPLODED VIEW AND PARTS LIST................................................................................. |
57 |
16. |
ELECTRICAL PARTS LIST................................................................................................. |
62 |
Please use this service manual with referring to the user guide ( D.F.U. ) without fail.
DV7600
DV7600
Part no. 90M25BW855010 First Issue 2005.05
MZ

MARANTZ DESIGN AND SERVICE
Using superior design and selected high grade components, MARANTZ company has created the ultimate in stereo sound. Only original MARANTZ parts can insure that your MARANTZ product will continue to perform to the specifications for which it is famous.
Parts for your MARANTZ equipment are generally available to our National Marantz Subsidiary or Agent.
ORDERING PARTS :
Parts can be ordered either by mail or by Fax.. In both cases, the correct part number has to be specified. The following information must be supplied to eliminate delays in processing your order :
1.Complete address
2.Complete part numbers and quantities required
3.Description of parts
4.Model number for which part is required
5.Way of shipment
6.Signature : any order form or Fax. must be signed, otherwise such part order will be considered as null and void.
USA
MARANTZ AMERICA, INC
1100 MAPLEWOOD DRIVE ITASCA, IL. 60143
USA
PHONE : 630 - 741 - 0300 FAX : 630 - 741 - 0301
AUSTRALIA
QualiFi Pty Ltd,
24 LIONEL ROAD,
MT. WAVERLEY VIC 3149 AUSTRALIA
PHONE : +61 - (0)3 - 9543 - 1522 FAX : +61 - (0)3 - 9543 - 3677
NEW ZEALAND
WILDASH AUDIO SYSTEMS NZ
14 MALVERN ROAD MT ALBERT AUCKLAND NEW ZEALAND PHONE : +64 - 9 - 8451958
FAX : +64 - 9 - 8463554
JAPAN Technical
D&M Holdings, Inc.
35- 1, 7- CHOME, SAGAMIONO SAGAMIHARA - SHI, KANAGAWA JAPAN 228-8505
PHONE : +81 42 748 1013 FAX : +81 42 741 9190
EUROPE / TRADING
MARANTZ EUROPE B.V.
P. O. BOX 8744, BUILDING SILVERPOINT BEEMDSTRAAT 11, 5653 MA EINDHOVEN THE NETHERLANDS
PHONE : +31 - 40 - 2507844
FAX : +31 - 40 - 2507860
THAILAND
MRZ STANDARD CO., LTD
746 - 754 MAHACHAI ROAD., WANGBURAPAPIROM, PHRANAKORN, BANGKOK, 10200 THAILAND
PHONE : +66 - 2 - 222 9181
FAX : +66 - 2 - 224 6795
TAIWAN
PAIYUING CO., LTD.
6 TH FL NO, 148 SUNG KIANG ROAD, TAIPEI, 10429, TAIWAN R.O.C. PHONE : +886 - 2 - 25221304
FAX : +886 - 2 - 25630415
CANADA
MARANTZ CANADA INC.
5-505 APPLE CREEK BLVD. MARKHAM, ONTARIO L3R 5B1 CANADA
PHONE : 905 - 415 - 9292 FAX : 905 - 475 - 4159
SINGAPORE
WO KEE HONG DISTRIBUTION PTE LTD
No.1 JALAN KILANG TIMOR #08-03 PACIFIC TECH CENTRE SINGAPORE 159303
PHONE : +65 6376 0338
FAX |
: +65 6376 0166 |
MALAYSIA
WO KEE HONG ELECTRONICS SDN. BHD.
2ND FLOOR BANGUNAN INFINITE CENTRE LOT 1, JALAN 13/6, 46200 PETALING JAYA SELANGOR DARUL EHSAN, MALAYSIA PHONE : +60 - 3 - 7954 8088
FAX : +60 - 3 - 7954 7088
KOREA
MK ENTERPRISES LTD.
ROOM 604/605, ELECTRO-OFFICETEL, 16-58, 3GA, HANGANG-RO, YONGSAN-KU, SEOUL KOREA
PHONE : +822 - 3232 - 155
FAX : +822 - 3232 - 154
SHOCK, FIRE HAZARD SERVICE TEST :
CAUTION : After servicing this appliance and prior to returning to customer, measure the resistance between either primary AC cord connector pins ( with unit NOT connected to AC mains and its Power switch ON ), and the face or Front Panel of product and controls and chassis bottom.
Any resistance measurement less than 1 Megohms should cause unit to be repaired or corrected before AC power is applied, and verified before it is return to the user/customer.
Ref. UL Standard No. 6500.
In case of difficulties, do not hesitate to contact the Technical
Department at above mentioned address.
050517MZ

1. TECHNICAL SPECIFICATIONS
General
System
DVD-Video, DVD-Audio, DVD-R/RW, Video CD, Super Audio CD, CD, MP3 files and JPEG files
Power requirements |
|
|
F version................................................... |
|
AC 100 V, 50/60 Hz |
K version (China)...................................... |
|
AC 220 V, 50/60 Hz |
L version (Taiwan) ......................................... |
|
AC 110 V, 60 Hz |
N version .................................................. |
|
AC 230 V, 50/60 Hz |
S version................................................... |
|
AC 230 V, 50/60 Hz |
U version ....................................................... |
|
AC 120 V, 60 Hz |
Power consumption ........................................................ |
|
28 W |
Weight ....................................................... |
|
4.6 kg (10 lb 2 oz) |
Dimensions ..................... |
440 (W) x 96.3 (H) x 305.5 (D) mm |
|
|
|
(17.3 (W) x 3.8 (H) x 12 (D) in.) |
Operating temperature ....... |
|
+5°C to +35°C (+41°F to +96°F) |
Operating humidity ................. |
|
5% to 85% (no condensation) |
S-Video output |
|
|
Y (luminance) - Output level |
............................. 1 Vp-p (75 Ω) |
|
C (color) - Output level ............................... |
|
286 mVp-p (75 Ω) |
Jacks ................................................................ |
|
S-VIDEO jack |
Video output (2 individual outputs) |
||
Output level ....................................................... |
|
1 Vp-p (75 Ω) |
Jacks ....................................................................... |
|
RCA jack |
Component video output (Y, CB/PB, CR/PR)
Output level ............................................... |
Y : 1.0 Vp-p (75 Ω) |
|
CB/PB, CR/PR : 0.7 Vp-p (75 Ω) |
Jacks ..................................................................... |
RCA jacks |
D1/D2 video output |
|
Output level ............................................... |
Y : 1.0 Vp-p (75 Ω) |
|
CB/PB, CR/PR : 0.7 Vp-p (75 Ω) |
Jacks ..................................................................... |
D terminal |
HDMI output |
|
Output Terminal ............................................................ |
19-pin |
21-pin connector assignment (Europe model only)
AV connector output .................................... |
|
|
|
21-pin connector |
|
This connector provides the video and audio signals for |
|||||
connection to a compatible color TV or monitor. |
|||||
|
20 18 16 14 12 10 |
8 6 |
4 |
2 |
|
|
21 19 17 15 13 11 |
9 7 |
5 |
3 |
1 |
PIN no. |
|
|
|
|
|
1 |
Audio 2/R out |
|
11 |
G out |
|
3 |
Audio 1/L out |
|
15 |
R or C out |
|
4 |
GND |
|
17 |
GND |
|
7 |
B out |
|
19 |
Video out or Y out |
|
8 |
Status |
|
21 |
GND |
|
Audio output |
|
Output level |
|
During audio output ............................... |
2 Vrms (1kHz, 0 dB) |
Number of channels ............................................................. |
2 |
Jacks ....................................................................... |
RCA jack |
Audio output (multi-channel / L, R, C, SW, LS, RS)
Output level |
|
|
During audio output ............................... |
|
2 Vrms (1kHz, 0 dB) |
Number of channels ............................................................. |
|
6 |
Jacks ....................................................................... |
|
RCA jack |
Audio characteristics |
|
|
Frequency response .............. |
4Hz to 44kHz (DVD fs: 96kHz) |
|
4Hz to 88kHz (DVD-Audio fs: 192kHz) |
||
S/N ratio ...................................................................... |
|
125 dB |
Dynamic range ........................................................... |
|
110 dB |
Total harmonic distortion ........................................ |
|
0.0012 % |
Wow and flutter: |
|
|
Limit of measurement (±0.001% W. PEAK) or lower |
||
Digital output |
|
|
Optical digital output .................................. |
|
Optical digital jack |
Coaxial digital output ............................................... |
|
RCA jack |
Other terminals |
|
|
Control in/out ........................................................... |
|
RCA jack |
RS232C ................................................................................ |
|
1 |
Accessories |
|
|
Remote control ..................................................................... |
|
1 |
AAA/AR03 dry cell batteries ................................................. |
|
2 |
Audio/Video cable (yellow/red/white) |
....................................1 |
|
System control cable ............................................................ |
|
1 |
Power cable .......................................................................... |
|
1 |
User Guide (this manual) |
|
|
1

Before You Start
Discs compatible with this player
Any disc that displays one of the following logos should play in this player. Other formats, including DVD-RAM, DVD-ROM, DVD+RW, DVD+R, CD-ROM (except those that contain MP3/JPEG files) and Photo CD will not play.
DVD-Video compatibility:
•Logos: 

•Single sided or double sided discs
•Single layer or dual layer discs
•Dolby Digital, DTS, MPEG or Linear PCM digital audio
•MPEG-2 digital video
Discs are generally divided into one or more titles. Titles may be further subdivided into chapters.
DVD-Audio compatibility:
•Logos: 

•Single sided discs
•Single layer or dual layer discs
•Linear or packed PCM digital audio
•Some discs may contain MPEG-2 video, and Dolby Digital, DTS or MPEG digital audio
Discs are generally divided into one or more groups. Groups may be further subdivided into tracks.
DVD-R compatibility:
This unit can play DVD-R discs. Please note the following points when using these discs:
•Logo: 
•This unit can play DVD-R discs recorded as DVD-Video format.
DVD-RW compatibility:
This unit can play DVD-RW discs. Please note the following points when using these discs:
•Logo: 
•This unit can play DVD-RW discs recorded as DVD-Video format.
•DVD-RW discs that were recorded with copyonce only permission cannot be played.
Audio CD compatibility:
•Logos: 


•12cm (5in.) or 8cm (3in.) discs
•Linear PCM digital audio
•Audio CD, CD-R* and CD-RW* formats CDs are divided into tracks.
*This unit can play CD-R and CD-RW discs recorded in Audio CD or Video CD format, or with MP3 audio files.
*Some copy-controlled CDs may not conform to official CD standards. They are special discs and may not play on the DV7600.
Video CD compatibility:
•Logo: 

•12cm (5in.) or 8cm (3in.) discs
•MPEG-1 digital audio
•MPEG-1 digital video
Video CDs are divided into tracks.
Super VCD compatibility:
•Logo: 

•12cm (5in.) or 8cm (3in.) discs
•MPEG-1 digital audio
•MPEG-2 digital video
Super VCDs are divided into tracks.
Super Audio CD compatibility:
•Logo: 
•Single layer, dual layer or Hyblid layer
•12cm (5in.) or 8cm (3in.) discs
•Digital audio (DSD)
Super Audio CDs are divided into tracks.
2

Before You Start
DVD-Video regions
All DVD-Video discs carry a region mark on the case somewhere that indicates which region(s) of the world the disc is compatible with. Your DVD player also has a region mark, which you can find on the rear panel. Discs from incompatible regions will not play in this player. Discs marked ALL will play in any player.
MP3 compatibility information
•The CD-ROM must be ISO 9660 compatible.
•Files should be MPEG1 Audio Layer 3 format, 44.1kHz or 48kHz. Incompatible files will not play.
•This player is not compatible with MP3 PRO, ID3-Tag and packet write.
•This player cannot play DVD-R/RW discs with recorded MP3 music data.
•This player only plays tracks that are named with the file extension “.mp3” or “.MP3”.
•This player is not compatible with multi-session discs. If you try and play a multi-session disc, only the first session will be played.
•Use CD-R or CD-RW media for recording your MP3 files. The disc must be finalized in order to play.
•Audio encoded at 128Kbps should sound close to regular audio CD quality. Although this player will play lower bit-rate MP3 tracks, the sound quality becomes noticeably worse at lower bit-rates.
•Only the first 8 characters of folder and track names (excluding the “.mp3” extension) are displayed.
•This player can recognize about total 250 files/ folder.
•Not compatible with variable bit-rate (VBR) files.
JPEG compatibility information
•While this player is designed to be able to handle image data recorded in JPEG format, no assurances are given that the player will be able to display image data recorded in all JPEG formats.
•This player cannot display progressive JPEG images.
•When writing JPEG files to CD-R/RW discs, always be sure to set the writing format to ISO 9660 Level 1.
•Always be sure to specify a file extension of “.JPG” or “.JPE” for JPEG files. The file will not be able to be displayed if a file extension other than “.JPG” or “.JPE” is specified or if no file extension is assigned to the file. (Note that this means that JPEG files created on a Macintosh will not be able to be displayed as is.)
•Depending on the file size and compression rate, some JPEG pictures cannot be displayed correctly.
Caution!
•DVD-R/RW and CD-R/RW discs recorded using a personal computer or a DVD or CD recorder may not play if the disc is damaged or dirty, or if there is dirt or condensation on the player’s lens.
•If you record a disc using a personal computer, even if it is recorded in a compatible format, there are cases in which it may not play because of the settings of the application software used to create the disc. (Check with the software publisher for more detailed information.)
•Unfinalized DVD-R/RW discs cannot be played.
•Unfinalized CD-R/RW discs cannot be played.
•Never try to replay anything other than a music CD (CDA format) or a CD-R/RW on which MP3 and/or JPEG files have been stored. Depending on the type of file, there may be times when doing so will result in problems or erroneous operation.
•There may be times when it is impossible to replay a CD-R/RW disc because of the characteristics of the disc being used or because of dirt or scratches on the disc.
3
2. SERVICE HINTS AND TOOLS
SERVICE HINTS
SERVICE TOOLS |
|
Audio signals disc |
4822 397 30184 |
Disc without errors (SBC444)+ |
|
Disc with DO errors, black spots and fingerprints (SBC444A) |
4822 397 30245 |
Disc (65 min 1kHz) without no pause |
4822 397 30155 |
Max. diameter disc (58.0 mm) |
4822 397 60141 |
Torx screwdrivers |
|
Set (straight) |
4822 395 50145 |
Set (square) |
4822 395 50132 |
13th order filter |
4822 395 30204 |
DVD test disc (PAL) |
4822 397 10131 |
DVD test disc (NTSC) ALMEDIO |
TDV-540 |
4

3. WARNING AND LASER SAFETY INSTRUCTIONS
GB WARNING
All ICs and many other semi-conductors are susceptible to electrostatic discharges (ESD). Careless handling during repair can reduce life drastically.
When repairing, make sure that you are connected with the same potential as the mass of the set via a wrist wrap with resistance.
Keep components and tools also at this potential.
F |
ATTENTION |
D |
WARNUNG |
NL WAARSCHUWING
Alle IC’s en vele andere halfgeleiders zijn gevoelig voor elektrostatische ontladingen (ESD).
Onzorgvuldig behandelen tijdens reparatie kan de levensduur drastisch doen verminderen.
Zorg ervoor dat u tijdens reparatie via een polsband met weerstand verbonden bent met hetzelfde potentiaal als de massa van het apparaat.
Houd componenten en hulpmiddelen ook op ditzelfde potentiaal.
I AVVERTIMENTO
Tous les IC et beaucoup d’autres semiconducteurs sont sensibles aux décharges statiques (ESD).
Leur longévité pourrait être considérablement écourtée par le fait qu’aucune précaution n’est prise a leur manipulation.
Lors de réparations, s’assurer de bien être relié au même potentiel que la masse de l’appareil et enfiler le bracelet serti d’une résistance de sécurité.
Veiller a ce que les composants ainsi que les outils que l’on utilise soient également a ce potentiel.
GB
Alle IC und viele andere Halbleiter sind empfindlich gegen elektrostatische Entladungen (ESD).
Unsorgfältige Behandlung bei der Reparatur kann die Lebensdauer drastisch vermindern. Sorgen sie dafür, das Sie im Reparaturfall über ein Pulsarmband mit Widerstand mit dem Massepotential des Gerätes verbunden sind.
Halten Sie Bauteile und Hilfsmittel ebenfalls auf diesem Potential.
D
Tutti IC e parecchi semi-conduttori sono sensibili alle scariche statiche (ESD).
La loro longevita potrebbe essere fortemente ridatta in caso di non osservazione della piu grande cauzione alla loro manipolazione. Durante le riparazioni occorre quindi essere collegato allo stesso potenziale che quello della massa dell’apparecchio tramite un braccialetto a resistenza.
Assicurarsi che i componenti e anche gli utensili con quali si lavora siano anche a questo potenziale.
Safety regulations require that the set be restored to its original condition and that parts which are identical with those specified be used.
NL
Bei jeder Reparatur sind die geltenden Sicherheitsvorschriften zu beachten. Der Originalzustand des Gerats darf nicht verandert werden.
Fur Reparaturen sind Original-Ersatzteile zu verwenden.
I
Veiligheidsbepalingen vereisen, dat het apparaat in zijn oorspronkelijke toestand wordt terug gebracht en dat onderdelen, identiek aan de gespecifieerde worden toegepast.
Le norme di sicurezza esigono che l’apparecchio venga rimesso nelle condizioni originali e che siano utilizzati pezzi di ricambiago idetici a quelli specificati.
“Pour votre sécurité, ces documents doivent être utilisés par des spécialistes agrées, seuls habilités à réparer votre appareil en panne.”
F
Les normes de sécurité exigent que l’appareil soit remis a l’état d’origine et que soient utilisées les pièces de rechange identiques à celles spécifiées.
LASER SAFETY
This unit employs a laser. Only a qualified service person should remove the cover or attempt to service this device, due to possible eye injury.
USE OF CONTROLS OR ADJUSTMENTS OR PERFORMANCE OF PROCEDURE OTHER THAN THOSE SPECIFIED HEREIN MAY RESULT IN HAZARDOUS RADIATION EXPOSURE.
AVOID DIRECT EXPOSURE TO BEAM
WARNING
The use of optical instruments with this product will increase eye hazard.
Repair handling should take place as much as possible with a disc loaded inside the player
WARNING LOCATION: INSIDE ON LASER COVERSHIELD
CAUTION VISIBLE AND INVISIBLE LASER RADIATION WHEN OPEN AVOID EXPOSURE TO BEAM ADVARSEL SYNLIG OG USYNLIG LASERSTRÅLING VED ÅBNING UNDGÅ UDSÆTTELSE FOR STRÅLING
ADVARSEL SYNLIG OG USYNLIG LASERSTRÅLING NÅR DEKSEL Å PNES UNNGÅ EKSPONERING FOR STRÅLEN VARNING SYNLIG OCH OSYNLIG LASERSTRÅLNING NÄR DENNA DEL ÄR ÖPPNAD BETRAKTA EJ STRÅLEN
VARO! AVATT AESSA OLET ALTTIINA NÄKYVÄLLE JA NÄKYMÄTTÖMÄLLE LASER SÄTEILYLLE. ÄLÄ KATSO SÄTEESEEN VORSICHT SICHTBARE UND UNSICHTBARE LASERSTRAHLUNG WENN ABDECKUNG GEÖFFNET NICHT DEM STRAHL AUSSETSEN DANGER VISIBLE AND INVISIBLE LASER RADIATION WHEN OPEN AVOID DIRECT EXPOSURE TO BEAM
ATTENTION RAYONNEMENT LASER VISIBLE ET INVISIBLE EN CAS D'OUVERTURE EXPOSITION DANGEREUSE AU FAISCEAU
030804ecm
5

4.EMERGENCY DISC EJECT
1.Remove the top cover of the player.
2.Remove two screws shown in the picture above.
3.Remove the cover of the drive unit with pressing the latches.
4.Now you can remove the disc.
6

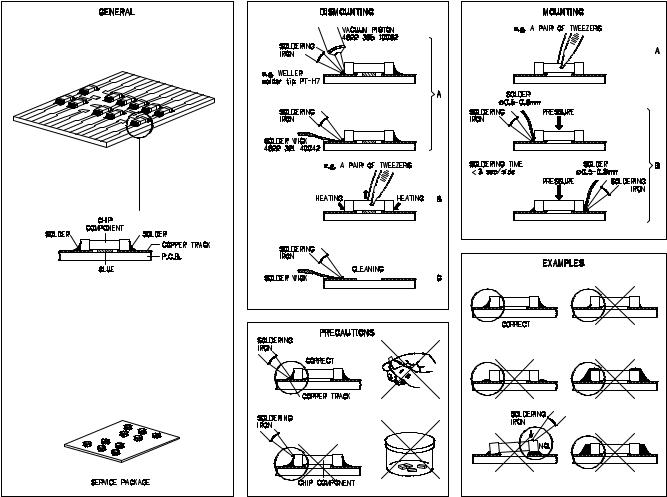
5. CAUTION (Optical pick up and Servo Board)
When removing the flat wire between Optical pick up and Servo Board,
Solder the three lands pointed by arrows to short the circuit.
Otherwise the LASER DIODE may be damaged by static electricity.
4
5
2
1
3
6
7
7
8 |
9 |

6. BACK END / FRONT END SOFTWARE |
6. BACK END / FRONT END SOFTWARE |
|||
|
(Firmware) VERSION CHECK |
|
(Firmware) VERSION CHECK |
|
1. |
First, connect TV monitor to the unit. |
1. |
|
|
2. |
Press the POWER ON/STANDBY button to turn on the |
2. POWER ON/STANDBY |
|
|
|
unit. |
3. OPEN/CLOSE |
TRAY |
|
3. |
Press the OPEN/CLOSE button to open the tray. |
4. |
CLEAR, 2, 5, 8, 0, CLEAR |
|
4. |
Press the CLEAR, 2, 5, 8, 0 and CLEAR button in order |
5. VERSION |
|
|
|
on the remote controller. |
|
|
|
5.The following information is displayed on the TV screen. The firmware version is shown.
 BACK END version
 FRONT END version
6. Press the POWER ON/STANDBY button to quit |
6. POWER ON/STANDBY |
SERVICE MODE. |
|
8
7. THE UPDATE DISC CREATION PROCEDURE 7. THE UPDATE DISC CREATION PROCEDURE
[A] Front End firmware update disc
Necessary Equipment
•Update data (99MA.BIN)
•CD-R or CD-RW
•CD-R writing software
Setting of writing software
1. |
File name |
: 99MA.BIN |
2. |
CD LABEL NAME |
: RMC_LDR_DOWN |
|
|
(uppercase alphabet) |
3. |
CD MODE |
: MODE 1 (CLOSE SESSION) |
4. |
FILE FORMAT |
: ISO9660 |
5. WRITE MODE |
: DISC AT ONCE |
|
NOTICE : Please set up CD LABEL NAME, without surely forgetting.
[B] Back End firmware update disc
Necessary Equipment
•Update data (MZD70099.ROM)
•CD-R or CD-RW
•CD-R writing software
Setting of writing software
1. |
File name |
: MZD70099.ROM |
2. |
CD LABEL NAME |
: any one. |
3. |
CD MODE |
: MODE 1 (CLOSE SESSION) |
4. |
FILE FORMAT |
: ISO9660 |
5. WRITE MODE |
: DISC AT ONCE |
|
[A] Front End firmware update disc
•99MA BIN
•CD R or CD RW
•CD R
1. File name |
99MA BIN |
|
2. CD LABEL NAME |
RMCALDRADOWN |
|
|
|
|
3. CD MODE |
MODE 1 CLOSE SESSION |
|
4. FILE FORMAT |
ISO9660 |
|
5. WRITE MODE |
DISC AT ONCE |
|
CD LABEL NAME |
|
|
[B] Back End firmware update disc
•MZD70099 ROM
•CD R or CD RW
•CD R
1. File name |
MZD70099 ROM |
2. CD LABEL NAME |
any one |
3. CD MODE |
MODE 1 CLOSE SESSION |
4. FILE FORMAT |
ISO9660 |
5. WRITE MODE |
DISC AT ONCE |
8. UPDATES BACK END FIRMWARE |
8. UPDATES BACK END FIRMWARE |
PROCEDURE |
PROCEDURE |
Necessary Equipment |
|
•Monitor
•Update data (MZD70099.ROM) or Disc (90M-DV7600BER)
NOTICE : Refer to "7. THE UPDATE DISC CREATION PROCEDURE", when you make update disc from update data.
Writing Procedure
•
• 90M DV7600BERMZD70099 ROM
"THE UPDATE DISC CREATION
PROCEDURE"
The writing of software takes about 3 minute. |
|
3 |
|
|
Caution: Be sure to connect a monitor for the update. |
|
|
|
|
1. |
Press POWER ON/STANDBY button to turn on the |
1. POWER ON/STANDBY |
|
|
|
unit. |
2. OPEN/CLOSE |
TRAY |
|
2. |
Press OPEN/CLOSE button to open the tray. |
3. |
CLEAR, 2, 5, 8, 0, CLEAR |
|
3. |
Press in order of CLEAR, 2, 5, 8, 0, and CLEAR button |
4. VERSION |
|
|
|
by remote control. |
5. |
|
TRAY |
4. |
Software version is displayed. |
6. |
PROGRAM |
|
5. |
Insert the Update Disc. |
7. TRAY |
|
|
6. |
Press PROGRAM button by remote control. |
8. FL |
"LOADING" |
|
7. |
The tray closes. |
9. |
|
|
8. |
"LOADING" is displayed on the front display. |
|
"READING" |
|
9. |
The update file name is displayed on the monitor. And |
10. |
TRAY |
|
|
next, "READING" is displayed. |
|
|
|
9
10.Then the tray opens automatically. And remove the Update disc from the tray.
11.The following updating state is displayed on the monitor. ERASE: >>>>>>>>>>>>>>>>>>
WRITE: >>>>>>>>>>>>>>>>>>
12."DONE" is displayed on the front display, when update finished.
13."LOADING" is kept on the front display, while updating.
14.Disconnect the mains cord from the unit.
15.Connect the mains cord to the unit again.
16.Press POWER ON/STANDBY button to turn on the unit, and tray is closed automatically.
17.Press POWER ON/STANDBY button to turn off the unit.
18Press POWER ON/STANDBY button while depressing
STOP button on the unit.
(The FL display shows "RESET OK → MARANTZ → INiTiAL OK → 0:00")
19Press POWER ON/STANDBY button to turn off the unit.
The software has been updated.
To check the version number of the software, see the chapter no. 6. BACK END / FRONT END SOFTWARE (Firmware) VERSION CHECK.
11. "ERASE" "WRITE"
ERASE
WRITE
12. |
|
"DONE" |
13. |
FL |
"LOADING" |
14. |
|
|
15. |
|
|
16. POWER ON/STANDBY |
TRAY |
|
17. POWER ON/STANDBY |
|
|
18 |
STOP |
POWER ON/STANDBY |
(FL |
"RESET OK MARANTZ |
|
INiTiAL OK 0 00" |
) |
|
19 POWER ON/STANDBY |
|
|
No. 6. BACK END / FRONT END SOFTWARE (Firmware) VERSION CHECK
9. UPDATES FRONT END FIRMWARE PROCEDURE
Necessary Equipment
• Update data (99MA.BIN) or Disc (90M-DV7600FER)
NOTICE : Refer to "7. THE UPDATE DISC CREATION PROCEDURE", when you make update disc from update data.
Writing Procedure
The writing of software takes about 1 minute.
1.Press POWER ON/STANDBY button to turn on the unit.
2.Press OPEN/CLOSE button to open the tray.
3.Insert the Update Disc.
4.Press OPEN/CLOSE button to close the tray.
5.The unit enters the firmware update mode automatically.
6."LOADING" is displayed on the front display.
7.Then the tray opens automatically. And remove the Update disc from the tray.
8."LOADING" is kept on the front display, while updating.
9.The disc tray closes automatically after several seconds. And "0:00" is displayed on the front display.
10.Press POWER ON/STANDBY button to turn off the unit.
The software has been updated.
To check the version number of the software, see the chapter no. 6 BACK END / FRONT END SOFTWARE (Firmware) VERSION CHECK.
9.UPDATES FRONT END FIRMWARE PROCEDURE
• |
|
90M DV7600FER |
|
|
99MA BIN |
|
|
|
|
|
|
|
|
"THE UPDATE DISC CREATION |
|
|
PROCEDURE" |
|
|
|
1 |
|
|
1 POWER ON/STANDBY |
|
||
2 OPEN/CLOSE |
TRAY |
|
|
3 |
|
TRAY |
|
4 OPEN/CLOSE |
TRAY |
|
|
5 |
|
|
|
6 FL |
"LOADING" |
|
|
7 |
TRAY |
|
|
8 |
FL |
"LOADING" |
|
9 |
TRAY |
FL |
|
"0 |
00" |
|
|
10 POWER ON/STANDBY
No 6. BACK END / FRONT END SOFTWARE (Firmware)
VERSION CHECK
10

10. WIRING DIAGRAM
Only N version
FRONT(POWER SWITCH) PART
11
Only N version
12

11. BLOCK DIAGRAM
HOST μ-P
13 |
14 |

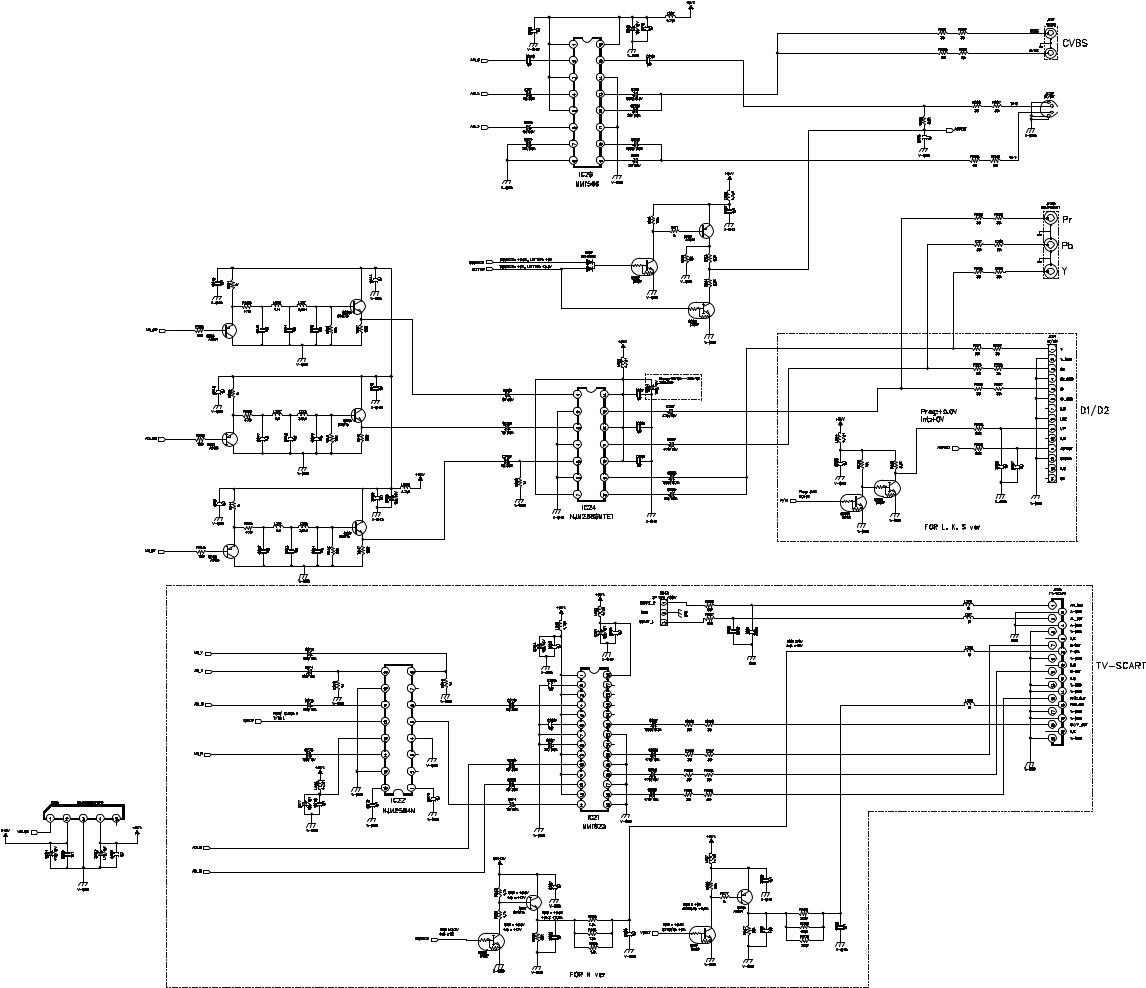
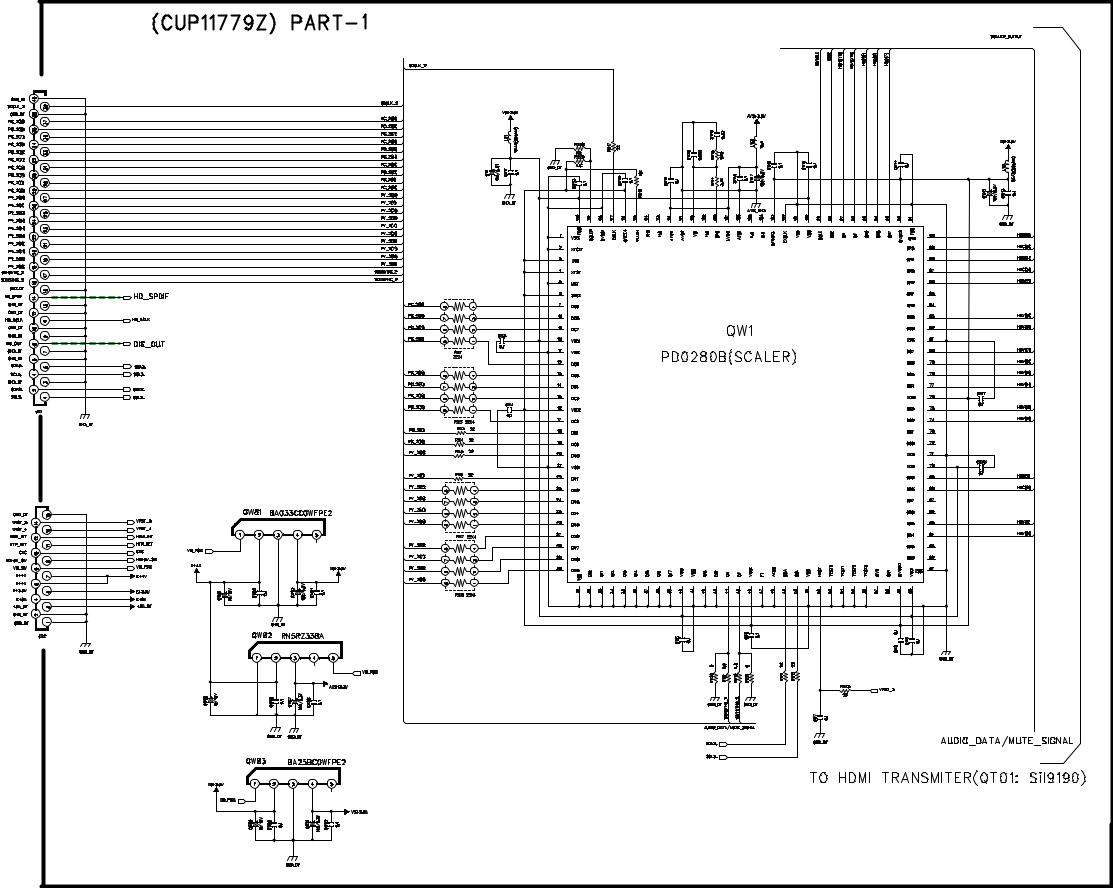
12. SCHEMATIC DIAGRAM
FTRONT PWB (CN41) |
AUDIO PWB (CX21) |
SACD LOADER(JS2) |
SACD LOADER(JS5) |
SACD LOADER(JS3) |
MAIN PWB
SACD
LOADER (JS4)
HOST |
MICOM |
SMPS
PWB (CN41)
15 |
16 |

MAIN PWB
I/P
CONV.
SACD LOADER (JS5)
HDMI
PWB (JW11)
SACD LOADER (JS6)
HDMI
PWB (JW12)
17 |
18 |

MAIN PWB 
VIDEO
ENCODER
VIDEO
ENCODER (RGB)
19 |
20 |
MAIN PWB 
VIDEO
AMP.
VIDEO
DRIVE
S-VIDEO
VIDEO
DRIVE
AUDIO PCB (CN43)
VIDEO
DRIVE
21 |
22 |
HDMI PWB |
|
MAIN |
|
PWB |
|
(CX11) |
|
|
QW01/ |
MAIN |
|
PWB |
|
(CX12) |
|
23 |
24 |

AUDIO + FRONT PWB 
FROM
MAIN
BOARD (CN21)
DSP
1k
SMPS
PWB (CN91)
25 |
26 |

AUDIO + FRONT PWB
MAIN
PCB (BN43)
SACD
LOADER (JS1)
27 |
28 |

HDMI PWB |
|
|
QT01/ |
29 |
30 |
 Loading...