

Logitech Magellan/SPACE MOUSE, Magellan/SPACE MOUSE Plus, Magellan/SPACE MOUSE Plus XT User Manual
Page 1
Page 2

Copyright
This manual and the programs on the
LogiCad3D CD-ROM are protected by copyright
of LogiCad3D. They must not be copied or
distributed without the express written
permission of LogiCad3D. Violators will be
prosecuted to the fullest extent of civil and
criminal laws. The right to these programs and
the manual are held by:
LogiCad3D GmbH - A Logitech Company
An der Hartmuehle 8
D-82229 Seefeld, Germany
Tel: + 49 (0) 8152-9919-0
Fax: + 49 (0) 8152-9919-50
Email: help@logicad3d.com
Web:
The information in this manual is subject to
change without notice. LogiCad3D shall not be
held liable for technical or editorial errors or
omissions contained herein, nor for incidental
or consequential damages resulting from the
furnishing, performance or use of this material.
The information in this manual may not be
changed without special notification. The
instructions in this manual are checked
regularly and necessary corrections are
included in all subsequent editions. More
copies or newer editions of this manual and
technical information on the Magellan/SPACE
MOUSE can be obtained only from LogiCad3D
GmbH.
www.logicad3d.com
NOTICE:
The use of the Magellan/SPACE MOUSE is
primarily intended for graphical applications
only. The company LogiCad3D is not liable for
any damages (including all kinds of damage
from lost profit, operating breakdown, loss of
business information, data or other kinds of
monetary loss) that are due to either proper or
improper use of this LogiCad3D product. In
any case, LogiCad3D’s liability is restricted to
the amount of money paid for the product.
This exclusion does not hold for damages
caused by LogiCad3D intentionally or grossly
negligent. In the same way, claims based on
general laws and rules of product liability
remain untouched. For other applications
LogiCad3D declines any liability or claims for
damages.
SPACE MOUSE is a registered European
trademark of LogiCad3D GmbH.
TM
Magellan
Inc./GmbH.
This device uses one or more patents held by
the Deutsches Zentrum für Luft- und
Raumfahrt e.V. (DLR).
Edited 07/00 by LogiCad3D GmbH - A Logitech
Company, GERMANY.
is the US trademark of LogiCad3D
The citation of names in this manual as a rule
does not mention existing patents, registered
designs or trademarks. Missing corresponding
remarks do not justify the assumption that the
names may be freely usable. All trademarks
are acknowledged where applicable.
NOTE: For optimal viewing of this document,
it is recommended to use the latest version of
Adobe Acrobat Reader, available on the
Magellan/SPACE MOUSE driver CD-ROM or at
www.adobe.com/acrobat.
2
Page 3

Contents
Introduction to Magellan/SPACE
MOUSE .................................................... 4
Installation ............................................. 5
Package Contents......................................... 5
Hardware Installation ...................................5
Supported Platforms .....................................5
Application List & Driver Installation
Commands................................................... 5
Driver Installation Procedures ....................... 9
Starting the Driver for the First Time .............9
Uninstalling the Driver ..................................9
Magellan/SPACE MOUSE Keyboard ...... 10
Common Functions..................................... 10
Standard Keyboards of Common
Applications ............................................... 10
Second-Level Keyboard............................... 11
Quicktip ..................................................... 11
Dialmode Keyboard .................................... 12
Magellan/SPACE MOUSE Motion
Control Center ...................................... 13
Motion Control Center Main Window ............ 13
Options Window ......................................... 15
Button Mapping Window ............................. 16
Troubleshooting.................................... 18
LogiCad3D Support............................... 19
Appendices ........................................... 20
Connecting to the RS232 Serial Port ............ 20
Connecting to IBM RS6000 Workstations ..... 20
Connecting to SGI Workstations .................. 20
Connecting to SUN Workstations ................. 21
SGI Workstations With IRIX 6.2 or Higher.... 21
Additional Command Line Options ............... 22
LPFK and Dialbox Driver Installation ............ 22
Product Specifications................................. 23
Warranty Information .......................... 25
3
Page 4
Introduction to Magellan/SPACE MOUSE
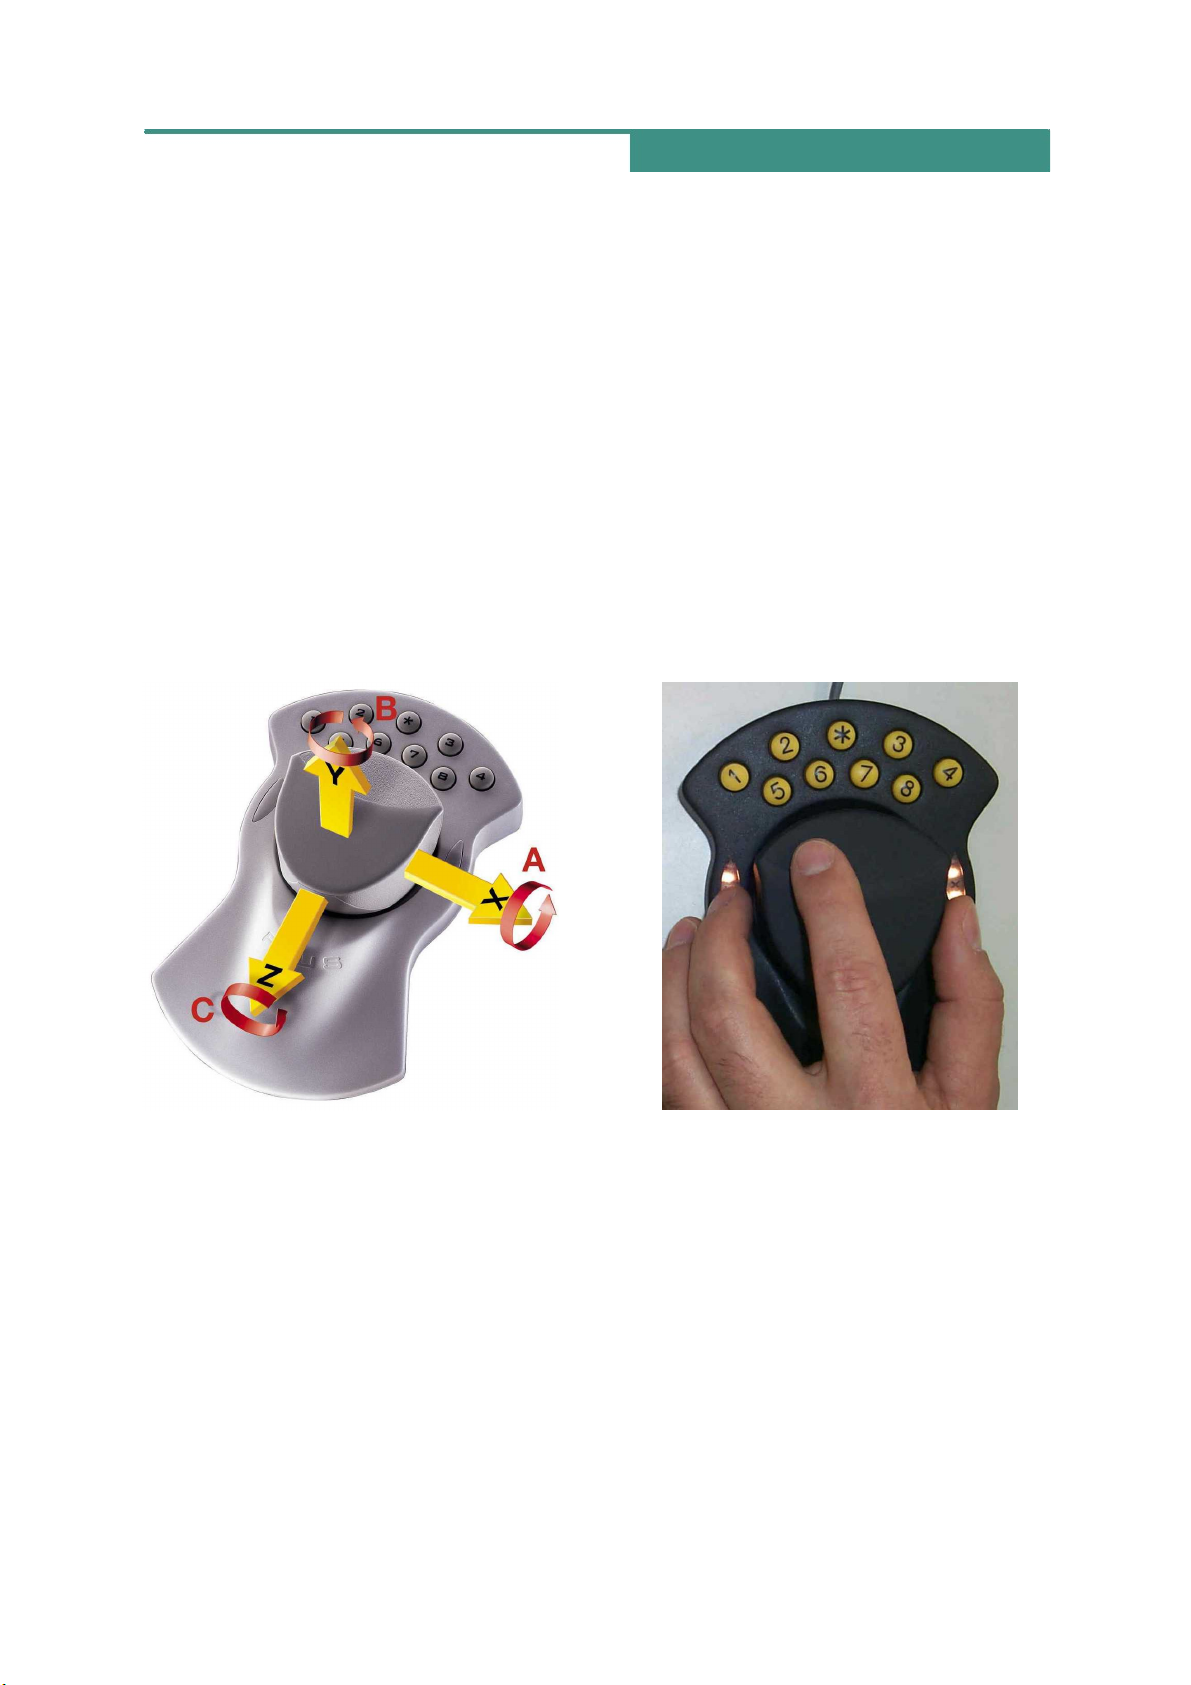
Magellan/SPACE MOUSE is a 3D input device
that is used to control the position and
orientation of 3D graphical objects in virtual
space. The device controls three translational
degrees of freedom (X, Y and Z) and three
rotational degrees of freedom (A, B and C).
How Magellan/SPACE MOUSE Controls
Six Degrees of Freedom
Moving the onscreen object is as easy as
moving the Magellan/SPACE MOUSE cap. Shift
the cap right or left to move the onscreen
object horizontally through space. Pull the cap
up or press it down to move the object
vertically through space. Pull the cap toward
the user or press it away to zoom in and out.
Rotate the cap about the desired axis to rotate
the onscreen object.
with a 3D CAD application, it takes over the
functions of the viewing and supply hand (e.g.
for a right-handed person this is the left hand).
The working hand (e.g. the right hand)
operates the conventional 2D mouse. This
corresponds to the natural way of working
with real objects and therefore supports
intuitive creativity when generating and
manipulating 3D objects in a CAD application.
How to Optimally Handle Magellan/
SPACE MOUSE
Spread three or four fingertips around the cap
and gently shift and twist it. Apply only light
fingertip pressure to the cap. DO NOT grasp
the entire cap in your hand. It does not matter
whether the right or left hand is used. No
shoulder or wrist movement is necessary. The
Note that the values input by Magellan/SPACE
MOUSE are not interpreted as absolute
position commands but as velocity commands.
When the cap is displaced translationally or
rotationally by a constant amount (a distance
measurement), the graphical object is
assigned a continuous speed in the same
direction (a velocity measurement). The
magnitude of the cap’s displacement
determines the magnitude of the onscreen
object’s velocity.
Two Hands for Intuitive Control
Magellan/SPACE MOUSE allows for
simultaneous control of six degrees of freedom
with only one hand. When used in conjunction
ergonomic design allows the hand to rest on
the device without fatigue.
Displacement Range
The cap may be shifted up to ±1.5 mm in the
translational directions. The cap may be
rotated up to ±4 degrees about the rotational
axes.
Magellan/SPACE MOUSE Measurement
System
The cap movements are measured inside the
cap by a worldwide-patented, optoelectronic
measuring system. The cap is suspended by
springs and always returns to its initial
position.
4
Page 5

Installation
To install the Magellan/SPACE MOUSE device
and driver software on UNIX systems, see the
information below. For help with installation
problems see Troubleshooting.
Package Contents
The product package contains:
a 3D input device (Magellan/SPACE MOUSE
Classic, Plus or Plus XT);
a CD-ROM containing the driver software;
the product documentation; and
a serial port adapter (if required for the
system specified at the time of order).
Hardware Installation
The Magellan/SPACE MOUSE has a serial
interface cable with a 9-pin female connector,
which must be connected to the proper serial
port (RS232 or V24) of your UNIX workstation.
The Magellan/SPACE MOUSE cable either plugs
directly into the serial port at the back of the
workstation or may require a separate adapter
cable, which has been included if required.
TURN OFF the workstation before connecting
the Magellan/SPACE MOUSE. Once the
connections have been made, you can restore
power to the workstation. For further
information see the related appendices listed
below.
Related Sections
Connecting to the RS232 Serial Port
Connecting to IBM RS6000 Workstations
Connecting to SGI Workstations
Connecting to SUN Workstations
Supported Platforms
The Magellan/SPACE MOUSE X-Window driver
is supported on the following platforms:
DEC
Digital Equipment Corporation
with OSF1
HP
Hewlett-Packard Company
with HP-UX
IBM
International Business
Machines Corporation with AIX
SGI 53
Silicon Graphics Inc. with IRIX
5.3
SGI 62/32
Silicon Graphics Inc. with IRIX
6.2/32 bit (R4000, R5000, ... )
SGI 62/64
Silicon Graphics Inc. with IRIX
6.2/64 bit (R10000, ... )
SGI 63/32
Silicon Graphics Inc. with IRIX
6.3/32 bit (R10000, ... )
SGI 64/64
Silicon Graphics Inc. with IRIX
6.4/64 bit (R10000, ... )
SGI 65/64
Silicon Graphics Inc. with IRIX
6.5/64 bit (R10000, ... )
SUN
Locate your application in the following pages
of this manual. The appropriate global
installation commands and other important
installation instructions are listed for each
supported platform.
NOTE: This list was last updated 10/2000.
(For the most current application list, please
see www.logicad3d.com/software/drivers.) If
the list indicates that an appropriate driver is
included with your application, you should
consult the application manual for the
appropriate Magellan/SPACE MOUSE
installation procedure.
Sun Microsystems with Solaris
5
Page 6

Application List & Driver Installation Commands
Application Platform Installation Command/Note
4D Navigator (v.4.20 or higher)
Alias|Wavefront
(all current versions)
ANSA (up to v.9.5)
ANSA (v.9.5)
Ansys (v.5.6)
CADDS5 (v.5.2 or higher)
CADENAS (all current versions)
Camand (Camax)
(all current versions)
CATIA (v.4.0 or higher)
CDRS (v.6.0 or higher)
Clovis (v.3.0, A36 or higher)
Covise (all current versions)
Division (all current versions)
EUCLID (up to v.2.3)
FIDES (v.3.92 or higher)
HP Shared 3D Viewer
(all current versions)
HyperMesh (v.3.1)
I-DEAS Master Series
(v.4, 5, 6, 7 or higher)
ICEM SURF (up to v.3.0)
HP, IBM, SGI (all), SUN ./xinstall
SGI 53 ./sgi/mglinst first permanent
SGI 62/32 ./sgi/mglin32 third
SGI 62/64 ./sgi/mglin64 third
SGI 63/32 ./sgi/mgl6332 third
SGI 64/64, SGI 65/64 ./sgi/mgl6464 third
IBM ./xinstall
(install X-Window driver
v.2.0/3.0)
SGI 53 ./sgi/mglinst first permanent
SGI 62/32 ./sgi/mglin32 first permanent
SGI 62/64 ./sgi/mglin64 first permanent
SGI 63/32 ./sgi/mgl6332 first permanent
SGI 64/64, SGI 65/64 ./sgi/mgl6464 first permanent
HP, SGI (all), SUN ./xinstall
DEC, HP, IBM, SGI (all), SUN
HP, IBM, SGI (all), SUN ./xinstall
DEC, HP, IBM, SGI (all), SUN
SGI 53 ./sgi/mglinst second permanent
SGI 62/32 ./sgi/mglin32 second permanent
SGI 62/64 ./sgi/mglin64 second permanent
SGI 63/32 ./sgi/mgl6332 second permanent
SGI 64/64, SGI 65/64 ./sgi/mgl6464 second permanent
HP, IBM, SGI (all), SUN ./xinstall
SGI 53 ./sgi/dialinst cdrs
SGI 62/32 ./sgi/dialin32 cdrs
SGI 62/64 ./sgi/dialin64 cdrs
SGI 63/32 ./sgi/dial6332 cdrs
SGI 64/64, SGI 65/64 ./sgi/dial6464 cdrs
SGI (all)
SGI (all)
HP, SGI (all)
SGI 53 ./sgi/mglinst second permanent
SGI 62/32 ./sgi/mglin32 second permanent
SGI 62/64 ./sgi/mglin64 second permanent
SGI 63/32 ./sgi/mgl6332 second permanent
SGI 64/64, SGI 65/64 ./sgi/mgl6464 second permanent
HP, IBM, SGI (all), SUN ./xinstall
SGI (all)
DEC, HP, IBM, SGI (all), SUN ./xinstall
DEC, HP, IBM, SGI (all), SUN ./xinstall
SGI 53 ./sgi/mglinst first permanent
SGI 62/32 ./sgi/mglin32 first permanent
SGI 62/64 ./sgi/mglin64 first permanent
SGI 63/32 ./sgi/mgl6332 first permanent
SGI 64/64, SGI 65/64 ./sgi/mgl6464 first permanent
Driver included with application
Driver included with application
Driver included with application
Driver included with application
Driver included with application
Driver included with application
6
Page 7

Application Platform Installation Command/Note
ICEM SURF (v.3.0 or higher)
IGRIP (all current versions)
Java3D (all current versions)
KISMET (all current versions)
MADYMO (v.5.1 or higher)
Medina - Pre/Post- Processor for
FEM (all current versions)
Pam System Internat for VT
CRASH (all current versions)
Patran (v.2.x, 3.x up to 8.x)
Patran (v.9.0 or higher)
Pro/ENGINEER (v.17 or higher)
Prosolvia Clarus
(all current versions)
Prosolvia Oxygen
(all current versions)
PT/PRODUCTS (all current versions)
ROBCAD (v.3.6 or higher)
Silma (all current versions)
SIMPACK (all current versions)
Softimage 3D (v.3.7 or higher)
Solid Designer (prior to v.6.0)
DEC, HP, IBM, SGI (all), SUN ./xinstall
SGI (all) ./xinstall
SUN
Follow the instructions found at
www.logicad3d.com/software/dri
vers/SUN-Java3D.html
IBM ./xinstall
(install X-Window driver
v.2.0/3.0)
SGI 53 ./sgi/mglinst first permanent
SGI 62/32 ./sgi/mglin32 first permanent
SGI 62/64 ./sgi/mglin64 first permanent
SGI 63/32 ./sgi/mgl6332 first permanent
SGI 64/64, SGI 65/64 ./sgi/mgl6464 first permanent
SGI 53 ./sgi/dialinst madymo
SGI 62/32 ./sgi/dialin32 madymo
SGI 62/64 ./sgi/dialin64 madymo
SGI 63/32 ./sgi/dial6332 madymo
SGI 64/64, SGI 65/64 ./sgi/dial6464 madymo
HP, IBM, SGI (all), SUN ./xinstall
SGI (all)
SGI 53 ./sgi/dialinst patran permanent
SGI 62/32 ./sgi/dialin32 patran permanent
SGI 62/64 ./sgi/dialin64 patran permanent
SGI 63/32 ./sgi/dial6332 patran permanent
SGI 64/64, SGI 65/64 ./sgi/dial6464 patran permanent
SGI (all)
DEC, HP, IBM, SGI (all), SUN ./xinstall
SGI (all)
SGI (all)
DEC, HP, IBM, SGI (all), SUN ./xinstall
HP, IBM, SGI (all), SUN
HP, IBM, SGI (all), SUN
HP, IBM, SGI (all), SUN ./xinstall
SGI 53 ./sgi/mglinst first permanent
SGI 62/32 ./sgi/mglin32 first permanent
SGI 62/64 ./sgi/mglin64 first permanent
SGI 63/32 ./sgi/mgl6332 first permanent
SGI 64/64, SGI 65/64 ./sgi/mgl6464 first permanent
DEC, HP, IBM, SUN ./xinstall
SGI 53 ./sgi/mglinst second permanent
SGI 62/32 ./sgi/mglin32 second permanent
SGI 62/64 ./sgi/mglin64 second permanent
SGI 63/32 ./sgi/mgl6332 second permanent
SGI 64/64, SGI 65/64 ./sgi/mgl6464 second permanent
Driver included with application
Driver included with application
Driver included with application
Driver included with application
Driver included with application
Driver included with application
7
Page 8

Application Platform Installation Command/Note
Solid Designer (v.6.0 or higher)
SIMPACK (all current versions)
Softimage 3D (v.3.7 or higher)
Solid Designer (prior to v.6.0)
Solid Designer (v.6.0 or higher)
Strim (prior to v.3.0)
Strim (v.3.0 or higher)
SuperScape VRT/ Viscape
(all current versions)
TEBIS (v.3.1 Release 8)
TEBIS (v.3.1 Release 9)
TECOPLAN (all current versions)
TGS OpenInventor
(v.2.5 or higher)
Unigraphics (v.11 or higher)
VEGA (v.3.0 or higher)
Virtual Design 2
(all current versions)
VisFly (v.1.1 or higher)
VisMockUp (v.1.1 or higher)
Vuppet Master
(all current versions)
World Tool Kit
(all current versions)
World Up (all current versions)
DEC, HP, IBM, SGI (all), SUN ./xinstall
HP, IBM, SGI (all), SUN ./xinstall
SGI 53 ./sgi/mglinst first permanent
SGI 62/32 ./sgi/mglin32 first permanent
SGI 62/64 ./sgi/mglin64 first permanent
SGI 63/32 ./sgi/mgl6332 first permanent
SGI 64/64, SGI 65/64 ./sgi/mgl6464 first permanent
DEC, HP, IBM, SUN ./xinstall
SGI 53 ./sgi/mglinst second permanent
SGI 62/32 ./sgi/mglin32 second permanent
SGI 62/64 ./sgi/mglin64 second permanent
SGI 63/32 ./sgi/mgl6332 second permanent
SGI 64/64, SGI 65/64 ./sgi/mgl6464 second permanent
DEC, HP, IBM, SGI (all), SUN ./xinstall
SGI 53 ./sgi/mglinst strim 100 permanent
SGI 62/32 ./sgi/mglin32 strim 100 permanent
SGI 62/64 ./sgi/mglin64 strim 100 permanent
SGI 63/32 ./sgi/mgl6332 strim 100 permanent
SGI 64/64, SGI 65/64 ./sgi/mgl6464 strim 100 permanent
SGI (all) ./xinstall
SGI 53, SGI62/64
HP, SGI (all) ./xinstall
Driver included with application
(install X-Window driver
v.2.0/3.0)
HP, SGI (all) ./xinstall
HP, IBM, SGI (all), SUN
DEC, HP, IBM, SGI (all), SUN ./xinstall
DEC, HP, IBM, SGI (all), SUN ./xinstall
SGI (all)
SGI (all), SUN ./xinstall
Driver included with application
Driver included with application
(install X-Window driver
v.2.0/3.0)
HP, IBM, SGI (all), SUN ./xinstall
HP, IBM, SGI (all), SUN ./xinstall
SGI (all)
SGI (all)
SGI (all)
Driver included with application
Driver included with application
Driver included with application
8
Page 9

Driver Installation Procedures
Follow the instructions below for either global
installation (with "root" privileges) or local
installation (without "root" privileges).
Related Sections
Troubleshooting
SGI Workstations With IRIX 6.2 or Higher
Additional Command Line Options
Global Installation
1
Mount the CD-ROM (replace the #
symbol with the number of your CD-ROM
drive).
DEC:
HP:
IBM:
SGI:
SUN:
2
Install and configure the driver. (Note
mkdir /CDROM
mount –rt cdfs –o noversion /dev/rz#c
/CDROM
cd /CDROM
mkdir /CDROM
mount –F cdfs –o ro,cdcase
/dev/dsk/c0t#d0 /CDROM
cd/ CDROM
mkdir /cdrom
mount –v cdrfs –r /dev/cd0 /cdrom
cd /cdrom
mkdir /CDROM
mount –rt iso9660 /dev/scsi/sc0d#10
/CDROM
cd /CDROM
mkdir /cdrom
mount –F hsfs –r /dev/dsk/c0c6d#s0
/cdrom
cd /cdrom/cdrom0
that your system may require a different
command line. Refer to the application
list on pages 7-9.)
./xinstall
Select your application and the serial port
to which the Magellan/SPACE MOUSE is
Install
and
Exit
connected. Press
3
(OPTIONAL) Set the user-defined
.
configurations. Create a link from
/usr/magellan/home
to the home
directory of all users, e.g.:
ln –s /hom /usr/magellan/home
Copy (once) the global configuration file
to the user home directory.
cp /usr/magellan/xdriver.ini
/home/<username>/xdriver.ini
2
Copy the driver from the CD-ROM
(replace the # symbol with the number of
your CD-ROM drive).
DEC:
HP:
IBM:
SGI:
SUN:
3
Install and configure the driver.
mkdir /CDROM
mount –rt cdfs –o noversion /dev/rz#c
/CDROM
cp /CDROM/dec/xdriver xdriver
mkdir /CDROM
mount –F cdfs –o ro,cdcase
/dev/dsk/c0t#d0 /CDROM
cp /CDROM/hp/xdriver xdriver
mkdir /cdrom
mount –v cdrfs –r /dev/cd0 /cdrom
cp /cdrom/ibm/xdriver xdriver
mkdir /CDROM
mount –rt iso9660 /dev/scsi/sc0d#10
/CDROM
cp /CDROM/sgi/xdriver xdriver
mkdir /cdrom
mount –F hsfs –r /dev/dsk/c0t6d#s0
/cdrom
cp /cdrom/cdrom0/sun/xdriver xdriver
chmod 555 xdriver
./xdriver -new
Select your application and the serial port
to which the Magellan/SPACE MOUSE is
Install
and
Exit
connected. Press
4
The driver must be active before you
.
launch your application. This can be
achieved in several ways, e.g. enter the
call of the xdriver in the application
startup file, in a login startup file (.cshrc)
or in the Xstartup file (as root). The call
of the xdriver is:
<path>/xdriver &
Starting the Driver for the First Time
After the system has copied the X-Window
driver, the driver must be started for the first
time and configured. The driver demands
sequential information in procedure, which it
then stores in a fixed configuration table. The
file name of the configuration table is
xdriver.ini
/usr/magellan
. It is saved in the directory
(the same directory in which the
X-Window driver is installed). While activating
the X-Window driver, it searches for the
configuration table and uses the information
stored there.
Local Installation
1
Create a subdirectory for the Magellan/
SPACE MOUSE driver.
mkdir ./magellan
chmod 777 ./magellan
cd ./magellan
Uninstalling the X-Window Driver
To uninstall a global installation, use the
following command:
/usr/magellan/xdriver –disableinit
To uninstall a local installation, simply remove
the
xdriver
entry from the start-up file.
9
Page 10

Magellan/SPACE MOUSE Keyboard
The keyboard of the Magellan/SPACE MOUSE
operates on two levels: the so-called
"standard" or top-level keyboard and the
second-level keyboard.
Common Functions
Several functions that are common to these
two levels are described below.
Translation ON/OFF
Turns the translational degrees of freedom
(inputs X, Y and Z) on or off. Turning
translation off fixes the "screen position" of the
onscreen object. The default is ON.
Rotation ON/OFF
Turns the rotational degrees of freedom
(inputs A, B and C) on or off. Turning rotation
off fixes the orientation of the onscreen object.
The default is ON.
Dominant Mode ON/OFF;
When dominant mode is on, only the input of
the greatest magnitude is registered, i.e. the
onscreen object moves in only one direction at
a time. This can be a translational or rotational
direction. Dominant mode is especially helpful
when learning how to use the Magellan/SPACE
MOUSE. The default is OFF.
Gain Down; Decrease Sensitivity
Decreases the sensitivity of the Magellan/
SPACE MOUSE. The same movements of the
cap will produce a slower movement of the
object. Each time the key is pressed, the
sensitivity decreases by one half.
Gain Up; Increase Sensitivity
Increases the sensitivity of the Magellan/
SPACE MOUSE. The same movements of the
cap will produce a faster movement of the
object. Each time the key is pressed, the
sensitivity doubles.
Gain Default; Default Sensitivity
Returns the Magellan/SPACE MOUSE back to
the standard sensitivity.
Standard Keyboards of Common
Applications
Functions of the standard keyboard are
executed simply by pressing and releasing any
one of the nine buttons of the Magellan/SPACE
MOUSE Classic or the eleven buttons of the
Magellan/SPACE MOUSE Plus and Plus XT. The
default function assigned to each button varies
with the application used. Standard keyboards
for some common CAD applications are listed
below. Note that the functions of the standard
keyboard may be customized by the user via
the Magellan/SPACE MOUSE driver. See Button
Mapping Window.
CADDS5 (v.8.3 or higher)
1
Translation ON/OFF
2
Rotation ON/OFF
3
Dominant Mode ON/OFF
4
Model Space Filter ON/OFF.
CADDS5 Model Space Filter.
5
Decrease Sensitivity
6
Increase Sensitivity
7
Default Sensitivity
Toggles the
NOTE: See also the CADDS5 user’s manual
under the cross reference
DynamicView
or
Using Dynamics Manipulation
on the View Display
Working With
.
CATIA (v.4)
1
Movement About Rotation Axis.
animation turned off in CATIA’s 3D menu, the
object onscreen performs a rotation about the
selected axis (the angle through which it rotates
can be changed with the sensitivity adjustment
in the 3D menu). When animation is on, the
object rotates at a constant speed about the
selected axis. The rotation speed doubles each
time the key is pressed. Pressing the
Magellan/SPACE MOUSE star key stops the
rotation and resets the screen.
2
Translation ON/OFF
3
Rotation ON/OFF
4
Select Rotation Axis.
this key displays the current rotation axis. While
still holding the button, a new rotation axis may
be selected with the 2D computer mouse.
5
Dominant Mode ON/OFF
6/+
Yes.
Activates the Yes button.
7/-
No.
Activates the No button.
8
Dialmode.
and dialmode (when Enable is checked in the
Single Axis Dial section of the Magellan Motion
Control Center main window). The default is
STANDARD mode. See Dialmode Keyboard.
*
Reset Screen.
its stored starting position.
Toggles between standard mode
Pressing and holding
Resets the onscreen object to
With
10
Page 11

CATIA (v.5)
2
Translation ON/OFF
3
Rotation ON/OFF
5
Dominant Mode ON/OFF
6
Increase Sensitivity
7
Default Sensitivity
7
New Rotation Center.
rotation center at the center of the current
screen.
8
Menu.
Brings up the Unigraphics menu.
Sets the new
NOTE: See also the Unigraphics user’s manual
under the cross reference
or
Magellan
.
View Point Function
Pro/ENGINEER (v.17 through 19)
1
Repaint.
2
Shade.
3
Display Datum.
datum planes.
4
Model Spin Center.
the spin center axis.
5
Decrease Sensitivity
6
Increase Sensitivity
7
Default Sensitivity
8
Default View.
view.
Repaints the current screen.
The object onscreen is shaded.
Toggles the display of the
The model will spin about
Resets the object to the default
NOTE: See also the Pro/ENGINEER user’s
manual under the cross reference
or
Function
Spaceball
.
View Point
Pro/ENGINEER (v.20 or higher)
1
Repaint.
2
Shade.
3
Previous View.
previous view.
4
Default View.
view.
5
Gain Up
6
Gain Down
7
Gain Default
8
Refit.
maintaining the current orientation.
Repaints the current screen.
The object onscreen is shaded.
Resets the object to the
Resets the object to the default
Resizes the view of the object while
NOTE: See also the Pro/ENGINEER user’s
manual under the cross reference
or
Function
Spaceball.
View Point
Second-Level Keyboard
Functions of the second-level keyboard are
executed by pressing any one of the eight
numerical keys in combination with the star
key. The keys must be pressed
simultaneously
Press and hold the star key followed by the
desired numerical key. Note that second-level
keyboard functions are not applicationdependent.
* 1
Translation ON/OFF
* 2
Rotation ON/OFF
* 3
Dominant Mode ON/OFF
* 4
Zeroing.
zeroed at the current position of the cap. All
subsequent inputs are relative to this position.
* 5
Translation Sensitivity.
sensitivity is increased incrementally on a scale
from zero (the default) to 7. Activating this key
sequence the eighth time resets the sensitivity
to zero.
* 6
Rotation Sensitivity.
sensitivity is increased incrementally on a scale
from zero (the default) to 7. Activating this key
sequence the eighth time resets the sensitivity
to zero.
* 7
Zero Radius.
the cap required to cause movement is
increased incrementally on a scale from zero to
15 (the default). After 15 the setting is reset to
zero. A high zero radius setting is helpful if slight
vibrations exist in the work environment.
* 8
Default Sensitivity.
and rotational sensitivities and the zero radius to
the default settings.
The Magellan/SPACE MOUSE is
The translational
The rotational
The minimum displacement of
Returns the translational
Quicktip
.
Unigraphics (v.11 or higher)
1
Translation ON/OFF
2
Rotation ON/OFF
3
Dominant Mode ON/OFF
4
Keep In View.
impossible to lose the graphical object outside
the bounds of the screen. The default is OFF.
5
Gain Down
6
Gain Up
Pressing this key makes it
A Quicktip is executed by pressing downward
on the cap with a quick tipping motion of your
finger, as shown below. The Quicktip function
11
Page 12

is an extra "virtual" button that may be
programmed just like the normal hardware
buttons. The default function assigned to
Quicktip toggles the driver window between
the foreground and background. Note that for
the Magellan/SPACE MOUSE Classic and Plus,
the translation and rotation must be turned ON
and the dominant mode turned OFF for the
Quicktip function to work.
Dialmode Keyboard
Dialmode functions like a manual dialbox. Press
one of the keys listed below to select one of
the six degrees of freedom. Twist the cap
about the Y-axis (i.e. in the horizontal plane of
the base of the Magellan/SPACE MOUSE) to
move the onscreen object in the selected
direction. See also Single Axis Dial.
1
Input X.
2
Input Y.
3
Input Z.
5
Input A.
6
Input B.
7
Input C.
Twist the cap for horizontal translation.
Twist the cap for vertical translation.
Twist the cap to zoom in or out.
Twist the cap to rotate about the x-axis.
Twist the cap to rotate about the y-axis.
Twist the cap to rotate about the z-axis.
12
Page 13

Magellan/SPACE MOUSE Motion Control Center
The Magellan/SPACE MOUSE Motion Control
Center (MCC) can be used both to directly
configure the hardware settings and to
program the standard keyboard.
Motion Control Center Main Window
The main window of the MCC, shown below,
contains basic features for configuring the
Magellan/SPACE MOUSE.
3D Modes
Translation ON/OFF
degrees of freedom (inputs X, Y and Z) on or
off. Turning translation off fixes the “screen
position” of the onscreen object. The default is
Rotation ON/OFF
ON.
degrees of freedom (inputs A, B and C) on or
off. Turning rotation off fixes the orientation of
the onscreen object. The default is ON.
Dominant ON/OFF
turns the translational
turns the rotational
turns dominant mode on or
off. When dominant mode is on, only the input
of the greatest magnitude is registered, i.e.
the onscreen object moves in only one
direction at a time. This can be a translational
or rotational direction. Dominant mode is
especially helpful when learning how to use
the Magellan/SPACE MOUSE. The default is
OFF. Use the
unfix the current translation, rotation and
dominant mode settings.
Sensitivity
Use these slider bars to adjust various
sensitivities of the Magellan/SPACE MOUSE. As
an example, it may be useful to have faster
zoom response (Z-sensitivity) than pan
response (X- and Y-sensitivity). The bars
labeled
collective sensitivities, while the six bars
labeled with the individual degrees of freedom
Changeable
Translation
tickbox to fix and
and
Rotation
adjust the
13
Page 14

are for individual adjustment. When a
sensitivity is increased, the same movements
of the Magellan/SPACE MOUSE cap generate
quicker movements of the onscreen object.
Untick the boxes next to the individual
adjustment bars to turn off the corresponding
degrees of freedom. The
is used to control the minimum displacement
of the cap necessary to cause movement of
the onscreen object. Increasing the null radius
may be helpful in work environments prone to
vibrations (e.g. industrial environments), which
may cause the Magellan/SPACE MOUSE to
register unintentional movements. With some
applications it may be necessary to tick
Null Radius
Exchange Y and Z Translation
sensitivity see Options Window.
slider bar
. For nonlinear
Application
The application selected during installation is
highlighted in the scroll bar menu. If you wish
to use the Magellan/SPACE MOUSE with a
different application, select the new application
Save
from the scroll bar menu and click
Panel
section of the MCC window. If you wish
to use the Magellan/SPACE MOUSE with more
than one application, select a different panel in
Panel
the
application and clicking
automatically switches to the panel settings of
the active application. Customized MCC
settings may be saved for up to four different
applications; see Panel. Click
the settings in the
Single Axis Dial
window to their defaults. For several common
applications an
also present, which is used to adjust the
overall sensitivity of the Magellan/SPACE
MOUSE.
section before choosing the
Save
. The MCC
Default
3D Modes, Sensitivity
sections of the MCC main
Internal Sensitivity
in the
to return
and
slider bar is
Buttons
As an alternative to manually pressing the
buttons on the Magellan/SPACE MOUSE, these
software buttons may be clicked with the 2D
mouse cursor to execute the default functions
assigned to the corresponding hardware
buttons. (For the Magellan/SPACE MOUSE
+
Classic, the plus [
present on the software keyboard but have no
effect.) Holding the 2D mouse cursor over one
of these software buttons displays two lines of
information text. The first line shows the
function mapped to the corresponding
hardware button. The second line shows the
function that is executed by pressing the
software button itself.
] and minus [-] buttons are
Buttons
The
arbitrary key sequences as commands onto
any of the Magellan/SPACE MOUSE hardware
buttons. To map a new command onto a
button, select the button number from the
scroll bar menu. The current function and
mapping code of the selected button are
displayed in the fields
Code
. Click
Mapping Window. After remapping a button,
the user should enter a new description in the
Meaning
Button Info
displays the key sequence mapped to the
hardware buttons whenever they are pressed.
Default
defaults.
section is also used to map
Meaning
Programming
field.
opens a small window that
resets all button mappings to their
and
Mapping
to open the Button
Panel
Click
Save
to save the current MCC
Quit
configuration. Click
that quitting the MCC does NOT stop the XWindow driver). Anytime changes are made
anywhere in the MCC window, the
is highlighted red, indicating that the current
changes have not been saved.
appears when unsaved changes have been
made, which can be used to undo any
unwanted changes. The four colored buttons
numbered 1 through 4 can be used to save up
to four independent configurations. The
configurations can be for different settings
within the same CAD application or they can
be associated with different applications (see
also Application). The background color of the
MCC window changes to match the color of the
numbered button of the active panel.
opens a small window for launching the
xdriver.htm
Options Window.
help file. Click
to quit the MCC (note
Save
button
Restore
Help
Options
to open the
Support Window
The configuration settings can be
interactively tested with a 3D cube demo
program by clicking
not possible to test the default functions of
the standard keyboard with the 3D Cube
demo program. Alternatively, click
to open a small window that displays both
the analog values of all six degree-offreedom inputs as well as the events
corresponding to each pressed key. By
clicking
the window of the target application, all
events generated by the Magellan/SPACE
MOUSE are sent to this application, no
matter which application is active.
Event Window
3D Cube
. Note that it is
3D Values
and then clicking into
14
Page 15

Single Axis Dial
Tick
Enable
to map the Dialbox Mode ON/OFF
function onto Magellan/SPACE MOUSE button
8. Press button 8 to activate the dialbox mode.
When dialbox mode is active, the hardware
buttons 1, 2, 3, 5, 6 and 7 are used to select
the inputs X, Y, Z, A, B and C, respectively.
Select a degree of freedom by pressing one of
these hardware buttons, then twist the cap
about the Y-axis (i.e. in the horizontal plane of
the base of the Magellan/SPACE MOUSE) to
move the onscreen object in the selected
direction. Alternatively, click
to activate the dialbox mode, and select the
active degree of freedom in this section of the
MCC window. Use the slider bar to change the
sensitivity of the single axis dial.
Active/Not Active
Dialbox Simulation
Unlike the single axis dial feature, a real
dialbox is simulated using the dialbox
simulation mode. This is only necessary for
some applications that do not support
Magellan/SPACE MOUSE but that do support
dialboxes. The functions of the tickboxes
numbered 1 through 8 correspond to the
default functions that your CAD application
would normally assign the eight wheels of a
dialbox. Select a degree of freedom by ticking
one of the eight tickboxes or by pressing the
corresponding hardware button. Twist the cap
about the Y-axis (i.e. in the plane of the base
of the Magellan/SPACE MOUSE). This executes
the same motion as that obtained by turning
the corresponding wheel on a real dialbox.
3D
Selecting
onscreen object in more than one degree of
freedom at a time. The cap must then be
moved and twisted in the normal, intuitive
directions (i.e. not only about the Y-axis). Click
3D Assignment
reassigning the six degrees of freedom to the
wheels of the dialbox. By correctly assigning
the six inputs, Magellan/SPACE MOUSE can be
used as normal with applications that do not
support its use. Selecting
values generated by Magellan/SPACE MOUSE
to be interpreted by the application as relative
values. Note that some IBM and SGI systems
may require a separate installation procedure
to activate the dialbox simulation mode. See
LPFK and Dialbox Driver Installation.
Options Window
Options
Click
main window to open the Options window,
shown at right. This window contains
makes it possible to move the
to open a small window for
in the
Relative
Panel
section of the MCC
causes all
additional features for controlling various
functions and appearances of the MCC.
Nonlinear Sensitivity
These values determine the nonlinear
behavior of the translational and rotational
sensitivity. Nonlinear sensitivity is
characterized by increasing sensitivity with
increasingly large deflections of the
Magellan/SPACE MOUSE cap. Values of 0 or
higher may be entered, with 0 having no
effect and higher values giving stronger
nonlinear behavior. The default for both
parameters is 100. Note that
Sensitivity
section of the MCC main window for these
values to take affect.
must be ticked in the
Nonlinear
Sensitivity
Keyboard Info
Use
No Keyboard Inf
Button Info Window. For CATIA users, the
Catia Config
configuration information for the function
buttons at the bottom of the CATIA window.
button is used to import the
o to toggle on and off the
Colors
Used to change the color of each MCC panel.
Values from 0 to 255 may be entered. Ticking
Colormap
creating new colors within the colormap.
keeps the X-Window driver from
Additional Options
Ticking
corresponding buttons in the
the MCC main window. When
ticked, a small colored dot corresponding to
the color of the active MCC panel appears in
the desktop icon of the minimized MCC
No Save, No Help
or
No Quit
hides the
Panel
section of
Panel Icon
is
15
Page 16

window. Ticking
keys pressed in the button mapping codes are
released after the mapping is executed.
Ticking
icon to always appear in front of other open
windows.
The Quicktip function may be toggled on and
off with the
Button Mapping Window
To program or "map" a new command onto a
Magellan/SPACE MOUSE button, select the
button number from the scroll bar menu in
the
Then click
Button Mapping window, shown below. Click
the buttons in this window to add commands
to the mapping code of the selected
Magellan/SPACE MOUSE button. The
functions of the buttons are described below.
Changes made to the mapping code are
displayed at the bottom of the window in the
Auto Icon
Buttons
Mapping Code
current changes or
Clear Key
causes the Magellan desktop
Debug
reports debug information.
Quicktip
section of the MCC main window.
Programming
field. Click
ensures that all
tickbox.
, which opens the
Okay
to save the
Abort
to cancel.
Press a Key
Single keys entered in a button’s mapping
sequence are displayed and stored here.
Wait
should be entered in mapping
sequences that require a window to be
opened or a menu to be pulled down.
Button Events
Enable
causes the application’s default
command to be executed whenever the
selected button is pressed, regardless of
other commands included in the button
mapping. For example, if
and the mapping code for an additional
function is included in the button mapping,
the default function and the additional
function are simultaneously executed.
Disable
being sent.
prevents the default command from
Enable
is entered
Button Action
causes a single beep to sound.
Beep
causes the mapped command to be
repeatedly executed as long as the button is
held down. Note that the beep command
cannot be repeated.
Repeat
16
Page 17

2D Mouse Buttons
Use these buttons to map the functions of the
three 2D mouse buttons.
Change Sensitivity
These buttons maps the Increase/Decrease
Sensitivity functions, either for collective
(translation or rotation) or individual (X, Y, Z,
A, B or C) degrees of freedom. The dialbox
buttons are used to map the sensitivity control
of the dialbox mode.
Predefined Button Mappings
A list of the predefined mapping codes
available for the current application is
displayed here. Click a mapping code to map
the function to the selected Magellan/SPACE
MOUSE button.
Motion Control Center
causes the MCC window to be brought
Show
Hide
to the front of the screen.
window to the back and
between front and back. Mapping one of the
Panel buttons numbered 1 through 4 switches
the MCC to that panel number.
sends the MCC
Change
toggles
LPFK
The functions of the 32 buttons correspond to
the default functions that your CAD application
normally assigns the buttons of an LPFK. Use
these buttons to map the corresponding LPFK
functions. Note that some IBM and SGI
systems may require a separate installation
procedure to activate the LPFK simulation
mode. See LPFK and Dialbox Driver
Installation.
17
Page 18

Troubleshooting
Problem/Error Possible Explanations Recommended Actions
Magellan/SPACE
MOUSE not found on
TTY.
Xdriver already
running. You must kill
(XXXX) PID and
restart xdriver using
xdriver –new.
Cannot copy xdriver. ¾ Access rights incorrect or not
Dialbox installation
failed.
¾ Access rights on TTY ports are
wrong.
¾ The correct adapter might not
be being used.
¾ There may be another driver
running on the TTY port (e.g.
Spaceball or Getty).
¾ There are many reasons for
this message. The user may
have quit the MCC and tried to
restart the X-Window driver
without first stopping the XWindow driver processes from
running.
logged on as ROOT.
¾ Some of the system files that
support LPFK and Dialbox may
not be installed on the system.
9 Check access rights on the
TTY ports and change if
necessary.
9 Make sure you use the correct
adapter.
9 Verify that the port is available
and not in use by another
device or driver.
9 Kill the running X-Window
driver process ID and restart
the X-Window driver, unless
the driver was installed
globally, in which case it will
automatically be relaunched a
few seconds after being killed.
9 Try copying the files
manually.
9 Contact your system
administrator (see also
comments below).
MCC does not start. ¾ Access rights to Xserver are
incorrect.
NOTE: Troubleshooting on UNIX requires
editing of critical startup files and therefore
some knowledge of UNIX commands. Your
system administrator should help you with it. If
the X-Window driver installation fails, an email
message is automatically generated, saved in
/tmp
the
directory and (if the workstation is
9 Use xhost + localhost.
connected to the internet) sent to our technical
support at help@logicad3d.com. We send
responses to these emails with suggestions on
how to resolve the problem. You can also
contact our technical support by phone. Please
call the numbers listed for your area (see
LogiCad3D Support).
18
Page 19

LogiCad3D Support
If you have any questions or comments about
the Magellan/SPACE MOUSE product, please
contact the persons or organizations listed for
your area. Various information about the
Magellan/SPACE MOUSE, including the latest
driver versions, can be found at the web sites.
America & Asia
LogiCad3D, Inc.
17672 Laurel Park Drive North, Suite 400
Livonia, MI 48152
U.S.A.
Tel: + 1-734-591-4047
Fax: + 1-734-591-4064
Email: logicad3d.US@logicad3d.com
Web: www.logicad3d.com
Marketing & Sales
Miguel Leitmann
Tel: + 1-734-591-4047
Email: Miguel.Leitmann@logicad3d.com
Support
Tel: + 1-800-540-4758
Email: support.US@logicad3d.com
Help
Email: help@logicad3d.com
EMEA (Europe, Middle East & Africa)
LogiCad3D GmbH
An der Hartmuehle 8
D-82229 Seefeld
Germany
Tel: + 49 (0) 8152-9919-0
Fax: + 49 (0) 8152-9919-50
Email: logicad3d.EU@logicad3d.com
Web: www.spacemouse.com
Marketing & Sales
Ralf Stetter
Tel: + 49 (0) 8152-9919-0
Email: Ralf.Stetter@logicad3d.com
Support
Tel: + 49 (0) 8152-9919-44
Email: support.EU@logicad3d.com
Help
Email: help@logicad3d.com
19
Page 20

Appendices
Connecting to the RS232 Serial Port
The Magellan/SPACE MOUSE is equipped with
a 9-pin D-Sub female connector. The wiring of
this connector matches any IBM-compatible PC
with a 9-pin serial connector. To use the
Magellan/SPACE MOUSE with other computers,
check the pin functions against the list shown
below and verify whether the Magellan/SPACE
MOUSE connector wiring matches your system.
If not, you must use an appropriate adapter
cable to connect the Magellan/SPACE MOUSE
wiring to that of your computer.
Pin Meaning
Case Shield Case
2TxD RxD
3RxD TxD
4 Supply DTR
5GND GND
7CTS RTS
8RTS CTS
The use of the handshake signals (CTS, DTR
and RTS) is absolutely necessary for the safe
operation of the Magellan/ SPACE MOUSE.
Without these handshake signals, loss of data
will occur. Additionally, the signal lines (DTR
and RTS) are used to supply power to the
Magellan/SPACE MOUSE. Thus no external
power supply is required. The minimum output
voltage has to be 5 V, providing a output
current of 9 mA on both signal lines.
Communication via the serial port using the
XON/XOFF protocol is supported by the
Magellan/SPACE MOUSE, but the handshake
signals (CTS, DTR and RTS) are needed for
safe operation. Thus the status of the
handshake signals has to be carefully checked
and treated by the computer. To activate the
Magellan/SPACE MOUSE, these signals should
have a positive (active) level.
Connecting to IBM RS6000 Workstations
The IBM–Magellan/SPACE MOUSE adapters for
25-pin and 9-pin D-Sub male RS232 ports use
the wiring schemes shown in the following
diagrams.
Connection to
Computer
Pin No. Pin No.
25-p. D-Sub f. 9-p. D-Sub m.
connector connector
shield ────────────────── shield
2 ────────── TxD ────────── 3
3 ────────── RxD ────────── 2
4 ────────── RTS ────────── 7
5 ────────── CTS ────────── 8
7 ────────── GND ────────── 5
20 ────┬───── DTR ────────── 4
6 ────┤ DSR
8 ────┘ DCD
(to RS232) (to Mag./S.M.)
Pin No. Pin No.
9-p. D-Sub f. 9-p. D-Sub m.
connector connector
shield ────────────────── shield
1 ────┐ DCD 1
2 ────│───── RxD ────────── 2
3 ────│───── TxD ────────── 3
4 ────┤───── DTR ────────── 4
5 ────│───── GND ────────── 5
6 ────┘ DSR ────────── 6
7 ────────── RTS ────────── 7
8 ────────── CTS ────────── 8
(to RS232) (to Mag./S.M.)
Connecting to SGI Workstations
If the 8-pin mini-DIN female RS232 connector
on an SGI workstation is used, the converteradapter cable shown in the following diagram
is required. The cable changes the mini-DIN
connector to that of the Magellan/SPACE
MOUSE and converts, if necessary, the 4 V
Pin No. Pin No.
8-p. mini-DIN m. 9-p. D-Sub m.
1 ──────── DTR (4V conv. 7V) ─── 1
2 ──────── CTS not used ────── 5
3 ──────── TxD ──────────── 3
4 ──────── GND ──────────── 5
5 ──────── RxD ──────────── 2
6 ──────── RTS ──────────── 7
7 ──────── DCD not used
8 ──────── GND ──────────── 5
connector ───────────── connector
shield shield
(to RS232) (to Mag./S.M.)
20
Page 21

output voltage of the SGI port handshake
signals to 5 V and 10 mA to supply the
Magellan/SPACE MOUSE. The input handshake
signals CTS and DCD of the workstation are
not connected in order to save some current
taken from the workstation’s output handshake
signals DTR and RTS.
Different SGI workstations—despite somewhat
similar connector types—show different
voltage and current conditions at the serial
RS232 port. One example is a Personal IRIX
workstation, which offers such a low current
(and voltage) handshake signal that the
Magellan/SPACE MOUSE (as well as any
standard mouse) is not able to operate due to
a lack of current. In such cases, only an
external power supply (min. 5.0 V, max. 11.0
V, 9 mA DC) into the DTR pin of the Magellan/
SPACE MOUSE will solve the problem. An
appropriate adapter cable with external power
supply has been included in the product
package based on the system specified at the
time of order. However, if an adapter with the
external power supply feature has not been
included with your Magellan/SPACE MOUSE or
should you discover after ordering that your
SGI machine requires an external power
supply, please contact the LogiCad3D Support
Center listed for your area.
Connecting to SUN Workstations
To install the Magellan/SPACE MOUSE on SUN
workstations, make sure that the hardware
configuration of the serial port to which you
want to connect the Magellan/SPACE MOUSE is
set to RS232.
configuration is required in order to supply
control voltages to the Magellan/SPACE
MOUSE through the handshake signal lines. To
configure the port to RS232, follow the steps
in your SUN user handbook. The wiring
scheme of the SUN–Magellan/SPACE MOUSE
adapter is shown below.
The default is RS422!
The RS232
Pin No. Pin No.
25-p. D-Sub f. 9-p. D-Sub m.
connector connector
shield ────────────────── shield
2 ────────── TxD ────────── 3
3 ────────── RxD ────────── 2
4 ────────── RTS ────────── 7
5 ────────── CTS ────────── 8
7 ────────── GND ────────── 5
20 ────────── DTR ────────── 4
(to RS232) (to Mag./S.M.)
SGI Workstations With IRIX 6.2 or
Higher
Some applications support the driver for the
Magellan/SPACE MOUSE that is integrated in
SGI systems with IRIX version 6.2 or higher.
At present, the following applications support
this driver:
Alias
Open Inventor
Follow the procedure below to install the XWindow driver with these applications.
1
Login as
program.
2
Select the CD-ROM as the source drive
(the Magellan/SPACE MOUSE driver is
located on the IRIX 6.2 System CD-ROM
1 of 2).
3
Select the step installation menu with
the following commands:
4
Exit the
5
Using the System Manager Tools,
configure the Serial Port Setup to which
the Magellan/SPACE MOUSE is connected
(Port 2) as
with
6
For older applications that use the old
name (e.g. IRIX Inventor) you must
create the file
config/magellan
After creating the file, reboot the system
for the new configuration to take effect.
NOTE: Install either the xdriver or the IRIX
kernel driver.
R3000 workstations, please contact the
LogiCad3D Support Center listed for your area
and ask if a driver is available. You can also
check our homepage at www.logicad3d.com.
root
and launch the
inst
install eoe.sw.optinput
go
quit
inst
program.
Magellan
. Test the installation
Run Confidence Test
/usr/lib/X11/input/
with following contents:
x_init {
name “spaceball”
}
Do not install both!
inst
.
For older
21
Page 22

Additional Command Line Options
The X-Window driver may be launched with
the following command line attachments.
-class Class information of all active windows
is shown.
-debug Reports debug information.
-dialsingle Sends all LPFK and Dialbox
events separately.
-disableinit Turns off the X-Window driver
/etc/inittab
in the
launched from
immediately.
-enableinit Relaunches the X-Window driver
from the
-fastinit Causes the X-Window driver to
initialize faster. Use of this option is NOT
recommended because the view of the panel
can be changed.
-graphics Opens a demo window in which a
3D cube can be moved in six degrees of
freedom.
-grab The 2D mouse cursor is blocked if the
Magellan/SPACE MOUSE is active.
-hidemcc Hides the MCC so that it is no
longer usable. (The
and the -nomcc option have the same effect.)
-inittab Informs the X-Window driver that it
was started from the
-installlpfk Installs the driver necessary for
the LPFK simulation.
-installmgl Installs the Magellan XIE driver.
(Only for SGI systems with IRIX 6.2 or higher.)
-irixmgl Activates the Magellan XIE driver
and functions within the MCC. (Only for SGI
systems with IRX 6.2 or higher.)
-new Set up new local configuration. The
configuration file
configuration of the driver is asked for.
-new -global Set up new global
configuration.
-nohelp or -nohtml Suppresses the creation
of the X-Window HTML files and disables the
Help
-nomcc or -nomotif No MCC window comes
up with the X-Window driver.
-noquit Ensure that the MCC will never be
turned off.
-showmcc Causes the MCC to reappear
(after it has been hidden, e.g. with the
hidemcc
/etc/inittab
button in the MCC.
or
file. An X-Window driver
/etc/inittab
is terminated
file.
Quit
button in the MCC
/etc/inittab
*.ini
is deleted and a new
-nomcc
commands).
.
–
-test Test the driver. Opens a window and
shows all X-Window driver data received.
-texte Text output. The texts used in the XWindow driver are output in all used
languages.
-tty <serial port> Connect information
about the Magellan/MOUSE at the defined
serial port with YES or NO.
-turbo The Turbo Magellan/SPACE MOUSE
(18ms data rate) is supported.
-ungrab or -nograb Ensures that the 2D
mouse cursor remains unblocked.
-uninstalllpfk Uninstalls the LPFK simulation
driver.
-uninstallmgl Uninstalls the Magellan XIE
driver. (Only for SGI systems with IRIX 6.2 or
higher.)
-user All logged-in users are shown.
-userdir or -userid Creates an
file from the user’s home directory (so that the
configuration file is user-dependent) and saves
*.ini
the configuration file
group-ID of the current user. For global
installation, the X-Window driver uses the
/usr/magellan/xdriver.ini
the default. Note that this option will work only
if the X-Window driver has been launched
inittab
using -
-xstartup Informs the X-Window driver that
it was started from the Xstartup.
LPFK and Dialbox Driver Installation
In order to use the LPFK and dialbox
simulation modes, it may be necessary to
install additional operating system files. The
following systems normally require additional
files:
SGI (IRIX 5.3 or higher)
IBM (AIX 4.14 or higher)
For IBM systems, consult your AIX user’s
manual. For SGI systems, follow the
installation procedure outlined below. Note
that LPFK and dialbox simulation modes are
not available on SUN.
1
Insert the IRIX 6.2 System CD-ROM 1 of
2.
2
Start the Software Manager. From the
System
or double-click on the CD-ROM icon on
your desktop.
.
menu select
with the user-ID and
configuration file as
Software Mana
xdriver.ini
ger
22
Page 23

3
Select the input directory next to the
Available Software
window.
/CDROM/dist
If you install the operating system
from a location other than the CDROM drive, change this accordingly.
4
Click
Customize Installation.
5
A list of all installed and available OS
modules appears. Scroll down to
6.2 Execution Environment
expand the folder.
6
Scroll down to
Optional Input Devices
highlight the entry and click
Product Specifications
and
Start
IRIX
.
7
This starts the installation process
whereby the following file is installed:
/usr/lib/X11/input/dial.o
8
After rebooting, reinstall the X-Window
driver, this time using the
-installlpfk
command.
./xdriver -new -global -installlpfk
9
To test the installation, start the XWindow driver and from the
menu select
Click on
,
now be able to manipulate the dials
and the buttons with the Magellan/
Run Confidence Test
Dials and Buttons
System
.
. You should
SPACE MOUSE device.
Magellan/
Feature/Specification
Contactless, wearless, high-linear measuring system Yes Yes Yes
Operating speed levels (increments of resolution) 600 600 600
Number of freely programmable buttons 9 11 11
Software-controllable keyboard LEDs No No Yes
Quicktip virtual button Yes Yes Yes
Device weight (for stability) 0.665 kg 0.680 kg 0.680 kg
Min. releasing force of the measuring system 0.2 N 0.2 N 0.2 N
Max. user force of the measuring system 4.4 N 4.4 N 4.4 N
Ratio of device weight to min. releasing force 33.2 33.2 33.2
Ratio of device weight to max. user force 1.5 1.5 1.5
Device weight deficit w.r.t. max. user force 0 % 0 % 0 %
Counter force to compensate max. user force 0 N 0 N 0 N
Min. releasing torque of the device 4 N mm 4 N mm 4 N mm
Max. user torque of the device 100 N mm 100 N mm 100 N mm
Customization of user force Possible Possible Possible
Customizable keyboard template Yes Yes Yes
Operating humidity (non-condensing) 10 to 98% RH 10 to 98% RH 10 to 98% RH
Operating temperature +5 to +60 °C +5 to +60 °C +5 to +60 °C
Storage humidity 10 to 98% RH 10 to 98% RH 10 to 98% RH
Storage temperature -40 to +85 °C -40 to +85 °C -40 to +85 °C
Gravity height of work center 25 mm 26 mm 26 mm
Dialbox simulation Yes 100% Yes 100% Yes 100%
LPFK simulation Yes 100% Yes 100 % Yes 100 %
Dominant Mode Yes Yes Yes
SPACE MOUSE
Classic
Magellan/
SPACE MOUSE
Plus
Magellan/
SPACE MOUSE
Plus XT
(2 yellow, 1 red)
23
Page 24

Feature/Specification
Magellan/
SPACE MOUSE
Classic
Magellan/
SPACE MOUSE
Plus
Magellan/
SPACE MOUSE
Plus XT
Supported systems
Power source 5V / 9mA 5V / 9mA 5V / 9mA
Interface type RS232, 9600 Baud RS232, 9600 Baud
Internal resolution 8 bit 8 bit 8 bit
Cable length 2 m 2 m (optional 3m) 2 m (optional 3m)
Converter-adapters available for the following
RS232 serial port connections
Connector 9-pin D-Sub fem 9-pin D-Sub fem 9-pin D-Sub fem
Drift-free with temperature change Yes Yes Yes
Resistant to aging effects (constant values
measured)
Standard data rate 40 ms 40 ms (opt. 18 ms) 40 ms (opt. 18 ms)
Dust and water splash protection Possible Possible Possible
FCC, TUV/GS, UL/UR, CE-Approved Yes Yes Yes
Length of manufacturer’s warranty 3 years 3 years 3 years
Standard driver source freely available Yes Yes Yes
Compact size L x W x H (mm) 165 x 112 x 40 188 x 120 x 44 188 x 120 x 44
UNIX:
DEC, HP,
IBM, SGI, SUN
PC:
Win95/98,
WinNT/2000,
DECNT, MIPSNT
IBM 25-p D-Sub m
IBM 9-p D-Sub m
SGI 8-p mini-DIN f
SGI 8-p DIN f
SGI 9-p D-Sub f
SUN 25-p D-Sub f
Yes Yes Yes
UNIX:
DEC, HP,
IBM, SGI, SUN
PC:
Win95/98,
WinNT/2000,
DECNT, MIPSNT
(opt. 19k Baud)
IBM 25-p D-Sub m
IBM 9-p D-Sub m
SGI 8-p mini-DIN f
SGI 8-p DIN f
SGI 9-p D-Sub f
SUN 25-p D-Sub f
UNIX:
DEC, HP,
IBM, SGI, SUN
PC:
Win95/98,
WinNT/2000,
DECNT, MIPSNT
RS232, 9600 Baud
(opt. 19k Baud)
IBM 25-p D-Sub m
IBM 9-p D-Sub m
SGI 8-p mini-DIN f
SGI 8-p DIN f
SGI 9-p D-Sub f
SUN 25-p D-Sub f
24
Page 25

Warranty Information
LogiCad3D’s Limited Lifetime Hardware
Warranty
LogiCad3D warrants that Magellan/SPACE
MOUSE is free from significant defects in
materials and workmanship under normal use
for as long as the device is owned. During the
first three years of ownership, LogiCad3D will
at its sole option, replace or repair at no
charge the product, which in its opinion is
defective.
During the remaining years of the warranty,
LogiCad3D will, at its sole option, replace or
repair the defective product. LogiCad3D will
charge a fixed fee to cover handling and
service costs based on LogiCad3D's then
current price schedules. LogiCad3D at its sole
option, may replace or repair the defective
product with a then current product having
similar features and functionality as
determined by LogiCad3D.
Damages or defects to the product caused by
improper installation, modification, misuse or
abuse are not, of course, covered by this
warranty. Additionally, the warranty service
offered above is nontransferable, which means
that the particular warranty service described
above is available only to the original
purchaser of the product(s). If LogiCad3D
determines that the product is not defective or
was not under warranty, it will return the
product(s) to you, freight collect.
To obtain warranty service, you must either
(a) have a completed warranty registration
card on file at LogiCad3D, or (b) submit
acceptable proof of purchase (for instance, a
copy of your sales receipt indicating date and
place of purchase) to LogiCad3D’s Customer
Service Department. You will need to pack the
product to be returned properly for shipment
and pay any applicable shipping charges.
LogiCad3D will send you the repaired or
replaced product at its own expense.
LOGICAD3D DISCLAIMS ALL OTHER
WARRANTIES, EITHER EXPRESS OR IMPLIED,
INCLUDING BUT NOT LIMITED TO IMPLIED
WARRANTIES OF MERCHANTABILITY AND
FITNESS FOR A PARTICULAR PURPOSE WITH
REGARD TO THE PRODUCT. IN NO EVENT
SHALL LOGICAD3D OR ITS SUPPLIERS BE
HELD LIABLE FOR ANY DIRECT, INDIRECT,
CONSEQUENTIAL OR INCIDENTAL DAMAGES
ARISING OUT OF THE USE OF OR INABILITY
TO USE THE PRODUCT, EVEN IF LOGICAD3D
HAS BEEN ADVISED OF THE POSSIBILITY OF
SUCH DAMAGES. SOME STATES DO NOT
ALLOW THE EXCLUSION OR LIMITATION OF
LIABILITY FOR CONSEQUENTIAL OR
INCIDENTAL DAMAGES, SO THE ABOVE
LIMITATION MAY NOT APPLY TO YOU.
FCC Compliance Statement
This device complies with Part 15 of the FCC
Rules. Operation is subject to the following two
conditions:
1)
This device may not cause harmful
interference.
2)
This device must accept any interference
received, including interference that may
cause undesired operation.
FCC Declaration of Conformance
Trade Name: Silicon Graphics, Inc.
Product: Computer Graphics Workstation
Model Number: CMNBO15B
Date of Conformance: 1/97
Responsible Party: Silicon Graphics, Inc.
Address: 2011 North Shoreline Boulevard
Mountain View, CA 94043-1389
U.S.A.
Tel: 650 933-1071
This equipment complies with Part 15 of the
FCC Rules. Operation is subject to the
following two conditions:
1)
This device may not cause harmful
interference.
2) This device must accept any interference
received, including interference that may
cause undesired operation.
NOTE: This equipment has been tested and
found to comply with the limits for a Class B
digital device, pursuant to Part 15 of the FCC
Rules. These limits are designed to provide
reasonable protection against harmful
interference in a residential installation. This
equipment generates, uses and can radiate
radio frequency energy and, if not installed
and used in accordance with the instructions,
may cause harmful interference to radio
communications. However, there is no
guarantee that interference will not occur in a
particular installation. If this equipment does
25
Page 26

cause harmful interference to radio or
television reception, which can be determined
by turning the equipment off and on, the user
is encouraged to try to correct the interference
by one or more of the following measures:
Reorient or relocate the receiving antenna.
Increase the separation between the
equipment and receiver.
Connect the equipment into an outlet on a
circuit different from that to which the
receiver is connected.
Consult the dealer or an experienced
radio/TV technician for help.
CAUTION: The user is cautioned that changes
or modifications to the equipment not
expressly approved by the party responsible
for compliance could void the user’s authority
to operate the equipment.
European Economic Community
Declaration of Conformance (CE)
The Magellan/SPACE MOUSE is attested to
meet the essential protection requirements
against electromagnetic emission, which are
established in the regulations of the council for
assimilating the rules and regulations of the
member states about electromagnetic
compatibility 89/336/EEC and changed by
regulation 92/31 EEC. This declaration is valid
for all samples produced according to the
enclosed production drawings, which are part
of this declaration. The following standards
were used for judging the product concerning
electromagnetic capability:
For trouble emission: EN55022
edition: 05/95
For trouble security: EN50082-1
edition: 03/93
VCCI Class B Declaration
Korea Class B Declaration
LogiCad3D Software License Agreement
This is a legal agreement between you (either
an individual or entity), the end user License
("Licensee") and LogiCad3D Inc.
("LogiCad3D"). If you do not agree to the
terms of this Agreement, promptly return the
disks and the other items that are a part of
this product in their original package with a
copy of your payment receipt for a full refund.
No part of this Software and all accompanying
documentation, including manuals, binders and
containers (the "Software") may be copied or
reproduced in any form or by any means
without the prior written consent of LogiCad3D
Inc. with the one exception that the Licensee
may copy the Software solely for backup
purposes.
License Grant
LogiCad3D grants to the Licensee a
nonexclusive right, without right to sublicense,
to use this copy of Software on a single
computer at a time. You may not rent or lease
the Software, but you may transfer the
Software on a permanent basis, provided you
retain no copies and the recipient agrees to
the terms of this Agreement. You may not
reverse- engineer, decompile or disassemble
the Software. Further, you may not network
the Software or otherwise use it on more than
one computer or computer terminal at the
same time. The Software is owned by
LogiCad3D or its suppliers and is protected by
United States copyright laws and international
treaty provisions.
Limited Warranty
LogiCad3D warrants that (a) the Software will
perform substantially in accordance with the
accompanying written materials for a period of
(90) days from the date of receipt and (b) any
hardware accompanying the Software will be
free from defects in materials and
workmanship under normal use and service for
a period of three years from the date of
receipt. Any implied warranties on the
Software and hardware are limited to 90 days
and three (3) years, respectively. Some states
do not allow limitations on duration of an
implied warranty, so the above limitation may
not apply to you.
End User Remedies
LogiCad3D’s entire liability and your exclusive
remedy shall be for any breach of warranty, at
LogiCad3D’s option, either (a) return of the
26
Page 27

price paid or (b) repair or replacement of the
Software or hardware that does not meet
LogiCad3D's Limited Warranty; provided that
the Software and hardware must be returned
either to LogiCad3D or to the point of purchase
with a copy of your receipt. This Limited
Warranty is void if failure of the Software and
or hardware has resulted from accident, abuse
or misapplication. Any replacement Software
or hardware will be warranted for the
remainder of the original warranty period or 30
days, whichever is longer.
No Other Warranties
LOGICAD3D DOES NOT WARRANT THE
SOFTWARE IS ERROR-FREE. LOGICAD3D
DISCLAIMS ALL OTHER WARRANTIES, EITHER
EXPRESS OR IMPLIED, INCLUDING BUT NOT
LIMITED TO IMPLIED WARRANTIES OF
MERCHANTABILITY, FITNESS FOR A
PARTICULAR PURPOSE AND
NONINFRINGEMENT OF THIRD-PARTY
RIGHTS WITH RESPECT TO THE SOFTWARE
OR HARDWARE. LOGICAD3D’S LIMITED
WARRANTY GIVES YOU SPECIFIC LEGAL
RIGHTS. YOU MAY HAVE OTHERS, WHICH
VARY FROM STATE TO STATE.
Limitation of Liabilities
IN NO EVENT SHALL LOGICAD3D OR ITS
SUPPLIERS BE LIABLE FOR ANY
CONSEQUENTIAL, INCIDENTAL OR INDIRECT
DAMAGES OF ANY KIND WHATSOEVER
(INCLUDING, WITHOUT LIMITATION,
DAMAGES FOR LOSS OF BUSINESS PROFITS,
BUSINESS INTERRUPTION, LOSS OF
BUSINESS INFORMATION OR OTHER
PECUNIARY LOSS) ARISING OUT OF THE USE
OF OR INABILITY TO USE THIS LOGICAD3D
PRODUCT, EVEN IF LOGICAD3D HAS BEEN
ADVISED OF THE POSSIBILITY OF SUCH
DAMAGES. IN NO EVENT SHALL LOGICAD3D’S
LIABILITY EXCEED THE LICENSE FEE PAID.
BECAUSE SOME STATES DO NOT ALLOW THE
EXCLUSION OR LIMITATION OF LIABILITY
FOR CONSEQUENTIAL OR INCIDENTAL
DAMAGES, THE ABOVE LIMITATIONS MAY
NOT APPLY TO YOU.
Terms
This license is effective until terminated. You
may terminate it at any time by destroying the
Software. It will also terminate upon conditions
set forth elsewhere in this Agreement or if you
fail to comply with any terms or conditions of
this Agreement. You agree upon such
termination to destroy the Software together
with all copies, modifications and merged
portions in any form.
General
This is the entire agreement between you and
LogiCad3D, superseding any prior agreement
whether written or oral relating to the subject
matter of this Agreement. In the event of
invalidity of any provision of this Agreement,
the parties agree that such invalidity shall not
affect the validity of the remaining potions of
the Agreement. This Agreement will be
governed by the laws of the state of California.
The United Nations Convention on Contracts
for the International Sale of Goods is
specifically disclaimed.
27
 Loading...