


Logitech C925e User Manual
WEBCAM
C925e
Setup guide

WEBCAM - C925e
CONTENTS |
|
|
|
English |
3 |
Česká verze |
33 |
Deutsch |
5 |
Slovenčina |
35 |
Français |
7 |
Українська |
37 |
Italiano |
9 |
Eesti |
39 |
Español |
11 |
Latviski |
41 |
Português |
13 |
Lietuvių |
43 |
Nederlands |
15 |
Български |
45 |
Svenska |
17 |
Hrvatski |
47 |
Dansk |
19 |
Srpski |
49 |
Norsk |
21 |
Slovenščina |
51 |
Suomi |
23 |
Română |
53 |
Ελληνικά |
25 |
Türkçe |
55 |
По-русски |
27 |
57 |
ةيبرعلا |
Po polsku |
29 |
59 |
תירבע |
Magyar |
31 |
|
|
www.logitech.com/support/c925e
2

WEBCAM - C925e
Thank you for buying your Logitech Webcam C925e!
Use this guide to set up your Logitech webcam and to begin making video calls
For questions or technical support, please visit www.logitech.com/support/c925e
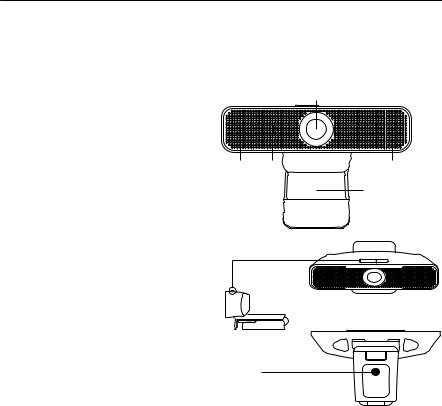
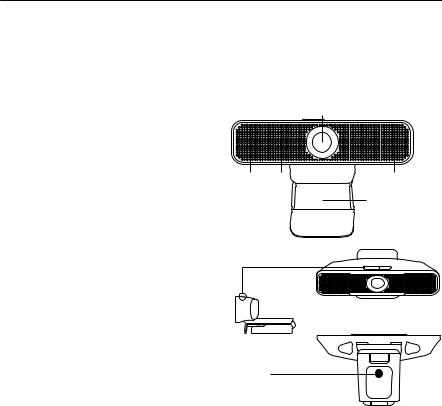
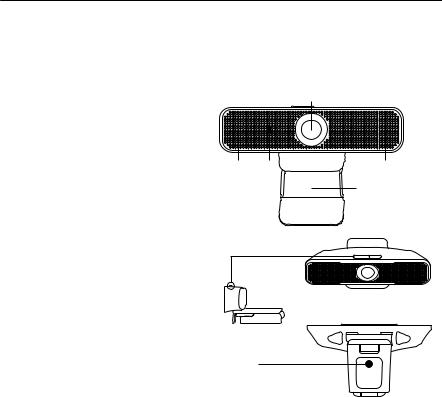
FEATURES |
|
|
1 |
||
1. |
Autofocus HD 1080p lens |
|
|
|
|
2. |
Omni directional microphones |
|
|
|
|
3. Activity light |
|
|
|
||
4. Flexible clip/base |
2 |
3 |
2 |
||
5. |
Privacy shutter |
||||
|
|
|
|||
6. Tripod attachment |
|
|
4 |
||
5
6
3 English
WEBCAM - C925e
SETTING UP YOUR WEBCAM
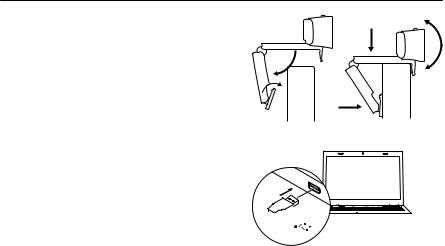
1.Place your webcam
Designed for the way you like to make a video call, place the webcam where you want it— on a computer monitor, desktop, or tripod
For placement on a monitor:
Grasp the webcam as shown and open the flexible clip/base with your other hand Mount the webcam, making sure the foot
on the flexible clip/base is flush with the back of your monitor
2.Connect the webcam
Connect the webcam to a computer
USB port The Windows® UVC or Mac drivers are loaded automatically Driver installation may take a few moments
3.Use the webcam
The webcam does not ship with video calling software To make a video call, use your video calling application
1
2


 USB
USB 
www.logitech.com/support/c925e
4 English

WEBCAM - C925e
Vielen Dank, dass Sie sich für die Logitech Webcam C925e entschieden haben!
Mit dieser Anleitung konfigurieren Sie Ihre Logitech Webcam und führen nach ein paar einfachen Handgriffen Ihr erstes Videogespräch
Besuchen Sie www.logitech.com/support/c925e, wenn Sie Fragen haben oder technischen Support benötigen
FUNKTIONEN |
|
|
1 |
||
|
|
|
|||
1. |
Autofokus-Linse HD 1080p |
|
|
|
|
2. |
Omnidirektionale Mikrofone |
|
|
|
|
3. Betriebs-LED |
2 |
3 |
2 |
||
4. Flexibler Clip/Standfläche |
|||||
|
|
4 |
|||
5. |
Privatsphäre-Schutz |
|
|
||
6. Stativhalterung
5
6
5 Deutsch

WEBCAM - C925e
EINRICHTEN IHRER WEBCAM
1.Befestigen der Webcam
Platzieren Sie die Webcam dort, wo es für Ihre Videogespräche am besten passt – an einem Computerbildschirm, Desktop oder Stativ
Für die Befestigung an einem Bildschirm:
Halten Sie die Webcam mit einer Hand wie auf der Abbildung gezeigt und ziehen Sie mit der anderen Hand die verstellbare Halterung nach unten Befestigen Sie die Webcam und stellen Sie dabei sicher, dass die verstellbare Halterung an der Bildschirmrückseite
fest anliegt
2.Anschließen der Webcam
Schließen Sie die Webcam an einen USBAnschluss des Computers an Die Windows®- UVC oder Mac-Treiber werden automatisch geladen Die Treiberinstallation kann
einen Moment dauern
3.Verwenden der Webcam
Im Lieferumfang der Webcam ist keine Software für Videogespräche enthalten Verwenden Sie die von Ihnen bevorzugte Anwendung, um Videogespräche zu führen
1
2


 USB
USB 
www.logitech.com/support/c925e
6 Deutsch
WEBCAM - C925e
Merci d'avoir acheté cette webcam Logitech Webcam C925e!
Utilisez ce guide pour configurer votre webcam Logitech et commencer à passer des appels vidéo
Pour toute question ou pour une assistance technique, rendez-vous sur www.logitech.com/ support/c925e
FONCTIONNALITÉS
1.Objectif HD 1080p avec mise au point automatique
2.Microphones omnidirectionnels
3.Témoin d'activité
4.Clip/base flexible
5.Obturateur de confidentialité
6.Filetage de fixation pour trépied
|
|
1 |
2 |
3 |
2 |
|
|
4 |
5
6
7 Français

WEBCAM - C925e
INSTALLATION DE LA WEBCAM
1.Positionnez la webcam
Conçue pour s'adapter à vos habitudes d'appels vidéo, la webcam peut être placée où vous le souhaitez, sur un écran
d'ordinateur, un bureau ou encore un trépied
Pour fixer votre webcam sur un écran:
Prenez la webcam d'une main tel qu'indiqué, puis ouvrez la base flexible (clip) avec l'autre main Fixez la webcam en veillant à ce que la patte de la base flexible soit bien alignée avec l'arrière de l'écran
2.Connectez la webcam
Connectez la webcam à un port USB
de l'ordinateur Les pilotes Windows® UVC ou Mac sont chargés automatiquement L'installation des pilotes peut prendre
un moment
3.Utilisez la webcam
La webcam n'est pas livrée avec un logiciel d'appels vidéo Pour effectuer un appel vidéo, utilisez votre application d'appels vidéo
1
2


 USB
USB 
www.logitech.com/support/c925e
8 Français
WEBCAM - C925e
Grazie per aver acquistato la webcam Logitech C925e!
Utilizzare questa guida per installare la webcam Logitech e iniziare subito ad effettuare videochiamate
Per eventuali domande o per contattare il supporto tecnico, visitare il sito Web www.logitech.com/support/c925e
CARATTERISTICHE
1.Obiettivo con risoluzione HD da 1080p e messa a fuoco automatica
2.Microfoni omnidirezionali
3.Spia di funzionamento
4.Base/clip flessibile
5.Copriobiettivo
6.Attacco per treppiede
|
|
1 |
2 |
3 |
2 |
|
|
4 |
5
6
9 Italiano

WEBCAM - C925e
SETTING UP YOUR WEBCAM INSTALLAZIONE DELLA WEBCAM
1.Posizionare la webcam
Progettata per essere posizionata in base alla modalità con cui si desidera effettuare le videochiamate: sul monitor del computer, sulla scrivania o su un treppiede
Posizionamento sul monitor:
Tenere la webcam come indicato e aprire la base/clip flessibile con l'altra mano Fissare la webcam assicurandosi che il piede della base/clip flessibile aderisca alla parte posteriore del monitor
2.Collegare la webcam
Collegare la webcam a una porta USB del computer I driver UVC per Windows® o Mac vengono caricati automaticamente L'installazione dei driver può richiedere qualche secondo
3.Utilizzare la webcam
La webcam non include un programma per le videochiamate Per effettuare
una videochiamata, utilizzare l'applicazione video esistente
1
2


 USB
USB 
www.logitech.com/support/c925e
10 Italiano
WEBCAM - C925e
¡Gracias por la compra de Logitech Webcam C925e!
Usa esta guía para configurar la cámara Web Logitech y empezar a realizar videoconferencias Para preguntas o asistencia técnica, visita www.logitech.com/support/c925e
FUNCIONES |
|
|
|
1. Lente HD 1080p con enfoque automático |
|
|
1 |
2. Micrófonos omnidireccionales |
|
|
|
|
|
|
|
3. Diodo de actividad |
|
|
|
4. Clip/base versátil |
|
|
|
5. Tapa de obturador |
|
|
|
6. Acoplamiento de trípode |
2 |
3 |
2 |
|
|
|
4 |
5
6
11 Español

WEBCAM - C925e
CONFIGURACIÓN
DE LA CÁMARA WEB
1.Colocación
La cámara Web se ha diseñado pensando en las preferencias de todos los usuarios para sus videoconferencias y, por tanto, puede colocarse donde uno quiera:
en el monitor del ordenador, en el escritorio o en un trípode
Para la colocación en un monitor:
Sujeta la cámara Web con una mano, como se indica, y abre el clip/base flexible con la otra mano Monta la cámara Web
El pie del clip/base flexible debe quedar a ras con la parte posterior del monitor
2.Conexión
Conecta la cámara Web a un puerto USB del ordenador Los controladores
UVC de Windows® o Mac se cargan automáticamente La instalación de los controladores puede tardar unos momentos
3.Uso
La cámara Web no se suministra con software para videoconferencias Para realizar videoconferencias,
usa tu aplicación de videoconferencias
1
2


 USB
USB 
www.logitech.com/support/c925e
12 Español
WEBCAM - C925e
Obrigado por ter adquirido a Webcam C925e da Logitech!
Utilize este manual para instalar a câmara Web Logitech e efectuar chamadas de vídeo Para esclarecer dúvidas ou obter suporte técnico, visite www.logitech.com/support/c925e
CARACTERÍSTICAS |
|
|
1 |
|
1. |
Lente HD 1080p com focagem automática |
|
|
|
2. |
Microfones omnidireccionais |
|
|
|
3. Luz de actividade |
|
|
|
|
4. Clip/base flexível |
|
|
|
|
5. |
Obturador de privacidade |
2 |
3 |
2 |
6. Fixação do tripé |
|
|
4 |
|
|
|
|
|
|
5
6
13 Português

WEBCAM - C925e
INSTALAR A SUA CÂMARA WEB
1.Coloque a câmara Web
Concebida para o seu modo preferido de efectuar videochamadas, coloque a câmara onde desejar – sobre o monitor de
um computador, secretária ou tripé
Para colocar sobre um monitor:
Segure a câmara Web como indicado
e abra o clip/base flexível com a outra mão Monte a câmara Web, certificando-se de que a extremidade do clip flexível/base está fixa na parte posterior do monitor
2.Ligue a câmara Web
Ligue a câmara Web a uma porta USB no computador Os controladores Windows® UVC ou Mac são carregados automaticamente A instalação dos
controladores pode demorar alguns minutos
3.Utilize a câmara Web
Ligue a câmara Web a uma porta USB no computador Os controladores Windows® UVC ou Mac são carregados automaticamente A instalação
dos controladores pode demorar alguns minutos
1
2


 USB
USB 
www.logitech.com/support/c925e
14 Português

WEBCAM - C925e
Dank u voor de aanschaf van de Logitech Webcam C925e!
Gebruik deze handleiding om uw Logitech-webcam in te stellen en videogesprekken te voeren Voor vragen of technische ondersteuning gaat u naar www.logitech.com/support/c925e
KENMERKEN |
|
|
1 |
|
1. |
HD-lens (1080p) met autofocus |
|
|
|
|
|
|
||
2. |
Omnidirectionele microfoons |
|
|
|
3. Activiteitslampje |
|
|
|
|
4. Flexibele clip en voetstuk |
|
|
|
|
5. |
Privacysluiter |
2 |
3 |
2 |
6. Bevestigingspunt voor driepoot |
|
|
4 |
|
|
|
|
|
|
5
6
15 Nederlands

WEBCAM - C925e
UW WEBCAM INSTELLEN
1.Plaats uw webcam
De webcam is ontworpen voor de manier waarop u videogesprekken wilt voeren Plaats de webcam waar u maar wilt:
op een computerscherm, desktop of driepoot
Voor bevestiging op een monitor:
Houd met uw ene hand de webcam vast zoals weergegeven en open met uw andere hand de flexibele clip/voet Bevestig de webcam en zorg ervoor dat het voetje op de flexibele clip/voet gelijk is aan de achterkant van uw scherm
2.Sluit de webcam aan
Sluit de webcam op een USB-poort van de computer aan De UVC-stuurprogramma's van Windows® of de stuurprogramma's Mac worden automatisch geladen De installatie van de stuurprogramma's kan enkele minuten duren
3.Gebruik de webcam
Sluit de webcam op een USB-poort van
de computer aan De UVC-stuurprogramma's van Windows® of de stuurprogramma's Mac worden automatisch geladen De installatie van de stuurprogramma's kan enkele minuten duren
1
2


 USB
USB 
www.logitech.com/support/c925e
16 Nederlands

WEBCAM - C925e
Tack för att du har valt att köpa Logitech Webcam C925e!
Använd den här guiden för att konfigurera din Logitech-webbkamera och komma igång med videosamtal
Besök www.logitech.com/support/c925e om du har frågor eller behöver teknisk support
FUNKTIONER
1. |
Autofokus HD 1080p objektiv |
|
|
1 |
2. |
Flervägsmikrofoner |
|
|
|
3. Sändningslampa |
|
|
|
|
4. Justerbar stativklämma |
|
|
|
|
5. |
Sekretesskydd |
2 |
3 |
2 |
6. Stativfäste |
|
|
4 |
|
|
|
|
|
|
5
6
17 Svenska

WEBCAM - C925e
KONFIGURERA WEBBKAMERAN
1.Placera webbkameran
Utformad så att du kan ringa videosamtal på ett sätt som passar just dig
Placera webbkameran på datorskärmen, skrivbordet eller på ett stativ
Placera på en datorskärm
Håll i webbkameran enligt bilden och öppna den justerbara stativklämman med andra handen Montera webbkameran Se till att du fäster stativklämmans bas plant mot datorskärmens baksida
2.Ansluta webbkameran
Anslut webbkameran till en USB-port på datorn Windows® UVCeller Mac-
drivrutinerna laddas automatiskt Det kan ta en stund för drivrutinerna att installeras
3.Använda webbkameran
Webbkameran levereras inte med programvara för videosamtal Använd ditt favoritprogram när du ska ringa videosamtal
1
2


 USB
USB 
www.logitech.com/support/c925e
18 Svenska

WEBCAM - C925e
Tak fordi du købte et Logitech Webcam C925e.
Du kan bruge denne vejledning til at konfigurere dit Logitech-webkamera og komme i gang med at føre videosamtaler
Du finder svar på spørgsmål og teknisk support på www.logitech.com/support/c925e
FUNKTIONER
1. |
Objektiv med autofokus og HD 1080p |
|
|
1 |
2. |
Retningsuafhængige mikrofoner |
|
|
|
3. Statusindikator |
|
|
|
|
4. Justerbar klips/fod |
|
|
|
|
5. |
Lukker som dækker kameraets objektiv |
2 |
3 |
2 |
6. Gevind til stativ |
|
|
4 |
|
|
|
|
|
|
5
6
19 Dansk
 Loading...