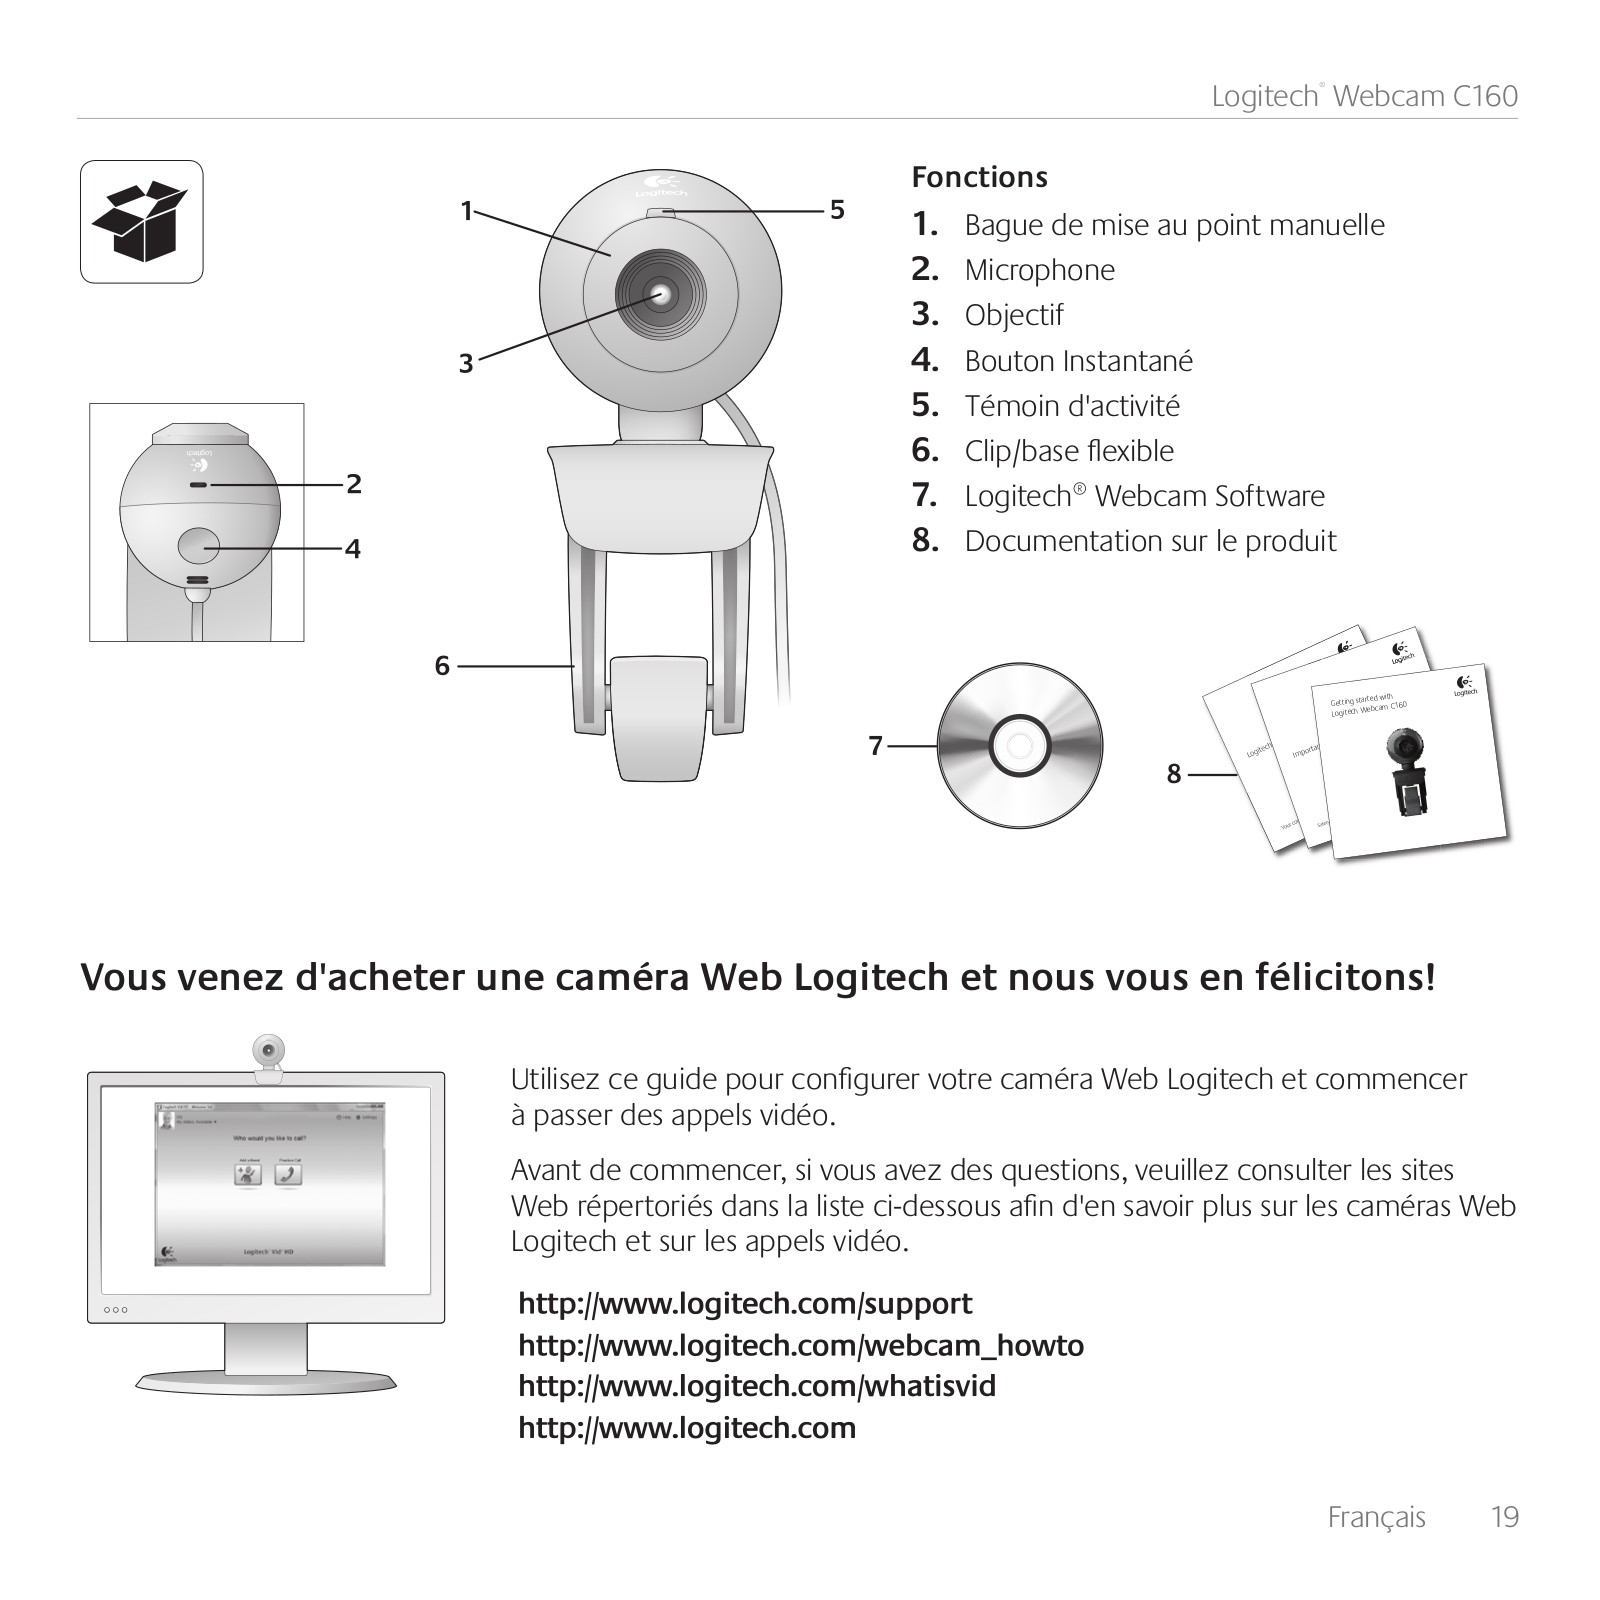
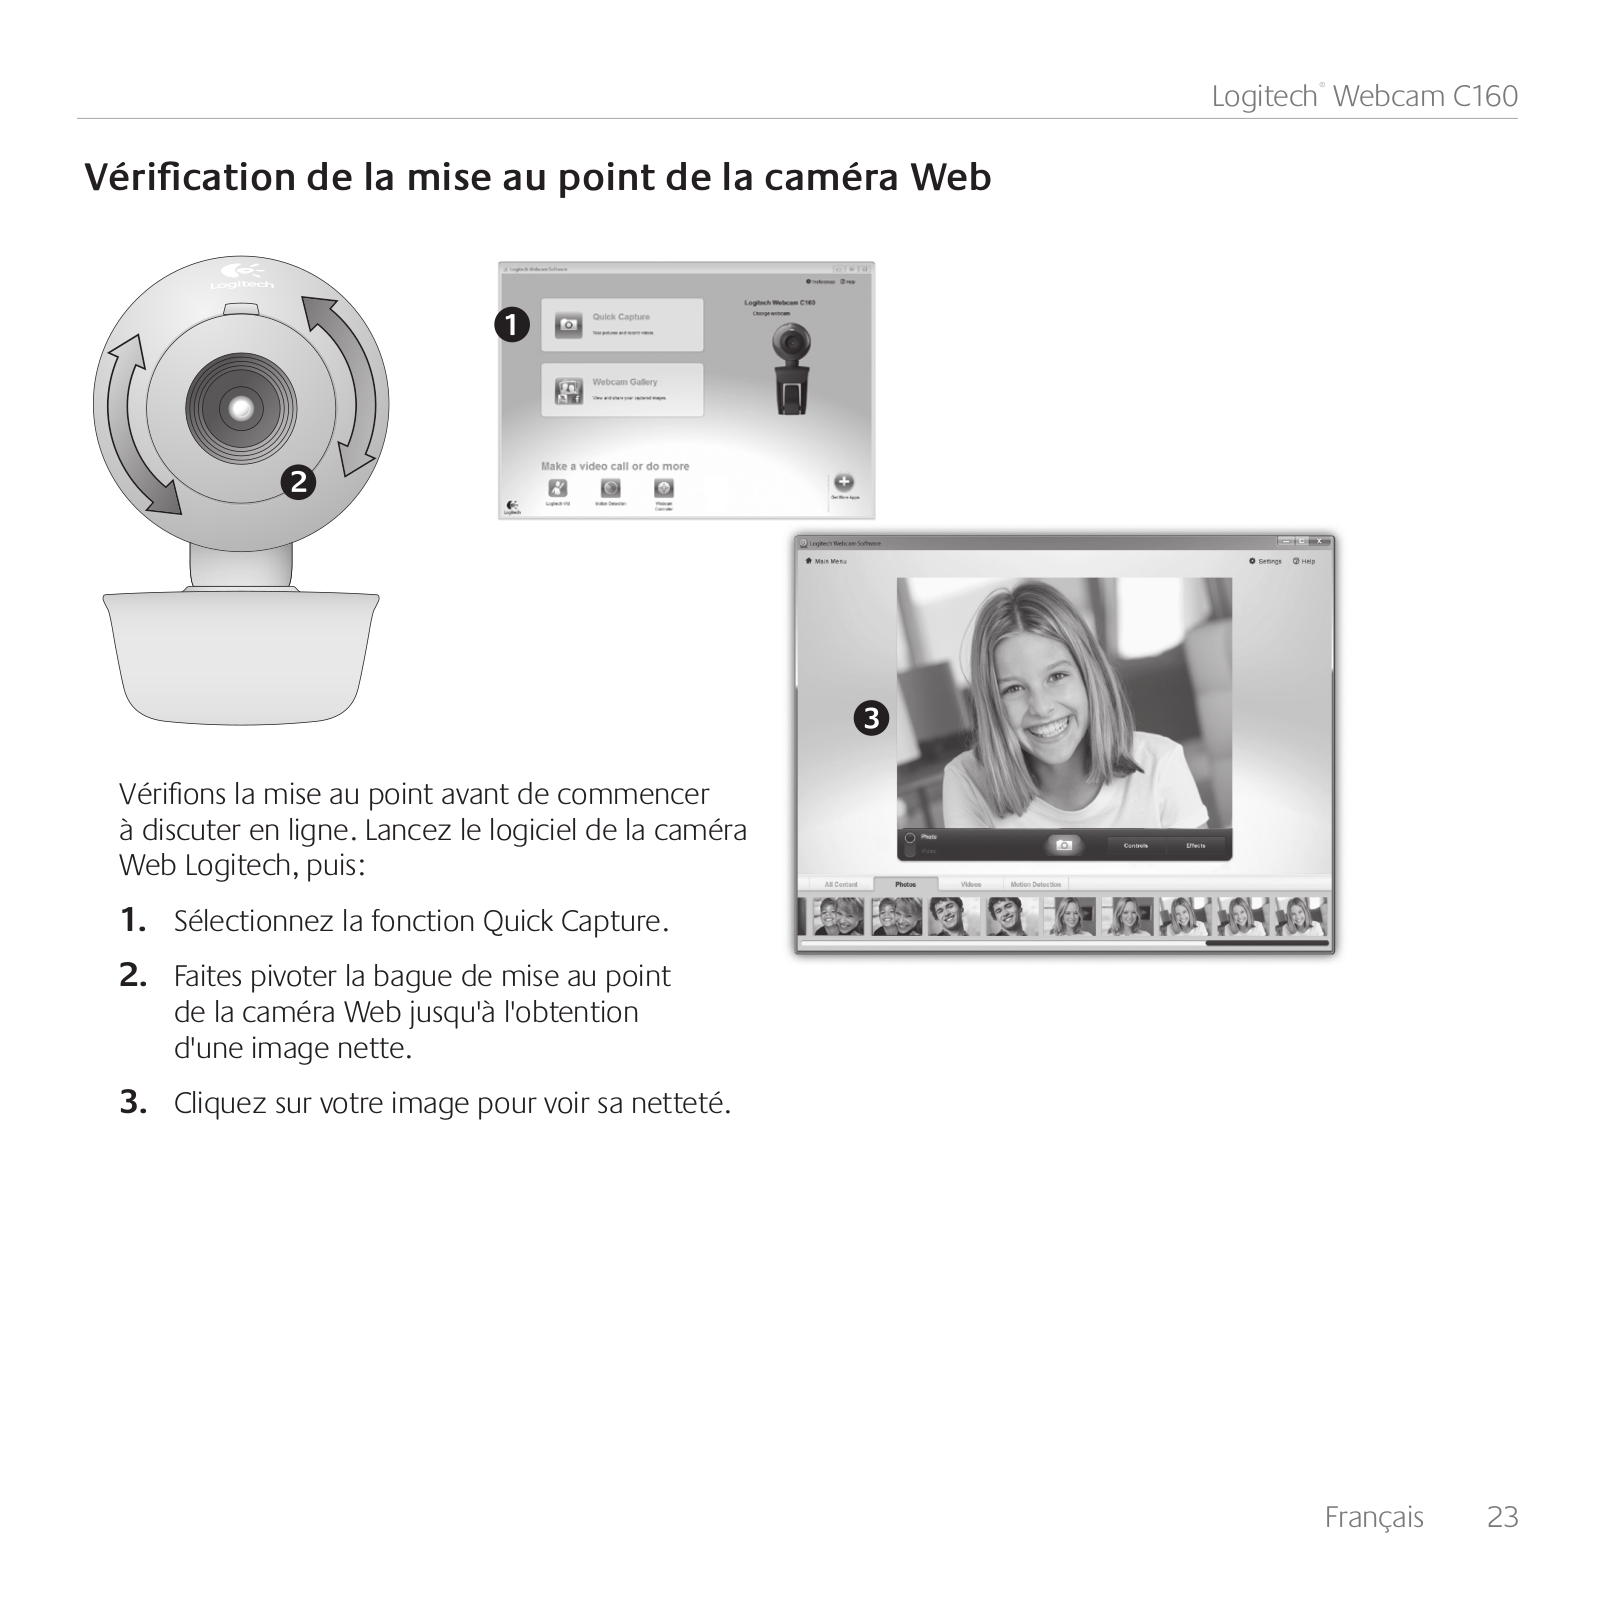
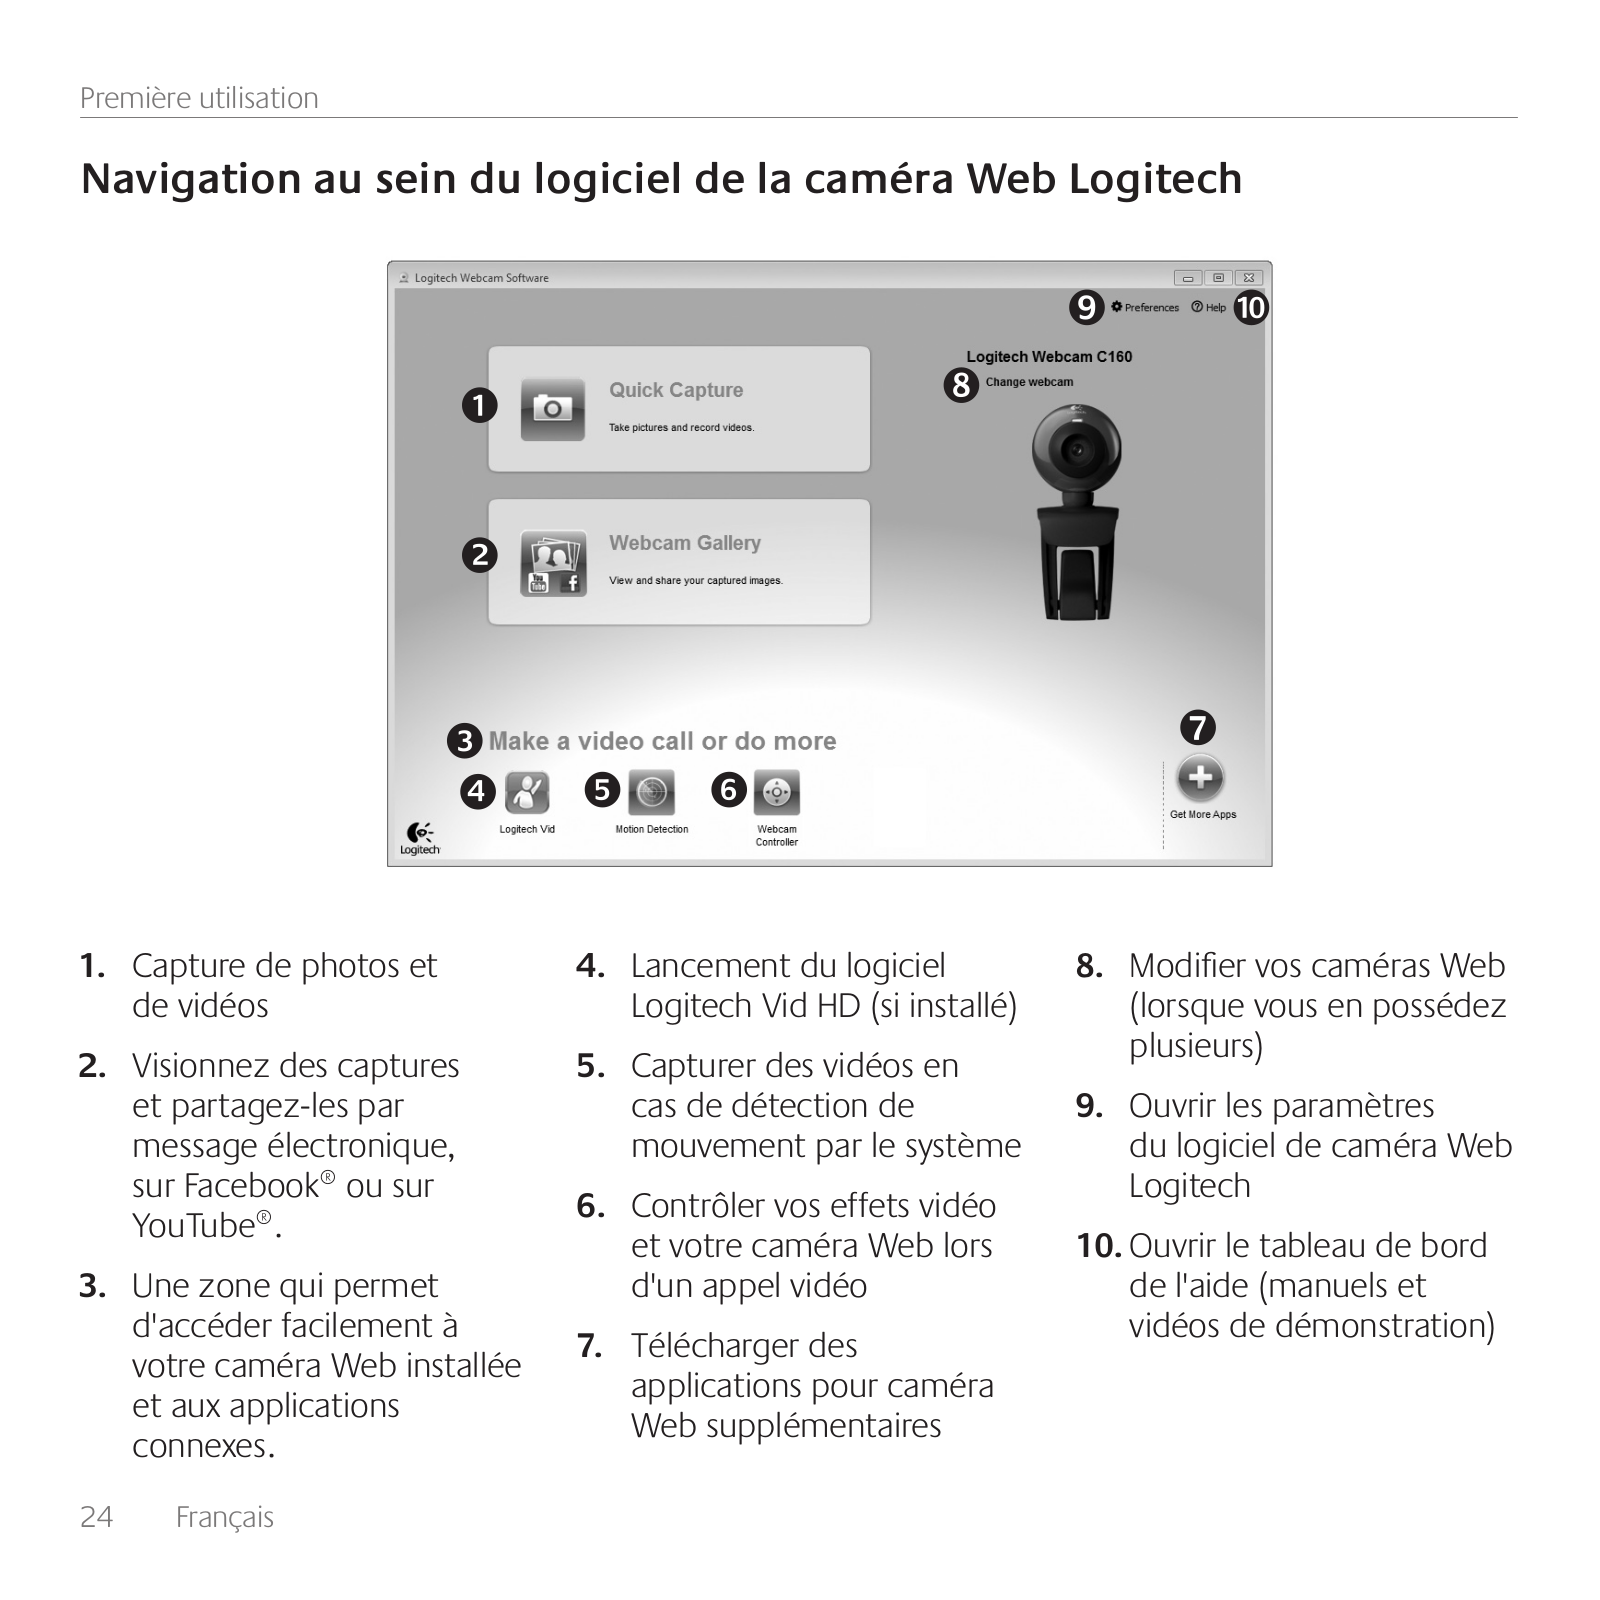
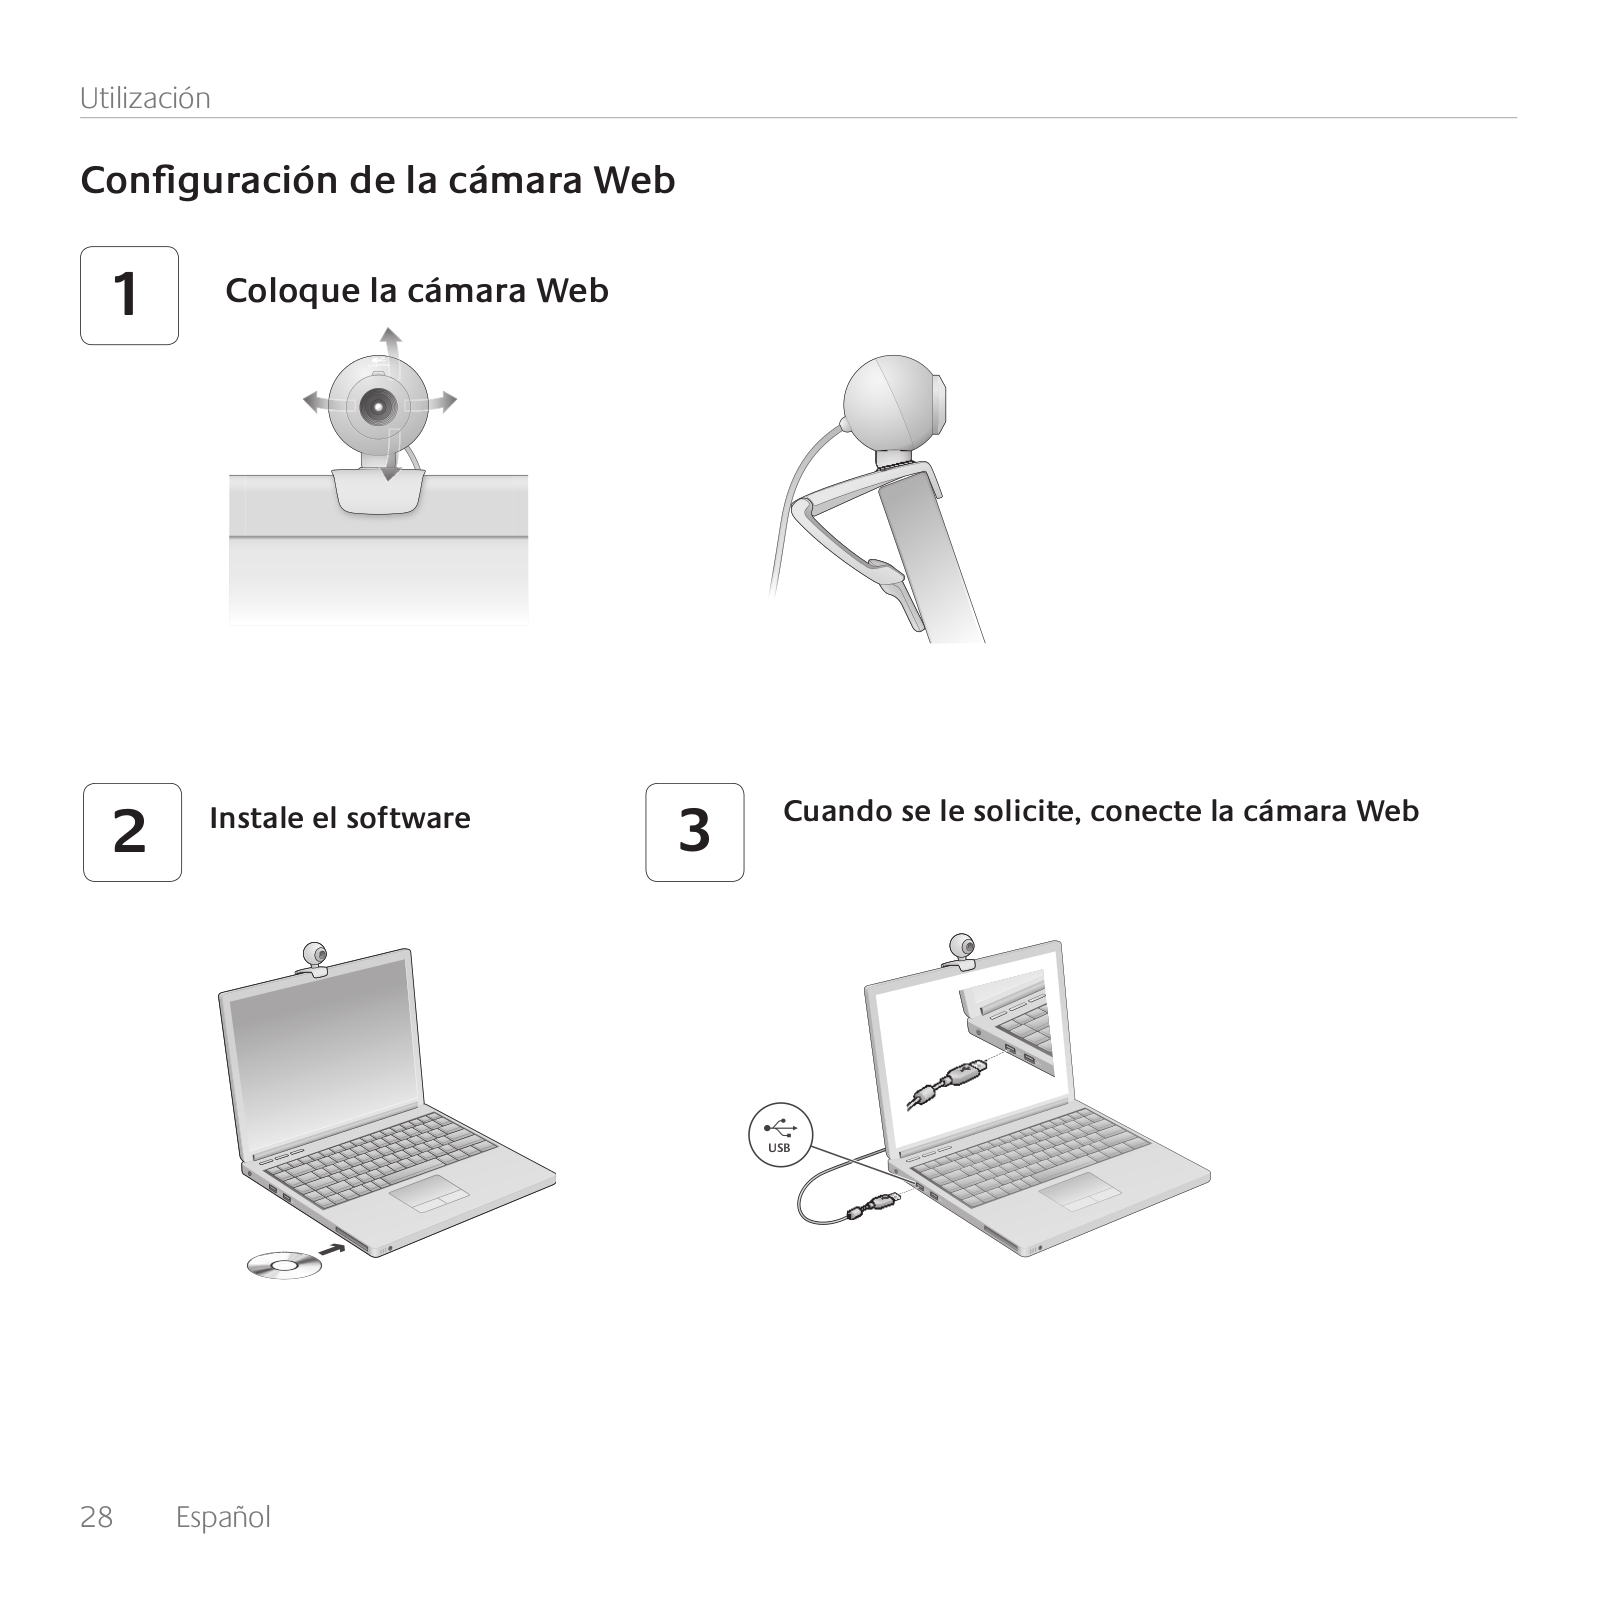
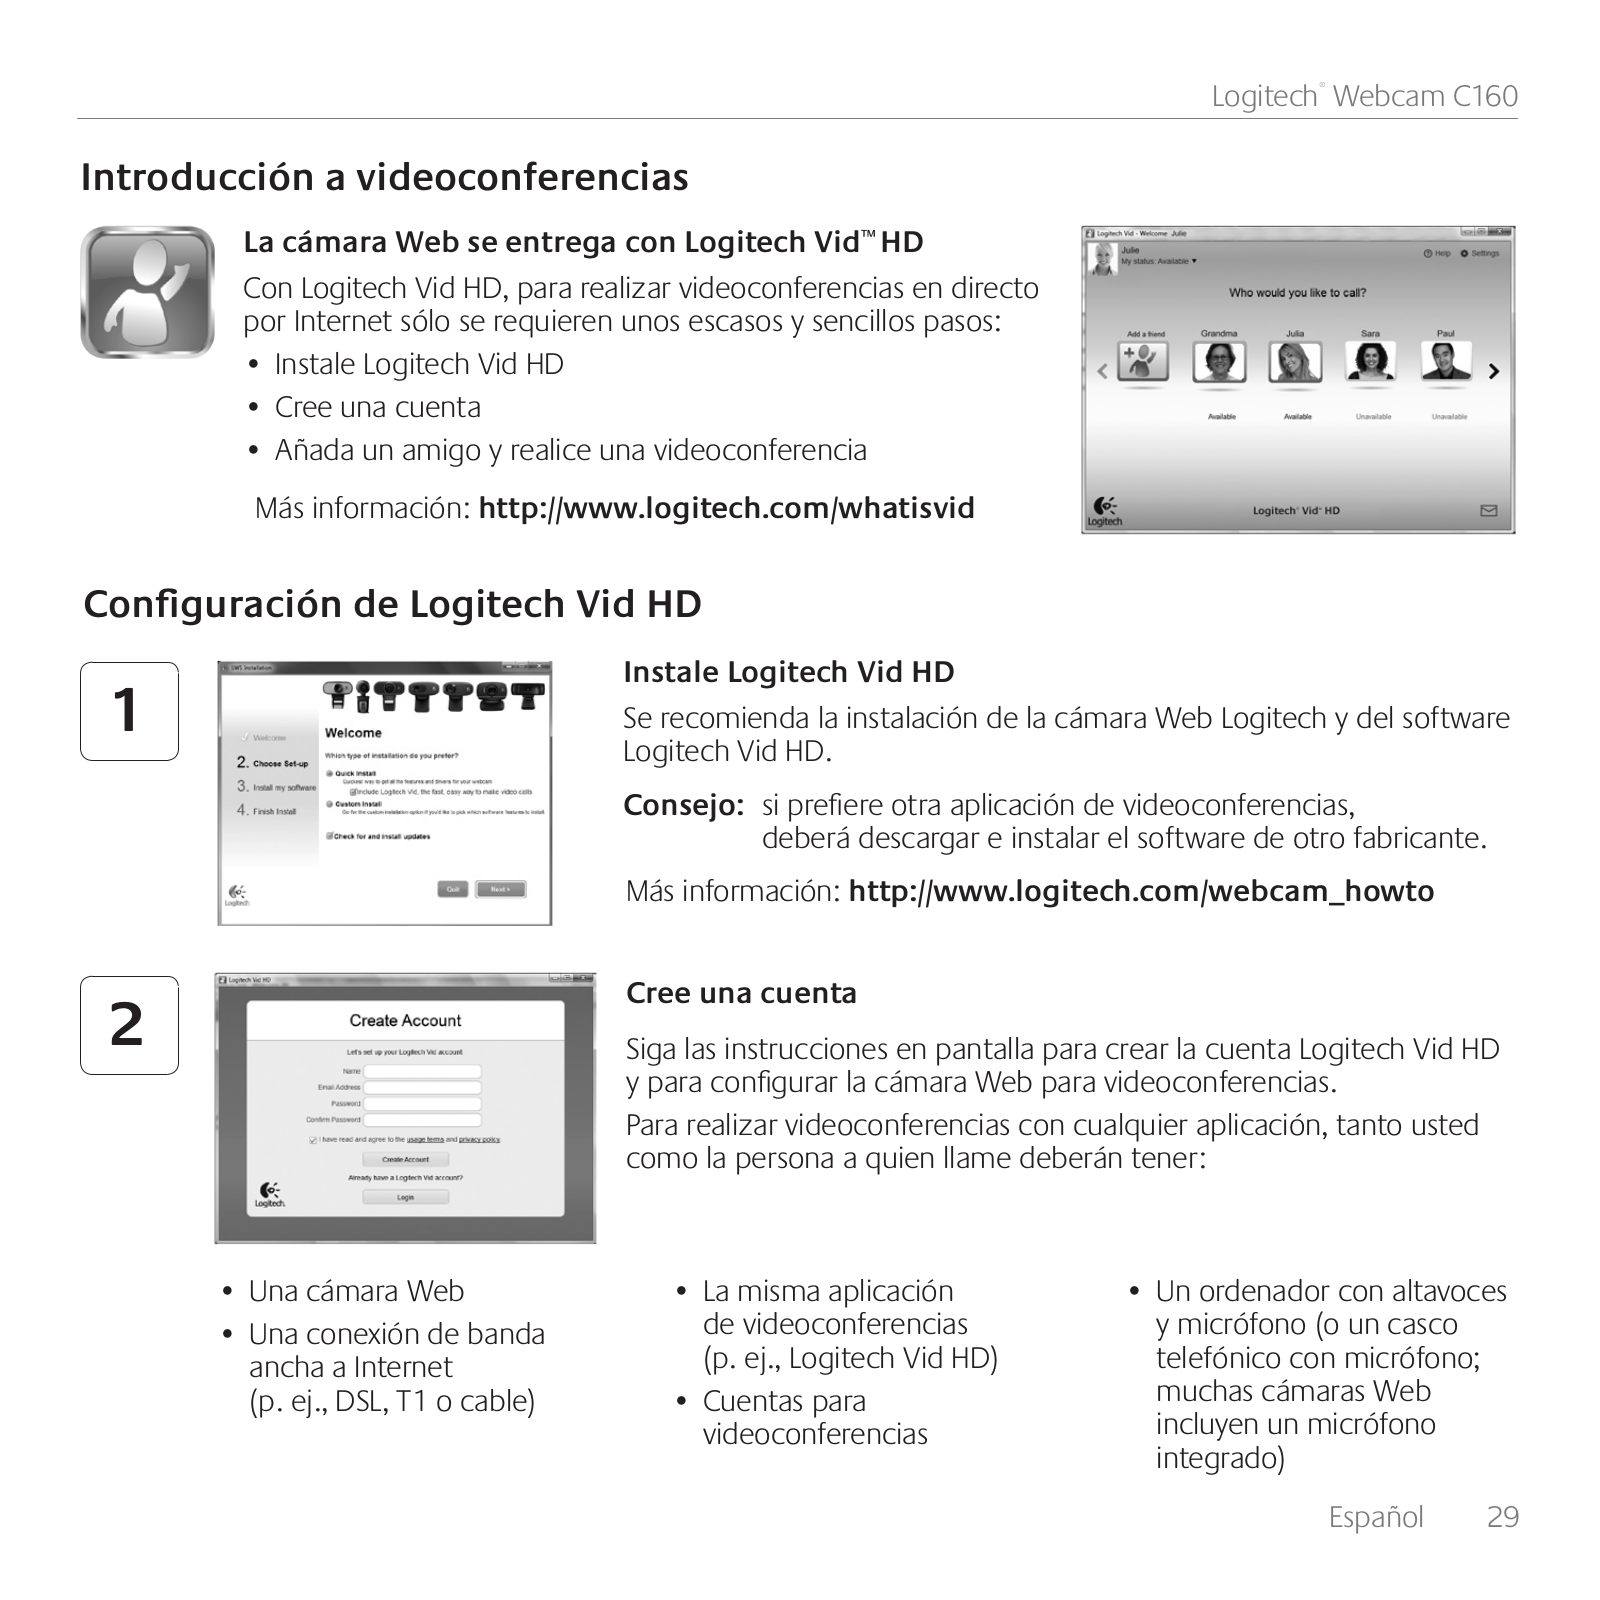
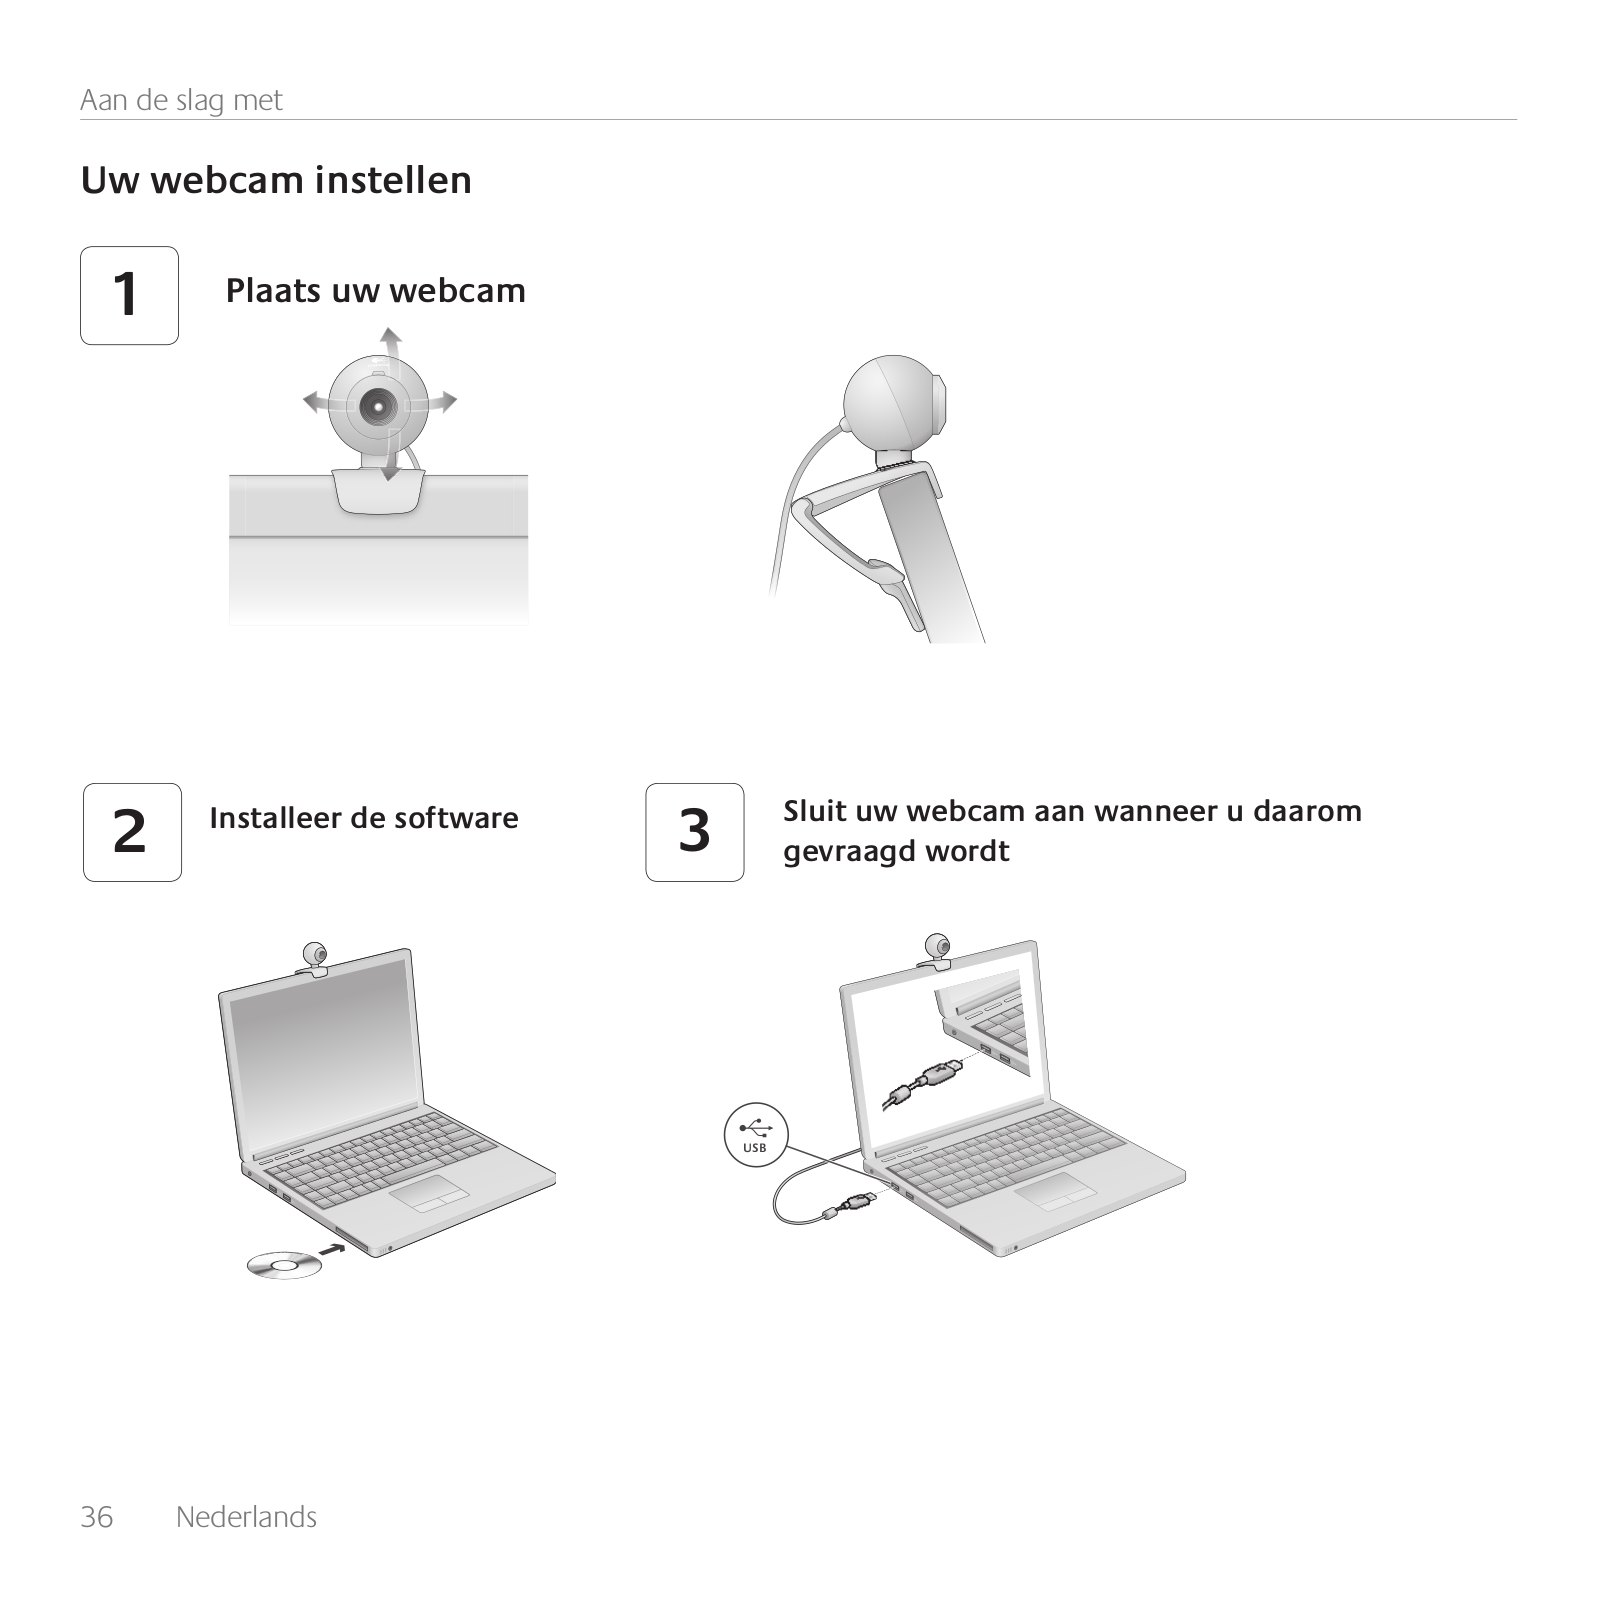
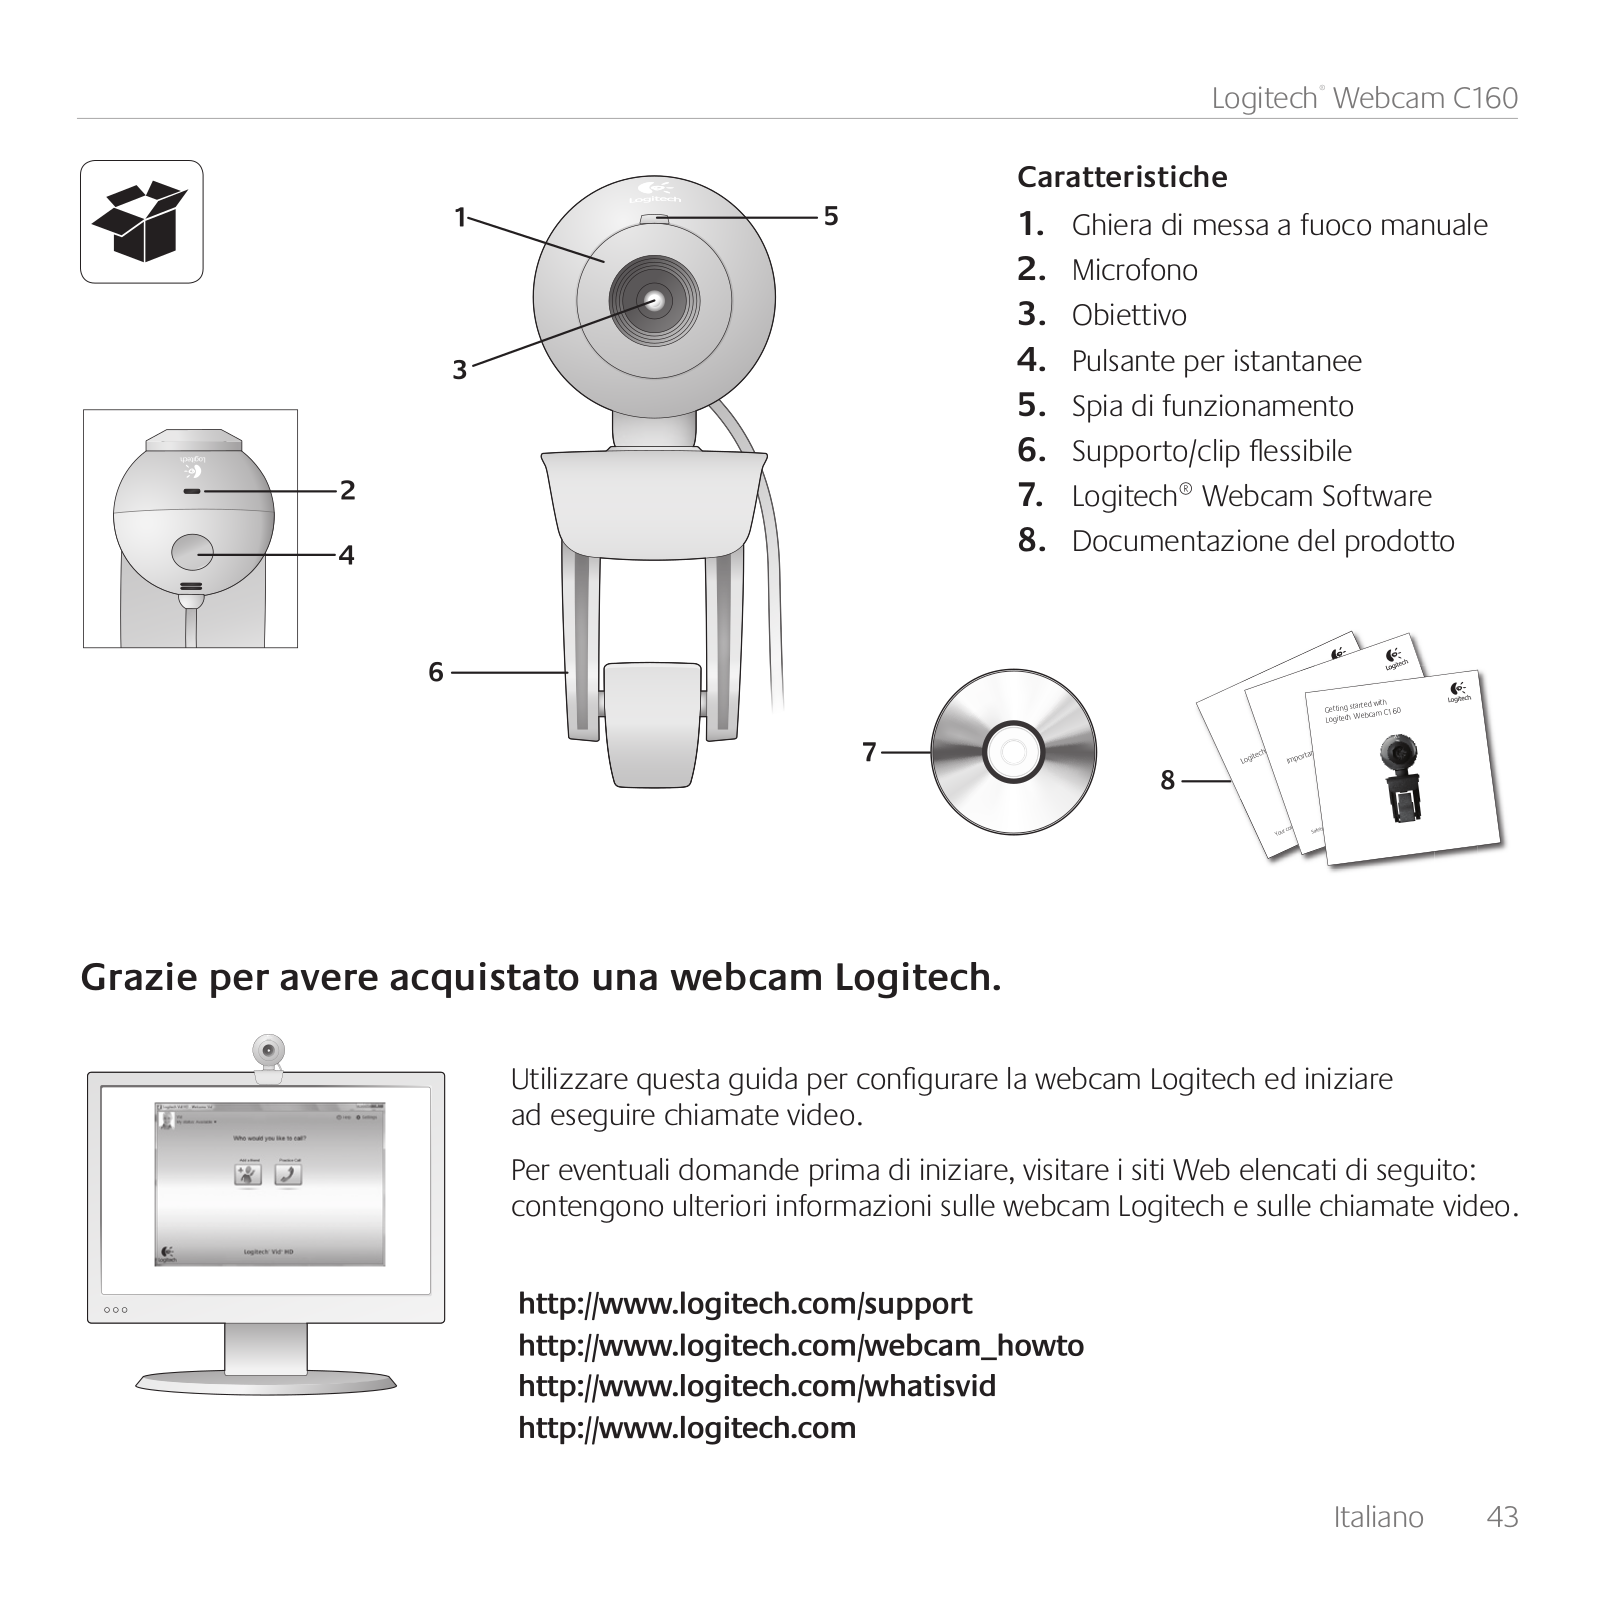
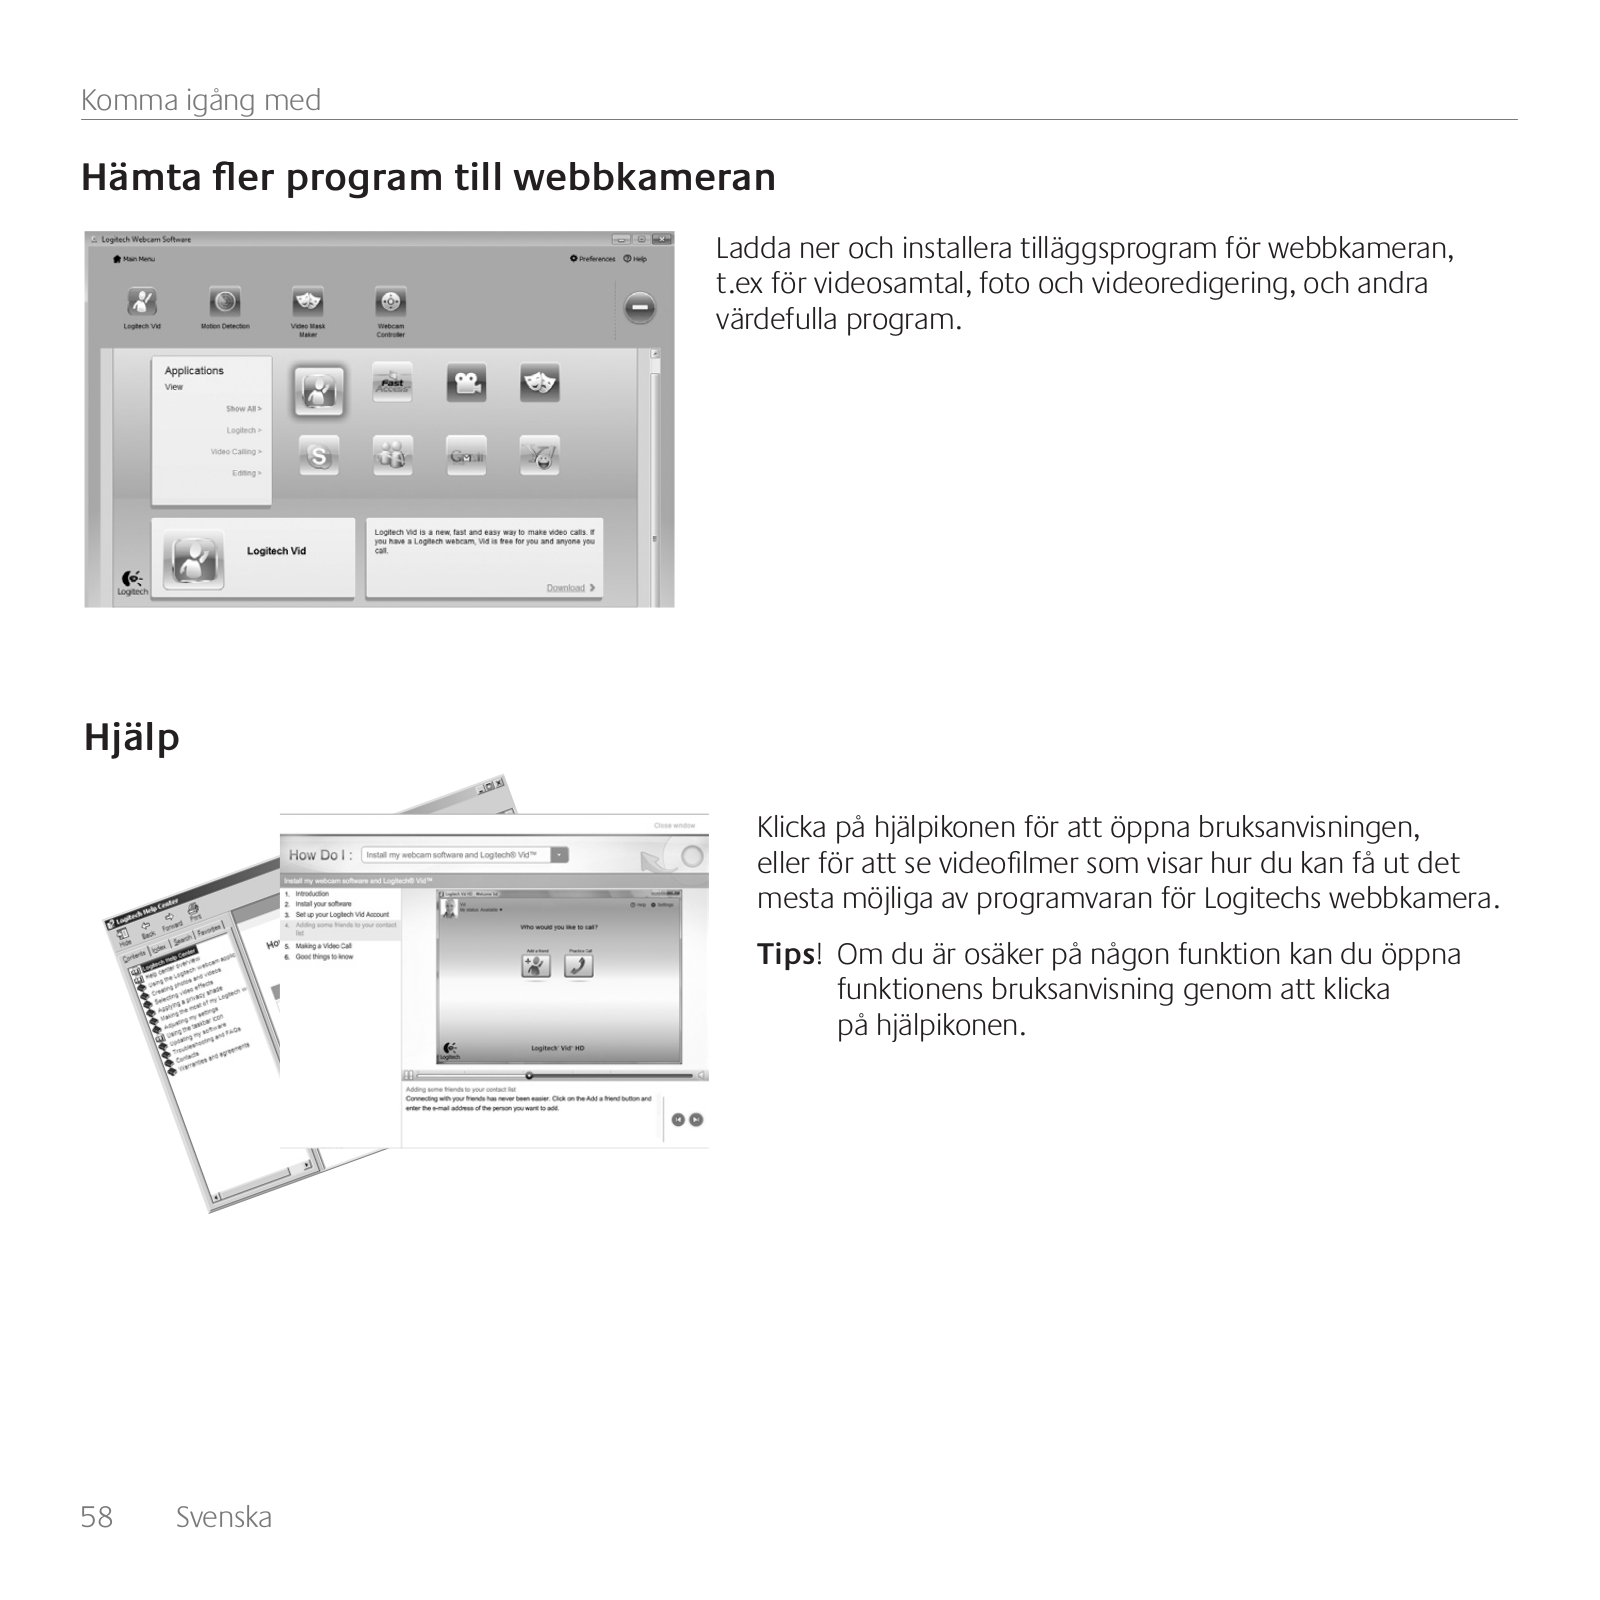
Logitech C160 User Manual [en, de, es, fr, it]

0 (0)

Getting started with Logitech® Webcam C160

Logitech® Webcam C160

Contents

English. . . . . . .

. . . . . . . . . . . . . . .

. . .

. .

.

3

Deutsch . . . . . . .

. . . . . . . . . . . . . . .

. . .

. .


. 11

Français. . . . . . .

. . . . . . . . . . . . . . .

. . .

. .

.

19

Español . . . . . . .

. . . . . . . . . . . . . . .

. . .

. .

. 27

Nederlands. . . . . .

. . . . . . . . . . . . . . .

. . .

. .

. 35

Italiano. . . . . . . . . . . . . . . . . . . . . . . . . . . . . . . . . . . . . 43

Svenska . . . . . . .

. . . . . . . . . . . . . . .

. . .

. .

.

51

Dansk. . . . . . .

. . . . . . . . . . . . . . .

. . .

. . .


59

Norsk. . . . . . .

. . . . . . . . . . . . . . .

. . .

. . .


67

Suomi . . . . . . .

. . . . . . . . . . . . . . .

. . .

. .

.

75

Português . . . . . .

. . . . . . . . . . . . . . .

. . .

. .

.

83

Ελληνικά. . . . . . .

. . . . . . . . . . . . . . .

. . .

. .


.91

Türkçe.


99

. . . . . . . .

. . . . . . . . . . . . . . . . . . . .

. . . .

. . .

114

www.logitech.com/support.

. . . . . . . . . . . . . . . . . . . .

. . . .

. . .

115

2   


Logitech® Webcam C160

Features

1.

Manual focusing ring

2.

Microphone

3.

Lens

4.

Snapshot button

5.

Activity light

6.

Flexible clip/base

7.

Logitech® Webcam Software

8.

Product documentation


(FUUJOHTUBSUFEXJUI


-PHJUFDI 8FCDBN$

Thank you for buying a Logitech webcam!

Use this guide to set up your Logitech webcam and to begin making video calls.

If you have questions before you start, please visit the websites listed below to learn more about Logitech webcams and video calling.

English 3

Getting started with

Setting up your webcam

1Place your webcam

2 Install the software

3

When prompted,

connect your webcam

USB

4English

Logitech® Webcam C160

Getting started with video calling

Your webcam comes with Logitech VidHD

With Logitech Vid HD, video calling live over the Internet takes only a few, easy steps:

Install Logitech Vid HD

Create an account

Add a friend and make a video call

Learn more: http://www.logitech.com/whatisvid

Setting up Logitech Vid HD

1

2

Install Logitech Vid HD

We recommend that you install both the Logitech Webcam and Logitech Vid HD software.

Tip: If you prefer another video-calling application, you will need to download and install third-party software.

Learn more: http://www.logitech.com/webcam_howto

Create an account

Follow the on-screen instructions to create your Logitech Vid HD account and to set up your webcam for video calling.

To make video calls with any application, both you and the person you call must have:

A webcam

A broadband Internet connection (e.g., DSL, T1, or cable)

The same videocalling application (e.g., Logitech Vid)

Video calling accounts

A computer with speakers and a microphone

(or a headset with a microphone; many Logitech webcams have a built-in microphone)

English    5

Getting started with

3

Add a friend or make a practice call

Click on the Practice Call tile to test your settings.

Tip: The Practice Call tile is always available on your Contact List so you can test your settings.

To add a friend, click on the Add a Friend tile and enter your friend’s e-mail when prompted.

After your friend has accepted your invitation, click on your friend’s picture to make a call.

Accessing account settings and starting applications

Logitech automatically detects and adjusts the best settings for your webcam. If you would like to re-take your profile picture or update any of your settings, click the Settings icon.

Double-click the icons to launch your applications.

1.Logitech Webcam Software

2.Logitech Vid HD

Tip: The Logitech Vid HD icon is only present if you chose to install Logitech Vid HD. To learn about third-party video calling, please visit:

www.logitech.com/webcam_howto

6    English


Logitech® Webcam C160

Checking webcam focus

Let’s check the focus before you start chatting online. Launch the Logitech Webcam Software, and then:

1.Choose the Quick Capture feature.

2.Rotate the webcam focusing ring to get a sharp picture.

3.Click on your image to view its sharpness.

English 7

Getting started with

Navigating the Logitech Webcam Software

1.Capture pictures and videos

2.View captured images and share via e-mail, Facebook,® or YouTube®.

3.An area for easy access to your installed webcamrelated applications

4.Launch Logitech Vid HD (if installed)

5.Capture videos triggered by detected motion

6.Control your video effects and webcam while on a video call

7.Download additional webcam applications

8.Change webcams (when you have more than one)

9.Open Logitech Webcam Software settings

10.Open help dashboard (manuals and how-to videos)

8    English


Logitech C160 User Manual

Logitech® Webcam C160

Capturing video and snapping pictures

Quick Capture allows you to take photos or record videos easily.

You have easy access to webcam controls and settings as well as video effects to personalize your images and recordings.

1.

Preview window

6.

Photo thumbnails

2.

Capture mode: photo/

7.

Video humbnails

3.

video

8.

Click a thumb-nail to enter

Capture button


the gallery

4.

Webcam controls


5.

Video effects and fun


filters (for webcams that


support this feature)


Fine tuning your webcam during a video call

1. Launch the webcam controller when on a video call.

2. Hide your video image with a photo while your webcam stays connected.

3. Use pan and tilt to find the best angle.

4. Use Face Tracking so you’re always in the picture.

5. Correct for poor lighting environments using RightLight.

6.Choose between autoor manual focus for webcams that support this feature.

7.Specify webcam operating characteristics.

Tip: Not all webcam models offer all of these webcam controls.

English    9

Getting started with

Get more applications for your webcam

Download and install additional applications for your webcam, like video calling, photo and video editing, and other valueadded programs.

Getting help

Click on the help icon to access a complete user manual, or watch how-to videos that show you how to get the most out of your Logitech webcam and software.

Tip: If you are not sure about a feature, click the help icon, and our manual will open to the right place.

10    English


Logitech® Webcam C160

Funktionen

1. Einstellring für manuellen Fokus

2. Mikrofon

3. Linse

4. Schnappschuss-Taste

5. Aktions-LED

6. Flexibler Clip/Standfl äche

7. Software für Logitech®-Webkamera

8. Handbuch zum Produkt

(FUUJOHTUBSUFEXJUI -PHJUFDI 8FCDBN$

Danke, dass Sie sich für eine Logitech-Webkamera entschieden haben!

Mit dieser Anleitung konfi gurieren Sie Ihre Logitech-Webkamera und führen nach ein paar einfachen Handgriffen Ihr erstes Videogespräch.

Wenn Sie vorher noch Fragen klären möchten, fi nden Sie Antworten zu Logitech-

Webkameras und Videogesprächen auf den nachstehend angeführten Websites.

Deutsch 11

Erste Schritte

Einrichten Ihrer Webkamera

1Anbringen der Webkamera

2

Installieren der Software

3

Wenn Sie dazu aufgefordert werden,

schließen Sie Ihre Webkamera an.

USB

12 Deutsch

Logitech® Webcam C160

Erste Schritte mit Videogesprächen

Im Lieferumfang Ihrer Webkamera ist die Software Logitech VidHD enthalten.

Mit Logitech Vid HD genügen ein paar einfache Schritte und schon führen Sie Ihre Videogespräche über Internet:

Logitech Vid HD installieren

Konto erstellen

Freund hinzufügen und Gespräch führen

Weitere Informationen: http://www.logitech.com/whatisvid

Einrichten von Logitech Vid HD

1

2

Logitech Vid HD installieren

Es wird empfohlen, dass Sie sowohl die Logitech-Webkamera als auch die Logitech Vid HD-Software installieren.

Tipp: Wenn Sie lieber eine andere Anwendung für Videogespräche nutzen möchten, müssen Sie die entsprechende Software herunterladen und installieren.

Weitere Informationen: http://www.logitech.com/webcam_howto

Konto erstellen

Befolgen Sie die Anweisungen auf dem Bildschirm, um Ihr Logitech Vid HDKonto zu erstellen und Ihre Webkamera für Videogespräche einzurichten.

Für ein Videogespräch müssen beim Anrufer wie beim Angerufenen folgende Voraussetzungen gegeben sein:

Eine Webkamera

Eine InternetBreitbandverbindung (DSL, UMTS oder Kabel)

Dieselbe Videoanwendung (z. B. Logitech Vid HD)

Konten für Videogespräche

Ein Computer mit Lautsprechern und Mikrofon (oder ein Kopfhörer mit Mikrofon - viele LogitechWebkameras verfügen über ein eingebautes Mikrofon)

Deutsch    13

Erste Schritte

3

Freund hinzufügen oder Testanruf führen

Klicken Sie auf "Testanruf", um Ihre Einstellungen zu testen.

Tipp: Die Funktion "Testanruf" ist in Ihrer Kontaktliste immer sichtbar, damit Sie Ihre Einstellungen jederzeit testen können.

Um einen Freund hinzuzufügen, klicken Sie auf "Freund hinzufügen" und geben Sie die E-Mail-Adresse Ihres Freundes ein, sobald Sie dazu aufgefordert werden.

Wenn Ihr Freund Ihre Einladung akzeptiert hat, klicken Sie auf sein Foto, um ein Gespräch zu beginnen.

Einstellungen des Kontos abrufen und Anwendungen starten

Logitech erkennt automatisch Ihre Webkamera und wählt die am besten geeigneten Einstellungen aus. Wenn Sie Ihr Profilfoto neu aufnehmen oder eine Einstellung ändern möchten, klicken Sie auf das Symbol "Eigene Einstellungen".

Doppelklicken Sie auf die Symbole, um Ihre Anwendungen zu starten.

1.Software für Logitech-Webkamera

2.Logitech Vid HD

Tipp: Das Logitech Vid HD-Symbol wird nur angezeigt, wenn Sie Logitech Vid HD installiert haben. Wenn Sie mehr über Videogespräche mit anderen Systemen erfahren möchten, finden Sie Hinweise unter:

www.logitech.com/webcam_howto

14    Deutsch

Logitech® Webcam C160

Fokus der Webkamera prüfen

Bevor Sie Ihren Online-Videochat beginnen, prüfen Sie die Fokuseinstellung. Starten Sie die Software für Logitech-Webkameras. Dann:

1.Wählen Sie die Quick Capture-Funktion.

2.Drehen Sie den Fokusring der Webkamera, bis das Bild scharf ist.

3.Klicken Sie auf Ihr Bild, um seine Schärfe zu prüfen.

Deutsch 15

Erste Schritte

Navigation in der Software für Logitech-Webkameras

1.Bilder und Videos aufnehmen

2.Aufgenommene Bilder ansehen und per E-Mail versenden bzw. in Facebook® oder YouTube® veröffentlichen

3.Ein Bereich für den einfachen Zugang zu Ihren Anwendungen,

die die Webkamera nutzen

4.

Logitech Vid HD starten

8.

Webkameras austauschen


(sofern installiert)


(wenn Sie über mehrere

5.

Videos aufzeichnen,


verfügen)

9.


nachdem der

Einstellungen der Software


Bewegungsmelder eine


für Logitech-Webkameras


Bewegung erkannt hat


öffnen

6.

Videoeffekte und

10. Hilfefunktionen


Webkamera während eines


(Handbücher und


Videogesprächs steuern


Videoanleitungen) öffnen

7.Zusätzliche WebkameraAnwendungen herunterladen

16    Deutsch

Logitech® Webcam C160

Videoaufnahmen und Schnappschüsse

Mit Quick Capture können Sie auf einfache Weise Fotos aufnehmen oder Videos aufzeichnen.

Die Funktion bietet Ihnen einfache Steuerelemente für die Webkamera und besondere Videoeffekte, damit Sie Ihre Bilder und Aufnahmen individuell gestalten können.

1.Vorschaufenster

2.Erfassen-Modus: Foto/Video

3.Erfassen-Schaltfläche

4. Webkamera-Steuerung

5. Videoeffekte und Spaßfilter (für Webkameras, die diese Funktion unterstützen)

6.Fotominiaturen

7.Videominiaturen

8.Klicken Sie auf eine Miniatur, um die Galerie aufzurufen

Feinabstimmung Ihrer Webkamera während eines Videogesprächs

1. Webkamera-Steuerung während eines Videogesprächs starten

2.Videobild mit einem Foto verbergen, während Ihre Webkamera angeschlossen bleibt

3.Schwenken und Neigen, um den besten Aufnahmewinkel zu finden

4.Gesichtsverfolgung verwenden, um immer im Bild zu bleiben

5. Schlechte Lichtverhältnisse mit RightLight verbessern

6.Bei Webkameras, die diese Funktion unterstützen, zwischen Autofokus und manuellem Fokus wählen

7. Funktionseigenschaften der Webkamera einstellen

Tipp: Nicht alle Webkameramodelle bieten alle diese

Steuerungsmöglichkeiten an.

Deutsch    17

Erste Schritte

Zusätzliche Anwendungen für Ihre Webkamera einrichten

Sie können zusätzliche Anwendungen für Ihre Webkamera herunterladen und installieren, etwa Videogespräche

und Videoschnitt sowie andere Programme mit erweiterten Funktionen.

Hilfe abrufen

Klicken Sie auf das Hilfesymbol, um das komplette Benutzerhandbuch anzusehen oder sehen Sie sich Videoanleitungen an, die Ihnen zeigen, wie Sie Ihre Webkamera und Ihre Software von Logitech am besten nutzen.

Tipp: Wenn Sie nicht genau wissen, wie Sie mit einer Funktion umgehen sollen, klicken Sie auf das Hilfesymbol und das Handbuch öffnet sich an der gewünschten Stelle.

18    Deutsch

Logitech® Webcam C160

Fonctions

1. Bague de mise au point manuelle

2.

Microphone

3.

Objectif

4.

Bouton Instantané

5.

Témoin d'activité

6.

Clip/base fl exible

7.

Logitech® Webcam Software

8.

Documentation sur le produit


(FUUJOHTUBSUFEXJUI


-PHJUFDI 8FCDBN$

Vous venez d'acheter une caméra Web Logitech et nous vous en félicitons!

Utilisez ce guide pour confi gurer votre caméra Web Logitech et commencer à passer des appels vidéo.

Avant de commencer, si vous avez des questions, veuillez consulter les sites

Web répertoriés dans la liste ci-dessous afi n d'en savoir plus sur les caméras Web

Logitech et sur les appels vidéo.

Français 19

Première utilisation

Confi guration de votre caméra Web

1Positionner votre caméra Web

2

Installation du logiciel

3

Branchez votre caméra Web lorsque

vous y êtes invité.

USB

20 Français

Logitech® Webcam C160

Premiers pas avec les appels vidéo

Votre caméra Web est livrée avec Logitech VidHD.

Grâce à Logitech Vid HD, il suffit de suivre quelques étapes simples pour pouvoir passer des appels vidéo en direct par Internet:

Installation de Logitech Vid HD

Création d'un compte

Ajout d'amis et réalisation d'un appel vidéo

Pour en savoir plus: http://www.logitech.com/whatisvid

Configuration de Logitech Vid HD

1

2

une caméra Web

une connexion Internet haut débit (par exemple, ADSL, T1 ou câble)

Installation de Logitech Vid HD

Il est recommandé d'installer à la fois le logiciel de caméra Web Logitech et Logitech Vid HD.

Conseil: Si vous souhaitez utiliser une autre application d'appels vidéo, vous devez télécharger et installer un logiciel tiers.

Pour en savoir plus: http://www.logitech.com/webcam_howto

Création d'un compte

Suivez les instructions à l'écran pour créer votre compte Logitech Vid HD et pour configurer la fonction d'appel vidéo de votre caméra Web.

Pour passer des appels vidéo avec n'importe quelle application, vous et la personne qui reçoit votre appel devez disposer des éléments suivants:

la même application d'appels vidéo (par exemple, Logitech Vid HD)

des comptes pour appels vidéo

un ordinateur équipé d'haut-parleurs et un microphone (ou un casque avec microphone; la plupart des caméras Web Logitech possèdent un microphone intégré)

Français    21

Première utilisation

3

Ajout d'amis et test des appels

Cliquez sur l'image d'appel d'essai pour tester vos paramètres.

Conseil: L'image d'appel d'essai apparaît toujours dans votre liste de contacts de sorte que vous puissiez tester vos paramètres.

Pour ajouter un ami, cliquez sur Ajouter un ami, puis saisissez l'adresse électronique de votre ami.

Quand votre ami a accepté votre invitation, cliquez sur l'image de votre ami pour passer un appel.

Accès aux paramètres du compte et aux applications de démarrage

Logitech détecte automatiquement votre caméra Web et définit les paramètres les plus adaptés. Si vous souhaitez changer l'image de votre profil ou mettre à jour les paramètres, cliquez sur l'icône Paramètres.

Double-cliquez sur les icônes pour lancer vos applications.

1.Logitech Webcam Software

2.Logitech Vid HD

Conseil: L'icône Logitech Vid HD apparaît uniquement si vous avez choisi d'installer Logitech Vid HD. Pour en savoir plus sur les logiciels tiers d'appel vidéo, visitez le site Web suivant:

www.logitech.com/webcam_howto

22    Français

Logitech® Webcam C160

Vérifi cation de la mise au point de la caméra Web

Vérifi ons la mise au point avant de commencer

à discuter en ligne. Lancez le logiciel de la caméra Web Logitech, puis:

1.Sélectionnez la fonction Quick Capture.

2.Faites pivoter la bague de mise au point de la caméra Web jusqu'à l'obtention d'une image nette.

3.Cliquez sur votre image pour voir sa netteté.

Français 23

Première utilisation

Navigation au sein du logiciel de la caméra Web Logitech

1.Capture de photos et de vidéos

2.Visionnez des captures et partagez-les par message électronique, sur Facebook® ou sur YouTube®.

3.Une zone qui permet d'accéder facilement à votre caméra Web installée et aux applications connexes.

4.Lancement du logiciel Logitech Vid HD (si installé)

5.Capturer des vidéos en cas de détection de mouvement par le système

6.Contrôler vos effets vidéo et votre caméra Web lors d'un appel vidéo

7.Télécharger des applications pour caméra Web supplémentaires

8.Modifier vos caméras Web (lorsque vous en possédez plusieurs)

9.Ouvrir les paramètres

du logiciel de caméra Web Logitech

10.Ouvrir le tableau de bord de l'aide (manuels et vidéos de démonstration)

24    Français


Logitech® Webcam C160

Capture vidéo et prise photo

Quick Capture vous permet de prendre des photos ou d'enregistrer


des vidéos facilement.


Vous pouvez accéder facilement aux commandes de la caméra,


à ses paramètres ainsi qu'à des effets vidéo qui vous permettent


de personnaliser vos images et vos enregistrements.


1.

Fenêtre d'aperçu


2.

Mode de capture: photo/vidéo


3.

Bouton de capture


4.

Commandes de la caméra


5.

Effets vidéos et filtres amusants (disponibles pour les caméras


Web compatibles)


6.

Vignettes photo


7.

Vignettes vidéo


8.

Cliquez sur une vignette pour accéder à la galerie

Personnalisation de votre caméra Web lors d'un appel vidéo

1. Lancer le contrôleur de caméra Web lors d'un appel vidéo.

2.Masquer votre image vidéo avec une photo en laissant votre caméra Web connectée.

3.Utiliser la fonction panoramique et inclinaison pour trouver le meilleur angle de vue.

4. Utiliser le suivi du visage pour toujours apparaître dans le cadre.

5. Corriger le manque d'éclairage grâce à RightLight.

6. Choisir entre la mise au point automatique ou manuelle pour les caméras Web compatibles.

7. Indiquer les caractéristiques de fonctionnement de la caméra Web.

Conseil: Tous les modèles de caméra Web ne disposent pas de ces commandes de caméra.

Français    25

Première utilisation

Obtenir plus d'applications pour votre caméra Web

Téléchargez et installez des applications supplémentaires pour votre caméra Web, comme des modules d'appel vidéo, de modification de photos / vidéos, ainsi que d'autres programmes à valeur ajoutée.

Assistance

Cliquez sur l'icône d'aide pour accéder à un manuel d'utilisateur complet ou voir des vidéos de démonstration expliquant comment tirer le meilleur parti du logiciel et de la caméra Web Logitech.

Conseil: Si vous avez des doutes concernant une fonction, cliquez sur l'icône d'aide pour ouvrir le manuel à la page demandée.

26    Français

Logitech® Webcam C160

Funciones

1. Control de enfoque manual

2. Micrófono

3. Objetivo

4. Botón de captura de instantáneas

5. Indicador luminoso de actividad

6. Clip/base versátil

7. Software de cámara Web Logitech®

8. Documentación del producto

(FUUJOHTUBSUFEXJUI -PHJUFDI 8FCDBN$

Gracias por la compra de una cámara Web Logitech.

Use esta guía para confi gurar la cámara Web Logitech y comenzar a realizar videoconferencias.

Si tiene alguna pregunta antes de comenzar, visite los sitios Web que aparecen abajo para obtener más información sobre las cámaras Web Logitech

y videoconferencias.

Español 27

Utilización

Confi guración de la cámara Web

1Coloque la cámara Web

2

Instale el software

3

Cuando se le solicite, conecte la cámara Web

USB

28 Español

Logitech® Webcam C160

Introducción a videoconferencias

La cámara Web se entrega con Logitech VidHD

Con Logitech Vid HD, para realizar videoconferencias en directo por Internet sólo se requieren unos escasos y sencillos pasos:

Instale Logitech Vid HD

Cree una cuenta

Añada un amigo y realice una videoconferencia

Más información: http://www.logitech.com/whatisvid

Configuración de Logitech Vid HD

1

2

Instale Logitech Vid HD

Se recomienda la instalación de la cámara Web Logitech y del software Logitech Vid HD.

Consejo: si prefiere otra aplicación de videoconferencias,

deberá descargar e instalar el software de otro fabricante. Más información: http://www.logitech.com/webcam_howto

Cree una cuenta

Siga las instrucciones en pantalla para crear la cuenta Logitech Vid HD y para configurar la cámara Web para videoconferencias.

Para realizar videoconferencias con cualquier aplicación, tanto usted como la persona a quien llame deberán tener:

Una cámara Web

Una conexión de banda ancha a Internet

(p. ej., DSL, T1 o cable)

La misma aplicación de videoconferencias (p. ej., Logitech Vid HD)

Cuentas para videoconferencias

Un ordenador con altavoces y micrófono (o un casco telefónico con micrófono; muchas cámaras Web incluyen un micrófono integrado)

Español    29

Utilización

3

Agregue un amigo o realice una llamada de práctica

Haga clic en la ficha Llamada de práctica para probar la configuración.

Consejo: la ficha Llamada de práctica estará siempre disponible en la lista de contactos para que pruebe la configuración.

Para agregar un amigo, haga clic en la ficha Agregar un amigo

e introduzca la dirección de correo electrónico del amigo cuando se le pida.

Cuando el amigo acepte la invitación, haga clic en su imagen para realizar una llamada.

Acceso a la configuración de la cuenta e inicio de aplicaciones

Logitech detecta y ajusta automáticamente la mejor configuración para la cámara. Si desea volver a tomar la fotografía de perfil o actualizar la configuración, haga clic en el icono Configuración..

Haga doble clic en los iconos para iniciar las aplicaciones.

1.Software de cámara Web Logitech

2.Logitech Vid HD

Consejo: el icono de Logitech sólo estará presente si se instala Logitech Vid HD. Para obtener información sobre videoconferencias de otros fabricantes, visite:

www.logitech.com/webcam_howto

30    Español

Loading...
+ 86 hidden pages