


Owner’s manual
Electric Dryer
RC9011A/B/C
TD-C9011A
Thank you for buying an LG Dryer.
Please read your manual carefully, as it provides instructions on safe installation, Use, and Maintenance.
Record the model and Serial Numbers, and retain the manual for future reference.
Model #
Serial #
Date of purchase
P/ No.: MFL32312574

F eatures
F
Ultra Big Capacity Drum
The LG Dryer has a large capacity.
Reduced drying time
Drying time is reduced by the use of an efficient air flow system and an optimized heater.
Innovative Noise Reduction
The optimized design of the air flow system and the vibration reduction technology helps to reduce noise.
Ease of Use
The electronic control has a large, easy to read LED display.
What are Sensor Dry and Manual Dry?
Your dryer provides sensor drying and manual drying programs.
Sensor Dry Dryer electronically senses laundry moisture level and automatically determines operation time based on the dryness of the load and the selected program. The control will change the estimated time remaining if it senses a large change in the time needed to complete the cycle. These large increases or decreases in the time display are normal, and do indicate a product malfunction.
Manual Dry Manual Dry allows you to set the desired dry time manually. Certain types of loads, such as large and/or bulky loads, may not dry properly using Sensor Dry. These loads should be dried using the Manual Dry feature to ensure complete drying.
C ontents
Safety Instructions .................................................................................. |
3 |
F |
Installation Instructions ............................................................................ |
6 |
|
Electrical Requirement .......................................................................... |
10 |
|
Appearance And Design ....................................................................... |
13 |
|
Operating Your Dryer ............................................................................ |
14 |
|
Additional Functions............................................................................... |
17 |
|
Caring For Your Dryer ........................................................................... |
19 |
|
Additional Tips For Smart Use .............................................................. |
22 |
|
Troubleshooting Guide .......................................................................... |
24 |
|
Technical Data ....................................................................................... |
28 |
|
2

S afety Instructions
READ ALL INSTRUCTIONS BEFORE USE
 WARNING
For your safety, the information in this manual must be followed to minimize the risk of fire or explosion, electric shock, or to prevent property damage, personal injury, or loss of life.
Your Safety and the safety of others is very important.
We have provided many important safety messages in this manual and on your appliance. Always read and obey all safety messages.
This is the safety alert symbol.
This symbol alerts you to potential hazards that can kill or hurt you and others.
All safety messages will follow the safety alert symbol and either the word DANGER or WARNING. These words mean:
 DANGER: You can be killed or seriously injured if you don’t immediately follow instructions.
 WARNING: You can be killed or seriously injured if you don’t follow instructions.
All safety messages will tell you what the potential hazard is, tell you how to reduce the chance of injury, and tell you what can happen if the instructions are not followed.
BASIC SAFETY PRECAUTIONS
 WARNING
To reduce the risk of fire, electric shock, or injury to persons when using this appliance, follow basic precautions, including the following:
•Read all instructions before using the dryer.
•Before use, the dryer must be properly installed as described in this manual.
•Do not place items exposed to cooking oils in your dryer. Items contaminated with cooking oils may contribute to a chemical reaction that could cause a load to catch fire.
•Do not dry articles that have been previously cleaned in, washed in, soaked in, or spotted with gasoline, dry-cleaning solvents, or other flammable or explosive substances as they give off vapors that could ignite or explode.
•Do not repair or replace any part of the dryer or attempt any servicing unless specifically recommended in this Use and Care Guide or in published user-repair instructions that you understand and have the skills to carry out.
•Do not tamper with the controls.
•Before the dryer is removed from service or discarded, remove the door to the drying compartment.
•Do not allow children to play on or in the dryer. Close supervision of children is necessary when the dryer is used near children.
•Do not use fabric softeners or products to eliminate static unless recommended by the manufacturer of the fabric softener or product.
•Do not use heat to dry articles containing foam rubber or similarly textured rubber-like materials.
•Keep area around the exhaust opening and adjacent surrounding areas free from the accumulation of lint, dust, and dirt.
•The interior of the dryer and exhaust vent should be cleaned periodically by qualified service personnel.
•Do not install or store the dryer where it will be exposed to the weather.
•Always check the inside of the dryer for foreign objects.
•Clean lint screen before or after each load.
•The dryer is not suitable for built-in. Please do not install as a built-in.
•Do not operate when the dryer is disassembled.
<![endif]>Instructions Safety
3
<![endif]>Safety Instructions
S afety Instructions
READ ALL INSTRUCTIONS BEFORE USE
 WARNING
For your safety, the information in this manual must be followed to minimize the risk of fire or explosion, electric shock, or to prevent property damage, personal injury, or loss of life.
• Do not store or use gasoline or other |
• Installation and service must be performed by a |
flammable vapors and liquids in the vicinity of |
qualified installer, service agency, or the gas |
this appliance or any other appliances. |
supplier. |
GROUNDING INSTRUCTIONS
This appliance must be grounded. In the event of malfunction or breakdown, grounding will reduce the risk of electric shock by providing a path of least resistance for electric current. This appliance must be equipped with a cord having an equipmentgrounding conductor and a grounding plug. The plug must be plugged into an appropriate outlet that is properly installed and grounded in accordance with all local codes and ordinances.
Do not modify the plug provided with the appliance. If it will not fit the outlet, have a proper outlet installed by a qualified electrician.
This appliance must be connected to a grounded metal, permanent wiring system or an equipmentgrounding conductor must be run with the circuit conductors and connected to the equipment-grounding terminal or lead on the appliance. Electrical shock can result if the dryer is not properly grounded.
 WARNING
Improper connection of the equipment-grounding conductor can result in a risk of electric shock. Check with a qualified electrician or service person if you are in doubt as to whether the appliance is properly grounded.
SAFETY INSTRUCTIONS FOR INSTALLATION
 WARNING
To reduce the risk of fire, electric shock, or injury to persons when using this appliance, follow basic precautions, including the following:
•Properly ground dryer to conform with all governing codes and ordinances. Follow details in the installation instructions. Electrical shock can result if the dryer is not properly grounded.
•Before use, the dryer must be properly installed as described in this manual. Electrical shock can result if the dryer is not properly grounded.
•Install and store the dryer where it will not be exposed to temperatures below freezing or exposed to the weather.
•All repairs and servicing must be performed by an authorized servicer unless specifically recommended in this Owner’s Guide. Use only authorized factory parts. Failure to follow this warning can cause serious injury, fire, electrical shock, or death.
4
S afety Instructions
SAFETY INSTRUCTIONS FOR INSTALLATION
•To reduce the risk of electric shock, do not install the dryer in humid spaces. Failure to follow this warning can cause serious injury, fire, electrical shock, or death.
•Connect to a properly rated, protected, and sized power circuit to avoid electrical overload.
Improper power circuit can melt, creating electrical shock and/or fire hazard.
•Remove all packing items and dispose of all shipping materials properly. Failure to do so can result in death, explosion, fire, or burns.
•Place dryer at least 18 in. above the floor for a garage or basement installation. Failure to do so can result in death, explosion, fire, or burns.
•Keep all packaging from children. Packaging material can be dangerous for children. There is a risk of suffocation.
•Do not install nearby heat item. Such as stove, cooking oven. Failure to do so can cause damage, smoke, and fire.
•Do not place candle and cigarettes on top of the product. Failure to do so can cause damage, smoke, and fire.
•Remove all protective vinyl film from the product. Failure to do so can cause damage, smoke, and fire.
READ ALL INSTRUCTIONS BEFORE USE
 WARNING
To reduce the risk of fire, electric shock, or injury to persons when using this appliance, follow basic precautions, including the following:
SAFETY INSTRUCTIONS FOR INSTALLATION
•Do not, under any circumstances, cut or remove the ground prong from the power cord. To prevent personal injury or damage to the dryer, the electrical power cord must be plugged into a properly grounded outlet.
•For personal safety, this dryer must be properly grounded. Failure to do so can result in electrical shock or injury.
•Refer to the installation instructions in this manual for specific electrical requirements for your model. Failure to follow these instructions can create an electrical shock hazard and/or a fire hazard.
•This dryer must be plugged into a properly grounded outlet. Electrical shock can result if the dryer is not properly grounded. Have the wall outlet and circuit checked by a qualified electrician to make sure the outlet is properly grounded. Failure to follow these instructions can create an electrical shock hazard and/or a fire hazard.
•The dryer should always be plugged into its own individual electrical outlet which has a voltage rating that matches the rating plate. This provides the best performance and also prevents overloading house wiring circuits which could cause a fire hazard from overheated wires.
•Never unplug your dryer by pulling on the power cord. Always grip plug firmly and pull straight out from the outlet. The power cord can be damaged, resulting in a risk of fire and electrical shock.
•Repair or replace immediately all power cords that have become frayed or otherwise damaged. Do not use a cord that shows cracks or abrasion damage along its length or at either end. The power cord can melt, creating electrical shock and/or fire hazard.
•When installing or moving the dryer, be careful not to pinch, crush, or damage the power cord. This will prevent injury and prevent damage to the dryer from fire and electrical shock.
SAVE THESE INSTRUCTIONS
<![endif]>Instructions Safety
5

<![endif]>Installation Instructions
I nstallation Instructions
F
the initial steps of setting up your dryer for use.
important information regarding the preparation and use of entire manual before proceeding with any installation or use.
connections, gas connections, and exhaust requirements are
Positioning the Dryer.
Choose a location with a solid floor for your dryer. Place the dryer at least eighteen inches above the floor for a garage installation. After placing the dryer in the desired location, make sure that it has the required clearances shown.
33.5" (850 mm)
25.2" (640 mm)

 23.6" (600 mm)
Note
Leveling legs should be secured.
All four legs should be on a solid, even floor and properly leveled as shown in this manual.
If dryer is not level, laundry may not be able to accurately detect the moisture level in the clothes. When leveling, please be cautious to avoid injury.
6

I nstallation


 Electrical Connections
Following are several warnings and instructions concerning making the electrical connection for electric dryers. More detailed information concerning the electrical connection is provided at the manual section entitled Electrical Requirements For Electric Dryer and it is important that you thoroughly review that section, and the remainder of this manual, before taking any steps to install or use this dryer.
1.Use only a new U.L. listed No. 10 (copper wire only) conductor power supply cord kit rated 240 Volts (minimum) 30 Amperes and labeled as suitable for use in a clothes dryer.
2.4-wire cord is required for manufactured (mobile) home installations and use and where local codes do not allow grounding of this appliance through neutral. As well as all new construction after January 1, 1996.
3.For additional instruction on connecting the dryer to an electrical power source, please refer to this manual’s section on Electrical Requirements for Electric Dryer.
 WARNING
•Use a new UL approved 30 amp power supply cord or 10 gauge solid copper wire.
•Use a UL approved strain relief.
•Disconnect power before making electrical connections.
•Connect neutral wire (white or center) to center terminal.
•Ground wire (green or bare) must be connected to green ground connector.
•Securely tighten all electrical connections
•See installation instructions for complete instructions.
•A 4-wire connection is required for all mobile and manufactured home installations, as well as all new construction after January 1, 1996.
•Failure to do so can result in fire or electrical shock.


 Preparation of the Dryer


 Confirming Heat Source


 Additional Instructions for Installation of Your Dryer in a Manufactured or Mobile Home
The following instructions are applicable to installations of the dryer in a manufactured or mobile home. Any installation in a manufactured or mobile home must comply with the Manufactured Home Construction and Safety Standards Title 24 CFR, Part 32-80 or Standard CAN/CSA0Z240 MH and local codes and ordinances. If you are uncertain whether your proposed installation will comply with these standards, please contact a service and installation professional for assistance.
1)The electrical connection for an electric dryer must be a 4-wire connection. More detailed information concerning the electrical connection is provided at the manual section entitled Electrical Requirements for Electric Dryer
<![endif]>Instructions Installation
7

<![endif]>Installation Instructions
I nstallation Instructions
Stacking Kit
In order to stack this dryer an LG stacking kit is required.
Support Holder
F
 WARNING
•Incorrect installation can cause serious accidents.
•The weight of the dryer and the height of installation makes the stacking procedure too risky for one person. This procedure should be performed by 2 or more experienced service personnel.
•The dryer is not suitable for a built-in installation. Please do not install as a built-in.
•Do not operate the dryer is disassembled.
3.Assemble the stacking kit as following.
This dryer may only be stacked on top of an LG washer. DO NOT attempt to stack this dryer on any other washer, as damage, injury or property damage could result.
To stack this dryer, the support holder included with the stacking kit must be used.
Washer Top plate size |
Support |
|
23.6 inch |
21.7 inch |
Holder |
(600mm) |
(550mm) |
|
Shape |
|
|
Installation Procedure
1.Place the LG dryer on the LG Washing machine.
2.Remove two screws at the bottom of the rear cover on each side as shown below.
•Peel the protective film from the double-sided tape on the bracket for your size washer.
•Attaching the support holder.
•Align the stacking kit holes and the rear cover holes and then firmly attach the bracket to the side of the washer in that position.
23.6 inch(600 mm)
21.7 inch(550 mm)
4. Assemble a stacking kit as following.
•Screw 2 screws which were removed earlier to assemble dryer and stacking kit. 
•Use accessory screws [1.2inch (30mm)] to assemble washer rear cover and stacking kit.  ,
,
•The procedure for the opposite side will be the same. 
8

I nstallation Instructions
F
 Level the dryer
1. Level the dryer is to prevent undesirable noise and vibration.
Locate your dryer on a solid, level floor. Make sure it is not subjected to splashing water or freezing temperatures. Do not store flammable materials near the dryer.
|
Adjustable feet |
|
|
Raise |
Lower |
Adjustable feet |
Adjustable feet |
|
2.If the dryer is not properly level, adjust the front leveling legs up and down as necessary.
Turn the legs clockwise to raise the dryer and counterclockwise to lower the dryer. Check the dryer diagonally to make sure it does not rock either way. Readjust the legs if necessary.
Diagonal Check
When pushing down corners of the dryer, the machine should not move at all. (Check in either direction.)
If machine rocks when pushing the machine top plate diagonally, adjust the feet again.
<![endif]>Instructions Installation
9

<![endif]>Electrical Requirement For Electric Dryers
E lectrical Requirement
COONECTING ELECTRIC DRYERS
 WARNING
To help prevent fire, electric shock, serious injury, or death, the wiring and grounding must conform to the latest edition of the National Electrical Code, ANSI/NFPA 70 and all applicable local regulations. Please contact a qualified electrician to check your home’s wiring and fuses to ensure that your home has adequate electrical power to operate the dryer.
 WARNING
To reduce the risk of fire, electric shock, or injury to persons when using this appliance, follow basic precautions, including the following:
•This dryer must be connected to a grounded metal, permanent wiring system, or an equipmentgrounding conductor must be run with the circuit conductors and connected to the equipmentgrounding terminal or lead on the dryer. Failure to do so can result in fire, explosion, or death.
•The dryer has its own terminal block that must be connected to a separate 240 VAC, 60-Hertz, single-phase circuit, fused at 30 amperes (the circuit must be fused on both sides of the line.) ELECTRICAL SERVICE FOR THE DRYER SHOULD BE OF THE MAXIMUM RATE VOLTAGE LISTED ON THE NAMEPLATE. DO NOT CONNECT DRYER TO 110-, 115-, OR 120-VOLT CIRCUIT. Heating elements are available for field installation in dryers which are to be connected to an electrical service of a different voltage than that listed on the rating plate. Failure to follow these instructions can result in fire, explosion, or death.
F
• The power cord (pigtail) connection between wall receptacle and dryer terminal block IS NOT supplied with dryer. Type of pigtail and gauge of wire must conform to local codes and with instructions on the following pages. Failure to follow these instructions can result in fire, explosion, or death.
• A 4-wire connection is required for all mobile and manufactured home installations, as well as all new construction after January 1, 1996. A 4-wire connection must be used where local codes do not permit grounding through the neutral wire. Failure to do so can result in fire, explosion, or death.
• Do not modify the plug and internal wire provided with the dryer.
• If it does not fit the outlet, a proper outlet will need to be installed by a qualified electrician.
Special Electrical Requirements for Mobile or Manufactured Homes
 WARNING
To reduce the risk of fire, electric shock, or injury to persons when using this appliance, follow basic precautions, including the following:
•Any installation in a manufactured or mobile home must comply with the Manufactured Home Construction and Safety Standards Title 24 CFR, Part 32-80 or Standard CAN/CSA0Z240 MH and local codes and ordinances.
•A 4-wire connection is required for all mobile and manufactured home installations, as well as all new construction after January 1, 1996.
Failure to do so can result in fire, explosion, or death.
•If branch circuit to dryer is 15 ft. (4.5 m) or less in length, use UL (Underwriters Laboratories) listed No.- 10 AWG wire (copper wire only), or as required by local codes. If over 15 ft. (4.50 m), use UL-listed No.-8 AWG wire (copper wire only), or as required by local codes. Allow sufficient slack in wiring so dryer can be moved from its normal location when necessary.
Failure to do so can result in fire, explosion, or death.
10
E lectrical Requirement
Review the following options to determine connection for your home:
4-wire receptacle (NEMA type14-30R)
Use the instructions in this section if your home has a 4-wire receptacle (NEMA type 14-30R) and you will be using a UL listed, 120/240 volt minimum, 30 amp, dryer power supply cord.


 : 4-wire connection with a Power supply cord.
•lf your local codes or ordinances do not allow the use of a 3 wire connection, or you are installing your dryer in a mobile home, you must use a 4- wire connection.
3-wire receptacle (NEMA type10-30R)
Use the instructions in this section if your home has a 3-wire receptacle (NEMA type 10-30R) and you will be using a UL listed, 120/240 volt minimum, 30 amp, dryer power supply cord.
Note
•Be sure the screws of the terminal block are tightened firmly. Failure to properly tighten the screws can result in fire, or property damage.
•If you are not sure of the power supply wires or cannot tell which are hot and neutral, consult a qualified electrician.
•If you are not sure if your electric outlet is wired properly, consult a qualified electrician. Connecting the power supply incorrectly can result in product damage, fire, injury or death.
•Direct wiring is not permitted by code in most locations. It is the customer's responsibility to ensure that the installation meets all local codes.
4-Prong plug
4-Prong plug
1.Connect neutral wire (white) of power cord to center terminal block screw.
2.Connect red and black wire to the left and right terminal block screws.
3.Connect ground wire (green) of power cord to external ground screw and move neutral ground wire of appliance and connect it to center screw.
4.Make sure that the strain relief screw is tightened and be sure that all terminal block nuts are on tight and power cord is in right position.
<![endif]>Dryers Electric For Requirement Electrical
11

<![endif]>Electrical Requirement For Electric Dryers


 : 3-Wire Connection with a Power Supply Cord
lf your local codes or ordinances permit the connection of a frame-grounding conductor to the neutral wire, use these instructions. If your local codes or ordinances do not allow the connection of a frame-grounding conductor to the neutral wire, use the instructions under
Section 3: Optional 3-wire connection.


 : Optional 3-wire
connection.
•If your local codes or ordinances do not allow the connection of a frame-grounding conductor to the neutral wire, use the instructions under this section.
1.Connect neutral wire (white) of power cord to center terminal block screw.
2.Connect ground wire of appliance and neutral wire of power cord to center terminal block screw.
3.Connect red and black wire to the left and right terminal block screws.
4.Make sure that the strain relief screw is tightened. and be sure that all terminal block nuts are on tight and power cord is in right position.
12

A ppearance And Design
F


 Control Panel
Water Container 


Door
Condenser Cover 
Air Ventilation Grill 
|
Control Panel |
|
LED Display |
||||||||
|
|
Program Selector |
|
• Time Display |
|||||||
|
|
|
• Indicator Lamps |
||||||||
|
|
|
|
|
|
|
|
|
|
|
|
|
|
|
|
|
|
|
|
|
|
|
|
|
|
|
|
|
|
|
|
|
|
|
|
|
|
|
|
|
|
|
|
|
|
|
|
|
|
|
|
|
|
|
|
|
|
|
|
|
|
|
|
|
|
|
|
|
|
|
|
<![endif]>Design And Appearance
Power ON/OFF |
START/PAUSE |
Additional Function Buttons |
|
Button |
|
• MORE TIME |
• TIME DELAY |
|
|
• LESS TIME |
• CUSTOM PGM |
|
|
• OPTION |
• WRINKLE CARE |
|
|
• BEEPER |
• DRUM LIGHT |
13

<![endif]>Operating Your Dryer
O perating Your Dryer
F
 Cycle Selection Table
|
Electronic Sensor Dry Cycles |
Drying |
||
|
Level |
|||
|
|
|
||
|
|
|
|
|
|
Quilts, small comforters |
For thick and quilted fabrics |
VERY |
|
|
and blankets |
|||
|
|
|
||
|
|
|
|
|
|
Terry towels, tea towels, |
For thick and quilted fabrics which do not need to be ironed |
MORE |
|
|
towels, bed linen |
|||
|
|
|
||
|
|
|
|
|
COTTON |
Bath towels, tea towels, |
For fabrics which do not need to be ironed |
NORMAL |
|
underwear, cotton socks |
||||
|
|
|
||
|
|
|
|
|
|
Sheets, pillowcase, towels |
For fabrics which do not need to be ironed |
LESS |
|
|
|
|
|
|
|
Bed linen, table linen, towels, |
For fabrics which do need to be ironed |
DAMP |
|
|
T-shirts, polo shirts, and work clothes |
|||
|
|
|
|
|
|
Bed linen, table linen, |
|
|
|
|
tracksuits, parka, |
For thick and quilted fabrics which do not need to be ironed |
MORE |
|
|
blankets |
|
|
|
MIXED FABRICS |
|
|
|
|
Shirts, blouses |
For fabrics which do not need to be ironed |
NORMAL |
||
|
|
|
|
|
|
Trousers, dresses, skirts, |
For fabrics which do need to be ironed |
DAMP |
|
|
blouses |
|
|
|
QUICK DRY |
A kind of linen and towel |
For the small loads of qualified fabrics with short drying times |
- |
|
except for the special fabrics |
||||
|
|
|
|
|
|
Special Fabrics Cycles |
|
||
|
|
|
|
|
DELICATES |
Silk, Women's thin clothes, |
For fabrics which are heat-sensitive like synthetic fabrics |
- |
|
|
lingerie |
|
|
|
SPORTS WEAR |
Athletic uniform, training wear |
For polyester material |
- |
|
|
|
|
|
|
WOOL |
Wool |
For wool fabrics |
- |
|
BULKY ITEM |
Bed clothes, sheets |
For bulky items |
- |
|
|
|
|
|
|
|
Manual Dry |
|
||
|
|
|
|
|
COOL AIR |
All fabrics that need to be fluffed without heat |
- |
||
|
|
|
|
|
WARM |
Bath towels, bath robes, |
Small clothes and pre-dried laundry normal fabrics |
|
|
dishclothes, quilted fabrics |
- |
|||
using hot temperature |
||||
|
made of acrylic |
|
||
|
|
|
||
|
|
|
|
|
 CAUTION
If the load is less than 2.2lbs (1kg), please use WARM course in MANUAL DRY course
Your wool should be used in WOOL program and heat-sensitive fabrics including silk, underwears, lingerie should be used in DELICATES course.
And also please comply with the recommended laundry load when you use the special fabric course. (Refer to page 22)
Otherwise, these clothes may not dry properly.
14

O perating Your Dryer
F
 BEFORE YOU USE YOUR DRYER
1.When unpacking your dryer, make sure there is no visible damage to the machine.
2.Follow the installation instructions and use a level to ensure proper installation.
3.Check the water reservoir, condenser, door, gasket and drum for signs of damage.
4.Run the dryer for a few minutes to make sure it is heating properly.
1. Turn power on. |
Turn the |
First, press the Power button. The indicator light |
dryer on. |
above the button will become illuminated, |
|
indicating that the machine is ready set to run. |
|
2. Open the door. |
|
3. Check the lint filter, water |
Open the |
container, and condenser. |
door. |
The lint filter near the door, should be emptied |
|
before drying operation. |
|
Open and check if lint filter is cleaned. |
|
If not, clean it referring to page 19. |
|
Water container and condenser are also checked |
|
to be emptied and cleaned for better drying result. |
|
4. Place laundry into the drum after |
|
sorting. |
|
The clothes should be sorted by fabric type and |
Check the |
dryness level and all the strings and belts of |
lint filter. |
clothes should be secured before being put into |
|
the drum. |
|
Push the laundry all the way back to keep it away |
|
from the door seal. |
|
If not, the door seal and clothes may be damaged. |
|
<![endif]>Dryer Your Operating
15

<![endif]>Operating Your Dryer
O perating Your Dryer
5. Close the Door.
Before you close the door, make sure fabrics are properly loaded and not caught in the door opening.
6. Select the Drying Cycle you want.
You can choose a cycle by turning the program control knob until the required program reaches to its indicator. If you press START/PAUSE button without choosing any cycle, the dryer will proceed with the COTTON program. [Please refer to following Cycle Selection table (page 14) for the detailed information]
F |
Select the |
desired |
cycle. |
7 . Press the Start button.
You can hear the drum turning.
8. After operation is completed, open the door and remove the laundry.
Be careful! Drum inside could be still hot. (Operation time varies depending on your cycle selection or options.)
9. Clean the lint filters and empty water container.
The lint filter should be cleaned after each load.
10. Turn off the Dryer.
Press the power button.
 CAUTION
•Be careful the filter is not turn or damaged when using a vacuum cleaner. If there is a little residue buildup on filter, you can scrub lint screen with the brush to remove.
•If you want to open the door while dryer is operating, please press the START/PAUSE button first, wait until drum completely stops and then open the door.
Take out the laundry.
Clean the door lint filter.
16

A dditional Functions
F
 TIME DELAY
The TIME DELAY feature allows you to have the dryer run at a time that is more convenient, for example when electricity rates are cheaper. The cycle can be delayed from 3 hours up to a maximum of 19 hours.
1.Load the dryer and close the door.
2.Press the POWER button.
3.Select the desired cycle and options.
4.Press the TIME DELAY button until the desired delay time is displayed.
5.Press the START/PAUSE button.
 WRINKLE CARE
Selecting this option will tumble the load periodically for a few seconds without heat. This will continue for up to 3 hours after the selected cycle, or until the door is opened. This prevents wrinkling of unremoved dry items until they can be removed.
Note
If the door is opened during the drying portion of a cycle before WRINKLE CARE has started, the cycle will not be cancelled and WRINKLE CARE will begin as soon as the normal drying portion of the cycle is completed.
 CUSTOM PROGRAM
If you have a special combination of settings that you use frequently, you can save these settings as a CUSTOM PROGRAM.
* To Save a CUSTOM PROGRAM
1.Turn on the dryer.
2.Select a cycle.
3.Use the cycle modifier buttons to adjust the settings for that cycle.
4.Set any other desired cycle options.
5.Press and hold the CUSTOM PROGRAM button for 3 seconds. You will hear two beeps to confirm the settings have been stored.
To Recall a CUSTOM PROGRAM
1.Press and release the CUSTOM PROGRAM button. The stored settings will be displayed.
2.Press and release the Cycle Selector Knob to start the cycle. The dryer will start automatically.
Note
You can only save one CUSTOM PROGRAM program at a time. If you press and hold the CUSTOM PROGRAM button for 3 seconds, you will overwrite any previously stored CUSTOM PROGRAM settings.
Once CUSTOM PROGRAM has been recalled, any of the memorized modifiers or options can be adjusted. However, if the Cycle Selector Knob is rotated, CUSTOM PROGRAM will be cancelled.
<![endif]>Functions Additional
17

<![endif]>Additional Functions
A dditional Functions
 CHILD LOCK
Use this option to prevent cycle settings from being changed while the dryer is operating. Press and hold the TIME DELAY button for 3 seconds to activate or deactivate the CHILD LOCK function.
The lock icon will be shown in the display, and all controls are disabled.
 DRUM LIGHT
Press the DRUM LIGHT button to turn on the drum light during dryer operation. This will allow you to more easily observe the load. The drum light will come on any time the door is opened.
F
 OPTIONS
GENTLE
-These are functioning to shorten or lengthen the cycle time by increasing or decreasing temperature.
-This option only is used with the COTTON and MIXED FABRICS cycles.
DAMP DRY BEEP
-This option causes the control to beep once the clothes have reached a "damp dry" level. This can be used to alert you to remove articles that you don't want to over dry or that you want to have damp for easier ironing.
-This option only is used with the COTTON and MIXED FABRICS cycles.
CREASE CARE
-This is a function to reduce wrinkles.
-This is a function to set up automatically when you only select the MIXED FABRICS cycle, but cancellation is impossible.
 MORE TIME/LESS TIME
The MORE TIME and LESS TIME buttons can be used to increase or decrease the dry time when MANUAL dry cycles are selected. These buttons are disabled once the cycle is started.
Note
These buttons are available only with MANUAL DRY, before you push START/PAUSE button.
 BEEPER
Press the BEEPER button to adjust the volume of the signals from high to off.
18
C aring For Your Dryer
Clean lint filter
To maintain proper air flow and keep your dryer operating a peak efficiency, it is important to empty the lint filter between every load. If the CLEAN FILTER light comes on during a cycle and the beeper sounds, pause the dryer and empty the filter immediately.
1. Open the door.
2. Pull the filter out.
F 
Clean lint filter during a cycle
If the CLEAN FILTER light flashes and the alarm sounds during operation, clean the filter promptly.
1.Press the POWER button to stop the dryer. The press it again to turn the dryer on.
2.Turn the CYCLE SELECTOR to select the COOL AIR cycle.
3.Press the START/PAUSE button the start the dryer.
4.Let the COOL AIR cycle run for 5 minutes to cool the dryer, then open the door and clean the lint filter.
Note
If the dryer is stopped in the middle of a cycle, the lint filter may be very hot. Failure to follow these cool down instructions could result in injury.
3. Open the filter and use your fingers to roll the lint off the screen surfaces. If the lint is difficult to remove or the filter material is showing signs of clogging, follow the cleaning instructions below.
4. Snap the filter closed and replace it in the dryer.
- Push the filter all the way down to avoid Interference with the door
5.Close the door.
Wash the lint screen in warm, soapy, water. Dry thoroughly and replace.
Empty water container
If your dryer is not connected to a household drain, then the water reservoir will capture the water from the drying process. This should be emptied every load. Failure to do so may result in poor drying performance.
If the container becomes full during a cycle, the EMPTY WATER light and alarm will be activated. In this case, the water reservoir should be emptied immediately, but in no case should it continue to be used for more than 1 hour.
1. Using the handle on the front of the drawer, pull out the reservoir.
2. Using the handle on the front of the drawer, pull out the reservoir.
3.Drain the water into a sink.
4.Press the START/PAUSE button to resume the cycle.
<![endif]>Dryer Your For Caring
19

<![endif]>Caring For Your Dryer
C aring For Your Dryer
F
Condenser
The condenser is a very important part of your dryer. This is where the moisture is removed form the air so there is no need for an outside exhaust. If the condenser is not properly maintained, it will greatly increase energy consumption and drying time. The condenser should be cleaned 3 or 4 times a year, or anytime the
CLEAN CONDENSER light blinks.
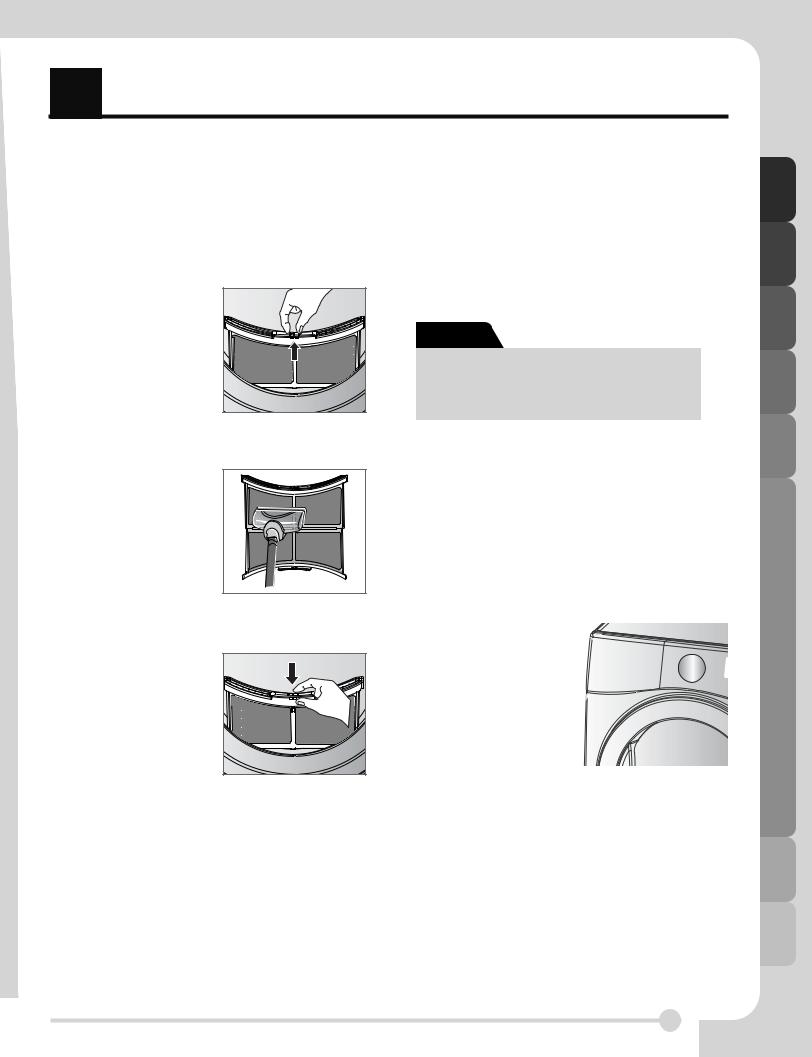
1.Push the tap and open the condenser cover.
Condenser cover |
2.Unlock the inner plate by rotating the locking levers on either side of the plate. Then slide the plate out of the opening.
Sealing cover
3.Carefully slide the condenser straight out of the housing using the finger ring at the center. Use care when handling the condenser to prevent damage that could reduce its efficiency.
Top
Bottom 
4.Thoroughly clean the condenser by running tap water through it from both the ends and the sides.
Front
Side
5.Slide the clean condenser into the housing. Make sure it is oriented as shown in the drawing in step 3.
6.Insert the inner plate into the opening in front of the condenser, then rotate the locking tabs to lock it in place. Then close the front cover.
 CAUTION
•NEVER operate the dryer without the condenser in place.
•Do not operate the dryer with a dirty or clogged condenser. Doing so will increase energy consumption and drying times.
•Handle the condenser with care. Do not use sharp or hard objects to clean the condenser as this could damage the condenser.
•Do not operate the dryer with a damaged condenser. Doing so could result in leaking which may result in property damage.
20
 Loading...