


 Loading...
OWNER’S MANUAL
AD Box For
Transparent
Display
Please read this manual carefully before operating your set and retain it for future reference.
TSP500
www.lg.com

<![endif]>ENGLISH
2
TABLE OF CONTENTS
4 SAFETY PRECAUTIONS
4Precautions in installing the Product
5Precautions to the AC Adapter and Electrical Power
6Precautions in Moving the Product
6Precautions in Using the Product
7Mounting on a wall
8LICENSES
9ASSEMBLING AND
PREPARING
9Accessories
10Parts and Buttons
11Installing the Guide Brackets
12PRODUCT INSTALLATION
12 TSP500-M LVDS connection
14 47/55WFB LVDS connection
16 49WFB LVDS connection
18 REMOTE CONTROL
20 USING THE TSP500 SET
20 Connecting to a PC
22 Adjusting the Screen
22- Selecting an Image Mode
22- Customizing Image Options
23- Customizing PC Display Options
23Adjusting the Sound
23- Selecting an Sound Mode
24- Customizing Sound Options
24 Using Additional Options
24 - Adjusting Aspect Ratio
26 - Using the Input List
27 ENTERTAINMENT
27- Connecting to a Wired Network
28- Network Status
29- Connecting USB Storage Devices
30- Browsing Files
32 - Viewing Movies
35 - Viewing Photos
38 - Listening to Music
40- Viewing the Contents List
41- DivX® VOD Guide
42- Using PIP/PBP
43CUSTOMIZING SETTINGS
43Accessing the Main Menus
44- PICTURE Settings
47- Power Sequence
48- AUDIO Settings
49- TIME Settings
50- OPTION Settings
55Picture ID Settings
56- NETWORK Settings
57 MAKING CONNECTIONS
58External Device Connection
58- DVI-D Connection
58- HDMI Connection
59- Component Connection
59- AV(CVBS) Connection
60Connecting to the LAN
60Connecting to a USB
61TROUBLESHOOTING
64 SPECIFICATIONS
66 IR CODES

67 CONTROLLING THE MULTIPLE
PRODUCT
67 Command Reference List
69 Transmission / Receiving Protocol
3
<![if ! IE]><![endif]>ENGLISH

<![endif]>ENGLISH
4
SAFETY PRECAUTIONS
Please read these safety precautions carefully before using the product.
|
WARNING |
|
CAUTION |
|
|
|
the warning message, you |
yyIf you ignore the caution message, you |
|
yyIf you ignore |
||||
|
may be seriously injured or there is a |
may be slightly injured or the product |
||
|
possibility of accident or death. |
may be damaged. |
||
 WARNING yyIndoor Use Only.
Precautions in installing the Product
 WARNING
yyKeep away from heat sources like electrical heaters.
►►Electrical shock, fire, malfunction or deformation may occur.
yyKeep the packing anti-moisture material or vinyl packing out of the reach of children.
►►Anti-moisture material is harmful if swallowed. If swallowed by mistake, force the patient to vomit and visit the nearest hospital. Additionally, vinyl packing can cause suffocation. Keep it out of the reach of children.
yyDo not put heavy objects on the product or sit upon it.
►►If the product collapses or is dropped, you may be injured. Children must pay particular attention. yyDo not leave the power or signal cable unattended on the pathway.
►►The passerby can falter, which can cause electrical shock, fire, product breakdown or injury. yyInstall the product in a neat and dry place.
►►Dust or moisture can cause electrical shock, fire or product damage.
yyIf you can smell smoke or other odors or hear a strange sound unplug the power cord and contact the service center.
►►If you continue to use without taking proper measures, electrical shock or fire can occur.
yyIf you dropped the product or the case is broken, turn off the product and unplug the power cord.
►►If you continue to use without taking proper measures, electrical shock or fire can occur. Contact the service center.
yyDo not drop an object on or apply impact to the product. Do not throw any toys or objects on the product screen.
►►It can cause injury to human, problem to product and damage the display.
yyDo not let the product fall or drop when connecting it with an external device.
►►This may cause injury and/or damage to the product.
yyWhen connecting it with a game device, keep a distance of four times as long as the diagonal measurement of the screen from the device.
►►If the product falls because of the short cable, this may cause injury and/or damage to the product. yyLeaving a fixed image on the screen for a long time may cause damage to the screen and
cause image burn-in. To use the product for a long period of time, use a screen saver on the PC or utilize the residual image prevention function on the product, and when the product is not used, turn off the power. Burn-in and related problems are not covered by the warranty on this product.
yyDo NOT install this product on a wall where there is high risk of exposure to oil fumes or mist.
►►This may damage product and cause is to fail.
 CAUTION
yyMake sure the product ventilation hole is not blocked. Install the product in a suitably wide place (more than 10cm from the wall)
►►If you install the product too close to the wall, it may be deformed or fire can break out due to internal heat. yyDo not block the ventilation hole of the product by a tablecloth or curtain.
►►The product can be deformed or fire can break out due to overheating inside the product.
yyInstall the product on a flat and stable place that has no risk of dropping the product.
►►If the product is dropped, you may be injured or the product may be broken. yyInstall the product where no EMI occurs.
yyKeep the product away from direct sunlight.
►►The product can be damaged.

5
yyIf you install the product in a place that does not meet the recommended conditions, this may cause serious damage to the product's picture quality, life cycle and appearance. Please check with LG or a qualified installer before installing. This caution applies to a place where there is an abundance of fine dust or oil mist, chemical substances are used, the temperature is very high or low, the humidity is very high, or the product is likely to remain turned on for a long period of time (airport and train station), failure to do so will invalidate the warranty.
yyDo not install the product in an area with poor ventilation (e.g.on a bookshelf, in a closet) or outside and avoid placing on cushions or carpets.
yyIn addition, do not install it where there are heating objects such as lighting equipment.
Precautions to the AC Adapter and Electrical Power
 WARNING
yyIf water or any foreign substance goes inside the product (TV, monitor, power cord, or AC adapter), disconnect the power cord immediately and contact the service center.
►►Otherwise, this may cause a fire or electric shock due to damage to the product.
yyDo not touch the power plug or AC adapter with wet hands. If the pins of the plug are wet or dusty, wipe and dry them before use.
►►Otherwise, this may cause a fire or electric shock.
yyMake sure to completely insert the power cord into the AC adapter.
►►If loosely connected, the poor connection may cause a fire or electric shock.
yyBe sure to use power cords and AC adapters provided or approved by LG Electronics, Inc.
►►The use of non-approved products may cause a fire or electric shock.
yyWhen unplugging the power cord, always pull it by the plug. Do not bend the power cord with excessive force.
►►The power line can be damaged, which may cause electric shock or fire.
yyBe careful not to step or place heavy objects (electronic appliances, clothing, etc.) on the power cord or AC adapter. Be careful not to damage the power cord or AC adapter with sharp objects.
►►Damaged power cords may cause a fire or electric shock.
yyNever disassemble, repair or modify the power cord or AC adapter.
►►This may cause a fire or electric shock.
yyMake sure to connect the power cable to the grounded current.
►►You may be electrocuted or injured. yyUse the rated voltage only.
►►The product can be damaged, or you may be electrocuted.
yyIn the presence of thunder and lightning, never touch the power cord and signal cable because it can be very dangerous.
►►It can cause electric shock.
yyDo not connect several extension cords, electrical appliances or electrical heaters to a single outlet. Use a power bar with a grounding terminal designed for exclusive use with the computer.
►►A fire can break out due to overheating.
yyDo not touch the power plug with wet hands. Additionally, if the cord pin is wet or covered with dust, dry the power plug completely or wipe dust off.
►►You may be electrocuted due to excess moisture.
yyIf you don't intend to use the product for a long time, unplug the power cable from the product.
►►Covering dust can cause a fire, or insulation deterioration can cause electric leakage, electric shock or fire. yyFix the power cable completely.
►►If the power cable is not fixed completely, a fire can break out.
yyDo not insert a conductor (like a metal chopstick) into one end of the power cable while the other end is connected to the input terminal on the wall. Additionally, do not touch the power cable right after plugging into the wall input terminal.
►►You may be electrocuted.
<![endif]>ENGLISH
yyThe appliance coupler is used as the disconnect device.

<![endif]>ENGLISH
6
yyPlease make sure the device is installed near the wall outlet to which it is connected and that the outlet is easily accessible.
yyAs long as this unit is connected to the AC wall outlet, it is not disconnected from the AC power source even if the unit is turned off.
 CAUTION
yyBe sure to keep the outlet, AC adapter, and pins of the power plug clean from dust and etc.
►►This may cause a fire.
yyDo not unplug the power cord while the product is in use.
►►Electrical shock can damage the product.
yyUse only the power cord supplied with the unit. If you use another power cord, make sure that it is certified by the applicable national standards when not provided by the supplier. If the power cable is faulty in any way, please contact the manufacturer or the nearest authorized repair service provider for a replacement.
Precautions in Moving the Product
 WARNING
yyMake sure to turn off the product.
►►You may be electrocuted or the product can be damaged.
yyMake sure to remove all cables before moving the product.
►►You may be electrocuted or the product can be damaged.
yyMake sure the panel faces forward and hold it with both hands to move. If you drop the product, the damaged product can cause electric shock or fire. Contact an authorized the service center for repair.
yyMake sure the product is turned off, unplugged and all cables have been removed. It may take 2 or more people to carry larger apparatus. Do not press against or put stress on the front panel of the apparatus.
 CAUTION
yyDo not shock the product when moving it.
►►You may be electrocuted or the product can be damaged.
yyDo not dispose the product-packing box. Use it when you move.
Precautions in Using the Product
 WARNING
yyDo not disassemble, repair or modify the product at your own discretion.
►►Fire or electric shock accident can occur.
►►Contact the service center for check, calibration or repair.
yyWhen the display is to be left unattended for an extended period of time, unplug it from the wall outlet.
yyKeep the product away from water.
►►Fire or electric shock accident can occur.
yyDo not shock or scratch the front and sides of the screen with metallic objects.
►►Otherwise, it may cause damage to the screen.
yyAvoid high temperatures and humidity.
7
 CAUTION
yyDo not put or store inflammable substances near the product.
►►There is a danger of explosion or fire due to careless handling of the inflammable substances. yyWhen cleaning the product, unplug the power cord and scrub gently with a soft cloth to
prevent scratching. Do not clean with a wet cloth or spray water or other liquids directly onto the product. An electric shock may occur. (Do not use chemicals such as benzene, paint thinners or alcohol)
yyTake a rest from time to time to protect your vision. yyKeep the product clean at all times.
yyTake a comfortable and natural position when working with a product to relax the muscles. yyTake a regular break when working with a product for a long time.
yyDo not press strongly upon the panel with a hand or sharp object such as nail, pencil or pen, or make a scratch on it.
yyKeep the proper distance from the product.
►►Your vision may be impaired if you look at the product too closely.
yySet the appropriate resolution and clock by referring to the User’s Guide.
►►Your vision can be impaired.
yyUse authorized detergent only when cleaning the product. (Do not use benzene, thinner or alcohol.)
►►Product can be deformed.
yyDo not expose to dripping or splashing and do not place objects filled with liquids, such as vases, cups, etc. on or over the apparatus(e.g. on shelves above the unit).
yyBatteries should not be exposed to excessive heat. For example, keep away from direct sunlight, open fireplace and electric heaters.
yyDo NOT place non-rechargeable batteries in charging device.
yyUsing headsets (earphones) for a long time or listening loudly can cause damage to your hearing.
yySpray water onto a soft cloth 2 to 4 times, and use it to clean the front frame; wipe in one direction only. Too much moisture may cause staining.
yyDo not use products using high voltage around the Monitor. (ex.Electrical Swatter)
►►Monitor may have malfunction as its electrical shock.
Mounting on a wall
<![endif]>ENGLISH
yyDo not install this product by yourself. Contact the service technician qualified by the Manufacturer. It may cause injuries.

<![endif]>ENGLISH
8
LICENSES
Supported licenses may differ by model. For more information of the licenses, visit www.lg.com.
The terms HDMI and HDMI High-Definition Multimedia Interface, and the HDMI logo are trademarks or registered trademarks of HDMI Licensing LLC in the United States and other countries.
This DivX Certified® device has passed rigorous testing to ensure it plays DivX® video.
To play purchased DivX movies, first register your device at vod.divx.com. Find your registration code in the DivX VOD section of your device setup menu.
DivX Certified® to play DivX® video up to HD 1080p, including premium content.
DivX®, DivX Certified® and associated logos are trademarks of DivX, LLC and are used under license.
Covered by one or more of the following U.S. patents:
7,295,673; 7,460,668; 7,515,710; 8,656,183; 8,731,369; RE45,052.
Manufactured under license from Dolby Laboratories. Dolby and the double-D symbol are trademarks of Dolby Laboratories.
 NOTE
NOTE
yyThe warranty will not cover any damages caused by using the product in an excessively dusty environment.

9
ASSEMBLING AND PREPARING
Accessories
 CAUTION
yyDo not use any pirated items to ensure the safety and product life span.
yyAny damages or injuries by using pirated items are not covered by the warranty. yyRisk of explosion if battery is replaced by an incorrect type.
yyDispose of used batteries according to the instructions.
 NOTE
NOTE
yyThe accessories supplied with your product may vary depending on the model.
yyProduct specifications or contents in this manual may be changed without prior notice due to upgrade of product functions.
yySuperSign SW & Manual
-Downloading from the LG Electronics website.
-Visit the LG Electronics website (https://www.lgecommercial.com/supersign) and download the latest software for your model.
<![endif]>ENGLISH
10
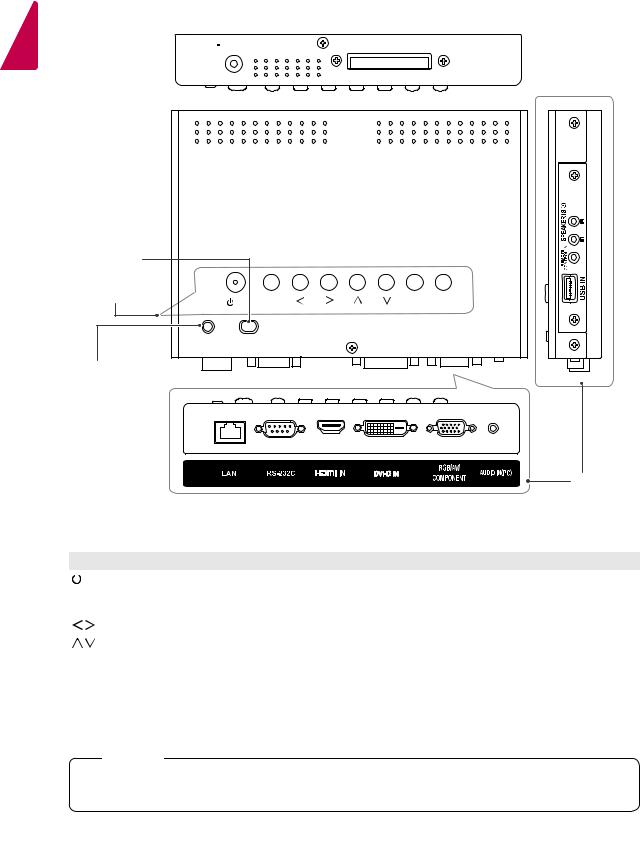
Parts and Buttons
| <![if ! IE]> <![endif]>ENGLISH |
,G |
OYGV#RXW |
|
|
|
||
|
|
|
|
IR Receiver |
|
|
|
Buttons |
2#L DXWR2VHW# |
PHQX |
LQSXW |
Power Indicator |
|
yyLED On(Red) |
|
: Power is on. |
|
yyLED |
|
On(Amber) : |
|
DPM |
|
yyLED Off : |
Connection |
Power is off. |
|
|
Panel |
Screen Marks |
Description |
/ I |
Turns the power on or off. |
|
|
AUTO/SET |
Displays the current signal and mode. |
|
Press this button to adjust the screen automatically (available only in RGB mode) |
|
Adjusts the volume level. |
|
|
|
Adjusts the up and down. |
|
|
MENU |
Accesses the main menus, or saves your input and exits the menus. |
|
|
INPUT |
Changes the input source. |
|
|
IR Receiver |
This is where the unit receives signals from the remote control. |
|
|
Power Indicator |
Turns red when the TSP500 set is turned on; turns amber when it is in Energy Saving |
|
mode. |
 NOTE
NOTE
yyYou can set the Power indicator to on or off by selecting OPTION in the main menu.
11
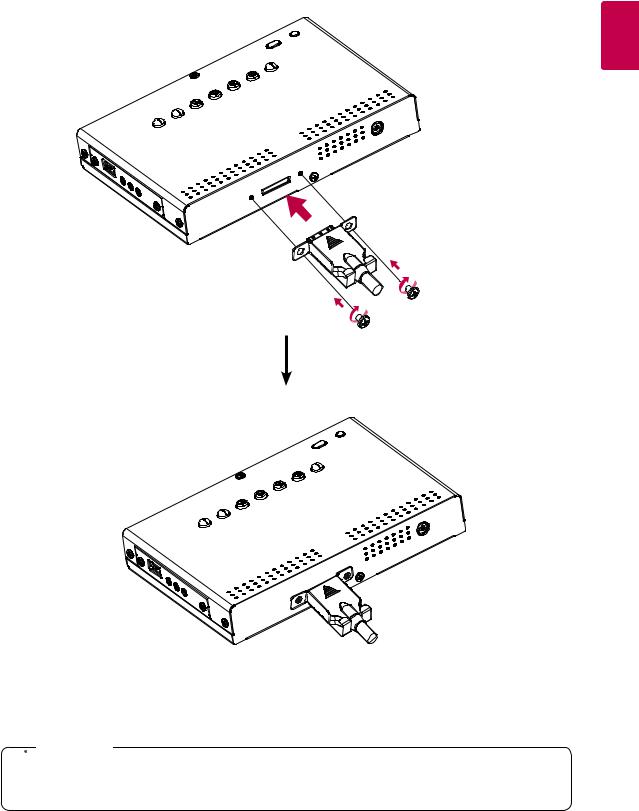
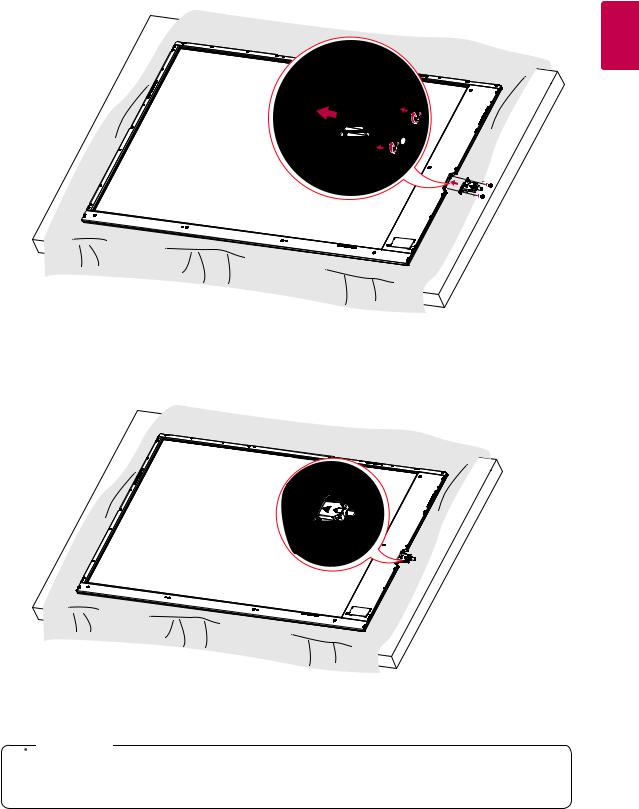
Installing the Guide Brackets
1 Install the guide brackets to the set using the screws supplied as accessories.
Back of the Product
224.2 mm

 Guide Bracket
Screws
(For Guide Bracket)
<![endif]>ENGLISH
2 Fix the set with the guide brackets installed using the screws supplied as accessories.
Front of the Product

 Guide Bracket
2#L DXWR2VHW# |
PHQX LQSXW |

<![endif]>ENGLISH
12
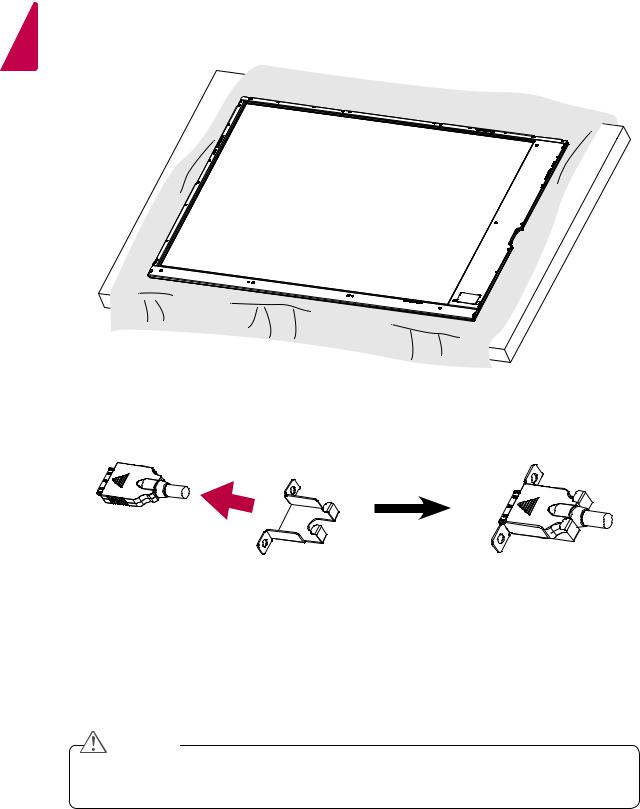
PRODUCT INSTALLATION
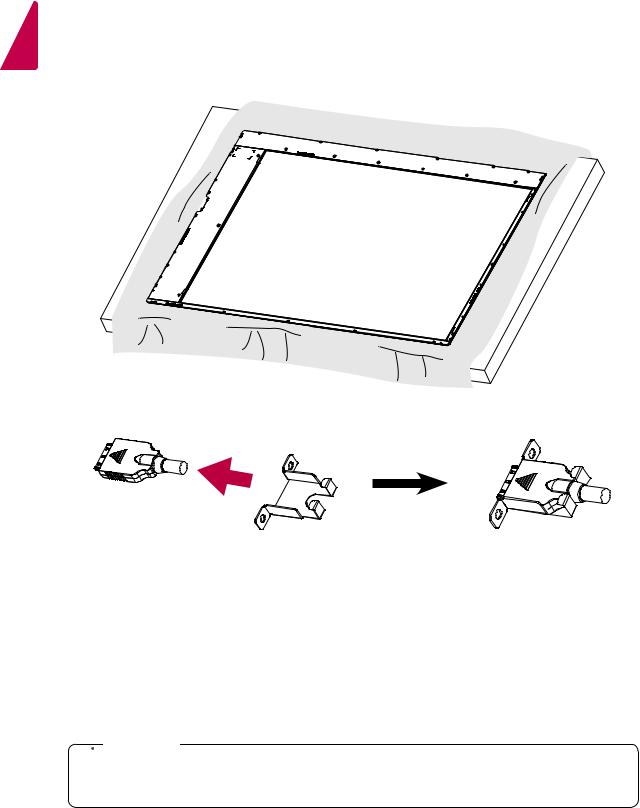
TSP500-M LVDS connection
1 Unscrew two screws to assemble LVDS cable and Holder. Don’t throw away the screws.
2 Put a LVDS cable in a holder. Cable head has to be properly oriented.
 CAUTION
yyTo prevent the cable from being separated, you must use a holder. yyCheck the direction of the LVDS cable to prevent damage to the cable.
13
3 Attach LVDS cable and holder to TSP500 with two screws saved in step 1.
<![if ! IE]><![endif]>ENGLISH
 CAUTION
yyTo prevent the cable from being separated, you must use a holder. yyCheck the direction of the LVDS cable to prevent damage to the cable.
<![endif]>ENGLISH
14
47/55WFB LVDS connection
1 Place a soft cloth on the table and put the set on it as illustrated.
2 Put a LVDS cable in a holder. Cable head has to be properly oriented.
 CAUTION
yyTo prevent the cable from being separated, you must use a holder. yyCheck the direction of the LVDS cable to prevent damage to the cable.
15
3 Attach LVDS cable and holder to the set with two screws. (These screws are included with TSP500-M.)
<![if ! IE]><![endif]>ENGLISH
4 Cable head has to be toward set back. (Label is located on set back.)
 CAUTION
yyTo prevent the cable from being separated, you must use a holder. yyCheck the direction of the LVDS cable to prevent damage to the cable.
<![endif]>ENGLISH
16
49WFB LVDS connection
1 Place a soft cloth on the table and put the set on it as illustrated.
2 Put a LVDS cable in a holder. Cable head has to be properly oriented.
 CAUTION
yyTo prevent the cable from being separated, you must use a holder. yyCheck the direction of the LVDS cable to prevent damage to the cable.

17
3 Attach LVDS cable and holder to the set with two screws. (These screws are included with TSP500-M.)
<![if ! IE]><![endif]>ENGLISH
4 Cable head has to be toward set back. (Label is located on set back.)
 CAUTION
yyTo prevent the cable from being separated, you must use a holder. yyCheck the direction of the LVDS cable to prevent damage to the cable.
<![endif]>ENGLISH
18
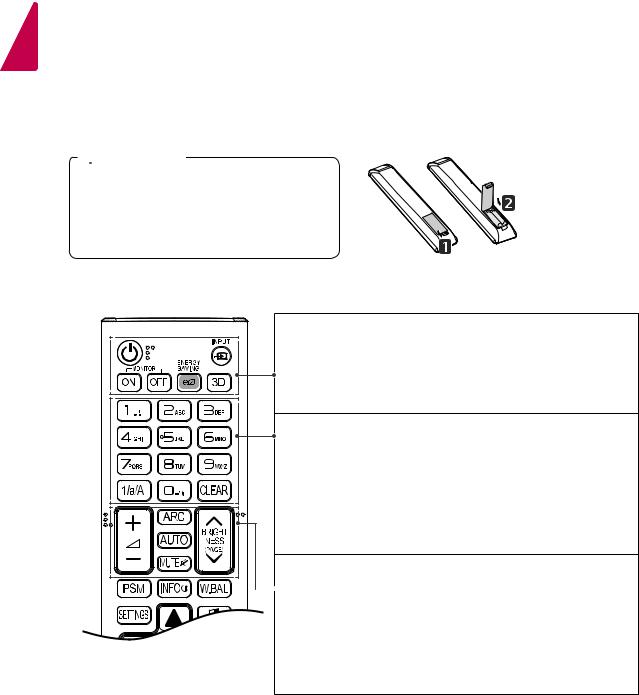
REMOTE CONTROL
The descriptions in this manual are based on the buttons of the remote control. Please read this manual carefully and use the TSP500 set correctly.
To replace batteries, open the battery cover, replace batteries (1.5 V AAA) matching  and
and  ends to the label inside the compartment, and close the battery cover.
To remove the batteries, perform the installation actions in reverse.
 CAUTION
yyDo not mix old and new batteries, as this may damage the remote control.
yyMake sure to point the remote control to the remote control sensor on the TSP500 set.

 (POWER) Turns the TSP500 set on or off.
MONITOR ON/OFF Turn off the TSP500 and then turn it back on. ENERGY SAVING Adjusts the brightness of the picture to reduce
energy consumption. INPUT Selects the input mode.
3D Used for viewing 3D videos. (This model does not support this.)
1/a/A Toggles between numerical and alphabetical.
(Depending upon the model, this feature may not be supported.)
Number and Alphabet buttons
Enters numerical or alphabetical characters depending upon the setting. (Depending upon the model, this feature may not be
supported.)
CLEAR Deletes the entered numerical or alphabetical character. (Depending upon the model, this feature may not be
supported.)
Volume Up/Down Button Adjusts the volume.
ARC Selects the Aspect Ratio mode.
 AUTO Automatically adjusts picture position and minimizes image instability (available for RGB input only).
MUTE Mutes all sounds.
BRIGHTNESS Adjust the brightness by pressing the Up and Down buttons on the remote control. In USB mode, the OSD menu has the Page function to move to the next file list.

19
PSM Selects the Picture Mode.
INFO Views the information of the currently program and the screen. W.BAL Enters the White Balance menu. (This model does not
support this.)
SETTINGS Accesses the main menus or saves your input and exit
menus.

 S.MENU SuperSign menu key. (This model does not support this.)
Navigation Buttons Scrolls through menus or options.
OK Selects menus or options and confirms your input.
BACK Allows you to move back one step in the user interaction
function.
EXIT Quit all OSD tasks and applications.
Allows you to control various multimedia devices to enjoy multimedia simply by using the remote control through the SimpLink menu. (This model does not support this.)
TILE Selects the TILE Mode.
PICTURE ID ON/OFF When the Picture ID number matches the Set
ID number, you can control whichever monitor you want in multi-display format.
USB Menu Control Buttons Controls media playback.
<![endif]>ENGLISH

<![endif]>ENGLISH
20
USING THE TSP500 SET
Connecting to a PC
The TSP500 does not include the monitor. You can connect TSP500 to a transparent open frame (model: 47/49/55WFB) to view the picture on it.
Your TSP500 set supports the Plug & Play* feature.
*Plug & Play: A PC will have a built-in driver for TSP500, no extra software is needed.
 NOTE
NOTE
yyIt is recommended to use the TSP500 set with an HDMI connection for the best image quality.
yyTo comply with the specifications of the product, use a shielded interface cable with ferrite core, such as the D-sub 15 pin cable and DVI-D/HDMI cable provided with the product.
yyIf you turn the TSP500 set on when the TSP500 is cold, the screen may flicker. This is normal. yySome red, green, or blue spots may appear on the screen. This is normal.
yyUse the standard Macintosh adapter since an incompatible adapter is available in the market. (Different signaling system)
yyApple computers may require an adapter to connect to this TSP500. Call or visit their web site for more information.
yyUse a High Speed HDMI®/TM Cable.
yyPlease check the PC environment if you cannot hear audio in HDMI mode. Some PCs require you to manually change the default audio output to HDMI.
yyIf you want to use HDMI-PC mode, you must set the input label to PC/DTV mode. yyWhen HDMI PC is used, a compatiblity problem might occur.
yyUse a certified cable with the HDMI logo attached. If you do not use a certified HDMI cable, the screen may not display or a connection error may occur.
yyRecommended HDMI cable types
-High-Speed HDMI®/TM cable
-High-Speed HDMI®/TM cable with Ethernet
21
 CAUTION
yyConnect the signal input cable and tighten it by turning the screws clockwise. yyDo not press the screen with your finger for a long time as this may result in
temporary distortion on the screen.
yyAvoid displaying a fixed image on the screen for a long period of time to prevent image burn. Use a screensaver if possible.
<![endif]>ENGLISH
<![endif]>ENGLISH
22
Adjusting the Screen
Selecting an Image Mode
Display images in its optimized settings by selecting one of the preset image modes.
1Press SETTINGS to access the main menus.
2Press the Navigation buttons to scroll to
PICTURE and press OK.
3Press the Navigation buttons to scroll to
Picture Mode and press OK.
4Press the Navigation buttons to scroll to an image mode you want and press OK.
Mode |
Description |
Vivid |
Adjusts the video image for a retail |
|
environment by enhancing the contrast, |
|
brightness, color, and sharpness. |
Standard |
Adjusts the image for a normal |
|
environment. |
Cinema |
Optimizes the video image for a cinematic |
|
look to enjoy movies as if you are in a |
|
movie theater. |
Sport |
Optimizes the video image for high and |
|
dynamic actions by emphasizing primary |
|
colors such as white, grass, or sky blue. |
Game |
Optimizes the video image for a fast |
|
gaming screen such as PCs or games. |
5When you are finished, press EXIT.
When you return to the previous menu, press
BACK.
Customizing Image Options
Customize basic and advanced options of each image mode for the best screen performance.
1Press SETTINGS to access the main menus.
2Press the Navigation buttons to scroll to
PICTURE and press OK.
3Press the Navigation buttons to scroll to
Picture Mode and press OK.
4Press the Navigation buttons to scroll to an image mode you want and press OK.
5Select and adjust the following options, and then press OK.
Option
Contrast
Brightness
Sharpness
Color
Tint
Color Temp.
Advanced
Control
Picture Reset
Description
Increases or decreases the gradient of the video signal. You may use Contrast when the bright part of the picture is saturated.
Adjusts the base level of the signal in the picture. You may use Brightness when the dark part of the picture is saturated.
Adjusts the level of crispness in the edges between the light and dark areas of the picture. The lower the level, the softer the image.
Adjusts intensity of all colors.
Adjusts the balance between red and green levels.
Set to warm to enhance hotter Colors such as red, or set to cool to make picture bluish.
Customizes the advanced options. Refer to the Advanced image options.
Restores the options to the default setting.
6When you are finished, press EXIT.
When you return to the previous menu, press
BACK.

Customizing PC Display Options
Customize options of each image mode for the best image quality.
yyThis function works in the following mode: RGB[PC] mode.
1Press SETTINGS to access the main menus.
2Press the Navigation buttons to scroll to
PICTURE and press OK.
3Press the Navigation buttons to scroll to Screen and press OK.
4Select and adjust following options, and then press OK.
Option
Resolution
Auto
Config.
Position/
Size/Phase
Reset
Description
Selects a proper resolution.
Sets to adjust the screen position, clock, and phase automatically.
The displayed image may be unstable for a few seconds while the configuration is in progress.
Adjusts the options when the picture is not clear, especially when characters are shaky, after the auto configuration.
Restores the options to the default setting.
5When you are finished, press EXIT.
When you return to the previous menu, press
BACK.
23
Adjusting the Sound
Selecting an Sound Mode
Play the sound in its optimized settings by selecting one of the preset sound modes.
1Press SETTINGS to access the main menus.
2Press the Navigation buttons to scroll to AUDIO and press OK.
3Press the Navigation buttons to scroll to Sound Mode and press OK.
4Press the Navigation buttons to scroll to a sound mode you want and press OK.
Mode |
Description |
Standard |
Select when you want standard-quality |
|
sound. |
Music |
Select when you listen to music. |
Cinema |
Select when you watch movies. |
Sports |
Select when you watch sports events. |
Game |
Select when you play games. |
5When you are finished, press EXIT.
When you return to the previous menu, press
BACK.
<![endif]>ENGLISH

<![endif]>ENGLISH
24
Customizing Sound Options
Customize options of each sound mode for the best sound quality.
1Press SETTINGS to access the main menus.
2Press the Navigation buttons to scroll to AUDIO and press OK.
3Press the Navigation buttons to scroll to Sound Mode and press OK.
4Press the Navigation buttons to scroll to a sound mode you want and press OK.
5Select and adjust following options, and then press OK.
Option |
Description |
Infinite |
LG's Infinity Sound option provides 5.1 |
Sound |
channel stereo sound quality from two |
|
speakers. |
|
|
Treble |
Increases the intensity of the high |
|
frequency part of audio. |
Bass |
Increases the intensity of the low |
|
frequency part of audio. |
Reset |
Resets the sound mode to the default |
|
setting. |
|
|
6When you are finished, press EXIT.
When you return to the previous menu, press
BACK.
Using Additional Options
Adjusting Aspect Ratio
Resize the image to view the image at its optimal size by pressing ARC while you are watching the display set.
 CAUTION
yyIf a fixed image displays on the screen for a long period of time, it could be imprinted and become a permanent disfigurement on the screen. This is “image burn” or “burn-in” and not covered by the warranty.
yyIf the aspect ratio is set to 4:3 for a long period of time, image burn may occur on the letterboxed area of the screen.
 NOTE
NOTE
yyYou can also change the image size by accessing the main menus.
MODE |
AV |
Component |
RGB |
DVI-D |
HDMI |
|
ARC |
|
|
|
|
|
|
|
|
PC |
PC |
DTV |
PC |
|
16:9 |
o |
o |
o |
o |
o |
o |
|
|
|
|
|
|
|
Just Scan |
x |
o |
x |
x |
o |
x |
|
|
|
|
|
|
|
1:1 |
x |
x |
o |
o |
x |
o |
4:3 |
o |
o |
o |
o |
o |
o |
|
|
|
|
|
|
|
Zoom |
o |
o |
x |
x |
o |
x |
|
|
|
|
|
|
|
Cinema |
o |
o |
x |
x |
o |
x |
Zoom |
|
|
|
|
|
|
|
|
|
|
|
|
|

-16:9 : This selection will allow you to adjust the picture horizontally, in linear proportion, to fill the entire screen(useful for viewing 4:3 formatted DVDs).
-Just Scan : This Selection will allow you view the picture of best quality without loss of original picture in high resolution image.
Note: If there is noise in original Picture, You can see the noise at the edge.
25
-4:3 : This selection will allow you to view a picture with an original 4:3 aspect ratio, black bars will appear on both the left and right of the screen.
-Zoom : This selection will allow you to view the picture without any alteration, while filling the entire screen. However, the top and bottom of the picture will be cropped.
Just
 Scan
Scan
-1:1 : The aspect ratio is not adjusted from the original. (Only HDMI PC, DVI-D PC, RGB PC)
-Cinema Zoom : Choose Cinema Zoom when you want to enlarge the picture in correct proportion.
Note: When enlarging or reducing the picture, the image may become distorted.
<![endif]>ENGLISH
Loading...