


32CS560

담 당 관리자
Model Description
MODEL
BRAND
Printing Specification
1. Trim Size (Format) : 182mm x 257 mm
2. Printing Colors
• Cover : 1 COLOR (BLACK)
• Inside : 1 COLOR (BLACK)
3. Stock (Paper)
• Cover : Uncoated paper , 백상지 60 g/㎡
• Inside : Uncoated paper , 백상지 60 g/㎡
4. Printing Method : Off-set
5. Bindery : Saddle Stitch
6. Language : Eng/Rus/Kaz/Ukr (4)
7. Number of pages : 64 pages
Part No.
1.
2.
User’s Guide Specification
User’s Guide Specification
Changes
4.
REV.
NO.
MM/DD/YY
SIGNATURE
CHANGE NO.
CHANGE CONTENTS
SUFFIX
LG
MFL67469008
(1204-REV02)
(1) Origin Notification
* LGEIN: Printed in Indonesia * LGEWA : Printed in U.K.
* LGESP : Printed in Brazil * LGEMX : Printed in Mexico
* LGEND/NP : Printed in China * LGEIL : Printed in India
* LGEMA : Printed in Poland
Special Instructions3.
Product Name
RU
1
2
3
4
5
7
6
8
This part contains Eco-hazardous substances (Pb, Cd, Hg, Cr6+, PBB, PBDE, etc.) within LG standard level,
Details should be followed Eco-SCM management standard[LG(56)-A-2524].
Especially, Part should be followed and controlled the following specification.
(1) Eco-hazardous substances test report should be submitted when Part certification test and First Mass Production.
(2) Especially, Don’t use or contain lead(Pb) and cadmium(Cd) in ink.
Notes
32CS560-ZD
32/42/47CS56**
GW Lee
12.02.07
JO Kim
12.02.07
HJ Shin
12.02.07
Mar./11/12
Gowoon LEE
EKLC300759
Changed the Simplink contents.
Apr./06/12
Gowoon LEE
EKLC400573
Deleted the sentence of DVB logo.

Pagination sheet
Pagination sheet
P/NO. MFL67469008
Total pages : 64 pages
LG(EN)
14
Front cover
………32
LG(Rus)
13
Front cover
………32
LG(Kaz)
13
Front cover
………32
LG(Ukr)
14
Front cover
13……32
LG(Eng)
Back cover
LG
P/no
5
Front cover
432Blank
13
14
14
Blank

www.lg.com
OWNER’S MANUAL
LCD TV
Please read this manual carefully before operating your
set and retain it for future reference.
P/NO : MFL67469008 (1204-REV02)
Printed in Korea
CS56**
6. TABLE OF CONTENTS
SAFETY INSTRUCTIONS
Precaution in Installing the Product
Electrical Power Related Precautions
Precautions When Moving the Product
Precautions When Using the Product
INSTALLATION PROCEDULE
ASSEMBLING AND PREPARING
Unpacking
Parts and buttons
Mounting on a table
Mounting on a wall
REMOTE CONTROL
WATCHING TV
Connecting an antenna
Turning the TV on for the first time
TROUBLESHOOTING
SPECIFICATIONS
OPEN SOURCE SOFTWARE NOTICE
ADDITIONAL INFORMATION OF THE
MANUAL
LANGUAGE
COMMON
COMMON
1. ATTACHING THE STAND
2. TIDYING CABLES
3.
NOT USING THE DESK
TYPE STAND
4. CONNECTING YOUR UNIT
5.
APPLIED LANGUAGE LIST
English
Русский
Қазақша
Українська
3
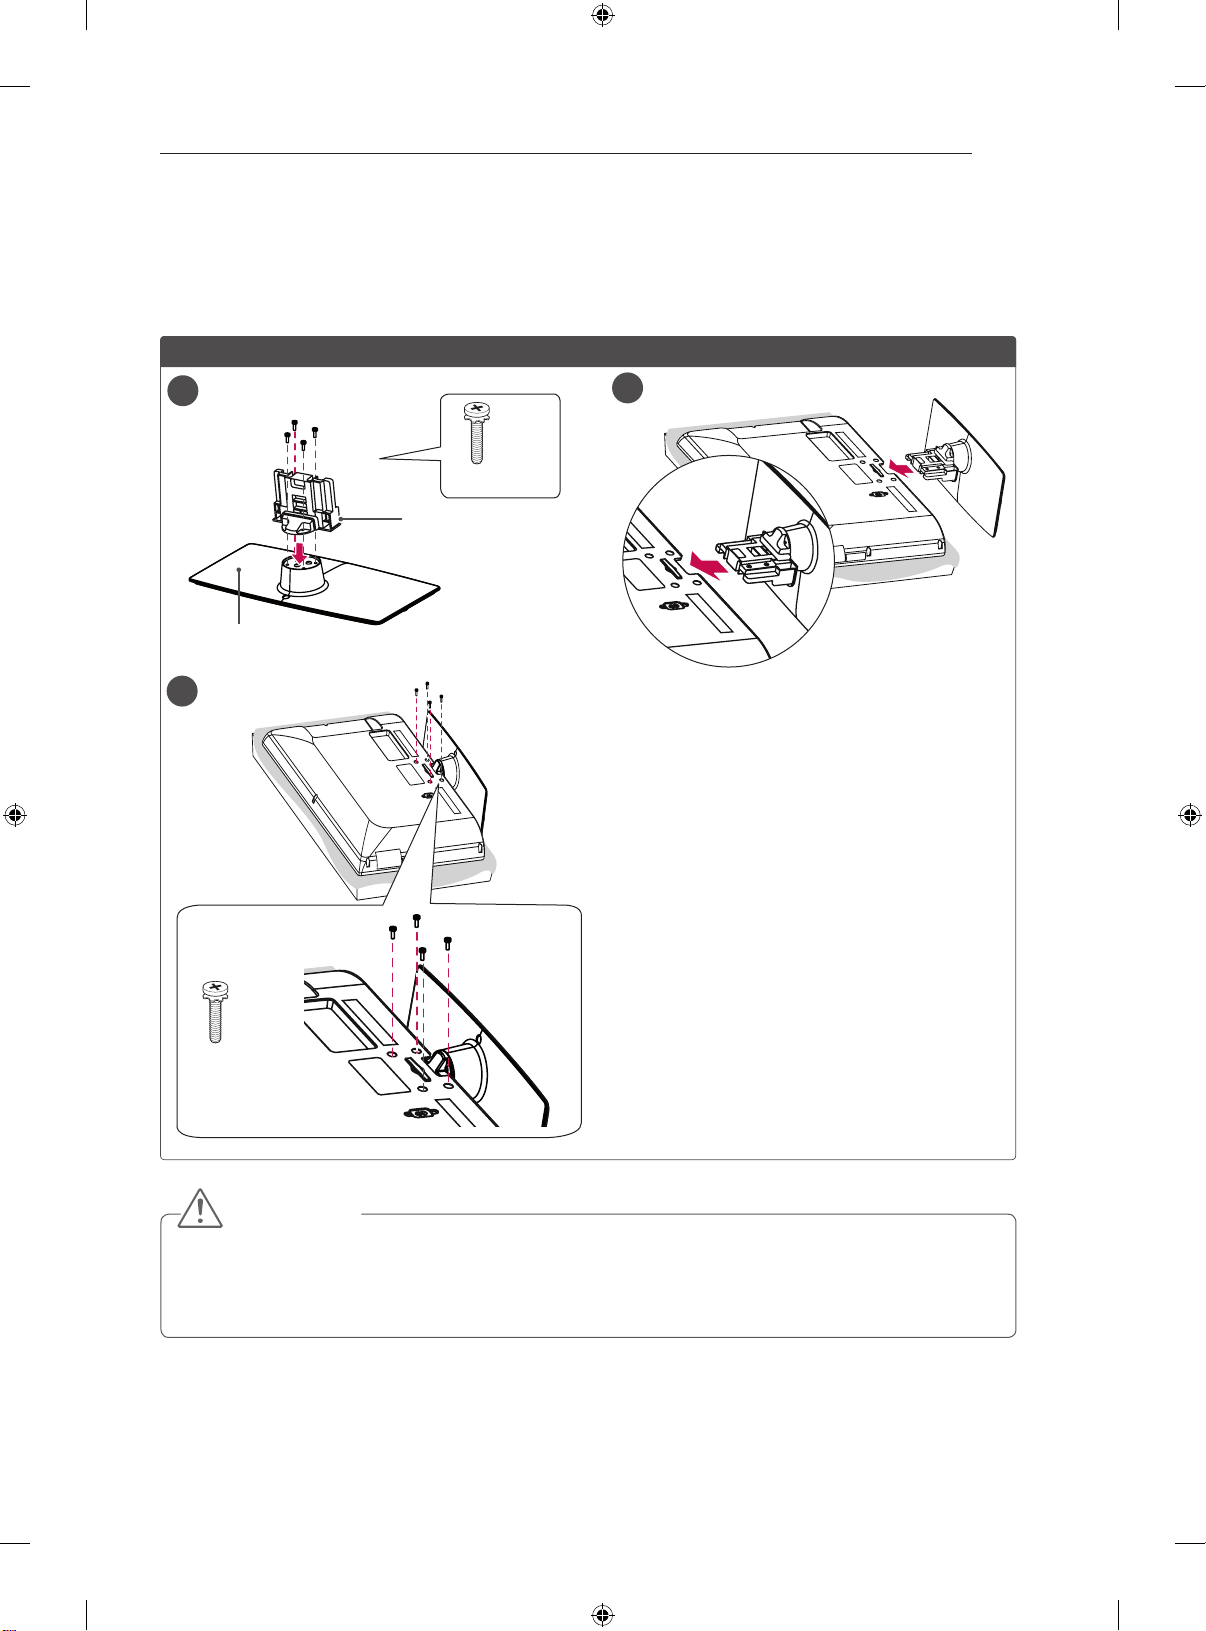
ATTACHING THE STAND
ATTACHING THE STAND
■ Image shown may differ from your TV.
1
2
CS56**
3
CAUTION
y When attaching the stand to the TV set, place the screen facing down on a cushioned table or flat
surface to protect the screen from scratches.
y Tighten the screws firmly to prevent the TV from tilting forward. Do not over tighten.
Stand Body
Stand Base
M4 x 20
4EA
M4 x 20
4EA
4
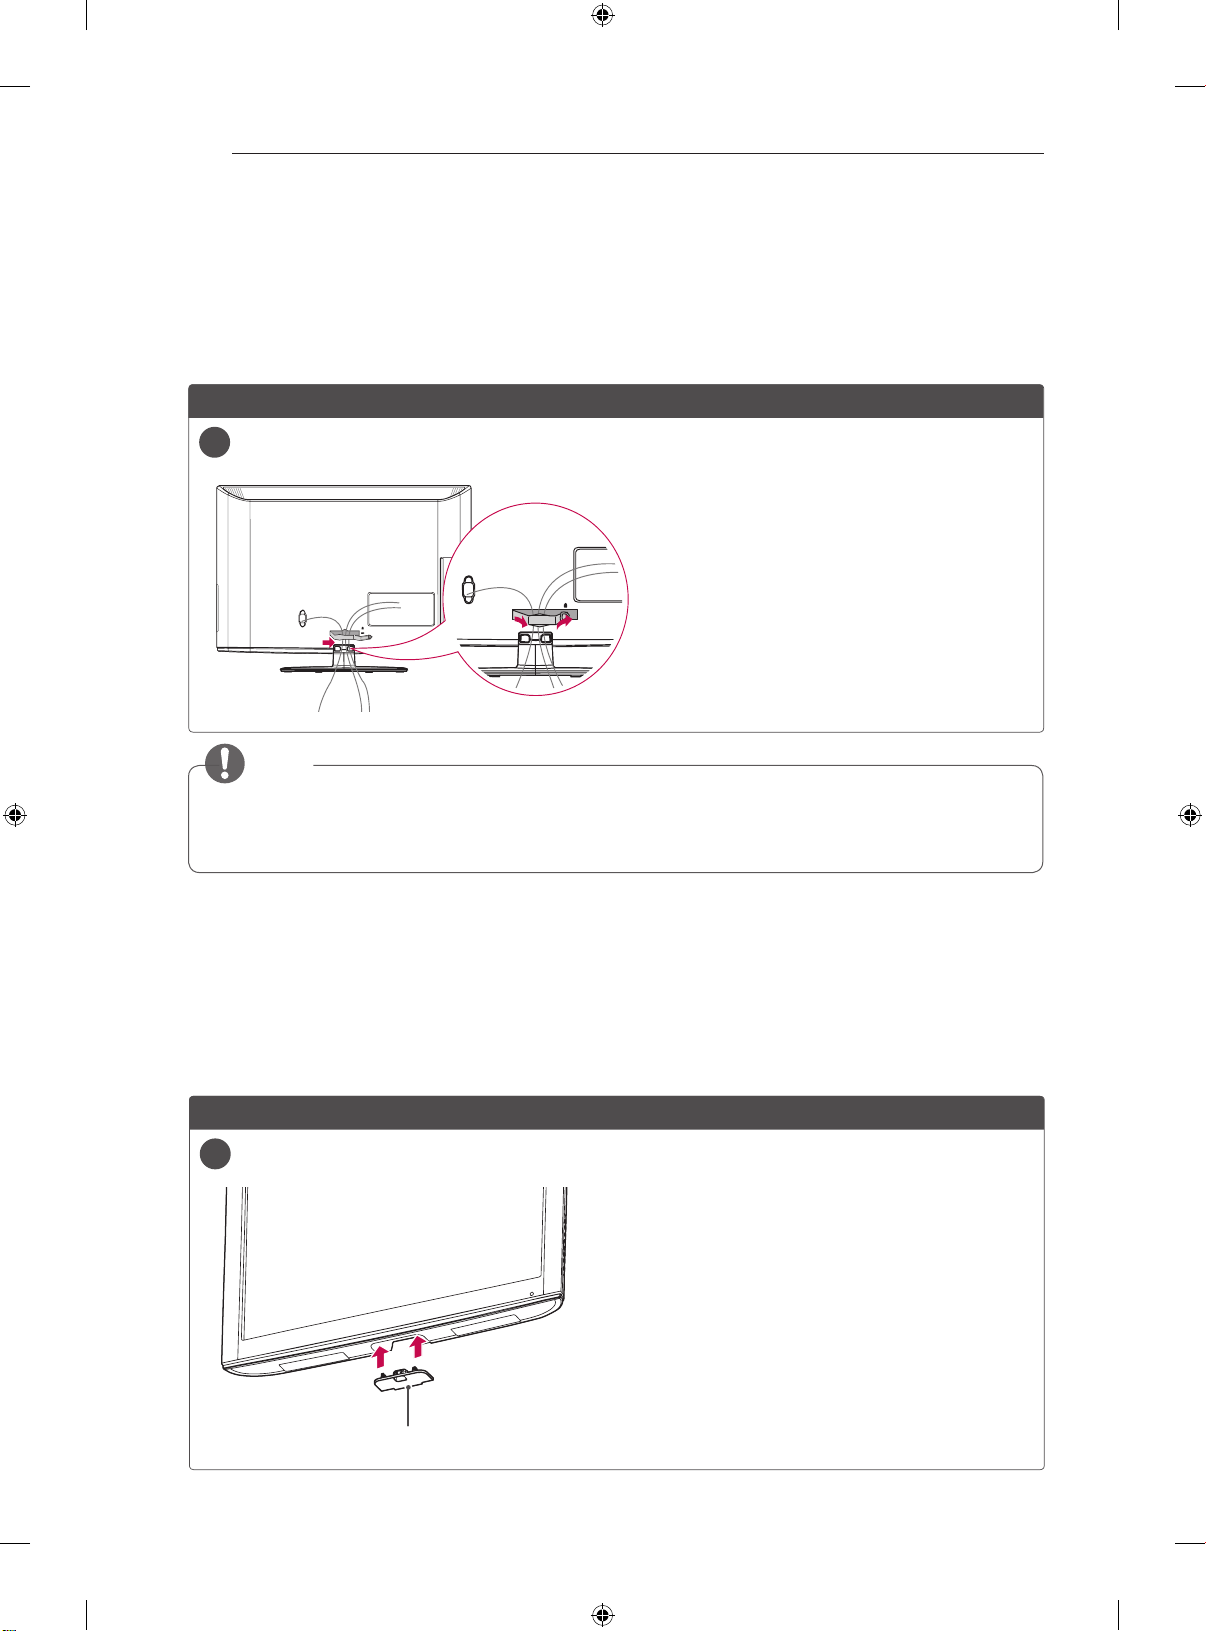
TIDING CABLES / NOT USING THE DESK TYPE STAND
TIDYING CABLES
■ Image shown may differ from your TV.
26/32LK33**, 32/37/42LK43**, 32/42/47LK53**, 32/37/42LK45**, 32/42LK55**
CS56**
1
NOT USING THE DESK TYPE STAND
■ Image shown may differ from your TV.
Protection cover
26/32LK33**, 32/37/42LK43**, 32/42/47LK53**, 32/37/42LK45**, 32/42LK55**
CS56**
1
1 Gather and bind the cables with the cable management clip.
2 Fix the cable management climp to the TV.
Push the supplied Protection cover into the opening at the bottom of the TV until clicking
sound.
NOTE
y Do not move the TV by holding the Cable management clip, as the Cable management clip may
break, and injuries and damage to the TV may occur.
5
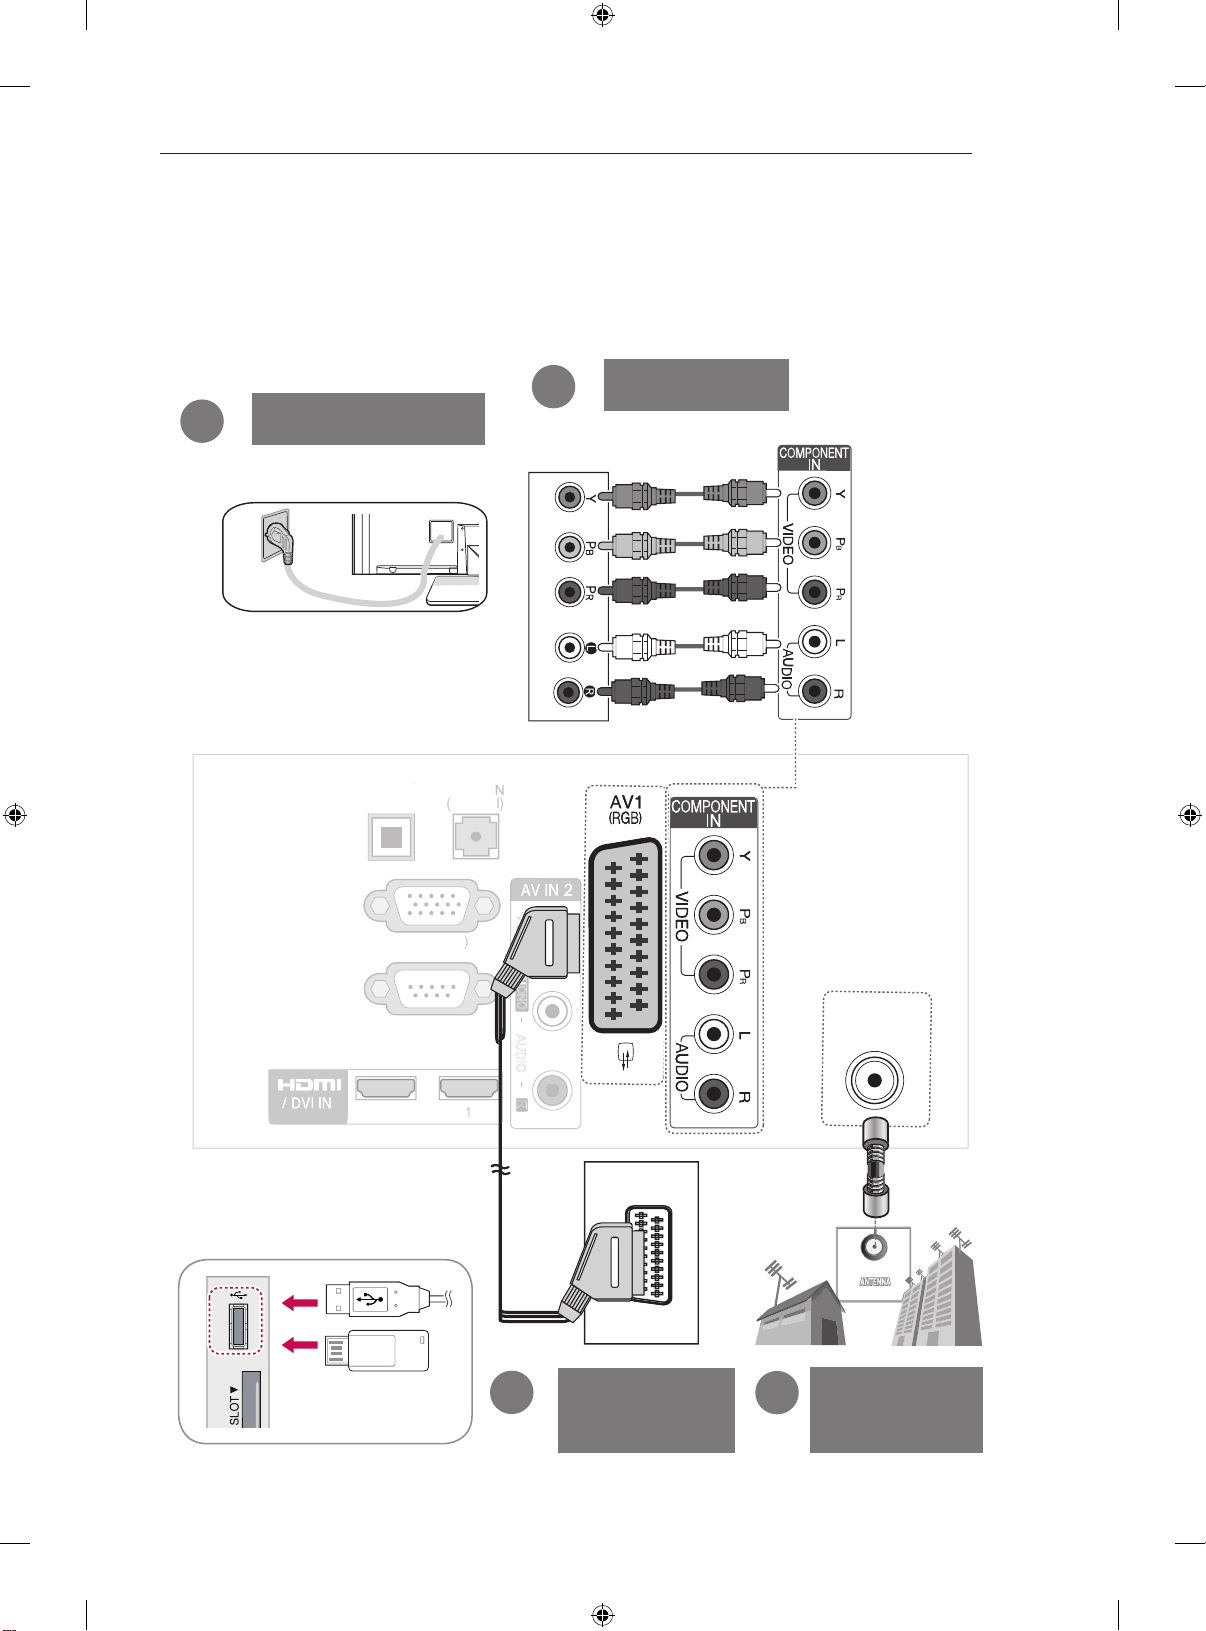
CONNECTING YOUR UNIT
A
UDI
O
I
N
(
G
B/
D
V
)
R
G
B IN
(
P
C
)
L/
MONO
R
AUDIO
VIDEO
ANTENNA
IN
2
1
O
P
TI
C
AL
D
IGIT
A
L
AU
DI
O
OUT
RS
-2
3
2
C
I
N
(CONTROL & SERVICE)
VCR
Connection
2
DVD/STB
2
Antenna
Connection
1
DVD/STB back
■ Image shown may differ from your TV.
CONNECTING YOUR UNIT
Power Cord
3
USB IN
or


www.lg.com
OWNER’S MANUAL
LCD TV
Please read this manual carefully before operating your
set and retain it for future reference.

2
SAFETY INSTRUCTIONS
ENGLISH
Please read these safety precautions carefully before using the product.
In this manual, the illustration may be somewhat different from your product because it is
just example to help the instruction.
PRECAUTION IN INSTALLING THE PRODUCT
Keep away from heat sources such as
electrical heaters.
- Electrical shock, fire, malfunction or
deformation may occur.
If you can smell smoke or other odours or hear
a strange sound unplug the Power cord and
contact the service center.
- If you continue to use without taking proper
measures, an electrical shock or a fire can occur.
Do not use the product in damp place such
as a bathroom or any place where it is likely
to get wet.
- This may cause a fire or could give an
electric shock.
Install the product on a flat and stable place
that has no risk of dropping the product.
- If the product is dropped, you may be injured
or the product may be broken.
Keep the product away from direct sunlight.
- The product can be damaged.
Do not place the product in a built-in
installation such as bookcase or rack.
- Adequate ventilation is required.
ELECTRICAL POWER RELATED
PRECAUTIONS
Make sure to connect the power cable to a
properly earthed outlet.
- You may be electrocuted or injured.
Do not touch the power plug with wet hands.
Additionally, it the cord pin is wet or covered
with dust, dry the power plug completely or wipe
dust off.
- You may be electrocuted due to excess
moisture.
During a thunder or lightning storm, unplug the
power cable or signal cable.
- You may be electrocuted or a fire can break
out.
Protect the Power cord from physical or
mechanical abuse, such as being twisted,
kinked, pinched, closed in a door, or walked
upon. Pay particular attention to plugs, wall
outlets, and the point where the cord exits
the appliance.
PRECAUTIONS WHEN MOVING THE PRODUCT
Do not impact the product when moving it.
- You may be electrocuted or the product
can be damaged.
Make the panel face forward and hold it
with both hands to move.
- If you drop the product, the damaged
product can cause electric shock or fire.
Contact your nearest service center for
repair.
Make sure to turn off the product.
Make sure to remove all cables before
moving the product.
- You may be electrocuted or the product
can be damaged.
PRECAUTIONS WHEN USING THE PRODUCT
Do not disassemble, repair or modify the
product at your own discretion.
- Fire or electric shock accident can occur.
- Contact the service center for check,
calibration or repair.
To reduce the risk of fire or electric shock,
do not expose this apparatus to rain or
moisture.
Apparatus should not be exposed to
dripping liquids or splashing and no
objects filled with liquids, such as vases,
should be placed on the apparatus.
Refer all servicing to qualified service
personnel. Servicing is required when
the apparatus has been damaged in any
way, such as power supply cord or plug
is damaged, liquid has been spilled or
objects have fallen into the apparatus, the
apparatus has been exposed to rain or
moisture, does not operate normally, or
has been dropped.
IMPORTANT INFORMATION TO PREVENT “IMAGE BURN /
BURN-IN” ON YOUR TELEVISION SCREEN
-
When a fixed image (e.g. logos, screen menus, video game,
computer display and teletext pages) is displayed on the
television for an extended period it can become permanently
imprinted on the screen. This phenomenon is known as “image
burn” or “burn-in”. Image burn is not covered under the
manufacturer’s warranty.
-
In order to prevent image burn, avoid displaying a fixed
image on your television’s screen for a prolonged period (2 or
more hours for LCD, 1 or more hours for Plasma).
-
Image burn can also occur on the letterboxed areas of
your television if you use the 4:3 aspect ratio setting for an
extended period.
As long as this unit is connected to the AC wall outlet, it is
not disconnected from the AC power source even if you
turn off this unit by SWITCH.
If you ignore the warning message, you may be seriously injured or there is a
possibility of accident or death.
If you ignore the caution message, you may be slightly injured or the product may be damaged.
CAUTION
WARNING
WARNING
CAUTION
WARNING
CAUTION
WARNING
CAUTION
WARNING
3
INSTALLATION PROCEDURE / ASSEMBLING AND PREPARING
ENGLISH
NOTE
Image shown may differ from your TV.
Your TV’s OSD (On Screen Display) may differ slightly from that shown in this manual.
The available menus and options may differ from the input source or product model that you are
using.
New features may be added to this TV in the future.
The TV can be placed in standby mode in order to reduce the power consumption. And the TV
should be turned off if it will not be watched for some time, as this will reduce energy consumption.
The energy consumed during use can be significantly reduced if the level of brightness of the picture
is reduced, and this will reduce the overall running cost.
INSTALLATION PROCEDURE
1 Open the package and make sure all the accessories are included.
2 Attach the stand to the TV set.
3 Connect an external device to the TV set.
ASSEMBLING AND PREPARING
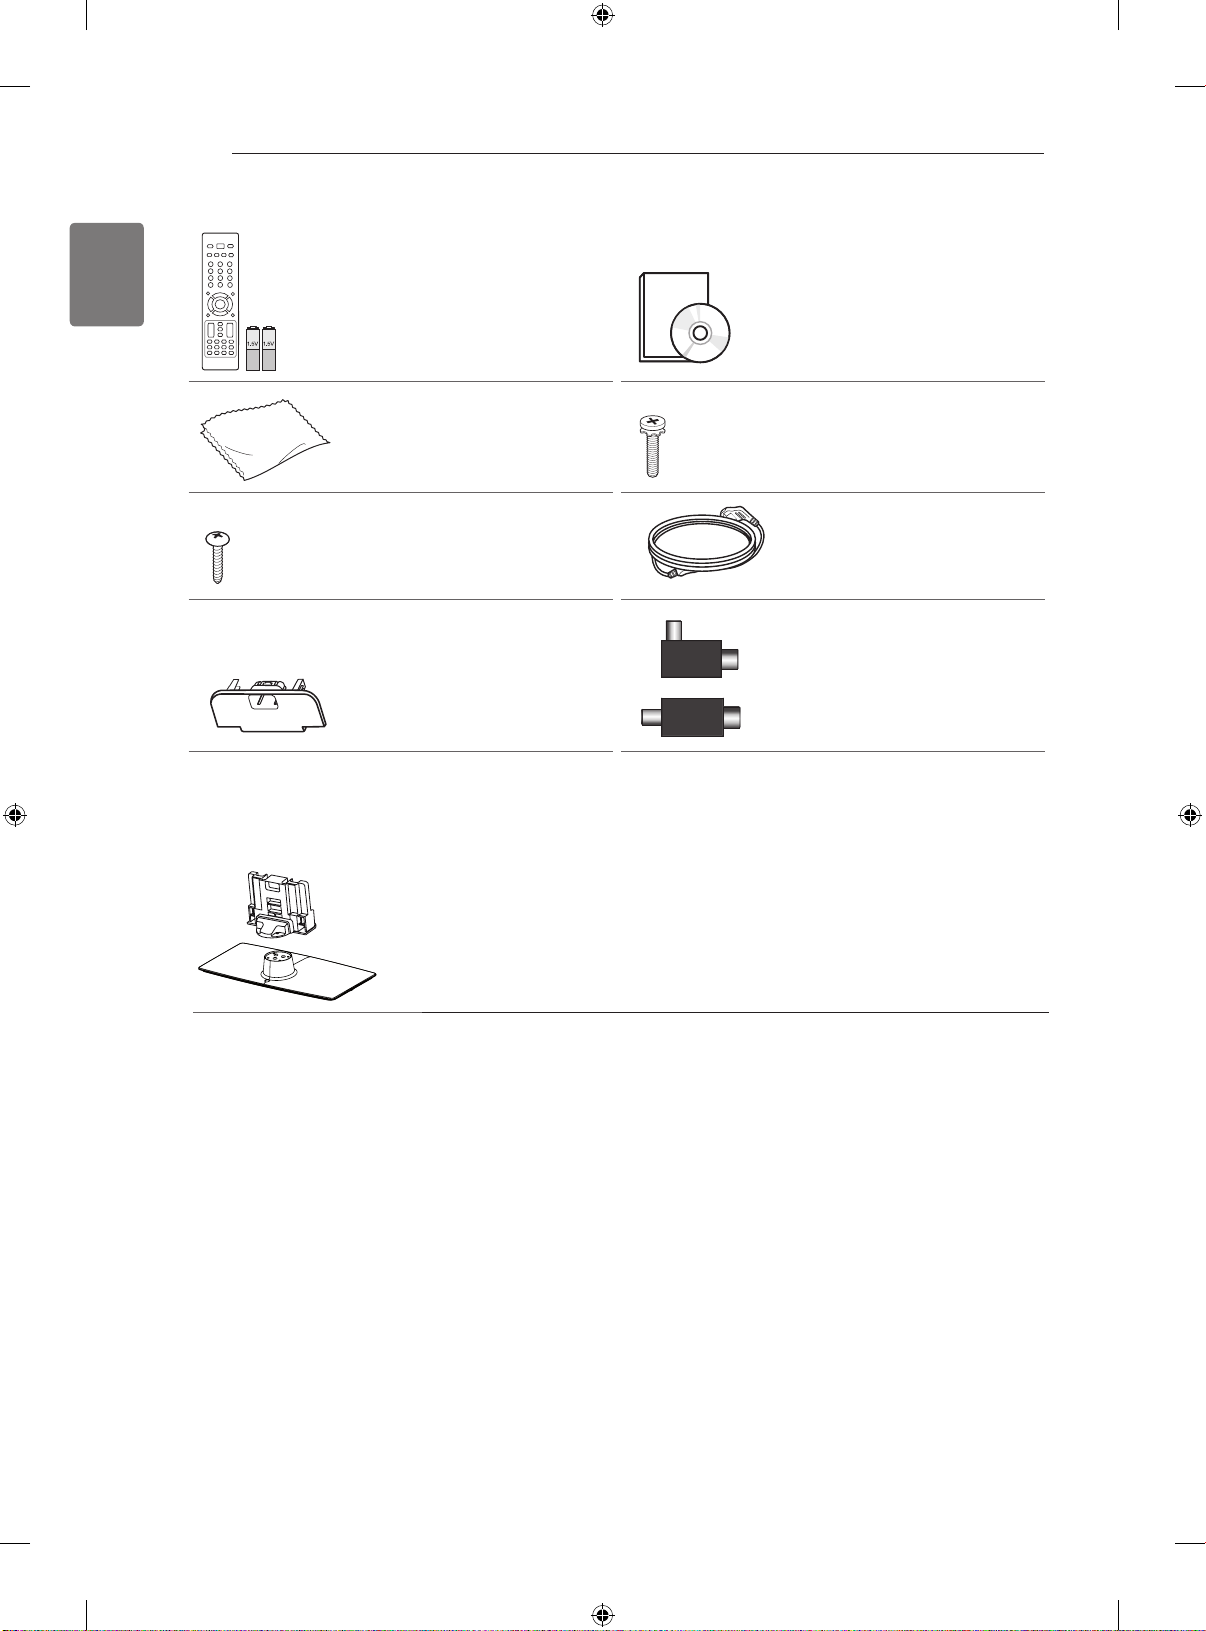
Unpacking
Check your product box for the following items. If there are any missing accessories, contact the local
dealer where you purchased your product. The illustrations in this manual may differ from the actual prod-
uct and item.
CAUTION
Do not use any unapproved items to ensure the safety and product life span.
Any damages or injuries by using unapproved items are not covered by the warranty.
NOTE
The items supplied with your product may vary depending on the model.
Product specifications or contents of this manual may be changed without prior notice due to
upgrade of product functions.
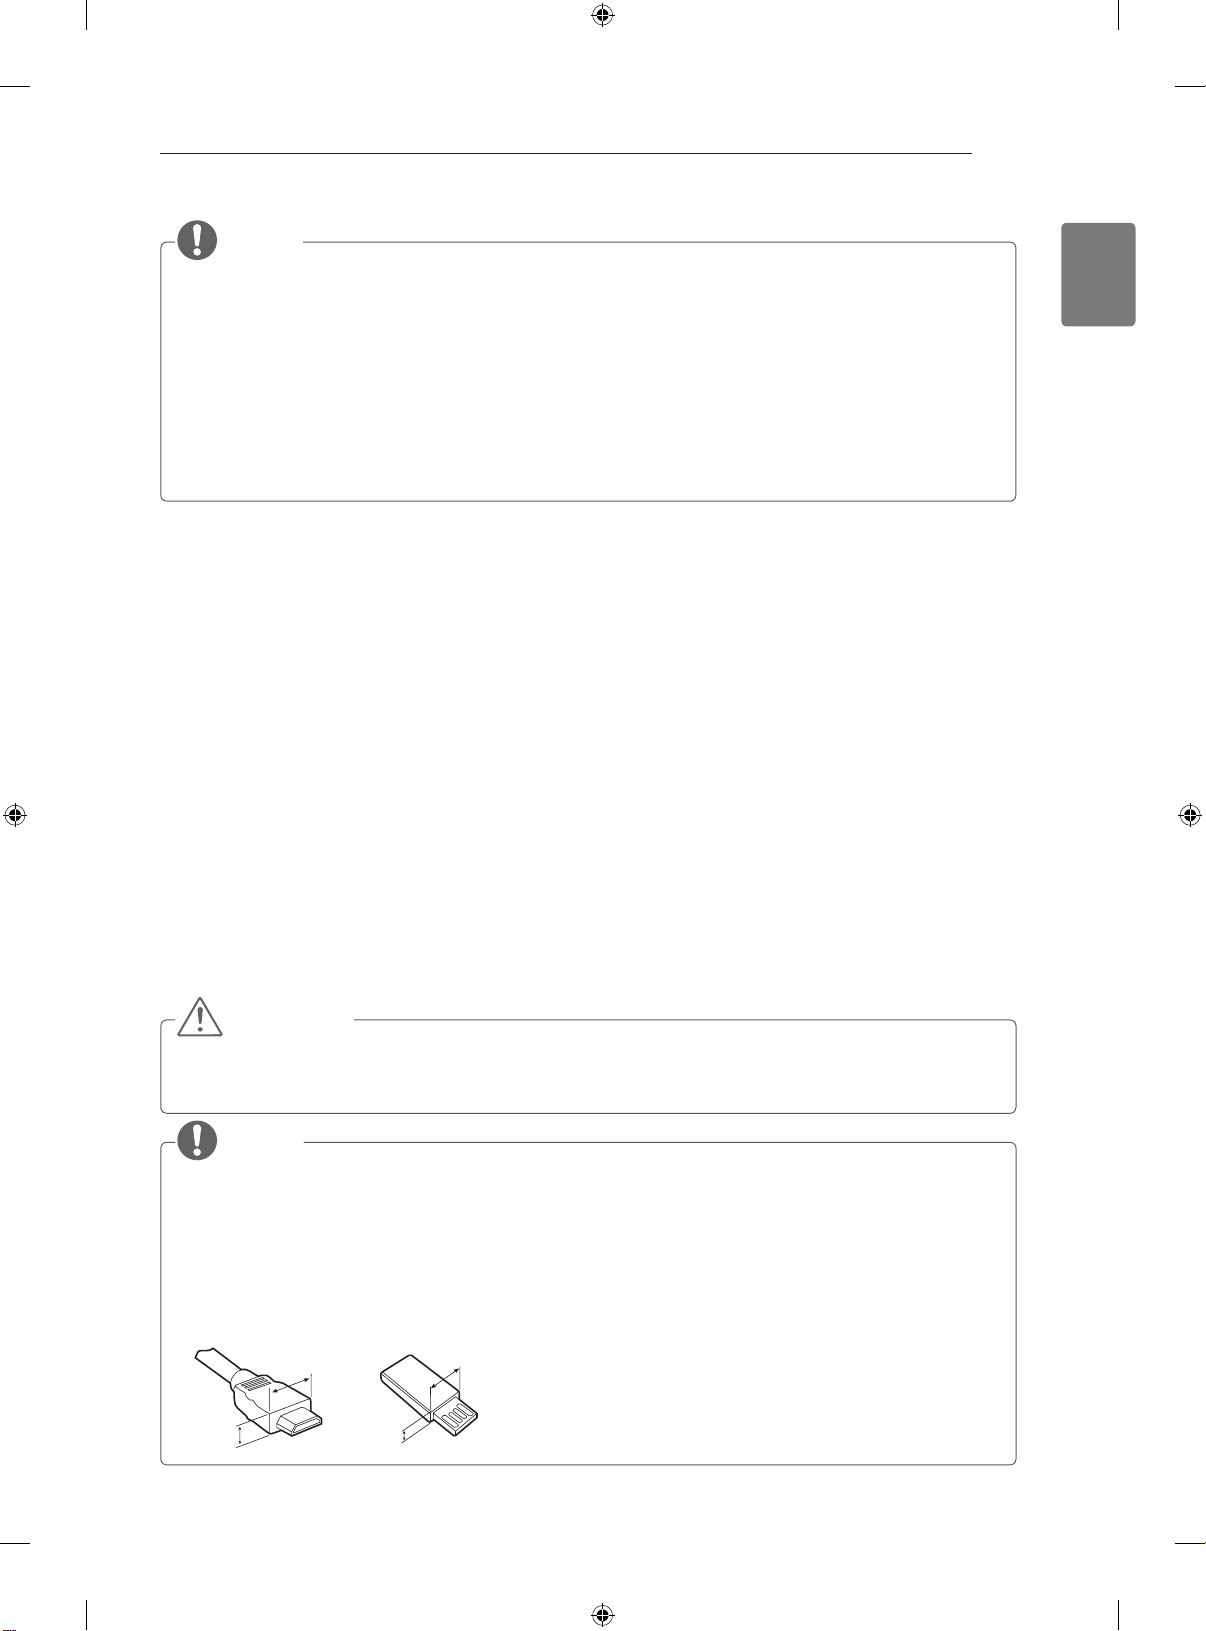
For an optimal connection, HDMI cables and USB devices should have bezels less than 10 mm thick
and 18 mm width. Use an extension cable that supports USB 2.0 if the USB cable or USB memory
stick does not fit into your TV’s USB port.
A
B
A
B
*A
<
=
10 mm
*B
<
=
18 mm
4
ASSEMBLING AND PREPARING
ENGLISH
Remote control and bat-
teries (AAA) Owner’s manual
Polishing cloth
(Depending on model)
Use this to remove dust
from the cabinet.
Screw for assembly
8EA, M4 x 20
Screw for xing
(Only 32/42CS56**) Power Cord
Protection cover
or
Isolator
1
(Depending on model)
Stand Body / Stand Base
5
ASSEMBLING AND PREPARING
ENGLISH
Parts and buttons
The TV can be placed in standby mode in order to reduce the power consumption. And the TV
should be turned off if it will not be watched for some time, as this will reduce energy consumption.
The energy consumed during use can be significantly reduced if the level of brightness of the
picture is reduced, and this will reduce the overall running cost.
NOTE
Do not step on the glass stand or subject it to any impact. It may break, causing possible injury
from fragments of glass, or the TV may fall.
Do not drag the TV. The floor or the product may be damaged.
Some models have a thin film attached on to the screen and this must not be removed.
CAUTION
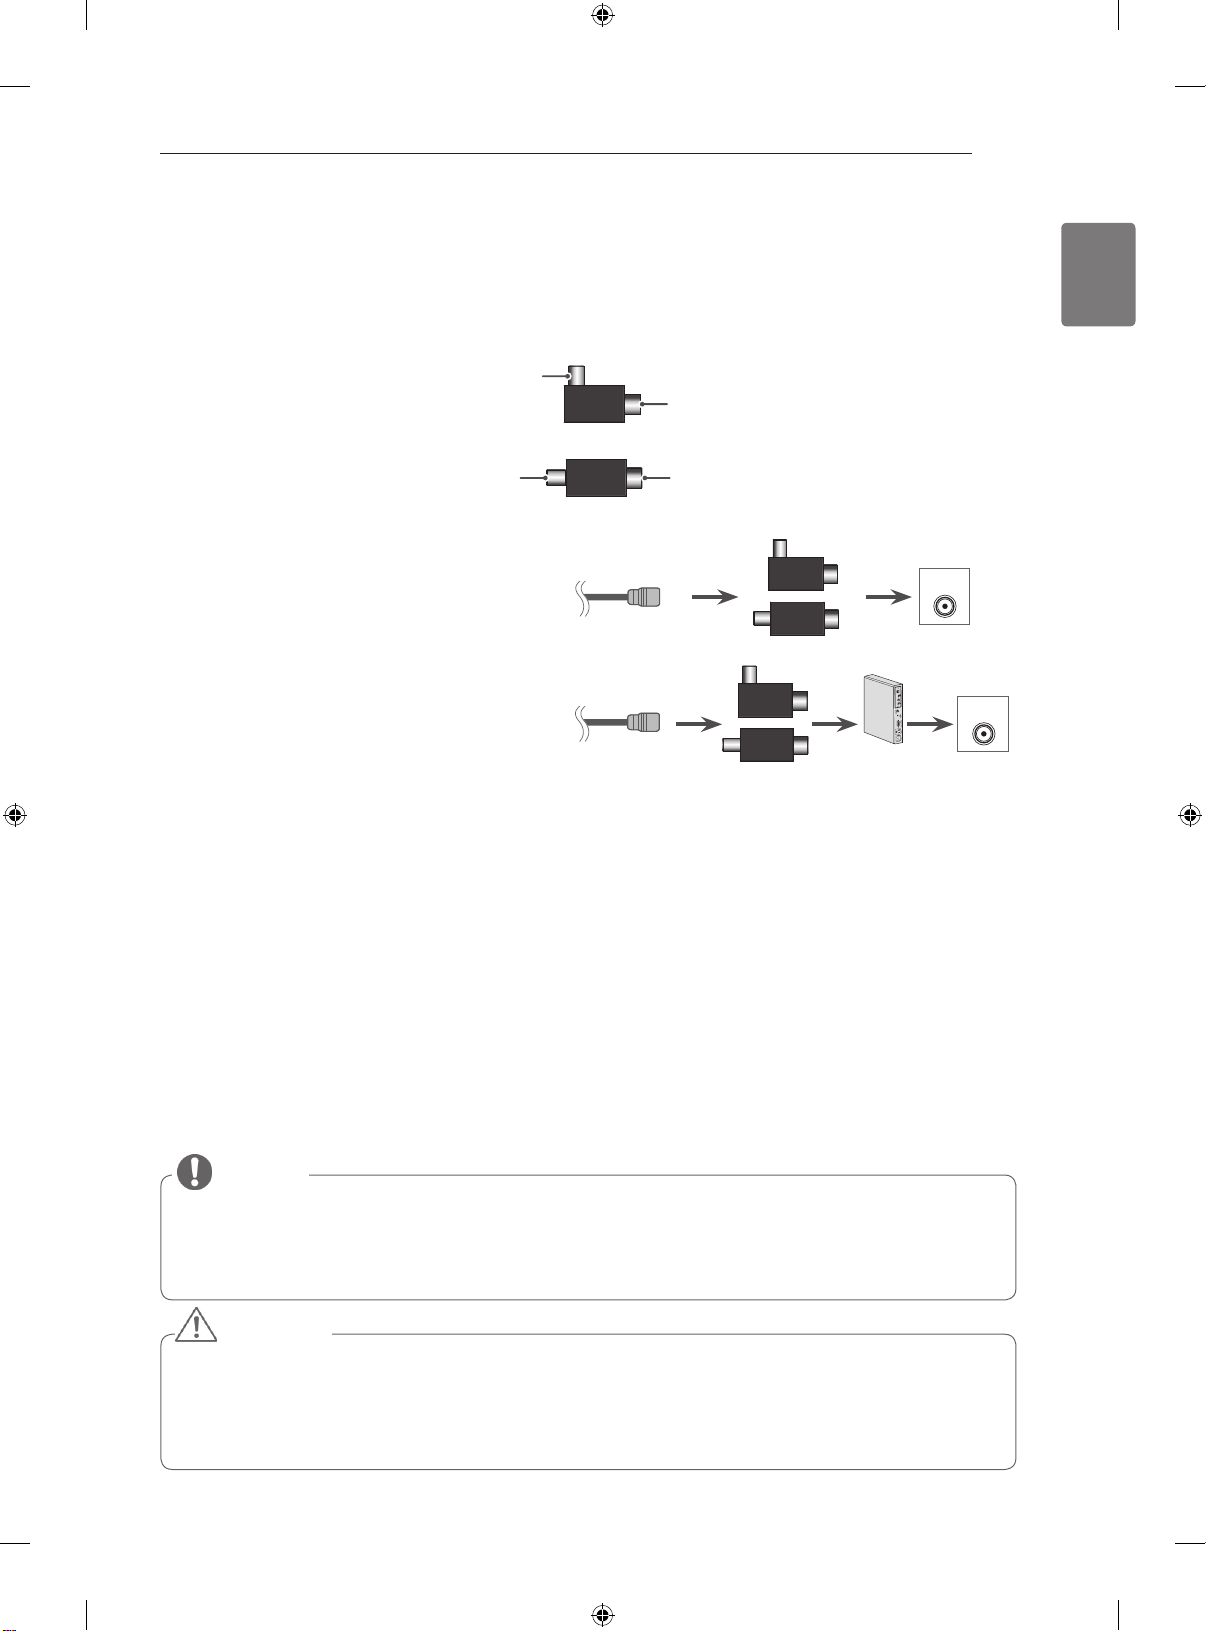
1 Antenna Isolator Installation Guide
Use this to install TV in a place where there is a voltage difference between GND of power and GND of antenna signal.
- If there is a voltage difference between GND of power and GND of antenna signal, the antenna contact might be
heated and excessive heat might cause an accident.
You can improve the safety when watching TV by efficiently removing power voltage from TV antenna. Avoid
disconnecting the antenna Isolator after installation.
Exterior of antenna isolator:
Connection method :
- Connect Plug 1 with a signal cable.
- Connect Plug 2 with ANT input end on the back of TV.
“Equipment connected to the protective earthing of the building installation through the mains connection or through other
equipment with a connection to protective earthing - and to a cable distribution system using coaxial cable, may in some
circumstances create a fire hazard.
Connection to a cable distribution system has therefore to be provided through a device providing electrical isolation below
a certain frequency range (galvanic isolator, see EN 60728-11)”
When applying the RF Isolator, a slight loss of signal sensitivity can occur.
ANTENNA
IN
RF Coaxial Wire
Isolator
or
ANTENNA
IN
ANTENNA
IN
RF Coaxial Wire
STB
Isolator
or
Isolator
or
Plug2
Plug1
Plug1Plug2

6
ASSEMBLING AND PREPARING
ENGLISH
OPTICAL DIGITAL
AUDIO OUT
AUDIO IN
(RGB/DVI)
RGB IN (PC)
RS-232C IN
(CONTROL & SERVICE)
L/MONO
R
AUDIO
VIDEO
2 1
ANTENNA
IN
USB IN
IN 3
H/P
Screen
Connection panel
Touch buttons
2
Speakers
No. Description
1
USB input
2
PCMCIA Card Slot
3
HDMI IN
4
Headphone
Socket
1
2
3
4
Remote control and intel-
ligent
1
sensors
Power Indicator
(Can be adjusted using
the Power Indicator in the
OPTION
menu.)
Touch Button Description
Scrolls through the saved programmes.
Adjusts the volume level.
OK ꔉ Selects the highlighted menu option or confirms an input.
SETTINGS Accesses the main menu, or saves your input and exits the menus.
INPUT Changes the input source.
/ I
Turns the power on or off.
1 Intelligent sensor - Adjusts the image quality and brightness based on the surrounding environment.
2 All of the buttons are touch sensitive and can be operated through simple touch with your finger.
7
ASSEMBLING AND PREPARING
ENGLISH
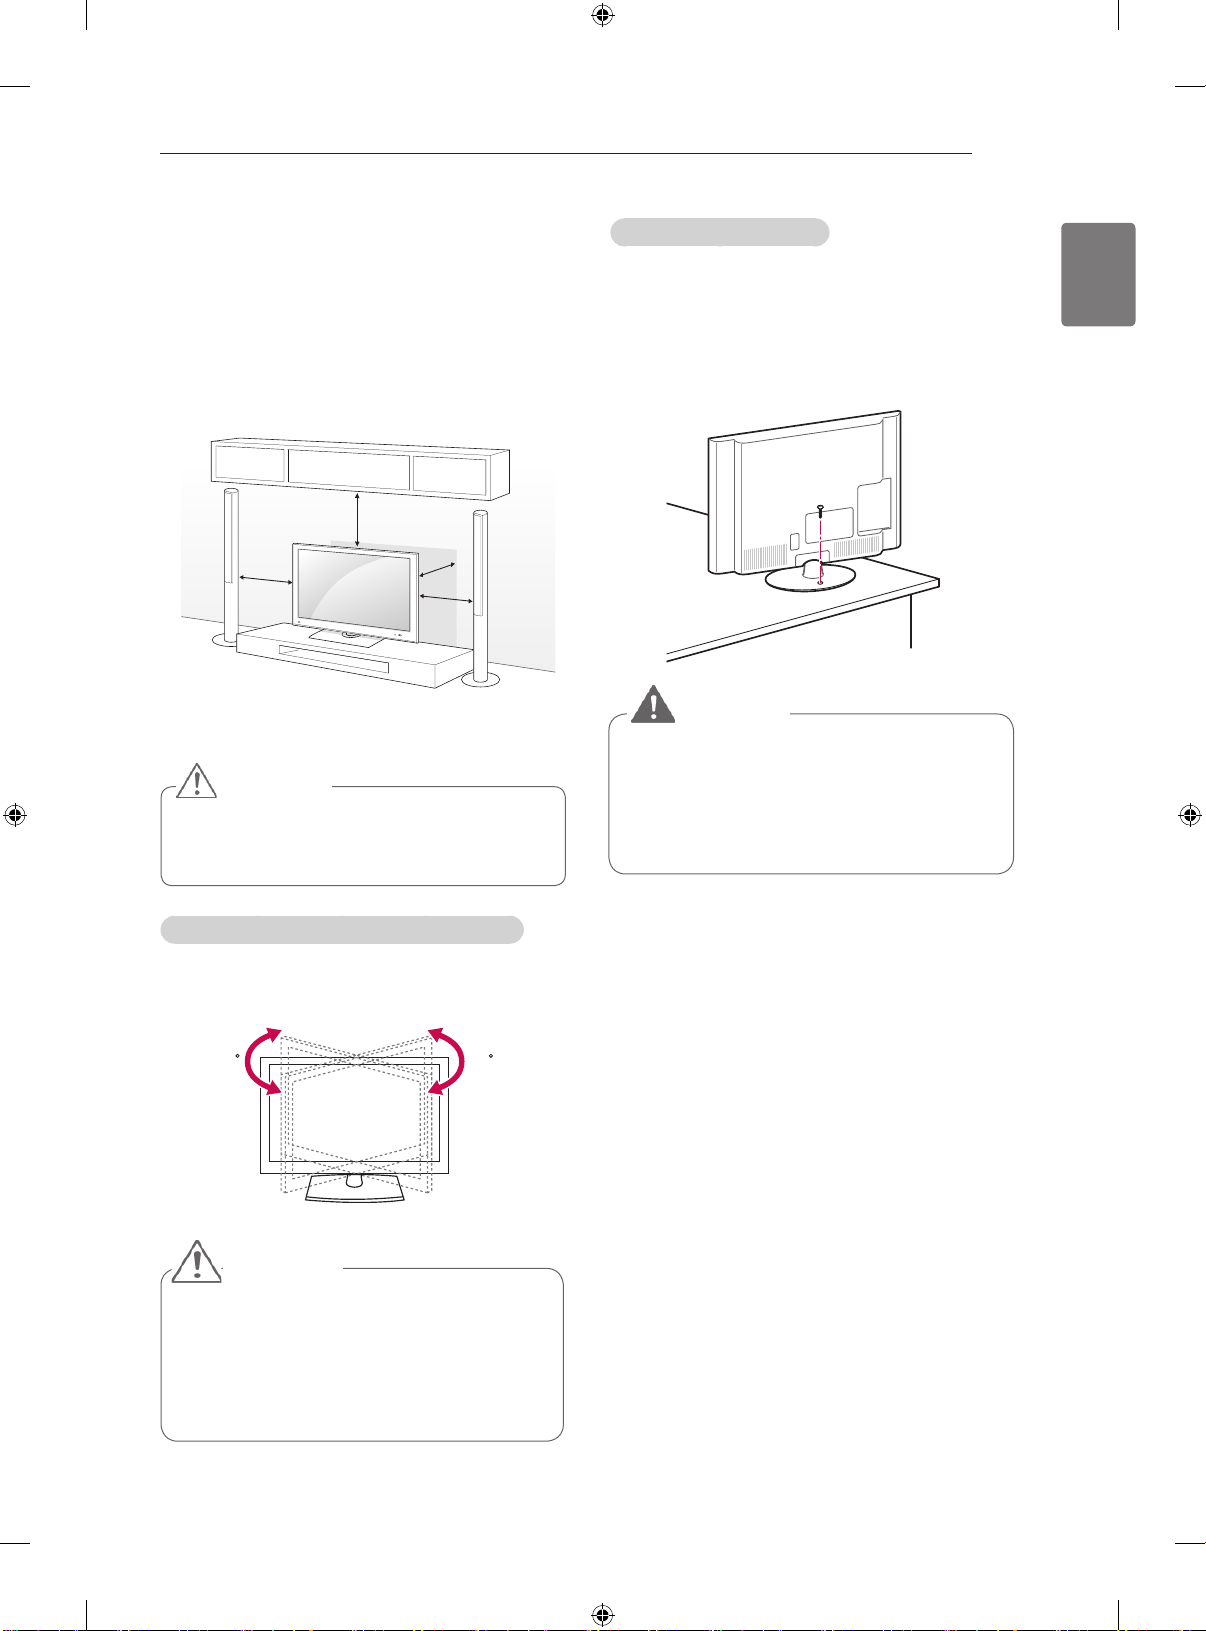
Mounting on a table
Image shown may differ from your TV.
1
Lift and tilt the TV into its upright position on a
table.
- Leave a 10 cm (minimum) space from the
wall for proper ventilation.
2
Connect the Power cord to a wall outlet.
Do not place the TV near or on sources
of heat, as this may result in fire or other
damage.
CAUTION
Securing the TV to a table
(Only 32/42CS56**)
Fix the TV to a table to prevent from tilting forward,
damage, and potential injury.
Mount the TV on a table, and then insert and
tighten the supplied screw on the rear of the stand.
To prevent the TV from falling over, the TV
should be securely attached to the floor/
wall per installation instructions. Tipping,
shaking, or rocking the TV may cause
injury.
WARNING
10 cm
10 cm
10 cm
10 cm
When adjusting the angle of the product,
watch out for your fingers.
»Personal injury may occur if hands or
fingers are pinched. If the product is tilted
too much, it may fall, causing damage or
injury.
CAUTION
Adjusting the angle of the TV to suit view
Swivel 20 degrees to the left or right and adjust
the angle of the TV to suit your view.
2020
8
ASSEMBLING AND PREPARING
ENGLISH
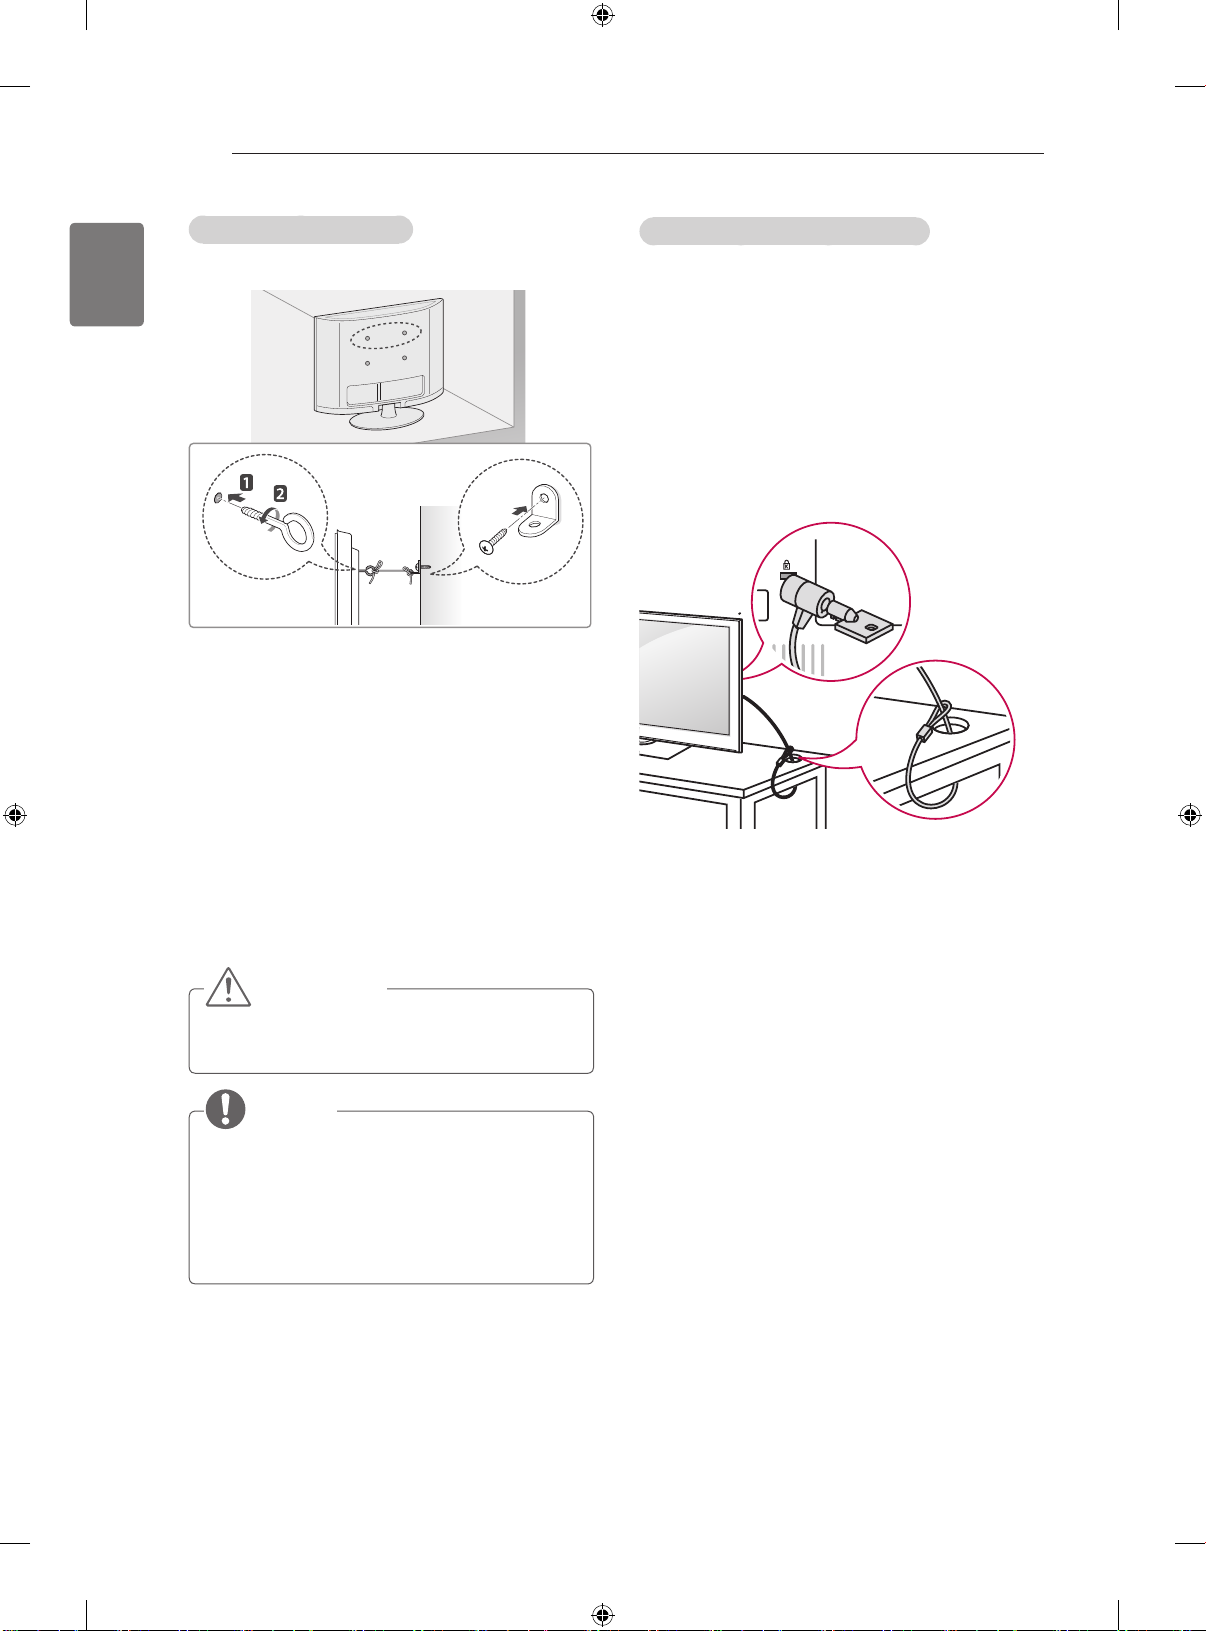
Securing the TV to a wall
(This feature is not available for all models.)
1 Insert and tighten the eye-bolts, or TV brackets
and bolts on the back of the TV.
- If there are bolts inserted at the eye-bolts
position, remove the bolts first.
2 Mount the wall brackets with the bolts to the
wall.
Match the location of the wall bracket and the
eye-bolts on the rear of the TV.
3 Connect the eye-bolts and wall brackets tightly
with a sturdy rope.
Make sure to keep the rope horizontal with the
at surface.
CAUTION
y Make sure that children do not climb on or
hang on the TV.
NOTE
y Use a platform or cabinet that is strong and
large enough to support the TV securely.
y Brackets, bolts and ropes are not provided.
You can obtain additional accessories from
your local dealer.
Using the Kensington security system
(Depending on model)
The Kensington security system connector is
located at the rear of the TV. For more information
of installation and using, refer to the manual
provided with the Kensington security system or
visit
http://www.kensington.com.
Connect the Kensington security system cable
between the TV and a table.
9
ASSEMBLING AND PREPARING
ENGLISH
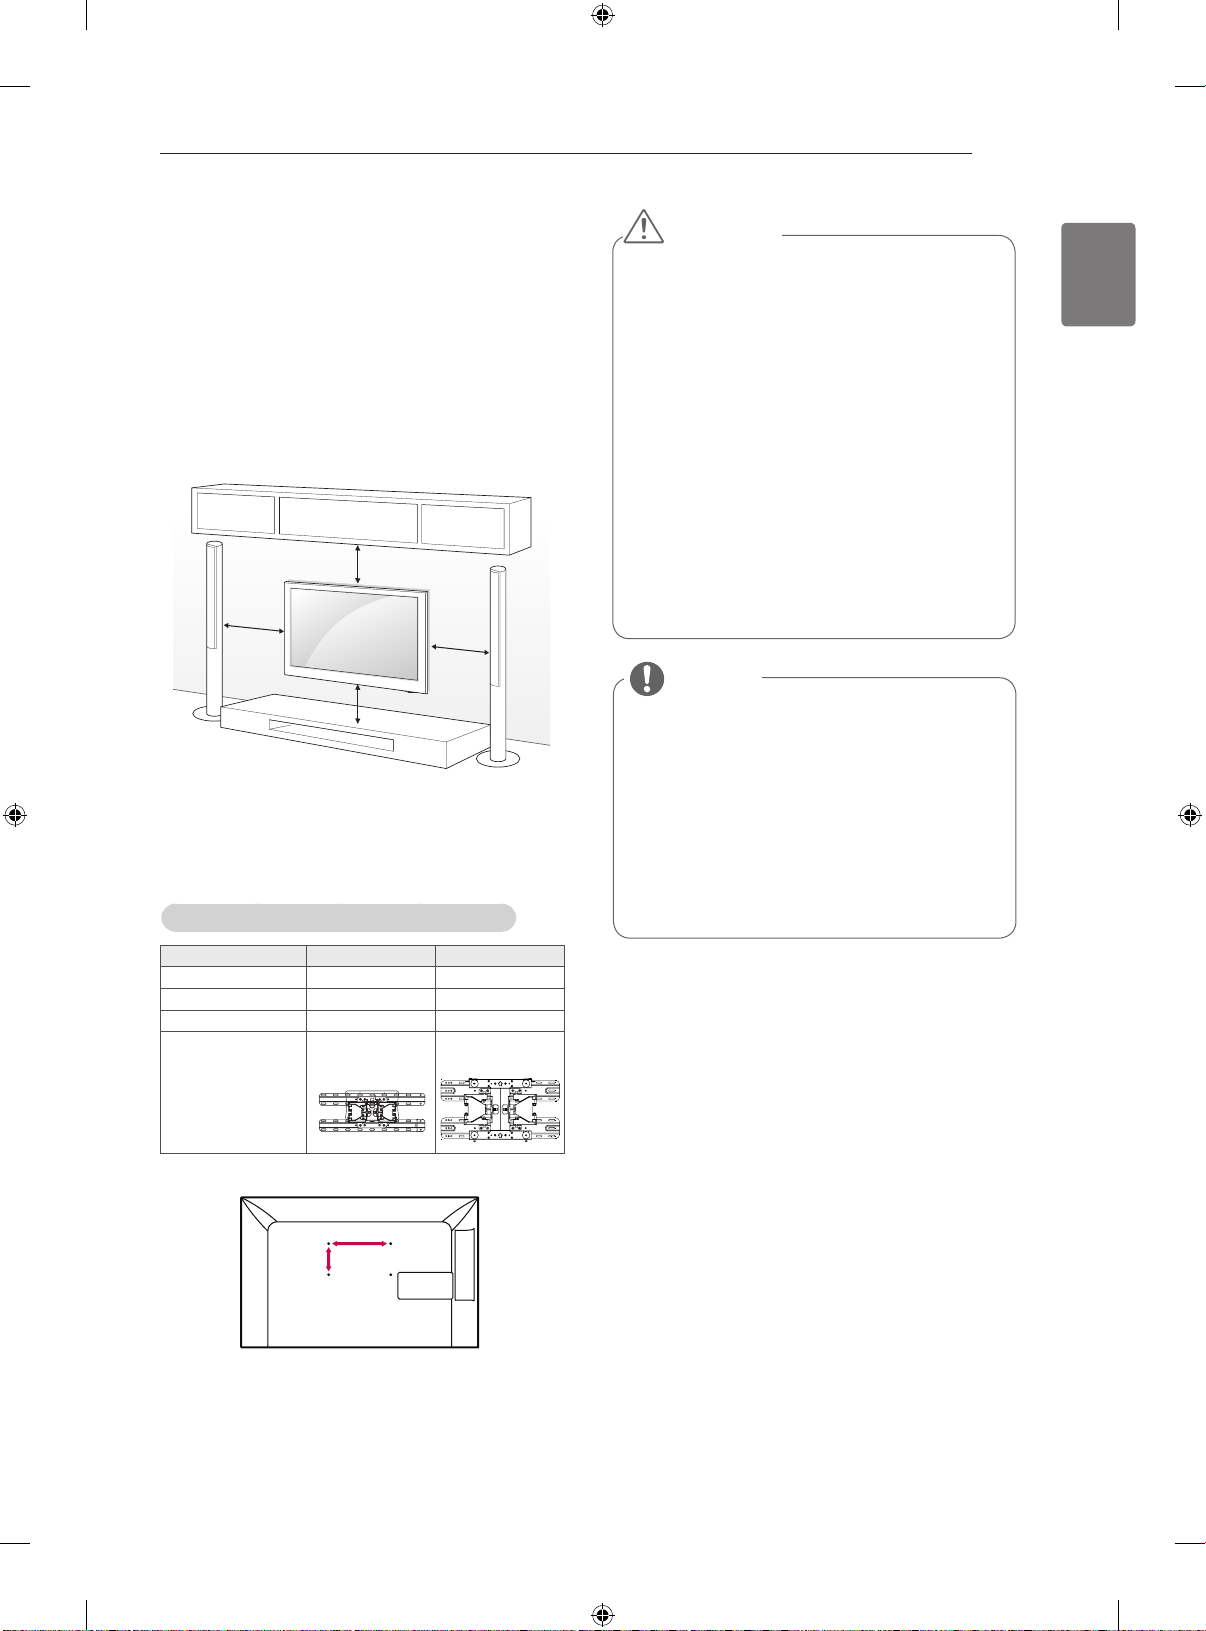
Mounting on a wall
Attach a wall mount bracket at the rear of the TV
carefully and install the wall mount bracket on a
solid wall perpendicular to the floor. When you
attach the TV to other building materials, please
contact qualified personnel.
LG recommends that wall mounting be performed
by a qualified professional installer.
10 cm
10 cm
10 cm
10 cm
Make sure to use screws and wall mount
bracket that meet the VESA standard. Standard
dimensions for the wall mount kits are described in
the following table.
Model
32CS56** 42/47CS56**
VESA (A x B)
200 x 100 200 x 200
Standard screw
M4 M6
Number of screws
4 4
Wall mount bracket
LSW100B
LSW200BX
Separate purchase(Wall Mounting Bracket)
Disconnect the power first, and then move
or install the TV. Otherwise electric shock
may occur.
If you install the TV on a ceiling or slanted
wall, it may fall and result in injury. Use
an authorized LG wall mount bracket
and contact the local dealer or qualified
personnel.
Do not over tighten the screws as this may
cause damage to the TV and void your
warranty.
Use the screws and wall mount bracket that
meet the VESA standard. Any damages
or injuries by misuse or using an improper
accessory are not covered by the warranty.
CAUTION
Use the screws that are listed on the
VESA standard screw specifications.
The wall mount kit includes an installation
manual and necessary parts.
The length of screws may differ
depending on the wall mount. Make sure
to use the proper length.
For more information, refer to the manual
supplied with the wall mount bracket.
NOTE
A
B
10
REMOTE CONTROL
ENGLISH
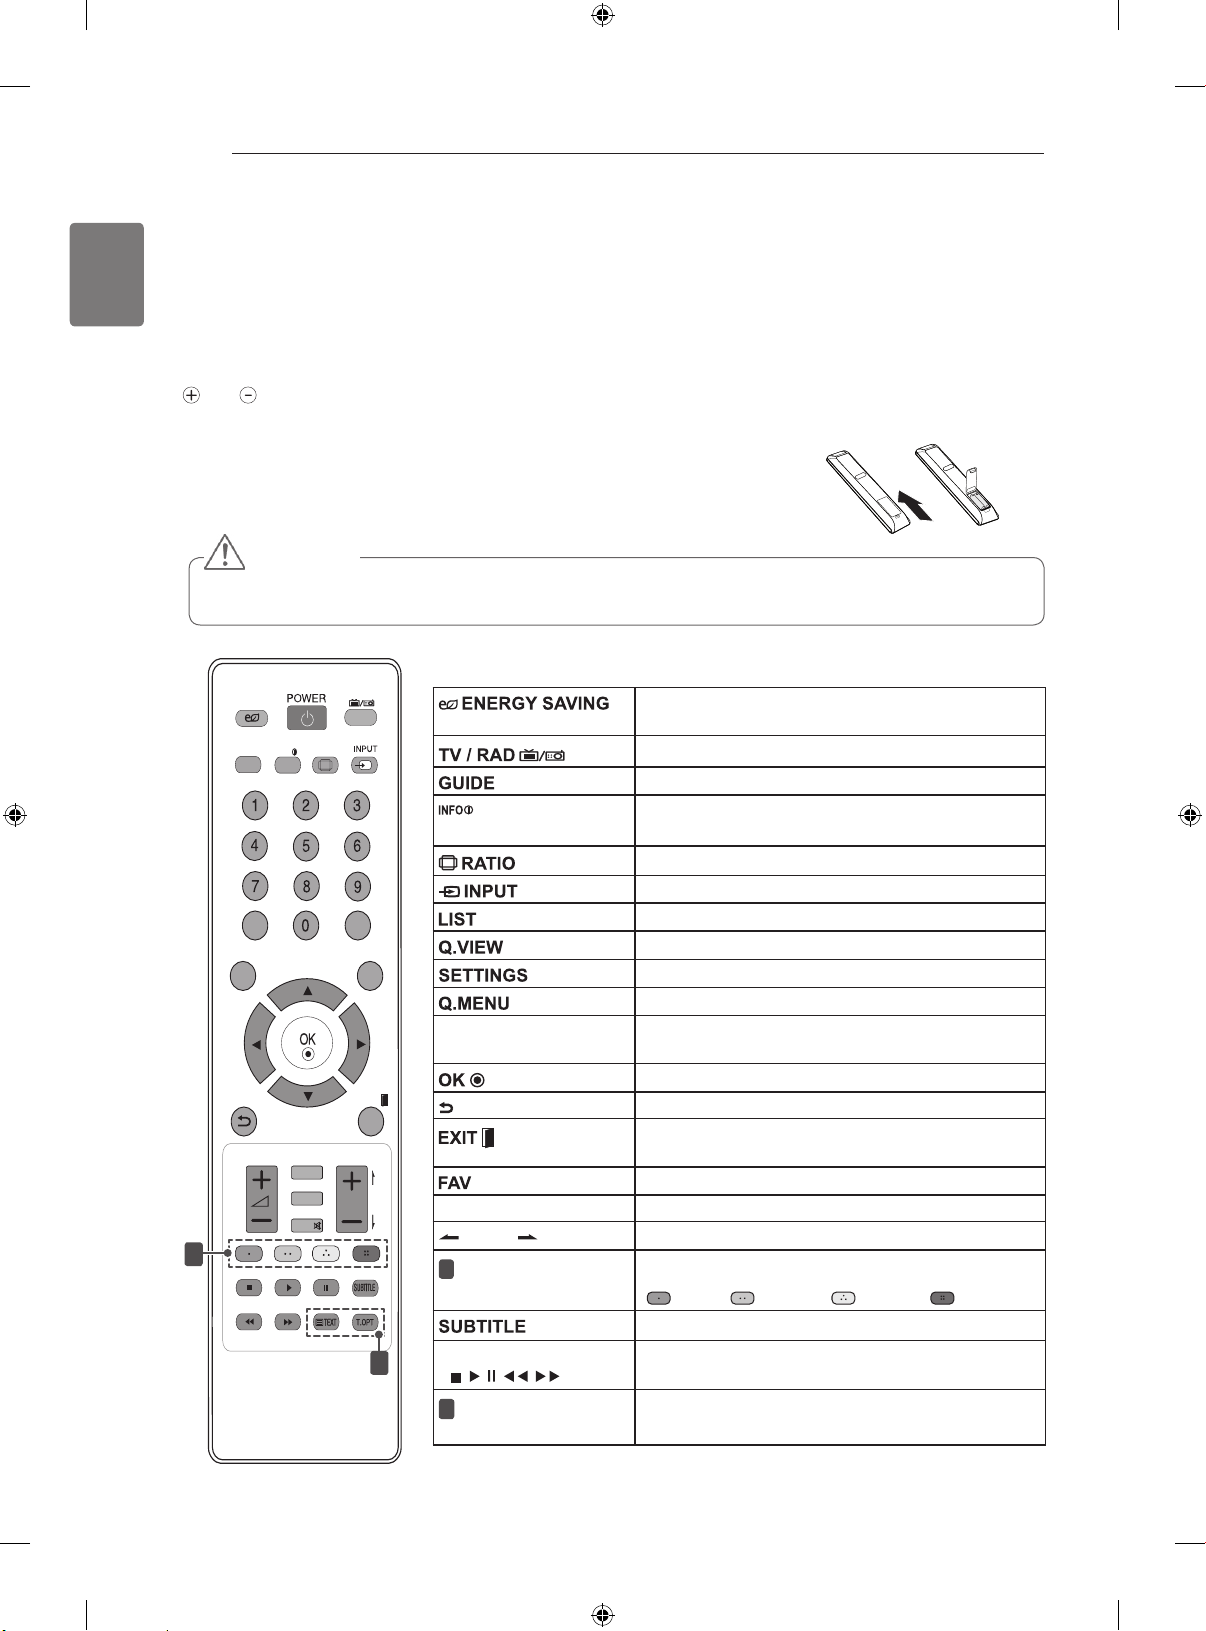
REMOTE CONTROL
The descriptions in this manual are based on the buttons on the remote control.
Please read this manual carefully and use the TV correctly.
To replace batteries, open the battery cover, replace batteries (1.5 V AAA) matching
and ends to the label inside the compartment, and close the battery cover. Be
sure to point the remote control to the remote control sensor on the TV.
To remove the batteries, perform the installation actions in reverse.
Do not mix old and new batteries, as this may damage the remote control.
CAUTION
Adjusts the brightness of the screen to reduce
energy consumption.
Selects Radio, TV and DTV programme.
Shows programme guide.
INFO
Views the information of the current programme
and screen.
Resizes an image.
Changes the input source; Turns the TV on.
Accesses the saved programme list.
Returns to the previously viewed programme.
Accesses the main menus.
Accesses the Quick menus.
Navigation buttons
(up/down/left/right)
Scrolls through menus or options.
Moves to the previous or next screen.
Returns to the previous level.
Clears all on-screen displays and return to TV
viewing.
Accesses your favourite programme list.
AD Switches the Audio Description on or off.
PAGE
Moves to the previous or next screen.
1
Coloured buttons
These access special functions in some menus.
( : Red, : Green, : Yellow, : Blue)
Recalls your preferred subtitle in digital mode.
Control buttons
(
, , , , )
Controls the MY MEDIA menus, or the SIMPLINK
compatible devices (USB,SIMPLINK).
2
TELETEXT BUT-
TONS
These buttons are used for teletext.
LIST
Q.VIEW
TV/RAD
ENERGY
SAVING
RATIO
SETTINGS
GUIDE
Q.MENU
INFO
FAV
MUTE
P
A
G
E
LIST
Q.VIEW
TV/RAD
ENERGY
SAVING
RATIO
SETTINGS
GUIDE
Q.MENU
INFO
FAV
MUTE
P
A
G
E
P
AD
P
EXIT
EXIT
2
1

11
WATCHING TV
ENGLISH
WATCHING TV
Connecting an antenna
Connect an antenna to watch TV while referring to
the following.
To prevent damage do not connect to the mains
outlet until all connections are made between the
devices.
Connect the TV to a wall antenna socket with an
RF cable (75 Ω).
For optimum picture quality, adjust
antenna direction.
In poor signal areas, to achieve better
picture quality it may be necessary to
install a signal amplifier to the antenna.
If the image quality is poor with an
antenna connected, aim the antenna to
the correct direction.
An antenna cable and converter are not
supplied.
NOTE
Turning the TV on for the first
time
When you turn the TV on for the first time, the
Initial setting screen appears. Select a language
and customize the basic settings.
1
Connect the Power cord to a power outlet.
2
In Standby mode, press (POWER) to turn the TV
on.
The Initial setting screen appears if you turn
the TV on for the first time.
You can also access Factory Reset by
accessing OPTION in the main menus.
NOTE
3
Follow the on-screen instructions to customize
your TV settings according to your preferences.
For those countries without confirmed
DTV broadcasting standards, some DTV
features might not work, depending on
the DTV broadcasting environment.
When France is selected for Country,
password is not ‘0’, ‘0’, ‘0’, ‘0’ but ‘1’, ‘2’,
‘3’, ‘4’.
NOTE
4 When the basic settings are complete,
press OK.
If you do not complete the Initial setting, it
will appear whenever the TV turns on.
Disconnect the Power cord from the
power outlet when you do not use the TV
for a long period of time.
NOTE
5 To turn the TV off, press
(POWER)
.
Selects a language to display.
Selects Home Use for the
home environment.
Selects a country to display.
Language
Mode Setting
Country
Time Zone
Set Password
Auto Tuning
Selects the time zone and
daylight saving.
(When Russia is selected for
Country)
Scans and saves available
programmes automatically.
Set the password.
(When France is selected for
Country)
12
TROUBLESHOOTING
ENGLISH
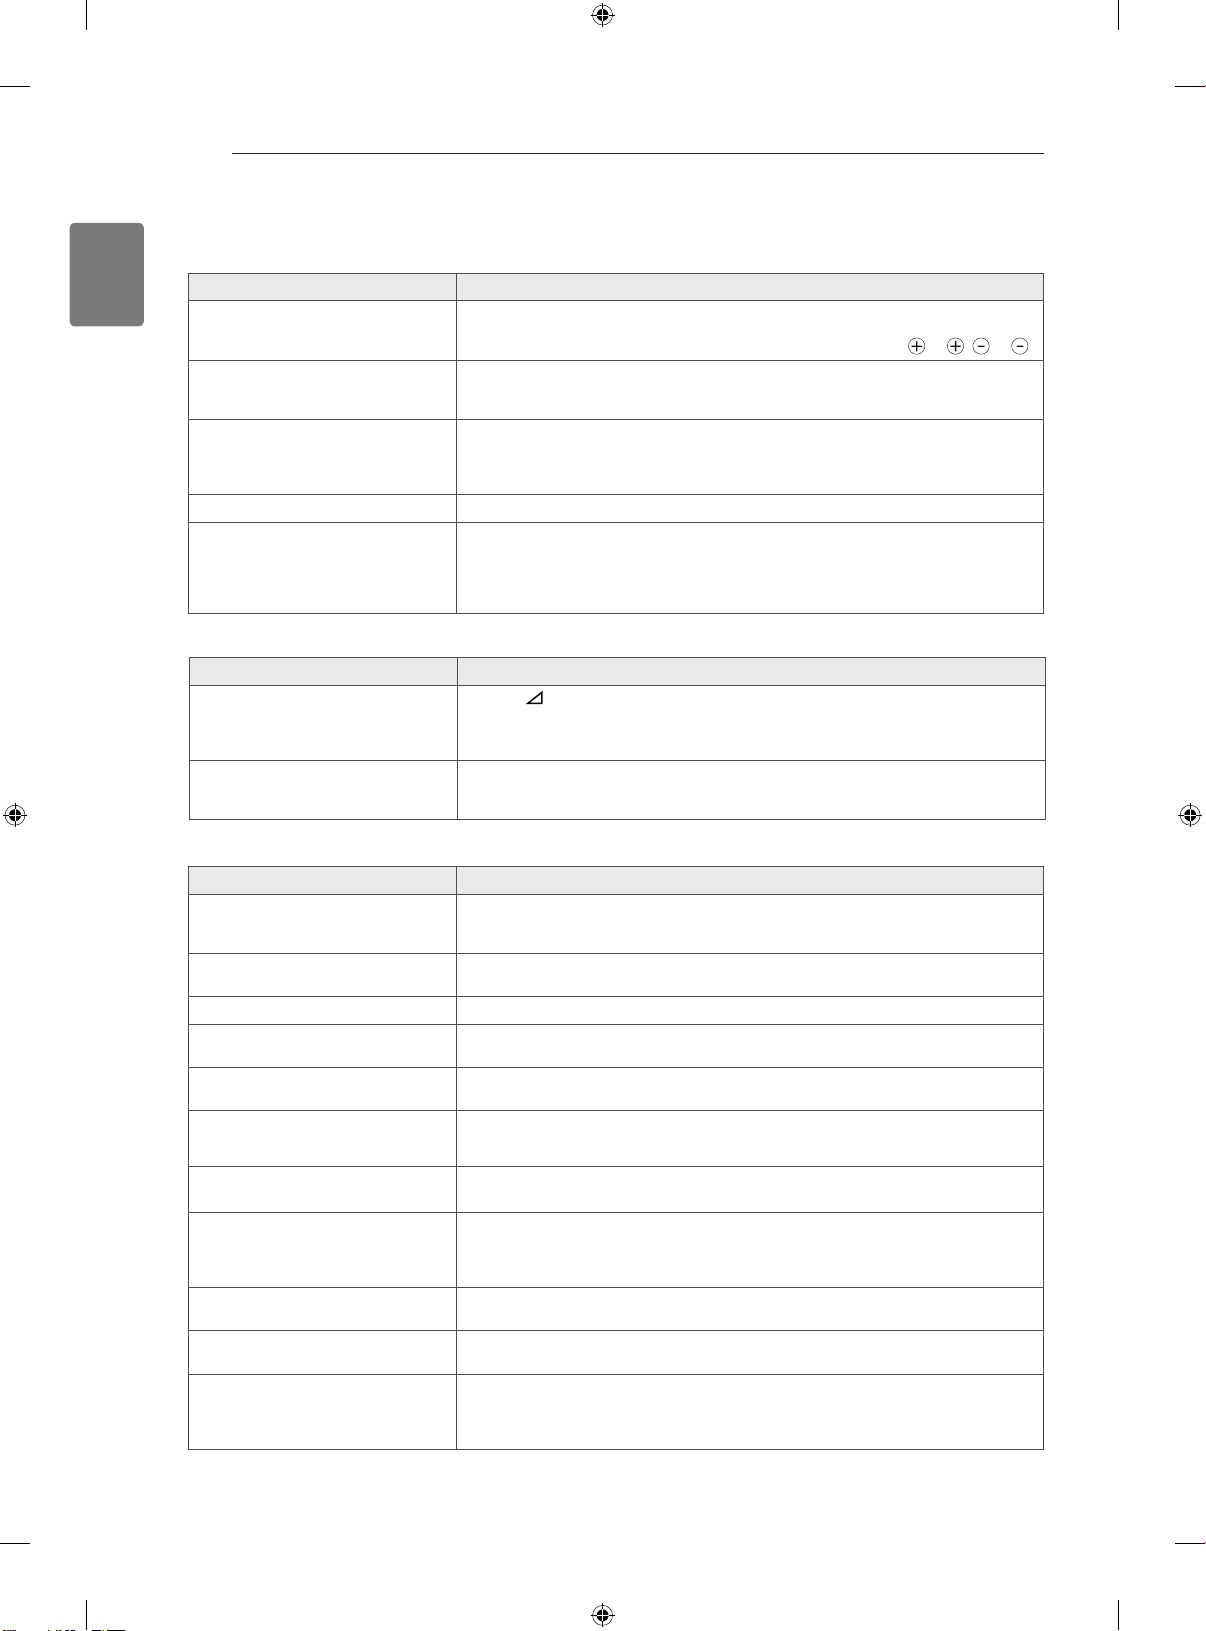
TROUBLESHOOTING
Problem Resolution
Cannot control the TV with the
remote control.
Check the remote control sensor on the product and try again.
Check if there is any obstacle between the product and the remote control.
Check if the batteries are still working and properly installed ( to , to ).
No image display and no sound is
produced.
Check if the product is turned on.
Check if the Power cord is connected to a wall outlet.
Check if there is a problem in the wall outlet by connecting other products.
Image appears slowly when the TV
turns on.
The image is muted during the product startup process. This is normal. If the
image does not appear in a few minutes, unplug the TV for 30 seconds and try
again. If the image still does not appear, contact the authorized service center
in your local area.
Cannot connect external devices.
Refer to the “Connection overview” and connect an external device.
The TV turns off suddenly.
Check the power control settings. The power supply may be interrupted.
Check if the Auto sleep feature is activated in the Time settings.
Refer to the “Sleep Timer”.
If there is no signal while the TV is on, the TV will turn off automatically after 15
minutes of inactivity.
Problem Resolution
No sound is produced while images
are displaying.
Press + or - button.
Check if the sound is muted by pressing MUTE.
Scroll to other channels. There may a problem with the broadcast.
Check if the audio cables are connected properly.
One of the speakers produce noises
or does not produce sound.
A change in ambient humidity or temperature may result in an unusual noise
when the product turns on or off.
There is no problem with your product.
Problem Resolution
An image displays in black and
white or the colour quality is poor.
Adjust the colour setting in the PICTURE menu.
Keep a sufficient distance between this product and other electronic products.
Scroll to other channels. There may a problem with the broadcast.
Horizontal or vertical bars appears
or images blur
Check if there are local interferences such as an electrical appliance or power
tool.
Lines or streaks appear on images
Check the antenna or aim the antenna to the proper direction.
Afterimages (ghosts) appear when
the product turns off
Pixels may have been damaged from a fixed image displayed for a long time
(image burn). Use a screen saver to prevent the pixel damage on the screen.
The power is on but the screen
appears extremely dark.
Adjust the brightness and contrast in the PICTURE menu.
“No Signal” appears on the screen.
Check if the signal cable is connected between the TV and products properly.
Check the selected input source by pressing INPUT.
Black spots appear on the screen.
Several pixels in red, green, white, or black may appear on the screen that can
attribute to the characteristics of the panel. This is normal.
The display offset is wrong.
Adjust the position setting in the PICTURE menu.
Check if the video card resolution and frequency are supported by the product.
If the frequency is out of range, set to the recommended resolution using the
display settings on the external device.
Thin lines appear in the background
of the screen.
Check the video cable connections.
Horizontal noises appear or
characters blur.
Adjust the Phase setting in the PICTURE menu. Refer to the “SCREEN”.
The reception on some channels is
poor
Scroll to other channels. There may a problem with the broadcast.
The station signal may be weak. Aim the antenna to the proper direction.
Check if there is local interference such as an electrical appliance or power
tool.
 Loading...