


BARBIE SEWING MACHINE
SW100BB
INSTRUCTION MANUAL
Français
English
Português
Español
Italiano
Deutsch
Nederlands
Ελληνικά
150mm(W)x210mm(H)
Français
INTRODUCTION
Des heures de plaisir t’attendent arbievec cette!Confectionnemachine àdescoudretenuesB
pour ta poupée Barbie et ses amis ou tes propres vêtements et accessoires ! Ta machine à coudre fonctionne à l’aide d’une pédale est équipée d’un tiroir de rangement et d’un mètre pour bien vérifier les dimensions avant la couture. De plus, tu peux immédiatement lancer une nouvelle collection avec la mallette de couture Barbie incluant une paire de ciseaux, 3 bobines de fil, un morceau de tissu et un coussin. Lis bien les instructions ci-dessous avant d’utiliser la machine à coudre pour la première fois.
ATTENTION : NE PAS LAISSER À LA PORTÉE DES JEUNES ENFANTS.
INSTALLATION DES PILES
La machine à coudre Barbie fonctionne20de1avec.5volts2 piles(nonalcainclinesuses)LR.
Ce jeu doit être alimenté par l’intermédiaireéesuniquementdes. piles spécifi
1.Ouvrir la porte du compartimentl’aideà pilesd’un tournevissitésous. le jeu à
2.Installer les 2 piles alcaliness(LR20)des polaritéen respectantindiquéleausenfond du compartiment à piles.
3.Refermer le compartiment à piles à l’aide du tournevis.
4.Mettre le jeu en marche.
Ne pas utiliser de piles rechargeables. Ne pas recharger les piles. Retirer les accumulateurs du jeu avant de les recharger. Ne charger les accumulateurs que sous la surveillance d'un adulte. Ne pasepilesmélangerou accumulateurs,différents types d
ou des piles et accumulateurs neufs et usagés. Les piles et accumulateurs doivent être mises en place en respectant la polarité. Les piles
et accumulateurs usagés doivent être enlevés du jouet. Les bornes d'une pile ou d'un accumulateur ne doivent pas être mis en court-circuit. Ne pas jeter les piles au feu. Retirer les piles en cas de non utilisation prolongée. Quand le jeu ne réagit plus, penser à changer les piles.
Si votre appareil présente un dysfonctionnement, ôtez les piles du compartiment et remettez les directement,
cette opération vous permet d’effectuerproduitle mode RESET sur votre |
. |
DÉCOUVERTE DE MA MACHINE À COUDRE BARBIE
La machine à coudre Barbie est composée de:
1- Une pédale de pied |
10Tiroir de stockage |
2- Un commutateur Marche/Arrêt |
11Pied de biche |
|
|
3- Un volant |
12Plat d’aiguille |
|
|
4- Un compartiment de bobine |
13Mollette de réglage |
5- Une poignée de transport |
de tension du fil |
|
|
6- Un guide-fil |
|
7- Un levier releveur de fil |
|
8- Levier du pied de biche |
|
9- Lumière |
|
1 |
|
UTILISATION DE LA MACHINE À COUDRE
COMMENT COUDRE :
•Poussez le commutateur « Marche/Arrêtineen route»(2).pour mettre la mach
•Poussez le volant (3) vers le hautne pourdroite,fairev rsdesle baspointspourendeslig points en zigzag.
•Soulevez le pied de biche (11) en employantbiche(8). le levier du pied d
•Placez le tissu sous le pied de bicher(8) à(11)l’arrièreet abaissezde la machinele levie.
•Appuyez sur la pédale de pied (1) pour commencer à coudre.
•Cousez quelques points en tournantelaleflèchevolant. (3) dans le sens d
•Appuyez sur la pédale de pied (1) etmentcommencez. à coudre normale
•Faites glisser le tissu sur l’aireendroitde coutureoù vousen fonctionvoulezfairede l’une ligne de points.
•Quand la ligne de points est effectuéd.Ce,ssezlâchezde lacoudrepédaleavantde pied’atteindre le bord du tissu.
FERMETURE DU POINT :
Pour empêcher le point de se défaire,suivantvous pouvez le fermer en les instructions suivantes :
•Tirez une longueur de fil de la mollette de réglage de tension (13) pour détendre l’aiguille (voir le schéma C).
•Relevez le pied de biche (11) et tournez le volant (3) dans le sens de la flèche, pour soulever l’aiguille hors du tissu.
•Coupez le fil (voir le schéma D).
•Retirez le tissu en le tirant vers vous et le point sera fermé automatiquement. (Si votre machine bloque, ou que le fil reste coincé dans la partie inférieure du mécanisme de couture, vous pouvez enlever le tissu en tournant doucement le volant jusqu’au tissu ou le fil pourra être retiré de la machine.)
FILETAGE DE VOTRE MACHINE A COUDRE :
• Utiliser du fil de coton ou de polyester lorsque le fil fourni est épuisé.
• Abaissez le pied de biche (11) en utilisant le levier (8).
2
CONTROLER LA SOLIDITE DES POINTS :
Comparez vos points avec l’illustration (schéma F) :
1)Regardez le point correct.
2)Les points sont trop serrés. Réduisdoucementz la tensionla mollenttetournant
de tension dans la direction indiquée (sens contraire des aiguilles d’une montre). 3) Les points sont trop lâches. Augmentezdoucementla tensionla en tournan
mollette de tension dans la direction indiquée (sens des aiguilles d’une montre).
Points manqués :
Ceux-ci peuvent être dus à une machineunefausseincorrectementaiguille filetée, adoptée, une aiguille émoussée oue.coudée, une tension incorrect
GARANTIE
NOTEVeuillez: garder ce mode d’emplormationsi,il c tient. d’importantes inf Ce produit est couvert par notre utegarantiemis deen deœuvrexansde. laPourgarantieto ou de service après vente, vous dvevezndeurvousmuniadrdesservotreà preuvevotrere d’achat. Notre garantie couvre lesagevicesimputablesde matérielau constructeuroude mont à l’exclusion de toute détériorationlaprovenantnotice d’utilisationdu non-respectou de toutede
intervention intempestive sur l’articlexposition(telleà quelachaleurdémontage,ou à l’humiditée …).
ENTRETIEN
1.Ne pas tenter de coudre des tissusant. épais ou de forcer le vol
2.Changer les piles lorsque vouseconstatezfonctionnequepasvotreaussimachinerapid ment que d’habitude.
3.Pour nettoyer le jeu, utiliser uniquementgèrementimbibéun chiffond’eau,douxà l’exclusionlé
de tout produit détergent.
4.Ne pas exposer le jeu à la lumièreuteautredirectesourcedu desoleilchaleurni à to.
5.Ne pas le mouiller.
6.Ne pas le démonter, ni le laisser tomber.
ATTENTION : Le produit contientitdesêtreaiguillesutilisé souspointuesla et devra surveillance d’un adulte.
Il est recommandé de conserver l’emballageultérieure. pourDanstouteun souciréférence constant d’amélioration, nous pouvonscouleursêtre ametlesnésdétailsà modifier le du produit présenté sur l’emballage.
ATTENTION : Ce produit contient des aiguilles et des ciseaux à pointes tranchantes et devrait être utilisé sous la surveillance d’un adulte.
3

English
INTRODUCTION
Hours of fun are guaranteed with this Barbie Sewing Machine! Design new outfits for your Barbie doll and her friends or even your own clothes and accessories! Your sewing machine works with a pedal and includes a storage drawer and a rule to check the dimensions before sewing.
You can also launch a new collection right away with the sewing kit including scissors, 3 spools, a piece of fabric and a cushion. Please read carefully the instructions below before using your sewing machine for the first time.
BEWARE: KEEP OUT OF REACH OF YOUNG CHILDREN.
BATTERY INSTALLATION
Your Barbie sewing machine worksed)with. 2 D batteries (not includ
This game must be powered using only the specified batteries.
1.Open the battery compartment machinecoverlocatedusingundera the sewing screwdriver.
2.Install the 2 D batteries observingndicatedcarefullyat the bottomthepolarityof i
the battery compartment, and as per the diagram shown opposite.
3.Close back the battery compartment and tighten the screw.
4.Turn the game on.
Do not use rechargeable batteries..RemDonovetrechargethe storagthe batterie
batteries beforeRechargerechargingstorage. batteries under adult supervision. Do not mix
different types of battery and storage battery, or new and old batteries or storage batteries. Insert batteries and storage batteries according to the polarity. Remove used storage batteries from game. Do not short-circuit the battery or storage battery terminals. Keep batteries away from fire. If game remains unused for an extended period, remove batteries. Only batteries of the same or equivalent type as recommended are to be used. When the sound becomes faint or the game does not respond, think about replacing the batteries.
WARNING: If the unit malfunctions or receives an electrostatic shock, switch the unit off and on again using the ON/OFF button. If this proves to be ineffective,and/orprerformmovettheResbattetriesprocedure.
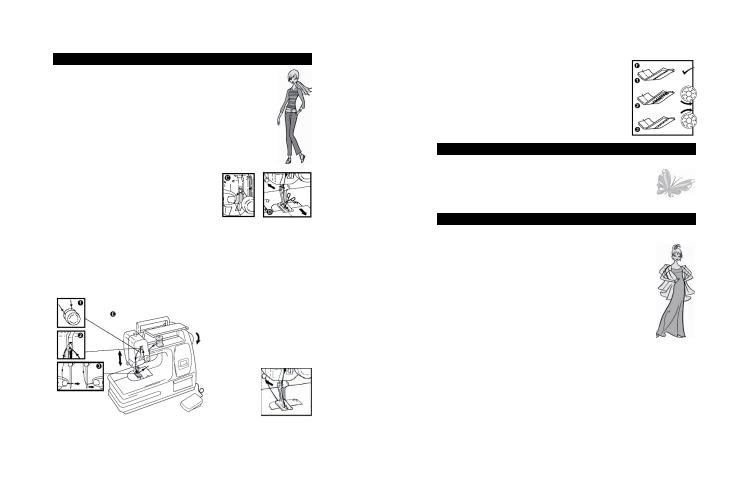
DISCOVER YOUR BARBIE SEWING MACHINE
The different parts on your Barbie sewing machine are:
1. |
Foot pedal |
10. |
Storage compartment |
2. |
On/off switch |
11. |
Presser foot |
3. |
Hand wheel |
12. |
Needle plate |
4. |
Bobbin case |
13. |
Tension dial |
5.Carrying handle
6.Thread guide
7.Take up lever
8.Presser foot lever
9.Bulb
4
USING YOUR SEWING MACHINE
HOW TO SEW:
•Push the On/Off switch (2) to turn the sewing machine on.
•Lift the presser foot (3) upwardsdownwardto make straightto makestitcheszigzagorstitches.
•Lift the presser foot (11) usingcatthedprbehindsserfootthesewinglver(8)machinelo .
•Place the piece of fabric underrthepresserfoot(8)leverand(8)lowe.
•Press the foot pedal to start sewing.
•Sew a few stitches by turning thethehanddirectionwheelof(3)arrowaccording. to
•Press the foot pedal (1) and start to sew normally.
•Move the piece of cloth on the sewingsiredlocationarea accordingof the stitchesto the.de
•When the line of stitching has beentpedalcompleted,.Stop sewingreleasebeforethe fooyu reach the edge of the fabric.
LOCKING THE STITCH:
To prevent the stitch from unraveling, you can lock the stitch by following these instructions:
•Pull a length of thread through the tension dial (13) to release the tension on the needle (see diagram C).
•Lift the presser foot (11) and turn the hand wheel (3) according to the direction of the arrow to lift the needle out of the fabric.
•Cut the thread (see diagram D).
•Remove the fabric by pulling it toward you; the stitch will be locked automatically. (If your machine jams or the thread is stuck in the lower part of the sewing mechanism, gently turn the hand wheel until the fabric or thread can be removed from the machine.)
THREADING YOUR SEWING MACHINE:
•When the thread supplied has run out, please replace it with cotton or polyester thread.
•Lower the presser foot (11) using the presser foot lever (8).
•After placing the spool of thread in the bobbin compartment, insert the thread through the thread guide (6) as shown on diagram E. (Make sure you insert the thread between the two discs of the tension dial).
•Raise the needle to its highest point by turning the hand wheel (3) according to the direction of the arrow, and thread the needle from left to right.
•Slide the thread under the presser foot (11), between the forks and to the rear of the machine.
5

CHECKING THE QUALITY OF THE STITCH:
Compare your stitches with the illustration (diagram F): 1. Observe the correct stitches.
2.These stitches are too tight. Reducerningthethetensiondialby gently tu (13) anticlockwise as shown.
3 The stitches are too loose. Increaserningthetensiondialby gently tu (13) clockwise as shown.
Missed stitches
These can occur if the machine isngincorrectlyneedle wasthreaded,fitted, the wro blunt or bent needle is used or the tension is incorrect.
WARRANTY
NOTEPlease: keep this instruction manual,ormationit contains. important inf This product is covered by our 2-year warranty.
For any claim under the warrantycontor actfteryoursaledistributorervice, pleaseand present a valid proof of purchase.facturingOur warrantymaterialcoversandany manu
workmanship defect, with the exception of any deterioration arising from the non-observance of the instruction manual or from any careless action implemented on this item (such as dismantling, exposition to heat and humidity, etc.). It is recommended to keep the packaging for any further reference.
CARE INSTRUCTIONS
Do not attempt to sew thick materials or force the hand wheel.
Change the batteries when you noticegat athatslowerthe speedmachinethanis workinusual.
To clean the machine, use only argentdry cloth;productdo.not use any dete
Do not expose the machine to direurcetsunlightofheat.or to any other so
Do not dismantle or drop.
WARNING: This product contains sharpunderneedlesthe directand should be used supervision of an adult.
It is recommended to keep the packagingce. for any further referen In a bid to keep improving our servificationes,weoncouldthe coloursimplement mod and the details of the product shown on the packaging.
WARNING:This product contains functionalnctionalsharpedgesharpon scissors and fu point on needle and should be usedof aunderadultthe. direct supervision
6
Português
INTRODUÇÃO
Estão garantidas horas de divertimentouradacomBarbie!estaCriaMáquinanovosde Cost
modelos para a tua boneca Barbie e para as suas amiguinhas ou até mesmo as tuas próprias roupas e acessórios! A tua máquina de costura funciona com um pedal e inclui um roupeiro onde podes guardar as roupas e uma régua para verificares as dimensões antes de costurar.
Também podes lançar imediatamente uma nova colecção com o kit de costura que inclui uma tesoura, 3 rolos, um pedaço de tecido e uma almofada. Por favor leia com atenção as instruções apresentadas abaixo antes de utilizar a sua máquina de costura pela primeira vez.
ATENÇÃO: MANTENHA FORA DO ALCANCE DAS CRIANÇAS MAIS NOVAS.
ENERGIA
Esta Máquina de Costura da Barbie)defunciona1,5V com 2(nãopilhasincluídas)D (LR20.
Neste jogo devem ser apenas utilizadas as pilhas mencionadas.
1.Abra a tampa do compartimentotraseiradas pilhasdo jogo,localizadautilizandoaparte uma chave de fendas.
2.Coloque as 2 pilhas alcalinas Dridade(LR20)indicadade acordono com a pola compartimento das pilhas, conforme a imagem apresentada ao lado.
3.Volte a fechar o compartimento das pilhas.
Não utilize pilhas recarregáveis.ireNãosreacarregueumuladoresas pilhasdo . Ret jogo antes de os recarregar. Não secarreguesobaosvigilânciaacumuladoresde sem adulto. As pilhas devem ser colocadas.Nãocommisturea polaridadeos difer ntescorrect tipos de pilhas ou acumuladores, nemvosepilhusadosou. Asacumuladorespilhas no
ou acumuladores gastos deverão ser retirados da unidade. Não coloque os terminais das pilhas em curto-circuito. Não atire as pilhas para o fogo. Retire as pilhas caso não utilize a unidade durante um longo período de tempo. Quando o som ficar fraco ou o jogo não responder, pense em substituir as pilhas. Se a sua unidade apanhar um choque eléctrico ou funcionar mal, retire imediatamentevolteas pilhascolocádo compar-las. Estimentoprocesso reinicia o seu produto.
DESCUBRA A SUA MÁQUINA DE COSTURA DA BARBIE
As diferentes peças da máquina de costura
da Barbie são: |
|
|
|
1. |
Pedal para o pé |
10. |
Compartimento de |
2. |
Interruptor de ligar/desligar |
|
armazenamento |
3. |
Roda manual |
11. |
Pé de pressão |
4. |
Caixa das bobinas |
12. |
Prato da agulha |
5. |
Pega de transporte |
13. |
Marcador da tensão |
6.Guia do fio
7.Alavanca do ponto
8.Alavanca inferior do ponto
9.Lâmpada
7
 Loading...