


Lenovo ThinkStation P500, ThinkStation P510, ThinkStation P700, ThinkStation P710, ThinkStation P900 How to Create and Configure RAID Arrays [en, ar, bg, cs, da, de, el, es, fi, fr, he, hr, hu, it, ja, ko, nb, nl, pl, pt, pt, ro, ru, sh, sk, sl, sr, sv, th, tr, uk, zc, zh]
...ThinkStation P500/P510, P700/P710, and P900/P910 How to Create and Configure RAID Arrays
Version 1.1
1. Introduction
The introduction of the new ThinkStation P500, P700, and P900 platforms brings with it several new storage options that are designed to increase the storage capacity and performance of the system. As with previous ThinkStation platforms, P500/700/900 will continue to support the standard SATA and SAS storage technologies to provide users with a wide variety of data storage solutions. This document will highlight the available SATA, SAS, and RAID storage solutions offered on this latest generation of ThinkStations as well as provide valuable information about how users can configure these solutions to provide the best performance possible. Note that P510, P710, and P910 will function in the same way as their predecessors (P500, P700, and P900) when it comes to creating and configuring RAID arrays. Therefore, this document will cover all of these platforms.
2. Configuring RAID Arrays
Configuring RAID arrays using the onboard Intel S-SATA controller
Legacy BIOS Method
Use this method to create a basic RAID array using the onboard Intel S-SATA controller with the system BIOS set to Legacy mode.
NOTE: This document shows the BIOS screens in Text Mode. P510/710/910 uses a GUI interface for the BIOS setup screens by default. The general structure/layout of the BIOS setup screens in GUI Mode are the same as Text Mode, but will look slightly different.
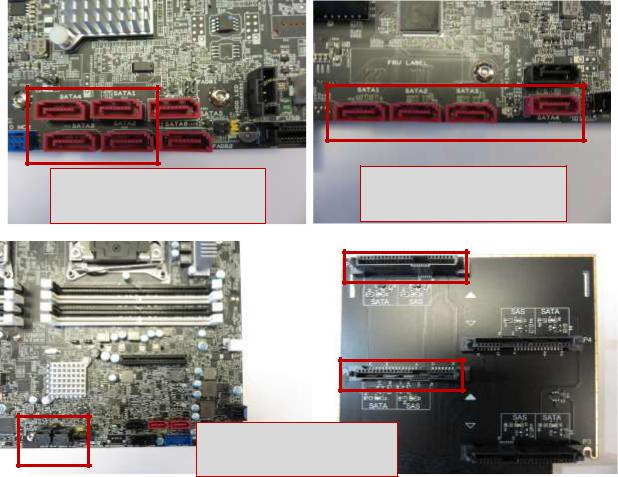
1. Install the drives for the RAID array into the system.
P500/P510 P700/P710
P900/P910
2. Power on the system and enter BIOS setup using the F1 key when prompted.

3.Once the BIOS setup window is visible, use the left and right arrow keys to select the “Devices” tab. From this tab, use the up and down arrow keys to select “PCH S-SATA Configuration”.
4. Under “Configure S-SATA as”, change the setting from “AHCI” to “RAID”.
5. Press F10 key to Save and exit BIOS setup.

6.After exiting, the system will reboot and load the Intel option ROM (Note the option ROM requires at least two drives to be installed to load). Press CTRL+I when prompted to enter the Intel option ROM.
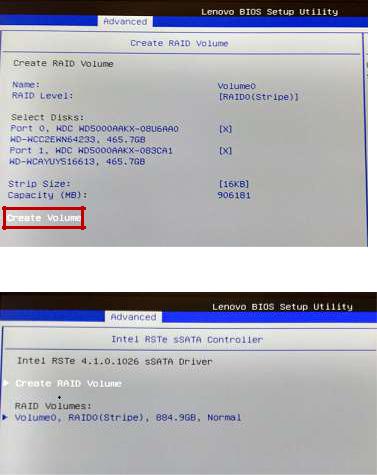
7. Once the RSTe Main Menu loads, select “1: Create RAID Volume” and press ENTER.
8.Enter a volume name (if desired) in the “Name” field and press ENTER.
9.Use TAB and the arrow keys to select the desired RAID type and press ENTER.
10.If necessary, the menu will prompt the user to select the disks to be included in the array. Select the desired disks by pressing SPACE (the disks to be used will be marked with green arrows). If the option to select disks is not available, it means RSTe has automatically selected the disks for the array. Press ENTER when finished.

11.Select desired strip size and press ENTER.
12.Select desired capacity and press ENTER.
13.Press ENTER to create the volume/array.
Press “Y” to confirm.

14.The user will then be returned to the RSTe menu. The array should now be listed under RAID Volumes and the disks that are part of the array listed under Physical Devices.
UEFI BIOS Method
Use this method to create a basic RAID array using the onboard Intel S-SATA controller with the system BIOS set to UEFI mode (OS Optimized Defaults set to ‘Enabled’ or Storage CSM Configuration is set to ‘UEFI’).
1.Install the drives for the RAID array into the system (see “How to Utilize Intel S-SATA controller” section above for installation instructions).
P500/P510 P700/P710
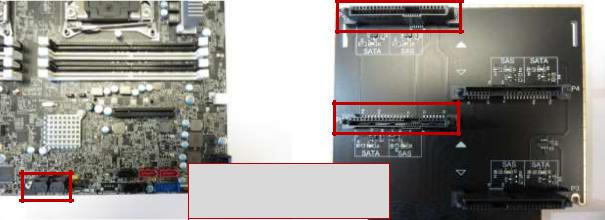
P900/P910
2. Power on the system and enter BIOS setup using the F1 key when prompted.

3.Once the BIOS setup window is visible, use the left and right arrow keys to select the ‘Startup’ tab. From this tab, use the up and down arrow keys to select ‘CSM Configuration’.
4.For Windows 7: Under ‘Storage’, change the setting from “Legacy” to “UEFI” and press F10 key to save and exit the BIOS setup menu.
For Windows 8 & Windows 10: Under ‘Save & Exit’, change the setting for “OS Optimized Defaults” from “Disabled” to “Enabled” and press F10 key to save and exit the BIOS setup menu.
5.During the system reboot, enter BIOS setup using the F1 key when prompted. Once the BIOS setup window is visible, use the left and right arrow keys to select the ‘Devices’ tab. From this tab, use the up and down arrow keys to select “PCH S-SATA Configuration”.

6. Under “Configure S-SATA as”, change the setting from “AHCI” to “RAID”.
7.Save and exit BIOS setup.
8.After exiting, the system will reboot. Press F1 to enter BIOS setup.
9.Use the left and right arrow keys to select the “Advanced” tab.
10.Use the up and down arrow keys to select “Intel RSTe S-SATA Controller” and press ENTER.
11.At this menu, the user should see a list of all drives connected to the S-SATA controller. To create a RAID volume, use the up and down arrow keys to select “Create RAID Volume” and press ENTER.
12.To give the volume a unique name, press ENTER to input the name and then press ENTER when finished.
13.Use the up and down arrow keys to highlight “RAID level” and press ENTER. Select the desired
RAID level and press ENTER. Note : only supported RAID levels will be listed.
14.Use the up and down arrow keys to select the disks to be included in the volume. Use SPACE to select each disk.
15.When done, use the up and down arrow keys to select the strip size and/or capacity. Press ENTER to input the value and then press ENTER again when done.
16.When all values are set appropriately, use the up and down arrow keys to select “Create Volume” and press ENTER to create the array.
The user will then be returned to the RSTe menu. The newly created array is now listed in the menu.
17. Save and exit BIOS setup when finished.

Configuring RAID arrays using the Avago controllers
Legacy BIOS Method – Setting up a RAID array
***Note: in order for the OS to recognize drive(s) attached to the Avago controller, the drive(s) must be configured as a RAID array or JBOD mode. Single drive RAID 0 arrays are acceptable.
Use this method to create a basic RAID array using the Avago MegaRAID SAS/SATA FLEX RAID Adapter or Avago 9364-8i adapter with the system BIOS set to Legacy mode.
1.Install the desired drives and Avago controller into the system (see “P500/P510-P700/P710- P900/P910 RAID Hardware Configuration” document for installation instructions).
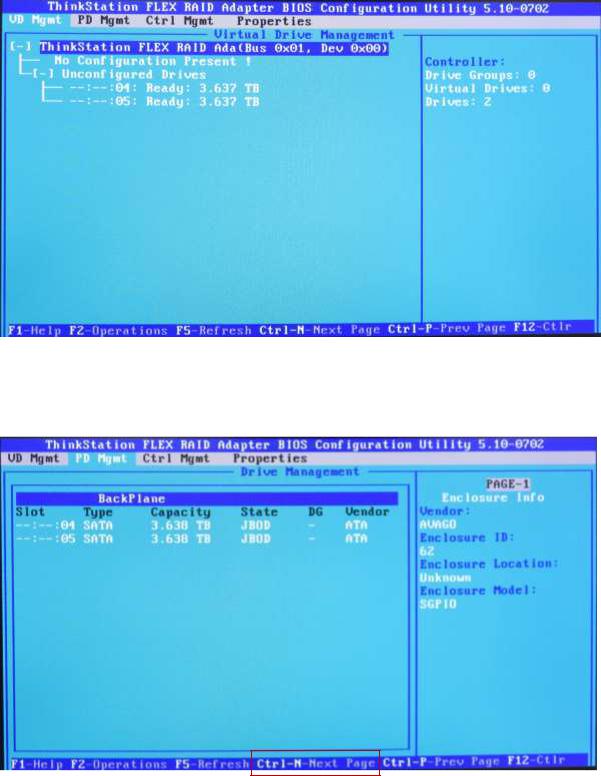
2.Power on the system and wait for the Avago option ROM to load. Press CTRL + R when prompted to enter the Avago MegaRAID configuration utility.
3.From the Avago MegaRAID configuration menu, press “Ctrl – N” to view the next page of the MegaRAID configuration menu to change the drive state from “JBOD” to “Unconfigured Good”.

4.Highlight a drive to use in a RAID array, press the F2 key, select the “Make unconfigured good” option and press Enter. Do this for each drive to use in a RAID array.
5. Notice the state of each drive will change from “JBOD” to “UG”.
 Loading...