

Page 1

Model: WS-9611U-IT
TX29U-IT
Sensor
2 “AA”
2 “AA”
Foldout
15 Advanced forecast icons tell you
Outdoor
Temperature
Indicator
Sun rise/set,
City Code, +
Moon Phase
Indoor
Temperature
+ Humidity
Time,
Calendar,
+ Alarm
Forecast Icon predicts 6-12 hours in the future
Quick Setup Guide
DC: 011017
WIRELESS FORECAST STATION
+ Channel
what to wear and how to prepare.
Stand
Temperature
Batteries
batteries
WS-9611U-IT www.lacrossetechnology.com/support Page | 1
Page 2
Time zones
GMT 0 to +/-12h
North American time
zones
-4
ATL
Atlantic
-5
EST
Eastern
(default)
-6
CST
Central
MST
-8
PST
Pacific
-9
ALA
Alaska
HAW
Step 1: Insert 2 fresh AA, batteries into the TX29U-IT sensor according
to the polarity marked in the battery compartment.
Step 2: Insert 2 fresh AA, Alkaline batteries into the forecast station
according to the polarity markings.
Step 3: After 5 minutes place sensor outside in a shaded location.
Get Started
Transmission range is 330 ft. (100 m).
Restart: If the outdoor temperature shows dashes, remove batteries
from the station & outdoor sensor. Press any button on the station 20
times. After 15 minutes, return to Step 1.
Set Time, Date, City Code, Temperature Units, Forecast Sensitivity
1. Hold the SET button to enter time set mode.
2. To adjust values press the CH/+ button.
3. Press the SET button to confirm adjustments and move to the next
item or exit setting menu.
Settings order:
1. Contrast (lcd 3)
2. Time Zone (0 to +/- 12)
3. Daylight Saving Indicator
4. Radio-controlled Time Signal (RCC ON/OFF)
5. 12/24 Hour Time Format (12h or 24h)
6. Hour
7. Minutes
8. Year (two digit)
-7
Mountain
9. Month
10. Date
11. City Code
-10
Hawaiian
12. Snooze Time
13. Fahrenheit/Celsius (ºF/ºC)
14. Forecast Sensitivity (2 and forecast icon flashes)
Note: The lowest number is used near the coastline, the highest number
is for the desert, and middle number is for everywhere else.
Press the SET button to exit, or wait 15 seconds without pressing
buttons to return to the normal time display.
WS-9611U-IT www.lacrossetechnology.com/support Page | 2
Page 3
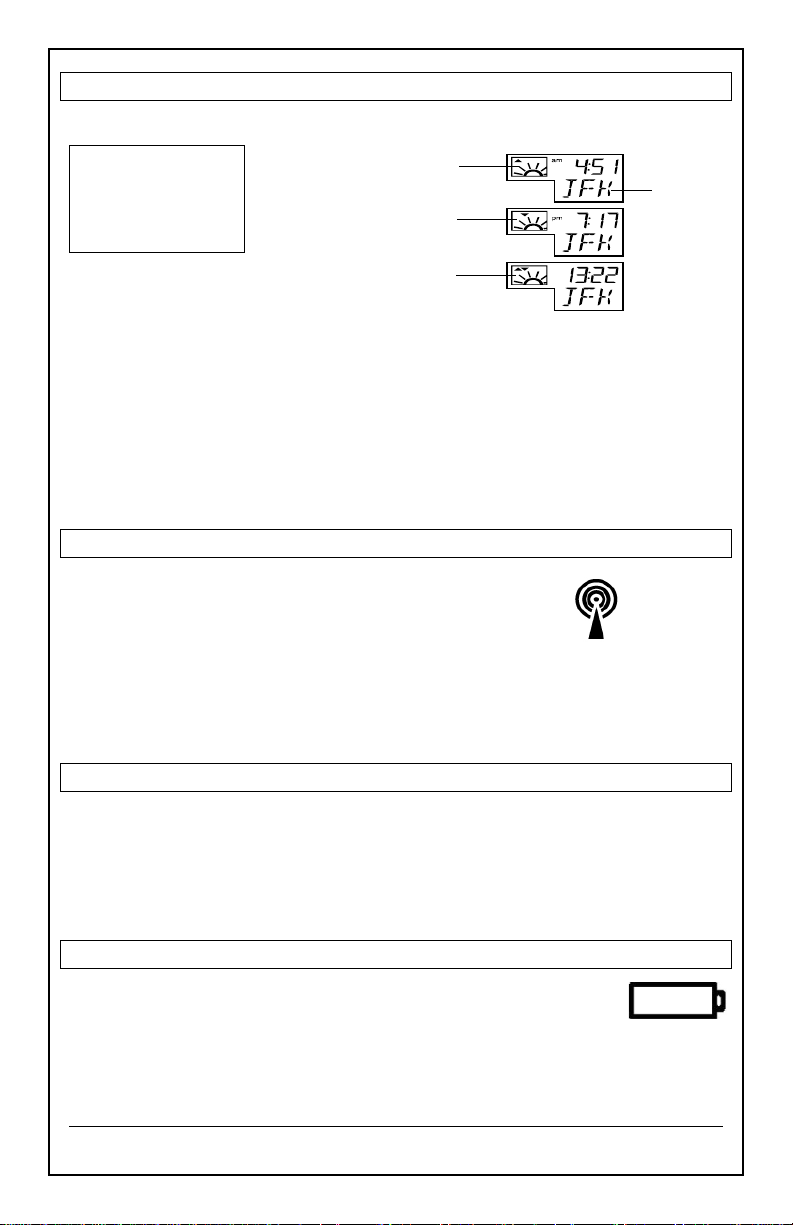
Sunrise/sunset Times (City C o des)
WWVB
ICON
Low
Icon
View:
Press SNOOZE/
SUN to toggle
between the
sunrise, sunset, and
sun duration time
Sun Set Icon & Sun Set Time for
Sun Rise Icon & Sun
Rise Time for Selected
Sun Duration Icon & Sun
Duration (in hours) for
city
Selected city
selected city
Set:
1. Press and release the SET button until the city code (JFK) flashes.
2. Press the CH/+ button to select the City code from the list at the end of this manual.
Note: If your city is not listed, use a city aligned to the north or south of
you for most accurate times. This includes cities in another state.
Note: During Daylight Saving Time, the WWVB reception icon must be
showing for the sunrise/set times to be accurate.
WWVB Radio-controlled Time
• WWVB Icon will flash when searching.
• For information about WWVB visit:
www.nist.gov/pml/div688/grp40/wwvb.cfm
ATOMIC SIGNAL SEARCH:
The forecast station will search for 1 hour between midnight and 6am
until the WWVB time signal is received. After reception, the forecast
station will only search for the atomic signal after midnight.
Display Modes (Date, Seconds, Alarm Time)
Press the SET button to select what to display below the time:
• Numeric Date
• Weekday, month, date
• Seconds Counting
• Alarm time
Low Battery Icon
Low battery icon indicates low battery for station or sensor.
• If the icon is displayed above the outdoor temperature
section, replace batteries in the outdoor sensor.
• If the icon is displayed above the indoor temperature
section, replace batteries in the forecast station.
WS-9611U-IT www.lacrossetechnology.com/support Page | 3
City Code
ATOMIC
Battery
Page 4

2
Outdoor
Icon
Outdoor
Alarm
1. Hold the ALM button to enter Alarm set mode (Hours, Minutes).
2. Press the CH/+ button to change a value.
Time Alarm (Set, Activate, Deactivate, Snooze)
3. Press the ALM button to confirm and exit.
From time mode press the ALM button to activate or deactivate the time
alarm. The alarm icon will show above the time when active.
Snooze: When alarm sound press the SNOOZE/SUN button to silence
the alarm for the previously set snooze time.
View/Reset MIN/M AX Values
The forecast station shows MIN/MAX temperatures with time and date of
occurrence.
View: Press the MIN/MAX button to view:
• Outdoor MAX
• Outdoor MIN
• Indoor MAX
• Indoor MIN
Reset: Press the MIN/MAX button to view a value to reset. Hold the SET
button for 5 seconds.
Outdoor Temperature Reception Icon/Channel Indicator
• The outdoor temperature reception icon will flash every
second when searching for the sensor and during startup.
• Once connected, the icon wil l appear for 3-4 seconds when
updating.
• The channel indicator will show below the temperature in
the black bar.
• Press the CH/+ button to view sensors on other channels.
Note: Channel 1 will not show when only one sensor is
connected.
Setup with Multiple Sensors
1. Insert batteries into sensor 1
2. Insert batteries into the forecast station
3. When outdoor temperature appears, insert batteries into sensor 2
4. When channel 2 appears insert batteries into sensor 3
5. Keep the forecast station and all sensors together for 15 minutes.
6. After 15 minutes place sensors outside in a shaded locations.
7. Transmission range is 330 ft. (100 m).
WS-9611U-IT www.lacrossetechnology.com/support Page | 4
Icon
Reception
Channel
Icon
Page 5

Moon Phase
Sunny Partly Sunny Rainy
15 Advanced Forecast
to worsen
The Moon icon of
the station displays
12 different moon
phases according
to the set calendar.
Forecast Icons
The forecast station uses changing atmospheric pressure to predict
weather conditions for the next 12-hours with 70-75% accurac y.
Advanced Weather Person Icon
Icons with Tendency
decide what to wear
and how to prepare
Up Arrow: Pressure
expected to improve.
Arrows help you
for weather.
is rising, weather
Down Arrow:
Pressure is falling,
weather expected
Sunny
Cloudy
Rainy
≥ 78.8ºF
(26°C)
66.2 – 78.6ºF
(19– 25.9°C)
50 - 66ºF
(10-18.9°C)
32 – 49.8ºF
(0 – 9.9°C)
Position Outdoor Sensor
• Mount the outdoor sensor on a north-f ac ing wall or in an y well
shaded area. Under an eave or deck rail is preferred.
• The maximum transmitting range to the wireless forecast station is
over 330 feet (100 meters) in open air, not including walls.
< 32ºF
(0°C)
WS-9611U-IT www.lacrossetechnology.com/support Page | 5
Page 6

Indoor
Humidity Range
1%-99% (RH)
Outdoor
Interval
About every 4 seconds
Power
Battery Life
Forecast Station
Over 24 months
TX29U-IT Sensor
Over 24 months
Dimensions
• Do not mix old and new batteries
• Do not mix Alkaline, Standard, Lithium or Rechargeable Batteries
• Always purchase the correct size and grade of battery most suitable for the
intended use.
• Replace all batteries of a set at the same time.
• Clean the battery contacts and also those of the device prior to battery
installation.
• Ensure the batteries are installed correctly with regard to polarity (+and -).
• Remove batteries from equipment with is not to be used for an extended
period of time.
• Remove expired batteries promptly.
Specifications
Temperature Range 14.1°F to +139.8°F -9.9°C to +59.9°C
Interval About every 15 seconds
Temperature Range -39.8°F to +139.8°F -39.9°C to +59.9°C
Distance Over 330 ft. (100 meters) RF 915MHz (open air)
Forecast Station 2-AA, IEC, LR6 Alkaline batteries (not included)
Care and Maintenance
TX29U-IT Sensor 2-AA, IEC, LR6 batteries (not included)
Forecast Station 3.5 x 5 x 1.2 inches (92.5 x 124.3 x 28.4 mm)
TX29U-IT Sensor 5.05" x 1.5" x .83" (128.27 x 38.1 x 21.08mm)
La Crosse Technology, Ltd. provides a 1-year limited time warranty (from date of purchase)
on this product relating to manufacturing defects in materials & workmanship.
View full warranty details online at:
www.lacrossetechnology.com/warranty_info.pdf
For warranty work, technical support or other information contact:
La Crosse Technology, Ltd
th
2830 26
Street S.
La Crosse, WI 54601
WS-9611U-IT www.lacrossetechnology.com/support Page | 6
Warranty and Support Information
Page 7

Contact Support:
1-608-782-1610
Online Product Support:
www.lacrossetechnology.com/support
Product Registration:
www.lacrossetechnology.com/support/register
Protected under U.S. Patents:
5,978,738 | 6,076,044 | RE43903
FCC Statement
This equipment has been tested and found to comply with the limits for a Class B digital
device, pursuant to part 15 of the FCC Rules. These limits are designed to provide
reasonable protection against harmful interference in a residential install ation. This
equipment generates, uses and can radiate radio frequency energy and, if not installed and
used in accordance with the instructions, may cause harmful interference to radio
communications. However, there is no guarantee that interference will not occur in a
particular installation. If this equipment does cause harmful interference t o radio or
television reception, which can be determined by turning the equipment off and on, the user
is encouraged to try to correct the interference by one or more of the following measures:
• Reorient or relocate the receiving antenna.
• Increase the separation between the equipment and receiver.
• Connect the equipment into an outlet on a circuit different from that to which the
receiver is connected.
• Consult the dealer or an experienced radio/TV technician for help.
This device must not be co-located or operating in conjunction with any other antenna or
transmitter.
Operation is subject to the following two conditions:
(1) This device may not cause harmful interference, and
(2) This device must accept any interference received, including interference that may
cause undesired operation.
Caution!
The manufacturer is not responsible for any radio or TV interference caused by
unauthorized modifications to this equipment. Such modifications could void the user
authority to operate the equipment.
All rights reserved. This manual may not be reproduced in any form, even in part, or
duplicated or processed using electronic, mechanical or chemical process without the
written permission of the publisher.
This booklet may contain errors or misprints. The information it contains is regularly
checked and corrections are included in subsequent editions. We disclaim any
responsibility for any technical error or printing error, or their consequences.
All trademarks and patents are recognized.
WS-9611U-IT www.lacrossetechnology.com/support Page | 7
Page 8

Code
City, State
Code
City, State
Code
City, State
Alabama
Kentucky
Oklahoma
MGM
Montgomery
LEX
Lexington
OKC
Oklahoma City
MOB
Mobile
Louisiana
TUL
Tulsa
Arkansas
NEW
New Orleans
Oregon
LIT
Little Rock
SHV
Shreveport
MFR
Medford
Arizona
Massachusetts
PDX
Portland
PHX
Phoenix
BOS
Boston
Pennsylvania
California
Maine
CXY
Harrisburg
FAT
Fresno
AUG
Augusta
PIT
Pittsburgh
LAX
Los Angeles
CAR
Caribou
SCR
Scranton
ROD
Redding
Michigan
South Carolina
SAN
San Diego
DET
Detroit
CHS
Charleston
SFO
San Francisco
PZQ
Rogers city
CUB
Columbia
Colorado
Minnesota
South Dakota
DEN
Denver
DLH
Duluth
FSD
Sioux Falls
DRO
Durango
INL
International Falls
RAP
Rapid City
GJT
Grand Junction
Missouri
Tennessee
PUB
Pueblo
JEF
Jefferson City
MEM
Memphis
District of Columbia
Mississippi
BNA
Nashville
DCA
Washington D.C.
JAN
Jackson
DKX
Knoxville
Florida
Montana
Texas
JAX
Jacksonville
BIL
Billings
AMA
Amarillo
MIA
Miami
HLN
Helena
AIN
Austin
ORL
Orlando
North Carolina
BRO
Brownsville
TLH
Tallahassee
CLT
Charlotte
DFW
Dallas/Ft. Worth
TPA
Tampa
RDU
Raleigh
ELP
El Paso
Georgia
North Dakota
HOU
Houston
ATL
Atlanta
BIS
Bismarck
ODO
Odessa
Hawaii
FAR
Fargo
SAT
San Antonio
HNL
Honolulu
Nebraska
Utah
Iowa
LNK
Lincoln
SLC
Salt Lake City
DSM
Des Moines
SNY
Sidney
Virginia
DVN
Davenport
New Hampshire
LYH
Lynchburg
Idaho
CON
Concord
ORF
Norfolk
BOI
Boise
New Jersey
Vermont
Illinois
TTN
Trenton
BTV
Burlington
ORD
Chicago
New Mexico
Washington
SPI
Springfield
ABQ
Albuquerque
SEA
Seattle
Indiana
Nevada
SFF
Spokane
EVV
Evansville
LAS
Las Vegas
West Virginia
IND
Indianapolis
RNO
Reno
CRW
Charleston
Kansas
New York
Wisconsin
DDC
Dodge City
BUF
Buffalo
GRB
Green Bay
K32
Wichita
JFK
New Y ork City
LSE
La Crosse
TOP
Topeka
SYR
Syracuse
West Virginia
Ohio
CRW
Charleston
CLE
Cleveland
Wyoming
CMH
Columbus
CPR
Casper
CANADA CITY LIST
Code
City
Code
City
Code
City
ALB
Calgary
OTT
Ottawa
QUE
Quebec
VAN
Vancouver
WIN
Winnipeg
TOR
Toronto
WS-9611U-IT www.lacrossetechnology.com/support Page | 8
 Loading...