

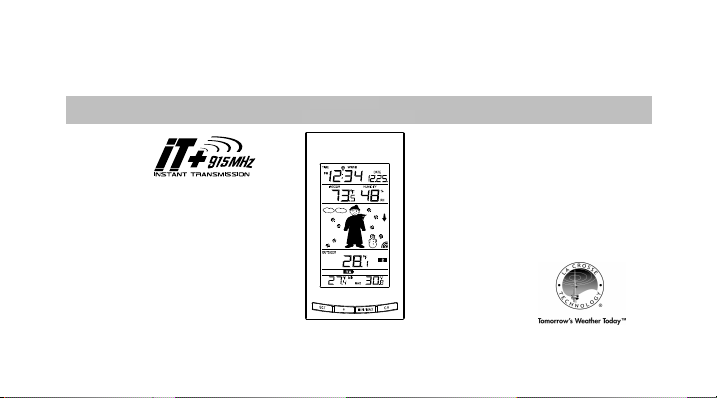
915 MHz WIRELESS WEATHER STATION
POSTE MÉTÉO SANS FIL 915 MHz
WS-9626U-IT
Instruction manual
Manuel d'lnstructions

Contents
Language Page
_________________________________________________________________________________
English 1
French 56
1
TABLE OF CONTENTS
Topic
Inventory of Contents
Features
Setting Up
Battery Installation
Function keys
LCD Screen and Settings
Atomic auto-set time - WWVB Radio Controlled Time 20
Manual Settings 21
Weather Forecast and Tendency 31
Display of Indoor Temperature and Humidity Reading 37
Display of Outdoor Temperature Reading 38
Display of Indoor Maximum and Minimum records 39
Display of Outdoor Maximum and Minimum records 40
Page
4
5
8
12
15
17
2
Daily Min and Max outdoor temperature display 43
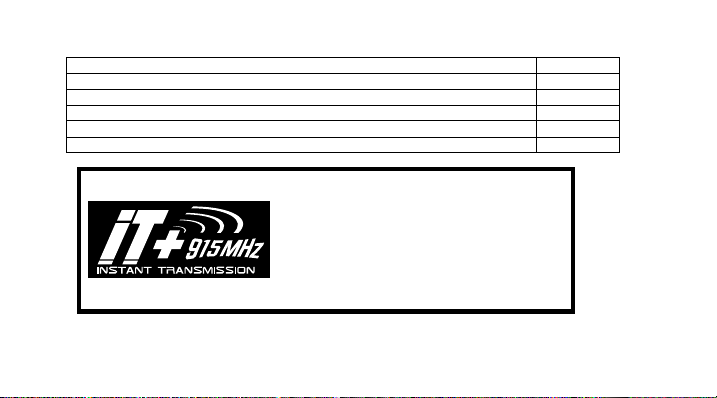
INSTANT TRANSMISSION
is the state
-of-
the-art
915 MHz Reception 44
Mounting 45
Care and maintenance 50
Specifications 51
Warranty 53
This product offers:
new wireless transmission technology, exclusively
designed and developed by LA CROSSE
TECHNOLOGY. INSTANT TRANSMISSION offers
you an immediate update (every 4 seconds!) of all
your outdoor data measured from the transmitters:
follow your climatic variations in real-time!
3

INVENTORY OF CONTENTS
1.
Wireless Weather Station
2.
Wireless Temperature Sensor (TX29U-IT) and mounting bracket.
3.
Instruction Manual and Warranty Card.
4.
4 Fresh “AA” IEC LR6, 1.5V Alkaline Batteries.
4
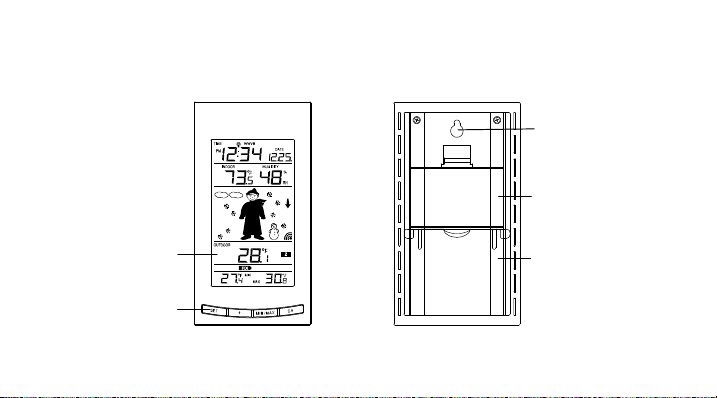
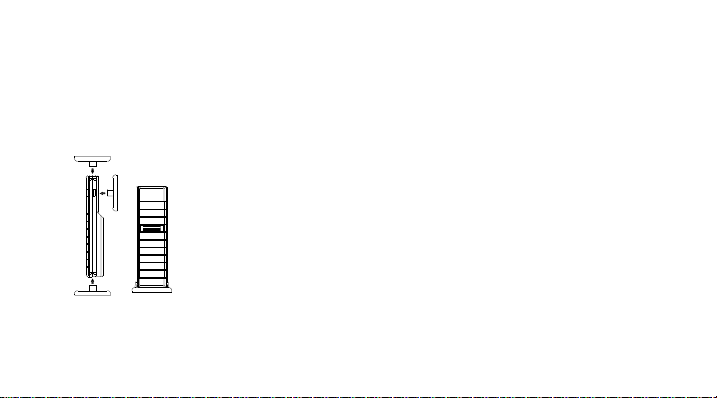
LCD
FEATURES:
The Weather station
Display
Function
Keys
Hanging hole
Battery
compartment
cover
Foldout
Stand
5

•
Atomic auto-set time (WWVB Radio controlled time) function with manual setti ng options
•
Atomic auto-set time reception ON/OFF setting
•
12/24 hour display
•
Daylight time saving ON/OFF
•
Hour, minute and second display
•
Time zone option ±12 hours
•
Wireless transmission at 915 MHz
•
Signal reception intervals at 4-second
•
Display indoor and outdoor temperature (°F or °C) and indoor humidity (% RH)
•
Weather forecasting with 15 easy-to-read weather forecast signs featured by
weather man
•
Weather forecasting icon sensitivity setting
•
Temperature display in degrees Fahrenheit (°F) or Celsius (°C) selectable
•
Indoor and Outdoor temperature display with MIN/MAX recording
•
All MIN/MAX outdoor recordings show date and time received
•
Display Daily Minimum and Maximum Temperature of outdoor channel s
•
All MIN/MAX recordings can be reset
6
•
Can take up to three outdoor transmitters
•
LCD contrast setting
•
Low battery indicator
•
Table standing/ Wall mounting
The Outdoor Temperature Transmitter
•
Remote transmission of outdoor temperature to Weather Station by
915 MHz
•
Shower proof casing
•
Wall mounting case
•
Mounting at a sheltered place. Avoid direct rain and sunshine
7

SETTING UP:
When one transmitter is to be used
1. First, insert the batteries into the Temperature transmitter. (see “Install a nd replace batteries
in the Temperature transmitter“).
2. Immediately after and within 30 seconds, insert the batteries into Weather station (see “Install
and replace batteries in the Weather station”). Once the batteries are i n place, all segments
of the LCD will light up briefly. Following the time as 12:00 and the "weather man" icon will be
displayed. If these are not displayed after 60 seconds, remove the batteries and wait for at least
10 seconds before reinserting them.
3. After inserting the batteries into the transmitter, the Weather station will start receiving data
from the transmitter. The outdoor temperature and the signal reception icon should then be
displayed on the Weather station. If this does not happen after 3 minutes, the batteries will
need to be removed from both units and reset from step 1.
4. In order to ensure sufficient 915 MHz transmission however, this should under good conditions
be a distance no more than 100 meters between the final position of the Weather Station and
the transmitter (see notes on “Mounting” and “915 MHz Reception”).
8

Note:
The indoor receiver registers the temperature by default in Farenheit (°F), but user can manually
set to Celsius (°C) ONLY after the initial set-up is complete as instructed in the manual. After the
LCD shows the temperature readings from the outdoor transmitter, user may set the
temperature unit to °C (See Manual Settings below).
When more than one transmitter is to be used
1. User shall remove all the batteries from the temperature station and transmitters and wait 60
seconds if setting has been done with one transmitter before.
2. Insert the batteries to the first transmitter.
3. Within 30 seconds of powering up the first transmitter, insert the batteries to the Weather Station.
Once the batteries are in place, all segments of the LCD will light up briefly. Following time as
12:00 and the weather man icon will be displayed. If they are not shown in LCD after 60 seconds,
remove the batteries and wait for at least 60 seconds before reinserting them.
4. The outdoor temperature from the first transmitter (channel 1) should then be displayed on the
Weather station. Also, the signal reception icon will be displayed. If this does not happen after 2
minutes, the batteries will need to be removed from both units and reset from step 1.
9

5. Insert the batteries to the second transmitter as soon as the outdoor temperature readings from
the first transmitter are displayed on the Weather station.
Note: User shall insert the batteries into the second transmitter wi thin 25 seconds of reception of the
first transmitter.
6. The outdoor temperature from the second transmitter and the "channel 2" icon should then be
displayed on the Weather station. If this does not happen after 2 minute, the batteries will need to
be removed from all the units and reset from step 1.
7. Insert the batteries to the third transmitter as soon as the "channel 2" icon and outdoor data are
displayed on the Weather station. Then within 2 minutes, the channel 3 outdoor data from the
third transmitter will be displayed and the channel icon will shift back to "1" once the third
transmitter is successfully received. If this is not happen, user shall restart the setting up from
step 1.
Note:
User shall insert the batteries into the third transmitter within 25 seconds of reception of the
second transmitter.
10

8. In order to ensure sufficient 915 MHz transmission however, this should under good conditions
be a distance no more than 100 meters between the final position of the Weather Station and
the transmitter (see notes on “Mounting” and “915 MHz Reception”).
Note:
If the signal reception is not successful on the first frequency (915MHz) for 45 seconds, the frequency
is changed to 920MHz and the learning is tried another 45 seconds. If still not successful the reception
is tried for 45 seconds on 910MHz. This will also be done for re-synchronization.
IMPORTANT:
•
Transmission problems will arise if the setting for additional sensors is not fol lowed as described
above. Should transmission problems occur, it is necessary to remove the batteries from all units
and start again the set-up from step 1.
•
The indoor receiver registers the temperature by default in Farenheit (°F), but user can
manually set to Celsius (°C) ONLY after the initial set-up is complete as instructed in the
manual. After the LCD shows the temperature readings from the three outdoor
transmitters, user may set the temperature unit to °C (See Manual Settings below).
11

9. Once the remote temperature has been received and displayed on the Weather station, the
Atomic auto-set time (WWVB time) code reception is automaticall y started. This takes typically
between 3-5 minutes in good conditions.
If after 10 minutes, the Atomic auto-set (WWVB) time has not been received, press the SET key to
manually enter a time initially.
Daily WWVB reception (Atomic auto-set time) is attempted at full hour between 12:00 am to 6:00 am. If
the reception is successful, there will no reception attempt until the following day. When this is
successful, the received time will override the manually set time. The date is also updated with the
received time. (Please refer also to notes on “Atomic auto-set ti me - WWVB Radio controlled Time”
and “Manual Time Setting”)
12
BATTERY INSTALLATION
INSTALL AND REPLACE BATTERIES IN THE WEATHER STATION
The Weather station uses 2 x AA, IEC LR6, 1.5V batteries. To install and replace the batteries, please
follow the steps below:
1. Remove the cover at the back of the weather station.
2. Insert batteries observing the correct polarity (see marking).
3. Replace compartment cover.
INSTALL AND REPLACE BATTERIES IN THE
TEMPERATURE TRANSMITTER
The Temperature Transmitter uses 2 x AA, IEC LR6, 1.5V battery. To
install and replace the batteries, please follow the steps below:
13
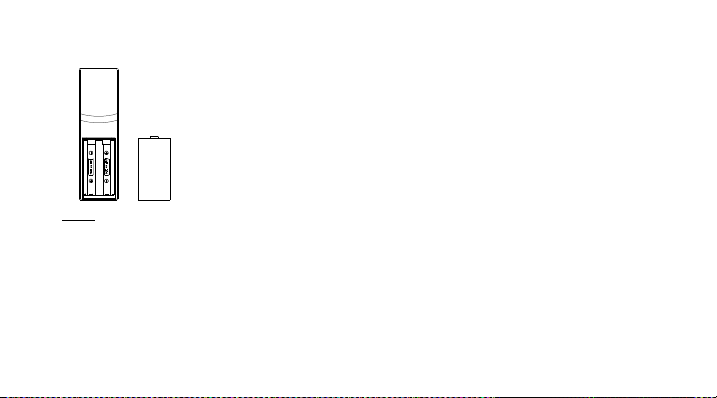
1. Pull out the battery holder at the bottom of the transmitter.
2. Insert the batteries, observing the correct polarity (see marking).
3. Replace the battery holder on the unit.
Note:
In the event of changing batteries in any of the units, all units need to be reset by following the setting
up procedures. This is because a random security code is assigned by the transmitter at start-up and
this code must be received and stored by the Weather station in the first 3 minutes of power being
supplied to it
14

BATTERY CHANGE:
It is recommended to replace the batteries in all units regularly to ensure optimum accuracy of these
units (Battery life See Specifications below).
Please participate in the preservation of the environment. Return used batteries to an
authorised depot.
15
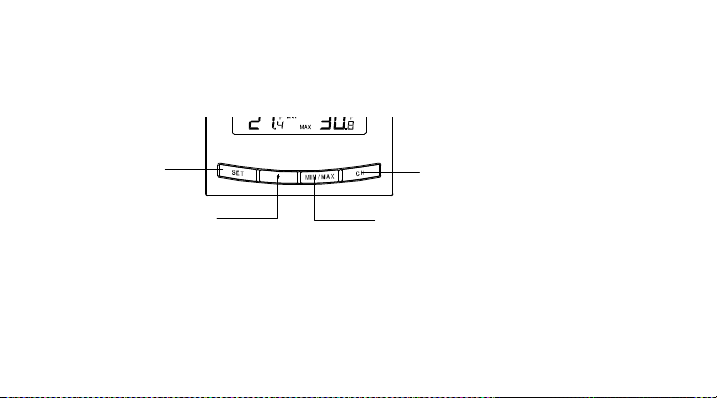
FUNCTION KEYS:
ET key
Weather station:
The weather station has four easy to use function keys.
S
SET key (Setting):
•
To enter the set mode for the following functions: LCD contrast, Time zone, Daylight saving time
ON/ OFF, Time Reception ON/OFF, 12/24 hour display, Manual time, Year, Month, Date, °C/°F,
and Weather forecast sensitivity settings.
+ key
MIN/
MAX key
CH key
16

•
Press to reset the maximum or minimum temperature and humidi ty records of the indoor or the
currently selected outdoor channel (will reset all records to current level)
MIN/ MAX
•
To toggle between the maximum/ minimum outdoor temperature and maximum/ minimum indoor
temperature data
+ key
•
To toggle between the "date" and "second of time" in the time di splay
•
To make adjustment for various settings
CH key
•
To toggle between the Outdoor transmitters 1, 2 and 3 (if more than 1 transmitter is used)
•
To exit from the manual setting mode
17
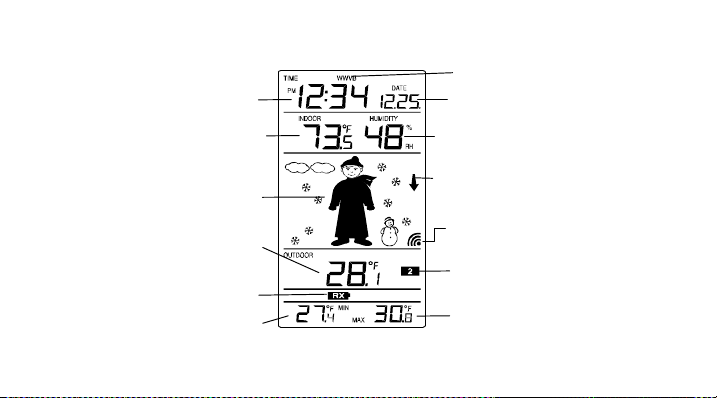
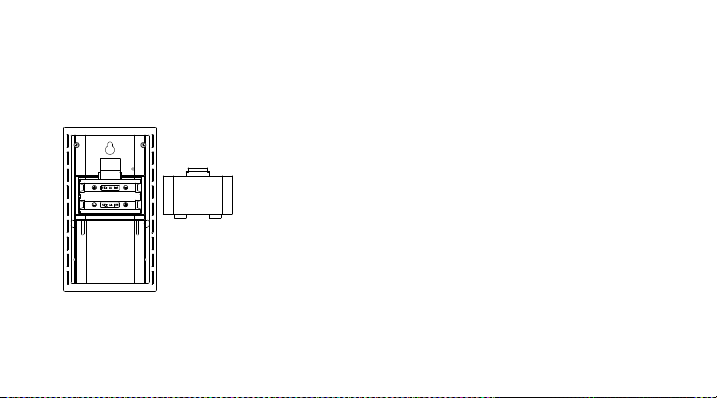
LCD SCREEN AND SETTINGS:
Weather
Forecast icon
(Weather boy)
Outdoor
Temperature
door Temperature
F
Low battery
indicator
reception On icon
In
Daily min temp
Time
in °F
in °
Radio controlled time
Displays "date" or "second"
Indoor Relative
Humidity %
Weather
Tendency icon
Outdoor
Reception
Signal*
Transmitter identification
(channel No.)
Daily max temp
18

*When the outdoor signal is successfully received by the Weather Station, this icon will be switched on.
(If not successful, the icon will not be shown in LCD) So user can easily see whether the last reception
was successful (icon on) or not (icon off). On the other hand, the short blinking of the icon shows that a
reception is currently taking place.
For better distinctness the LCD screen is split into 5 sections displaying the information for time and
indoor data, weather forecast, and outdoor data.
Section 1 - TIME AND DATE
•
In normal mode, display the radio controlled time and date.
•
Display "second" of time when the "+" key is pressed
Section 2 - INDOOR TEMPERATURE AND INDOOR HUMIDITY
•
Display the current indoor temperature and humidity.
19

Section 3 - WEATHER ICON (FEATURED BY WEATHER MAN)
•
Display of the weather to be expected in form of 15 fancy weather symbols (featured by
Weather man) which change their appearance depending on the air pressure development
(past air pressure change) and the current outdoor temperature.
•
Display the weather tendency indicator
•
A signal reception symbol will be shown indicating that receiver is receiving outdoor data
•
Format of the weather man icons refers to the "WEATHER FORECAST AND TENDENCY"
Section 4 - OUTDOOR TEMPERATURE
•
Display the outdoor temperature of the currently selected channel.
SECTION 5 – DAILY MIN AND MAX TEMPERATURE
•
Display the daily maximum and minimum temperature of the currently selected outdoor channel.
20

ATOMIC AUTO-SET TIME FUNCTION - WWVB RADIO CONTROLLED TIME
The NIST (National Institute of Standards and Technology—Time and Frequency Division) WWVB
radio station is located in Ft. Collins, Colorado, and transmits the exact time signal continuously
throughout the United States at 60 kHz. The signal can be received up to 2,000 miles away through the
internal antenna in the weather projection station. However, due to the nature of the Earth’s
Ionosphere, reception is very limited during daylight hours. The wireless weather station will search for
a signal every night when reception is best.
The WWVB radio station receives the time data from the NIST Atomic cl ock in Boulder, Colorado. A
team of atomic physicists is continually measuring every second, of every day, to a n accuracy of ten
billionths of a second per day. These physicists have created an international standard, measuring a
second as 9,192,631,770 vibrations of a Cesium-133 atom in a vacuum. For more detail, visit
http://www.boulder.nist.gov/timefreq.htm. To listen to the NIST time, call (303)499-7111. This number
will connect you to an automated time, announced at the top of the minute in “Coordinated Universal
Time”, which is also known as Greenwich Mean Time (GMT). This time does not follow Daylight Saving
Time changes. After the top of the minute, a tone will sound for every second. It is possible that your
21

wireless weather station may not be exactly on the second due to the variance in the quartz. However,
the clock will adjust the quartz timing over the course of several days to be very accurate; under 0.10
seconds per day
MANUAL SETTINGS:
The following manual settings can be done in the setting mode:
•
•
•
•
•
•
•
•
•
Press the SET key to advance to the setting mode:
.
LCD contrast setting
Time zone setting
Daylight saving time setting
Time reception ON/OFF setting
12/24-Hour setting
Manual time setting
Calendar setting
°C/ °F setting
Weather forecasting icon sensitivity setting
22
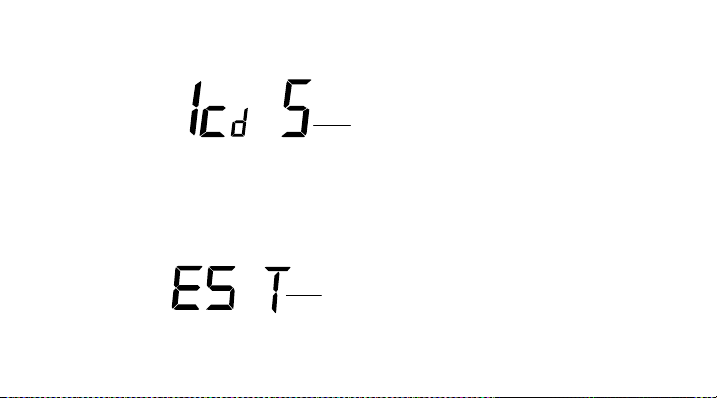
LCD CONTRAST SETTING
The LCD contrast can be set to 8 different levels to suit the users needs (default LCD contrast setting is
LCD 4). To set the desired contrast level:
1. The above display will be seen. Press the + key to select the level of contrast desired.
2. Press the SET key to confirm and enter the “Time Zone setting” or exit the setting mode by
pressing the CH key
TIME ZONE SETTING:
flashing
flashing
23
The time zone default is "EST -5". To set a different time zone:
1. The current time zone value starts flashing.
2. Use the + key to set the time zone. The range runs from -5, -6, -7 …-12, 12, 11, 10… 0, -1, -2, -3,
-4 hr, in consecutive 1-hour intervals.
(The U.S. time zones are: -5hr(EST), -6hr(CST), -7hr(MST) and -8hr(PST), -9hr (ALA)
and -10hr (HAW).)
3. Confirm with the SET key and enter the Daylight Saving Time (DS T) setting.
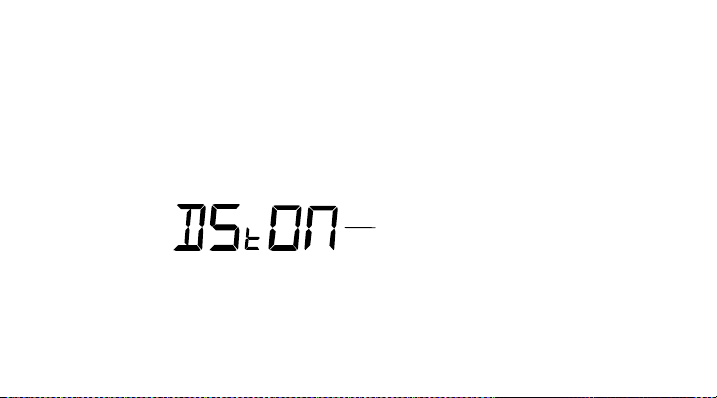
DAYLIGHT SAVING TIME SETTING ON/ OFF
1. The digit “DST ON” will start flashing on the LCD.
2. Use the + key to turn On or OFF the daylight saving time function.
flashing
24

3. Confirm with the SET key and enter the “Time reception On/Off setting” or exit the setting
mode by pressing the CH key.
TIME RECEPTION ON/OFF SETTING
(time reception icon)
In area where reception of the Atomic auto-set time (WW VB time) is not possible, the time reception
function can be turned OFF. The clock will then work as a normal Quartz clock. (Default setting is ON).
1. The digit “ON” and the time reception icon will start flashing on the LCD.
2. Use the + key to turn OFF the time reception function.
Flashing
flashing
25

3. Confirm with the SET key and enter the “12/24-Hour Display setting” or exit the setting mode
by pressing the CH key.
Note:
If the Time Reception function is turned OFF manually, the clock will not attempt any reception
of the Atomic auto-set time (WWVB time) as long as the Time Reception OFF function is
activated. The Time Reception icon will not be displayed on the LCD.
12/24 HOUR TIME DISPLAY SETTING
1. After setting time reception ON/OFF, press the SET key, “12h” or “24h” fl ashes in the LCD.
(default 12 h)
2. Press the + key to select the “12h” or “24h” display mode.
flashing
26

3. Press the SET again to confirm and to enter the “Manual Time setting” or exit the setting mode
by pressing the CH key.
Note:
When 24h mode display is selected, the calendar format will be date and month display. When
12h mode display is selected, the calendar format will be month and date display.
MANUAL TIME SETTING
In case the Weather station is not able to detect the Atomic auto-set time (WWVB) signal (disturbances,
transmitting distance, etc.), the time can be manually set. The clock will then work as a normal Quartz
clock.
Hours (flashing)
27
Minutes (flashing)

To set the clock:
1. The hour and minute digits start flashing in the time display section.
2. Use the + key to adjust the hours and then press SET key to go to the mi nute setting.
3. The minute will be flashing. Press the + key to just the minutes.
4. Confirm with the SET key and enter the “Calendar Setting” or exit the setti ng mode by pressing
the CH key
Note:
The unit will still try to receive the signal at each full hour despite it being manually set. When it does
receive the signal, it will change the manually set time into the received time.
CALENDAR SETTING
Year
28
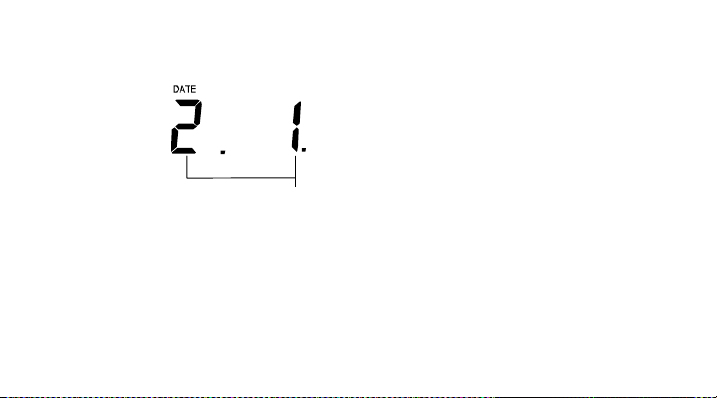
The date default of the Weather station is 1. 1. of the year 2006 after i nitial set-up. Once the radiocontrolled time signals are received, the date is automatically updated. However, if the signals are not
received, the date can also be set manually. To do this:
1. Using the + key, set the year required. The range runs from 2003 to 2029 (default is 2006).
2. Press the SET key to enter the month setting mode.
"Date. Month." (for 24h time display)
"Month. Date." (for 12h time display)
29

3. The month digit will be flashing. Press the + key to set the month and then press the SET key to
go to the date setting.
4. The date digit will be flashing. Press the + key to set the date.
5. Confirm with the SET key and enter the “°C/°F TEMPERATURE UNIT SETTING” or exit the
setting mode by pressing the CH key.
°C/°F TEMPERATURE UNIT SETTING
The default temperature reading is set to °F (degree Fahrenheit Cel sius). To select °C (degree
Celsius):
1. The “°C/ °F” will be flashing, use the + key to toggle between “°C” and “°F”.
flashing
30

2. Once the desired temperature unit has been chosen, confirm with the SET key and enter the
“Weather Forecast Icon Sensitivity setting” or exit the setting mode by pressi ng the CH key.
WEATHER FORECASTING ICON SENSITIVITY SETTING
For locations with rapid changes of weather conditions, the threshold can be set to a different level for
faster display of changing weather conditions.
Sensitivity level
(flashing)
31

1. Using the + key to set the weather sensitivity level. There are 3 levels of setting: 1, 2 and 3; level
1 is the most sensitive setting, level 3 is the least sensitive setting (default setting is "2").
2. Confirm with the SET key and exit the Manual settings.
WEATHER FORECAST AND TENDENCY:
The weather forecast icons (Weather man):
One of the 15 different weather icons (featured by Weather man with different clothing) is displayed in
the centre of LCD, which indicates the different forecast weather condition due to air pressure level
(Sunny, Sunny + Cloudy or Cloudy + Rainy) and the current outdoor temperature (Temperature value
detected by Channel 1):
32

≥≥≥≥
°°°°
°°°°
°°°°
18.9
°°°°C)
°°°°
°°°°
°°°°
Sunny
78.8
(26°°°°C)
F
66.2 to 78.6
(19 to 25.9°°°°C)
F
50 to 66
(10 to
F
32 to 49.8
(0 to 9.9°°°°C)
F
< 32
F (0
C)
33

≥≥≥≥
°°°°
66.2 to
°°°°
°°°°
°°°°
°°°°
Sunny +
Cloudy
78.8
(26°°°°C)
F
(19 to 25.9°°°°C)
78.6°°°°F
50 to 66
(10 to 8.9°°°°C)
34
F
32 to 49.8
(0 to 9.9°°°°C)
F
< 32
F (0
C)

≥≥≥≥
°°°°
66.2 to
°°°°
°°°°
°°°°
°°°°
Cloudy +
Rainy
Note:
After setting up, readings for weather forecasts should be disregarded for the next 12-24 hours. This
will allow sufficient time for the Weather station to collect air pressure data at a constant altitude and
therefore result in a more accurate forecast.
78.8
(26°°°°C)
F
78.6°°°°F
(19 to 25.9°°°°C
)
50 to 66
(10 to
35
F
32 to 49.8
(0 to 9.9°°°°C)
F
< 32
F (0
C)

Common to weather forecasting, absolute accuracy cannot be guaranteed. The weather forecasting
feature is estimated to have an accuracy level of about 75% due to the varying areas the Weather
station has been designed for use in. In areas that experience sudden changes in weather (for example
from sunny to rain), the Weather station will be more accurate compared to use in areas where the
weather is stagnant most of the time (for example mostly sunny).
If the Weather station is moved to another location significantly higher or lower than its initial standing
point (for example from the ground floor to the upper floors of a house), remove the batteries and reinsert them after about 30 seconds. By doing this, the Weather station will not mistake the new location
as being a possible change in air-pressure when really it is due to the slight change of altitude. Again,
disregard weather forecasts for the next 12 to 24 hours as this will allow time for operation at a constant
altitude.
THE WEATHER TENDENCY INDICATOR
Working together with the weather icons are the weather tendency indicators (the upward and
downward arrow located near the Weather man). When the indicator points upwards, it means that the
36

air-pressure is increasing and the weather is expected to improve, but when indicator points
downwards, the air-pressure is dropping and the weather is expected to become worse.
Therefore, user may see how the weather has changed and is expected to change. For example, if the
indicator is pointing downwards together with cloudy icons, it means that the last noticeable change in
the weather was when it was sunny (the sunny icon only). Therefore, the next change in the weather
will be the cloudy icons since the indicator is pointing downwards.
Note:
Once the weather tendency indicator has registered a change in air pressure, it will remain permanently
visualized on the LCD.
37

Indoor
icon
DISPLAY OF INDOOR TEMPERATURE AND HUMIDITY READING:
The indoor temperature and humidity are measured and displayed on the second section of the LCD.
Indoor
Temperature
in °F
Indoor Relative
Humidity %
38

DISPLAY OF OUTDOOR TEMPERATURE READING:
The outdoor temperature and humidity are measured and displayed on the fourth section of the LCD.
Outdoor icon
Note:
A channel number next to the outdoor temperature will shown if more than one transmitter has been
used.
Outdoor
Temperature in °F
Transmitter identification
No. (shown when more
than one transmitter is
used)
39

DISPLAY OF INDOOR MAXIMUM AND MINIMUM RECORDS:
1. In normal display mode, press the MIN/ MAX button three times. The maximum indoor
temperature will be shown in the bottom section of LCD. Also the time and date of recording this
temperature will be displayed.
2. Then press the MIN/MAX button one more time, the minimum indoor temperature will be shown
in the bottom section of LCD. Also the time and date of recording this temperature will be
displayed:
Indoor icon
Min icon
40
Time and date of
recording the min
temperature
Min temperature

3. Press one more time the MIN/ MAX button to go back to the normal display.
RESETTING THE INDOOR MAXIMUM / MINIMUM RECORDS
1. In normal display mode, press the MIN/ MAX button to advance to the indoor MIN/ MAX display.
2. Press the SET key once, this will reset the currently shown indoor minimum or and maximum
data recorded to the current time, date, temperature and humidity.
Note:
The indoor minimum and maximum record is to be reset separately.
DISPLAY OF OUTDOOR MAXIMUM AND MINIMUM RECORDS:
1. In normal display mode, press the CH button to select the desired channel. The channel ID will
be displayed next to the outdoor temperature reading.
2. Press the MIN/MAX button once, the max temperature of the selected channel will be displayed.
Also the time and date of recording this temperature will be displayed:
41

Outdoor icon
of recording the
Max
3. By pressing MIN/MAX button once more, the min temperature of the selected channel will be
Time and date
max
temperature
temperature
Channel No.
Max icon
shown. Also the time and date of recording this temperature will be displayed.
42

4. Press one more time the MIN/ MAX button to advance to the indoor Max/ Min temp display.
RESETTING THE OUTDOOR MAXIMUM/ MINIMUM RECORDS
Note:
•
It is required to reset the outdoor max/ min records of different channels separately.
•
The outdoor minimum and maximum records are to be reset separately.
1. In normal display mode, press the CH button to select a channel. The channel Identification No.
(channel No.) will be displayed above the outdoor temperature reading.
Note: The transmitter number will only be displayed if more than one transmitter is applied.
2. Press the MIN/ MAX button once. The "max" icon will be displayed.
3. Press the SET button, this will reset the outdoor maximum temperature record to the current
value.
4. Press MIN/ MAX button once more to show the minimum data. The "min" icon will be displayed.
5. Press the SET button, this will reset the outdoor minimum temperature record to the current
value.
43

6. Press three more times the MIN/MAX key to return to the normal display.
Min daily temp
DAILY MIN AND MAX OUTDOOR TEMPERATURE DISPLAY
This weather station will display the daily maximum and minimum outdoor temperat ure for each outdoor
channel, at the bottom of the LCD, in normal display.
Channel No.
of the channel
Max daily temp
of the channel
44

To view the daily max and min temperature of another channel, user shall press the CH key in normal
display.
Note:
The daily minimum temperature record is reset automatically at 8:00 pm a nd the daily maximum
temperature is reset automatically at 8:00 am every day.
915 MHz RECEPTION
The Weather station should receive the temperature data within 15 minutes after set-up. If the
temperature data is not received 15 minutes after setting up (not successfully continuously, the outdoor
display shows “- - -” ), please check the following points:
1. The distance of the weather station or transmitter should be at least 1.5 to 2 meters away from
any interfering sources such as computer monitors or TV sets.
2. Avoid positioning the Weather station onto or in the immediate proximi ty of metal window
frames.
3. Using other electrical products such as headphones or speakers operati ng on the same signal
frequency (915MHz) may prevent correct signal transmission and recepti on.
45

4. Neighbours using electrical devices operating on the 915MHz signal frequency can also cause
interference.
Note:
When the 915MHz signal is received correctly, do not re-open the battery cover of either the transmitter
or Weather station, as the batteries may spring free from the contacts and force a false reset. Should
this happen accidentally then reset all units (see Setting up above) otherwise transmission problems
may occur.
The transmission range is about 100 m from the transmitter to the Weather station (in open space).
However, this depends on the surrounding environment and interference levels. If no reception is
possible despite the observation of these factors, all system units have to be reset (see Setting up).
MOUNTING
POSITIONING THE WEATHER STATION:
The Weather Station may be hung onto wall easily or free standing.
46

To wall mount
Choose a sheltered place. Avoid direct rain and sunshine.
Before wall mounting, please check that the outdoor temperature values can be received from the
desired locations.
1. Fix a screw (not supplied) into the desired wall, leaving the head extended out
the by about 5mm.
2. Remove the stand from the Weather Station by pulling it away from the base
and hang the station onto the screw. Remember to ensure that it locks into
place before releasing.
47

Free standing
With the foldout stand, the weather station can be placed onto any flat surface.
48

POSITIONING THE TEMPERATURE TRANSMITTER:
The Transmitter is supplied with a holder that may be attached to a wall
with the two screws supplied. The Transmitter can also be position on a
flat surface by securing the stand to the bottom to the Transmitter.
49

To wall mount:
Note:
Before permanently fixing the transmitter wall base, place all units in the desired locations to check that
the outdoor temperature reading is receivable. In event that the signal is not received, relocate the
transmitters or move them slightly as this may help the signal recepti on.
1. Secure the bracket onto a desired wall using the screws and plastic
anchors.
2. Clip the remote temperature sensor onto the bracket.
50

CARE AND MAINTENANCE:
•
Extreme temperatures, vibration and shock should be avoided as these may cause damage to
the unit and give inaccurate forecasts and readings.
•
When cleaning the display and casings, use a soft damp cloth only. Do not use solvents or
scouring agents as they may mark the LCD and casings.
•
Do not submerge the unit in water.
•
Immediately remove all low powered batteries to avoid leakage and damage. Replace only with
new batteries of the recommended type.
•
Do not make any repair attempts to the unit. Return them to their original point of purchase for
repair by a qualified engineer. Opening and tampering with the unit may invalidate their
guarantee.
•
Do not expose the units to extreme and sudden temperature changes, this may lead to rapid
changes in forecasts and readings and thereby reduce their accuracy.
51

SPECIFICATIONS:
Temperature measuring range:
Indoor : 14.1°F to +139.8°F with 0.2°F resolution
(-9.9ºC to +59.9ºC with 0.1ºC resolution,
“OF.L” displayed if outside this range)
Outdoor : -39.8°F to +139.8°F with 0.2°F resolution
(-39.9ºC to +59.9ºC with 0.1ºC resolution,
“OF.L” displayed if outside this range)
Relative humidity measuring range:
Indoor : 1% to 99% with 1% resolution (displays “- -” when lower
than 1 %; displays "99" % if higher than 99 %)
Indoor temperature checking interval : every 15 seconds
Indoor humidity checking interval : every 20 seconds
Outdoor data reception : every 4 seconds
52

Power supply:
Weather station : 2 x AA, IEC, LR6, 1.5V
Temperature transmitter : 2 x AA, IEC, LR6, 1.5V
Battery life cycle (Alkaline batteries recommended)
Weather station : Approximately 24 months
Temperature transmitter : Approximately 24 months
Dimensions (L x W x H)
Weather station : 3.18" x 1.22" x 5.64"
Temperature transmitter : 1.50" x 0.83" x 5.05"
53

WARRANTY
For warranty work, technical support, or information contact:
La Crosse Technology, Ltd
2809 Losey Blvd. South
La Crosse, WI 54601
Phone: 608.782.1610
Fax: 608.796.1020
support@lacrossetechnology.com
sales@lacrossetechnology.com
(information on other products)
www.lacrossetechnology.com
e-mail:
(warranty work)
web:
54
Springfield / Lacrosse Canada.
1-800-661-6721
5151 Thimens Rd.
Montreal, Quebec
H4R 2C8

Question? Instructions? Please visit:
www.lacrossetechnology.com/9626itc
All rights reserved. This handbook must not be reproduced in any form, even in excerpts, or duplicated or
processed using electronic, mechanical or chemical procedures without written permission of the publisher.
This handbook may contain mistakes and printing errors. The information in this handbook is regularly checked
and corrections made in the next issue. We accept no liability for technical mistakes or printing errors, or their
consequences.
All trademarks and patents are acknowledged.
55

TABLE DES MATIERES
Sujet
Inventaire 58
Caractéristiques 59
Montage 62
Installation des piles 67
Commandes 70
Ecran LCD et réglages 71
Heure radio-pilotée (signal horaire WWVB) 74
Réglages manuels 75
Prévision et tendance météo 86
Affichage des relevés de température et d’humidité intérieures 92
Affichage des relevés de température extérieure 93
Affichages des maximum et minimum intérieurs enregistrés 94
Affichages des maximum et minimum extérieurs enregistrés 96
Page
56

Affichage des min et max quotidiens de la température extérieure 100
Réception 915 MHz 101
Mise en place 103
Entretiens 107
Specifications 107
Garantie 109
Ce produit présente:
La TRANSMISSION INSTANTANEE est le
summum en matière de technologie sans fil,
conçue et développée exclusivement par LA
CROSSE TECHNOLOGY. La TRANSMISSION
INSTANTANEE actualise sans délai (toutes les
4 secondes!) toutes les données extérieures
relevées par les émetteurs: vous suivrez les
variations climatiques en temps réel!
57

INVENTAIRE
1.
Poste météo sans fil
2.
Capteur de température sans fil (TX29U) et support.
3.
Mode d’emploi et fiche de garantie
4.
4 piles alcalines “AA” IEC LR6, 1.5V neuves.
58

CARACTERISTIQUES:
Poste météo
Affichage LCD
Commandes
Trou de
suspension
Couvercle des
piles
Pied pliable
59

•
Heure radio-pilotée (signal horaire WWVB) avec option de réglage manuel
•
Réception de l’heure activée/annulée
•
Affichage de l’heure en format 12/24 heures
•
Heure d’été activée/annulée
•
Affichage des heures, minutes et secondes
•
Option de fuseau horaire ±12 heures
•
Transmission sans fil à 915 MHz
•
Réception des signaux toutes les 4 secondes
•
Affichage de la température intérieure et extérieure (°F ou °C) et humidité intérieure (%HR)
•
Prévisions météo représentées par 15 bonshommes météo faciles à lire
•
Réglage de la sensibilité de l’icône de prévision météo
•
Affichage de la température en degrés Fahrenheit (°F) ou Celsius (°C) au choix
•
Affichage de la température intérieure et extérieure avec MIN/MAX enregistrés
•
Toutes données enregistrées extérieures MIN/MAX avec heure et date de réception
•
Affichage des min et max quotidiens de la température des canaux extérieurs
•
Toutes les données enregistrées MIN/MAX peuvent être remises à zéro
•
Peut recevoir jusqu’à trois émetteurs extérieurs
60

•
Contraste du LCD réglable
•
Indicateur de piles faibles
•
S’accroche au mur ou se pose sur une table.
Emetteur de température extérieure
•
Transmission à distance de la température extérieure au poste météo
par 915 MHz
•
Boîtier imperméable
•
Support mural
•
Installer l’appareil dans un endroit abrité. Eviter la pluie directe et els
rayons du soleil.
61

MONTAGE:
Avec un seul émetteur
1. Commencer par installer les piles dans l’émetteur de température (voir “Installation et
remplacement des piles dans l’émetteur de température”).
2. Dans les 30 secondes qui suivent la mise sous tension de l’émetteur, installer les piles dans le
poste météo (voir “Installation et remplacement des piles dans le poste météo”). Une fois
que les piles sont en place, tous les segments du LCD s’allument brièvement, à la suite de quoi
l’heure - 12:00 et le "bonhomme météo" s’affichent. S’ils ne s’affichent pas sur le LCD dans les
60 secondes, retirer les piles et attendre au moins 10 secondes avant de les remettre en place.
3. Quand les piles sont en place dans l’émetteur, le poste météo commence à recevoir les données
de l’émetteur. La température extérieure et l’icône de réception du signal devraient s’afficher sur
le poste météo. Si ceci ne se produit pas dans les 3 minutes qui suivent, retirer les piles des
deux appareils et recommencer à partir de l’étape 1.
4. Pour assurer une transmission 915 MHz suffisante, la distance entre le poste de température et
l’émetteur ne devrait pas excèder 100m (voir les notes sur la “Mise en place” et la “ Réception
915 MHz ”).
62

REMARQUE IMPORTANTE:
Le récepteur intérieur enregistre la température en Farenheit (°F) par défaut, mais l'utilisateur
peut règler les Celsius (°C) manuellement, SEULEMENT après que le montage initial a été
effectué, conformément au mode d'emploi. Après que le LCD affiche les relevés de
température/humidité de l'émetteur extérieur, il est possible de règler la température en °C (Voir
la section FONCTIONNEMENT ci-dessous).
Avec plusieurs émetteurs
1. Retirer toutes les piles du poste de température et des émetteurs et attendre 60 secondes si le
réglage a déjà été effectué avec un émetteur.
2. Installer les piles dans le premier émetteur.
3. Dans les 30 secondes qui suivent la mise sous tension du premier émetteur, installer les piles
dans le poste de température. Une fois que les piles sont en place, tous les segments du LCD
s’allument brièvement, à la suite de quoi l’heure - 12:00 et le bonhomme météo s’affichent. S’ils
ne s’affichent pas sur le LCD dans les 60 secondes, retirer les piles et attendre au moins 60
secondes avant de les remettre en place.
4. La température et l’humidité extérieures captées par le premier émetteur (Canal 1) devraient
63

s’afficher sur le poste météo Si ceci ne se produit pas dans les 2 minutes qui suivent, retirer les
piles des deux appareils et recommencer à partir de l’étape 1.
5. Installer les piles du deuxième émetteur dès que la température et l’humidité extérieures du
premier émetteur s’affichent sur le poste météo.
Note: Il est nécessaire de mettre en place les piles du deuxième émetteur dans les 25 secondes qui
suivent la réception du premier émetteur.
6. La température et l’humidité extérieure du second émetteur et l’icône « Canal 2 » devraient
s’afficher sur le poste météo. Si ceci ne se produit pas dans les 2 minutes qui suivent, retirer les
piles de tous les appareils et recommencer à partir de l’étape 1.
7. Installer les piles du troisième émetteur dès que l’icône « Canal 2 » et les données extérieures
s’affichent sur le poste de température. Dans les 2 minutes qui suivent, les données extérieures
du Canal 3 du troisième émetteur s’affichent et l’icône de canal retourne à « 1 », une fois que le
troisième émetteur est capté. Sinon, recommencer le montage à partir de l’étape 1.
Installer les piles du troisième émetteur dans les 25 secondes qui suivent la réception du
Note:
deuxième émetteur.
64

8. Pour assurer une transmission 915 MHz suffisante, la distance entre le poste de température et
l’émetteur ne devrait pas excèder 100m (voir les notes sur la “Mise en place” et la “
Réception 915 MHz ”).
Note:
En cas de non réception du signal sur la première fréquence (915 MHz) dans les 45 secondes, la
fréquence passe à 920MHz et un nouvel essai d’apprentissage est effectué pendant 45 secondes. En
cas d’insuccès, un nouvel essai de réception est effectué pendant 45 secondes sur 910MHz. Ces
essais sont aussi effectués pour re-synchronization.
IMPORTANT:
•
Le récepteur intérieur enregistre la température en Farenheit (°F) par défaut, mais
l’utilisateur peut règler les Celsius (°C) manuellement, SEULEMENT après que le
montage initial a été effectué, conformément au mode d’emploi Après que le LCD affiche
les relevés de température/humidité des 3 émetteurs extérieurs, il est possibl e de règler
la température en °C (Voir la section FONCTIONNEMENT ci-dessous).
65

•
Des problèmes de transmission apparaissent si les capteurs supplémentaires ne sont pas
montés conformément aux indications ci-dessus. En cas de problèmes de transmission, retirer
les piles de tous les appareils et recommencer à partir de l’étape 1.
9. Une fois que la température est captée et affichée sur le poste météo, la réception du code
horaire WWVB Heure radio-pilotée est lancée automatiquement. Ceci prend généralement 3-5
minutes dans de bonnes conditions.
En cas de non réception de l’heure WWVB dans les 10 minutes, appuyer sur SET pour entrer l’heure
manuellement.
Un essai de réception WWVB est effectué quotidiennement toutes les heures justes entre minuit et 6h.
Si la réception est réussie, aucun autre essai de réception n’est effectué jusqu’au lendemain. Quand la
réception est réussie, l’heure captée supplante l’heure réglée manuellement. La date est actualisée en
même temps que l’heure reçue. (Se reporter aux notes des sections “Heure radio-pilotée (signal
horaire WWVB)” et “Réglage manuel de l’heure”).
66

INSTALLATION DES PILES
INSTALLET ET REMPLACER LES PILES DANS LE POSTE METEO
Le poste météo fonctionne avec 2 piles AA, IEC LR6, 1.5V. Pour
installer et remplacer les piles, suivre les étapes ci-dessous:
1. Retirer le couvercle à l’arrière du poste météo.
2. Installer les piles en respectant les polarités (voir les
marques).
3. Remettre le couvercle en place.
67

INSTALLER ET REMPLACER LES PILES DANS L’EMETTEUR DE TEMPERATURE
L’émetteur de température fonctionne avec 2 piles AA, IEC LR6, 1.5V. Pour les installer ou les
remplacer, suivre les étapes ci-dessous:
Note:
Quand on remplace les piles de l’un des appareils, il est nécessaire de réenclencher tous les appareils
1. Sortir le porte-piles dans le bas de l’émetteur.
2. Installer les piles en respectant les polarités (voir les marques).
3. Remettre le porte-piles en place.
68

conformément aux procédures de montage. En effet, un code de sécurité est attribué de façon
aléatoire par l’émetteur au moment de la mise en fonction et ce code doit être reçu et stocké en
mémoire par le poste de météo dans les 3 minutes qui suivent la mise en place des piles.
REMPLACEMENT DES PILES:
Il est recommandé de remplacer régulièrement les piles de tous les appareils pour en assurer un
maximum de précision (Cycle de vie des piles voir les Spécificati ons ci-dessous).
Participez à la protection de l’environnement et déposez toutes piles usagées dans
une décharge autorisée.
69

COMMANDES:
Commande
de réglage
MAX
Commande
Poste météo:
Le poste météo possède quatre commandes faciles à utiliser.
Commande SET (Réglage):
•
Pour entrer le mode de réglage des fonctions suivantes: contraste du LCD, fuseau horaire, heure
d’été activée/annulée, réception de l’heure activée/annulée, affichage 12/24 heures, réglage
manuel de l’heure, année, mois, date, °C/°F, et réglages de la sensibilité des prévisions météo.
Command
e de canal
Commande
MIN/
70

•
Appuyer pour réenclencher les données de température et d’humidité maximum ou minimum
intérieures ou du canal extérieur sélectionné (réenclenche toutes les données enregistrées au
niveau actuel)
MIN/ MAX
•
Pour alterner entre les données de température extérieure maximum/ minimum et de
température et d’humidité intérieure maximum/ minimum.
Commande ‘+’
•
Pour alterner entre l’affichage de la ‘date’ et des ‘secondes’ sur l’affichage de l’heure.
•
Pour effectuer les différents réglages.
Commande CH (canal)
•
Pour alterner entre les émetteurs extérieurs 1, 2 et 3 (si plus d’un émetteur est utilisé)
•
Pour sortir du mode de réglage manuel
71

ECRAN LCD ET REGLAGES:
de prévision météo
commandée
Heure
Température intérieure en °F
Icône
(Bonhomme météo)
Température extérieure en °F
Témoin de piles faibles
Temp. min. quotid.
Icône de réception de l’heure radio-
Affiche "date" ou "secondes"
Humidité relative intérieure en %
Icône de tendance météo
Signal de réception extérieure*
Identification de l’émetteur
( No. de canal)
Temp. max. quotid.
72

* Quand le signal extérieur est capté par le poste météo, cet icône s’allume. (Sinon l’icône ne s’affiche
pas sur le LCD). Ceci permet à l’utilisateur de savoir si la dernière récepti on a réussi (icône allumé) ou
non (icône éteint). Par ailleurs, un clignotement bref indique qu’une réception est en cours.
Pour plus de clarté, l’écran LCD est divisé en 5 sections qui affichent l’heure et les données intérieures,
les révisions météo et les données extérieures.
Section 1 - HEURE ET DATE
•
Dans le mode normal, affiche l’heure et la date radio-commandées.
•
Affiche les ‘secondes’ de l’heure quand on appuie sur "+".
Section 2 - TEMPERATURE ET HUMIDITE INTERIEURES
•
Affiche la température et l’humidité intérieures actuelles.
73

Section 3 - ICONE METEO (REPRESENTEE PAR LE BONHOMME METEO)
•
Affichage du temps qu’il devrait faire sous la forme de 15 symboles météo (représentés par un
Bonhomme) qui changent d’apparence en fonction de l’évolution de la pression atmosphérique
(changement de pression atmosphérique passée) et de la température extérieure actuelle.
•
Affiche l’indicateur de tendance météo
•
Un symbole de réception de signal indique que le récepteur reçoit les données extérieures.
•
Pour le format des icônes météo, se reporter à la section "
METEO
Section 4 - TEMPERATURE EXTERIEURE
•
Section 5 –TEMPERATURE MIN ET MAX QUOTIDIENNE
•
"
Affiche la température extérieure du canal sélectionné.
Affiche la température quotidienne maximum et minimum du canal sélectionné actuellement.
PREVISION ET TENDANCE
74

Heure radio-pilotée (signal horaire WWVB)
La station de radio WWVB du NIST (Institut National des Normes et de la Technologie—Division Heure
et Fréquence) est situé à Ft. Collins, Colorado, et transmet sans interruption un signal horaire exact à
travers les Etats-Unis à 60 kHz. Le signal peut être capté dans un rayon de 3200 km au moyen de
l’antenne interne du poste météo. Cependant, en raison de la nature de la ionosphère terrestre, la
réception est très limitée durant la journée. Le poste météo recherche le signal la nuit, moment où la
réception est meilleure.
La station de radio WWVB reçoit les données horaires de la pendule atomique NIST de Boulder,
Colorado. Une équipde de physiciens atomistes mesure continuellement chaque seconde de chaque
jour au dix millionième de seconde près par jour. Ces physiciens ont créé une norme internationale
selon laquelle une seconde équivaut à 9,192,631,770 vibrations d’un atome de Cesium-133 dans un
vacuum.
Pour de plus amples informations sur le WWVB et la pendule atomique, visiter le site du NIST : at
http://www.boulder.nist.gov/timefreq/stations/wwvb.htm. Pour entendre l’heure NIST, appeler le
(303)499-7111. Ce numéro vous connectera à une horloge parlante, annoncée chaque minute en
75

“Temps coordonné universel”, également appelé Greenwich Mean Time (GMT). Cett e heure ignore les
changements d’heure d’été. Après le top de chaque minute, une tonalité se fait entendre toutes les
secondes. Il est possible que votre poste météo ne soit pas exact à la seconde près en raison des
variations du quartz. La pendule mettra quelques jours à ajuster le quartz pour afficher l’heure avec une
précision : 0,10 seconde près par jour.
REGLAGES MANUELS:
Les réglages suivants peuvent s’effectuer dans le mode de réglage:
•
Réglage du contraste du LCD
•
Réglage du fuseau horaire
•
Réglage de l’heure d’été
•
Réglage de la réception de l’heure
•
Réglage de l’heure12/24 heures
•
Réglage manuel de l’heure
•
Réglage du calendrier
•
Réglage de l’unité de température en °F/°C
•
Réglage de la sensibilité de l’icône de prévision météo
76

Appuyer sur SET pour passer au mode de réglage:
REGLAGE DU CONTRASTE DU LCD
Le contraste du LCD peut se règler sur 8 niveaux, au choix de l’utilisateur (le réglage par défaut est
LCD 4). Pour régler le niveau de contraste désiré:
1. L’affichage ci-dessus apparaît. Appuyer sur ‘+’ pour sélectionner le niveau de contraste désiré.
2. Appuyer sur SET pour confirmer et entrer le “Réglage du fuseau horair e” ou sortir du mode de
réglage en appuyant sur CH.
clignotant
77

REGLAGE DU FUSEAU HORAIRE:
Le fuseau horaire du poste météo est réglé par défaut sur "EST -5" . Pour règler un autre fuseau
horaire:
1. Le fuseau horaire actuel se met à clignoter.
2. Utiliser la commande ‘+’ pour règler le fuseau horaire de -5, -6, -7 …-12, 12, 11, 10… 0, -1, -2, -3,
-4 h, par tranches consécutives d’une heure.
(Les fuseaux horaires étasuniens sont: -5h(EST), -6h(CST), -7h(MST) et -8h(PST), -9h (ALA)
et -10h (HAW).)
3. Appuyer sur SET pour confirmer et entrer le “Réglage de l’heure d’été” .
clignotant
78

REGLAGE DE L’HEURE D’ETE
1. Le signe “DST ON” se met à clignoter sur le LCD.
2. Utilier ‘+’ pour activer ou annuler la fonction d’heure d’été.
3. Appuyer sur SET pour confirmer et entrer la “Mise sous/hors de la réception de l’heure” ou
sortir du mode de réglage en appuyant sur CH.
clignotant
79

MISE SOUS/HORS TENSION DE LA RECEPTION DE L’HEURE
(icône de réception de
Dans les zones dans lesquelles la réception de l’heure WWVB n’est pas possible, désactiver la
réception de l’heure pour faire fonctionner la pendule comme une pendule à quartz normale. (Fonction
activée par défaut).
1. Le mot “ON” et l’icône de réception de l’heure se mettent à clignoter sur le LCD.
2. Utiliser la commande ‘+’ pour désactiver la fonction de réception de l’heure.
3. Confirmer avec la commande SET et entrer le “Réglage de l’affichage de l’heure 12/24 H” ou
sortir du mode de réglage en appuyant sur CH.
clignotant
l’heure)
clignotant
80

Note:
Si la fonction de réception de l’heure est désactivée manuellement, la pendul e ne fait aucun
essai de réception de l’heure WWVB tant que cette fonction reste désactivée. L’icône de
réception de l’heure ne s’affiche pas sur le LCD.
REGLAGE DE L’AFFICHAGE DE L’HEURE 12/24 H
1. Après avoir règlé la réception de l’heure, appuyer sur SET. “12h” ou “24h” clignote sur le LCD.
(réglage par défaut: 12 h)
2. Appuyer sur ‘+’ pour sélectionner le mode d’affichage “12h” ou “24h”.
clignotant
81

3. Appuyer encore une fois sur SET pour confirmer et entrer le “Réglage manuel de l’heure” ou
sortir du mode de réglage en appuyant sur CH.
Note: Quand le mode d’affichage 24h est sélectionné, le calendrier est affiché en format date-mois.
Dans le mode d’affichage 12h, le format du calendrier est mois-date).
REGLAGE MANUEL DE L’HEURE
Si le poste météo ne réussit pas à capter le signal WW VB (interférences, distance de transmission,
etc), il est possible de régler l’heure manuellement. La pendule fonctionne alors comme une pendule à
quartz normale.
Heures (clign)
Minutes (clign)
82

Pour règler la pendule:
1. Les chiffres des heures et des minutes se mettent à clignoter sur la section de l’affichage de
l’heure.
2. Utiliser la commande ‘+’ pour règler les heures, puis appuyer sur SET pour règler les minutes.
3. Les minutes se mettront à clignoter. Appuyer sur ‘+’ pour les règler.
4. Appuyer encore une fois sur SET pour confirmer et entrer le “
sortir du mode de réglage en appuyant sur CH.
Note:
Bien que l’appareil ait été réglé manuellement, il continue à essayer de recevoir le signal toutes les
heures justes. Quand il reçoit le signal, l’heure captée supplante l’heure réglée manuellement.
REGLAGE DU CALENDREIR
” ou
83

REGLAGE DU CALENDREIR
La date par défaut du poste météo est 1. 1. de l’année 2006 après le montage initial. Quand l’appareil
"Date-Mois" (pour affichage 24h)
"Mois-Date." (pour affichage 12h)
Année
84

reçoit les signaux radio-commandés, la date est actualisée automatiquement. Cependant, en cas de
non réception des signaux, il est possible de règler la date manuellement. Pour ce faire;
1. Utiliser la commande ‘+’ pour règler l’année, de 2003 à 2029 (réglage par défaut: 2006).
2. Appuyer sur SET pour entrer le mode de réglage du mois.
3. Les chiffres du mois se mettent à clignoter. Appuyer sur ‘+’ pour règler le mois, puis sur SET
pour passer au réglage du quantième.
4. Les chiffres des quantièmes se mettent à clignoter. Appuyer sur ‘+’ pour règler la date.
5. Confirmer avec SET et entrer le “°REGLAGE DE L’UNITE DE TEMPERATURE EN C/°F” ou
sortir du mode de réglage en appuyant sur CH.
REGLAGE DE L’UNITE DE TEMPERATURE EN °C/°F
clignotant
85

Le relevé de la température par défaut est réglé en °F (degrés Fahrenheit). Pour sélectionner les °C
(degrés Celsius):
1. “°C/ °F” clignotera. Utiliser la commande ‘+’ pour alterner entre “°C” et “°F”.
2. Après avoir sélectionné l’unité de température désirée, appuyer sur SET et entrer le “Réglage de
la sensibilité de l’icône de prévision météo” ou sortir du mode de réglage en appuyant sur
CH.
REGLAGE DE LA SENSIBILITE DE L’ICONE DE PREVISION METEO
Dans les lieux soumis à des changements de temps brusques, il est possible de règler le seuil à un
niveau différent pour un affichage plus rapide des changements de conditions météo.
Niveau de
sensibilité
(clignotant)
86

1. Utiliser la commande ‘+’ pour règler le niveau de la sensibilité météo. Il y a 3 niveaux ; le niveau
1 est le plus sensible et le niveau 3 le moins sensible (le réglage par défaut est «2»).
2. Confirmer avec SET et sortir du mode de Réglages manuels.
PREVISIONS ET TENDANCES METEO:
Les icônes de prévision météo (Bonhomme météo):
L’un des 15 différents icônes météo (représentés par le bonhomme météo vêtu de différentes façons)
s’affiche au centre du LCD, pour indiquer les prévisions météo en fonction du niveau de la pression
atmosphérique (Ensoleillé, Ensoleillé ‘+’ Nuageux, Nuageux ‘+’ Pluvieux) et la température extérieure
actuelle (la température est détectée par le Canal 1):
87

≥≥≥≥
°°°°
°°°°
°°°°
°°°°
°°°°
°°°°
Ensoleillé
78.8
(26°°°°C)
F
66.2 à 78.6
(19 à 25.9°°°°C)
F
50 à 66
F
32 à 49.8
F
F (0
C)
(10
à
18.9°°°°C)
(0 à 9.9°°°°C)
< 32
88

≥≥≥≥
°°°°
°°°°
°°°°
°°°°
°°°°
°°°°
Ensoleillé
+
Nuageux
78.8
(26°°°°C)
F
66.2 à 78.6
(19
à
25.9°°°°C)
F
50 à 66
(10
à
18.9°°°°C)
89
F
32 à 49.8
(0 à 9.9°°°°C)
F
< 32
F (0
C)

≥≥≥≥
°°°°
°°°°
°°°°
à
°°°°
°°°°
°°°°
Nuageux
+
Pluvieux
Note:
Après le montage, ignorer les relevés des prévisions météo pendant les 12-24 heures qui suivent. Ceci
donnera au poste météo le temps de recueillir les données de pression atmosphérique à une altitude
constante et de produire ainsi des prévisions plus exactes.
78.8
(26°°°°C)
F
66.2 à 78.6
(19 à 5.9°°°°C)
F
50 à 66
(10
90
à
18.9°°°°C)
F
32
49.8
(0 à 9.9°°°°C)
F
< 32
F (0
C)

Comme pour toutes les prévisions météo, il est impossi ble de garantir une précision absolue. On
estime que les prévisions du poste météo sont exactes à 75% environ, en raison des différentes zones
pour lesquelles le poste météo a été conçu. Dans les zones dans lesquelles les changements de temps
sont brusques (par exemple de soleil à pluie), le poste météo sera plus précis que dans les régions
dans lesquelles le temps ne change pratiquement jamais (par exemple, soleil quasi constant).
Si le poste météo est déplacé dans un lieu considérablement plus élevé ou plus bas que le point initial
(par exemple, du rez-de-chaussée aux étages supérieurs d’une maison), retirer les piles et les remettre
en place après 30 secondes environ. Ceci permettra au poste météo de ne pas confondre le nouvel
emplacement avec un changement de pression atmosphérique, alors qu’il n’est dû qu’à un léger
changement d’altitude. Ignorer les prévisions météo pendant les 12-24heures qui suivent pour donner
au poste météo le temps de fonctionner à une altitude constante.
INDICATEURS DE TENDANCE METEO
Les indicateurs de tendance météo (les flèches tournées vers le haut ou le bas, près du Bonhomme
météo) accompagnent les icônes. Quand l’indicateur est tourné vers le haut, il indique que la pression
91

atmosphérique augmente et que le temps devrait s’améliorer, quand il est tourné vers le bas, la
pression atmosphérique est en baisse et le temps devrait se dégrader.
Ceci permet de voir comment le temps a changé et comment il devrait évoluer. Par exemple, un
indicateur est tourné vers le bas et accompagné d’un icône de soleil et nuage, indique que le dernier
changement de temps notable s’est produit quand le temps était ensoleillé (icône de soleil seulement).
En conséquence, le prochain changement de temps sera être indiqué par un nuage de pluie puisque
l’indicateur est tourné vers le bas.
Note :
Une fois que l’indicateur de tendance météo a enregistré un changement de pression atmosphérique, il
reste affiché en permanence sur le LCD.
92

AFFICHAGE DE LA TEMPERATURE ET DE L’HUMIDITE INTERIEURES:
érature
intérieure en
Icône intérieur
La température et l’humidité intérieures sont relevées et affichées sur la deuxième section du LCD.
Temp
°F
Humidité int.
relative en %
93

AFFICHAGE DE LA TEMPERATURE EXTERIEURE:
l’émetteur quand plus d’un
Icône
La température et l’humidité extérieures sont relevées et affichées sur la quatrième section du LCD.
extérieur
Note:
Un numéro de canal s’affiche à côté de la température extérieure dans le cas où plus d’un émetteur est
utilisé.
Température
extérieure en °F
N° d’identification de
émetteur est utilisé
94

AFFICHAGE DES DONNES INTERIEURES MAXIMUM ET MINIMUM ENREGISTREES:
1. Dans le mode d’affichage normal, appuyer trois fois sur la commande MIN/ MAX. La température
intérieure maximum s’affichera sur la section du bas du LCD, avec l’heure et l a date de
l’enregistrement.
2. Appuyer encore une fois sur MIN/ MAX pour afficher la température intérieure maximum sur la
section du bas du LCD, avec l’heure et la date de l’enregistrement.
95

d’enregist. de la
Icône min
Icône intérieur
96
Heure
température
minimum.
Température
min

3. Appuyer encore une fois sur MIN/ MAX pour retourner à l’affichage normal.
REENCLENCHEMENT DES DONNES INTERIEURES MAXIMUM ET MINIMUM
ENREGISTREES :
1. Dans le mode d’affichage normal, appuyer sur MIN/ MAX pour avancer à l’affichage des
données intérieures MIN/ MAX.
2. Appuyer une fois sur SET pour réenclencher les données intérieures minimum et maximum
affichées à l’heure, la date, la température et l’humidité actuelles.
Note:
Les données minimum et maximum doivent être réenclenchées séparément.
AFFICHAGE DES DONNES EXTERIEURES MAXIMUM ET MINIMUM ENREGISTREES
1. Dans le mode d’affichage normal, appuyer sur CH pour sélectionner le canal désiré. Le numéro
d’identification du canal s’afficheraà côté du relevé de température extérieure.
2. Appuyer une fois sur MIN/MAX. La température max. du canal sélectionné s’affichera. L’heure
d’enregistrement de cette température s’affichera aussi.
97

Température
Icône extérieur
max
Heure et date
d’enregis. de la
température
max.
N° de canal
Icône max
98

3. Appuyer encore une fois sur MIN/MAX pour afficher la température minimum du canal
sélectionné avec l’heure et la date d’enregistrement de ce relevé.
4. Appuyer encore une fois sur MIN/MAX pour passer à l’affichage de la température max/min
intérieure.
REENCLENCHEMENT DES DONNES EXTERIEURES MAXIMUM ET MINIMUM
ENREGISTREES
Note:
•
Les données extérieures Max/Min des différents canaux doivent être réenclenchées séparément.
•
Les données extérieures Max/Min doivent être réenclenchées séparément.
1. Dans le mode d’affichage normal, appuyer sur CH pour sélectionner le canal désiré. Le numéro
d’identification du canal (N° canal) s’affichera au-dessus du relevé de température extérieure.
Note: Le numéro de l’émetteur ne s’affiche que lorsque plus d’un émetteur est utilisé.
2. Appuyer une fois sur MIN/ MAX L’icône "max" s’affichera.
3. Appuyer sur SET pour réenclencher la température extérieure maximum à la valeur actuelle.
99
 Loading...