

Konica Minolta bizhub C10 User Manual

bizhub C10
Facsimile User’s
Guide
4556-9608-00A

Thank You
Thank you for purchasing a bizhub C10. You have made an excellent choice.
This User’s Guide describes operating procedures and precautions for the
use of the Fax functions. Be sure to read this User’s Guide before starting
any machine operations.
In order to ensure correct use of the Fax functions, read this User’s Guide,
and then store it where it can immediately be referred to when necessary.
Trademarks
KONICA MINOLTA and the KONICA MINOLTA logo are trademarks or registered trademarks of KONICA MINOLTA HOLDINGS, INC.
bizhub and PageScope are trademarks or registered trademarks of
KONICA MINOLTA BUSINESS TECHNOLOGIES, INC.
All other trademarks and registered trademarks are the property of their
respective owners.
Copyright Notice
Copyright © 2007 KONICA MINOLTA BUSINESS TECHNOLOGIES, INC.,
Marunouchi Center Building, 1-6-1 Marunouchi, Chiyoda-ku, Tokyo, 1000005, Japan. All Rights Reserved. This document may not be copied, in
whole or part, nor transferred to any other media or language, without written
permission of KONICA MINOLTA BUSINESS TECHNOLOGIES, INC.
Manual Notice
KONICA MINOLTA BUSINESS TECHNOLOGIES, INC. reserves the right to
make changes to this guide and to the equipment described herein without
notice. Considerable effort has been made to ensure that this guide is free of
inaccuracies and omissions. However, KONICA MINOLTA BUSINESS
TECHNOLOGIES, INC. makes no warranty of any kind including, but not limited to, any implied warranties of merchantability and fitness for a particular
purpose with regard to this guide. KONICA MINOLTA BUSINESS TECHNOLOGIES, INC. assumes no responsibility for, or liability for, errors contained in
this guide or for incidental, special, or consequential damages arising out of
the furnishing of this guide, or the use of this guide in operating the equipment, or in connection with the performance of the equipment when so operated.

Contents
1 Introduction ....................................................................................................... 1
Machine Parts 2
Front View 2
Rear View 3
2 Control Panel and Configuration Menu .......................................................... 5
About the Control Panel 6
Fax Mode Screen 10
About the Fax Mode Screen 10
About the Function Mode Screen 10
Entering Fax Mode 11
Symbol list 11
Configuration Menu Overview 12
Configuration Menu 17
MACHINE SETTING 18
FAX REGISTRATION 19
TX SETTING 20
RX SETTING 21
COMM. SETTING 23
REPORTING 24
Contents
i

USER SETTING 25
Specifying Settings in Configuration Menu 26
General Procedure for Specifying Settings in Configuration Menu 26
Memory Reception 27
Setting Up the Memory RX Mode 27
Turning Off the Memory RX Mode 28
3 Sending Faxes .................................................................................................29
Basic Fax Operation 30
Sending a Fax Using the ADF 30
Sending a Fax Using the Original Glass 32
Improving Resolution 34
Specifying a Recipient 34
Directly Entering a Fax Number 35
Using a One-Touch Dial Key 35
Using the Speed Dial Function 36
Using the List Function of the Phone Book 36
Using the Search Function of the Phone Book 37
Using the Redial Function 38
Specifying Multiple Recipients 38
Sending a Fax to Multiple Recipients (Broadcast Transmission) 38
Sending a Fax at a Specified Time (Timer Transmission) 40
Sending a Fax Manually 41
Sending a Fax Manually After Using the Telephone 41
Sending a Fax Manually Using the On Hook Key 41
Canceling (Deleting) a Document Queued in Memory for Transmission 42
About the Fax Header 43
4 Receiving Faxes ..............................................................................................45
Receiving Faxes Automatically 46
Receiving Faxes Manually 46
Printing Received Faxes 47
What Is the Guaranteed Imageable (Printable) Area? 47
Adding the Sender’s Information When Printing Faxes 48
Method of printing during reception 49
REDUCTION RX: ON 49
REDUCTION RX: OFF 51
REDUCTION RX: CUT 53
5 Registering Recipients ....................................................................................55
About the FAX REGISTRATION Function 56
One-Touch Dialing 56
Programming a One-Touch Dial Key 56
Changing/Deleting One-Touch Dial Information 58
Speed Dialing 59
Programming a Speed Dial Number 59
Contentsii

Changing/Deleting Speed Dial Information 60
Group Dialing 61
Programming Group Dialing 61
Changing/Deleting Group Dialing Information 62
6 Confirmation Mode .........................................................................................65
About the Machine’s Counters 66
Checking the Counter for Fax Printing 66
Checking the Counter for Total Scans 66
Checking the Transmission/Reception Result From the Message Window 67
About the Reports and Lists 67
Printing the Reports and Lists 67
TX RESULT REPORT 67
RX RESULT REPORT 68
ACTIVITY REPORT 68
MEMORY DATA LIST 69
MEMORY IMAGE PRINT 69
ONE-TOUCH LIST 69
SPEED DIAL LIST 69
GROUP DIAL LIST 70
7 Troubleshooting ..............................................................................................71
Problems When Sending Faxes 72
Problems When Receiving Faxes 73
Error Messages on the Message Window 75
8 Appendix .......................................................................................................... 77
Technical Specifications 78
Entering Text 79
Key Operation 79
Entering Fax Numbers 79
Entering Names 80
Entering Email Addresses 80
Changing Input Mode 81
Inputting Example 81
Correcting Text And Input Precautions 82
Index 83
Contents iii

Contentsiv

Introduction
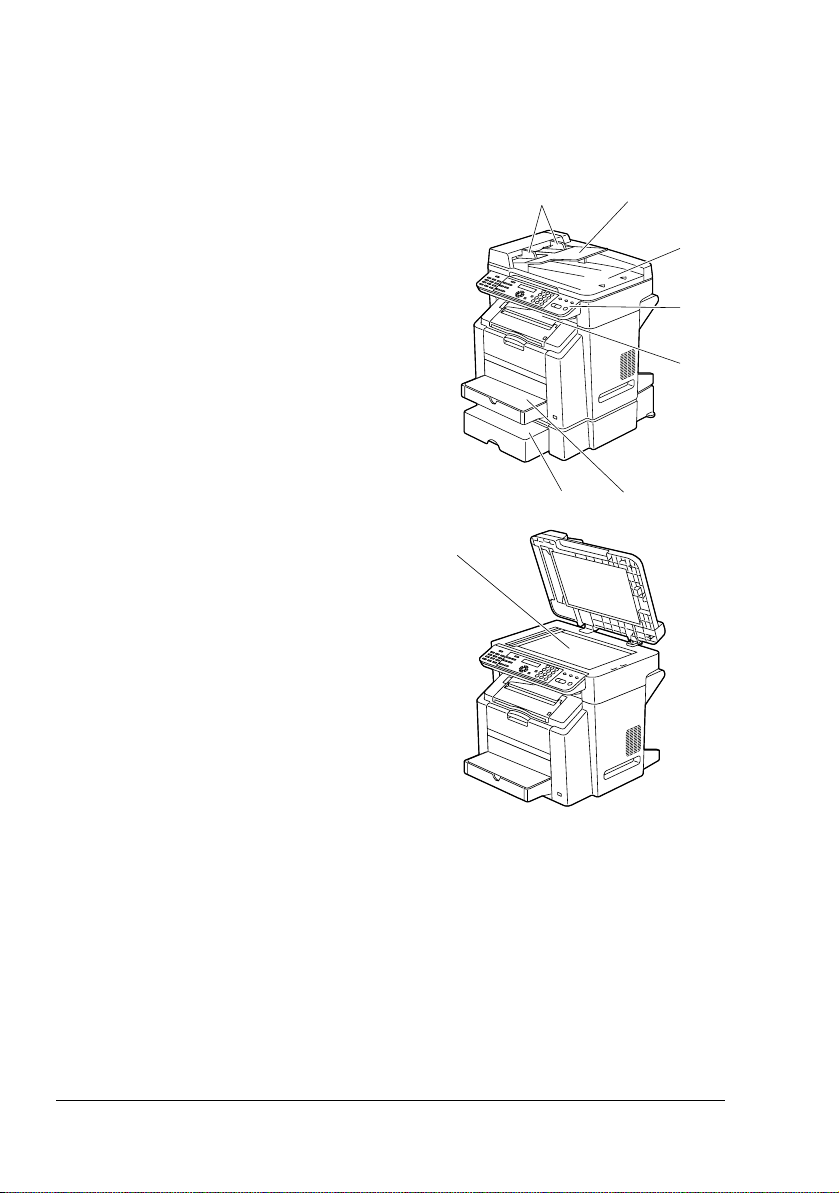
Machine Parts
The parts of the machine referred to throughout this manual are illustrated
below. Please take some time to become familiar with them.
Front View
1–Automatic document feeder
(ADF)
1a–Document guide
1b–Document feed tray
1c–Document output tray
2–Control panel
3–Output tray
4–Tray 1 (Multipurpose tray)
5–Tray 2
6–Original glass
" The ADF may appear as
“document cover” in some
status and error messages.
1b1a
1c
2
3
5 4
6
Machine Parts2
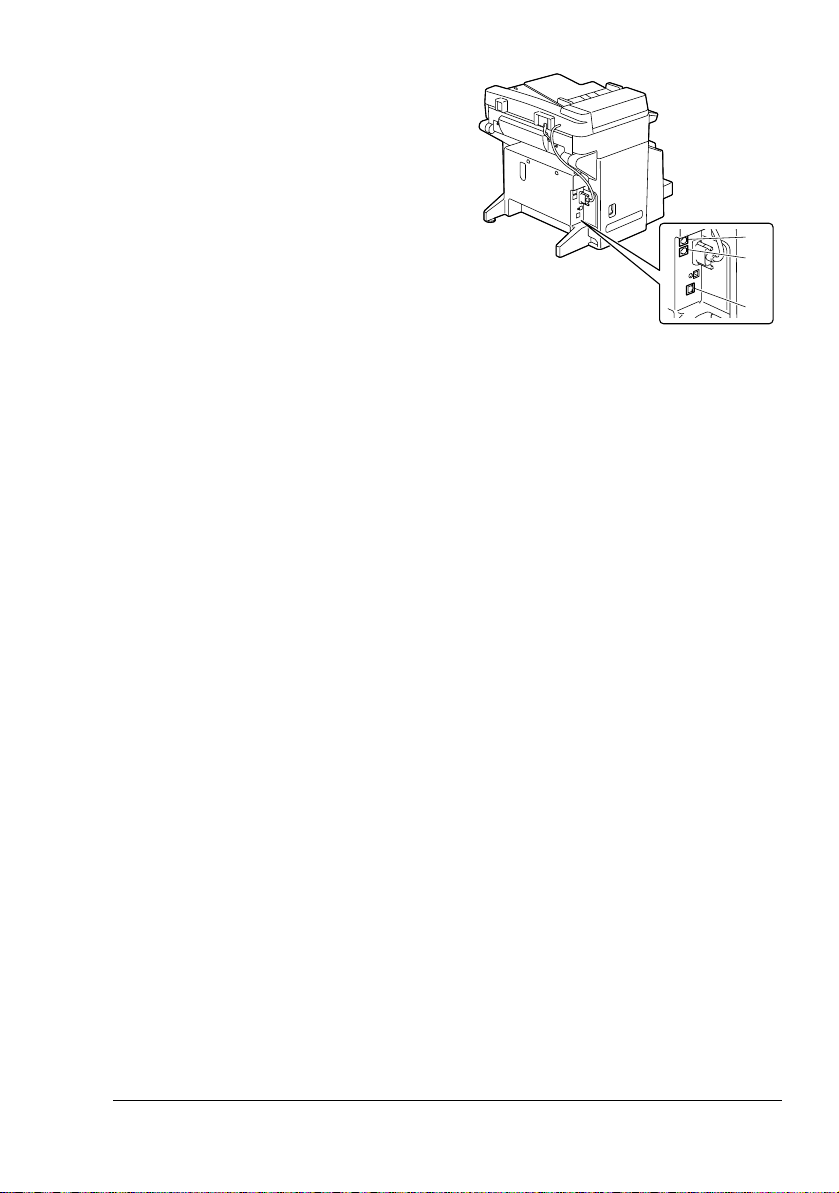
Rear View
1–TEL (telephone) jack
2–LINE (telephone line) jack
3–10Base-T/100Base-TX (IEEE
802.3) Ethernet interface port
1
2
3
Machine Parts 3

Machine Parts4

Control Panel and
Configuration
Menu
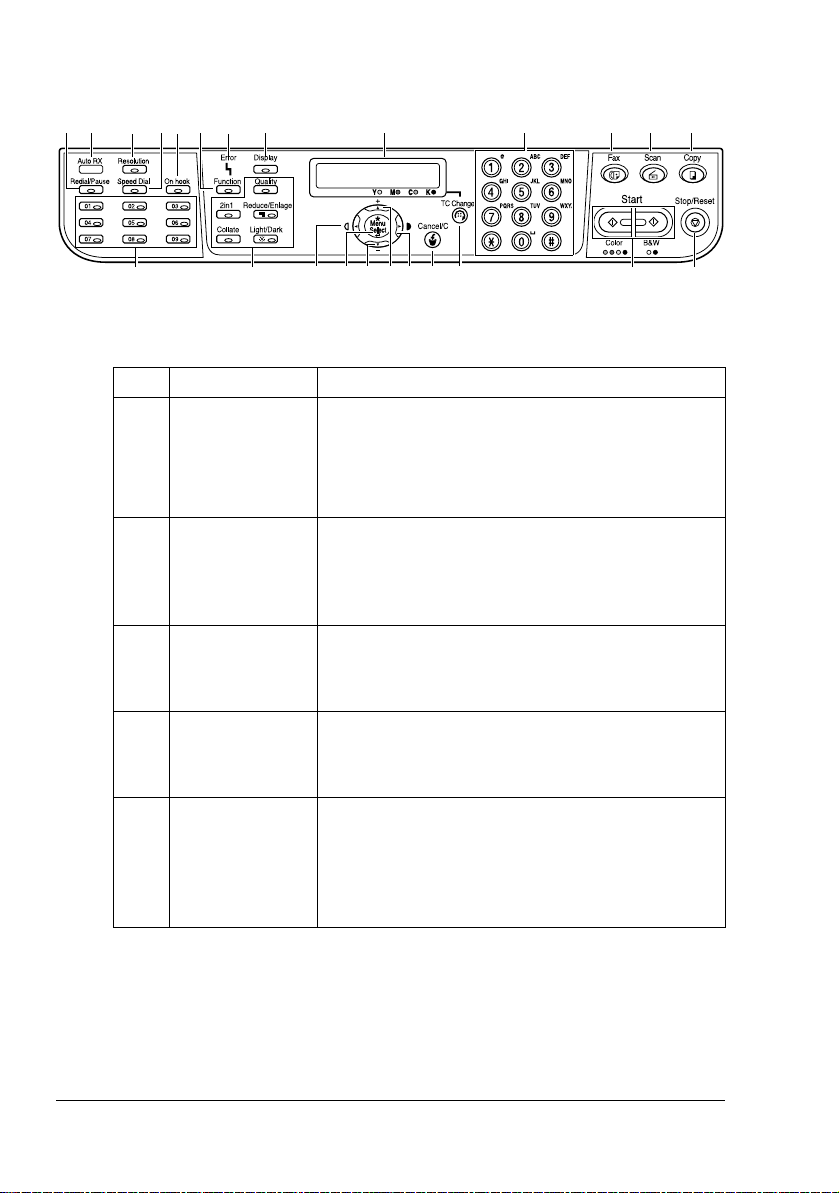
About the Control Panel
12 4
3 5 6 7 8 10 11 12 13
No. Part Name Description
1 Redial/Pause
key
2 Auto RX indica-
tor
3 Resolution key Adjusts the image quality of the fax documents.
4 Speed Dial key Recalls a speed dial number.
5 On hook key Sends and receives transmissions with the
9
161720
Recalls the last number dialed.
Inserts a pause when a number is dialed.
For details, refer to “Using the Redial Function” on
page 38.
Lights up when the automatic reception function is
selected.
For details, refer to “Receiving Faxes Automatically” on page 46.
For details, refer to “Improving Resolution” on
page 34.
For details, refer to “Using the Speed Dial Function” on page 36.
receiver on the hook.
For details, refer to “Sending a Fax Manually Using
the On Hook Key” on page 41 or “Receiving Faxes
Manually” on page 46.
15181921222324
14
About the Control Panel6

6 Function key Specifies tray, duplex, ID card copy, and fax set-
tings.
For details, refer to “Sending a Fax to Multiple
Recipients (Broadcast Transmission)” on page 38,
“Sending a Fax at a Specified Time (Timer Transmission)” on page 40, or “Canceling (Deleting) a
Document Queued in Memory for Transmission”
on page 42.
7 Error indicator Indicates an error condition.
For details, refer to “Error Messages on the Message Window” on page 75.
8 Display key Checks the machine status and settings.
For details, refer to “Confirmation Mode” on page
65.
9 Message window Displays settings, menus, and messages.
For details, refer to “Fax Mode Screen” on page
10.
10 Keypad Enters desired number of copies.
Enters fax number, E-mail address, and names of
recipients.
For details on dialing a destination, refer to “Specifying a Recipient” on page 34. For details on entering text, refer to “Entering Text” on page 79.
11 Fax key Enters Fax mode.
Lights up in green to indicate that the machine is in
Fax mode.
For details, refer to “Fax Mode Screen” on page
10.
12 Scan key Enters scan mode (Scan to E-mail or Scan to PC).
Lights up in green to indicate that the machine is in
Scan mode.
For details, refer to the Printer/Copier/Scanner
User’s Guide.
About the Control Panel 7

13 Copy key Enters Copy mode.
Lights up in green to indicate that the machine is in
Copy mode.
For details, refer to the Printer/Copier/Scanner
User’s Guide.
14 Stop/Reset key Stops an operation at any time.
Exits the menu.
Cancels scanning, transmission, reception, and
printing, and returns them to their default settings.
For details, refer to “Basic Fax Operation” on page
30.
15 Start key Starts a color copy.
Starts a monochrome copy or fax.
For details, refer to “Basic Fax Operation” on page
30 or “Receiving Faxes Manually” on page 46.
16 TC Change key Press when replacing the toner. For details, refer
to the Printer/Copier/Scanner User’s Guide.
17 Cancel/C key Clears the specified number of copies.
Switches to the first screen of a menu item or to
the main screen.
For details, refer to “Specifying Settings in Configuration Menu” on page 26 or “Entering Text” on
page 79.
18 ) Moves right through the available menu choices.
Sets the current character and moves the cursor to
the right when entering text.
For details, refer to “Specifying Settings in Configuration Menu” on page 26.
19 + Moves up in the menu structure.
Scrolls upward through the available menu
choices.
For details, refer to “Specifying Settings in Configuration Menu” on page 26.
About the Control Panel8

20 , Moves down in the menu structure.
Scrolls downward through the available menu
choices.
For details, refer to “Specifying Settings in Configuration Menu” on page 26.
21 Menu Select key Enters the menu structure.
Moves down in the menu structure.
Selects the displayed menu choice.
For details, refer to “Specifying Settings in Configuration Menu” on page 26.
22 * Moves left through the available menu choices.
Sets the current character and moves the cursor to
the left when entering text.
For details, refer to “Specifying Settings in Configuration Menu” on page 26.
23 Copy operations
key
Provides copy operations.
For details, refer to the Printer/Copier/Scanner
User’s Guide.
" If a copy operations key is pressed in Fax
mode, the machine enters Copy mode. For
details, refer to the Printer/Copier/Scanner
User's Guide.
24 One-touch dial
keys
Registers and recalls one-touch dial numbers.
For details, refer to “Using a One-Touch Dial Key”
on page 35 or “One-Touch Dialing” on page 56.
About the Control Panel 9

Fax Mode Screen
About the Fax Mode Screen
Press the Fax key to display the Fax mode screen.
The following appears in the Fax mode screen.
Position Part Name Description
Upper Mode or function
name
Lower Messages Displays messages such as operating instructions.
About the Function Mode Screen
Press the Function key to display the Function mode screen.
The following appears in the Function mode screen.
Position Part Name Description
Upper Function name 1.BROADCAST
Indicates the currently selected mode or function
settings.
Displays the current menu, function or settings.
Error messages are displayed when errors occur.
The current time and remaining amount of mem-
ory is displayed during standby.
A fax can be sent to multiple recipients in a single
transmission. For details, refer to “Sending a Fax to
Multiple Recipients (Broadcast Transmission)” on
page 38.
2.TIMER TX
A document can be scanned and stored in memory to
be sent at a specified time. For details, refer to “Sending a Fax at a Specified Time (Timer Transmission)”
on page 40.
3.CANCEL RESERV.
Of the documents stored in memory and waiting to be
sent, a specific document can be selected and
deleted. For details, refer to “Canceling (Deleting) a
Document Queued in Memory for Transmission” on
page 42.
Lower Messages Displays messages such as operating instructions.
Fax Mode Screen10
Entering Fax Mode
Before using the Fax function, make sure that the Fax key lits green. Otherwise, press it to enter the Fax mode.
Pressing the Speed Dial key, Redial/Pause key or a one-touch dial key
switches the machine to Fax mode when it is in any mode other than Fax
mode.
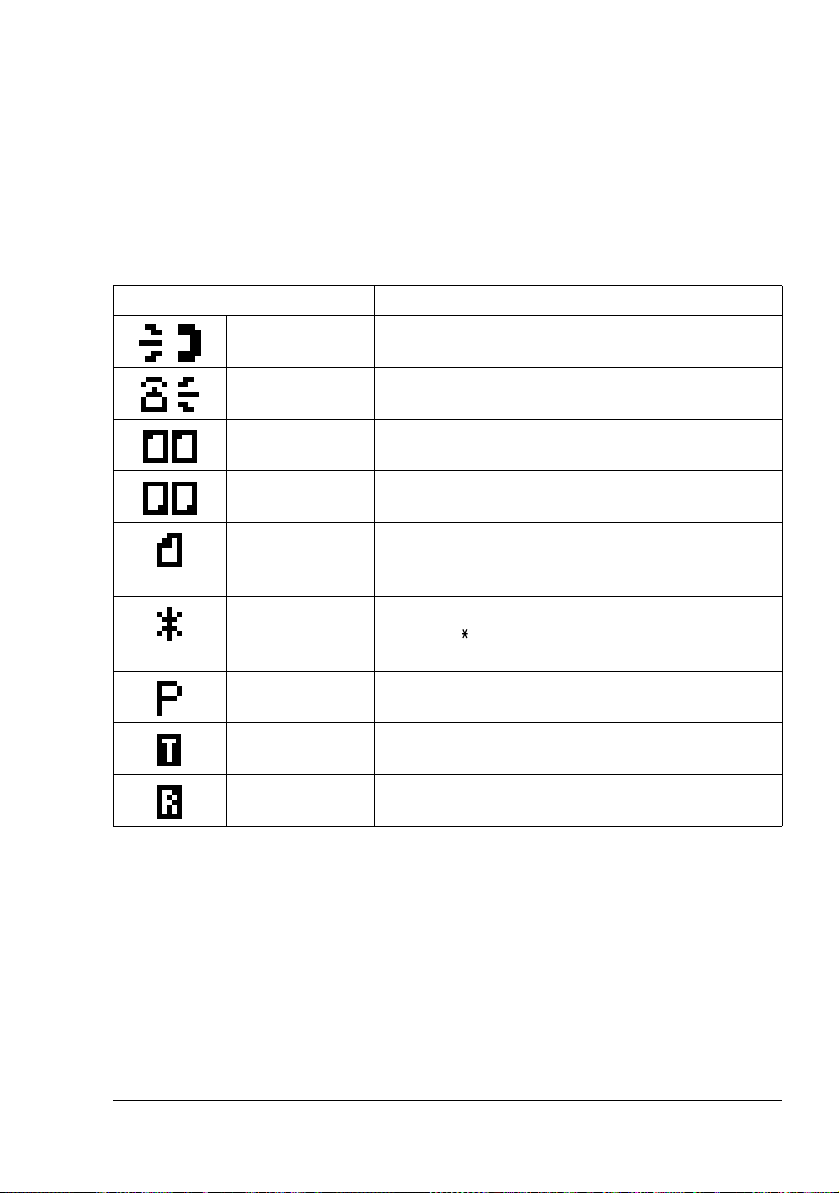
Symbol list
Symbol Description
Dialing A fax number is being dialed.
Ringing The machine is being called.
Sending The document is being sent.
Receiving A document is being received.
Number of
scanned document pages
Tone If Pulse is selected as the telephone line type,
Pause A pause is inserted.
Timer transmission
Memory reception
The number of scanned document pages appears
next to the icon.
press the key to temporarily change the line type
to Tone.
A document is queued for timer transmission.
A document is queued for memory reception.
Fax Mode Screen 11
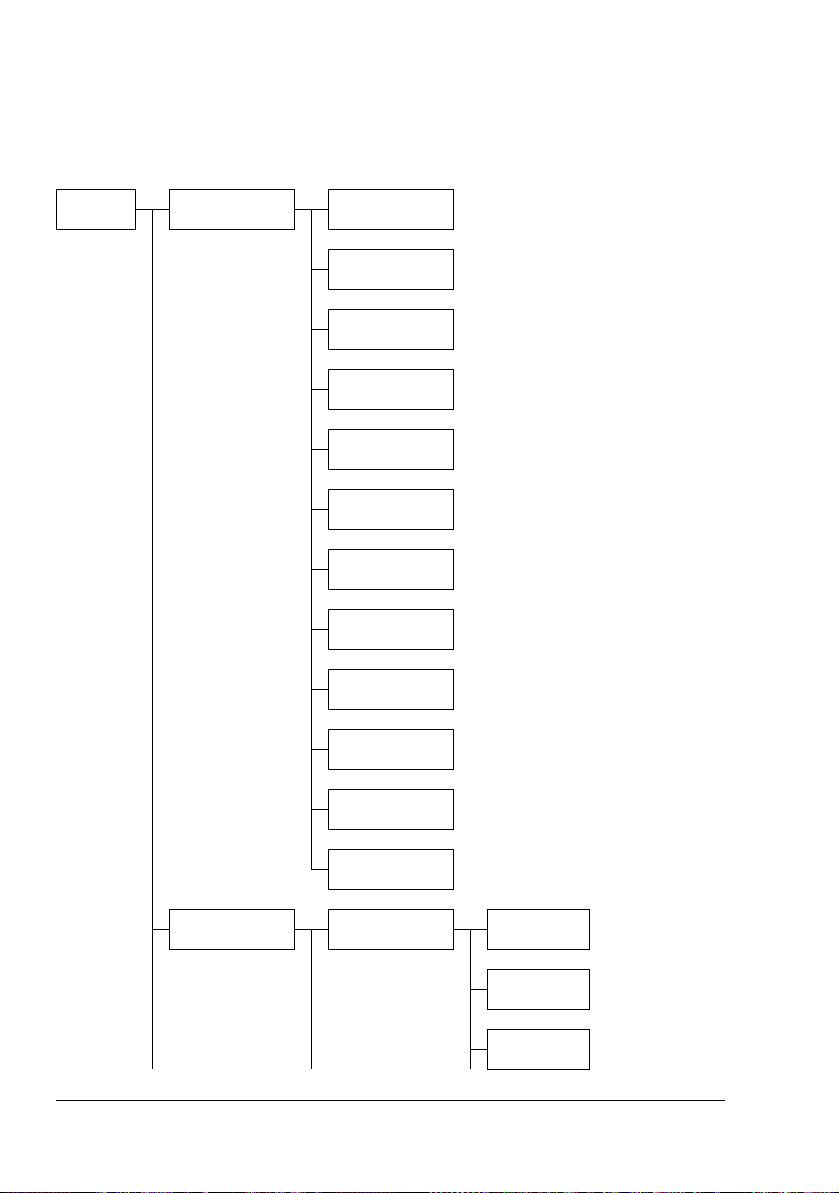
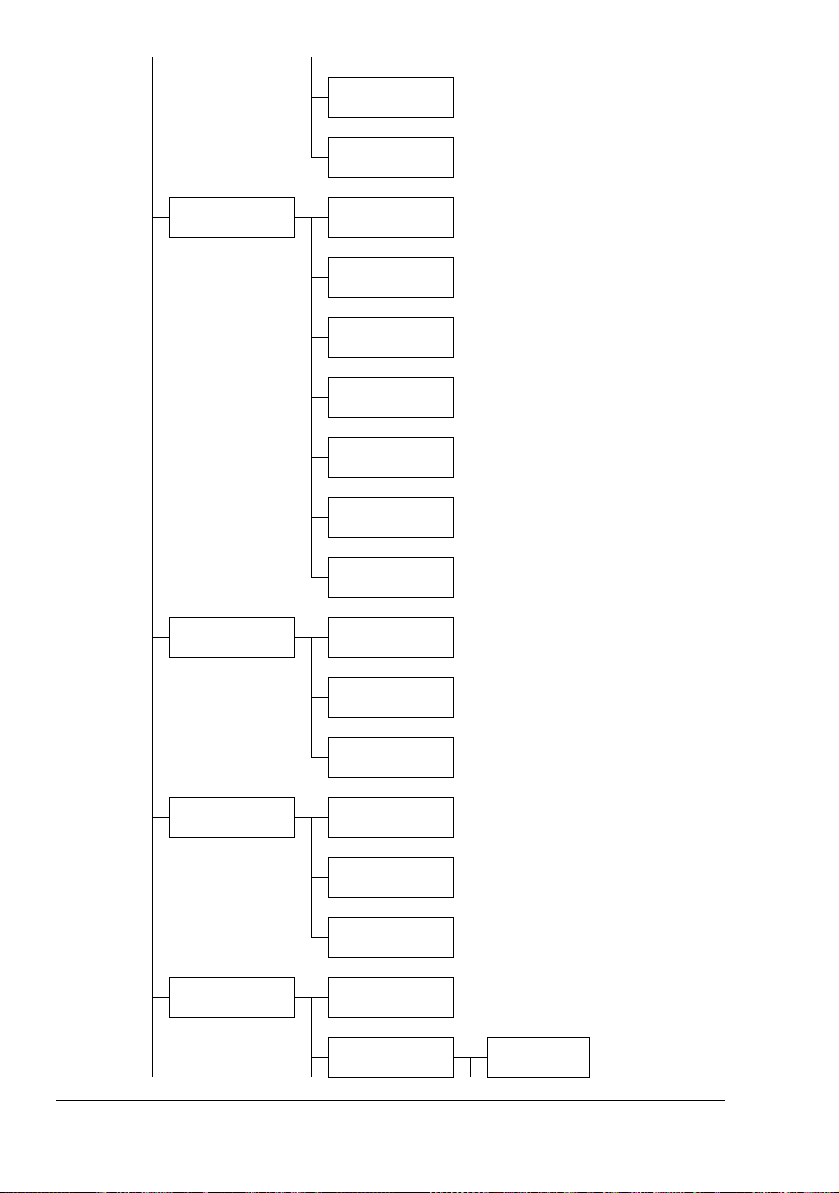
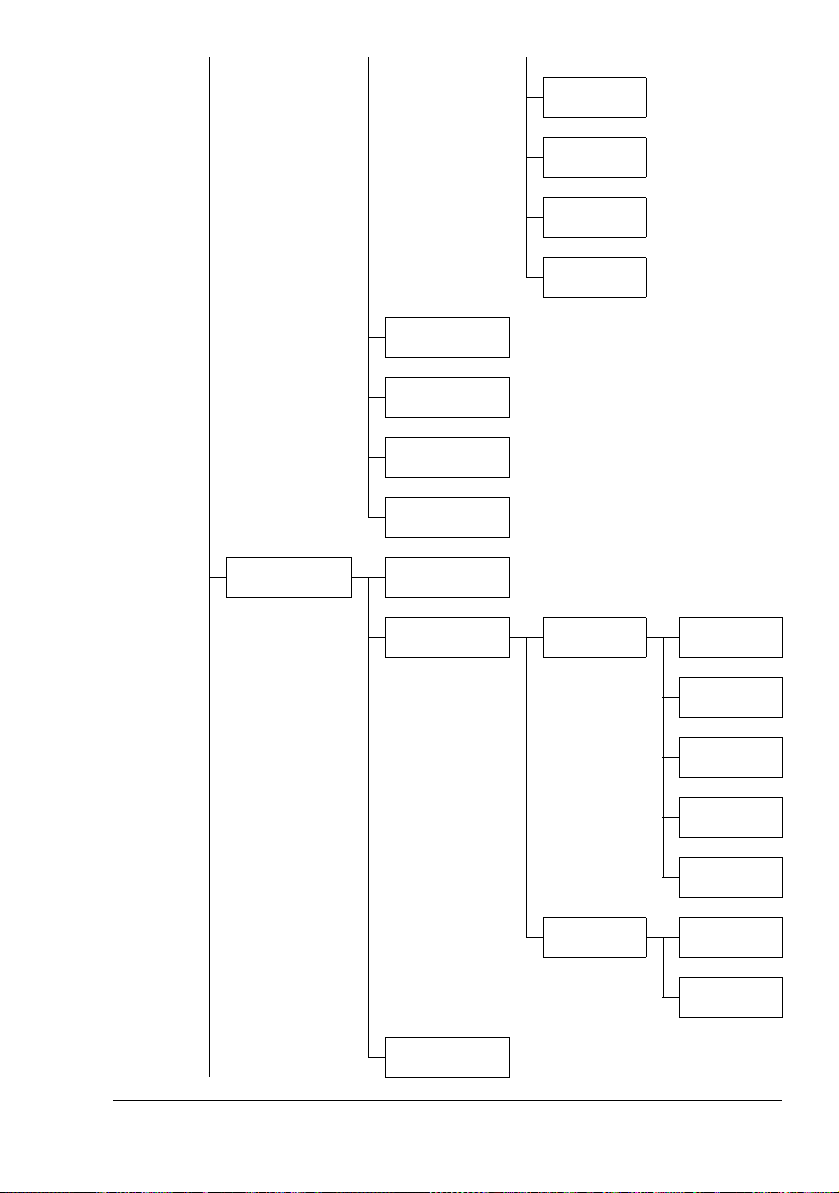
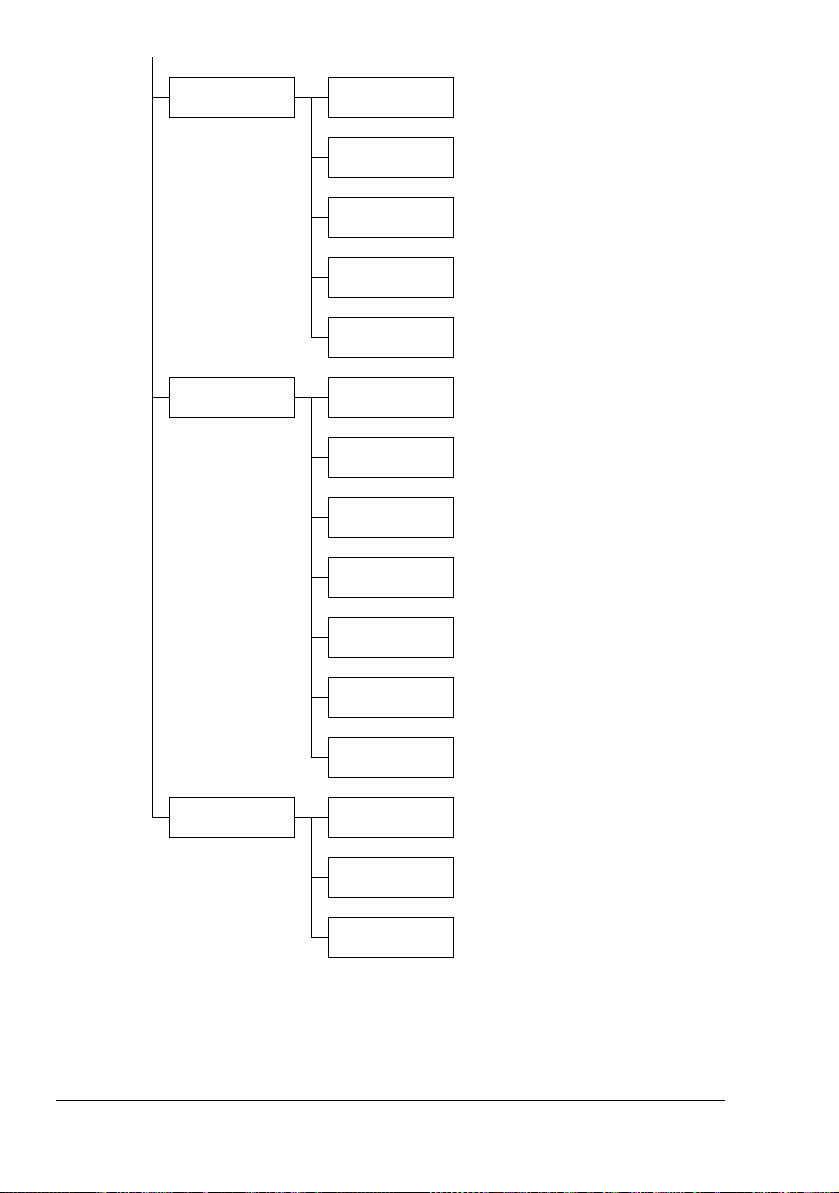
Configuration Menu Overview
The bizhub C10 configuration menu accessible from the control panel is
structured as shown below.
" Press the Menu Select key to enter the configuration menu.
Menu
Select
MACHINE SETTING
1.AUTO PANEL
RESET
2.ENERGY
SAVE MODE
3.LCD CONTRAST
4.LANGUAGE
5.LAMP OFF
TIME
6.BUZZER
VOLUME
7.INITIAL
MODE
8.TONER
EMPTY STOP
PAPER SOURCE
SETUP
9.TONER NEAR
EMPTY
10.AUTO CONTINUE
11.CALIBRATION
12.REMOTE
MONITOR
1.TRAY1
PAPER
Configuration Menu Overview12
PLAIN
PAPER
TRANSPARENCY
LABELS

LETTERHEAD
ENVELOPE
POSTCARD
THICK
STOCK
GLOSSY
2.TRAY2
PAPER
COPY SETTING 1.MODE
2.DENSITY
LEVEL (A)
3.DENSITY
LEVEL (M)
4.COLLATE
5.QUALITY
6.PAPER PRIORITY
FAX REGISTRATION
1.ONE-TOUCH
DIAL
2.SPEED DIAL
A4
LETTER
3.GROUP DIAL
TX SETTING 1.SCAN DEN-
SITY
Configuration Menu Overview 13
2.RESOLUTION
3.HEADER
RX SETTING 1.MEMORY RX
COMM. SETTING
MODE
2.NO. of
RINGS
3.REDUCTION
RX
4.RX PRINT
5.RX MODE
6.FOOTER
7.SELECT
TRAY
1.TEL LINE
TYPE
2.LINE MONITOR
3.PSTN/PBX
REPORTING 1.ACTIVITY
USER SETTING 1.FAX PTT
REPORT
2.TX RESULT
REPORT
3.RX RESULT
REPORT
SETTING
2.DATE&TIME SET HOUR
Configuration Menu Overview14
3.DATE FORMAT
4.PRESET
ZOOM
5.USER FAX
NO.
6.USER NAME
SET
MINUTE
SET YEAR
SET MONTH
SET DAY
DIRECT PRINT 1.IMAGE
QUALITY
2.PAPER SIZE TRAY1 PLAIN
PAPER
LABELS
POSTCARD
THICK
STOCK
GLOSSY
TRAY2 A4
LETTER
3.N-UP LAY-
OUT
Configuration Menu Overview 15
NETWORK SETTING
1.IP ADDRESS
2.SUBNET
MASK
3.GATEWAY
4.DNS CONFIG.
5.DDNS CONFIG.
E-MAIL SETTING
SCANNER SETTING
1.SENDER
NAME
2.E-MAIL
ADDRESS
3.SMTP
SERVER
4.SMTP PORT
NO.
5.SMTP TIMEOUT
6.TEXT
INSERT
7.DEFAULT
SUBJECT
1.RESOLUTION
2.IMAGE FORMAT
3.CODING
METHOD
Configuration Menu Overview16

Configuration Menu
The machine settings can be changed according to the desired normal operations.
" All factory default values are shown in bold.
" For details on specifying settings on the configuration menu, refer to
“Specifying Settings in Configuration Menu” on page 26.
" For details on specifying settings for options in the PAPER SOURCE
SETUP, COPY SETTING, DIRECT PRINT, E-MAIL SETTING and
SCANNER SETTING menus and for some options in the MACHINE
SETTING and USER SETTING menus, refer to the Printer/Copier/
Scanner User's Guide.
" For details on specifying settings for options in the NETWORK SET-
TING, refer to the Reference Guide.
Configuration Menu 17
MACHINE SETTING
1.AUTO PANEL
RESET
2.ENERGY SAVE
MODE
3.LCD CONTRAST
4.LANGUAGE
5.LAMP OFF
TIME
6.BUZZER VOLUME
7.INITIAL
MODE
8.TONER EMPTY
STOP
For details on specifying settings, refer to the Printer/
Copier/Scanner User’s Guide.
Settings HIGH / LOW / OFF
Select the volume of alarms and the beep that sounds
when a key is pressed.
Settings COPY / FAX
Select the mode that the machine starts up in or returns
to after the automatic reset.
Settings ON / ON(FAX) / OFF
Select whether or not printing stops when the toner has
run out.
If a fax is received while printing stopped, the received
fax is saved in memory and automatically printed after
the error is corrected.
ON: All printing stops when the machine has
detected that the toner has run out.
9.TONER NEAR
EMPTY
10.AUTO CONTINUE
11.CALIBRATION
12.REMOTE
MONITOR
ON (FAX): Only fax printing stops when the
machine has detected that the toner has run out,
and a message appears in the message window.
OFF: Printing does not stop when the machine has
detected that the toner has run out, and a message
appears in the message window.
For details on specifying settings, refer to the Printer/
Copier/Scanner User’s Guide.
Settings ON / OFF
Select whether or not to perform image stabilization. If
ON is selected, image stabilization is started.
For details on specifying settings, refer to the Printer/
Copier/Scanner User’s Guide.
For details on specifying settings, refer to the Printer/
Copier/Scanner User’s Guide.
Configuration Menu18

FAX REGISTRATION
1.ONE-TOUCH
DIAL
2.SPEED DIAL Program speed dial numbers with fax numbers, allowing
3.GROUP DIAL Program a single one-touch dial key with a maximum of
Program one-touch dial keys with fax numbers, allowing
the recipient to be specified easily without the need to
manually enter the number using the keypad.
A maximum of nine one-touch dial keys can be programmed.
For details on specifying one-touch dial keys, refer to
“One-Touch Dialing” on page 56.
the recipient to be specified easily without the need to
manually enter the number using the keypad.
A maximum of 100 fax numbers can be programmed.
For details on specifying speed dial numbers, refer to
“Speed Dialing” on page 59.
50 different fax numbers as one group. Programming a
one-touch dial key with a group of fax numbers is convenient when documents are frequently sent to a group of
multiple recipients.
For details on specifying group dialing, refer to “Group
Dialing” on page 61.
Configuration Menu 19
TX SETTING
1.SCAN DENSITY
2.RESOLUTION Settings STD / FINE / S/F / H/T
3.HEADER Settings ON / OFF
Settings
Specify the density for scanning a document.
Select the default scanning resolution (image quality).
STD: For documents containing normal text (such
FINE: For documents containing small text
S/F: For documents such as newspapers or those
H/T: For documents with shades, such as photos
To change the resolution from the default setting before
transmission, press the Resolution key.
Select whether or not the transmission information (date
sent, sender’s name, fax number, etc.) is printed on sent
faxes.
LIGHT DARK
as handwriting) (Standard)
containing detailed illustrations (Super Fine)
(Half Tone)
If H/T was selected, a screen appears, allowing
you to select a detailed setting (STD, FINE or S/F).
" On models for the USA, Canada and Korea, OFF
cannot be selected.
Configuration Menu20

RX SETTING
1.MEMORY RX
MODE
2.NO. of
RINGS
3.REDUCTION RXSettings ON / OFF / CUT
4.RX PRINT Settings MEMORY RX / PRINT RX
Settings ON / OFF
Select whether to allow (ON) memory reception or not
(OFF). In cases when confidential faxes are being
received, the received documents can be stored in memory and printed at a specified time or when memory
reception is turned off (this function is set to OFF).
A password can be set to specify the starting time or
ending time of memory reception, or to cancel the function. The set starting time and ending time are valid
every day until memory reception is turned off.
For details on specifying settings, refer to “Setting Up the
Memory RX Mode” on page 27.
Settings 1-16 (Default : Depends on the sales
region)
Enter the number of rings (between 1 and 16) until the
machine automatically begins receiving the fax when an
external telephone is connected.
Select whether documents longer than the current paper
size are printed reduced, split, or discarded.
ON: The document is printed at a reduced size.
OFF: The document is printed at full size and split
onto multiple pages.
CUT: The document is printed, but any part that
does not fit within the page is erased. For details
on the relationship between the length of the
received document and the document that is actually printed, refer to “Printing Received Faxes” on
page 47.
Select whether the fax is printed only after all document
pages have been received or printing begins as soon as
the first page of the document is received.
MEMORY RX: Printing begins after all pages have
been received.
PRINT RX: Printing begins after the first page has
been received.
Configuration Menu 21

5.RX MODE Settings AUTO RX / MANUAL RX
Select whether the reception mode is set to automatic
reception or manual reception.
AUTO RX: Automatically begins receiving the fax
after the set number of rings.
MANUAL RX: Does not automatically receive the
fax. Reception begins after making a connection
by picking up the telephone receiver or pressing
the On hook key, then pressing the Start key.
For details on manual reception, refer to “Receiving
Faxes Manually” on page 46.
6.FOOTER Settings ON / OFF
Select whether or not the reception information (date
received, number of pages, etc.) is printed at the bottom
of each received document.
7.SELECT TRAY Settings TRAY1: DISABLE / ENABLE
TRAY2: DISABLE / ENABLE
Select which paper tray can be used to supply paper
when printing received documents or transmission
reports. A paper tray that cannot be used for supplying
paper can also be specified.
" If the tray2 is not installed, TRAY2 does not
appear.
Configuration Menu22
 Loading...