


KS-908HT
SPEAKER SYSTEM
INSTRUCTION MANUAL
SYSTEME DE ENCEINTE
MODE D’EMPLOI
LAUTSPRECHERSYSTEM
BEDIENUNGSANLEITUNG
LUIDSPREKERSYSTEEM
GEBRUIKSAANWIJZING
SISTEMA DIFFUSORI
ISTRUZIONI PER L’USO
SISTEMA DE ALTAVOCES
MANUAL DE INSTRUCCIONES
KENWOOD CORPORATION
LA DICHIARAZIONE DI CONFORMITA'
"CE" DI QUESTO
PRODOTTO E' DEPOSITATA PRESSO:
KENWOOD ELECTRONICS EUROPE B.V.
AMSTERDAMSEWEG 37 1422 AC UITHOORN THE NETHERLANDS
ENGLISH FRANÇAIS DEUTSCH NEDERLANDS ITALIANO ESPAÑOL
B61-1216-00 00 C (E) KW EW 0312

ENGLISH
2 EN

Introduction
Thank you for selecting our speakers as part of your high-fidelity system. We at KENWOOD are confident that your choice will bring you years of rich listening pleasure. Please take the time to read through this booklet carefully. It will help you to obtain the peak performance for which the speakers were designed.
For your records
Record the serial number, found on the back of the unit, in the spaces designated on the warranty card, and in the space provided below. Refer to these model and serial numbers whenever you call upon your KENWOOD dealer for information or service on this product. Model KS-908HT is composed of the front speakers, center speaker and surround speakers.
KS-908HT Serial number
Important Safeguards
 Caution: Read this item carefully to keep your safety.
1.Suffocation – After taking the unit out of the polyethylene bag, be sure to dispose of the polyethylene bag out of the reach of children. Otherwise, they may play with the bag, which could cause hazard of suffocation.
2.Water and moisture – The appliance should not be used near water - for example, near a bathtub, washbowl, kitchen sink, laundry tub, in a wet basement, or near a swimming pool, etc.
3.Heat – Do not install the unit near a source of heat, such as radiators, or under direct sunlight.
4.Modification – Do not attempt to open or modify the unit, for this could cause fire hazard or malfunction.
5.Cleaning – Do not use volatile solvents such as alcohol, paint thinner, gasoline, or benzine, etc. to clean the cabinet. Use a clean dry cloth.
6.Abnormal smell – If an abnormal smell or smoke is detected, immediately turn the power OFF and unplug the appliance from the wall outlet. Contact your dealer or nearest service center.
ENGLISH
3 EN
ENGLISH
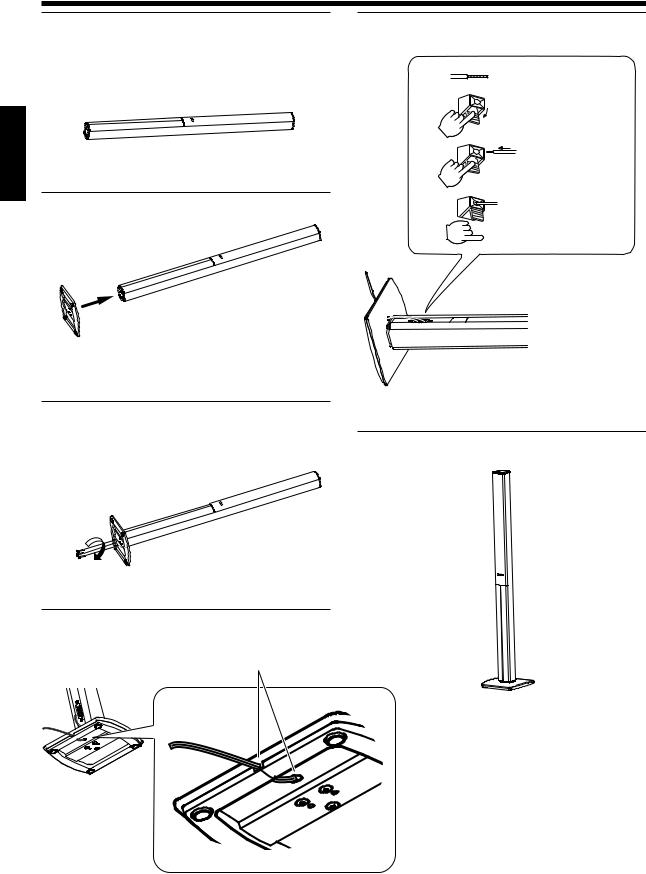
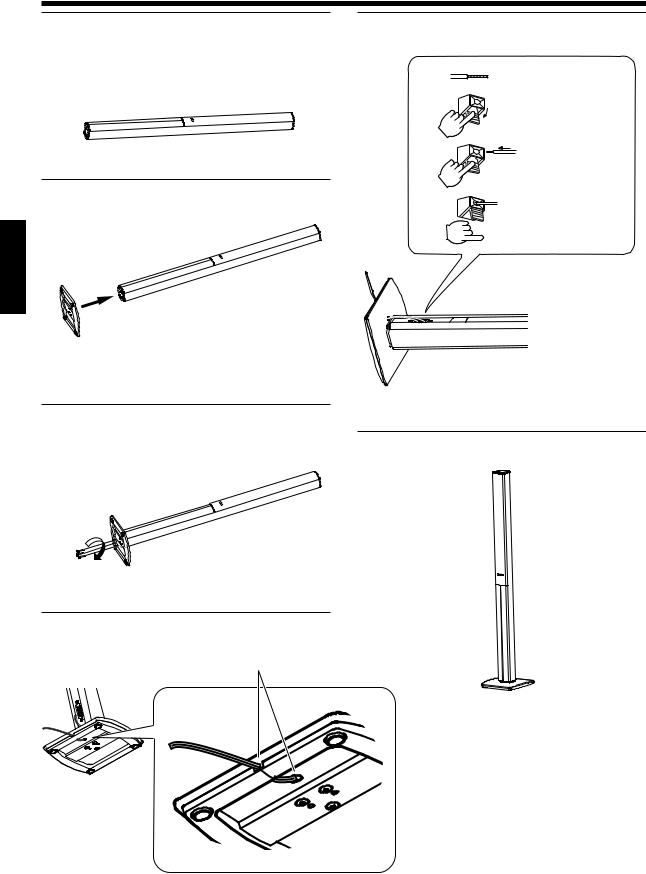
Assembly (Front Speaker)
1. Lay the speaker body on its side. |
5. Connect the speaker cord to the terminals. |
Place the speaker body gently on a level, stable surface (on a chair, etc.).
1.Twist wire’s conductor
2. Loosen
3. Insert the conductor
2. Fit the base.
4. Secure
• The base is heavy. Take care not to drop it on your foot.
3. Clamp the base using the provided screws.
4. Pass the speaker cord through the bottom of the base.
Insert the speaker cord here.
• Connect the wire with white stripes to the (+) terminal.
6. Stand up the speaker body.
4 EN
Installation
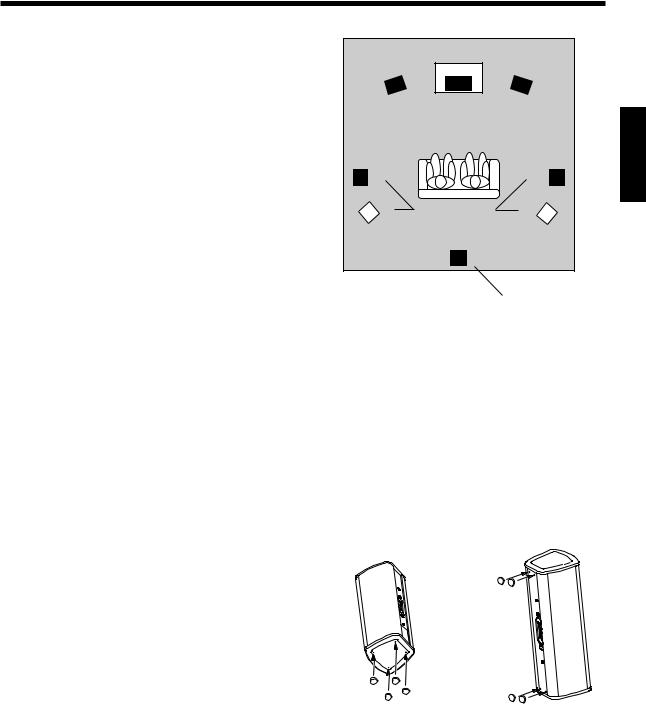
Positioning For Optimal Surround Sound
This speaker system can provide full Surround sound.To enjoy
the full effect of the Surround sound field, please position the
speakers as described below.
•Place the left and right speakers at each side of your TV. Angle the speakers towards the listening area to enhance the stereo effect.
•Place the center speaker on the center between the front left and right speakers. Tilt the speaker upward or downward so that it is directly facing the listening area.
•Place the surround speakers as high as possible, either directly to the sides of the listening area or else slightly behind the listening area. Adjust the angles so that these speakers are facing directly towards the listeners.
•Place the surround back speaker (option) behind the listining position, at the same height as the left and right surround speakers.
Left |
Center |
Right |
speaker |
speaker |
speaker |
Left |
|
Right |
|
|
|
|
Surround speakers |
|
|
|
|
|
Surround back speaker |
|
|
|
(option) |
ENGLISH
About Using Speakers Near a TV
This speaker include magnetic shielding and can therefore be installed close to a TV set. Note, however, that placing speakers too
close to a TV may in some cases produces distortion in the color reception. In such case, turn on the TV and check that color
reproduction is normal. If color is distorted, turn the TV off for 15 to 30 minutes, then turn it back on and check again. (This allows
the TV’s degaussing circuitry to correct for the magnetic field from the speakers.) If distortion is still present, move the speakers
further from the TV.
Attaching the cushions
Attach cushions to the base of the surround speaker. The |
On floor or shelf |
On the wall |
cushions prevent the speaker from sliding, and dampen its |
|
|
vibrations. |
|
|
Installation Methods
On Floor or Shelf
Place the speakers on the floor or on a shelf or other horizontal stable surface. Keep in mind that speakers are not fixed into place, so be careful to avoid knocking them over.
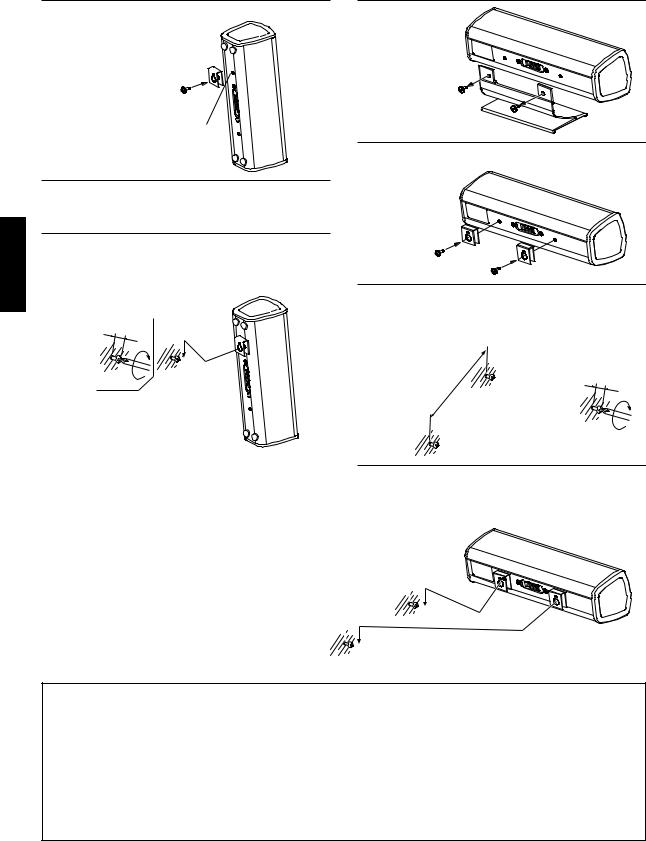
On the Wall
The center and surround speakers include mount holes for wall mounting. You can hang the surround speakers on the wall vertically, and the center speaker horizontally.
For vertical mount, you use only one screw and hang the speaker from its upper mount hole only. For horizontal mount, you need to set two screws into the wall at the appropriate distance so that you can hang the speaker from both mount holes. Continued on next page.
5 EN
ENGLISH
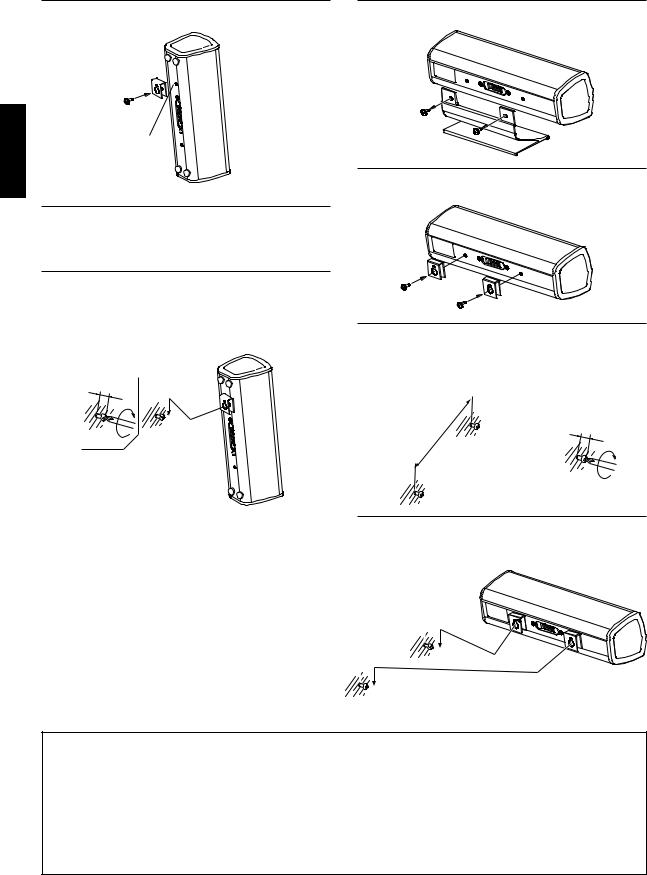
Surround speakers
1.Attach the bracket using supplied screw as shown below.
Be sure to attach in the upper hole.
2Screw a single screw into the wall at the desired location. Screw it only part way in, so that the screw projects 12 to 14 mm (1/2 to 9/16 inches) outward from the wall surface.
3.Hang the speaker by fitting the top mount hole (at the upper rear of the speaker) over the extending part of the screw. Confirm that the speaker is held firmly and securely in place.
12 - 14 mm (1/2 - 9/16”)
Center speaker
1. Remove the base.
2.Attach the bracket, using screws which are removed in step 1.
3.Screw two screws into the walls 120 mm (4-3/4 inches) apart, making sure that screws are horizontally level. Screw each screw only part way in, so that the screw projects 12 to 14 mm (1/2 to 9/16 inches) outward from the wall surface.
12 - 14 mm
120 mm (1/2 - 9/16”) (4-3/4”)
4.Hang the speaker by fitting the two mount holes (at the rear of the speaker) over the extending part of the screw. Confirm that the speaker is held firmly and securely in place.
Precautions
Please observe the following precautions when mounting speakers onto the wall.
•Be sure that the wall you are using is strong enough to support the full weight of the speaker (approx. 1.1 kg [2.4 lb]).
•Wall screws must be purchased separately. Be sure to use screws that are appropriate for the wall you are using, and that are long enough to provide sufficient strength.
•If you are uncertain about the wall’s support strength, the type of screw to use, or any other points regarding this type of
installation, please consult a contractor or other qualified person before proceeding.
Be sure to follow the procedure given here when carrying out installation. Kenwood can assume no liability for injury or damage that may occur if a speaker setup falls from the wall as a result of incorrect installation or insufficient support strength.
6 EN

Connections
The speaker wires and labels of speakers’ back panel are color-coded to facilitate connection. Connect each wire to the matching-
colored terminal, as shown in the figure.
Be sure to turn off your amplifier before connecting or disconnecting speakers.
1.Twist wire’s |
2. Push |
conductor |
|
Subwoofer (option) |
|
|
Right |
3.Insert the conductor
Front speakers
Center speaker
4.Release
Left
ENGLISH
(–) |
(+) Red |
(–) |
(+) Green |
(–) |
(+) |
|
|
|
White |
||
|
|
|
|
|
|
|
Wire with white line |
|
|
|
|
Right |
Left |
|
Surround |
|
speakers |
SPEAKERS (6-8Ω)
(–) 


 (+) Blue
(–) |
(+) |
|
Gray |
FRONT |
CENTER SURR BACK |
SURR |
|
/SW |
|
Speaker terminals (Amplifier or receiver)
SUB
WOOFER
1. The speaker system’s maximum input power is indicated in the specifications.To avoid speaker damage, never run the
speakers at power levels exceeding this limit.
2.This speaker system has a nominal impedance of 8 ohms. To ensure safe and reliable operation, be sure that your amplifier or receiver is able to work with 8-ohm speakers.
•Never short the (+) and (–) speaker wires together.
•Do not reverse L and R or (+) and (–) connections. Reversal of sides or polarities may result in unnatural, incorrectly positioned sound.
7 EN

ENGLISH
Specifications
Accessories |
|
|
Speaker wire |
|
|
Red .................................................................. |
|
4.5m(14ft) |
White ............................................................... |
|
4.5m(14ft) |
Blue .................................................................. |
|
10m(33ft) |
Gray .................................................................. |
|
10m(33ft) |
Green .................................................................... |
|
3m(9ft) |
Cushion ........................................................... |
|
8 pcs (2 seet) |
Base for front speaker ........................................................ |
2 |
|
Screw for base .................................................................... |
|
6 |
Bracket for wall mounting ................................................. |
4 |
|
Screw for wall mounting ................................................... |
2 |
|
Front speakers |
|
|
System ................. |
2 way 5 speakers (Magnetically shielded) |
|
Enclosure ............................................................ |
|
Bass-Reflex |
Loudspeaker |
|
|
Woofer ............................... |
|
70 mm(2-3/4") Cone type x 4 |
Tweeter ...................................... |
|
19 mm(3/4") Dome type |
Nominal Impedance ....................................................... |
8 Ω |
|
Nominal Input Power ................................................... |
40 W |
|
Maximum Input Power ................................................ |
80 W |
|
Peak Input Power ........................................................... |
|
120 W |
Sensitivity .................................................. |
|
86 dB / W at 1 m |
Frequency Response ................................ |
75 Hz~40,000 Hz |
|
Dimensions (including the base) |
||
Width ................................................... |
|
220 mm(8-11/16") |
Height ............................................... |
|
1,154 mm(45-7/16") |
Depth ................................................... |
|
220 mm(8-11/16") |
Net Weight ............ |
5.3 kg(11.7 lb) /piece (including the base) |
|
Surround speakers
System ................. |
2 way 3 speakers (Magnetically shielded) |
|
Enclosure .......................................... |
|
Acoustic air suspension |
Loudspeaker |
|
|
Woofer ............................... |
|
70 mm(2-3/4") Cone type x 2 |
Tweeter ...................................... |
|
19 mm(3/4") Dome type |
Nominal Impedance ....................................................... |
8 Ω |
|
Nominal Input Power ................................................... |
40 W |
|
Maximum Input Power ................................................ |
80 W |
|
Peak Input Power ........................................................... |
|
120 W |
Sensitivity .................................................. |
|
83 dB / W at 1 m |
Frequency Response ............................... |
110 Hz~40,000 Hz |
|
Dimensions |
|
|
Width ............................................................... |
|
76 mm(3") |
Height .................................................... |
|
230 mm(9-1/16") |
Depth ....................................................... |
|
78 mm(3-1/16") |
Net Weight ............................................. |
|
1.1 kg(2.4 lb) /piece |
Center speaker
System ................. |
2 way 3 speakers (Magnetically shielded) |
|
Enclosure .......................................... |
|
Acoustic air suspension |
Loudspeaker |
|
|
Woofer ............................... |
|
70 mm(2-3/4") Cone type x 2 |
Tweeter ...................................... |
|
19 mm(3/4") Dome type |
Nominal Impedance ....................................................... |
8 Ω |
|
Nominal Input Power ................................................... |
40 W |
|
Maximum Input Power ................................................ |
80 W |
|
Peak Input Power ........................................................... |
|
120 W |
Sensitivity .................................................. |
|
83 dB / W at 1 m |
Frequency Response ............................... |
110 Hz~40,000 Hz |
|
Dimensions (including the base) |
||
Width ........................................................... |
|
280 mm(11") |
Height ...................................................... |
|
104 mm(4-1/8") |
Depth ....................................................... |
|
81 mm(3-3/16") |
Net Weight ............. |
1.2 kg(2.7 lb) /piece (including the base) |
|
NOTE:THE GRILLES ON ALL THE SPEAKERS CANNOT BE REMOVED.
KENWOOD follows a policy of continuous advancements in development. For this reason specifications may be changed
without notice.
8 EN

Introduction
Nous vous remercions d’avoir bien voulu intégrer nos enceintes à votre chaîne. KENWOOD a la certitude que ce choix vous
réserve des années de plaisir musical. Prenez le temps de lire attentivement ce livret. Il vous permettra d’obtenir le meilleur de ces
enceintes.
Pour votre référence
Inscrivez le numéro de série, que vous trouverez à l’arrière de l’appareil, dans les espaces prévus de la carte de garantie et dans
l’espace prévu ci-dessous. Indiquez les numéros de modèle et de série au cas où vous devriez faire appel à votre concessionnaire
pour des renseignements ou réparations de cet appareil.
Le modèle KS-908HT comprend les enceintes avant, l'enceinte centrale et les enceintes surround.
KS-908HT Numéro de série
Précautions de sécurité
 Attention: Lire attentivement ce qui suit pour votre sécurité.
1.Etouffement – Après avoir retiré l’appareil du sac de polyéthylène, bien placer ce dernier hors de la portée des enfants. S’ils jouent avec ce sac, un risque d’étouffement est possible.
2.Eau et humidité – Ne pas poser un récipient contenant de l’eau (vase, cuvette, etc.) sur cet appareil. Eviter également d’installer l’appareil dans un endroit exposé à l’humidité.
3.Chaleur – Ne pas installer cet appareil à proximité d’une source de chaleur comme un appareil de chauffage ou à un endroit directement exposé au soleil.
4.Modificatiòn – Ne pas tenter d’ouvrir l’appareil, ni de le modifier car cela pourrait être à l’origine d’un incendie ou d’une anomalie de fonctionnement.
5.Nettoyage – Ne pas utiliser de solvants volatiles tels que de l’alcool, du diluant à peinture, de l’essence ou de la benzine, etc., pour nettoyer le coffret. Utiliser un chiffon propre et sec.
6.Odeur anormale – Si une odeur anormale ou une fumée sort de l’appareil, couper immédiatement l’alimentation et débrancher le cordon d’alimentation. Contacter votre concessionnaire ou une centre de service le plus proche.
FRANÇAIS
9 FR
Montage (Enceinte avant)
1. Couchez l'enceinte sur le côté.
Posez-le sur une surface plane (sur un siège, etc.).
2. Montez le pied.
5. Raccordez le cordon de l'enceinte aux bornes.
1. Conducteurs à fils torsadés
2. Pressez
3. Insérez le fil
4. Relâchez
FRANÇAIS
•Ce socle est lourd. Prenez garde de ne pas le faire tomber sur vos pieds.
3. Vissez à fond pour fixer solidement le pied.
• Branchez le fil rayé blanc sur la borne (+).
6. Faites reposer le caisson sur son socle.
4.Faites passer le cordon de l'enceinte par la base du pied.
Faites glisser le cordon à cet endroit.
10 FR
Installation
Positionnement pour obtenir un son surround optimal
Ce système d’enceintes vous permet d’obtenir un son surround
complet.
Cependant, pour pouvoir bénéficier de tous les effets du champ
sonore surround, il convient de placer les enceintes comme
indiqué ci-dessous.
•Placer les enceintes gauche et droite des côtés opposés de votre téléviseur. Diriger les enceintes vers la zone d’écoute pour augmenter l’effet stéréo.
•Placez l’enceinte centrale sur le centre entre les enceintes gauches et droits d'avant. Incliner l’enceinte vers le haut ou vers le bas afin de la tourner directement vers la zone d’écoute.
•Placer les enceintes surround aussi haut que possible, directement sur les côtés de la zone d’écoute ou légèrement derrière celle-ci. Régler leur angle d’orientation afin de les diriger directement vers les auditeurs.
•Placez l'enceinte arrière surround (option) derrière la position d'écoute, à la même hauteur que les enceintes surround gauche et droite.
Enceinte |
Enceinte |
Enceinte |
|
Gauche |
|
centrale |
droite |
Gauche |
|
|
Droite |
|
|
|
|
|
Enceintes surround |
|
|
|
|
|
|
|
|
Enceinte arrière |
|
|
|
surround (option) |
|
Utilisation des enceintes à proximité d’un téléviseur
Les enceintes avant et centrales sont équipées de blindage magnétique et peuvent dès lors être installées à proximité d’un
téléviseur. Ne pas oublier cependant que, si vous les placez trop près d’un téléviseur, elles peuvent parfois provoquer une défor-
mation dans la réception des couleurs. Si cela devait être votre cas, mettre le téléviseur sous tension et vérifier si la reproduction
des couleurs est normale. Si les couleurs sont déformées, mettre le téléviseur hors tension pendant 15 à 30 minutes puis le
remettre sous tension et vérifier. (Cela permet aux circuits de démagnétisation du téléviseur de corriger le champ magnétique des
enceintes). Si les couleurs sont toujours déformées, éloigner les enceintes du téléviseur.
FRANÇAIS
Fixation des coussins |
Posées sur le sol ou sur une |
Accrochées à un mur |
Fixer les coussins à la base des enceintes. Les coussins servent |
étagère |
|
à empêcher l’enceinte de glisser et à amortir les vibrations.
Méthodes d’installation
Posées sur le sol ou sur une étagère
Placer les enceintes sur le sol ou sur une étagère ou sur toute autre surface horizontale. Ne pas oublier cependant que les enceintes ne sont pas fixées ; éviter dès lors de les renverser par mégarde.
Accrochées à un mur
Les enceintes centrales et surround possèdent des découpes pour le montage mural. Les enceintes surround peuvent être suspendus verticalement au mur ; L'enceinte centrale s’accroche horizontalement.
Pour un montage vertical, une seule vis est nécessaire: il suffit d’accrocher l’enceinte uniquement par l’orifice de montage supérieur. Pour le montage horizontal, insérer deux vis dans le mur à la distance appropriée, de sorte à pouvoir accrocher l’enceinte par les deux orifices de montage. Suite sur la page suivante.
11 FR
Enceinte surround
1. Montez la patte de fixation au moyen de la vis fournie.
Attention à utiliser le trou du haut pour cette installation.
2Visser une seule vis dans le mur à l’emplacement souhaité. La visser à moitié en la laissant dépasser de 12 à 14 mm de la surface du mur.
FRANÇAIS |
3. Suspendre l’enceinte en posant l’orifice de montage |
|
|
|
supérieur (situé en haut, à l’arrière de l’enceinte) sur la |
|
partie saillante de la vis. Vérifier si l’enceinte est bien |
|
accrochée et si elle tient fermement. |
|
12 - 14 mm |
Enceinte centrale
1. Retirez le socle.
2.Montez les pattes de fixation en utilisant les vis retirées à l’étape 1.
3.Visser deux vis dans le mur, à 120 mm de distance l’une de l’autre, en prenant bien soin de les placer à l’horizontale. Les visser à moitié en les laissant dépasser de 12 à 14 mm de la surface du mur.
120 mm |
12 - 14 mm |
4.Suspendre l’enceinte en posant les deux orifices de montage (situés à l’arrière de l’enceinte) sur la partie saillante des vis.Vérifier si l’enceinte est bien accrochée et si elle tient fermement.
Précautions
Prendre les précautions suivantes lors du montage des enceintes au mur :
•S’assurer que le mur utilisé est suffisamment robuste pour supporter tout le poids de l’enceinte (environ 1,1 kg).
•Vous pouvez acquérir les vis murales séparément. Toujours utiliser des vis appropriées en fonction du mur utilisé et suffisamment longues pour offrir une résistance adéquate.
•Si vous avez des doutes quant à la résistance du mur, sur le type de vis à utiliser ou sur tout autre point concernant ce type d’installation, veuillez consulter un entrepreneur ou une autre personne qualifiée avant de commencer.
Toujours suivre la procédure expliquée dans le présent manuel lors de l’installation. Kenwood ne peut être tenu responsable d’aucun dégât ou dommage dû à la chute de l’enceinte suite à une installation incorrecte ou à une résistance insuffisante du support.
12 FR
 Loading...