


KTC-9090DAB
DAB HIDEAWAY TUNER 3 page 2- 29
INSTRUCTION MANUAL
SYNTONISEUR DAB ESCAMOTABLE 3 page 30 - 57
MODE D’EMPLOI
SINTONIZADOR EXTRAÍBLE DAB 3 página 58 - 85
MANUAL DE INSTRUCCIONES
© PRINTED IN JAPAN B64-1748-20 / 03 (E) (DT)

Contents |
|
Safety precautions .............................................................. |
3 |
Before use ............................................................................ |
4 |
An entrance to KTC-9090DAB
About operation of A, G groups
About operation of B groups
About operation of C groups
About operation of D groups
About operation of E groups
About operation of F groups
DAB features (Basic) .......................................................... |
10 |
About DAB (Digital Audio Broadcasting)
Selecting DAB Mode
Selecting DAB Seek Mode
DAB Reception
Primary/Secondary Switching
Service Preset Memory
Auto Ensemble Memory Entry
Recalling a Preset Service
Display Switching for DAB
DAB features (Search) ....................................................... |
15 |
Programme Type (PTY) Function
Programme Type (PTY) Function
PTY Watch Select Mode
Programme Type Display
Language Filter Search Mode
Language Filter Select Mode
DAB features (Step Up) ..................................................... |
18 |
Announcement select mode
Traffic Announcement Function
News Bulletin Function with Announcement News Timeout Setting Presetting Volume for Announcement
Regional Announcement Function Dynamic Range Control (DRC) Automatic Switching DAB priority Automatic Switching from DAB to RDS
DAB features (Remote control) ........................................ |
22 |
Accessories......................................................................... |
24 |
Installation Procedure....................................................... |
25 |
Connecting Cables to Terminals....................................... |
26 |
Installation ......................................................................... |
27 |
Troubleshooting Guide..................................................... |
29 |
Specifications..................................................................... |
29 |
2 | English

Safety precautions
2WARNING
To prevent injury and/or fire, take the following precautions:
•Insert the unit all the way until it is fully locked in place. Otherwise it may fly out of place during collisions and other jolts.
•To prevent short circuits, never put or leave any metallic objects (e.g., coins or metal tools) inside the unit.
•If the unit starts to emit smoke or strange smells, turn off the power immediately and consult your Kenwood dealer.
•Be careful not to drop the unit or subject it to strong shock.
2CAUTION
To prevent damage to the machine, take the following precautions:
•Do not open the top or bottom covers of the unit.
•Do not install the unit in a spot exposed to direct sunlight or excessive heat or humidity. Also avoid places with too much dust or the possibility of water splashing.
•During installation, do not use any screws except for the ones provided. The use of improper screws might result in damage to the main unit.
•When drilling a hole in the car to fix the brackets, make sure not to damage the fuel tank, brake tube, wiring harnesses, etc. on the other side.
NOTE
•If you experience problems during installation, consult your Kenwood dealer.
•If the unit does not seem to be working right, try pressing the reset button on the control unit first. If that does not solve the problem, consult your Kenwood dealer.
Cleaning the Unit
If the front panel is dirty, wipe it clean with a silicon cloth or soft dry cloth with the power off.
2CAUTION
•Do not use hard cloths or paint thinner, alcohol, or other volatile solvents. These may damage external surfaces or remove indicator characters.
IMPORTANT INFORMATION
About the disc changer to be connected:
Kenwood disc changers/ CD players released in 1998 or later can be connected to this unit.
Note that any Kenwood disc changers/ CD players released in 1997 or earlier and disc changers made by other makers cannot be connected to this unit. Unsupported connection may result in damage. Setting the "O-N" Switch to the "N" position for the applicable Kenwood disc changers/ CD players.
English | 3

Before use
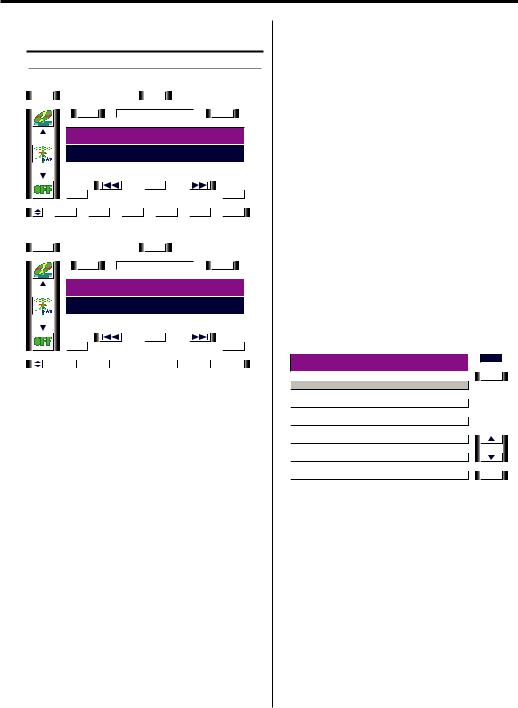
ABCDEFG
An entrance to KTC-9090DAB
This unit performs operations with a control unit such as a CD receiver or a cassette receiver.
1The control units that can operate this unit are divided into some groups by function. Make sure to which group your control unit belongs. If the operation or the function differs, it is explained group by group.
After confirming the group, read the instructions for the control unit of the corresponding group (page 4 - 10). Then go to the pages for each operation (page 10).
2On the upper right of each feature is a group display. If the group can use that function, it’s displayed as "A" if it can’t, it’s displayed as "Å".
3Content of the display depends on the control unit. In the case that the content of the display is different, both the long name and short name such as "AAAAA"/"BBB" are described.
NOTE
•The capital letters and small letters of the display can be reversed.
Model list of Control unit (As of April, 2005)
"Model Name = Group name, Note number" is described model by model.
NOTE
•Control units released in 2005 and later belong to the A*³ group unless otherwise described in the Instruction Manual.
DDX…
DDX7015=#3, DDX7025=#3, DDX7035=#3,
Ez…
Ez500=A*3*5#1, Ez700SR=A*3*5#1,
KDC-2…
KDC-2029=A*1*2*3#1, KDC-228=A*1*2*3#1,
KDC-3…
KDC-3022=A#1, KDC-3028=A*1*2*3#1, KDC-3029=A*1*2*3#1, KDC-3029R=A*1*3*4, KDC-319=A#1, KDC-322=A#1, KDC-328=A*1*2*3#1,
KDC-4…
KDC-4019=A#1, KDC-4022=A#1, KDC-419=A#1, KDC-422=A#1,
KDC-5…
KDC-5016=B#1, KDC-5018=A#1, KDC-5019=A#1, KDC-5020=A#1, KDC-5020R=A*1, KDC-5021=A*1, KDC-5021V=A*1, KDC-5023=A#1, KDC-5023R=A*1, KDC-5024=A*1, KDC-5024V=A*1, KDC-5027=A*1,
KDC-506=A*1, KDC-5060R=D#2, KDC-507=A*1, KDC-5070R=C, KDC-508=A*1, KDC-5080R=B, KDC-5090B=B, KDC-5090R=A, KDC-5094RY=A*1, KDC-515S=B#1, KDC-516S=A#1, KDC-519=A#1, KDC-57MR=A#1,
KDC-6…
KDC-6010=D#1, KDC-6011=C, KDC-6012R=C, KDC-6015=B#1, KDC-6016R=B, KDC-6020=A#1, KDC-6021=A*1, KDC-6023=A#1, KDC-6024=A*1, KDC-6060R=D#2, KDC-6070R=C, KDC-6080R=B, KDC-6080RV=B, KDC-6090R=A,
KDC-7…
KDC-7011=C#1, KDC-7016=B#1, KDC-7018=A#1, KDC-7018R=A, KDC-7021=A, KDC-7021SE=A, KDC-7024=A*1, KDC-7027=A*1, KDC-7060R=D#2, KDC-7070R=C, KDC-7071RY=C, KDC-7080R=B, KDC-7080RV=B, KDC-7090R=A, KDC-715S=B#1, KDC-716S=A#1, KDC-719=A#1, KDC-722=A#1,
KDC-8…
KDC-8011=C, KDC-8015=B#1, KDC-8016=B#1, KDC-8018=A#1, KDC-8020=A#1, KDC-8021=G*1, KDC-8023=A#1, KDC-8024=A*1, KDC-8026=A#1, KDC-8060R=D#2, KDC-8070R=C, KDC-8080R=B+, KDC-8090R=A,
KDC-9…
KDC-9010=D, KDC-9011=C, KDC-9012R=C, KDC-9015=B+, KDC-9017=A#1, KDC-9020R=G*1, KDC-9023R=A*1, KDC-9026R=A*1, KDC-9060R=D#2, KDC-9090R=A,
KDC-B…
KDC-B7021=A,
KDC-M…
KDC-M4524=A*1, KDC-M6021=A*1, KDC-M6021G=A*1, KDC-M6024=A*1, KDC-M6024G=A*1, KDC-M7024=A*1, KDC-M9021=G*1, KDC-M9021SE=G*1, KDC-M907=G*1,
KDC-MP…
KDC-MP2028=A*1*2*3#1, KDC-MP222=A#1,
KDC-MP228=A*1*2*3#1, KDC-MP4023=A*1,
KDC-MP4023G=A*1, KDC-MP4028=A*2*3#1, KDC-MP4029=A*1*2*3#1, KDC-MP4029G=A*1*2*3#1, KDC-MP425=A#1, KDC-MP428=A*2*3#1, KDC-MP5028=A*1*2*3#1, KDC-MP5029=A*1*2*3#1, KDC-MP5029V=A*2*3#1, KDC-MP522=A#1, KDC-MP528=A*1*2*3#1, KDC-MP6026=A#1, KDC-MP6029=A*1*2*3#1, KDC-MP6090R=A, KDC-MP628=A*1*2*3#1, KDC-MP7018=A#1, KDC-MP7028=A*1*2*3#1, KDC-MP728=A*1*2*3#1, KDC-MP8017=A#1, KDC-MP8029=A*1*2*3#1, KDC-MP819=A#1, KDC-MP822=A#1, KDC-MP825=A#1, KDC-MP828=A*1*2*3#1, KDC-MP919=G#1, KDC-MP922=A#1, KDC-MP925=A*1#1,
KDC-MPV…
KDC-MPV5025=A#1, KDC-MPV525=A#1, KDC-MPV6022=A#1, KDC-MPV619=A#1, KDC-MPV622=A#1, KDC-MPV7019=A#1, KDC-MPV7020=A#1, KDC-MPV7023=A#1, KDC-MPV7026=A#1, KDC-MPV8025=A#1, KDC-MV6521=A*1,
4 | English

KDC-PS…
KDC-PS9016R=B+, KDC-PS9018R=A, KDC-PS9070R=C, KDC-PS9080R=B+, KDC-PS911R=C, KDC-PS9590R=A, KDC-PSW9521=G*1, KDC-PSW9524=A*1, KDC-PSW9527=A*1,
KDC-V…
KDC-V6017=A#1, KDC-V6090R=A, KDC-V6524=A*1, KDC-V7017=A#1, KDC-V7022=A#1, KDC-V7090R=A, KDC-V7521=A,
KDC-W…
KDC-W4531=A*1*3*4, KDC-W5031=A*1*3*4, KDC-W6027=A*1, KDC-W6031=A*1*3, KDC-W6527=A*1, KDC-W6527SE=A*1, KDC-W6531=A*1*3, KDC-W657=A*1, KDC-W7027=A*1, KDC-W7031=A*1*3, KDC-W7531=A*1*3, KDC-W8027=A*1, KDC-W8531=A*1*3, KDC-W9027=A*1, KDC-WV6027=A*1,
KDC-X…
KDC-X459=A#1, KDC-X469=A#1, KDC-X559=A#1, KDC-X569=A#1, KDC-X579=A#1, KDC-X589=A*1*2*3#1, KDC-X615=B#1, KDC-X617=A#1, KDC-X659=A#1, KDC-X711=C, KDC-X715=B, KDC-X717=A#1, KDC-X7529=A*1*2*3#1, KDC-X759=G#1, KDC-X769=A#1, KDC-X789=A*1*2*3#1, KDC-X811=C, KDC-X815=B+, KDC-X817=A, KDC-X8529=A*1*2*3#1, KDC-X859=G#1, KDC-X869=A#1, KDC-X879=A*1#1, KDC-X889=A*1*2*3#1, KDC-X911=C, KDC-X915=B+, KDC-X917=A, KDC-X959=A#1, KDC-X969=A#1, KDC-X979=A*1#1,
KDC-Z…
KDC-Z727=A#1, KDC-Z737=A#1, KDC-Z828=A#1, KDC-Z838=A#1, KDC-Z939=A*1,
KMD-7…
KMD-71=C,
KMD-8…
KMD-860R=D#2, KMD-870R=C,
KMD-P…
KMD-PS970R=C, KMD-PS971R=B+,
KMD-X…
KMD-X91=C, KMD-X92=B+,
KRC-4…
KRC-435=A#1,
KRC-5…
KRC-507S=C, KRC-508S=B#1, KRC-509S=A#1, KRC-535=A#1, KRC-559R=D#2, KRC-577R=C, KRC-578R=B, KRC-579B=B, KRC-579R=A, KRC-587=C#1, KRC-591=A*1, KRC-591V=A*1, KRC-594=A*1, KRC-594V=A*1,
KRC-6…
KRC-607=C#1, KRC-608=B#1, KRC-609=A#1, KRC-659R=D#2, KRC-665=A#1, KRC-665R=A*1, KRC-666=A#1, KRC-666G=A#1, KRC-666R=A*1, KRC-6701RY=C, KRC-677R=C, KRC-678R=B, KRC-678RV=B, KRC-679R=A, KRC-680R=B, KRC-687R=C, KRC-687W=C, KRC-688=B#1, KRC-689=A#1, KRC-691=A*1, KRC-694=A*1,
KRC-7…
KRC-708=B#1, KRC-709=A#1, KRC-759R=D#2, KRC-765=A#1, KRC-766=A#1, KRC-7701RY=C, KRC-777R=C, KRC-778R=B, KRC-778RV=B, KRC-779R=A, KRC-781R=A, KRC-787=C#1, KRC-788=B#1, KRC-789=A#1, KRC-791=A, KRC-794=A*1,
KRC-8…
KRC-807=C#1, KRC-859C=D#2, KRC-859R=D#2, KRC-859W=D#2, KRC-865=A#1, KRC-877R=C, KRC-877W=C, KRC-878R=B+, KRC-887R=C, KRC-888=B#1, KRC-889=A#1,
KRC-9…
KRC-977R=C,
KRC-PS…
KRC-PS1077R=C, KRC-PS959R=D#2, KRC-PS978R=B+, KRC-PS979R=A, KRC-PS987R=C, KRC-PS988R=B+, KRC-PS989R=A,
KRC-V…
KRC-V679R=A, KRC-V791=A, KRC-V879R=A,
KRC-X…
KRC-X657=C, KRC-X858=B+, KRC-X957=C,
KRC-Z…
KRC-Z965=A*1,
KVC-…
KVC-1000 + KTC-1000R=E,
KVT-7…
KVT-715DVD=#3, KVT-725DVD=#3, KVT-735DVD=#3,
KVT-8…
KVT-815DVD=#3,
KVT-9…
KVT-910DVD=F, KVT-911DVD=F, KVT-915DVD=#3, KVT-920DVD=F, KVT-925DVD=#3, KVT-930DVD=F, KVT-935DVD=#3,
KVT-M…
KVT-M700=#3,
X…
X838=A*1,
Z…
Z638=A*1, Z727=A#1, Z738=A*1, Z828=A#1, Z828MP=A, Z838W=A*1,
NOTE
•Note that some of the operations for the models with "*"/ "+" sign in its group name differ from the standard.
#1 RDS functions can not be used.
For example : <Automatic Switching DAB priority> etc.. #2 The control unit needs to be upgraded. Please take your
control unit to the Kenwood dealer.
#3 See each instruction manual for details.
English | 5

Before use
AıÇΉÏG
About operation of A, G groups
This manual does not cover operations using menus. See the control unit instruction manuals for the menu operations.
The following setting items are added for the DAB function.
•Switching DAB/SIRIUS*
•Automatic Switching DAB priority
•Dynamic Range Control (DRC)
•Regional Announcement Function
•Selecting DAB Seek Mode
•Auto Ensemble Memory Entry
•Announcement select mode
•PTY Watch Select Mode
•Language Filter Search Mode
*To the users of KDC-X917/ X817/ X717/ 9017/ V7017/ 716S, Z828, Z727.
Before using, set the "SW DAB/SIRIUS" in the menu to switch to "DAB".
NOTE
•An incorrect setting may cause a false display of the name.
•It is possible to select the non-indicator mode for some control units, however, the operations in this manual are always described in the indicator mode.
•This manual refers the control unit with the Multi-function Key System as Multi Key.
See the control unit instruction manuals for its operations.
ÅBÇΉÏÌ
About operation of B groups
This manual does not cover operations using menus. See the control unit instruction manuals for the menu operations.
The following setting items are added for the DAB function.
•Automatic Switching from DAB to RDS
•Dynamic Range Control (DRC)
•Regional Announcement Function
•Selecting DAB Seek Mode
•Auto Ensemble Memory Entry
•Announcement select mode
•PTY Watch Select Mode
•Language Filter Select Mode
ÅıCΉÏÌ
About operation of C groups
This manual does not cover operations using menus. See the control unit instruction manuals for the menu operations.
The following setting items are added for the DAB function.
•Traffic Announcement Function*
•News Bulletin Function*
•Selecting DAB Seek Mode
•Automatic Switching from DAB to RDS
•Dynamic Range Control (DRC)
•Regional Announcement Function
•Auto Ensemble Memory Entry
NOTE
*This setting is common with both the DAB source and RDS source. Set in the same manner as the operation of the same function of the RDS. In the case that the RDS function is not set in the menu, the item is not displayed.
ÅıÇD‰ÏÌ
About operation of D groups
This manual does not cover operations using menus. See the control unit instruction manuals for the menu operations.
The following setting items are added for the DAB function.
•Traffic Announcement Function*
•News Bulletin Function*
•Selecting DAB Seek Mode
•"DUAL MAIN"/"MAIN"/"DUAL SUB"/ "SUB"**
•Automatic Switching from DAB to RDS
•Dynamic Range Control (DRC)
•Regional Announcement Function
•"DATA-SRV"**
NOTE
*This setting is common with both the DAB source and RDS source. Set in the same manner as the operation of the same function of the RDS. In the case that the RDS function is not set in the menu, the item is not displayed.
**This item can be set, but the function doesn’t work.
6 | English
ÅıÇÎEÏÌ
About operation of E groups
Control Function
DAB Control Screen (Main)
|
T I |
|
|
|
|
|
|
|
|
|
|
M E N U |
|
|
1 2 : 0 0 |
|
|||||||
|
|
|
|
|
|
|
|
|
|
|
|
|
|
|
|
|
|
|
|
|
|
|
|
|
|
|
|
S - |
|
|
|
|
|
D A B |
|
|
|
|
|
S + |
|
|
|||||
|
|
|
|
|
|
|
|
|
|
|
|
|
|||||||||||
|
|
DAB 1 |
P 1 |
1 4 5 1 . 0 7 2 |
|
||||||||||||||||||
|
|
|
E N S E M B L E L A B E L # # # |
||||||||||||||||||||
|
|
AUTO1 |
ALM |
|
|
NEWS |
|
REG |
|
AF |
|
TI |
|||||||||||
|
|
|
|
|
|
|
|
|
|
MAIN |
DAB |
DRC |
|
PR |
|||||||||
|
|
|
|
|
|
|
|
|
|
|
|
|
|
|
|
|
|
|
|
|
|
|
|
|
|
|
|
|
|
|
|
|
|
|
|
|
|
|
|
|
|
|
|
|
|
|
|
|
|
|
|
|
|
|
|
|
|
|
|
BAND |
|
|
|
|
|
|
|
|
|
|
|
|
|
|
SRV |
|
|
|
|
|
|
|
|
|
|
|
|
|
|
|
PTY |
|
|||
|
|
|
|
|
|
|
|
|
|
|
|
|
|
|
|
|
|
|
|||||
|
|
P 1 |
|
|
P 2 |
|
P 3 |
|
P 4 |
|
|
P 5 |
|
P 6 |
|
||||||||
DAB Control Screen (Shift) |
|
|
|
|
|
|
|
|
|
|
|||||||||||||
|
T I |
|
|
|
|
|
|
|
|
M E N U |
|
|
1 2 : 0 0 |
|
|||||||||
|
|
|
|
|
|
|
|
|
|
|
|
|
|
|
|
|
|
|
|||||
|
|
|
|
S - |
|
|
|
|
|
D A B |
|
|
|
|
|
S + |
|
||||||
|
|
|
|
|
|
|
|
|
|
|
|
||||||||||||
|
|
DAB 1 |
P 1 |
1 4 5 1 . 0 7 2 |
|
||||||||||||||||||
|
|
|
E N S E M B L E L A B E L # # # |
||||||||||||||||||||
|
|
|
AUTO |
ALM |
|
|
NEWS |
|
REG |
|
AF |
|
TI |
||||||||||
|
|
|
|
|
|
|
|
|
|
MAIN |
DAB |
DRC |
|
PR |
|||||||||
|
|
|
|
|
|
|
|
|
|
|
|
|
|
|
|
|
|
|
|
|
|
|
|
|
|
|
|
|
|
|
|
|
|
|
|
|
|
|
|
|
|
|
|
|
|
|
|
|
|
|
|
|
|
|
|
|
|
|
|
BAND |
|
|
|
|
|
|
|
|
|
|
|
|
|
|
SRV |
|
|
|
|
|
|
|
|
|
|
|
|
|
|
|
|
PTY |
|
||
|
|
|
|
|
|
|
|
|
|
|
|
|
|
|
|
|
|||||||
|
|
SEEK |
|
|
AME |
|
|
|
|
|
|
P/S |
|
|
TI VOL |
|
TITLE |
|
|||||
[4] / [¢] button
Each time [4] / [¢] is touched for at least 1 second the Ensemble switches in the way selected in Seek mode.
Touch [4] / [¢] to switch services. ] DAB Reception. (page 12)
[S+] / [S-] button
Touch [S+] / [S-] to switch services. ] DAB Reception. (page 12)
[BAND] button
Touch [BAND] to switch the Pre-set band. ] Service Preset Memory. (page 12)
[P1] - [P6] button
Touch [P1] - [P6] to register and call up the Service. ] Service Preset Memory. (page 12)
] Recalling a Preset Service. (page 13)
[SEEK] button
Touch [SEEK] to switch the Seek mode. ] Selecting DAB Seek Mode. (page 11)
[AME] button
1 Touch [AME].
2 Touch [4] or [¢] to start auto ensemble
memory entry.
] Auto Ensemble Memory Entry. (page 13)
[P/S] button
Touch [P/S] to switch the Service component. ] Primary/Secondary Switching. (page 12)
[TI VOL] button
Touch [TI VOL] for at least 2 seconds to register the volume for the Announcement.
] Presetting Volume for Announcement. (page 19)
[TITLE] button
Touch [TITLE] to switch the display item. ] Display Switching for DAB. (page 14)
[TI] button
Touch [TI] to switch the interrupting function of the Traffic Announcement on/off.
] Traffic Announcement Function. (page 19)
[PTY] button
Touch [PTY] to the DAB PTY Search Screen.
[SRV] button
Touch [SRV] to the DAB Service List screen.
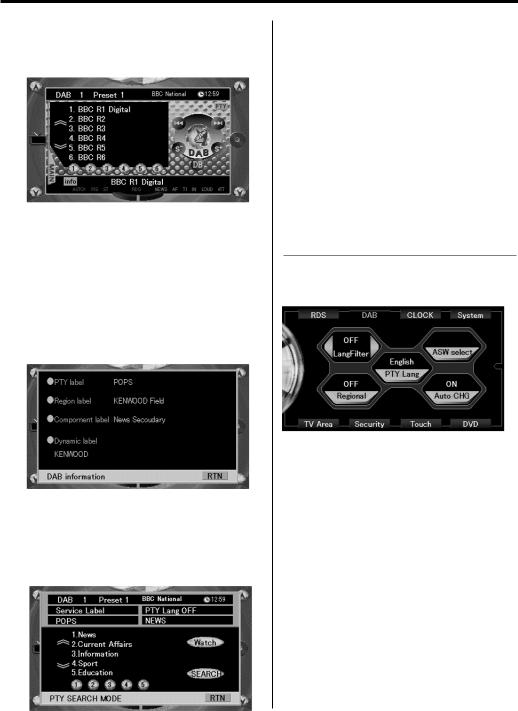
DAB PTY Search Screen
|
D B - I N F O |
|
|
|
ENG. |
|
|
J a z z |
|
M u s i c |
|
|
|
|
S o c i a l |
A f f a i r s |
|
LANG. |
|
|
|
|
|
|
|||
|
|
|
|
|
|
|
|
R e l i |
g |
i o n |
|
|
|
|
|
|
|
|
|
|
|
P h o n e |
I n |
|
|
|
|
|
|
|
|
|
||
|
T r a v e l & T o u r i n g |
|
|
|
||
|
|
|
|
|
||
|
L e i s u r e & H o b b y |
|
|
|
||
|
|
|
|
|
|
|
|
J a z z |
M u s i c |
CTRL |
|||
Refer to the DAB PTY Search Screen together with the PTY Search Screen of the KVC-1000.
[5] / [∞] button and PTY item
1 Touch [5] / [∞] to switch the list.
2 Touch the name of the PTY to search by the selected type.
] Programme Type (PTY) Function. (page 16)
[LANG.] button
Touch [LANG.] to display the name of the language currently used.
[CTRL] button
Touch [CTRL] to return to the source control screen.
English | 7
Before use
DAB Service List Screen
E N S E M B L E _ L A B E L
S E R V I C E _ L A B E L
A L P H A 1
A L P H A 2
A L P H A 3
A L P H A 4
A L P H A 5
A L P H A 6 |
CTRL |
Menu item 1 - 6 button
Touch the name of the Service to switch to the selected Service.
[5] / [∞] button
Touch [5] / [∞] to switch the display item.
[CTRL] button
Touch [CTRL] to return to the DAB control screen.
Setup Function
DAB Setup Screen
|
R D S |
C H G |
|
|
|
||||
|
|
|
O |
N |
|
|
O F F |
|
|
|
D R C |
|
|
|
|
|
|
||
|
|
|
O |
N |
|
|
O F F |
|
|
|
R E G |
I N T |
|
|
|
||||
|
|
|
O |
N |
|
|
O F F |
|
|
|
|
|
|
|
|
|
|
|
|
|
D A B |
S E T U P |
|
RTN |
|
||||
As for operation on the DAB Setup Screen, refer to the System Setup Function of the KVC-1000.
[RDS CHG] button
] Automatic Switching from DAB to RDS. (page 21)
[DRC] button
] Dynamic Range Control (DRC). (page 20)
[REG INT] button
] Regional Announcement Function. (page 20)
8 | English
ÅıÇΉFÌ
About operation of F groups
Control Function
DAB Control Screen
[SEEK] button
Touch [SEEK] to switch the Seek mode. ] Selecting DAB Seek Mode. (page 11)
[4] / [¢] button
Each time [4] / [¢] is touched the Ensemble switches the way selected in Seek mode.
] DAB Reception. (page 12)
[S+] / [S-] button
Touch [S+] / [S-] to switch services. ] DAB Reception. (page 12)
[P/S] button
Touch [P/S] to switch the Service component. ] Primary/Secondary Switching. (page 12)
[DB] button
Touch [DB] to switch the Pre-set band.
]Service Preset Memory. (page 12)
[1]- [6] button
Touch [1] - [6] to register and call up the Service. ] Service Preset Memory. (page 12)
] Recalling a Preset Service. (page 13)
[AME] button
1 Touch [AME].
2 Touch [4] or [¢] to start auto ensemble memory entry.
] Auto Ensemble Memory Entry. (page 13)
[DRC] button
Touch [DRC] to switch the DRC function ON/OFF. ] Dynamic Range Control (DRC). (page 20)
[LIST] button
Touch [LIST] to the DAB Service List Screen.
[info] button
Touch [info] to the DAB Information Screen.
[PTY] button
Touch [PTY] to the DAB PTY Search Screen.
DAB Service List Screen
Service Labels in the Ensemble being received are displayed.
[uu] / [dd] button
Touch [uu] / [dd] to switch the display item.
[MAIN] button
Touch [MAIN] to return to the DAB Control Screen.
[1] - [6] button
Touch [1] - [6] to switch to the selected Service.
DAB Information Screen
As for the content of the display item, refer to the <Display Switching for DAB> (page 14).
[RTN] button
Touch [RTN] to return to the DAB Control Screen.
DAB PTY Search Screen
[uu] / [dd] button
Touch [uu] / [dd] to switch the display item.
[1] - [5] button
Touch [1] - [5] to select the 5 items being displayed.
[SEARCH] button
Touch [SEARCH] to search a Service in the Ensemble by the selected PTY.
] Programme Type (PTY) Function. (page 16)
[Watch] button
Touch [Watch] to register the selected PTY in the Watch.
] PTY Watch Select Mode. (page 16)
[RTN] button
Touch [RTN] to return to the DAB Control Screen.
Setup Function
As for operation on the DAB Setup Screen, refer to the System Setup Function of the control unit.
DAB Setup Screen
[LangFilter] button
Touch [2] / [3] to switch the language to be filtered.
] Language Filter Select Mode. (page 17)
[Regional] button
] Regional Announcement Function. (page 20)
[PTY Lang] button
Touch [PTY Lang] to switch the language displaying the PTY.
[ASW select] button
Touch [ASW select] to the DAB Announcement select Screen.
[Auto CHG] button
] Automatic Switching DAB priority. (page 20)
English | 9

Before use
DAB Announcement select Screen
Touch each item to switch ON/OFF.
] Announcement select mode. (page 18)
[RTN] button
Touch [RTN] to return to the DAB Setup Screen.
10 | English
DAB features (Basic)
ABCDEFG
About DAB (Digital Audio
Broadcasting)
Thanks to the transmission of broadcast signals in digital format, the DAB system can reproduce clearer audio than conventional analogue broadcasting and stabilise reception even in a mobile object such as a vehicle.
In existing analogue broadcasting (e.g., FM), for a broadcast station to broadcast one programme the frequency must be changed and transmitted for each region and when travelling over long distances it is necessary to change the frequency.
|
FM-A |
|
RDS-B |
FM-C |
|
Jazz music |
|||
Local1 |
|
FM-A |
FM-C |
RDS-B |
|
|
|
Local2 |
|
|
|
|
|
channel |
B |
|
C |
|
D |
|
|
|
(band III) |
(L band) |
%"# C |
Ensemble provider |
|
||
Services
Pops music
Dynamic Label:
Song name, singer, song introduction, and other textual information related to the programme.
Jazz music
Link Function:
Where is the same programme being broadcast? For example: RDS-B
News
Primary: English
Secondary: French
Secondary: German
Secondary: Dutch
Secondary: Italian
Sports
Primary: Regular audio
Secondary: A team fans
Secondary: B team fans
Parliament relay
Traffic news announcement
Alarm announcement
Data Service
The DAB allots transmitting channels to the stations in the same manner as in a TV station, allowing one single channel to cover the whole area. A station broadcasting through the channel is called an Ensemble (Ensemble provider), providing more
than one Service. The Services include the Audio programme and Data service.
•Also, the Services include various Service Information such as the Service Label (name), network information, etc. For example, information such as an RDS station broadcasts is the same programming as with the DAB services provided.
•Based on this data, when it is no longer possible to receive the DAB, there will be automatic switching to the RDS station which will allow continued monitoring of the Service.
Programme organisation has been created for descriptive purposes and differs from actual broadcasts. Also note that depending on time, the number of programmes is subject to change.
Audio programme service consist of;
• Audio Modes
There are three modes: stereo, joint stereo , and single channel (e.g., mono).
• Sound Quality
There are a variety of levels which range from sound quality on par with a telephone to highquality sound at the level of CD. There is also a mode that cuts the sampling frequency in half to raise the transfer efficiency.
Audio mode and sound quality are each used to advantage in broadcasts depending on the contents of the Service (Audio programme). In addition, the textual information (Dynamic Label) related to the service (Audio programme) can be transmitted.
Alarm announcement;
When an emergency programme is broadcast in case of a disaster, all functions are interrupted and switched to the alarm announcement.
ABCDEFG
Selecting DAB Mode
ABCDG
Press the [SRC] button.
Select the "DAB" display.
EF
Refer to the Source mode page of the instruction manual of your control unit.
ABCDEFG
Selecting DAB Seek Mode
Select the method how to select an ensemble.
A*2
Press the [AUTO] button.
ABCDG (except for A*2)
1Display the menu mode using the control unit and select a setting item.
2Selecting Tuning Mode:
Switch the setting of the menu items.
3Exit from the menu mode.
EF
Touch [SEEK] to switch the Seek mode.
Display and Setting
Tuning mode |
Display |
Auto Ensemble Seek |
"Seek Mode Auto 1"/"AUTO 1"/"AUTO" |
Preset Service Recall |
"Seek Mode Auto 2"/"AUTO 2" |
Manual Seek |
"Seek Mode Manual"/"MANUAL" |
NOTE
•As for D group, the Pre-set Service Recall of the AUTO2 cannot be set.
English | 11
DAB features (Basic)
ABCDEFG
DAB Reception
In DAB, select Ensemble and then choose Service (Audio programme).
Switching the ensemble
channel
|
|
|
|
|
(band III) (L band) |
Ensemble |
|
||||
|
|
|
|
Service 1 |
|
|
|
|
|
||
|
|
|
|||
|
|
|
|
Service 2 |
Switching service |
|
|
||||
|
|
|
|
Service 3 |
|
|
|
|
|
|
|
|
|
|
|
||
1Switching the ensemble
Press the [4] or [¢] button for at least 1 second.
As for F group, touch [4] / [¢] on the DAB
Control Screen.
Tuning mode |
Operation |
Auto Ensemble Seek |
An Ensemble in good receiving condition |
|
can be selected and received. |
Preset Service Recall |
Services registered can be recalled in the |
|
order of the Pre-set number. |
Manual Seek |
Channels are switched one after another. |
2Switching service
Press the [4] or [¢] button.
As for F group, touch [S+] / [S-] on the DAB
Control Screen.
NOTE
•Switching the Service causes a break-off of the sound for about one second.
•There is no switching to data service.
•The ST indicator lights during reception of a Stereo Audio programme.
•As for E and F group, Services can be switched directly whilst the Service list is being displayed (page 8 - 9).
12 | English
ABCDEFG
Primary/Secondary Switching
The Primary and Secondary can be switched with services that are composed of more than one service components.
Ensemble
|
|
Service 1 |
|
||
|
|
||||
|
|
|
|
Primary |
"PRIMARY" / "P/S P"/ "PRI"/ "MAIN" |
|
|
|
|
||
|
|
|
|
Secondary |
"SECONDARY"/ "P/S S"/ "SEC"/ "SUB" |
|
|
|
|
||
|
|
|
|
… |
|
|
|
|
|
||
|
|
Service 2 |
|
||
|
|
||||
|
|
|
|
|
|
Press the [AM] button.
As for E and F groups, touch [P/S] on the DAB
Control Screen.
NOTE
•When Secondary service exists in Service. ABCG: The P/S indicator is ON.
E: The PR indicator is ON.
F: The P/S indicator is ON blue. When Secondary service is selected. ABCG: The P/S indicator blinks. E: The SC indicator is ON.
F: The P/S indicator is ON red.
•The Primary is selected automatically when the service is switched or the unit is turned off.
•The Primary/ Secondary switching is not available when the service has only one service component or its Secondaries consist of data services.
•As for B and F group, set the desired language in the <Language Filter Select Mode> to switch to only the set language. If the selected language has no Secondary, switching to the Secondary is not possible (page 17).
ABCDEFG
Service Preset Memory
The service being received can be stored in memory under a preset button.
ABCDEF
1 Press the [FM] button to select the preset band. As for E and F groups, touch [BAND] / [DB] on the DAB Control Screen.
Each time you press the button, the preset band switches between DAB1, DAB2 and DAB3.
2 Receive the service to be preset.
3 Hold down the preset button ([1] - [6]) to preset the service for two seconds or more.
The service is preset when the number of the button blinks once.
Multi Key of A group
Before proceeding to Step 3 descried above, change sections to the preset section.
Refer to <Station Preset Memory> of the tuner function. See the control unit instruction manuals for its operations.
G
1Press the [FM] button to select the preset band.
2Enter Memory mode
Press the [#3] button for at least 1 second.
"Preset Memory" is displayed.
3Receive the service to be preset.
4Select the preset number
Press the [FM] or [AM] button.
5Put the service in the memory
Press the [#3] button for at least 2 seconds.
The preset number display blinks 1 time.
6Repeating steps 3 to 5 and putting the desired service in the memory.
On each band, 1 service can be put in the memory on each [#1] — [#6].
7Exit Memory mode
Press the [#3] button.
NOTE
•Up to 6 services can be preset in each of preset bands DAB1, DAB2 and DAB3.
•As the preset memory consists of the storage of services, the distinction of Primary and Secondary service components is not preset. The Primary service component is received when a service is recalled.
•If no Service is being received, it cannot be stored in memory.
•Preset bands DAB1, DAB2 and DAB3 refer to the bands for use in preset memory and do not mean different receiving bands.
•G: You can set up to 6 memories even on a control unit with 8 preset buttons.
ABCÎEFG
Auto Ensemble Memory Entry
Ensembles that can be received through the pre-set band currently being heard are automatically stored in memory one after another.
A representative Service of the Ensembles stored in memory can be called up with a one-touch operation. This function is convenient in such cases as when on a journey where one has no idea what ensemble is available. Up to 6 ensemble can be stored this way.
Preset button:< > < > < > < > < > < >
A*3
1Select the preset band for auto ensemble memory entry.
2Press the [AUTO] button for at least 2 seconds.
After storing in the memory finishes, the number of the pre-set buttons and the ensemble label are displayed.
ABCDG (except for A*3)
1Select the preset band for auto ensemble memory entry.
2Display the menu mode using the control unit and select a setting item.
Select the "Auto Memory"/ "A-MEMORY" display.
3Press the setting button of the menu items on the control unit for at least 2 seconds to start the Auto ensemble memory entry.
After storing in the memory finishes, the number of the pre-set buttons and the ensemble label are displayed.
EF
1Select the preset band for auto ensemble memory entry.
2Touch [AME].
3Touch [4] or [¢] to start auto ensemble memory entry.
English | 13
DAB features (Basic)
ABCDEFG
Recalling a Preset Service
ABCDEF
Press the [FM] / [BAND] / [DB] button to select the preset band, and press the desired preset number button ([1] - [6]).
The number of the pressed button is shown in the display.
Multi Key of A group
Change sections to the preset section before pressing preset button.
Refer to <Preset Tuning> of the Tuner function. See the control unit instruction manuals for its operations.
G
1Press the [FM] button to select the preset band.
2Call up the service
Press the [#1] — [#4] button.
The services are called up as shown below.
Press button |
Call up number |
[#1/5] |
No.1 j No.5 |
[#2/6] |
No.2 j No.6 |
[#3] |
No.3 |
[#4] |
No.4 |
NOTE
•If ensemble is switching, it may take some time until there is sound.
ABCDEFG
Display Switching for DAB
The information shown in the display can be selected.
Switching the Display:
For operations, see the <Switching Display>/ <Switching Display of Tuner> page of the instruction manual of your control unit.
As for E, F-group, touch [TITLE] / [info] on the
DAB Control Screen.
|
Display item |
Display |
|
Ensemble label |
"Ensemble Label"/ "ENSEMBLE" |
|
Service label |
"Service Label"/ "SERVICE"/ "SERV LBL" |
|
Dynamic label |
"Dynamic Label"/ "DYNAMIC" |
|
Received Frequency |
"Frequency"/ "FREQ" |
|
PTY label |
"PTY Label"/ "PTY" |
|
Component label |
"Component Label"/ "Component"/ "COMP" |
14 | English |
|
|
Audio quality |
"Audio Quality"/ "QUALITY" |
Region label |
"Region Label"/ "REGION" |
Ensemble label:
Displays the name of the ensemble being received.
Service label:
Displays the name of the service being received.
Component label:
Displays the name of the Audio service component (Primary / Secondary) being received.
Dynamic label:
Displays the textual information related to the Audio programme. (As for the scrolling method, refer to the Radio text Scroll or Text Scroll of the control unit.)
PTY label:
Displays the Programme Type (PTY) of the service being received.
Audio quality:
Displays the sound quality information of the Audio service being received.
### kbps: Transmission speed (The larger, the higher the sound quality becomes.)
## kHz: Sampling frequency
P#: Protection level (Correcting error level) Example: "384 kbps 48 kHz P5"/ "384 kbps"
Region label:
Displays the name of the area of the ensemble being received.
NOTE
•Whilst signals are not being provided by the providers or being stored in memory, each label displays such messages.
•When the control unit cannot indicate 16 letters within a line, the display of each label is abbreviated within eight letters.
•Depending on the kind of letters used in each display, some may not be possible to display.
•The setting of the ON/OFF for the auto scroll is common with the setting of the Text Scroll for the CD mode and the disc changer mode of the control unit.
•Items mentioned above are the display items for the DAB. The number of display items such as watches, characters, etc. and the order of the display depend on the control unit. (Refer to the operation manual of the control unit at the same time.)

DAB features (Search)
ABCD‰ÏG
Programme Type (PTY) Function
This function permits desired programme types from within the received Ensemble to be searched and monitored.
1Entering PTY Selection Mode:
Press the [38] (PTY) button.
If your control unit does not have [38] (PTY) button, press [FM] (■PTY) button for at least 1 second.
As for G-group, press the [#2] (■PTY) button for at least 1 second.
"PTY" is displayed and the Programme Type Selection (PTY) Mode entered.
NOTE
•This function cannot be used during the interruption of the announcement/ PTY Watch.
2Select the programme type
•Each time the [FM] / [AM] button is pressed the programme type switches.
As for the available programme type, refer to the <Programme Type Display>.
•Press the pre-set button for direct selection.
Default settings are pre-set as follows:
[1]. Music |
[2]. Speech |
[3]. News |
[4]. Other Music |
[5]. Serious Classical |
[6]. Varied |
NOTE: Changing the preset programme types
•Select the programme type to be preset and hold down a preset button ([1] - [6]) for two seconds or more. The previously preset programme type is cleared and replaced with the newly selected programme type.
•As for G-group, refer to <Program Type preset> of the RDS function. See the control unit instruction manuals for its operations.
3Search a service of the selected programme type
Press the [4] or [¢] button.
When the selected programme type is found, the letters indicating the result of the search (Service label, etc.) are displayed and the programme is received.
NOTE
•If the selected programme type is not found, the message ("NO PTY", etc.) is displayed.
When searching for a service of another programme type, repeat procedures 2 and 3.
Switching to Another Service:
Repeat procedure 3.
Another service of the same programme type will be searched.
Cancelling Search In the Middle:
Press the [38] (PTY) button.
If your control unit does not have [38] (PTY) button, press [FM] (■PTY) button for at least 1 second.
As for G-group, press the [#2] (■PTY) button for at least 1 second.
NOTE
• This setting is valid only with the DAB source.
Searching by programme type and language: AB+ÇΉÏG
1Press the button whilst in programme type selection mode.
A*3: Press the [T.I]/ [AUTO] button. AB+ G: Press the [DISP]/ [SCRL] button.
2Selecting a language:
Press the [FM] or [AM] button.
As for the available languages, refer to the <Language Filter Search Mode>/ <Language Filter Select Mode>. (page 17)
3Searching by the selected programme type and language:
Press the [4] / [¢] button to start searching.
4Exiting: Press the [T.I]/ [AUTO]/ [DISP] / [SCRL] button.
Languages to be displayed:
ABCD‰ÏG
AB+ G
Select English, French, German, Dutch, Spanish, Portuguese, Norwegian or Swedish in <Language Filter Search Mode>/ <Language Filter Select Mode> to display in the selected language. (page 17)
BCD (except for B+)
1Press the button whilst in programme type selection mode.
B: Press the [DISP] button.
CD: Press the [38] (PTY) button for at least 1 second.
English | 15
DAB features (Search)
2Press the pre-set button of the desired language.
English is [1], French is [2], German is [3] and Swedish is [4].
3Exiting: Press the [DISP] button.
NOTE
• As for D group, Swedish is not available.
ÅıÇÎEFÌ
Programme Type (PTY) Function
This function permits desired programme types from within the received Ensemble to be searched and monitored.
E
1Touch [PTY] on the DAB Control Screen.
2Touch [5] / [∞] to switch the list.
3Touch the name of the PTY to search by the selected type.
Cancelling Search In the Middle:
Exiting: Touch [CTRL].
F
1Touch [PTY] on the DAB Control Screen.
2Switch the display item on the DAB PTY Search Screen and press buttons [1] – [5] to select a PTY.
3Touch [SEARCH] to start searching.
Cancelling Search In the Middle:
Exiting: Touch [RTN].
Languages to be displayed:
ÅıÇÎEFÌ
Select a language by touching the [Lang] / [PTY Lang] on the DAB PTY search Screen for E (page 7) and on the DAB Setup screen for F (page 9) to display in the selected language.
ABÇΉFG
PTY Watch Select Mode
After registering a desired programme type, when the programme in the registered type starts in the Ensemble being received, the Service is
16 | English
automatically switched.
1Display the menu mode using the control unit and select a setting item.
Select the "PTY Watch"/ "PTYW SEL"/ "PTYWATCH" display.
2Press the setting button of the menu items on the control unit for at least 1 second to switch to PTY watch select mode.
(A*5: Press the setting button of the menu items on the control unit.)
3Switching the setting.
Each time the [FM] or [AM] button is pressed the programme type is switched.
PTY Watch off Ô 1. — 29. Ô
As for available programme types, refer to the <Programme Type Display>.
4Exit menu mode.
NOTE
•Finish the selected PTY programme to return to the previous service.
•The "All Music"/ "MUSIC" and "All Speech"/ "SPEECH" in the table of the <Programme Type Display> cannot be selected.
•As for F group, it is operated on the DAB PTY Search Screen. PTY watch can be turned OFF by "32.NONE".
|
|
|
ABCDEFG |
|
Programme Type Display |
||||
|
|
|
|
|
|
No. Programme type |
Display |
|
|
|
1. |
News |
"News"/ "NEWS" |
|
|
2. |
Current Affairs |
"Current Affairs"/ "AFFAIRS" |
|
|
3. |
Information |
"Information"/ "INFO" |
|
|
4. |
Sport |
"Sport"/ "SPORT" |
|
|
5. |
Education |
"Education"/ "EDUCATE"/ "EDUCAT" |
|
|
6. |
Drama |
"Drama"/ "DRAMA" |
|
|
7. |
Culture |
"Cultures"/ "CULTURE" |
|
|
8. |
Science |
"Science"/ "SCIENCE" |
|
|
9. |
Varied |
"Varied Speech"/ "VARIED" |
|
|
10. |
Pop Music |
"Pop Music"/ "POP M" |
|
|
11. |
Rock Music |
"Rock Music"/ "ROCK M" |
|
|
12. |
Easy Listening Music |
"Easy Listening M"/ "EASY M"/ "M.O.R M" |
|
|
13. |
Light Classical |
"Light Classic M"/ "LIGHT M" |
|
|
14. |
Serious Classical |
"Serious Classics"/ "CLASSICS" |
|
|
15. |
Other Music |
"Other Music"/ "OTHER M" |
|
|
16. |
Weather |
"Weather& Metr"/ "WEATHER" |
|
|
17. |
Finance |
"Finance"/ "FINANCE" |
|
|
18. |
Children's programmes |
"Children's Prog"/ "CHILDREN" |
|
19. |
Social Affairs |
"Social Affairs"/ "SOCIAL" |
20. |
Religion |
"Religion"/ "RELIGION" |
21. |
Phone |
"Phone In"/ "PHONE IN" |
22. |
Travel |
"Travel & Touring"/ "TRAVEL" |
23. |
Leisure |
"Leisure & Hobby"/ "LEISURE" |
24. |
Jazz Music |
"Jazz Music"/ "JAZZ" |
25. |
Country Music |
"Country Music"/ "COUNTRY" |
26. |
National Music |
"National Music"/ "NATION M" |
27. |
Oldies Music |
"Oldies Music"/ "OLDIES" |
28. |
Folk Music |
"Folk Music"/ "FOLK M" |
29. |
Documentary |
"Documentary"/ "DOCUMENT" |
30. |
(Music) |
"All Music"/ "MUSIC" |
31. |
(Speech) |
"All Speech"/ "SPEECH" |
NOTE
•Speech … 1–9, 16–23, 29 : Music … 10–15, 24–28
•In the <PTY Watch Select Mode> the "All Music"/ "MUSIC", "All Speech"/ "SPEECH" cannot be selected.
•F group adds the item "32.NONE".
AıÇΉÏG
Language Filter Search Mode
Audio programmes only in the desired language can selectively be received in the Ensemble.
1Select menu mode using the control unit. Select the menu item.
Select the "Language Search"/ "LANG SEARCH"/ "LANG SEL" display.
2Press the setting button of the menu items on the control unit for at least 1 second to switch to Language filter Search mode.
(A*5: Press the setting button of the menu items on the control unit.)
3Switching the setting.
Each time the [FM] or [AM] button is pressed the setting is switched in the order as shown below:
|
Language |
|
Language |
|
Language |
|
Filter Off |
|
Gaelic |
|
Urdu |
|
Welsh |
|
Italian |
|
Swahili |
|
Danish |
|
* Dutch |
|
Punjabi |
* German |
|
* Norwegian |
|
Hindi |
|
* |
English |
|
* Portuguese |
|
Gujurati |
* |
Spanish |
|
Finnish |
|
Bengali |
* French |
* Swedish |
|
|
||
|
Irish |
|
Flemish |
|
|
4Searching for a programme in the selected language.
Press the [4] / [¢] button to start searching for a programme in the selected language.
NOTE
•If no programme in the selected language is found, "Language n/a"/ "NO COMPO" is displayed. For searching another programme in another language, repeat procedures 2 and 3.
Switching to another programme:
Repeat procedure 4.
Searching for another programme in the newly selected language starts.
Cancelling Search In the Middle:
Exit menu mode.
NOTE
•A programme in the ensemble is selected regardless of the Service or the Primary/ Secondary setting.
•Search using a language with the "*" to display the type of PTY and the Announcement Select into the selected language. Search using another language to display in English.
•Search a programme with the "Filter Off"/ "LANG OFF" to search programmes in all languages.
ÅBÇΉFÌ
Language Filter Select Mode
In the case that a service provider provides a multilingual audio programme, setting to switch only to the Secondary of the desired language is possible.
Ensemble |
Example: |
||||||||||||
|
|
|
|
|
|
|
|||||||
|
|
|
|
Service 1 |
Filter Off |
German |
|||||||
|
|
|
|||||||||||
|
|
|
|
|
|
Primary [English] |
|
|
|
|
|
|
|
|
|
|
|
|
|
O |
|
O |
|
||||
|
|
|
|
|
|
|
|
||||||
|
|
|
|
|
|
|
|
||||||
|
|
|
|
|
|
. . . . . . . . . . . |
. . . |
. . . . . . |
. . |
. |
. . |
. . . |
|
|
|
|
|
|
|
Secondary [French] |
O |
|
|
|
|
|
|
|
|
|
|
|
|
. . . . . . |
. . |
. |
. . |
. . . |
|||
|
|
|
|
|
|
|
|
|
|
|
|||
|
|
|
|
|
|
Secondary [German] |
O |
|
O |
|
|||
|
|
|
|
|
|
. . . . . . |
. . . |
||||||
|
|
|
|
|
|
|
|
||||||
|
|
|
|
|
|
Secondary [Italian] |
O |
|
|
|
|
|
|
|
|
|
|
|
|
. . . . . . |
. . |
. |
. . |
. . . |
|||
|
|
|
|
|
|
|
|
|
|
|
|||
|
|
|
|
Service 2 |
Language |
|
|
|
|
|
|
||
|
|
|
|
|
|
|
|||||||
|
|
|
|
|
|
|
|
|
|
|
|
|
|
|
|
|
|
|
|
|
|
|
|
|
|
|
|
B
1Display the menu mode using the control unit and select a setting item.
Select the "LANG Filter"/ "LANG FIL" display.
2Press the setting button of the menu items on the control unit for at least 1 second to switch to
Language filter select mode.
English | 17
DAB features (Search) |
|
DAB features (Step Up) |
3Switching the setting.
Each time the [FM] or [AM] button is pressed the setting is switched in the order as shown below:
|
Language |
|
Language |
|
Language |
|
Filter Off |
|
Gaelic |
|
Urdu |
|
Welsh |
|
Italian |
|
Swahili |
|
Danish |
* Dutch |
|
Punjabi |
|
|
|
|
|
|
|
* German |
* Norwegian |
|
Hindi |
||
* |
English |
|
* Portuguese |
|
Gujurati |
* |
Spanish |
|
Finnish |
|
Bengali |
* French |
* Swedish |
|
|
||
|
Irish |
|
Flemish |
|
|
4 Exit menu mode.
F
Setting can be carried out on the DAB Setup Screen. (page 9)
NOTE
•Select a language with the "*" to switch the language of the Announcement Select into the selected language. Select another language to switch to English. (except for
F)
•As for only B+ group, select a language with the "*" to switch the language of the Announcement Select and the type of PTY into the selected language. Select another language to switch to English.
•If the selected language has no Secondary, switching to the Secondary is not possible.
18 | English
ABÇΉFG
Announcement select mode
Either accepting or not accepting the interruption of each announcement provided by Ensemble providers can be set by each type.
Even whilst receiving another source, when the set announcement starts, the source is switched automatically.
Example:
Audio programme |
|
|
Interrupt |
|
|
|
|
|
|
"*Traffic news"
"*News"
"*Weather"
ABG
1Display the menu mode using the control unit and select a setting item.
Select the "ASW Select"/ "ASW SEL" display.
2Press the setting button of the menu items in the control unit for at least 1 second to switch to Announcement select mode.
(A*5: Press the setting button of the menu items on the control unit.)
3Each time the [FM] or [AM] button is pressed the setting is switched in the order as shown below:
Display item |
Display |
* "Alarm" |
Danger to life due to outbreak of war etc., |
|
Information on important items |
"Traffic news" |
Traffic information |
"Transport news"/ |
Time table information of public transportation |
"Travel News" |
services |
"Warning" |
Lower priority items than Alarm (power failure, |
|
cut-off of the water supply, etc.) |
"News" |
News flash |
"Weather" |
Weather forecasting |
"Event" |
Event information |
"Special event" |
Undetermined event information |
"Radio info" |
Programme information, advance notice |
"Sports news" |
Sports news |
"Financial news" |
Financial news |
4Switching the setting
Press the [4] or [¢] button.
Indication of the "*" at the front of a display item means that interruption of the item is permitted.
5Exit menu mode.
Exiting the interruption:
Switch the setting of the interruption of the item being interrupted from permission to prohibition.

F
Setting can be carried out on the DAB Setup Screen. (page 9)
NOTE
•The setting of the interruption of the "Alarm" is always ON. Switching to OFF is not possible.
•During an interruption another announcement cannot interrupt the item.
Languages to be displayed (except for F)
Select English, French, German, Dutch, Spanish, Portuguese, Norwegian or Swedish in <Language Filter Search Mode>/ <Language Filter Select Mode> to display in the selected language. (page 17)
ÅıCDEÏÌ
Traffic Announcement Function
Traffic information can be received automatically. It is also possible to play a tape or disc whilst waiting for a traffic announcement programme to start.
Set this function referring to the <Traffic Information Function> of the control unit.
If the [TI] button is not provided set through the menu.
Traffic Announcement Function is displayed as "TI".
When the function is on, the TI indicator is turned on.
In the case of an Ensemble provider supporting the Traffic Announcement, the TI indicator is turned on. When a Traffic Announcement programme starts, "TRAFFIC INFO"/ "TRAFFIC" is displayed, adjusting the volume to the set level.
When a traffic information programme starts whilst playing a tape or a disc, automatic switching to the traffic information happens.
Either an ending of the traffic information or deterioration of the receiving signal results in switching back to the previous source.
NOTE
•This setting is valid for both the DAB and RDS sources.
•As for D group, turning the function ON causes the TI indicator light up and an interruption causes the TA indicator to turn on. In the case that the Ensemble
supports the Traffic Announcement, the TP indicator turns on.
ÅıCDEÏÌ
News Bulletin Function with Announcement News Timeout Setting
The News Bulletin information can be listened to in priority by overriding another programme or
source. When this function is turned on, the interval for allowing the overriding of news (news timeout period) can be set in the range between 10 and 90 minutes.
1Set this function referring to the <News Bulletin Function with PTY News Timeout Setting> of the control unit.
2Starting the News Announcement programme causes the NEWS indicator to blink, adjusting the volume to the set level.
NOTE
•This setting is valid for both the DAB and RDS sources.
•This function cannot be used if the <RDS function> and the <News Bulletin Function with PTY News Timeout Setting> are not provided for in the control unit.
•As for E group, refer to <News Bulletin Function with PTY News Timeout Setting> of the RDS function.
ABCDEFG
Presetting Volume for Announcement
Pre-setting the volume unique to announcements is possible.
A*1 G*1
During reception of announcement the adjusted volume is automatically remembered, and the next time it switches to announcement it's automatically the remembered volume.
ABCDEFG (except for A*1, G*1 )
1Receive a DAB station.
2Adjust the volume for the announcement.
3Press the [TI VOL ADJ] button for at least 2 seconds.
An indication of the volume blinks once and the volume is stored in the memory. Announcements can be heard at this volume.
NOTE
•This setting is valid for both the DAB and RDS sources.
•This function cannot be set if the <Pre-setting Volume for Traffic Information/News> function of the RDS function is not provided for in the control unit. (except for A*1, G*1)
English | 19
DAB features (Step Up)
•This function does not reduce the listening volume in the DAB and tuner modes. The volume set here is recalled only when it is larger than the volume which is currently used in the DAB or tuner mode.
•Setting the volume unique to the announcement and turning Announcement select mode on with the minimum volume results in only the desired announcement being heard.
•As for E and F group, refer to <Pre-setting the Volume for Traffic Information/News> of the RDS function.
ABCDEFG
Regional Announcement Function
The interruption of the announcement such as the Alarm of either a restricted region where the programme is being received (regional restriction ON) or all regions (regional restriction OFF) can be selected.
ABCDG
1Display the menu mode using the control unit and select a setting item.
Select the "REG ASW"/ "REG INT"/ "REGA"/ "REG"/ "Regional ASW" display.
2Switch the setting of menu items.
"ON": Regional on "OFF": Regional off
3Exit menu mode.
E F
Set this function on the DAB Setup Screen. (page 8 - 9)
NOTE
• This setting is valid only with the DAB source.
ABCDEFG
Dynamic Range Control (DRC)
In the case that the producer of a programme wants to adjust dynamic range, DRC information is transmitted. Whether to receive the DRC or not can be selected and set according to listeners' preference.
ABCDG
1Display the menu mode using the control unit and select a setting item.
Select the "DRC" display.
2Switch the setting of menu items.
"ON": Functioning "OFF": Not functioning
3Exit menu mode.
E
Set this function on the DAB Setup Screen. (page 8)
F
Touch [DRC] on the DAB Control Screen.
NOTE
•As the dynamic range is changed based on the Dynamic Range Control information sent from a Service provider, this function does not work whilst no information is being transmitted from the Provider.
•When the Dynamic Range Control (DRC) is set ON, the sound volume is somewhat lower.
Also, if the DRC data can’t be cleanly demodulated, the DRC may be invalid.
AıÇΉFG (except for A*4)
Automatic Switching DAB priority
RDS/DAB provides information when the DAB service and RDS station are broadcasting the same programme.
When the receiving signal of a DAB station deteriorates, the reception can be switched automatically to the RDS station broadcasting the same radio programme, allowing listeners to continue listening to the same programme.
On the contrary, when an RDS station is being received, the reception can be switched automatically to the DAB station broadcasting the same radio programme, allowing the same programme to be heard at a higher sound quality.
20 | English
Service of DAB: |
|
|
|
RDS: |
|
|
|
Source mode: |
%"# |
%"# |
%"# |
RDS: |
|
|
|
Service of DAB: |
|
|
|
Source mode: |
56/&3 |
%"# |
|
AG
1Display the menu mode using the control unit and select a setting item.
Select the "DAB PRIORITY"/ "DAB-P"/ "DABP"/ "Priority DAB"/ "PRIORITY" display.
2Switch the setting of menu items.
"ON": Functioning "OFF": Not functioning
3Exit menu mode.
F
Set this function on the DAB Setup Screen. (page 9)
NOTE
•When the receiving signal of a DAB station deteriorates, the reception can be switched to the RDS station, however, when the receiving signal of a DAB station recovers, the reception can be switched to the previous condition.
The DAB indicator blinks during the period of switching to the RDS station. (except for F)
•Switching the reception from the RDS station to the DAB station causes switching the source mode to the DAB source. After this, every operation enters DAB mode. For selecting other FM/AM stations, switch the source mode to the TUNER source mode before selecting.
•If the tuner of the Control unit provides no RDS function, this function does not work.
•It takes at least 10 seconds after receiving the RDS signal to switch from the RDS station to the DAB service.
ÅBCDEÏÌ
Automatic Switching from DAB to RDS
Presently, the coverage areas of DAB stations are smaller than those of RDS stations.
Therefore, when the receiving condition of a DAB station deteriorates, the reception can be switched automatically to the RDS station broadcasting the same radio programme to minimize the sound interruption. The DAB indicator blinks during the period of switching to the RDS station.
Service of DAB:
RDS:
BCD
1Display the menu mode using the control unit and select a setting item.
Select the "SW RDS"/ "RDS CHG"/ "RDS"/ "Switching to RDS" display.
2Switch the setting of menu items.
"ON": Functioning "OFF": Not functioning
3Exit menu mode.
E
Set this function on the DAB Setup Screen. (page 8)
NOTE
•When the receiving signal of the DAB station recovers, the reception can be switched to the DAB source.
•If the tuner of the Control unit provides no RDS function, this function does not work.
English | 21
DAB features (Remote control)
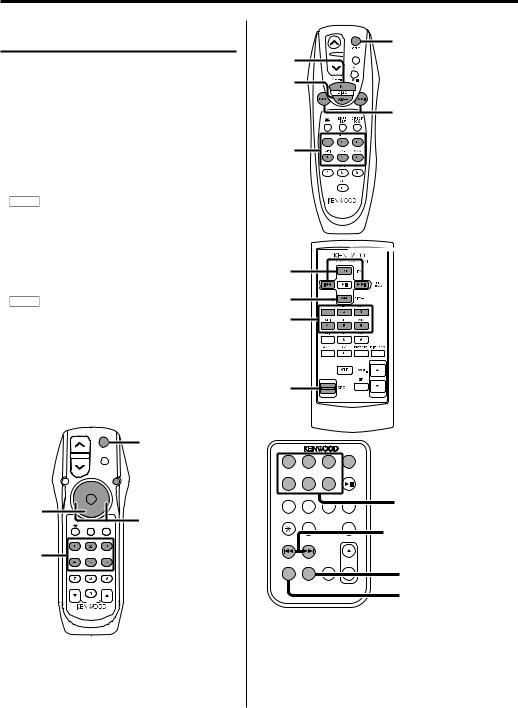
ABCDEFG
DAB features of remote control
[TUNER] button (Switching Modes)
Each press toggles between TUNER mode and DAB mode.
[SRC] / [SOURCE] button (Switching Modes)
Each press switches the usable source modes in order.
[1] to [6] buttons (Preset Memory)
Recalls the services that have been stored to memory.
NOTE
• Operation can’t be done with the B group.
[4] / [¢] buttons (Service Switching)
Pressing the [¢] button switches the services from within the Ensemble in order.
Pressing the [4] button switches the services in the reverse order.
NOTE
• The E KVC-1000 is ensemble switching.
[AM] button (Primary/Secondary Switching)
Each press of the [AM] button switches between Primary/secondary within the services.
[FM] button (Preset Band Switching)
Each press of the [FM] button switches one step among the DAB1, DAB2 and DAB3 bands.
-,
32#
!44
6/,
!5$

 &-
&-
D
|
|
!-n |
|
|
ÊÉÊ |
|
|
|
:/.% |
$ /+ |
|
|
|
|
|
|
)2%#4 |
|
|
D |
|
|
!"# |
$%& |
|
|
|
£Ê ÊÈ |
'() |
*+, |
-./ |
|
|
|
|
023 |
456 |
789 |
|
|
|
|
|
1: |
|
|
|
|
|
|
2 6/, |
|
|
|
|
SRC
FM
AM
4 / ¢
1 - 6
 4 / ¢
4 / ¢
FM
AM 1 - 6
SRC
ABC DEF
1 2 3 SRC SRC
SRC
|
GHI |
JKL |
MNO |
|
4 |
|
5 |
6 |
|
|
|
|
PROG |
1 - 6 |
|
PRS |
TUV |
WXY |
|
7 |
|
8 |
9 DNPP |
|
|
|
QZ |
OK |
|
|
|
0 |
4 / ¢ |
|
|
|
|
DIRECT |
|
|
|
|
|
|
|
TUNE |
|
|
|
|
TRACK |
|
VOL |
|
|
|
|
FM |
|
– |
DISC |
+ |
|
|
AM |
|
FM |
ATT |
|
|
|
|
|
|
REW |
|
FF |
|
|
REMOTE CONTROL UNIT |
AM |
CA-R66 |
|
22 | English

1 |
ABC |
DEF |
|
TUNER |
2 |
3 |
TUNER |
||
GHI |
JKL |
MNO |
|
|
4 |
5 |
6 |
TAPE |
|
PRS |
TUV |
WXY |
|
1 - 6 |
7 |
8 |
9 |
CD |
|
|
QZ |
|
|
|
|
0 |
DIRECT |
CD·MD |
4 / ¢ |
|
OK |
CH |
||
– |
+ |
DNPP |
|
|
|
|
|
||
TUNE |
|
|
|
|
TRACK |
|
|
VOL. |
|
– |
+ |
|
|
|
|
FM |
AM |
FM |
PROG |
|
|
|
|
|
|
|
|
|
|
|
REW DISC |
FF |
|
|
|
|
|
REMOTE CONTROL UNIT |
|
|
AM |
|||
|
|
|
|
|
|
|
|
|
– |
+ |
SRC |
SRC |
|
FM |
|
|
TUNE |
¢ |
4 |
|
|
|
|
¢ |
|||
|
|
|
|
4 |
|
|
|
|
|
FM |
TRACK |
|
|
|
|
|
+ |
|
|
|
AM |
|
A |
|
DSIC |
38 |
|
|
T |
– |
|
|||
|
|
T |
|
AM |
|
|
|
|
|
|
|
1 - 6 |
|
|
|
|
|
|
|
|
|
|
|
DNPP/ |
DIRECT |
MODE V.SEL |
FNC |
|
|
|
SBF |
OK |
||
DNPP/ |
OK |
|
|
|
|
|
SBF |
|
|
ABC |
DEF |
|
|
|
|
1 |
2 |
3 |
|
|
|
|
GHI |
JKL |
MNO |
AME |
REAR AV |
|
|
4 |
5 |
6 |
|
|
|
|
PRS |
TUV |
WXY |
|
|
|
|
7 |
8 |
9 |
|
|
|
|
|
QZ |
|
|
SP |
|
|
|
0 |
|
OPEN |
|
REMOTE CONTROL UNIT |
REMOTE CONTROL UNIT |
|
|
|||
!5$
6 |
6 |
|
|
|
|
|
D |
|
|
|
|
|
|
|
|
|
-/"* / , |
|
-, |
|
, /1, |
|
|
|
-1 |
Ê/ / |
£Ê ÊÈ |
1 "Ê °
REMOTE CONTROL UNIT
VOL. |
RC-110 |
|
SOURCE |
|
SOURCE |
|
OK |
ATT |
DNPP(SBF) |
FM |
FM |
DISC+ |
|
4

 3
3
PROG
DISC- 
AM
AM
|
SRC |
|
|
UP |
FM |
|
|
|
5 |
¢ |
FM/DISC+ |
VOLUME |
|
|
∞ |
ATT |
SRC |
|
||
|
DWN |
AM |
|
4 |
AM/DISC– |
4 / ¢
English | 23

Accessories
External view |
Number of items |
External view |
Number of items |
1 |
..................................... 1 |
7 |
..................................... 1 |
2 ..................................... |
2 |
8 |
..................................... 1 |
3 ..................................... |
4 |
9 |
..................................... 1 |
4 ..................................... |
4 |
0 |
..................................... 1 |
5 ..................................... |
3 |
! |
..................................... 1 |
6 ..................................... |
1 |
@ |
..................................... 1 |
2CAUTION
•The use of any accessories except for those provided might result in damage to the unit. Make sure only to use the accessories shipped with the unit, as shown above.
24 | English

Installation Procedure
1.To prevent short circuits, remove the key from the ignition and disconnect the - terminal of the battery.
2.Install the DAB antenna and connect the antenna cable to the DAB hideaway tuner.
3.Connect the DAB hideaway tuner and the control unit using the provided DAB connection cable.
4.Make the proper input and output cable connections for each unit.
5.Install the unit in your car.
6.Reconnect the - terminal of the battery.
7.Press the reset button on the control unit.
2CAUTION
•Do not connect the DAB control cable whilst the control unit is turned ON.
•Be sure to press the reset button on the control unit after installation.
•If your car is not prepared for this special connection-system, consult your Kenwood dealer.
•Make sure that all cable connections are securely made by inserting jacks until they lock completely.
•Do not let unconnected cables or terminals touch metal on the car or anything else conducting electricity. To prevent short circuits, also do not remove the caps on the ends of the unconnected cables or the terminals.
•Insulate unconnected cables with vinyl tape or other similar material.
•Be sure to use the provided DAB antenna (Accessory 7, 8) as the DAB antenna. Using other antenna than provide may lead to malfunction.
•Take care so that the antenna cable and other connection cables are not caught by mobile parts. Otherwise cable disconnection or other trouble may result.
•Do not apply too much force on the antenna cable, other connection cables and connectors by bending a cable, etc. Otherwise cable disconnection or other trouble may result.
•Securely fasten the screws that fix the DAB antenna as well as the screws of the DAB antenna itself. Screws that loosen introduce the danger of the antenna coming apart during travel.
•DC voltage is output from the DAB antenna terminal of the DAB hideaway tuner to supply power to the DAB
antenna. Be sure to connect the supplied DAB antenna only. Otherwise, the unit may be damaged.
•After the unit is installed, check whether the brake lamps, indicators, wipers, etc. on the car are working properly.
English | 25
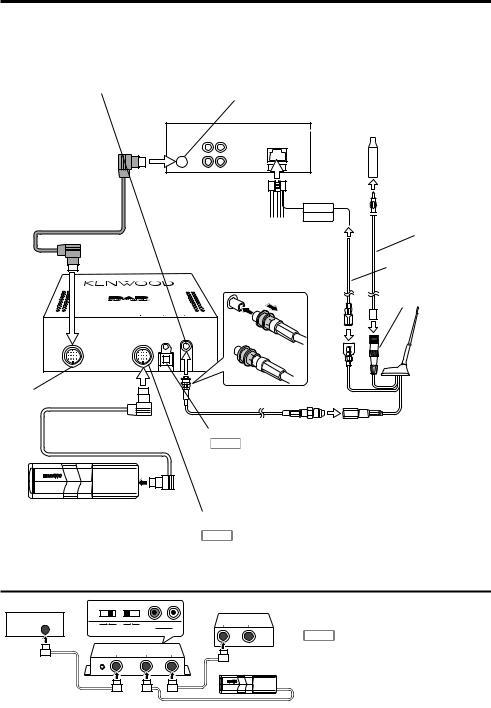
Connecting Cables to Terminals
2CAUTION |
(*…commercially available) |
•DC voltage is output from the DAB antenna terminal of the DAB hideaway tuner to supply power to the DAB antenna. Be sure to connect the supplied DAB antenna only. Otherwise, the unit may be damaged.
To Kenwood disc changer / DAB control input
 FM/AM antenna input
Control unit
DAB connection cable (Accessory1)
DAB HIDEAWAY TUNER
KTC–9090DAB
To control unit
Connection cable (supplied with the Disc changer)
Disc changer
P.CONT. |
|
|
ANT.CONT. |
|
|
Power control/Motor |
FM/AM antenna cable* |
|
antenna control wire |
|
|
(Blue/White) |
|
|
DAB hideaway tuner |
FM/AM antenna |
|
control cable* |
||
|
||
1 |
(M10) |
2 

 3
3
DAB/FM/AM antenna
(Accessory7, 8)
DAB antenna cable (Accessory@)
RDI output
NOTE
•To use the data output from the Radio Data Interface (RDI) connector, a separate RDI-enabled component is required.
•The Radio Data Interface (RDI) output may contain test data, but this isn’t broadcast data.
Kenwood disc changer control input
NOTE
• To connect the Disc changer, consult your Disc changer manual.
If you want to connect KCA-S210A
Control unit |
]“N” |
|
DAB hideaway tuner |
|
|
|
|
TO |
TO |
|
O N |
OFF ON |
HEAD UNIT |
CHANGER |
|
|
|
||
|
PROTOCOL |
AUX |
AUX |
|
|
SWITCH |
SWITCH |
IN |
|
|
TO |
TO |
TO |
|
|
H/U |
CHANGER 1 |
CHANGER 2 |
|
Disc changer
Connect the KTC-9090DAB to the terminal labelled TO CHANGER 2.
NOTE
•Set the PROTOCOL selection switch to "N" position.
26 | English
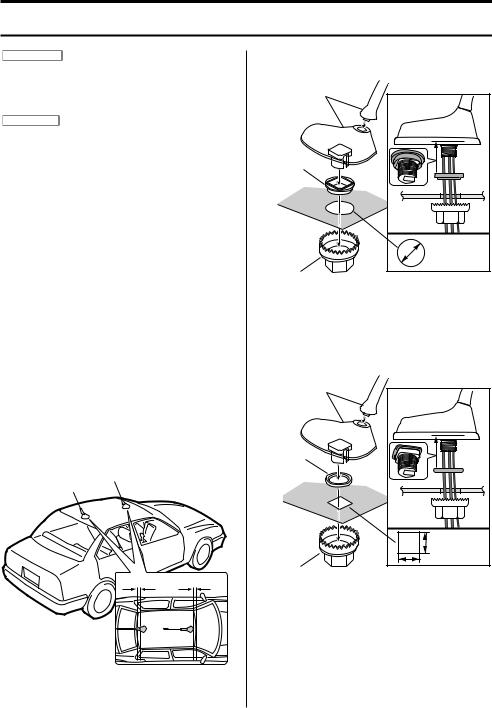
Installation
Mounting the DAB Antenna to the Roof
2WARNING
•If a hole to insert the antenna has burrs, remove them first. Leaving burrs causes damage to the antenna cable leading to accidents and failures.
2CAUTION
•Make a hole in the roof and mount the DAB antenna. Specialized knowledge is required for this job and an installer should be requested for the installation work.
•The DAB antenna should be mounted so that it does not protrude beyond the width and length of the car.
•Do not install at a spot where the roof is markedly curved. Doing so will allow water to enter from a gap between the roof and the waterproof rubber.
•Securely fasten the screws that fix the DAB antenna as well as the screws of the DAB antenna itself. Screws that loosen introduce the danger of the antenna coming apart during travel.
1Determine the mounting position of the DAB antenna. (It replaces with established FM / AM antenna.)
2Wipe away any dirt from the mounting position.
3Remove the lining in a place where you can make a hole in the roof.
Make a Ø19.5 mm round hole, or a 15mm rectangular hole in the roof.
4Mount the DAB antenna and fasten it by tightening the nut from the inside.
5Use a cable clamp to fix the antenna cable and perform the wiring as far as the DAB hideaway unit.
100 mm – 200 mm
• In the case of a round fixing hole
DAB antenna (Accessory7, 8)
Waterproof rubber (Accessory9)
Car roof
Nut (Accessory!)
Ø19.5 mm |
• In the case of a rectangular fixing hole
DAB antenna (Accessory7, 8)
Waterproof rubber (Accessory0)
Car roof
Nut (Accessory!)
15 mm |
English | 27
 Loading...