


MONITOR WITH DVD RECEIVER
KVT-617DVD KVT-647DVD
INSTRUCTION MANUAL
Take the time to read through this instruction manual.
Familiarity with installation and operation procedures will help you obtain the best performance from your new DVD Receiver.
For your records
Record the serial number, found on the back of the unit, in the spaces designated on the warranty card, and in the space provided below. Refer to the model and serial numbers whenever you call upon your Kenwood dealer for information or service on the product. Model KVT-617DVD/KVT-647DVD Serial number
US Residence Only
Register Online
Register your Kenwood product at www.kenwoodusa.com
© B64-3466-00/00 (KV/RV)

Contents |
|
Before Use .................................................... |
4 |
Notes on Playing MP3/WMA/JPEG/MPEG.. |
6 |
About Playing Dual Disc ............................. |
7 |
Opening/Closing the Monitor and |
|
Power Switch ............................................ |
8 |
Removing/Attaching the Protection Panel.. |
9 |
KVT-617DVD/647DVD Basic Operations . 10 |
|
Basic Operations of Remote Controller ... |
12 |
About discs................................................. |
15 |
Switching Screen Mode............................. |
16 |
Controlling during DVD Video, Video CD, |
|
JPEG or MPEG Playback......................... |
18 |
Displaying the DVD/VCD/JPEG/MPEG Playback |
|
screen |
|
Displaying the Easy Control Panel |
|
Displaying the DVD/VCD Control screen |
|
DVD Disc Menu |
|
VCD Zoom Control |
|
Picture Control |
|
Information Display |
|
Direct Search |
|
CD/MP3/WMA/JPEG/MPEG/Disc Changer
Play Control............................................. |
24 |
Displaying the Easy Control Panel
Displaying the CD/MP3/WMA/JPEG/MPEG/Disc Changer Control screen
Displaying the CD/MP3/WMA/JPEG/MPEG/Disc Changer Menu screen
Set Disc Name
Directory List (during MP3/WMA/JPEG/MPEG play) ID3/WMA TAG Display (during MP3/WMA play) Disc Select (during play by disc changer)
Direct Search
Tuner Control ............................................. |
32 |
Displaying the Easy Control Panel
Displaying the Tuner Control screen
Displaying the Tuner Menu screen
Seek Mode
Auto Memory
Manual Memory
Preset Select
Set Station Name
Direct Search
Traffic Information
Search for Program Type
Radio Text
2 | English
TV/ VIDEO Control ..................................... |
38 |
Displaying the TV Picture screen
Displaying the Easy Control Panel
Displaying the TV Control screen
Displaying the TV Menu screen
Seek Mode
Auto Memory
Manual Memory
Preset Select
Set Station Name
Direct Search
SIRIUS Tuner Control |
|
<North American sales only> ............... |
42 |
Displaying the Easy Control Panel Displaying the SIRIUS Tuner Control screen Displaying the SIRIUS Tuner Menu
Channel Search
Channel Memory Direct Channel Search Information Display
HD Radio Control |
|
<North American sales only> ............... |
46 |
Displaying the Easy Control Panel
Displaying the HD Radio Control screen
Displaying the HD Radio Menu
Seek Mode
Auto Memory
Manual Memory
Receive Mode
Title Display
DAB Tuner control ..................................... |
50 |
Displaying the Easy Control Panel
Displaying the DAB Tuner Control screen
Displaying the DAB Tuner Menu screen
Seek Mode
Auto Ensemble Memory
Service Preset Memory
Service Select
Language Filter
Search for Program Type
DAB Information
DAB Announcement
Weather Band Tuner Control .................... |
56 |
Displaying the Easy Control Panel |
|
Displaying the Weather Band Tuner Control screen |
|
Character Entry.......................................... |
57 |
How To Use the Character Entry screen |
|

Source Select.............................................. |
58 |
Displaying the Control screen |
|
Displaying the Source Select screen |
|
Adjusting the Monitor Display Position |
|
and Quality............................................. |
59 |
Displaying the Screen Control screen |
|
Displaying the Angle Control screen |
|
Setup Menu................................................ |
60 |
Setup Menu............................................................ |
60 |
Displaying the Control screen |
|
Displaying the Setup Menu screen |
|
Audio Set Up ......................................................... |
61 |
Display the Audio setup screen |
|
Crossover Network Setup |
|
DVD Setup ............................................................. |
63 |
Displaying the DVD SETUP 1 screen |
|
Displaying the DVD SETUP 2 screen |
|
Displaying the DVD SETUP 3 screen |
|
Language Setup |
|
Parental Level Setup |
|
System Setup ........................................................ |
67 |
Displaying the System 1 screen |
|
Displaying the System 2 screen |
|
AV Interface ........................................................... |
68 |
Displaying the AV I/F 1 screen |
|
Displaying the AV I/F 2 screen |
|
Displaying the AV I/F 3 screen |
|
User Interface ........................................................ |
70 |
Displaying the User I/F 1 screen |
|
Displaying the User I/F 2 screen |
|
Touch Panel Adjustment |
|
Clock |
|
Security Code Setup |
|
Set Up Memory |
|
SIRIUS Setup <North American sales only>..... |
75 |
Displaying the SIRIUS Set Up screen |
|
DAB Set Up ............................................................ |
76 |
Displaying the DAB Set Up screen |
|
Announcement Selection |
|
Sound Effects Menu................................... |
78 |
Sound Effects Menu ............................................. |
78 |
Displaying the Control screen |
|
Displaying the Sound Effects Menu screen |
|
Audio Control ........................................................ |
79 |
Displaying the Audio Control 1 screen |
|
Displaying the Audio Control 2 screen |
|
Equalizer ................................................................ |
80 |
Displaying the Equalizer screen |
|
Tone curve setup |
|
Zone Control ......................................................... |
82 |
Displaying the Zone Control screen |
|
Muting Audio Volume upon Reception of |
|
Phone call ............................................... |
83 |
Muting Audio Volume upon Reception of Phone |
|
call |
|
Glossary...................................................... |
84 |
Troubleshooting Guide ............................. |
85 |
Specifications ........................................... |
89 |
English | 3
Before Use
2WARNING
To prevent injury or fire, take the following precautions:
•To prevent a short circuit, never put or leave any metallic objects (such as coins or metal tools) inside the unit.
•Do not touch the liquid crystal fluid if the LCD is damaged or broken due to shock. The liquid crystal fluid may be dangerous to your health or even fatal.
If the liquid crystal fluid from the LCD contacts your body or clothing, wash it off with soap immediately.
•Mounting and wiring this product requires skills and experience. For safety’s sake, leave the mounting and wiring work to professionals.
2CAUTION
To prevent damage to the machine, take the following precautions:
•Make sure to ground the unit to a negative 12V DC power supply.
•Do not install the unit in a spot exposed to direct sunlight or excessive heat or humidity. Also avoid places with too much dust or the possibility of water splashing.
•Do not place the faceplate or the faceplate case in areas exposed to direct sunlight, excessive heat or humidity. Also avoid places with too much dust or the possibility of water splashing.
•To prevent deterioration, do not touch the terminals of the unit or faceplate with your fingers.
•Do not subject the faceplate to excessive shock, as it is a piece of precision equipment.
•When replacing a fuse, only use a new fuse with the prescribed rating. Using a fuse with the wrong rating may cause your unit to malfunction.
•Do not use your own screws. Use only the screws provided. If you use the wrong screws, you could damage the unit.
•You cannot view video pictures whilst the vehicle is moving. To enjoy TV/video pictures, find a safe place to park and engage the parking brake.
NOTE
•If you experience problems during installation, consult your Kenwood dealer.
•When you purchase optional accessories, check with your Kenwood dealer to make sure that they work with your model and in your area.
•If the unit fails to operate properly, press the Reset button to restore factory settings.
ATT AUTO
Reset button
Screen brightness during low temperatures
When the temperature of the unit falls such as during winter, the liquid crystal panel's screen will become darker than usual. Normal brightness will return after using the monitor for a while.
4 | English
Audio units you can control from the KVT-617DVD/647DVD Receiver (As of June, 2006):
KTC-SR901, KTC-SR902, KTC-SR903, KTC-HR100, KTC-HR100MC, KTCHR100TR, KHD-CX910, KHD-C710, KTC-WB100, KDC-C719, KDC-C669, KDC-C469, KDV-C810, KDC-CX89, KDC-CX87, KDC-C717, KDC-C667, KDC-C467, KDC-D301, KDC-CX85, KDC-C715, KDC-C665, KDC-C465, KDC-CX82, KDC-C712, KDC-662, KDC-D300, KMD-D400, KTC-9090DAB, KTC-V300N, KTC-V500N (Set the "O-N" switch to "N" position if provided.)
Navigation units you can control from the KVT-617DVD/647DVD Receiver (As of June, 2006):
KNA-DV2100, KNA-DV3100, KNA-DV4100, KNA-G510
Loading and Replacing the battery
Use one lithium battery (CR2025). |
|
Insert the batteries with the +and |
|
-poles aligned properly, following |
Keep on slide |
the illustration inside the case. |
|
2WARNING |
Pull out |
|
Store unused batteries out of the reach of children. Contact a doctor immediately if the battery is accidentally swallowed.
•Do not set the remote controller on hot places such as above the dashboard.
•The provided battery is intended for use in operation checking, and it’s service life may be short.
•When the remote controllable distance becomes short, replace the battery with new one.
Cleaning the panel and monitor
When the operator panel and monitor panels are dirty, wipe and clean them using a soft cloth (such as a commercially available silicon coated cloth). When contaminated excessively, clean them using a cloth dipped in a neutral detergent first, then remove the detergent using a dry cloth. Do not use a hard cloth and a volatile chemical (such as
an alcohol). If used, the panel surface may be scratched or printed letters may be erased.
Cleaning the disc slot
As dust can accumulate in the disc slot, clean it occasionally. Your discs can get scratched if you put them in a dusty disc slot.
Lens Fogging
Right after you turn on the car heater in cold weather, dew or condensation may form on the lens in the disc player of the unit. Called lens fogging, discs may be impossible to play. In such a situation, remove the disc and wait for the condensation to evaporate. If the unit still does not operate normally after a whilst, consult your Kenwood dealer.
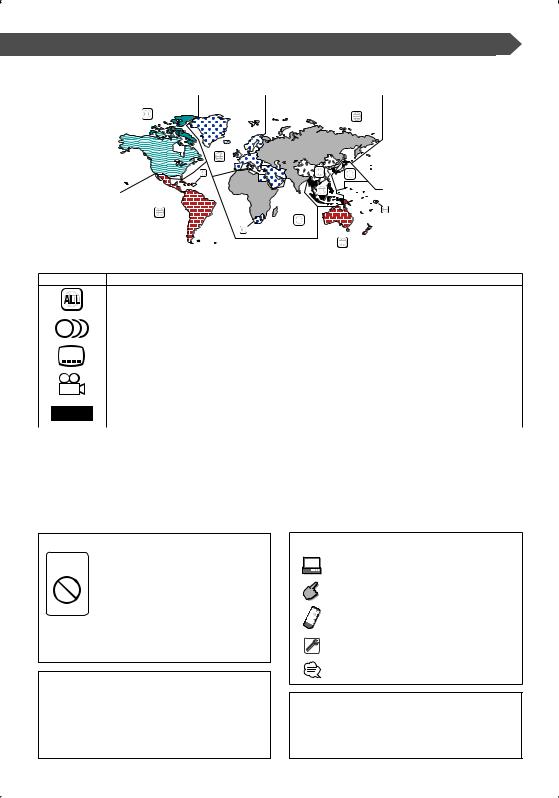
Region codes in the world
The DVD players are given a region code according to the country or area it is marketed, as shown in the following map.
1 |
|
5 |
|
2 |
|
1 |
6 |
2 |
|
|
|
|
3 |
|
4 |
|
1 |
|
|
|
|
5 |
|
|
2 |
|
|
|
4 |
Icons on the DVD discs
Icon |
Description |
|
Indicates the region code where the disc can be played. |
||
|
|
||
8 |
Number of voice languages recorded with the audio function. The number in the icon indicates the number |
||
of voice languages. (Max. 8 languages) |
|
||
|
|
||
|
|
||
32 |
Number of subtitle languages recorded with the subtitle function. The number in the icon indicates the |
||
|
number of subtitle languages. (Max. 32 languages) |
||
9 |
Number of angles provided by the angle function. The number in the icon indicates the number of angles. |
||
(Max. 9 angles) |
|
||
|
|
||
16:9 LB |
Aspect ratios that can be selected. "LB" stands for Letter Box and "PS" for Pan/Scan. In the example on the left, |
||
the 16:9 video can be converted into letter box video. |
|||
|
|||
|
|
||
Unplayable discs |
|
||
This player cannot play back any of the following discs. |
|
||
• DVD-ROM/DVD-RAM discs |
• HQ-VCD/SVCD discs |
||
• CDV discs (Only the audio part can be reproduced) |
• CD-G/CD-EG/CD-EXTRA discs (Only the audio can be reproduced) |
||
• Photo CD discs |
|
• DVD-Audio |
|
• Dual Disc |
|
|
|
Also, you cannot play back the DVD-R/RW and DVD+R/RW discs if not recorded in the DVD-Video format.
Restrictions due to difference between discs
Inhibition |
Some DVD and VCD discs can be played |
|
only in certain playback modes according |
||
icon |
||
|
to the intentions of the software producers. |
|
|
As this player plays discs according to their |
|
|
intentions, some functions may not work as |
|
|
intended by you. Please be sure to read the |
|
|
instructions provided with each disc. When an |
|
|
inhibition icon is displayed on the monitor, it |
|
|
indicates that the disc being played is under |
|
|
the restriction as described above. |
The illustrations of the display and the panel appearing in this manual are examples used to explain more clearly
how the controls are used. Therefore, what appears on the display in the illustrations may differ from what appears on the display on the actual equipment, and some of
the illustrations on the display may represent something impossible in actual operation.
Explanation of icons used on this manual
Indicates the key operation on the receiver.
Indicates the button you must touch.
Indicates the key or joystick operation on the remote controller.
The initial value of each setup is shown.
Gives an additional information or an operation advice.
Time is displayed on each control screen in the 12-hour clock display type (with AM/PM displayed) or in the
24 hour clock display type (without AM/PM displayed) depending on the sales area. The display type cannot be changed. In this instruction manual, screens of the 24-hour display type are used as examples.
English | 5
Notes on Playing MP3/WMA/JPEG/MPEG
This unit can play MP3 (MPEG1 Audio Layer 3)/ WMA/JPEG/MPEG (MPEG 1/MPEG 2). Note, however, that the MP3/WMA/JPEG/MPEG recording media and formats acceptable are limited. When writing MP3/WMA/JPEG/MPEG, pay attention to the following restrictions.
Acceptable media
The MP3/WMA/JPEG/MPEG recording media acceptable to this unit are CD-ROM, CD-R, CD-RW, DVD-R/RW and DVD+R/ RW.
When using CD-RW, do full format not quick format to prevent malfunction.
Acceptable medium formats
The following formats are available for the media used in this unit. The maximum number of characters used for file name including the delimiter (".") and three-character extension are indicated in parentheses.
•ISO 9660 Level 1 (12 characters)
•ISO 9660 Level 2 (31 characters)
•Joliet (64 characters)
•Romeo (128 characters)
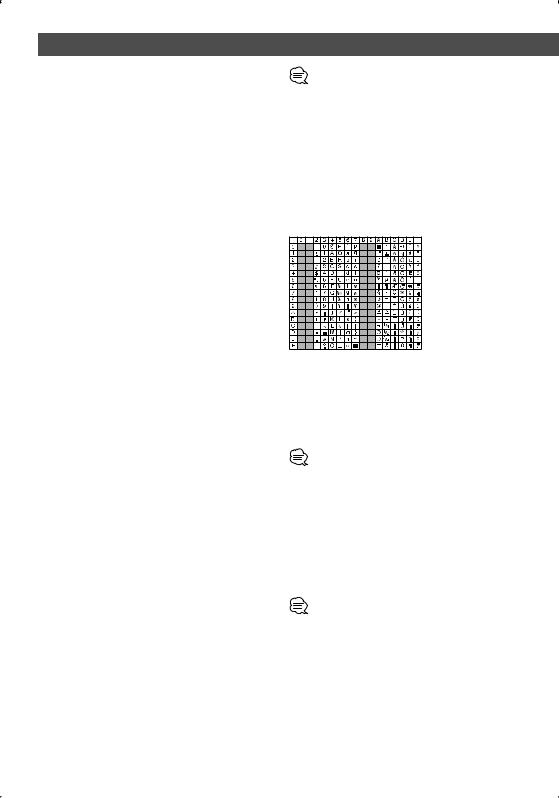
Up to 200 characters can be displayed in the long file name format. For a list of available characters, see the instruction manual of the writing software and the section <Entering file and folder names> below.
The media reproducible on this unit has the following limitations:
•Maximum number of directory levels: 8
•Maximum number of files per folder: 255
•Maximum number of characters for folder name: 200
•Maximum number of folders: 254
MP3/WMA/JPEG/MPEG written in the formats other than the above may not be successfully played and their file names or folder names are not properly displayed.
Settings for your MP3/WMA/JPEG/MPEG encoder and CD/DVD writer
Do the following setting when compressing audio data in MP3/WMA data with the MP3/WMA encoder.
MP3/WMA
• Transfer bit rate: MP3: 32 —320 kbps WMA: 48 —192 kbps
• Sampling frequency: MP3: 32, 44.1, 48 kHz WMA: 32, 44.1, 48 kHz
Do the following setting when compressing video/audio data in JPEG/MPEG data with the JPEG/MPEG encoder.
JPEG
• Picture size: Baseline format: 5,120 (W) x 3,840 (H) pixels
(Maximum size)*1
Progressive format: 2,048 (W) x 1,536 (H) pixels
(Maximum size)*2
MPEG
•Video format: MPEG1, MPEG2
•Picture size: MPEG1: 320x240, 352x240 (NTSC), 352x288 (PAL)
MPEG2: 640x480, 720x480 (NTSC), 720x576 (PAL)
•Audio format: MPEG1 Audio Layer2
•Transfer bit rate: 32—384 kbps CBR
•Sampling frequency: 32, 44.1,48 kHz
When you use your CD/DVD writer to record MP3/WMA/JPEG/ MPEG up to the maximum disc capacity, disable additional writing. For recording on an empty disc up to the maximum capacity at once, check Disc at Once.
•Play mode may not be possible when portions of the functions of Windows Media Player 9 or higher are used.
•*1 A part of picture will not be displayed if the size of a picture exceeds maximum.
•*2 A picture will not be displayed if the size of a picture exceeds maximum.
•When you write for MPEG 2 data, please be sure to use DVD media.
•When you write data in DVD media, please be sure to set a setup of a DVD writer to "Disc at once".
Entering ID3 tag
The Displayable ID3 tag is ID3 version 1.x.
For the character code, refer to the List of Codes.
Entering file and folder names
You can use only characters shown on the code table for file name and folder name.
If you use any other character for entry, the file and folder names are not displayed correctly. They may neither be displayed correctly depending on the CD/DVD writer used. The MP3/WMA/JPEG/MPEG file must have the MP3/WMA/ JPEG/MPEG extension (.mp3/.wma/.jpg/.mpg).
•A file with a name entered with characters not on the code list may not play correctly.
Writing files into a medium
When a medium containing MP3/WMA/JPEG/MPEG data is loaded, the unit checks all the data on the medium. If the medium contains a lot of folders or non-MP3/WMA/JPEG/ MPEG files, therefore, it takes a long time until the unit starts playing MP3/WMA/JPEG/MPEG.
In addition, it may take time for the unit to move to the next MP3/WMA/JPEG/MPEG file or a File Search or Folder Search may not be performed smoothly.
Loading such a medium may produce loud noise to damage the speakers.
•Do no attempt to play a medium containing a non-MP3/WMA/ JPEG/MPEG file with the MP3/WMA/JPEG/MPEG extension. The unit mistakes non-MP3/WMA/JPEG/MPEG files for MP3/ WMA/JPEG/MPEG data as long as they have the MP3/WMA/ JPEG/MPEG extension.
•Do not attempt to play a medium containing non MP3/WMA/ JPEG/MPEG.
6 | English

MP3/WMA/JPEG/MPEG playing order
When selected for play, Folder Search, File Search, or for Folder Select, files and folders are accessed in the order in which they were written by the CD/DVD writer.
Because of this, the order in which they are expected to be played may not match the order in which they are actually played. You may be able to set the order in which MP3/WMA/ JPEG/MPEG are to be played by writing them onto a medium such as a CD-R with their file names beginning with play sequence numbers such as "01" to "99", depending on your CD/DVD writer.
JPEG
JPEG is a standardized image compression mechanism. JPEG stands for Joint Photographic Experts Group, the original name of the committee that wrote the standard. JPEG is designed for compressing either full color or gray scale images.
MPEG 1
The most common implementations of the MPEG 1 standard provide a video resolution of 352-by- 240 at 30 frames per second (fps). This produces video quality slightly below the quality of conventional VCR videos.
MPEG 2
MPEG 2 offers resolutions of 720x480 and 1280x720 at 60 fps (NTSC), with full CD-quality audio. This is sufficient for all the major TV standards, including NTSC, and even PAL. MPEG 2 is used by DVD-ROMs. MPEG-2 can compress a 2- hour video into a few gigabytes.
About Playing Dual Disc
About Playing Dual Disc
Dual Discs are two-sided discs that have a recordable CD for audio on one side and a recordable DVD for video on the other.
Playback of the DVD side is possible with this unit. However, since the CD side of Dual Discs is not physically compatible with the general CD standard, it may not be possible to play the CD side with this unit.
Frequent loading and ejecting of a Dual Disc may result in scratches on the disc.
Serious scratches can lead to playback problems on this unit. In some cases, a Dual Disc may become stuck in the discloading slot and will not eject.
To prevent this, we recommend you refrain from using Dual Disc with this unit.
Please refer to the manufacturer for more detailed information about Dual Discs.
English | 7
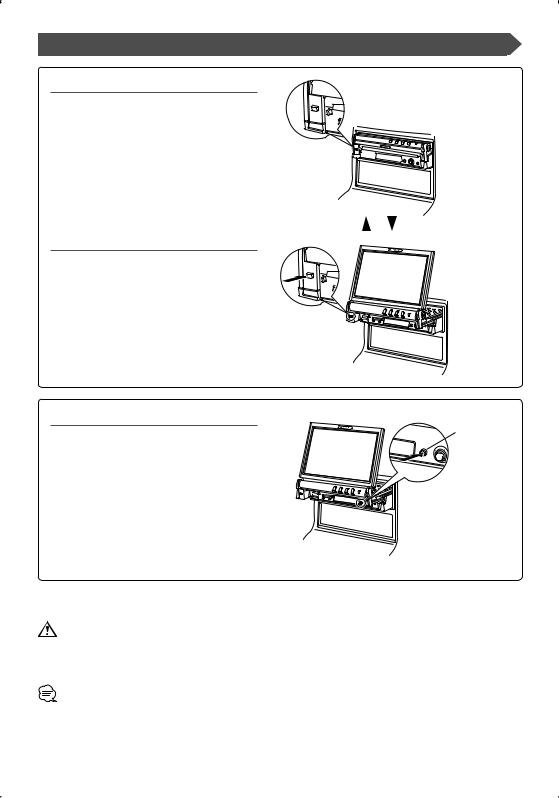
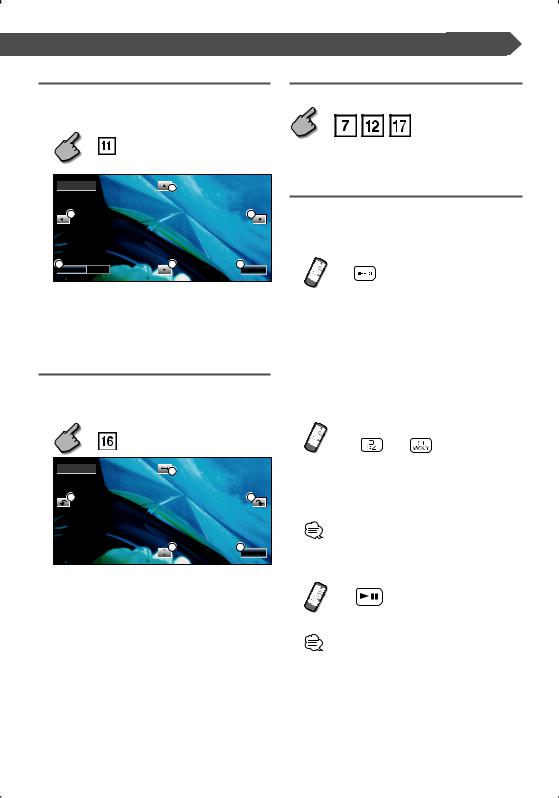
Opening/Closing the Monitor and Power Switch
Open the monitor
[OPEN/CLOSE] key 


Close the monitor
Turn the power on
[SRC] key
Hold down the [SRC] key more than one second to turn it off.
•Do not touch the moving components when you are opening or closing the monitor. If you touch the moving components, you may be hurt or the equipment may be damaged.
•Do not try to open or close the monitor by hand.
•You can automatically open or close the monitor when you turn on or off the ignition key (page 59).
•If the monitor movement is stopped by the shift lever or another obstacle when the monitor is opened, this movement is canceled by the safety function. If an obstacle is pinched by the monitor when closed, the monitor movement is also canceled by the safety function. If it has occurred, remove the obstacle and press the [OPEN/CLOSE] key again.
8 | English
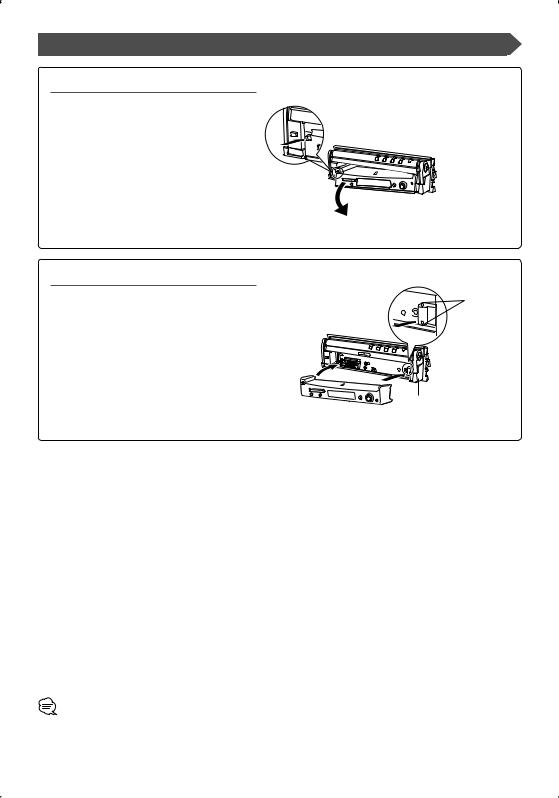
Removing/Attaching the Protection Panel
Remove the protection panel
Attach the protection panel
Place the right end of the protection panel onto hooks and push it until clicked and locked. Then, push the left end of the panel to lock it.
•Close the monitor first, then remove or attach the protection panel.
•After you have removed the protection panel, you cannot operate the receiver.
•After you have removed the protection panel, you can flash the burglar alarm lamp (page 72).
Two hooks
English | 9
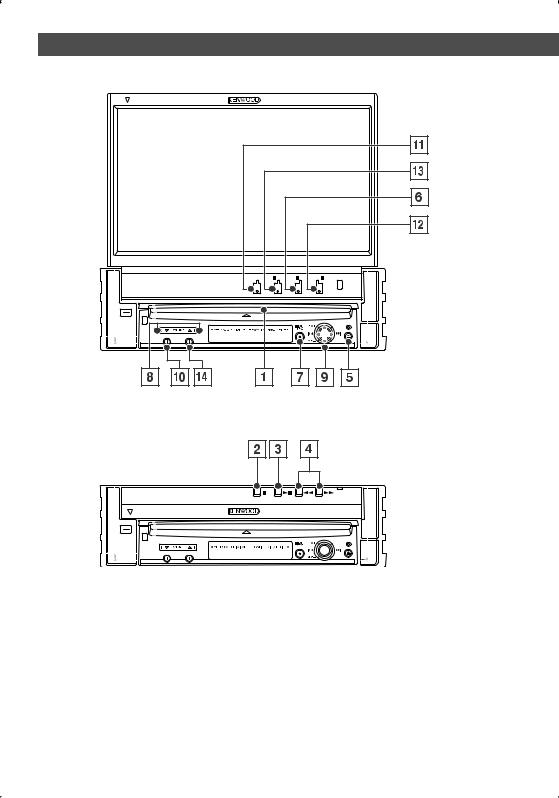
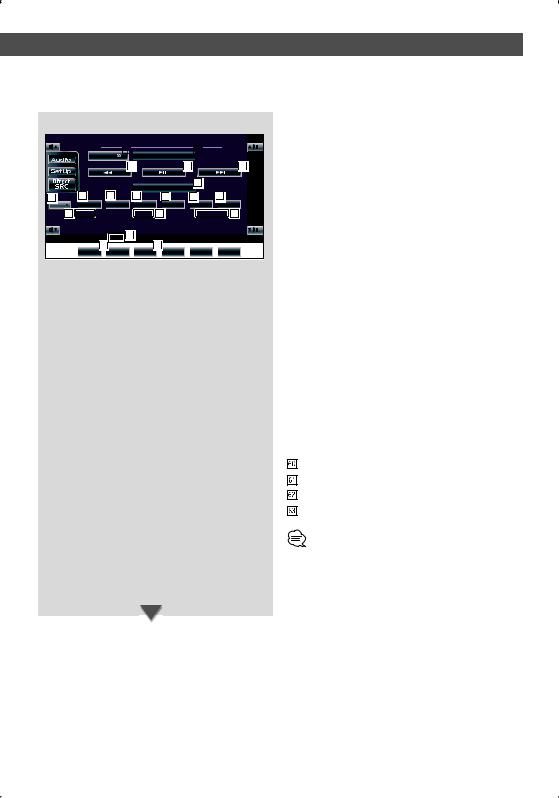
KVT-617DVD/647DVD Basic Operations
■ When the monitor is open
SCRN |
MODE |
M.CTRL V.SEL |
V.OFF |
FNC AV OUT SEL |
S |
|
M |
V |
F |
OPEN/CLOSE
ATT AUTO
■ When the monitor is closed
OPEN/CLOSE |
ATT AUTO
1 |
Play Disc |
4 |
|
[Disc insertion slot] |
|
|
A disc is played when you insert it. |
|
2 |
Stop |
5 |
|
[7] key |
|
|
Stops playing a disc. |
|
3 |
Play/Pause |
6 |
|
[38] key |
|
Pauses and replays a disc.
10 | English
Search Selectors [22]/[33] key
Searches a disc backward or forward.
Eject Disc [0] key
The disc is ejected.
Video source selection/V.OFF [V.SEL] key
Video source selection changes in the following order each time you press the key.
DVD/VCD
TV */ Video
R-CAM *
Navigation *
* Optional accessory
You can also turn off the video display by pressing the key more than 1 second.
When you press the key again, the previous video display comes back on.
7Audio Source Selection/Power Supply [SRC] key
Audio source selection changes in the following order each time you press the key.
SIRIUS *
DAB *
TUNER or HD Radio *
Built-in Disc player
External Disc player *
TV */ Video
External Disc Changer *
AUX EXT *
Navigation *
Weather Band Tuner *
Standby Mode
* Optional accessory
You can also turn off the power by pressing the key longer than 1 second.
When you press the key again,the power turns on.
8Volume Controls [5]/[∞] key
Adjusts the volume.
9Joystick
Track/Station Selectors [4]/[¢] key
Selects a music or chapter, track, or frequency.
Band/Folder Selectors [FM]/[AM] key
[FM] key switches to the FM1/2/3 band or next folder/ disc.
[AM] key switches to the AM band or previous folder/ disc.
pAttenuater [ATT] key
Attenuates the volume.
Press it again to cancel muting.
qScreen Setup [SCREEN] key
Displays the Screen Setup or Angle Setup screen. (page 59)
wFunction/AV OUT SEL [FNC] key
The video source function changes in the following order each time you press the key.
Picture & Easy Control Panel
Source Control
Picture
Switches the source that is output at the AV OUTPUT terminal when it is pressed more than 1 second.
eSwitch Screen Mode/M.CTRL [MODE] key
Switches the screen mode. (page 17)
The DVD Disc Menu screen appears when you press the key more than 1 second. (page 22)
•DVD Disc Menu is not available when the top menu of the DVD is shown.
rSeek Mode [AUTO] key
Selects the Seek mode.
(see page 34, 40, 48, 52 for the <Seek Mode>)
•Aside from the navigation system, the display turns on when you apply the parking brake.
•It is necessary to set "Navigation Source" of <AV Interface> to "On" to add Navigation as an audio source that can be selected the with [SRC] key. (page 69)
•It is necessary to engage the shift knob of car to "Reverse" to switch to rear view camera video display.
English | 11

Basic Operations of Remote Controller
11
12
13
2
14
15
16
17
18
19
21
22
23
25
26
10
9
8
7
1
20
3
24
4
5
6
27
DVD : An operation during DVD playback
VCD : An operation during VCD playback
DISC : An operation during DVD, VCD, CD, MP3/WMA/JPEG/MPEG or MD playback TV : An operation during TV source
TUNER : An operation during FM/AM broadcasting source
12 | English
1Remote Control Mode selector switch
Selects one of the following remote control modes.
AUD: Tuner source or attached disc changer source DVD: Built-in DVD/VCD/CD/MP3/WMA/JPEG/MPEG
player source TV: TV source
2[SRC] key
Audio source changes each time you press the key.
3[ ] / [
] / [ ] key
] key
DISC TV TUNER
Adjusts the volume.
4 [2-ZONE] key
DISC TV TUNER
Turns Zone function on or off each time you press the key.
(page 82 for the <Zone Control>)
5 [ ] / [
] / [ ] key
] key
DISC TV TUNER
Adjusts the volume of the rear channel. You can adjust the rear channel volume when Zone function is on.
6 [ATT] key
DISC TV TUNER
When you press the key, the volume is attenuated.
When you press the key again, the volume returns to the previous level.
7 Joystick
DVD
Enters your selection from the DVD Disc Menu.
8 [DISP] key
DISC TV TUNER
(When 1 is set to "AUD" or "TV")
Video source selection changes in the following order each time you press the key.
DVD/VCD
TV */ Video
R-CAM *
Navigation *
* Optional accessory
•It is necessary to engage the shift knob of car to "Reverse" to switch to rear view camera (R-CAM) video display.
9 [TOP MENU] key
DVD (When 1 is set to "DVD")
Calls the Top menu of DVD Disc Menu.
|
DISC |
|
TV |
|
TUNER |
(When 1 is set to "TV" or |
|
"AUD") |
|
|
|
|
|
|
Switches the Screen mode. (page 17) |
|||||
p [RETURN] key |
|
|
|
|||
|
|
|
|
(When 1 is set to "DVD") |
||
|
DVD |
|
VCD |
|||
Returns to the previous screen when the DVD/VCD Disc Menu is displayed.
q [MENU] key
DVD (When 1 is set to "DVD") Calls the DVD Disc Menu.
VCD (When 1 is set to "DVD")
Turns the PBC (Playback Control) function On or Off.
w [SUB TITLE] key
DVD (When 1 is set to "DVD") Switches a subtitle language.
e [ANGLE] key
DVD (When 1 is set to "DVD") Switches the view angle.
r [ZOOM] key
DVD VCD (When 1 is set to "DVD")
Each time you press the button, the zoom ratio switches.
t[DVD SETUP] key
Not used.
y [ ] key
] key
DISC TV TUNER
Opens or closes the monitor each time you press the key.
u [AM–] / [FM+] key
DISC (When 1 is set to "DVD" or "AUD") FM+: Selects next disc.
AM–: Selects previous disc.
TV (When 1 is set to "TV" or "AUD")
FM+: Switches to TV1, TV2, VIDEO1, or VIDEO2. TUNER (When 1 is set to "AUD")
FM+: Switches to the FM1, FM2, or FM3 band.
AM–: Switches to the AM band.
i [38] key
DISC (When 1 is set to "DVD" or "AUD")
Plays or pauses.
TV (When 1 is set to "TV" or "AUD")
TUNER (When 1 is set to "AUD")
Selects the Seek mode.
(page 34, 40, 48, 52 for the <Seek Mode>)
o [7] key
DISC (When 1 is set to "DVD") Stops playing the built-in disc player.
English | 13

; [AUDIO] key
DVD (When 1 is set to "DVD")
Switches an audio language.
a [4] / [¢] key
DISC (When 1 is set to "DVD" or "AUD") Selects a song.
TV (When 1 is set to "TV" or "AUD")
Selects a channel.
TUNER (When 1 is set to "AUD")
Selects a station.
s [1] / [¡] key
DISC (When 1 is set to "DVD" or "AUD")
1: Fast Backward. The speed changes each time it is pressed. (Except JPEG file)
¡: Fast Forward. The speed changes each time it is pressed. (Except JPEG file)
d [ ] / [
] / [  ] key
] key
DVD (When 1 is set to "DVD")  : Slow Backward.
 : Slow Forward.
Basic Operations of Remote Controller
f[ ] key
] key
Not used.
g[0] – [9] key
TV (When 1 is set to "TV")
TUNER (When 1 is set to "AUD")
 —
—  : Recall the stations on memory.
h[DIRECT] key
Selects the Direct Search mode.
(page 23, 31, 36, 45 for <Direct Search>)
j [CLEAR] key
DVD (When 1 is set to "DVD")
Clears a numeric value you have entered in the built-in disc player during direct search.
TV (When 1 is set to "TV") TUNER (When 1 is set to "AUD")
Selects an AV source to be output at the AV OUTPUT port.
14 | English

About discs
Handling discs
• Do not touch the recording surface of the disc.
•CD-R/RW, DVD-R/RW, and DVD+R/RW are easier to damage than a normal music CD. Use a CD-R/RW, DVD-R/RW, or DVD+R/RW after reading the caution items on the package etc.
•Do not stick a tape, sticker, etc., on the disc.
Also, do not use a disc with those materials pasted on it.
When using a new disc
If the disc center hole or outside rim has burrs, use it after removing them with a ball pen etc.
Burrs
Burrs
Disc shaped accessory
Do not insert a disc shape accessory into the unit.
Disc cleaning
Wipe from the center of the disc to outward.
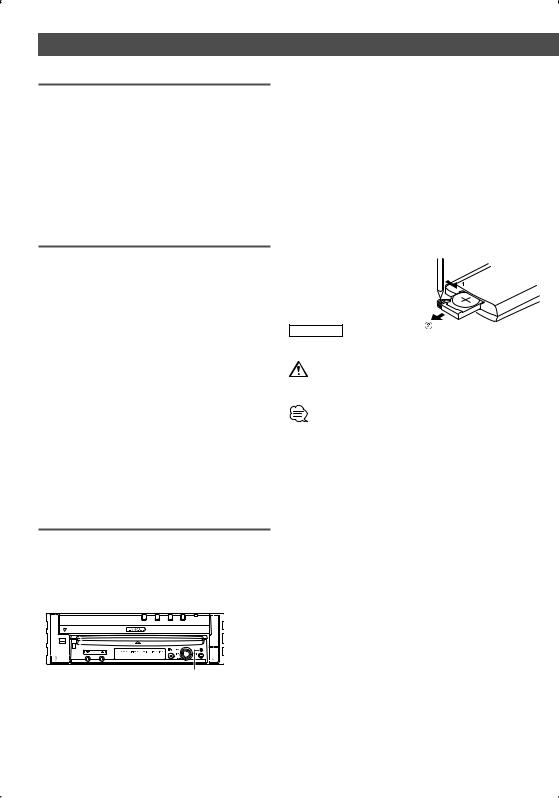
Removing discs
When removing discs from this unit pull them out horizontally.
Discs that cannot be used
• Discs that are not round cannot be used.
•Discs with coloring on the recording surface or that are dirty cannot be used.
• This unit can only play the CDs with one of labels.
Discs without the label may not be played on the unit.
•A CD-R or CD-RW that hasn’t been finalized cannot be played. (For the finalization process refer to your CD-R/CD- RW writing software user’s guide, and your CD-R/CD-RW recorder instruction manual.)
Disc storage
•Do not leave discs in direct sunlight (On the seat or dashboard etc.) and where the temperature is high.
•Put discs in their cases.
English | 15
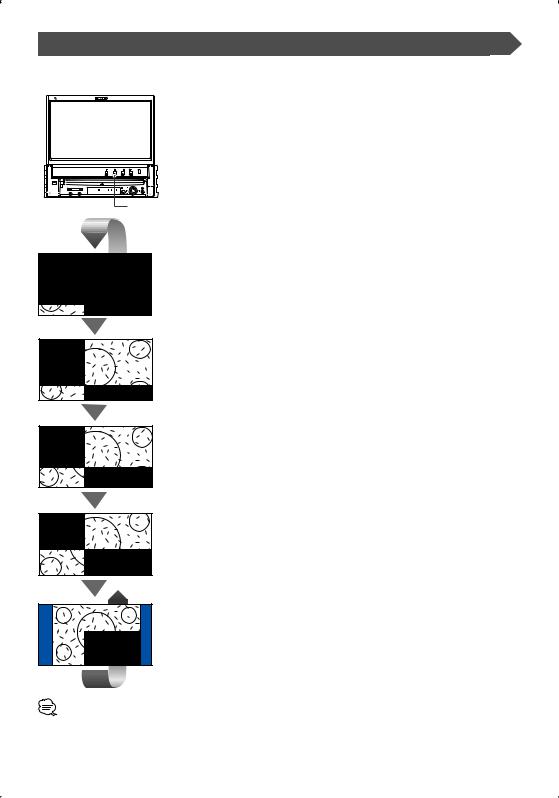
Switching Screen Mode
The Screen mode of the monitor changes each time the [MODE] key is pressed.
S |
M |
V |
F |
|
|
|
[MODE] key |
Full picture mode (FULL)
Justify picture mode (JUST)
Cinema picture mode (CINEMA)
Zoom picture mode (ZOOM)
Normal picture mode (NORMAL)
•When you select the Menu, Easy Control screen, or Navigation, the display is shown in the full-size display mode automatically. The screen mode of these displays cannot be changed.
•You can set the screen mode for each of the DVD/VCD, TV, and video images.
16 | English

English | 17
Controlling during DVD Video, Video CD , JPEG or MPEG Playback
Various control screens appear when you play back a DVD Video (DVD), a Video CD (VCD) disc, a JPEG or MPEG files.
Displaying the DVD/VCD/JPEG/MPEG Playback screen
You can use the following operations when displaying DVD/VCD/JPEG/MPEG images.
Play the DVD/
VCD or JPEG/ V
MPEG files.
DVD playback screen
DVD VIDEO |
1 |
Title 1 |
Chap 3 |
2 |
T |
0:02:37 |
3 |
MODE: F U L L AV-OUT: DVD
5 |
6 |
4 |
7 |
1Title Number Display
2Chapter Number Display
3Play Time Display
4Forward Chapter Search Area
Selects the next chapter.
5Backward Chapter Search Area
Selects the previous chapter.
6DVD Disc Menu Control Buttons Area (page 22)
•When you touched during DVD menu played it will change to Highlight screen. (page 22).
7 Information Display Button Area (page 23)
VCD playback screen
DVD VCD |
8 |
Scene |
2 |
P 2:37 |
3 |
PBC VER2 |
MODE: FU L L AV-OUT: DVD |
|
10 |
11 |
9 |
12 |
8Scene/Track Number Display
9Forward Scene/Track Search Area
Selects the next scene (when PBC is On) or track (when PBC is Off ).
pBackward Scene/Track Search Area
Selects the previous scene (when PBC is On) or track (when PBC is Off ).
qZoom Control Button Area
Displays the Zoom Control buttons (page 23).
w Information Display Button Area (page 23)
•For DVD/VCD playback, DVD/VCD picture selection, or controller key operations, see <KVT-617DVD/647DVD Basic Operations> (page 10).
•The information display is cleared automatically after approximately 5 seconds. Also, the information can be displayed automatically when it is updated (page 70).
18 | English
JPEG/MPEG playback screen
DVD MEDIA 13 |
3 |
1 |
P 0:01:48 18 |
|
MODE: FU L L |
AV-OUT: DVD |
|
15 |
16 |
14 |
17
e Folder/File Number Display
rForward File Search Area
Selects the next folder or file.
tBackward File Search Area
Selects the previous folder or file.
yPicture Control Button Area (page 23) JPEG playback only.
u Information Display Button Area (page 23) i Play Time Display
• The Easy control panel functions are seeing page 24.
Displaying the Easy Control Panel
The Control Panel is displayed in a floating position of the DVD/VCD screen.
F
Easy Control Panel
DVD VIDEO |
T i t l e |
1 |
C h a p |
3 |
|
T |
0 : 0 5 |
: 3 2 |
|
|||||||
|
19 |
|||||||||||||||
|
|
|
|
|
MODE: FU L L AV-OUT: DVD |
|
|
|
||||||||
|
20 |
|
21 |
|
|
22 |
22 |
|
|
23 |
|
23 |
|
24 |
|
|
SRC |
|
|
|
|
|
|
|
|
|
|
|
|
|
|
|
|
DVD VIDEO |
T i t l e |
1 |
C h a p |
3 |
|
T |
0 : 0 5 |
: 3 219 |
||||||||
IN
o Adjusts the volume. ; Switches the source.
aStops playback.
When pressed twice, the disc is played from its beginning when you play it in the next time.
s Fast Forwards or Fast Backwards d Chapter Search DVD
Searches for a chapter.
Scene/Track Search VCD
Selects a scene (when PBC is On) or a track (when PBC is Off ).
f Plays or pauses.
•The Easy Control Panel is hidden when you touch a central area of the monitor.
English | 19
Displaying the DVD/VCD Control |
|
|
|
||||||
screen |
|
|
|
|
|
|
|
|
|
Plays a DVD/VCD using various functions. |
|
|
g Ejects the disc from the built-in disc player. |
||||||
|
|
h Calls the Sound Effects Menu. (page 78) |
|||||||
|
|
|
|
|
|
|
|
||
|
F |
|
|
|
|
|
j Calls the Setup Menu. (page 60) |
||
|
|
|
|
|
|
k Displays the Source Select screen. (page 58) |
|||
|
|
|
|
|
|
|
|
||
DVD/VCD Control screen |
|
|
|
l Fast Forwards or Fast Backwards. |
|||||
|
|
|
/ Stops playing. |
|
|||||
|
|
|
|
|
|
|
|
|
|
|
DVD VIDEO |
33 |
|
33 |
13:50 |
|
When pressed twice, the disc is played from its |
||
|
|
|
|
30 |
|
beginning when you play it in the next time. |
|||
|
26 |
|
|
|
|
|
|
||
|
|
|
|
32 |
|
|
|
|
|
|
27 |
|
31 |
|
31 |
|
z Selects a chapter, a scene or a track. |
||
|
|
|
|
|
|
|
|||
|
28 |
29 |
|
|
29 |
41 |
IN |
When the DVD/VCD is paused, touch this button to |
|
|
34 |
35 |
|
|
36 |
TIME 37 |
start single-frame stepping. |
|
|
N ex t |
PBC |
REP |
|
|
SCRL |
x Plays or pauses. |
|
||
38 |
T i t l e 1 |
C h a p |
3 39 |
40 T 0 : 0 5 : 2 0 |
|
|
|||
|
K E N WO O D 43 |
|
|
|
25 |
|
c Slow Forwards or Backwards. |
DVD |
|
|
|
T-REP |
42 |
|
|
|
v Turns the PBC function of VCD On or Off. (VCD Ver |
||
|
|
|
|
|
|
|
|
||
|
|
|
|
|
|
|
|
2.0) |
|
|
|
|
|
|
|
|
|
b Switches the Repeat Play operations in the |
|
|
|
|
|
|
|
|
|
following sequence. |
|
|
|
|
|
|
|
|
|
DVD: Title Repeat, Chapter Repeat, Repeat Off |
|
|
|
|
|
|
|
|
|
VCD: Track Repeat, Repeat Off (Available when the |
|
|
|
|
|
|
|
|
|
PBC is off ) |
|
|
|
|
|
|
|
|
|
n Scrolls the display text. |
|
|
|
|
|
|
|
|
|
m Switches the play time display in the following |
|
|
|
|
|
|
|
|
|
sequence. |
|
|
|
|
|
|
|
|
|
DVD: Title, chapter, remaining titles |
|
|
|
|
|
|
|
|
|
VCD: Track, disc, remaining discs (Available when |
|
|
|
|
|
|
|
|
|
the PBC is off ) |
|
|
|
|
|
|
|
|
|
, Title Number Display DVD |
|
. Chapter/Scene/Track Number Display
P Play Time Display
Q Appears when a disc is inserted.
W Function Indicator
E Volume Label Display
20 | English
Controlling during DVD Video, Video CD, JPEG or MPEG Playback
English | 21
|
|
DVD Disc Menu |
2 Select Disc Menu options |
Selects an option from the DVD Disc Menu. |
Disc Menu |
1 Display the Disc Menu Control screen |
Cancel |
|
DVD Disc Menu Control Buttons
Area (page 18)
1 |
MenuCtrl |
3 SUB |
1 0 / 1 0 |
4Audio |
1 / 1 |
MenuCtrl |
6 |
Top |
Menu |
Return |
3 |
1 |
|
5 |
3 |
3 |
5 |
2 |
6 |
Zoom |
Angle 1 / 1 |
Exit |
4 |
7 |
Highlight |
3 |
2 |
8 |
Enter |
|
Cancel |
Exit |
|
1 Calls the Menu Control. |
|
|
||
1 Calls the Menu. |
2 Switches the picture angle. |
|
(during program playback only) |
||
2 Returns to the Disc Menu screen. |
||
3 Switches the caption language. |
||
3 Selects a menu option. |
||
(during program playback only) |
||
4 Enters your menu selection. |
||
4 Switches the voice language. |
||
5 Returns to the previous menu screen. |
||
(during program playback only) |
||
6 Displays the Top Menu. |
5 Displays the Zoom Control screen. |
|
7 Highlight Control. |
6 Clears the Disc Menu Control. |
|
8 Clears the Disc Menu Control. |
|
Highlight Control
You can select a chapter and title for the DVD Menu screen. When you touch the screen, you can select the DVD menu.
Highlight
Highlight On
DVD Menu
1. KENWOOD
2. KENWOOD
3.KENWOOD
4.KENWOOD
5.KENWOOD
6.KENWOOD
Zoom Control
Zoom
ZoomCtrl
2
2 |
2 |
1 Zoom |
x 2 |
2 |
3 |
Cancel |
4 |
Exit |
1 Changes the zoom ratio at 4 levels (2 times, 3 times, 4 times, or off ) each time you touch.
2 Scrolls the screen in the direction you touch.
3 Returns to the Disc Menu Control screen.
4 Clears the Disc Menu Control.
•To cancel Highlight Control, press [MODE] key. (page 11)
22 | English
Controlling during DVD Video, Video CD, JPEG or MPEG Playback
VCD Zoom Control
Displays an enlarged VCD screen.
1 Display the Zoom Control screen
|
Zoom Control Button Area |
|
(page 18) |
ZoomCtrl |
2 |
|
|
2 |
2 |
1 |
x 2 |
2 |
3 |
Zoom |
|
Exit |
1 Changes the zoom ratio at 4 levels (2 times, 3 times, 4 times, or off ) each time you touch.
2 Scrolls the screen in the direction you touch.
3 Clears the Zoom Control button.
Picture Control
Rotates a picture for JPEG files.
1 Display the JPEG Menu Control screen
JPEG Menu Control Button Area (page 19)
PictureCtrl |
1 |
|
|
|
|
3 |
|
4 |
|
2 |
5 |
Exit
1 Switch the picture flip horizontal.
2 Switch the picture flip vertical.
3 Rotate the picture counter clockwise.
4 Rotate the picture clockwise.
5 Clears the JPEG Menu Control button.
Information Display
Displays the DVD and AV information.
Information Display Button Area
(page 18,19)
The information is displayed for 5 seconds.
Direct Search
You can search for a DVD/VCD chapter, scene or track by entering its number.
1Select the Direct Search mode
The following items can be searched directly each time it is pressed.
DVD: Title, Chapter, Time, Direct number VCD (when PBC is On): Scene, Direct number VCD (when PBC is Off ): Track, Time
However, the direct search may not be supported for some discs.
2Enter a number or time
—
When playing back a VCD, enter a PBC screen number (if PBC is On) or a track number (if PBC is Off ).
• To clear your incorrect entry, press 
 (CLEAR).
3 Search
•The operation ends automatically if you do not operate within 10 seconds.
•The time search function cannot be searched correctly at the time set up depending on the particular disc.
English | 23
CD/MP3/WMA/JPEG/MPEG/Disc Changer Play Control
You can call various control screens during CD/MP3/WMA/JPEG/MPEG/Disc Changer playback.
Displaying the Easy Control Panel
The CD/MP3/WMA/JPEG/MPEG/Disc Changer Play Control Panel is displayed in a floating position of the selected picture.
F
Easy Control Panel
During CD playback
DVD CD |
1 |
|
|
MODE: FU L L |
AV-OUT: DVD |
2 |
3 |
4 |
4 |
5 |
5 |
6 |
SRC |
|
|
|
|
|
|
DVD CD |
|
T r a c k |
3 |
P |
0 5 : 3 2 |
1 |
|
|
|
|
IN |
|
|
During MP3/WMA/JPEG/MPEG playback
3 |
7 |
7 |
5 |
5 |
6 |
SRC |
|
– |
+ |
|
|
DVD MEDIA |
|
3 |
1 |
P |
0 : 0 5 : 3 2 |
|
|
|
|
|
|
During playback on disc changer
|
8 |
8 |
5 |
5 |
6 |
SRC |
D - |
D |
+ |
|
|
CD CH |
D 1 |
T 3 |
|
P 5 : 3 2 |
|
During playback on CD player
|
5 |
5 |
6 |
SRC |
|
|
|
CD |
T 3 |
P 5 : 3 2 |
|
1Adjusts the volume.
2Switches the source.
3Stops playing the built-in disc player.
4Fast Forwards or Fast Backwards. (only when a CD is played back on the built-in disc player)
5Selects a song or data.
When you continue to touch button: Fast Forwards or Fast Backwards.
( Disabled when a JPEG is being played.)
6Plays or pauses.
7Selects a folder. (only when an MP3/WMA/JPEG/ MPEG is played back on the built-in disc player)
8Selects a disc. (only when a disc is played back on the disc changer)
•For CD/MP3/WMA/JPEG/MPEG/Disc Changer playback and receiver key operations, see <KVT-617DVD/647DVD Basic Operations> (page 10).
•The Easy Control Panel is hidden when you touch a central area of the monitor.
24 | English
Displaying the CD/MP3/WMA/ JPEG/ MPEG/Disc Changer Control screen
You can play the CD/MP3/WMA/disc changer using various functions.
F
CD Control screen
9 |
|
|
|
|
|
|
|
9 |
|
DVD CD |
10 |
|
|
|
13:50 |
|
|
|
|
|
|
|
|
27 |
|
|
|
11 |
Menu |
|
|
|
|
|
|
|
|
|
|
|
|
|
|
|
|
13 |
15 |
|
17 |
|
|
15 |
|
|
12 |
|
16 |
|
|
16 |
26 |
|
|
|
|
|
|
|
IN |
||
|
|
|
|
|
|
|
||
|
|
18 |
19 |
20 |
21 |
22 |
23 |
|
|
|
SCN |
REP |
RDM |
DISP |
SCRL |
TIME |
|
|
24 T r a ck 4 |
|
|
P 2 : 0 9 25 |
|
|
||
9 |
K E N WO O D |
|
|
|
14 |
9 |
||
|
|
|
|
|
|
|
|
|
|
|
|
REP |
28 |
|
|
|
|
During CD playback
9 Adjusts the volume.
pCalls the CD Menu.
qCalls the Sound Effects Menu. (page 78)
wDisplays the Source Select screen. (page 58)
eCalls the Setup Menu. (page 60)
rEjects the disc from the built-in disc player.
tSelects a track.
yFast Forwards or Fast Backwards.
uPlays or pauses.
iStarts or stops Scan Play (that plays the beginning of each song one after the other).
o Repeats playing (the present track).
;Starts or stops Random Play (to play songs in random order).
aSelects the Disc Name (see <Set Disc Name>, page 29), Disc Text, or Track Text mode for text display.
s Scrolls the display text.
dSwitches the play time display between Track, Disc, and Disc Remaining Time.
fTrack Number Display
gPlay Time Display
hAppears when a disc is inserted.
jStops playing the built-in disc player.
When pressed twice, the disc is played from its beginning when you play it in the next time.
k Function Indicator
English | 25
MP3/WMA/JPEG/MPEG Control screen
DVD MEDIA |
35 |
35 |
13:50 |
|
32 |
||
Menu |
29 |
+ |
|
|
|
|
|
33 |
|
34 |
33 |
|
|
|
|
|
|
|
|
|
31 |
|
|
|
|
|
|
|
31 |
|
|
|
45 IN |
||
|
|
|
|
|
|
|
|
|
|
|
|
|
|
|
|
|
|
|
|||||
|
41 |
|
36 |
37 |
|
38 |
|
39 |
|
40 |
|
|
|
|
|
||||||||
|
N ex t |
|
|
|
SCN |
REP |
|
RDM |
|
DISP |
|
SCRL |
|
|
|
|
|
||||||
43 |
|
|
3 |
|
|
|
1 |
|
P 0 : 0 0 : 3 8 |
|
|
|
|||||||||||
|
|
|
|
K E N W O O D |
|
|
|
44 |
|
|
|
|
|
|
|
|
|
||||||
|
|
|
|
|
|
|
|
|
|
|
|
|
|
|
|
|
30 |
|
|
|
|
|
|
|
|
|
|
|
|
|
|
|
REP |
46 |
|
|
|
|
|
|
|
|
|
|
|
||
|
|
|
|
|
|
|
|
|
|
|
|
|
|
|
|
|
|
|
|
||||
|
|
|
|
|
|
42 |
FREP |
|
|
|
|
|
|
|
|
|
|
|
|
|
|
||
During MP3/WMA/JPEG/MPEG play
l Calls the MP3/WMA/JPEG/MPEG Menu. / Ejects a disc.
zFast Forwards or Fast Backwards.
( Disabled when a JPEG is being played.)
xStops playing.
When pressed twice, the disc is played from its beginning when you play it in the next time.
c Selects a song or data. v Plays or pauses.
b Selects a folder.
nStarts or stops Scan Play (that plays the beginning of each song or data one after the other).
m Repeats to play (the present song).
,Starts or stops Random Play (to play songs of the present folder in random order).
. Selects the Folder name, File name, Title (ID3/WMA tag), Artist name (ID3/WMA tag), or Album name (ID3 tag) for text display.
PScrolls the display text.
QSwitches the button display.
WRepeats playing the song or data of the present folder.
E Folder and File Number Display
R Play Time Display
T Appears when a disc is inserted.
Y Function Indicator
26 | English
CD/MP3/WMA/JPEG/MPEG/Disc Changer Play Control
Disc changer/CD player Control screen
|
CD CH |
47 |
|
|
|
49 |
13:50 |
|
|
|
|
Menu |
|
|
D i s c + |
|
|
||
|
|
|
|
|
|
|
|
||
|
|
|
|
|
|
|
|
||
|
|
|
48 |
|
|
50 |
48 |
|
|
|
D i s c |
- |
49 |
|
|
|
|
52 |
|
|
|||
56 |
51 |
53 |
57 |
|
58 |
59 |
|
N ex t |
SCN |
REP |
RDM |
DISP |
SCRL |
TIME |
|
|
60 D 3 |
|
T 7 61 |
|
P 3 : 2 5 62 |
||
|
|
REP |
63 |
|
|
|
|
|
|
54 |
55 |
|
|
|
|
|
|
DREP |
MRDM |
|
|
|
|
During play by the disc changer/CD player
U Calls the Disc Changer/ CD player Menu.
ISelects a track.
Starts Fast Forward or Fast Backwards when it is held down.
O Selects a disc. (Function of Disc Changer) : Plays or pauses.
AStarts or stops Scan Play (that plays the beginning of each song one after the other).
S Repeats playing (the present track).
DStarts or stops Random Play (to play songs in random order).
FRepeats playing disc (the present disc). (Function of Disc Changer)
GStarts or stops Magazine Random Play (to play songs of the disc changer in random order). (Function of Disc Changer)
HSwitches the button display.
JSelects the Disc Name (see <Set Disc Name>, page 29), Disc Text, or Track Text mode for text display.
KScrolls the display text.
LSwitches the play time display between Track, Disc, and Disc Remaining Time.
Disc Number Display (Function of Disc Changer)
Track Number Display
Play Time Display
Function Indicator
•The functions that can be used and the information that can be displayed will differ depending on the models being connected.
English | 27
Displaying the CD/MP3/WMA/JPEG/ MPEG/Disc Changer Menu screen
You can select menu options using various functions.
Selects options from various function menus. Returns to the CD/MP3/WMA/JPEG/MPEG/Disc Changer Control screen.
 Me n u
CD Menu screen
D V D C D  Name Set
65 |
• The available functions vary depending on the source used.
64 |
28 | English
 Loading...