


AUDIO VIDEO SURROUND RECEIVER
KRF-V4550D
INSTRUCTION MANUAL
KENWOOD CORPORATION
Preparation
Operations
Additional Information
B60-4967-10 01 MA (E2) |
0009 |
Before applying the power
Units are designed for operation as follows.
2
U.S.A. and Canada |
......................................................... AC 120 V only |
Australia .......................................................................... |
AC 240 V only |
Europe and U.K. ............................................................. |
AC 230 V only |
China and Russia ............................................................ |
AC 220 V only |
Other countries ........................................... |
AC 110 - 120 / 220 - 240 V |
|
switchable* |
Preparations
 Caution : Read this page carefully to ensure safe operation.
Unpacking
Unpack the unit carefully and make sure that all accessories are put aside so they will not be lost.
Examine the unit for any possibility of shipping damage. If your unit is damaged or fails to operate, notify your dealer immediately. If your unit was shipped to you directly, notify the shipping company without delay. Only the consignee (the person or company receiving the unit) can file a claim against the carrier for shipping damage.
We recommend that you retain the original carton and packing materials for use should you transport or ship the unit in the future.
Keep this manual handy for future reference.
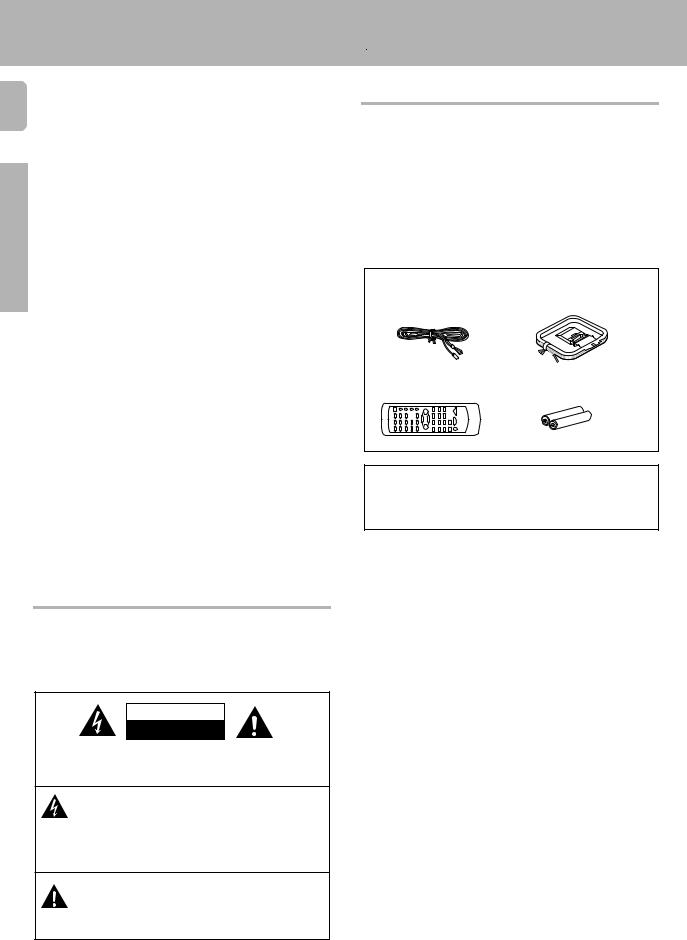
Accessories
FM indoor antenna (1) |
AM loop antenna (1) |
Remote control unit (1) |
Batteries (R6/AA) (2) |
Microcomputer malfunction
If operation is not possible or an erroneous display appears, even though all connections have been made properly, reset the microcomputer referring to "In case of difficulty". ⁄
Safety precautions
WARNING :
TO PREVENT FIRE OR ELECTRIC SHOCK, DO NOT
EXPOSE THIS APPLIANCE TO RAIN OR MOIS-
TURE.
CAUTION
RISK OF ELECTRIC SHOCK
DO NOT OPEN
CAUTION: TO REDUCE THE RISK OF ELECTRIC SHOCK, DO NOT
REMOVE COVER (OR BACK). NO USER-SERVICEABLE PARTS IN-
SIDE, REFER SERVICING TO QUALIFIED SERVICE PERSONNEL.
THE LIGHTNING FLASH WITH ARROWHEAD SYMBOL, WITHIN AN EQUILATERAL TRIANGLE, IS INTENDED TO ALERT THE USER TO THE PRESENCE OF UNINSULATED "DANGEROUS VOLTAGE" WITHIN THE PRODUCT’S ENCLOSURE THAT MAY BE OF SUFFICIENT MAGNITUDE TO CONSTITUTE A RISK OF ELECTRIC SHOCK TO PERSONS.
THE EXCLAMATION POINT WITHIN AN EQUILATERAL TRIANGLE IS INTENDED TO ALERT THE USER TO THE PRESENCE OF IMPORTANT OPERATING AND MAINTENANCE (SERVICING) INSTRUCTIONS IN THE LITERATURE ACCOMPANYING THE APPLIANCE.
Maintenance of the unit
When the front panel or case becomes dirty, wipe with a soft, dry cloth. Do not use thinner, benzine, alcohol, etc. for these agents may cause discoloration.
In regard to contact cleaner
Do not use contact cleaners because it could cause a malfunction. Be specially careful not to use contact cleaners containing oil, for they may deform the plastic component.
Before applying the power
Contents
|
Caution : Read the pages marked |
carefully to ensure |
|
3 |
||
|
safe operation. |
|
|
|
|
|
|
|
Before applying the power |
2 |
|
|
|
|
|
|
|
|||
|
|
Safety precautions ............................................. |
|
2 |
|
|
|
|
Unpacking .......................................................... |
|
2 |
|
|
|
|
How to use this manual ..................................... |
4 |
|
|
|
|
|
Special features ................................................. |
|
4 |
|
Preparations |
|
|
Names and functions of parts |
5 |
|
||
|
|
|
|
|||
|
|
Setting up the system ........................................ |
|
7 |
|
|
|
Preparations |
Connecting audio components .......................... |
8 |
|
|
|
|
|
Connecting video components .......................... |
9 |
|
|
|
|
|
Connecting a DVD player (6-channel input) ..... |
10 |
|
|
|
|
|
Digital connections .......................................... |
|
11 |
|
|
|
|
Connecting the antennas ................................. |
12 |
|
|
|
|
|
Connecting the system control ....................... |
13 |
|
|
|
|
|
Connecting the speakers ................................. |
14 |
|
|
|
|
|
Preparing the remote control .......................... |
15 |
|
|
|
|
|
Preparing for surround sound ....................... |
16 |
|
|
|
|
|
Speaker settings .............................................. |
|
16 |
|
|
|
|
|
|
|
|
|
|
..............................................Normal playback |
17 |
Operations |
|
Recording .......................................................... |
19 |
|
|
Preparing for playback ..................................... |
17 |
|
|
Listening to a source component .................... |
18 |
|
|
Adjusting the sound ......................................... |
18 |
|
|
Recording audio (analog sources) ................... |
19 |
|
|
Recording video ............................................... |
20 |
|
|
Recording audio (digital sources) .................... |
20 |
|
|
Listening to radio broadcasts ....................... |
21 |
|
|
Tuning (non-RDS) radio stations ...................... |
21 |
|
|
Using RDS (Radio Data System) ..................... |
21 |
|
Operations |
Using the DISPLAY key ................................... |
22 |
|
Presetting RDS stations |
|
|
|
|
(RDS AUTO MEMORY) ................................... |
22 |
|
|
Presetting radio stations manually .................. |
23 |
|
|
Receiving preset stations ................................ |
23 |
Informatiion |
|
Surround modes .............................................. |
25 |
|
|
Receiving preset stations in order (P.CALL) ... |
23 |
|
|
Tuning by program type (PTY search) ............. |
24 |
|
|
Ambience effects ............................................. |
25 |
Additional |
|
Surround play |
26 |
|
|
|
||
|
DVD 6-channel playback .................................. |
27 |
|
|
Convenient functions ....................................... |
27 |
|
|
Basic remote control operation for other |
|
|
|
components ....................................................... |
29 |
|
|
DVD player operations ..................................... |
29 |
|
|
CASSETTE deck, CD player & MD recorder |
|
|
|
operations ........................................................ |
30 |
|
|
|
|
|
Additional |
In case of difficulty .......................................... |
31 |
Information |
Specifications .................................................. |
32 |

How to use this manual
4
This manual is divided into three sections, Preparations, Operations, and Additional Information.
Preparations
|
Shows you how to connect your audio and video components to the |
|
|
receiver and prepare the surround processor. |
|
|
We will guide you to make setting up your system as easy as possible. |
|
|
However, since this receiver works with all of your audio and video |
|
Preparations |
components, connecting the system can be fairly complex. |
|
Operations |
||
|
Shows you how to operate the various functions available from the receiver.
Additional Information
Shows you additional information such as "In case of difficulty" (troubleshooting) and "Specifications".
Memory back up function
Please note that the following items will be deleted from the unit's memory if the power cord is disconnected from the AC outlet for approximately 3 days.
• Power mode. |
• Monitor ON/OFF. |
• Input selector settings. |
• MD/TAPE settings. |
• Device preset. |
• 6ch/2ch input setting. |
• Picture output. |
• Listen mode setting. |
• Speaker ON/OFF |
• Speaker settings. |
• Volume level. |
• Input mode setting. |
• BASS, TREBLE, INPUT |
• Midnight mode setting. |
level. |
• Broadcast band. |
• Subwoofer ON/OFF. |
• Frequency setting. |
• Dimmer level. |
• Preset stations. |
|
• Tuning mode. |
Before applying the power
Special features
True home theater sound
This receiver incorporates a wide variety of surround modes to bring you maximum enjoyment from your video software. Select a surround mode according to your equipment or the software you are going to play and enjoy! ∞
Dolby Pro Logic & Dolby 3 Stereo
This surround system reproduces theater-like surround sound from video software marked 
 .
.
The PRO LOGIC mode uses the built-in adaptive matrix circuit to steer the Left, Center, Right and Surround channel audio signals. The 3 STEREO mode will redirect the Surround signal to the front left and right speakers when only the front and center speakers are used.
Dolby Digital
The DOLBY DIGITAL mode lets you enjoy full digital surround from software processed in the Dolby Digital format. Dolby Digital provides up to 5.1 channels of independent digital audio for better sound quality and more powerful presence than conventional Dolby Surround.
DVD 6-channel input
If you own a DVD player equipped with 6-channel output, this receiver allows you to obtain the full surround sound impact of DVD source material featuring multi-channel encoding. Since the source signals are digital and each channel is input independently, the resulting ambience is far superior to what can be achieved with conventional surround sound systems.
RDS (Radio Data System) tuner
The receiver is equipped with an RDS tuner that provides several convenient tuning functions: RDS Auto Memory, to automatically preset up to 40 RDS stations broadcasting different programs; station name display, to show you the name of the current broadcast station; and PTY search to let you tune stations by program type.
PTY (Program TYpe) search
Tune the stations by specifying the type of program you want to hear.
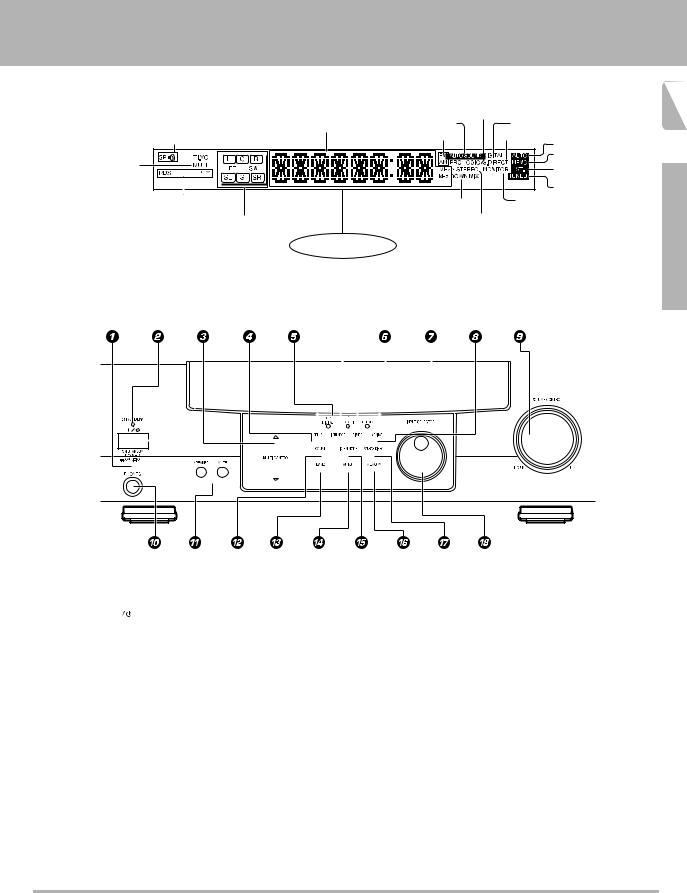
Names and functions of parts
Frequency display, |
|
PRO LOGIC |
|
Input display, |
|
||
|
indicator |
||
Preset channel display, |
|
||
AUTO SOUND indicator |
DIGITAL indicator |
||
Surround mode display |
|||
Speakers' indicator |
Band indicators |
S.DIRECT indicator |
|
|
|
AUTO indicator |
MUTE indicator |
|
MEMO. indicator |
|
ST. indicator |
|
|
|
|
|
|
TUNED indicator |
RDS indicators |
DOWN MIX indicator |
MONITOR indicator |
|
|
|
|
|
|
|
Speaker selection indicators |
|
|
|
|
|
|
|
|
|
|
|
|
|
|
|
|
|
|
3 STEREO indicator |
|
||||||||||||
|
|
|
|
|
|
|
Input channel indicators |
|
|
|
|
|
|
|
|
|
|
|
|
|
|
|
|
|
|
STEREO indicator |
|
||||||||||||
|
|
|
|
|
|
|
Output channel indicators |
|
|
|
Display |
|
|||||||||||||||||||||||||||
|
|
|
|
|
|
|
|
|
|
|
|
|
|
|
|
|
|
|
|
|
|||||||||||||||||||
|
|
|
|
|
|
|
|
|
|
|
|
|
|
|
|
|
|
|
|
|
|
|
|
|
|
|
|
|
|
|
|
|
|
|
|
|
|
|
|
|
|
|
|
|
|
|
|
|
|
|
|
|
|
|
|
|
|
|
|
|
|
|
|
|
|
|
|
|
|
|
|
|
|
|
|
|
|
|
|
|
|
|
|
|
|
|
|
|
|
|
|
|
|
|
|
|
|
|
|
|
|
|
|
|
|
|
|
|
|
|
|
|
|
|
|
|
|
|
|
|
|
|
|
|
|
|
|
|
|
|
|
|
|
|
|
|
|
|
|
|
|
|
|
|
|
|
|
|
|
|
|
|
|
|
|
|
|
|
|
|
|
|
|
|
|
|
|
|
|
|
|
|
|
|
|
|
|
|
|
|
|
|
|
|
|
|
|
|
|
|
|
|
|
|
|
|
|
|
|
|
|
|
|
|
|
|
|
|
|
|
|
|
|
|
|
|
|
|
|
|
|
|
|
|
|
|
|
|
|
|
|
|
|
|
|
|
|
|
|
|
|
|
|
|
|
|
|
|
|
|
|
|
|
|
|
|
|
|
|
|
|
|
|
|
|
|
|
|
|
|
|
|
|
|
|
|
|
|
|
|
|
|
|
|
|
|
|
|
|
|
|
|
|
|
|
|
|
|
|
|
|
|
|
|
|
|
|
|
|
|
|
|
|
|
|
|
|
|
|
|
|
|
|
|
|
|
|
|
|
|
|
|
|
|
|
|
|
|
|
|
|
|
|
|
|
|
|
|
|
|
|
|
|
|
|
|
|
|
|
|
|
|
|
|
|
|
|
|
|
|
|
|
|
|
|
|
|
|
|
|
|
|
|
|
|
|
|
|
|
|
|
|
|
|
|
|
|
|
|
|
|
|
|
|
|
|
|
|
|
|
|
|
|
|
|
|
|
|
|
|
|
|
|
|
|
|
|
|
|
|
|
|
|
|
|
|
|
|
|
|
|
|
|
|
|
|
|
|
|
|
|
|
|
|
|
|
|
|
|
|
|
|
|
|
|
|
|
|
|
|
|
|
|
|
|
|
|
|
|
5
Preparations
1 POWER key |
^ |
||
Use to switch the main power ON/OFF. |
|||
2 ON/STANDBY ( |
|
) key |
^ |
|
|||
|
|||
Use to switch the power ON/STANDBY when |
|||
the POWER is turned ON. |
|
||
STANDBY indicator |
|
||
3 MULTI CONTROL key |
^ |
||
Use to control a variety of settings. |
|
||
4 SET UP key |
^ |
||
Use to select speakers' settings etc. |
|
||
5 Surround indicators |
|
||
DOLBY DIGITAL indicator |
§ |
||
Lights when the receiver is in the Dolby |
|||
Digital mode. |
|
||
PRO LOGIC indicator |
§ |
||
Lights when the receiver is in the PRO LOGIC |
|||
mode. |
|
||
3 STEREO indicator |
§ |
||
Lights when the receiver is in the 3 STEREO |
|||
mode. |
|
||
6 INPUT MODE key |
7 |
||
Use to switch between the digital and analog inputs.
7 DIMMER key |
)• |
Use to adjust the brightness of the display. |
|
Use to select the REC MODE. |
|
8 MONITOR key |
( |
Use to monitor the source that is connected |
|
to the VIDEO2/MONITOR jack. |
|
9 VOLUME CONTROL knob |
* |
0 PHONES jack |
( |
Use for headphone listening. |
|
! SPEAKER key |
& |
Use to turn the speaker ON/OFF. |
|
MUTE key |
( |
Use to temporarily mute the sound. |
|
@ SOUND key |
¶ |
Use to adjust the sound quality and ambience |
|
effects. |
|
# BAND key |
¡ |
Use to select the broadcast band. |
|
$ AUTO key |
¡ |
Use to select the auto tuning mode. |
|
% LISTEN MODE key |
§ |
Use to select the listening mode.
^ MEMORY key |
™ |
Use to store radio stations in the preset |
|
memory. |
|
& SOURCE DIRECT key |
( |
Use to pass the source material direct to the |
|
amplifier. |
|
* INPUT SELECTOR knob |
* |
Use to select the input sources.
Standby mode
While standby indicator is lit, this receiver is in standby mode and consumes a small amount of current for back-up. This system can be switched ON by using the remote control.
Names and functions of parts
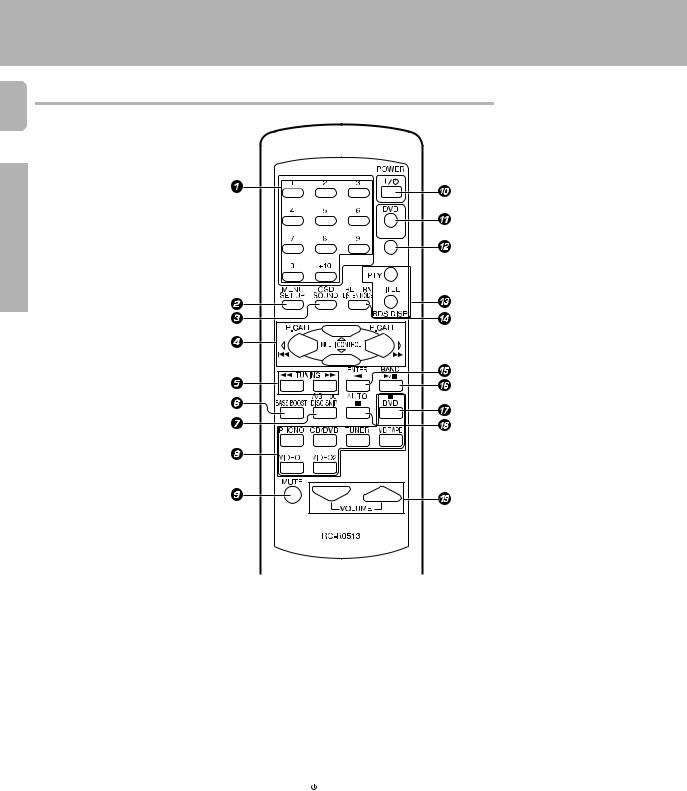
Remote control unit
6
Preparations
1 Numeric keys £
If CD or MD is selected as the input source, these keys function as numeric keys. If tuner is selected as the input source, these keys are used to call up station presets.
2 SET UP key |
^ |
Use to select speakers' settings etc. |
|
MENU key |
|
Use to operate other components. |
|
3 SOUND key |
¶ |
Use to adjust the sound quality and ambi- |
|
ence effects. |
|
OSD key |
|
Use to operate other components. |
|
4 MULTI CONTROL keys |
^ |
Used to control a variety of settings. |
|
P.CALL 4/¢ keys |
£ |
If tuner is selected as the input source, these keys function as P.CALL keys.
4/¢ keys
If CD or MD is selected as the input source, these keys function as skip keys.
5TUNING 1/¡ keys
If tuner is selected as the input source,
these keys function as tuning keys.
If CD, MD or TAPE is selected as the input source, these keys function as search keys.
6 BASS BOOST key *
Use to select the maximum adjustment setting for the low frequency range.
POWER
RECEIVER
7DISC SKIP key
If CD is selected as the input source, this key functions as the multi-CD player disc skip key.
A/B key
If TAPE is selected as the input source, this (A and B) of a double cassette deck.
+100 key
Use to select the disc number with the
multi-CD player.
8 INPUT SELECTOR keys (DVD, PHONO,
CD/DVD, TUNER, MD/TAPE, VIDEO1,
VIDEO2) |
* |
||
Selects the inputs and sets the remote |
|||
control to operate the component regis- |
|||
tered at the respective input. |
|
||
9 MUTE key |
( |
||
Use to temporarily mute the sound. |
|
||
0 POWER ( |
|
) key |
^ |
|
|||
|
|||
Use to turn the receiver on and off. |
|
||
! DVD POWER key |
ª |
||
Used to operate DVD player. |
|
||
@ RECEIVER key |
|
||
Use to return to the operation of the receiver.
# TITLE key
Use to operate other components.
RDS operation keys ™¢
Use to receive RDS broadcasts.
$ LISTEN MODE key |
§ |
Use to select the listening mode. |
|
RETURN key |
|
Use to operate other components. |
|
%ENTER key
Use to operate other components.
2 key
If tape is selected as the input source, this key functions as the play key for side B of the cassette (the side facing away from the front
of the deck). |
|
^ BAND key |
¡ |
Use to select the broadcast band. |
|
6 key
If CD is selected as the input source, this key functions as the play/pause key.
If MD or TAPE is selected as the input source, this key functions as the play key.
& 8 key
Use to operate other components.
* AUTO key |
¡ |
Use to select the auto tuning mode. |
|
7 key |
|
If CD, MD or TAPE |
is selected as the input |
source, this key functions as the stop key. |
|
( VOLUME keys |
* |
Use to adjust the receiver volume.
Setting up the system
Make connections as shown in the following pages. When connecting the related system components, be sure to also refer to the instruction manuals supplied with the components you are connecting.
Do not connect the power cord to a wall outlet until all connections are completed.
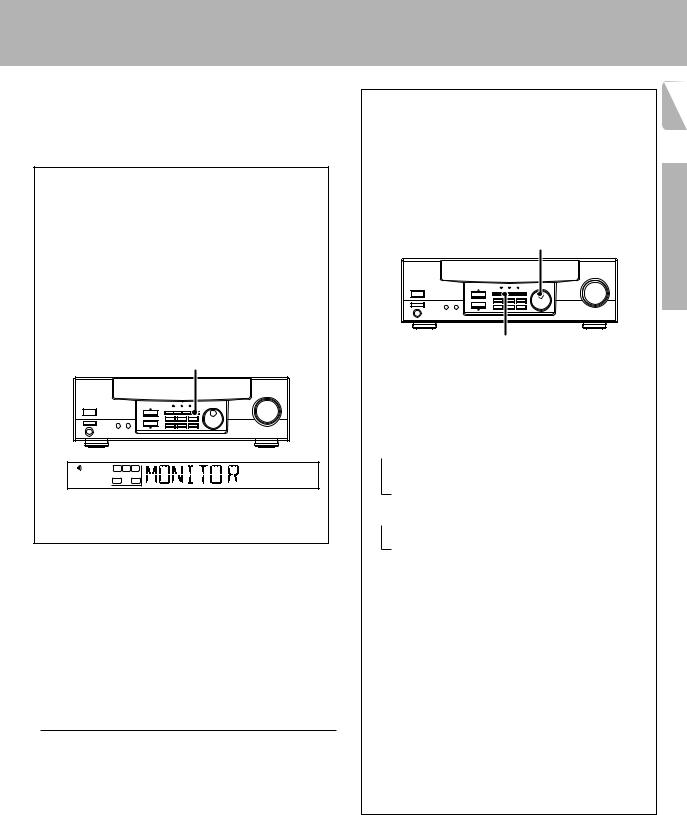
VIDEO 2/MONITOR jacks
The receiver’s VIDEO 2/MONITOR jacks can be used in two different ways. Make the appropriate setting for the component connected to the jack when the receiver is turned on.
Use as a VIDEO 2 jack
You can connect a video deck or the like to these jacks and perform video playback and recording. The initial factory setting is "VIDEO 2".
Use as a MONITOR jack
You can connect a cassette deck or the like to these jacks and make use of the deck’s monitoring function during recording. Alternately, you can connect a graphic equalizer to these jacks to apply compensation to the music signal.
To use the VIDEO 2/MONITOR jacks as MONITOR jacks, hold down the MONITOR key of the main unit for more than two seconds so that the indication shown below appears.
MONITOR |
SP |
L |
R |
|
|
|
SW |
STEREO MONITOR |
•To switch the setting back to "VIDEO 2", once again hold down the MONITOR key for two seconds or more.
Notes
1.Be sure to insert all connection cords securely. If their connections are imperfect, the sound may not be produced or noise may interfere.
2.Be sure to remove the power cord from the AC outlet before plugging or unplugging any connection cords. Plugging/unplugging connection cords without disconnecting the power cord can cause malfunctions and may damage the unit.
3.Do not connect power cords from components which power consumption is larger than what is indicated on the AC outlet at the rear of this unit.
Analog connections
Audio connections are made using RCA pin cords. These cables transfer stereo audio signal in an "analog" form. This means the audio signal corresponds to the actual audio of two channels. These cables usually have 2 plugs on each end, one red for the right channel and one white for the left channel. These cables are usually packaged with the source unit, or are available at your local electronics retailer.
Input mode settings
CD/DVD, DVD/6ch and VIDEO2 inputs each include jacks for digital audio input and analog audio input.
You must select beforehand which type of input is to be used for each connected component.
The initial factory settings is to use the digital audio signal for playback (CD/DVD, DVD/6ch and VIDEO2).
To use the analog audio input for playback instead (if, for example, you have connected a VCR to the VIDEO2 input), you must set the input mode for the corresponding input to the analog mode.
After completing connections and turning on the receiver, follow the steps below.
INPUT SELECTOR
INPUT MODE
1 Use the INPUT SELECTOR knob to select CD/DVD or VIDEO2.
2Press the INPUT MODE key.
Each press switches the setting as follows:
In DVD/6ch play mode
 1 D-AUTO (digital input, auto sound)
2 D-MANUAL (digital input, manual sound)
3 6ch INPT (DVD/6ch input)
4 ANALOG (analog input, manual sound)
In other mode than DVD/6ch play mode
 1 D-AUTO (digital input, auto sound)
2 D-MANUAL (digital input, manual sound)
3 ANALOG (analog input, manual sound)
Digital input:
Select this setting to play digital signals from a DVD, CD, or LD player.
Analog input:
Select this setting to play analog signals from a cassette deck, VCR, or record player.
Auto sound:
In the auto sound mode (AUTO SOUND indicator lights), the receiver selects the listening mode automatically during playback to match the type of input signal (Dolby Digital, PCM) and the speaker setting. The initial factory setting is auto sound on.
To keep the receiver set to the currently selected listening mode, use the INPUT MODE key to select "D-MANUAL" (manual sound). However, even when this setting is selected, there may be cases in which the listening mode is selected automatically to match a Dolby Digital source signal depending on the combination of listening mode and source signal.
If the INPUT MODE key is pressed quickly, sound may not be produced.
7
Preparations
Setting up the system
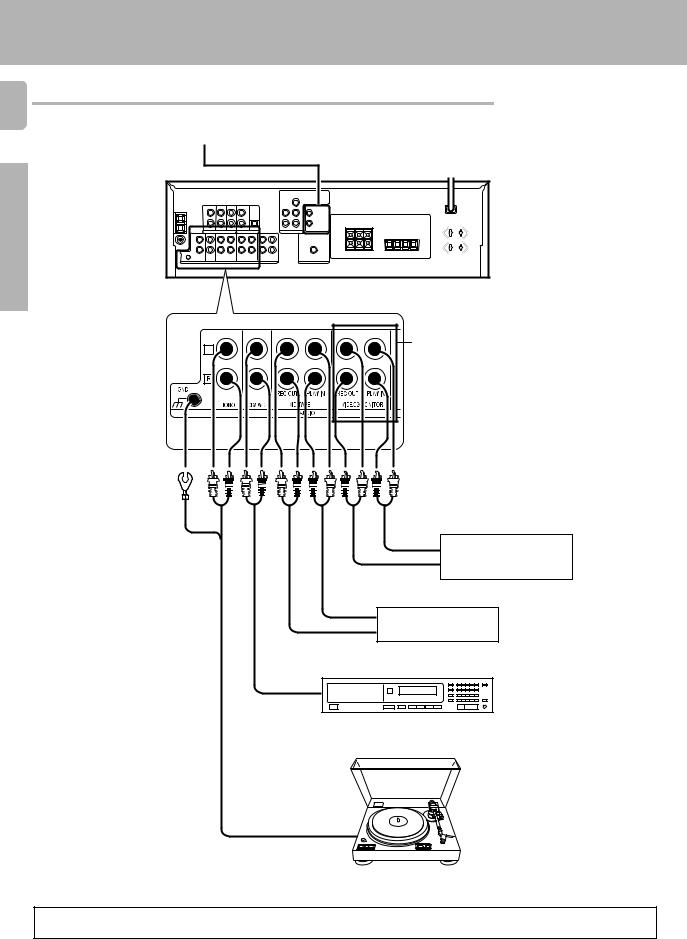
Connecting audio components
8
SYSTEM CONTROL jacks #
To AC wall outlet
Preparations
VIDEO2/MONITOR jacks You can connect an equalizer in Monitor mode, or a video component in Video 2 mode.
OUT
Video component, 3 head cassette deck, or Graphic
equalizer (
IN
OUT
Cassette deck or MD recorder
IN
OUT
CD player
OUT
Moving Coil (MC) cartridge record player cannot be used directly from the receiver unit. It can only be used when another equilizer amplifier is connected.
Record player
When you connect the video component to the VIDEO2/MONITOR jacks, connect the video cord (yellow RCA pin cords) of the connected component to the VIDEO2 IN jack .

Setting up the system
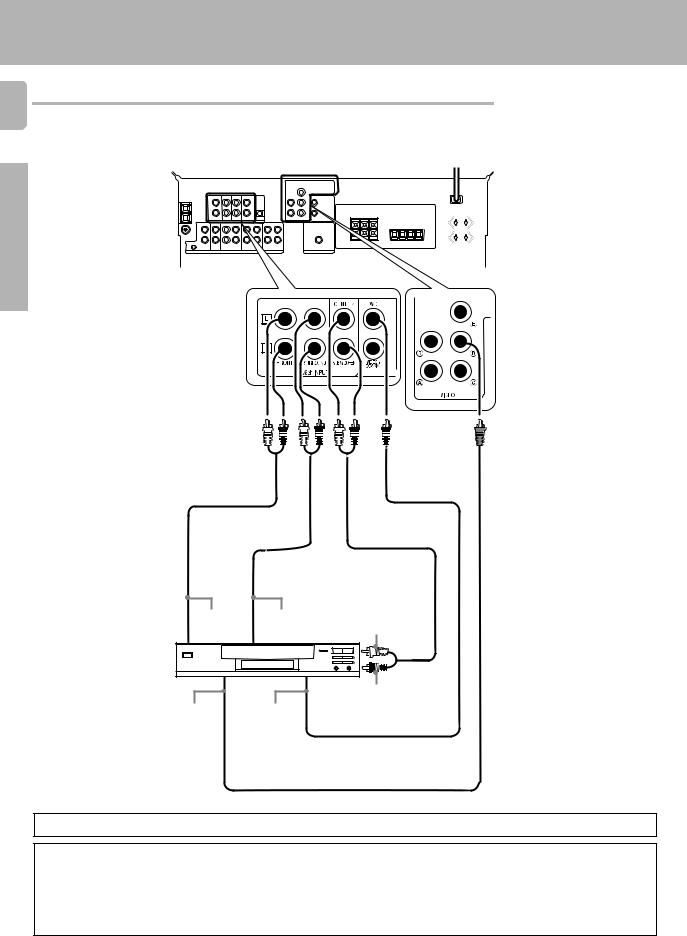
Connecting video components
9
Preparations
IN |
OUT |
IN |
OUT |
Video deck |
|
|
|
|
Audio inputs |
Video inputs and outputs |
|
|
and outputs |
(Yellow RCA pin cords) |
|
OUT |
OUT |
DVD player or LD player
Monitor TV
VIDEO IN
Video Inputs
(Yellow RCA pin cord)
A video component with digital audio outputs should be connected to the VIDEO2 jacks.
Setting up the system
10
Preparations
Connecting a DVD player (6-channel input)
If you have connected a DVD player to the receiver |
with digital connection, be sure to read the "Input mode |
|
settings" section carefully. |
7 |
|
|
|
|
|
|
|
FRONT |
SURROUND |
|
OUT L/R |
OUT L/R |
CENTER OUT |
DVD player
SUBWOOFER OUT
VIDEO OUT |
COAXIAL |
(Yellow RCA |
DIGITAL |
pin cord) |
OUT |
|
(AUDIO) |
To switch the speakers off , press the MUTE key.
CAUTION
Be sure to adhere followings or proper ventilation will be blocked causing damage or fire hazard.
•Do not place any objects impairing heat radiation onto the top of unit.
•Leave a space around the unit (from the largest outside dimension including projection) equal or greater than, shown below.
Top panel : 50 cm |
Side panel : 10 cm |
Back panel : 10 cm |
 Loading...