


 796.4158*
* 


MFL68639705

TABLE OF CONTENTS |
|
IMPORTANT SAFETY INSTRUCTIONS............................. |
3-5 |
GROUNDING REQUIREMENTS............................................. |
5 |
FEATURES AND BENEFITS |
|
Key Parts and Components ................................................. |
6 |
Included Accessories ........................................................... |
6 |
Optional Accessories........................................................... |
6 |
INSTALLATION REQUIREMENTS |
|
................................... |
7 |
Choose the Proper Location ............................................... |
7 |
Flooring .................................................................................. |
7 |
Clearances ............................................................................ |
7 |
INSTALLATION INSTRUCTIONS |
|
Unpacking and Removing Shipping Bolts......................... |
8 |
Connecting the Water Lines................................................ |
9 |
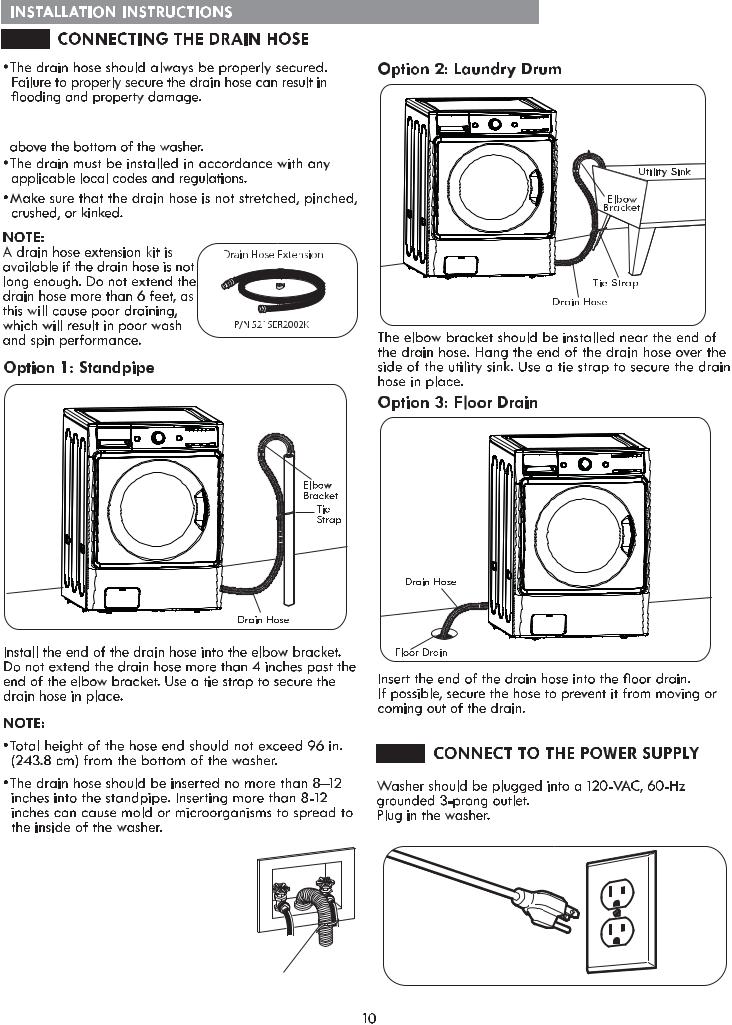
Connecting the Drain Hose ............................................... |
10 |
Connect to the Power Supply............................................. |
10 |
Leveling the Washer........................................................... |
11 |
Installation of Non-Skid Pads (optional)........................... |
11 |
HOW TO USE |
|
Control Panel Features........................................................ |
12 |
Operating the Washer......................................................... |
13 |
Cycle Guide .................................................................... |
14-15 |
Sorting Wash Loads............................................................ |
16 |
About the Dispenser Drawer .............................................. |
17 |
Detergent and Dispenser Use............................................. |
18 |
Time and Status Display.................................................... |
19 |
....................................................... |
20 |
Steam Cycles and Options................................................. |
21 |
Special Functions................................................................ |
22 |
CARE AND CLEANING |
|
Regular Cleaning.......................................................... |
23-24 |
Maintenance .................................................................. |
25-26 |
Cleaning the Water Inlet Filters.................................... |
25 |
Cleaning the Drain Pump Filter..................................... |
26 |
KENMORE CONNECT™ System......................................... |
27 |
TROUBLESHOOTING GUIDE |
|
Normal Sounds You May Hear......................................... |
28 |
Before Calling for Service .......................................... |
28-30 |
WARRANTY ............................................................................ |
31 |
PRODUCT RECORD
In the space below, record the date of purchase, model,
the washer door. Have these items of information available whenever you contact Sears concerning your
product. Model No.
Date of Purchase Serial No.
Save these instructions and your sales receipt for future reference.
PROTECTION AGREEMENTS
Master Protection Agreements
Congratulations on making a smart purchase. Your new Kenmore Elite® product is designed and manufactured for years of dependable operation. But like all products, it may require preventive maintenance or repair from time to time. That’s when having a Master Protection Agreement can save you money and aggravation.
The Master Protection Agreement also helps extend the life of your new product. Here’s what the
Agreement* includes:
vParts and labor needed to help keep products operating properly under normal use, not just defects. Our coverage goes well beyond the product warranty.
No deductible, no functional failure excluded from coverage – real protection.
vExpert service by a force of more than 10,000 authorized Sears service technicians, which means someone you can trust will be working on your product.
vUnlimited service calls and nationwide service, as often as you want us, whenever you want us.
“No-lemon” guarantee – replacement of your covered product if four or more product failures occur within twelve months.
Product replacement if your covered product can not be 
vAnnual Preventive Maintenance Check at your request
– no extra charge.
vFast help by phone – we call it Rapid Resolution.
Phone support from a Sears representative on all products. Think of us as a “talking owner’s manual.”
vPower surge protection against electric damage due to
v$250 food loss protection annually for any food spoilage that is the result of mechanical failure of any covered refrigerator or freezer.
vRental reimbursement if repair of your covered product takes longer than promised.
v25% discount 
repair service and related installed parts.
Once you purchase the Agreement, a simple phone call is all that it takes for you to schedule service. You can call at any time day or night or schedule a service appointment online.
The Master Protection Agreement is a risk-free purchase. If you cancel for any reason during the product warranty period, we will provide a full refund, or a prorated refund any time after the product warranty period expires. Purchase your Master Protection Agreement today!
Some limitations and exclusions apply.
For prices and additional information in the U.S.A. call 1-800-827-6655.
*Coverage in Canada varies on some items.
For full details call Sears Canada at 1-800-361-6665.
Sears Installation Service
For Sears professional installation of home appliances, garage door openers, water heaters, and other major home items, in the U.S.A. or Canada call:
1-800-4-MY-HOME®.
2

SAFETY MESSAGES
7KHUH DUH PDQ\ LPSRUWDQW VDIHW\ PHVVDJHV LQ WKLV PDQXDO DQG RQ \RXU DSSOLDQFH $OZD\V UHDG DQG REH\ DOO VDIHW\ PHVVDJHV
7KLV LV WKH VDIHW\ DOHUW V\PERO 7KLV V\PERO DOHUWV \RX WR SRWHQWLDO KD]DUGV WKDW FDQ UHVXOW LQ SURSHUW\ GDPDJH DQG RU VHULRXV ERGLO\ KDUP RU GHDWK
$OO VDIHW\ PHVVDJHV ZLOO IROORZ WKH VDIHW\ DOHUW V\PERO DQG HLWKHU WKH ZRUG '$1*(5 RU :$51,1* 7KHVH ZRUGV PHDQ
,QGLFDWHV D KD]DUGRXV VLWXDWLRQ ZKLFK LI QRW DYRLGHG ZLOO UHVXOW LQ GHDWK RU VHULRXV LQMXU\
,QGLFDWHV D KD]DUGRXV VLWXDWLRQ ZKLFK LI QRW DYRLGHG FRXOG UHVXOW LQ GHDWK RU VHULRXV LQMXU\
$OO VDIHW\ PHVVDJHV ZLOO WHOO \RX ZKDW WKH SRWHQWLDO KD]DUG LV WHOO \RX KRZ WR UHGXFH WKH FKDQFH RI LQMXU\ DQG WHOO \RX ZKDW FDQ KDSSHQ LI WKH LQVWUXFWLRQV DUH QRW IROORZHG
IMPORTANT SAFETY INSTRUCTIONS
 WARNING
7R UHGXFH WKH ULVN RI oUH HOHFWULF VKRFN RU LQMXU\ WR persons when using this appliance, follow basic precautions, including the following.
v%HIRUH XVH WKH ZDVKHU PXVW EH SURSHUO\ LQVWDOOHG DV GHVFULEHG LQ WKLV PDQXDO
v'R QRW ZDVK DUWLFOHV WKDW KDYH EHHQ SUHYLRXVO\ FOHDQHG LQ ZDVKHG LQ VRDNHG LQ RU VSRWWHG ZLWK JDVROLQH GU\ FOHDQLQJ VROYHQWV RU RWKHU pDPPDEOH RU H[SORVLYH VXEVWDQFHV DV WKH\ JLYH Rç YDSRUV WKDW FRXOG LJQLWH RU H[SORGH
v'R QRW DGG JDVROLQH GU\ FOHDQLQJ VROYHQWV RU RWKHU pDPPDEOH RU H[SORVLYH VXEVWDQFHV WR WKH ZDVK ZDWHU 7KHVH VXEVWDQFHV JLYH Rç YDSRUV WKDW FRXOG LJQLWH RU H[SORGH
v8QGHU FHUWDLQ FRQGLWLRQV K\GURJHQ JDV PD\ EH SURGXFHG LQ D KRW ZDWHU V\VWHP WKDW KDV QRW EHHQ XVHG IRU WZR ZHHNV RU PRUH +<'52*(1 *$6 ,6 (;3/26,9( ,I WKH KRW ZDWHU V\VWHP KDV QRW EHHQ XVHG IRU VXFK D SHULRG EHIRUH XVLQJ WKH ZDVKHU WXUQ 21 DOO KRW ZDWHU IDXFHWV DQG OHW WKH ZDWHU pRZ IURP HDFK IRU VHYHUDO PLQXWHV 7KLV ZLOO UHOHDVH DQ\ DFFXPXODWHG K\GURJHQ JDV $V WKH JDV LV pDPPDEOH GR QRW VPRNH RU XVH DQ RSHQ pDPH GXULQJ WKLV WLPH
v'R QRW LQVWDOO RU VWRUH WKH ZDVKHU ZKHUH LW ZLOO EH H[SRVHG WR WKH ZHDWKHU RU IUHH]LQJ WHPSHUDWXUHV
v'R QRW WDPSHU ZLWK FRQWUROV
v'R QRW UHSDLU RU UHSODFH DQ\ SDUW RI WKH ZDVKHU RU DWWHPSW DQ\ VHUYLFLQJ RWKHU WKDQ DV GHVFULEHG LQ WKLV PDQXDO :H VWURQJO\ UHFRPPHQG WKDW DQ\ VHUYLFH EH SHUIRUPHG E\ D TXDOLoHG WHFKQLFLDQ
v6HH ,QVWDOODWLRQ ,QVWUXFWLRQV IRU JURXQGLQJ UHTXLUHPHQWV
v$/:$<6 IROORZ WKH IDEULF FDUH LQVWUXFWLRQV VXSSOLHG E\ WKH JDUPHQW PDQXIDFWXUHU
v'R QRW SODFH LWHPV H[SRVHG WR FRRNLQJ RLO LQ \RXU ZDVKHU ,WHPV FRQWDPLQDWHG ZLWK FRRNLQJ RLOV PD\ FRQWULEXWH WR D FKHPLFDO UHDFWLRQ WKDW FRXOG FDXVH D ORDG WR FDWFK oUH
v8VH IDEULF VRIWHQHUV RU SURGXFWV WR HOLPLQDWH VWDWLF RQO\ DV UHFRPPHQGHG E\ WKH PDQXIDFWXUHU
v7KLV ZDVKHU LV QRW GHVLJQHG IRU PDULWLPH XVH RU IRU PRELOH LQVWDOODWLRQV VXFK DV LQ 59V DLUFUDIW HWF
v7XUQ 2)) WKH ZDWHU IDXFHWV DQG XQSOXJ WKH ZDVKHU LI WKH PDFKLQH LV WR EH OHIW IRU DQ H[WHQGHG SHULRG RI WLPH VXFK DV GXULQJ YDFDWLRQV
v'R QRW DOORZ FKLOGUHQ WR SOD\ RQ RU LQ WKH ZDVKHU &ORVH v3DFNDJLQJ PDWHULDO FDQ EH GDQJHURXV IRU FKLOGUHQ
VXSHUYLVLRQ RI FKLOGUHQ LV QHFHVVDU\ ZKHQ WKH ZDVKHU LV |
7KHUH LV D ULVN RI VXçRFDWLRQ .HHS DOO SDFNDJLQJ |
XVHG QHDU FKLOGUHQ |
IURP FKLOGUHQ |
v%HIRUH WKH ZDVKHU LV UHPRYHG IURP VHUYLFH RU GLVFDUGHG UHPRYH WKH GRRU WR SUHYHQW FKLOGUHQ IURP FOLPELQJ LQVLGH
v$OZD\V FKHFN WKH LQVLGH RI WKH ZDVKHU IRU IRUHLJQ REMHFWV EHIRUH ORDGLQJ ODXQGU\ .HHS WKH GRRU FORVHG ZKHQ QRW LQ XVH
vWARNING: 7KLV SURGXFW FRQWDLQV FKHPLFDOV NQRZQ WR WKH 6WDWH RI &DOLIRUQLD WR FDXVH FDQFHU DQG ELUWK GHIHFWV RU RWKHU UHSURGXFWLYH KDUP Wash hands after handling.
3

IMPORTANT SAFETY INSTRUCTIONS
 WARNING
7R UHGXFH WKH ULVN RI oUH HOHFWULF VKRFN RU LQMXU\ WR persons when using this appliance, follow basic precautions, including the following.
8QSOXJ WKH ZDVKHU EHIRUH FOHDQLQJ WR DYRLG WKH ULVN RI HOHFWULF VKRFN
vNever use harsh chemicals, abrasive cleaners, or solvents to clean the washer. 7KH\ ZLOO GDPDJH WKH oQLVK
vDo not put oily or greasy rags or clothing on top of the washer. 7KHVH VXEVWDQFHV JLYH Rç YDSRUV WKDW FRXOG LJQLWH WKH PDWHULDOV
vDo not wash items that are soiled with vegetable or cooking oil. 7KHVH LWHPV PD\ FRQWDLQ VRPH RLO DIWHU ODXQGHULQJ DQG PD\ FDWFK oUH
vDisconnect this appliance from the power supply before attempting any user maintenance. Turning the controls to the OFF position does not disconnect this
appliance from the power supply. )DLOXUH WR IROORZ WKLV ZDUQLQJ FDQ FDXVH VHULRXV LQMXU\ oUH HOHFWULF VKRFN RU GHDWK
vDo not combine detergents, fabric softeners, and/or other ODXQGU\ SURGXFWV IURP GLçHUHQW PDQXIDFWXUHUV IRU XVH LQ D ORDG XQOHVV VSHFLoHG RQ WKH IDEULF ODEHO
vDo not mix chlorine bleach with ammonia or acids
such as vinegar. Follow package directions when using laundry products. ,QFRUUHFW XVDJH FDQ SURGXFH SRLVRQRXV JDV UHVXOWLQJ LQ VHULRXV LQMXU\ RU GHDWK
vDo not reach into the washer while parts are moving. Before loading, unloading, or adding items, push in the
cycle selector knob and allow the drum to coast to a complete stop before reaching inside. )DLOXUH WR IROORZ WKLV ZDUQLQJ FDQ FDXVH VHULRXV LQMXU\ oUH HOHFWULF VKRFN RU GHDWK
 WARNING
vRefer to INSTALLATION INSTRUCTIONS for detailed grounding procedures. ,QVWDOODWLRQ LQVWUXFWLRQV DUH SDFNHG LQ WKH ZDVKHU IRU WKH LQVWDOOHUV UHIHUHQFH ,I WKH ZDVKHU LV PRYHG WR D QHZ ORFDWLRQ KDYH LW FKHFNHG DQG UHLQVWDOOHG E\ D TXDOLoHG VHUYLFH WHFKQLFLDQ )DLOXUH WR IROORZ WKLV ZDUQLQJ FDQ FDXVH VHULRXV LQMXU\ oUH HOHFWULF VKRFN RU GHDWK
vDo not, under any circumstances, cut or remove the third (ground) prong from the power cord. )DLOXUH WR IROORZ WKLV ZDUQLQJ FDQ FDXVH VHULRXV LQMXU\ oUH HOHFWULF VKRFN RU GHDWK
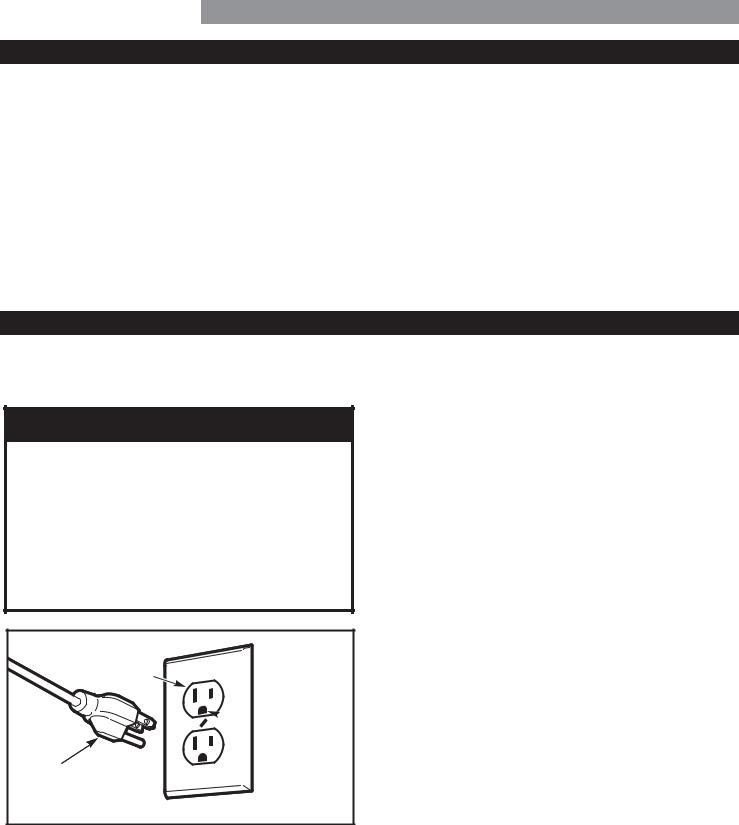
vFor personal safety, this appliance must be properly grounded. )DLOXUH WR IROORZ WKLV ZDUQLQJ FDQ FDXVH VHULRXV LQMXU\ oUH HOHFWULF VKRFN RU GHDWK
vThe power cord of this appliance is equipped with a
3-prong (grounding) plug which mates with a standard 3-prong (grounding) wall outlet WR PLQLPL]H WKH SRVVLELOLW\ RI HOHFWULF VKRFN KD]DUG IURP WKLV DSSOLDQFH
vThis washer must be plugged into a 120VAC, 60Hz grounded outlet. )DLOXUH WR IROORZ WKLV ZDUQLQJ FDQ FDXVH VHULRXV LQMXU\ oUH HOHFWULF VKRFN RU GHDWK
vHave the wall outlet and circuit checked by a
TXDOLoHG HOHFWULFLDQ WR PDNH VXUH WKH RXWOHW LV SURSHUO\ grounded. )DLOXUH WR IROORZ WKLV ZDUQLQJ FDQ FDXVH VHULRXV LQMXU\ oUH HOHFWULF VKRFN RU GHDWK
vWhere a standard 2-prong wall outlet is encountered, it is your personal responsibility and obligation to
have it replaced with a properly grounded 3-prong wall outlet. )DLOXUH WR IROORZ WKLV ZDUQLQJ FDQ FDXVH VHULRXV LQMXU\ oUH HOHFWULF VKRFN RU GHDWK
vDo not install on carpet. Install the washer on a solid pRRU )DLOXUH WR IROORZ WKLV ZDUQLQJ FDQ FDXVH VHULRXV OHDN GDPDJH
vDo not remove grounding prong. Do not use an
adapter or extension cord. Plug into a grounded 3-prong outlet. )DLOXUH WR IROORZ WKHVH ZDUQLQJV FDQ FDXVH VHULRXV LQMXU\ oUH HOHFWULF VKRFN RU GHDWK
vThe washer should always be plugged into its own
individual electrical outlet which has a voltage rating that matches the rating plate. 7KLV SURYLGHV WKH EHVW SHUIRUPDQFH DQG DOVR SUHYHQWV RYHUORDGLQJ KRXVH ZLULQJ FLUFXLWV ZKLFK FRXOG FDXVH D oUH KD]DUG IURP RYHUKHDWHG ZLUHV
vNever unplug your washer by pulling on the power cord. $OZD\V JULS SOXJ oUPO\ DQG SXOO VWUDLJKW RXW IURP WKH RXWOHW )DLOXUH WR IROORZ WKLV ZDUQLQJ FDQ FDXVH VHULRXV LQMXU\ oUH HOHFWULF VKRFN RU GHDWK
vImmediately repair or replace all power cords that have become frayed or otherwise damaged. Do not
use a cord that shows cracks or abrasion damage along its length or at either end. &RQVXOW ZLWK D TXDOLoHG VHUYLFH WHFKQLFLDQ )DLOXUH WR IROORZ WKLV ZDUQLQJ FDQ FDXVH VHULRXV LQMXU\ oUH HOHFWULF VKRFN RU GHDWK
vWhen installing or moving the washer, be careful not to pinch, crush, or damage the power cord. )DLOXUH WR IROORZ WKLV ZDUQLQJ FDQ FDXVH VHULRXV LQMXU\ oUH HOHFWULF VKRFN RU GHDWK
vThe washer must be installed and electrically
JURXQGHG E\ D TXDOLoHG VHUYLFH WHFKQLFLDQ LQ accordance with local codes WR SUHYHQW VKRFN KD]DUG DQG DVVXUH VWDELOLW\ GXULQJ RSHUDWLRQ
vThe washer is heavy. Two or more people may be needed to install and move the appliance. )DLOXUH WR GR VR FDQ UHVXOW LQ GDPDJH WR SURSHUW\ RU VHULRXV ERGLO\ LQMXU\
vStore and install the washer where it will not be
exposed to temperatures below freezing or exposed to outdoor weather conditions. )DLOXUH WR IROORZ WKLV ZDUQLQJ FDQ FDXVH VHULRXV OHDN GDPDJH
vTo reduce the risk of electric shock, do not install the washer in humid spaces. )DLOXUH WR IROORZ WKLV
ZDUQLQJ FDQ FDXVH VHULRXV LQMXU\ oUH HOHFWULF VKRFN RU GHDWK
4
IMPORTANT SAFETY INSTRUCTIONS
 WARNING: RISK TO CHILDREN
v'R QRW DOORZ FKLOGUHQ WR SOD\ RQ RU LQ WKH ZDVKHU &ORVH v.HHS ODXQGU\ SURGXFWV RXW RI FKLOGUHQV UHDFK 7R VXSHUYLVLRQ RI FKLOGUHQ LV QHFHVVDU\ ZKHQ WKH ZDVKHU LV SUHYHQW SHUVRQDO LQMXU\ REVHUYH DOO ZDUQLQJV RQ XVHG QHDU FKLOGUHQ $V FKLOGUHQ JURZ WHDFK WKHP WKH SURGXFW ODEHOV )DLOXUH WR FRPSO\ ZLWK WKHVH ZDUQLQJV SURSHU VDIH XVH RI DOO DSSOLDQFHV )DLOXUH WR FRPSO\ ZLWK FRXOG UHVXOW LQ VHULRXV SHUVRQDO LQMXU\
WKHVH ZDUQLQJV FRXOG UHVXOW LQ VHULRXV SHUVRQDO LQMXU\
v'HVWUR\ WKH FDUWRQ SODVWLF EDJ DQG RWKHU SDFNLQJ PDWHULDOV DIWHU WKH ZDVKHU LV XQSDFNHG &KLOGUHQ PLJKW XVH WKHP IRU SOD\ &DUWRQV FRYHUHG ZLWK UXJV EHGVSUHDGV RU SODVWLF VKHHWV FDQ EHFRPH DLUWLJKW FKDPEHUV )DLOXUH WR FRPSO\ ZLWK WKHVH ZDUQLQJV FRXOG UHVXOW LQ VHULRXV SHUVRQDO LQMXU\
GROUNDING REQUIREMENTS
IMPORTANT: Please read carefully. TO CONNECT ELECTRICITY
 WARNING
,PSURSHU FRQQHFWLRQ RI WKH HTXLSPHQW JURXQGLQJ FRQGXFWRU FDQ UHVXOW LQ ULVN RI HOHFWULF VKRFN &KHFN ZLWK D TXDOLoHG HOHFWULFLDQ RU VHUYLFH WHFKQLFLDQ LI \RX DUH LQ GRXEW DV WR ZKHWKHU WKH DSSOLDQFH LV SURSHUO\ JURXQGHG 'R QRW PRGLI\ WKH SOXJ SURYLGHG ZLWK WKH DSSOLDQFH ,I LW GRHV QRW oW WKH RXWOHW KDYH D SURSHU RXWOHW LQVWDOOHG E\ D TXDOLoHG HOHFWULFLDQ )DLOXUH WR IROORZ WKHVH ZDUQLQJV FDQ FDXVH VHULRXV LQMXU\ oUH HOHFWULF VKRFN RU GHDWK
SURQJ JURXQGLQJ W\SH ZDOO UHFHSWDFOH

 (QVXUH SURSHU
JURXQG H[LVWV
EHIRUH XVH
SURQJ
grounding
SOXJ
GROUNDING INSTRUCTIONS
7KLV DSSOLDQFH PXVW EH JURXQGHG ,Q WKH HYHQW RI PDOIXQFWLRQ RU EUHDNGRZQ JURXQGLQJ ZLOO UHGXFH WKH ULVN RI HOHFWULF VKRFN E\ SURYLGLQJ D SDWK RI OHDVW UHVLVWDQFH IRU HOHFWULF FXUUHQW 7KLV DSSOLDQFH LV HTXLSSHG ZLWK D FRUG KDYLQJ DQ HTXLSPHQW JURXQGLQJ FRQGXFWRU DQG JURXQGLQJ SOXJ 7KH SOXJ PXVW EH SOXJJHG LQWR DQ DSSURSULDWH RXWOHW WKDW LV SURSHUO\ LQVWDOOHG DQG JURXQGHG LQ DFFRUGDQFH ZLWK DOO ORFDO FRGHV DQG RUGLQDQFHV

 Safely and conveniently keeps the door ajar when the washer is not in use, to promote air circulation and allow the interior of the drum to dry. To use this feature, close the door gently until it just contacts the door magnet.

120 VAC, 60 Hz
14.5 – 142 PSI (100 – 980 kpa)
27" (W) x 29 3/4" (D) x 38 11/16"(H). 51" (D with door open)
68.6 cm (W) X 75.6 cm (D) X 98.3 cm (H), 129.5 cm (D with door open)
205 lbs (93 kg)
1,300 RPM


 Installing the washer in a humid space, or installing or storing the washer where it will be exposed to the weather or freezing temperatures, may result in rust or other damage that is not covered in the product warranty.
22 1/4 " |
|
(57 cm) |
|
29 3/4" |
4 in. |
(81.2 cm) |
(10 cm) |
51" |
|
(129.5 cm) |
|
1" |
27" |
|
1" |
|
(68.6 |
cm) |
|||
(2.5 cm) |
(2.5 cm) |
|||
|
|
|||
|
27in. (68.6 cm) |
|
||
INSTALLATION INSTRUCTIONS
 UNPACKING AND REMOVING SHIPPING BOLTS
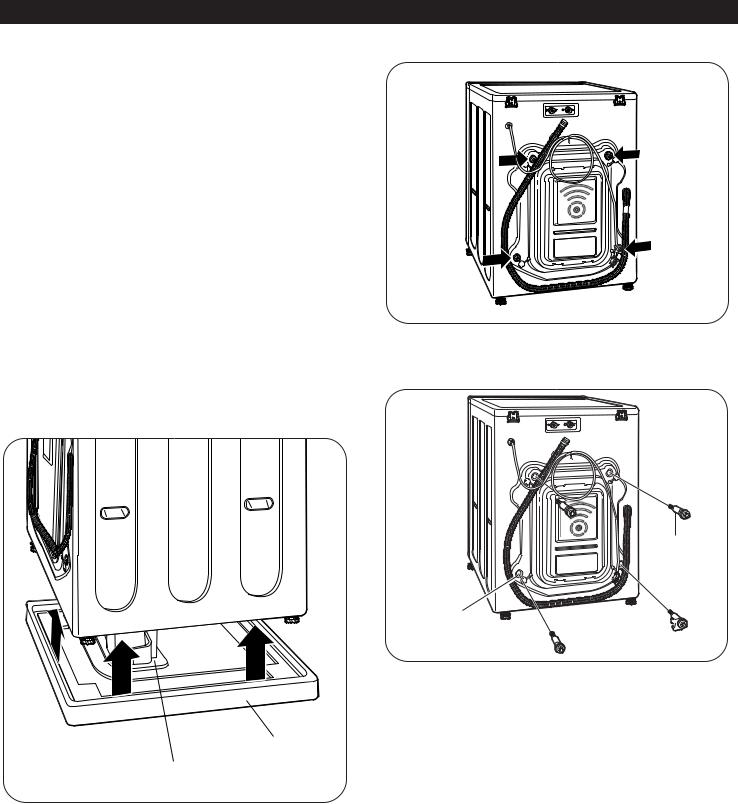
:KHQ UHPRYLQJ WKH ZDVKHU IURP WKH FDUWRQ EDVH EH VXUH WR UHPRYH WKH IRDP GUXP VXSSRUW LQ WKH PLGGOH RI WKH FDUWRQ EDVH 6HH GUDZLQJ EHORZ
,I \RX PXVW OD\ WKH ZDVKHU GRZQ WR UHPRYH WKH EDVH SDFNDJLQJ PDWHULDOV DOZD\V SURWHFW WKH VLGH RI WKH ZDVKHU DQG OD\ LW FDUHIXOO\ RQ LWV VLGH DO NOT OD\ WKH ZDVKHU RQ LWV IURQW RU EDFN
7R SUHYHQW LQWHUQDO GDPDJH GXULQJ WUDQVSRUW WKH ZDVKHU LV HTXLSSHG ZLWK IRXU VKLSSLQJ EROWV DQG SODVWLF UHWDLQHUV
IMPORTANT:
v7KHVH VKLSSLQJ EROWV DQG UHWDLQHUV MUST NOT EH UHPRYHG XQWLO MXVW EHIRUH PRYLQJ WKH ZDVKHU LQWR LWV oQDO SRVLWLRQ
v7KHVH EROWV DQG UHWDLQHUV MUST EH UHPRYHG EHIRUH RSHUDWLQJ WKH ZDVKHU
v)DLOXUH WR UHPRYH VKLSSLQJ EROWV DQG UHWDLQHUV PD\ FDXVH VHYHUH YLEUDWLRQ DQG QRLVH ZKLFK FDQ OHDG WR SHUPDQHQW GDPDJH WR WKH ZDVKHU
NOTE: 7KH SRZHU FRUG LV VHFXUHG WR WKH EDFN RI WKH ZDVKHU ZLWK D VKLSSLQJ EROW WR KHOS SUHYHQW RSHUDWLRQ ZLWK VKLSSLQJ EROWV LQ SODFH
Shipping
Bolts
 Power
Power
Cord
1.6WDUWLQJ ZLWK WKH ERWWRP WZR VKLSSLQJ EROWV XVH WKH ZUHQFK LQFOXGHG WR IXOO\ ORRVHQ DOO IRXU VKLSSLQJ EROWV E\ WXUQLQJ WKHP FRXQWHUFORFNZLVH
Carton
Base
Foam Tub
Support
Shipping Bolts
Hole Cap
2. 5HPRYH WKH EROW DVVHPEOLHV E\ ZLJJOLQJ WKHP VOLJKWO\ ZKLOH SXOOLQJ
3. /RFDWH WKH IRXU KROH FDSV LQFOXGHG LQ WKH DFFHVVRU\ SDFN DQG LQVWDOO WKHP LQ WKH VKLSSLQJ EROW KROHV
NOTE: 6DYH WKH EROW DVVHPEOLHV IRU IXWXUH XVH 7R SUHYHQW GDPDJH WR LQWHUQDO FRPSRQHQWV '2 127 WUDQVSRUW WKH ZDVKHU ZLWKRXW UHLQVWDOOLQJ WKH VKLSSLQJ EROWV
8
 CONNECTING THE WATER LINES
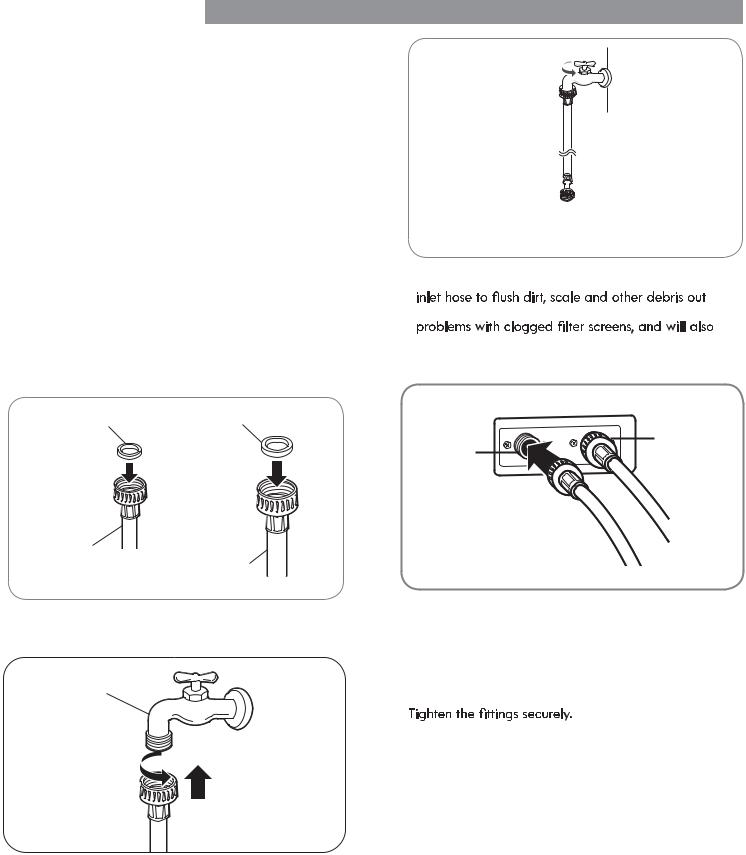
vIMPORTANT: Use new hoses when installing the washer. Do NOT reuse old hoses.
vWater supply pressure must be between 14.5 psi and 142 psi (100 – 980 kPa) . If the water supply pressure is more than 142 psi, a pressure reducing valve must be installed.
vPeriodically check the hose for cracks, leaks, and wear, and replace the hose if necessary.
vMake sure that the water lines are not stretched, pinched, crushed, or kinked.
vThe washer should never be installed or stored in a location subject to freezing temperatures. Damage to the water lines and internal mechanisms of the washer can result. If the washer was exposed to freezing temperatures prior to installation, allow it to stand at room temperature for several hours before use and check for leaks prior
to operation.
vFor optimal wash performance, the hot water temperature should be set at 120°-135°F (48-57°C) and the cold water at 60°F (15°C).
INSTALLATION INSTRUCTIONS
3.Always run a gallon or two of water through each of the water lines. Doing so will help prevent future
allow you to verify which water line is hot and which is cold.
Rubber Seal |
Rubber Seal |
Water Hose |
Water Hose |
(to water inlet |
|
on washer) |
(to tap) |
1.  sure there is a rubber seal in place in both ends.
Water Faucet
2.Connect the water supply hoses to the HOT and
COLD water faucets tightly by hand and then tighten another ï turn with pliers.
Cold |
Hot |
Water |
|
Water |
Inlet |
Inlet |
|
WARNING: Do not overtighten the hoses. Overtightening can damage the valves resulting in leaking and property damage.
4.Attach the (red) hot water line to the hot water inlet on the back of the washer. Attach the (blue) cold water line to the cold water inlet on the back of the washer.
NOTE: When installing the hoses onto the water inlet valves, be careful not to cross-thread the hose
 DO NOT overtighten the hoses; this could cause damage to internal components, the valve or the hose gasket. Overtightening could result in property damage from leaks.
9


 hose lower than 29 in. (73.7 cm) or higher than 96 in. (243.8 cm)
If the water valves and drain are built into the wall, fasten the drain hose to one of the water hoses with the tie strap (ribbed side on inside).
Tie Strap
 Loading...