


91147812200

Double 30" Electric Self-Cleaning
Built-In Wall Oven with Upper
Microwave
Use & Care Guide
Horno El_ctrico
Doble de 30" Empotrado con Autolimpieza
y Microondas Superior
Guia para el Uso y Cuidado
Models, Modelos 911.47812, 47813, 47814, 47819
229c4020P3 12-2
(SR-10501-2)
20P312-2 ENv01
Sears, Roebuck and Co.,
Hoffman Estates, IL 60179 U.S_. www.sears.com
SELF-CLEANINGBUILT-IN
WALLOVENWITHMICROWAVE
TABLEOFCONTENTS,
Lower Oven Display ............... 16
Lower Oven Clock .................. 17
Oven Safety .......................... 34_
Removal of Packaging Tape ....6
Features of Your Oven .............. 7
Microwave Oven Control .......... 8
Power Level .......................... 8-9
Time Cook I .............................. 9
Time Cook Guide ...................... 9
Time Cook II ........................... 10
Time Defrost ........................... 10
Add 30 Seconds ..................... 10
Express Cook ......................... 10
Auto Feature ........................... 10
Timed Defrosting Guide ......... 11
Humidity Sensor ..................... 12
Popcorn .................................. 12
Reheat .................................... 12
Potato ..................................... 12
Beverage ................................ 13
Snacks .................................... 13
Snacks Guide ......................... 13
Cook ....................................... 13
Cook Guide ............................ 13
Upper Oven Clock .................. 14
Kitchen Timer ......................... 14
Display On/Off ........................ 14
Reminder ................................ 14
Delay Start .............................. 14
Sound On/Off .......................... 14
Lower Oven Control ................ 15
For your convenience and future reference, please write down your model
and serial numbers in the space provided. They are located on the inside
wall of the microwave when the microwave oven door is opened.
MODEL NUMBER: SERIAL NUMBER:
Lower Oven Kitchen Timer ._.. 17
Lower Oven Tones ................. 18
Lower Oven F Code ............... 18
Lower Oven Cooking Tips.. 19-21
Baking With Margarine ........... 20
Baking .................................... 22
Broiling ................................... 23
Setting Special Features .. 24-25
Self-Cleaning Cycle .......... 26-27
Microwave Oven Interior ........ 28
Microwave Oven Floor ............ 28
MicrowaveOvenDoor Window _.28
Outside Oven Surfaces .......... 28
Microwave Control Panel ........ 28
Lower Oven Control Panel...... 29
Broiler Pan and Grid ............... 29
Oven Racks ............................ 29
Wails of the Oven ................... 29
Glass ...................................... 29
Oven Light Bulb ...................... 30
Removable Oven Racks ......... 30
Oven Door .............................. 31
Before Calling for
Service .............................. 32-34
Temperature Adjustment ........35
Warranty ................................. 36
Service Numbers .................... 76
© Sears, Roebuck and Co.
20P312-2 ENv01
2
IMPORTANTSAFETY
INSTRUCTIONS
SAVE THESE INSTRUCTIONS
Read all instructions before using this appliance. When using gas or
electrical appliances, basic safety precautions should be followed,
including the following:
• ALWAYS KEEP your appliance
clear of things that will burn
(gasoline and other flammable
vapors or liquids).
• ALWAYS KEEP the oven area
IMPORTANT: To insuresafety for
yourself, famiqyand home, please
read your Owner's Manual carefully.
Keep it handy for reference. Pay
close attention to Safety Sections. BE
SURE your appliance is installedand
grounded by a qualified technician,
• DO NOT leave children alone
or unattended near an appliance
in use
• TEACH CHILDREN not to play with
controls or any part of the appliance
and net to sit, climb or stand on the
door, or any part of the appliance.
• CAUTION: NEVER STORE items
of interest to children in cabinets
above the appliance. Children
climbing on the appliance could
be seriously injured,
• KEEP TillS book for later use.
• NEVER TRY to repair or replace
any part of the appliance unless
instructions are given inthis manual.
All otherwork should be done by a
qualified technician.
• NEVER USE yourappliance for
warming or heating the room.
• ALWAYS KEEP combustible wall
coverings, curtains, dishcloths,
towels, potholders and other linens
a safe distance from the appliance.
• NEVER USE a towel or other bulky
cloth as a potholder. Make sure the
potholder is dry. Moist potholders
could cause steam burns. DO NOT
let potholders touch hot surfaces.
free from things that will burn. Food,
wooden utensils and grease buildup
could catch fire. Plastic utensils
could melt and canned foods could
explode. Your appliance should
never be used as a storage area.
• NEVER HEAT unopened food
containers. Pressure buildup can
cause the container to burst and
cause injury.
• NEVER LEAVE containers of fat
or drippings inyour oven.
• NEVER TRY to clean a hot surface.
Some cleaners produce noxious
fumes and wet cloths or sponges
could cause steam burns.
• BE SURE the oven is securely
installed in a cabinet that is firmly
attached to the house structure.
• LARGE SCRATCHES OR
IMPACTS to glass doors can lead
to broken or shattered glass.
• DO NOT touch heating elements,
surfaces near them or interior oven
surfaces. These may be hot enough
to cause burns even though they
are dark in color. During and after
use, do not touch or let clothing or
flammable material contact the
elements or hot surfaces until they
have had time to cool. Other
surfaces near the oven vent
openings, oven door and window
surfaces may also be hot enough
to cause burns.
3
20P312-2 ENv01
IMPORTANTSAFETY
INSTRUCTIONS
,aJ
I
• PLACEOVENRACKSinthedesired
positionwhiletheoveniscool.Ifracksmust
bemovedwhileovenishot,donotlet
potholdercontactthehotovenelement.
• AFTERBROILING,atwaystakethebroiler
panandgridoutoftheoven
andcleanthem.Leftovergreaseinthebroiler
pancouldcatchfirethenexttimeyouuse
youroven.
• ALWAYSUSEcarewhenopeningtheoven
doorLethotairandsteamescapebefore
movingfoods.
• NEVERUSEaluminumfoiltolinetheoven
bottom.Improperuseoffoilcouldstartafire,
orelectricalshockcouldresult,
• NEVERBLOCKtheovenventopening.
• CLEANONLYthepartslistedinthismanual
Followallcleaninginstructions.
Besuretoremovethebroilerpanandgrid
beforeself-cleaning
• NEVERRUB,move,cleanordamagethe
doorgasketonserf-cleaningovens,Itis
essentialfora goodseal.
• NEVERTRYtocleanutensils,cookware,
removableparts,orbroilerpanandgridin
these_f-cleencycle,
• DONOTUSEovencleaners-
Nocommercialovencleanerorprotective
coatingof anykindshouldbeusedinor
aroundanypartof theoven.
• IFTHESELF-CLEANINGmode
malfunctions,turntheovenoffand
disconnectlhepowersupply,Haveit
servicedbyaqualifiedtechnician.
• A FANshouldbeheardsometimeduringthe
self-cleencycle.Ifnot,callforsewicebefore
nextserf-cleancycle.
IMPORTANTSAFETYNOTICE
TheCaliforniaSafeDrinkingWaterandToxic
EnforcementActrequiresthegovernorof
Californiato publishalistofsub_ancas
knowntothestatetocausebirthdefectsor
otherreproductiveharmandrequires
businessesto waretheircustomersof
potentialespoeuretosuchsohetencen.
Thefiberglassinsulationinaserf-claanlag
ovenwillgiveoffa verysmallamountof
cad)onmonoxideduringthecleaningcycle.
Exposurecanberelalmizodbyventingwith
anopendoororwthdoworusinga
ventilationfanorhood.
IMPORTANT: The health of some birds is
extremelysensitive to thefumes given off
daring the self-cleaning cycleof anyoven,
Movebirdstoanother well-ventilatedroom.
READAND UNDERSTAND
THIS INFORMATIONNOWi
BesureeveryoneInyourhomeknowswhat
todeincaseoffire.Neverusewaterona
greasefire;Itwillonlyspreadtheflames.
OVENFIRE:
Donottrytomovethepan!
1, Closetrfeovendoorandturn
controlsoff,
2. ftfiresentinues,carefullyopenthedoor,
throwbakingsodaonthefire,
o,ruseadrychemical,foamor
ha!on-typeextinguisher.
When using electrical
appliances, basic safety
precautions should be
followed, Including the following:
WARNING: To reduce the risk of
burns, electric shock, fire, injury
to persons or exposure to
excessive microwave energy:
• Read all Instructions before
using this appliance.
• Read and follow the specific
microwave safety' Instructions. ,
4
20P312-2ENvO1
IMPORTANTSAFETY
INSTRUCTIONS
• THIS APPLIANCE must be
grounded. Connect only to properly
grounded outlet. See the Grounding
Instructions in the Installation
Instructions,
• USE this appliance only for its
intended use as described in this
manual. Do not use corrosive
chemicals or vapors in this
appliance. This microwave oven is
specifically designed to heat or
cook food and is not intended for
laboratory or industrial use.
• INSTALL or locate this appliance
only in accordance with the
provided Installation Instructions.
• DO NOT cover or block any
openings on the appliance.
• THIS MICROWAVE oven is not
approved or tested for marine use
• DO NOT operate this appliance if it
is not working properly or if it has
been damaged or dropped,
• AS WITH ANY APPLIANCE, close
supervision is necessary when used
by children.
• DO NOT overcook food. Carefully
attend appliance if paper, plastic
or other combustible materials are
placed inside the oven to facilitate
cooking.
• REMOVE wire twist-tiesfrom paper
or plasticbags before placing inthe
oven,
• DO NOT use your microwave oven
to dry newspapers.
• DO NOT use recycled paper
products. Recycled paper towels,
napkins and waxed paper can
contain metal flecks which may
cause arcing or ignite. Paper
products containing nylon or nylon
filaments should be avoided.
• DO NOT heat food in closed
containers, such as glass jars,
which may explode.
• DO NOT pop popcorn in your
microwave unless you use popcorn
labeled for use in microwave ovens
• DO NOT overcook potatoes. They
could dehydrate and catch fire,
causing damage to your oven.
• DO NOT operate the microwave oven
if it is empty.
• DO NOT use your microwave oven
as a storage space,
• IF MATERIAL INSIDE the even
should ignite, close the door, turn
the oven off and disconnect the
power to the appliance.
• OVERSIZED food or oversized
metal cookware should not be used
in a microwave oven. Electrical
shook or fire could occur.
• DO NOT clean with metal scouring
pads. Pieces can break off the pad,
causing electrical shock.
• DO NOT defrost frozen beverages
that have narrow-necked bottles
Pressure could build up, causing
the bottle to burst.
• USE POTHOLDERS when
removing cookwarefrom the oven.
Cookware could become hot during
cooking due to the transferred heat
from the food.
• BE CAREFUL touching the walls
or the oven bottom during orafter
cooking. The waftsand floor could
become hot.
• DO NOT boil eggs ina microwave
oven. Pressure will build up inside
the egg yolk and will cause the egg
to burst.
• USE PLASTIC containers that are
approved by the manufacturer for
microwave use. Do not allow
children to use plastic containers
unless supervised. Do not subject
empty containers to microwaving
20P312-2 ENv01
5
IMPORTANTSAFETY
INSTRUCTIONS
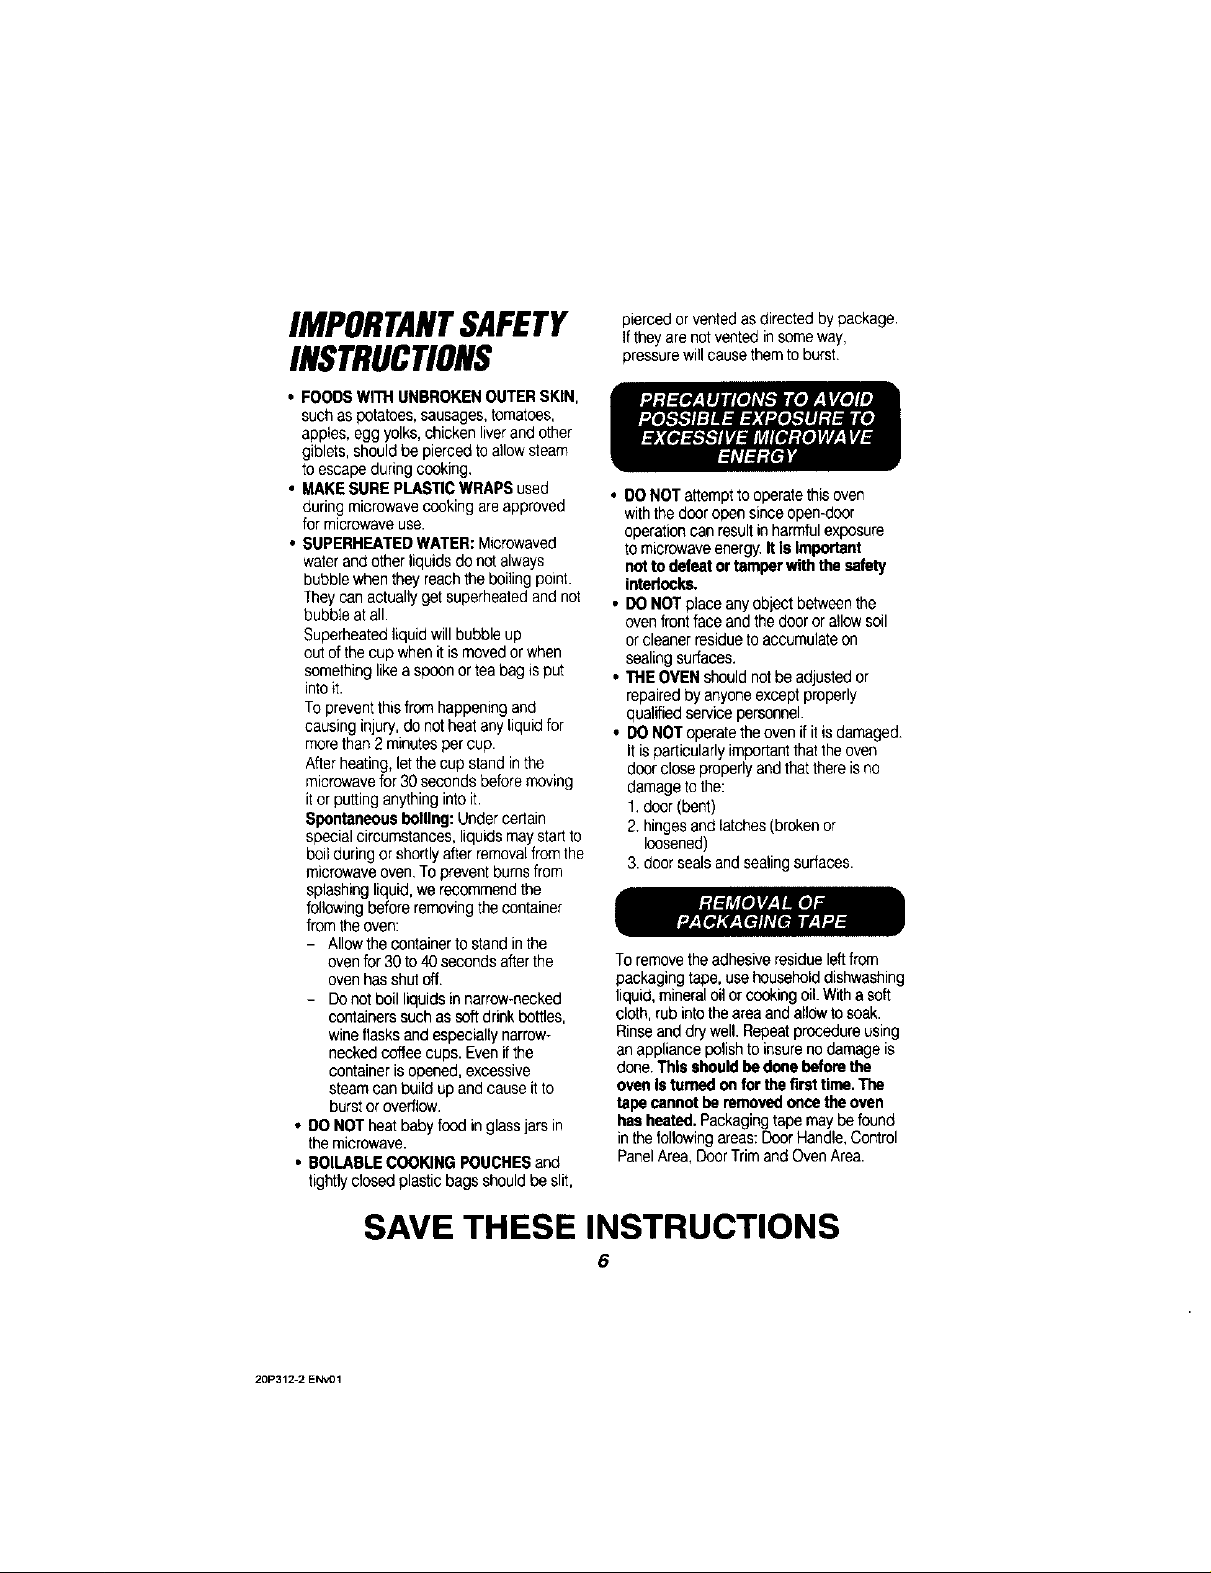
• FOODSWITHUNBROKENOUTERSKIN,
suchaspotatoes,sausages,tomatoes,
apples,eggyolks,chickenliverandother
giblets,shouldbe piercedtoallowsteam
to escapeduringcooking,
• MAKESUREPLASTICWRAPSused
duringmicrowavecookingareapproved
formicrowaveuse.
• SUPERHEATEDWATER:Microwaved
waterandotherliquidsdonot always
bubblewhentheyreachtheboilingpoint.
Theycanactuallyget superheatedandnot
bubbleatall.
Superheatedliquid willbubbleup
out ofthecupwhenitis movedorwhen
somethinglikea spoonor teabagisput
intoit.
Topreventthisfromhappeningand
causinginjury,do notheatanyliquidfor
morethan2 minutespercup.
Afterheating,letthecup standinthe
microwavefor30 secondsbeforemoving
itor puttinganythingintoit.
Spontaneousbelling:Undercertain
specialcircumstances,liquidsmaystartto
boilduringor shortlyafterremovalfromthe
microwaveoven,Topreventburnsfrom
splashingliquid,werecommendthe
followingbeforeremovingthecontainer
fromtheoven:
- Allowthe oentainertostandin the
ovenfor 30to 40secondsafterthe
ovenhasshutoff.
- Donotboilliquidsinnarrow-necked
containerssuchas softdrinkbottles,
wineflasksand especiallynarrow-
neckedcoffeecups.Evenifthe
containeris opened,excessive
steamcanbuildupand causeitto
burst or overflow,
• DONOTheatbabyfood in glassjarsin
themicrowave.
• BOILABLECOOKINGPOUCHESand
tightlyclosedplasticbagsshouldbe slit,
piercedorventedasdirectedbypackage.
Iftheyare notventedinsomeway,
pressurewillcausethemto burst.
• O0 NOTattempttooperatethisoven
withthedooropen sinceopen-door
operationcanresultinharmfulexposure
tomicrowaveenergy.ItIs Important
notto defeatortamper withthe safety
interlocks.
• DONOTplaceanyobjectbetweenthe
ovenfrontfaceandthe dooror allowsoil
or cleanerresidueto accumulateon
sealingsurfaces.
• THEOVENshouldnotbeadjustedor
repairedbyanyoneexceptproperly
qualifiedservicepersonnel.
• DONOToperatetheovenif itisdamaged.
Itis particularlyimportantthattheeven
doercloseproperlyandthatthereisno
damagetothe:
1.door(bent)
2.hingesandlatches(brokenor
loosened)
3.doorsealsandsealingsurfaces.
Toremovetheadhesiveresidueleftfrom
packagingtape,usehouseholddishwashing
liquid,mineraloilor cookingoil.Withasoft
cloth,rubintotheareaandallowtosoak.
Rinseanddrywell.Repeatprocedureusing
anappliancepolishtoinsurenodamage is
done.Thisshouldbedonebefo_ the
ovenIsturnedonforthe firsttime.The
tapecannotberemovedoncetheoven
hasheated.Packagingtapemaybefound
in thefollowingareas:DoorHandle,Control
PanelArea,DoorTrimand OvenArea.
20P312-2 ENv01
SAVE THESE INSTRUCTIONS
6
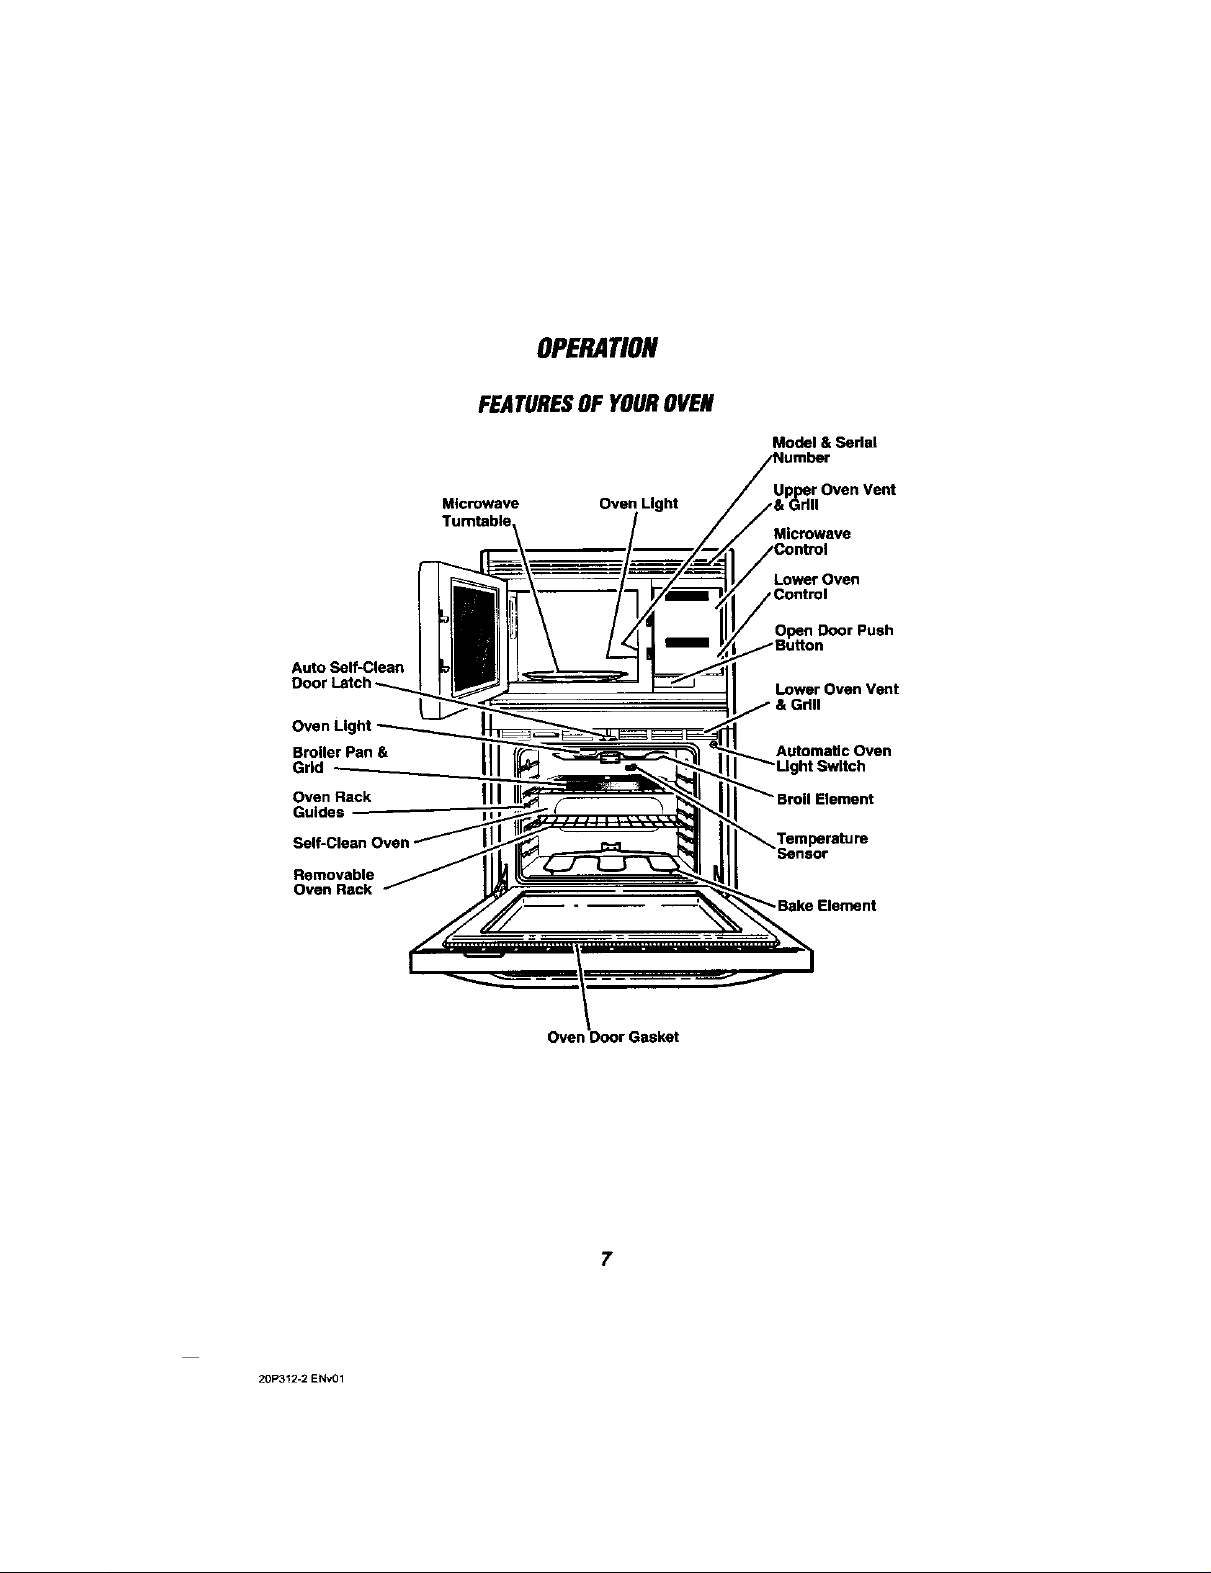
OPERATION
FEATURESOFYOUROVE#
Model & SeriaL
Auto Self-Clean
Broiler Pan &
Grid
Oven Rack
Guides
Removable
Oven Rack
Microwave Oven Light
Turntable
III
Oven Door Gasket
Upper Oven Vent
,& GHII
Microwave
Lower Oven
Open Door Push
Lower Oven Vent
;witch
20P312-2 ENv01
7
OPERATION
_ MICROWAVE O'v_l
When power is restored, all digits
)
SENSO_ COO_NG CON_Mr_'_ COO_NG
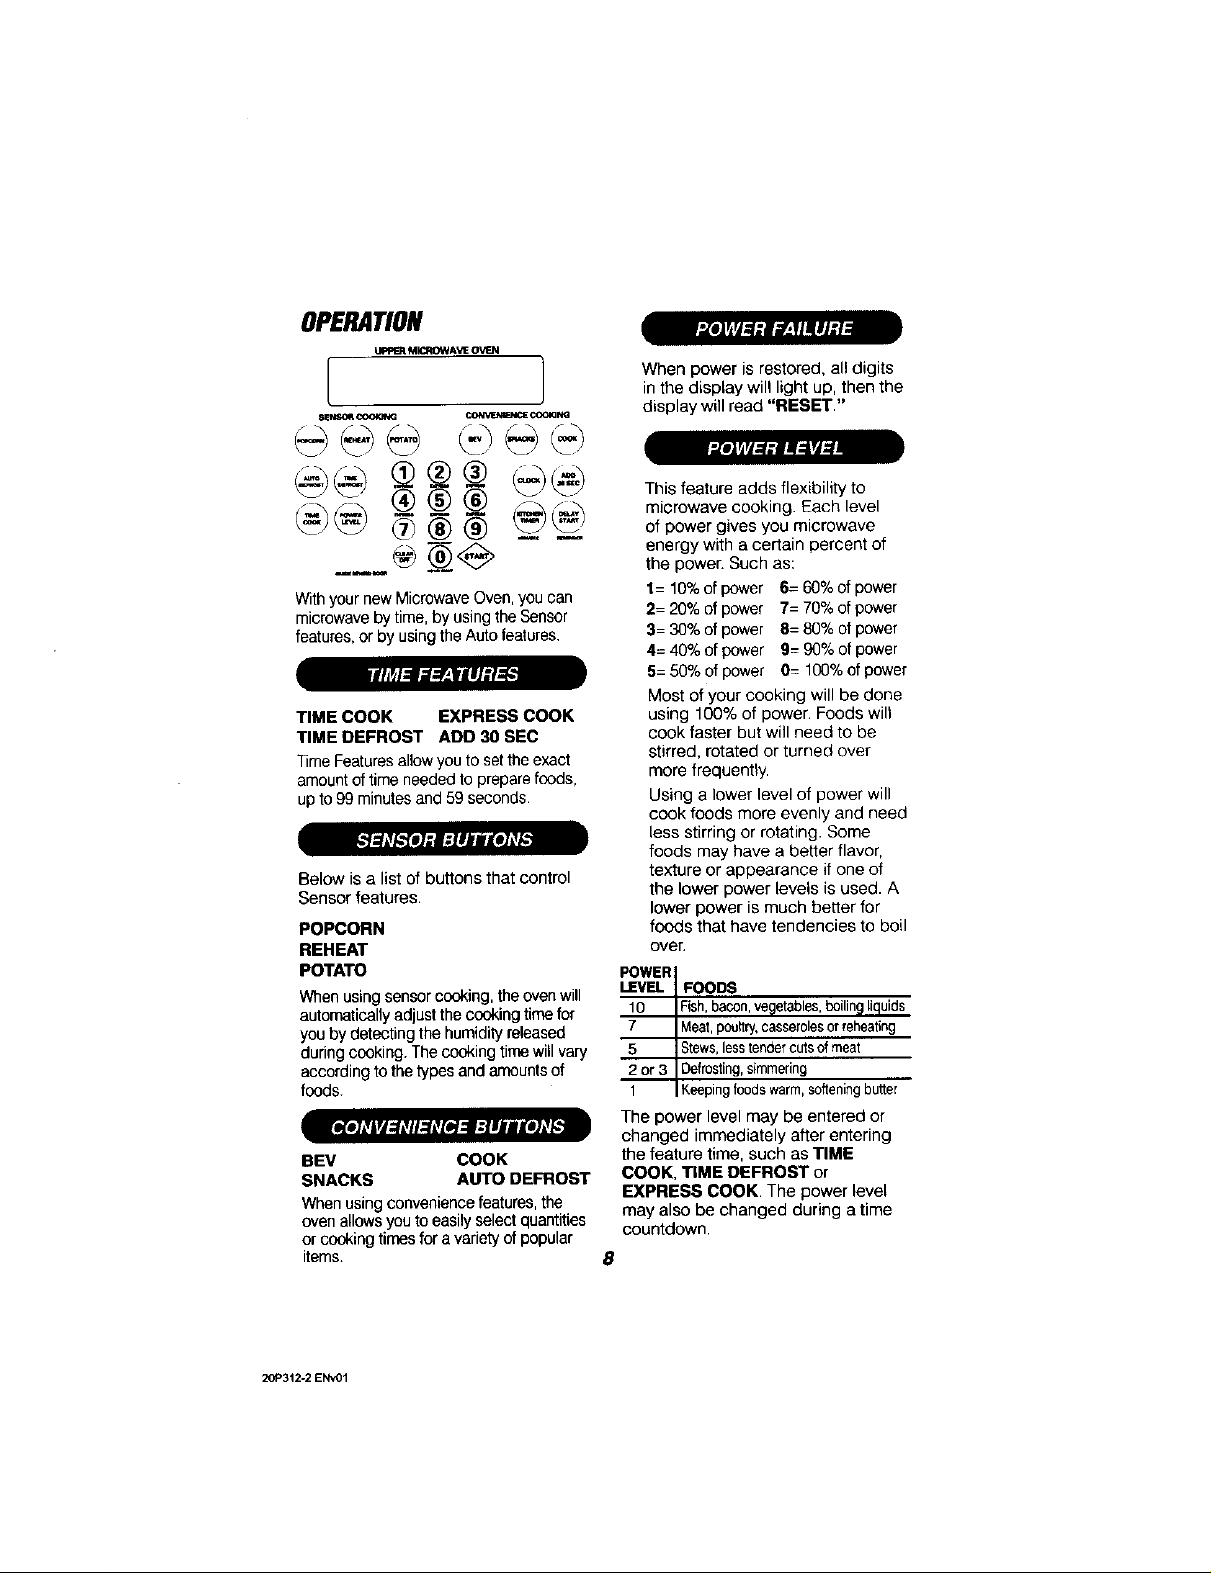
Withyournew MicrowaveOven,you can
microwaveby time, by using the Sensor
features,or by usingthe Auto features,
TIME COOK EXPRESS COOK
TIME DEFROST ADD 30 SEC
TimeFeaturesallowyouto setthe exact
amountoftime neededto prepare foods,
upto 99minutesand 59 seconds.
Below is a list of buttons that control
Sensor features.
POPCORN
REHEAT
POTATO
When using sensor cooking, the oven will IIB/B. FOODS
automatically adjust the cooking time for 10 Fish,bacon,vegetables,boilingliquids
you by detecting the humidity released 7 Meat,poultry+casserolesorreheating
during cooking. The cooking time will vary 5
according to the types and amounts of 2or3 Defrosting,simmering
foods. 1 Keepng foodswarm,softeningbutter
BEV COOK
SNACKS AUTO DEFROST
Whenusingconveniencefeatures,the
ovenallowsyou to easilyselect quantities
or cookingtimesfor avariety of popular
items.
in the display will light up, then the
display will read "RESET."
This feature adds flexibility to
microwave cooking. Each level
of power gives you microwave
energy with acertain percent of
the power. Such as:
1= 10%of power 6= 60%of power
2= 20% ofpower 7= 70%of power
3= 30% ofpower 8= 80% of power
4= 40% ofpower 9= 90% ofpower
5=50%of power 0= 100%of power
Most of your cooking will be done
using 100% of power. Foods will
cook faster but will need to be
stirred, rotated or turned over
more frequently.
Using a lower level of power will
cook foods more evenly and need
less stirring or rotating. Some
foods may have a better flavor,
texture or appearance if one of
the lower power levels is used. A
lower power is much better for
foods that have tendencies to boil
over,
POWER Stews,lesstendercutsofmeat
The power level may be entered or
changed immediately after entering
the feature time, such as TIME
COOK, TIME DEFROST or
EXPRESS COOK, The power level
may also be changed during a time
countdown,
8
2OP312-2 ENv01

OPERATION
1. Pressthe TIME COOKpad or the
TIME DEFROSTpad.
2. Pressthe NUMBERpadsto seta
cookingor defrosting time
3. Pressthe POWERLEVELpad.
4. Pressa NUMBERpad to setthepower
levelyou need.
5. Pressthe STARTpad
TIME COOK GUIDE
(Use power level 10 unless noted)
VEGETABLE
Beans
_(esh)
[frozen)
Broccoli
(fresh)
(frozenchopped)
_mts
(fresh,sliced',
(frozen)
Cornonthe
cob
(fresh}
(frozen)
Mixedreg.
(frozen)
Peas
(fresh,shelled)
(frozen)
potatoes
fresh, cubed,
white
flesh,whole,
sweetorwhite
WEIGHT
11b
10ozpackage
1 bunch
P/. to1V2Ibs.)
10 oz. package
10oz. package
10oz. package
1to 5 ears
ear
2to6ears
10oz. package
2Ibs.unshelled
10oz. package!
4 potatoes
6 to8 oz.each)
t (6to8oz)
COOKING'lIME
10to 15 min.
4toBmin
5 to9 rain.
4to7 min.
4to 8 rain.
i 3to 7 min.
1_hrnin.perear
3to 6 rain.
2to3rain.perear
2to6min.
7 to 10 min,
2to6 min.
9to 12 min.
1to 4 min.
TIME COOK1 isautomaticallysetfor
powerlevel 10,but youcan change this
levelto oneyouprefer.Youmayseta
cookingtime up to99 minutesand 59
seconds.
1. Pressthe TIMECOOK pad
2. Pressthe NUMBERpadsto enteryour
preferredcooking time
3. Ifyou wishto changethe power level,
pressthe POWERLEVELpad and
thenpress aNUMBER pad to select
yourpreferred powerlevel.
4. Pressthe STARTpad
Ifyouopen the ovendoor duringcooking
tocheck foods, when the door isclosed
pressthe STARTpad to continue
cooking.
COMMENTS
In 1_qt. casserole,place V2cup water
in 1-qt.casserole, place2 tablespoons water
In2-qt, casserole,place '/2cupwater
In 1-qt.casserole.
In 1_/z_!t. casserole,place V4cup water.
In 1-qt.casserole, place 2 tablespoonswater
In 2-qt.obtong glass baking dish, placecorn. If con
is in no water,huskcorn and add V4cup water.
Rearrangeafter halfthetime,
Place in 2-qt. oblong glass baking dish. Cover with
vented plastic wrap. Rearrangeafterhaftthe time,
In 1-qhcasserole,place 3tablespoonswater.
In 1-qt.casserole,place _ cup water
In 1-qt.casserole,place 2 tablespoonswater
Peelandcut into 1-inchcubes. Place in 2-qt.
casserolewithV2cupwater.Stirafter halfthe time.
Piercewith cooking fork.Place in centerof the oven
Let stand5 minutes
9
20P31_2ENv01
OPERATION
TimedCooking
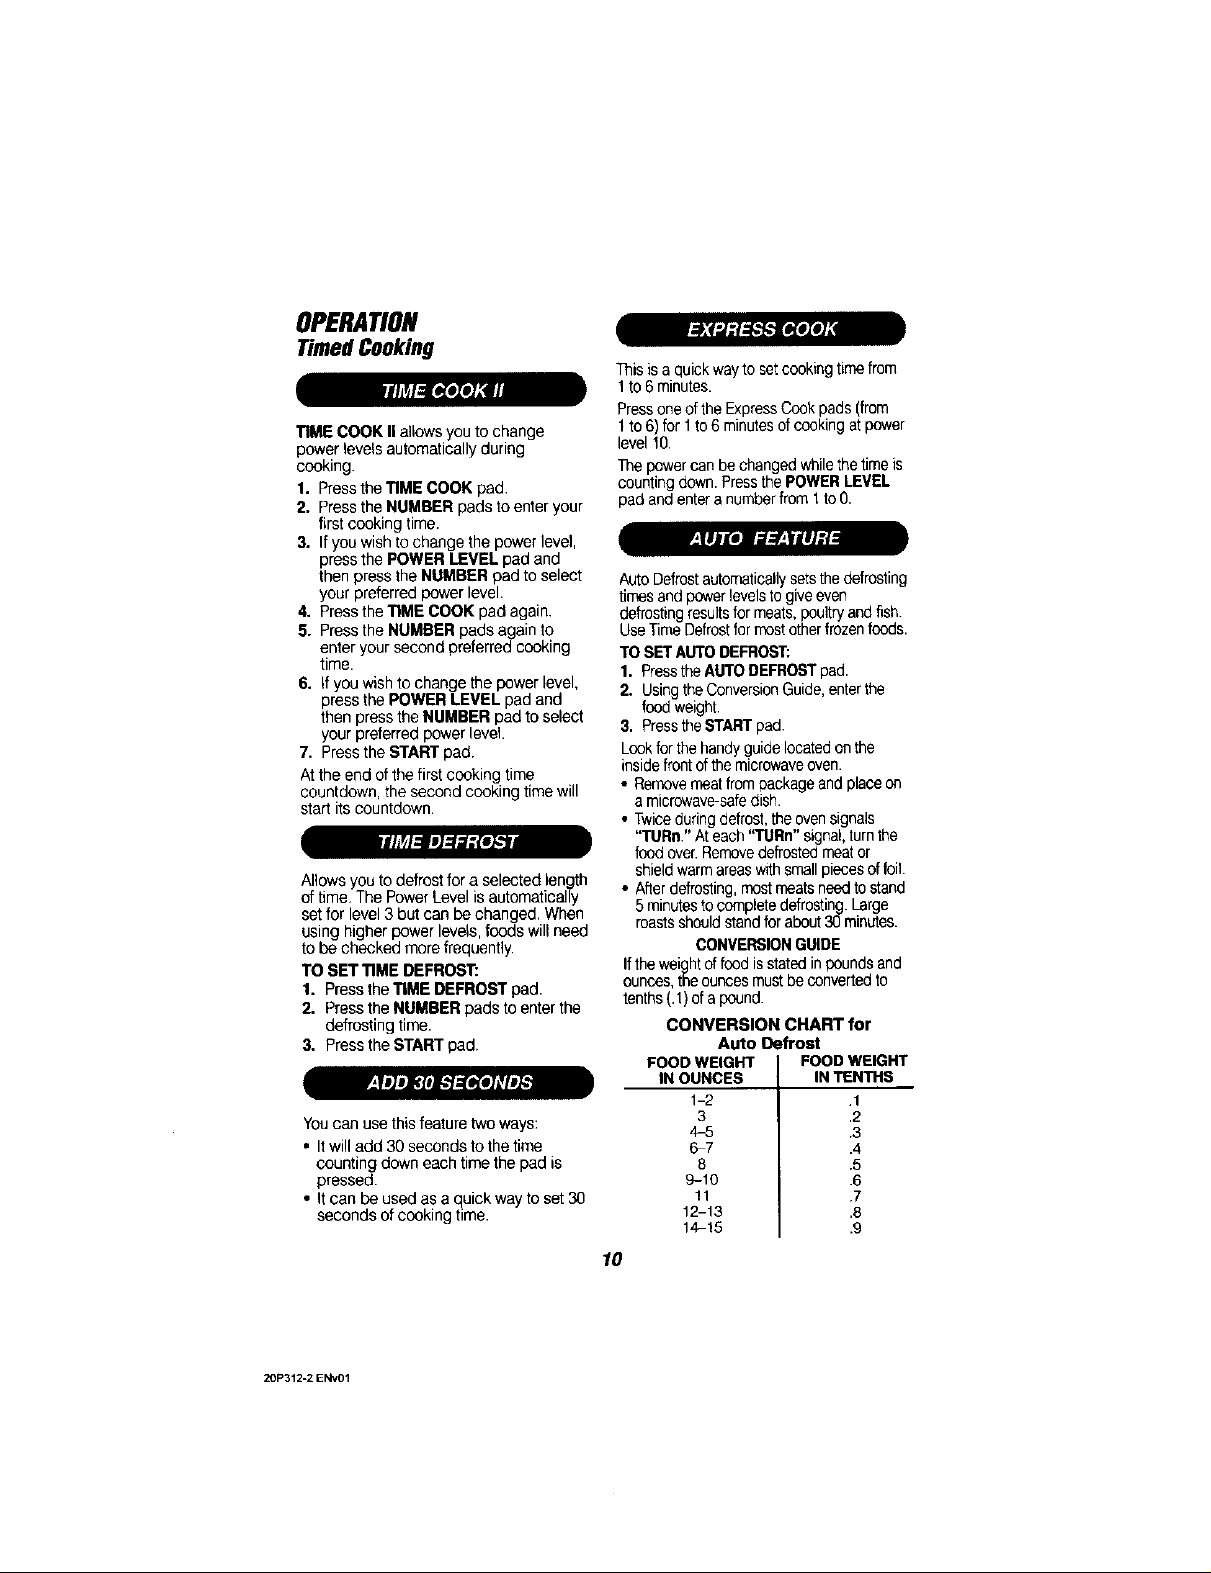
TIME COOKII allowsyou to change
powerlevelsautomaticallyduring
cooking.
1. PresstheTIME COOKpad
2. PresstheNUMBERpads to enter your
firstcooking time.
3. If you wishto changethe power level,
pressthe POWERLEVELpad and
thenpress the NUMBERpad to select
your preferredpower level
4. Pressthe TIME COOKpadagain
5. Pressthe NUMBERpadsagain to
enter yoursecond preferredcooking
time.
6. If you wishto changethe power level,
pressthe POWERLEVEl. padand
thenpress the NUMBERpad to select
yourpreferred powerlevel.
7. Pressthe STARTpad
Atthe end ofthe first cookingtime
countdown,the secondcooking time will
startits countdown.
lllh'd..'Oe]..%7+/o/..'_IrJ
Allowsyou to defrostfor a selectedlength
of time,The PowerLevelis automatically
setfor level3 but can be changed, When
using higherpower levels,foods will need
to be checked morefrequently
TO SETTIME DEFROST:
1. Pressthe TIME DEFROSTpad.
2. Pressthe NUMBERpadsto enterthe
defrosting time,
3. Pressthe STARTpad.
A
Ir,Je]m]Fcrdf**].,_e]_?lm],.']
Youcanusethisfeature twoways:
• It will add 30 secondstothe time
counting down eachtimethe pad is
pressed.
• It can be used as aquick way toset 30
seconds ofcookingtime.
Thisisaquick wayto setcookingtimefrom
1to6minutes.
PressoneoftheExpressCookpads(from
1to 6) for 1to 6minutesofcookingatpower
level10,
Thepowercanbechangedwhilethetimeis
countingdown.PressthePOWERLEVEL
padandenteranumberfrom1to0+
AutoDefrostautomaticallysetsthedefrosting
timesandpowerlevelstogiveeven
defrostingresultsformeats,poultryandfish.
UseTimeDefrostformostotherfrozenfoods.
TOSETAUTODEFROST:
1. PresstheAUTODEFROSTpad.
2. UsingtheConversionGuide,enterthe
foodweight.
3. PresstheSTARTpad.
Lookforthehandyguidelocatedonthe
insidefrontofthemicrowaveoven.
• Removemeatfrompackageandplaceon
amicrowave-safedish.
• Twiceduringdefrost,theovensignals
"TURn."Ateach"TURn"signal,turnthe
fondover.Removedefrostedmeator
shieldwarmareaswithsmallpiecesoffoil.
• Afterdefrosting,mostmeatsneedtostand
5minutestocompletedefrosting.Large
roastsshouldstandfor about30minutes.
CONVERSIONGUIDE
Iftheweightoffoodisstatedinpoundsand
ounces,theouncesmustbeconvertedto
tenths(.1)ofa pound.
CONVERSION CHART for
FOOD WEIGHT FOOD WEIGHT
Auto Defrost
IN OUNCES IN TENTHS
1-2 ,1
3 .2
_7 .4
8 .5
9-10 .6
11 .7
12-13 .8
14-15 .9
10
20P312-2 ENv01
OPERATION
TimedCooking
F0qO
Breads, Cakes
Buns and roils
Sweet rolls
Fish and Seafood
Fillets, frozen (! Ib)
Shellfish,smallpiecesI1Ib)
Meat
Bacon (1 Ib,)
Franks(lib.)
Ground meat (1 Ib)
Roast:beef.lamb,veaL,pork
Steaks,chops and
cutlets
PouHry
Chicken, broiler,fryer
cut up (2V2to 3 Ibs)
Chicken,whole
(2V2to 3 Ibs)
Cornish Hen
Turkeybreast
(4 to 6 ths.)
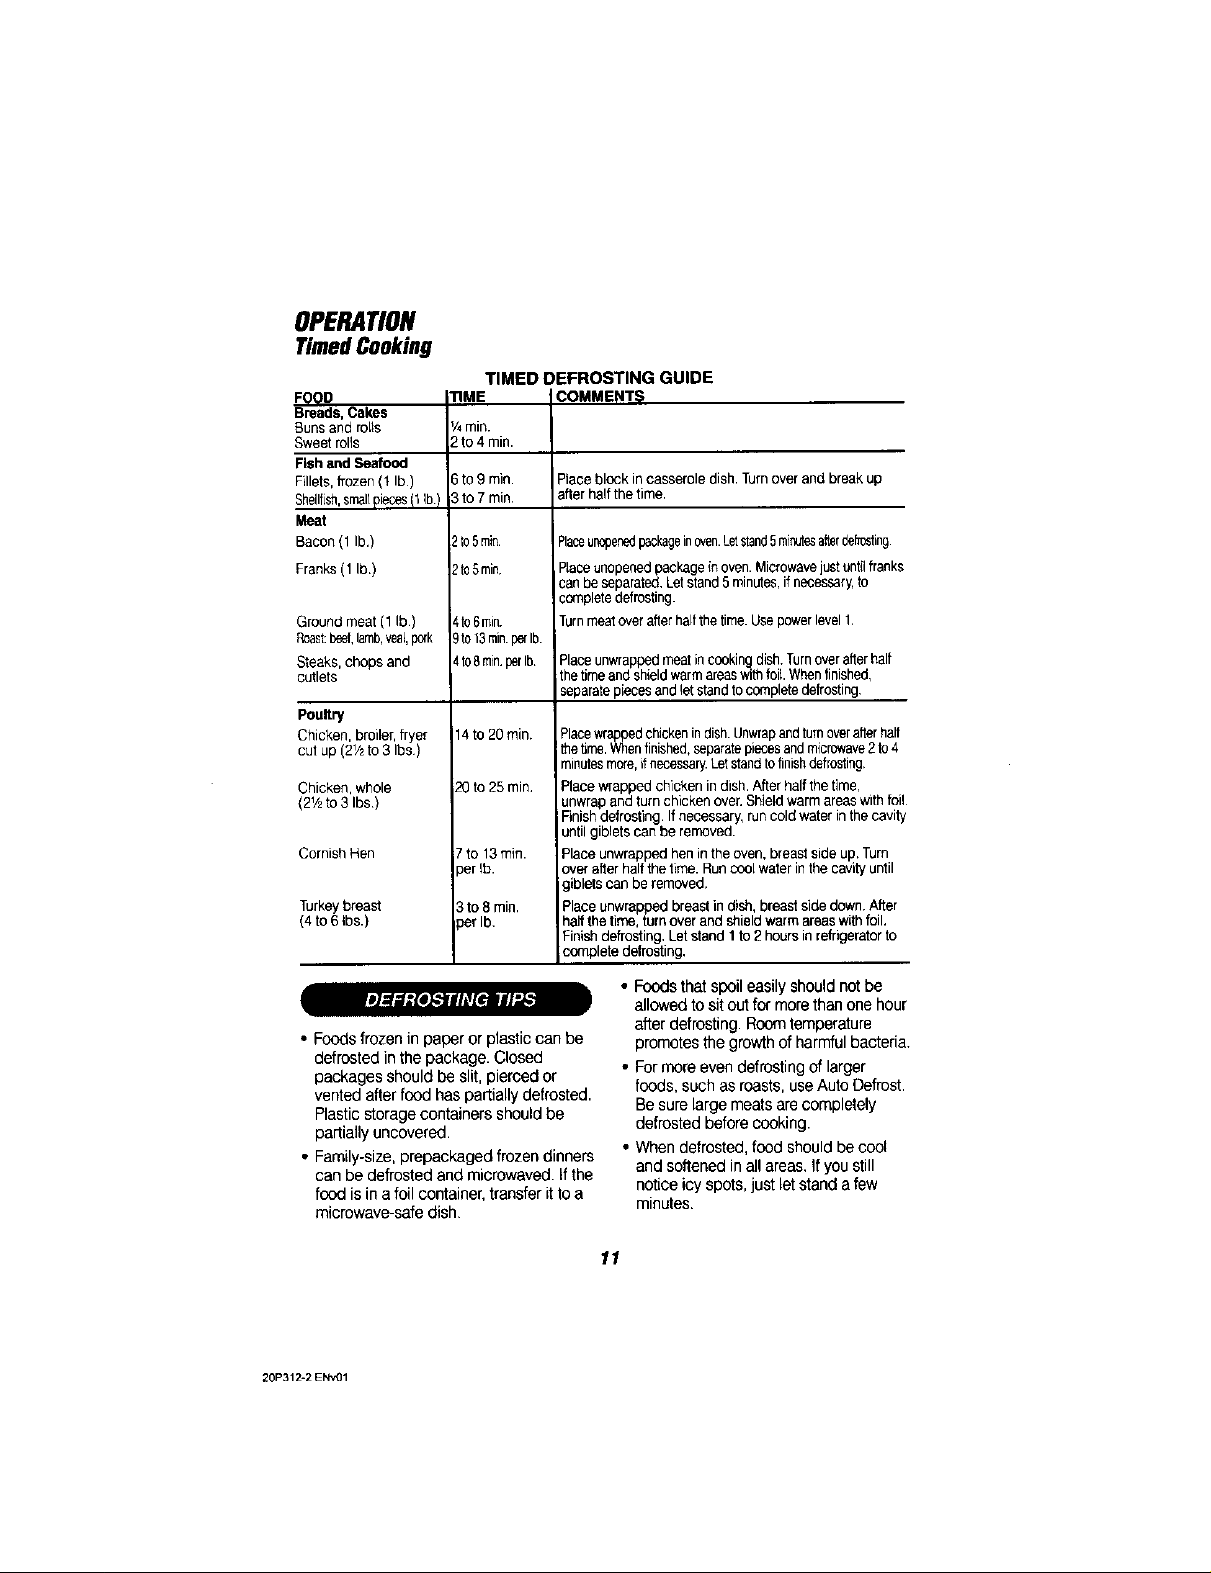
TIMED DEFROSTING GUIDE
TIME COMMENTS
V4min.
2to 4 min.
6to 9 min. Place block incasserole dish.Turnoverand breakup
to 7 min, after halfthetime,
2 to5rnin. Placeu_penedpackageinoven.Letstand5 minutesgterpahosfin9
tto5min, Placeunopenedpackageinoven.Microwavejustuntilfranks
Ire6rain. Turnmeatoverafterhaltthe time.Usepowerlevel1,
)to13min.palb.
to8rain,parlb. Placeunwrappedmeatincookingdish.Turnoverafterhalf
14to 20 min. Placewrappedchickenindish.Unwrapandturnoverafterhalf
20to 25 min, Placewrapped chicken in dish.Afterhalfthetime,
7to 13 rain. Place unwrappedhen intheoven.breastside up.Turn
_erlb. over after halfthe time. Runcool waterinthe cavity until
to 8min, Placeunwrapped breast in dish,breast sidedown. After
_erlb. halfthetime, turnoverand shield warm areaswithfoil,
canbeseparated,Letstand5minutes,ifnecessary,to
completedefrosting.
thetimeandshieldwarmareaswithfoil.Whenfinished,
separatepiecesand_etstandtocompletedefrosting,
thehme.Whenfinished,separatepiecesandmicrowave2 to4
minutesmore,Ifnecessary.Letstandtofinishdefrosting.
unwrapandturn chicken over,Shield warmareaswith foil
Finishdefrosting. Ifnecessary,runcold waterin the cavity
untilgiblets can be removed.
giblets can beremoved.
Finishdefrosting, Let stand 1to2 hours inrefrigeratorto
complete defrosting,
• Foods frozenin paper or plastic can be
defrostedin thepackage. Closed
packages shouldbe slit, piercedor
ventedafter foodhas partiallydefrosted.
Plasticstoragecontainers shouldbe
partiallyuncovered.
• Family-size,prepackagedfrozendinners
can be defrosted and microwaved.If the
food is in afoil container,transferit toa
microwave-safedish
20P312-2ENV01
• Foodsthat spoileasilyshouldnot be
allowedtosit out for morethanone hour
afterdefrosting.Roomtemperature
promotesthe growthof harmfulbacteria.
• Formoreeven defrostingof larger
foods,such as roasts,useAuto Defrost
Be surelarge meatsarecompletely
defrostedbefore cooking.
• Whendefrosted,food should becool
and softenedinall areas,Ifyou still
noticeicy spots,just let standa few
minutes.
11

OPERATION
SensorCooking
TheSensorFeaturedetectsthe increasing
humidityreleasedduring cooking.The
ovenautomaticallyadjuststhecooking
time tovarioustypes and amountsof food
• The propercontainers andcovers are
essentialfor best sensorcooking
• Alwaysuse microwave-safecontainers
andcover themwith lidsor vented
plastic wrap. Never usetight-sealing
plastic containers,which can prevent
steamfromescaping and causefoodto
overcook,
• Be surethe outside ofthe cooking
containersand the inside ofthe
microwaveovenare dry beforeplacing
food in the oven. Beadsof moisture
turning intosteamcan misleadthe
sensor
Use onlywith prepackaged microwave
popcorn weighing 1.75to 3.5 ounces,
TO USE THE POPCORNFEATURE:
Followpackage instructionsusingTIME
COOK ifthe package is lessthan 1.75
ouncesor largerthan 3.5 ounces.Piecethe
packageof popcorn in the centerofthe
microwave.
1. Pressthe POPCORNpad.
if youopen the door while"POP" is in the
display,"ERROR" will appear.Close the
door and pressthe STARTpad.
2. HOW TOADJUSTTHE POPCORN
PROGRAMTO PROVIDEA SHORTER
OR LONGERCOOKTIME:
Ifyoufind thatthe brand of popcorn
you use underpops or overcooks
consistently,youcan add or subtract
20to 30 secondsto/fromthe automatic
popping time.
TO ADDTIME:
After pressingthePOPCORNpad, press
9 immediatelyafterthe ovenstarts for an
extra 20seconds, Press9 againto add
another 10seconds (total 30 seconds
additionaltime).
TO SUBTRACTTIME:
After pressingthe POPCORNpad, press
1immediatelyafter the ovenstartsfor
20 secondsless cooking time,Press1
againto reducecooking time another10
seconds(total 30seconds lesstime).
TheReheatFeaturereheatssingle
servingsof previouslycooked foodsor a
plateof leftovers.
1. Placecovered food intheoven,
2. Pressthe REHFJ&Tpad. Theovenwill
start immediately,
3. The ovensignalswhen steamis
sensedand thetimeremainingbegins
counting down.
Do not openthe oven door untiltime is
finishedcounting down, If the door is
opened, closeit and pressthe START
padimmediately.
After removingfood fromthe oven,stir,if
possible,to evenoutthe temperature,if
the food is not hot enough,usethe TIME
COOKpad to reheatformore time,
Reheatedfoodsmay havewide
vedatlon intemperature.Some areas
maybe extremelyhot.
FOODSNOT RECOMMENDEDFOR
REHEATING:
• Bread Products
• Foodsthat mustbereheated uncovered
• Foodsthat needto be stirred
• Foodsthat call fora dry lookor crisp
surface after reheating
ThePotatoFeaturecooksYzto2 Ibs.of
potatoes
1. Pierceskinwithforkandplacepotatoeson
theturntable.Ifcookingthreeor more
potatoes,arrangeinastarpattern.
2. PressthePOTATOpad.Theovenstarts
immediately.Theovensignalswhensteam
issensedandthetimeremainingbegins
countingdown.
Donotopentheovendooruntiltimeisfinished
countingdown.Ifthedoorisopened,closeit
andpresstheSTARTpadimmediately.Iffood
isnotdoneenough,usetheTIMECOOKpad
12 tocookformoretime.
20P312-2 ENVOI
OPERATION
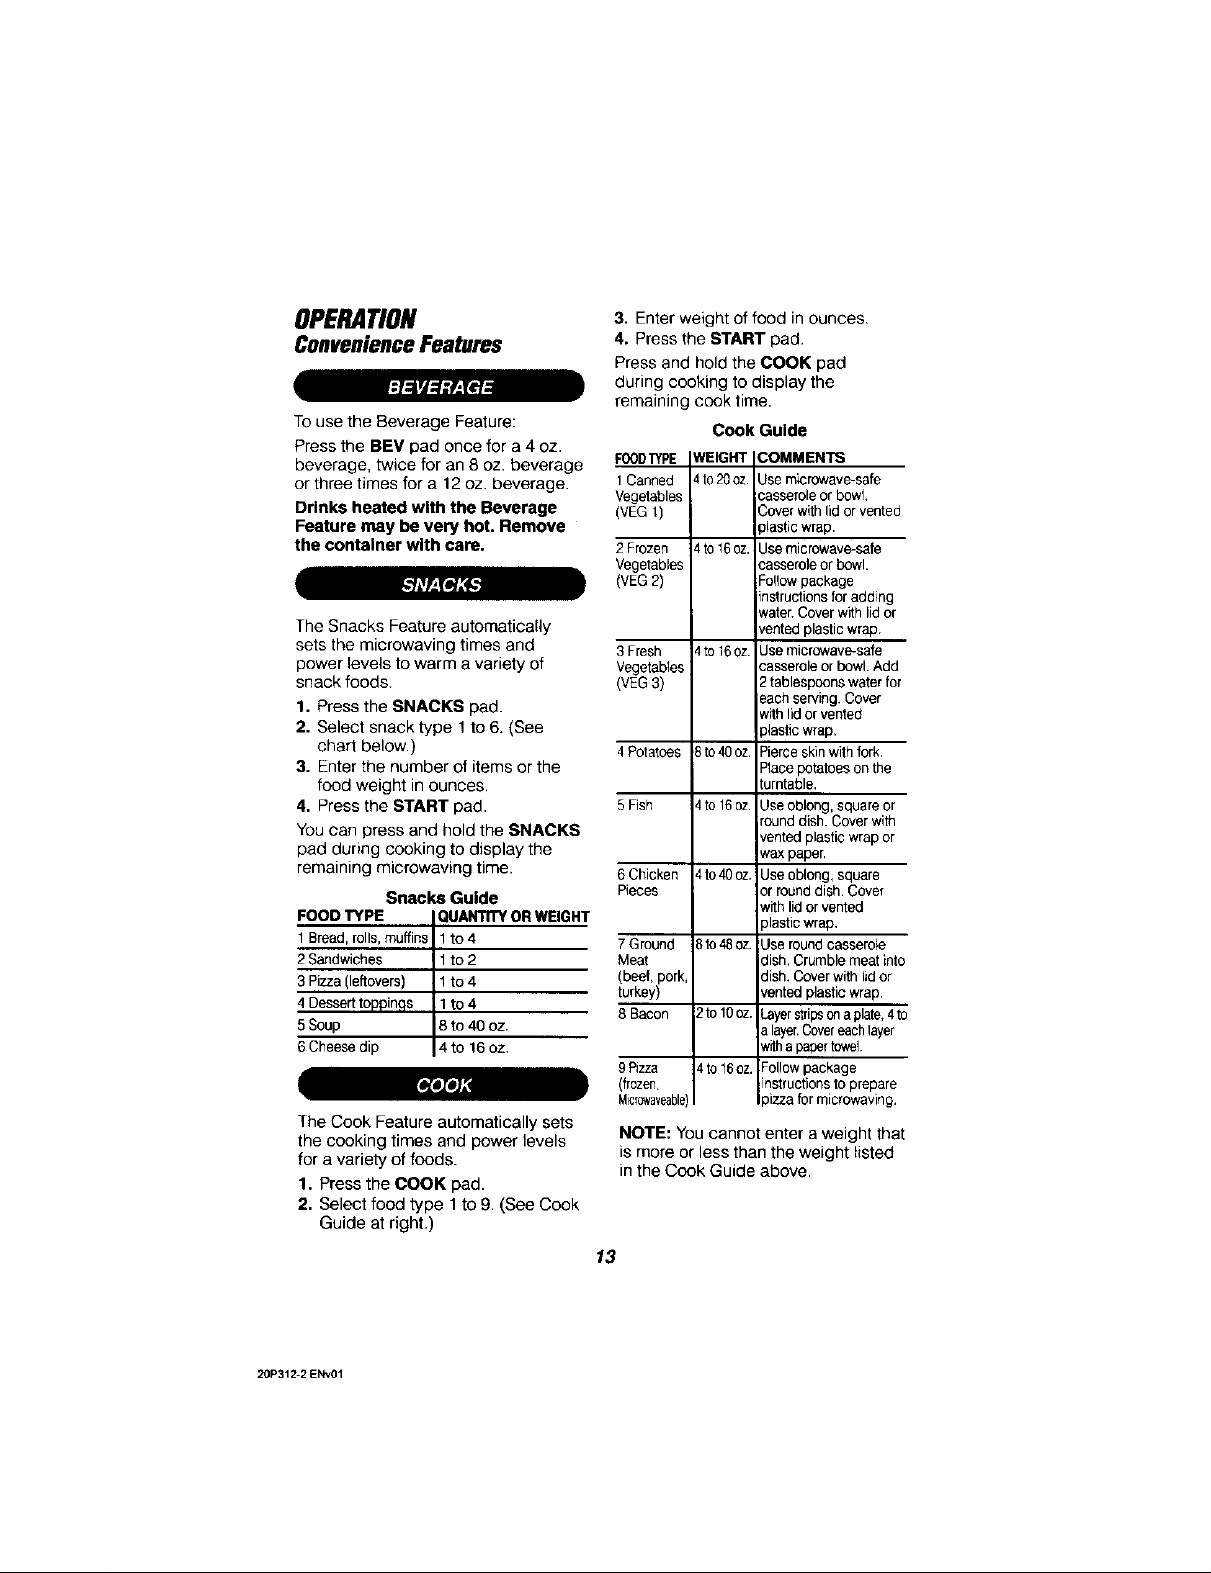
ConvenienceFeatures
To use the Beverage Feature:
Press the BEV pad once for a 4 oz.
beverage, twice for an 8 oz. beverage
or three times for a 12 oz. beverage.
Drinks heated with the Beverage
Feature may be very hot. Remove
the container with care.
The Snacks Feature automatically
sets the microwaving times and
power levels to warm a variety of
snack foods.
1. Press the SNACKS pad.
2. Select snack type 1 to6. (See
chart below.)
3. Enterthe number of items or the
food weight in ounces.
4, Press the START pad.
You can press and hold the SNACKS
pad during cooking to display the
remaining microwaving time.
FOOD TYPE
1Bread, rolls, muffins
2 Sandwiches
3 Pizza(leftovers)
4 Desserttoppin£s
5 Soup
6 Cheesedip
J
The Cook Feature automatically sets
the cooking times and power levels
for a variety of foods.
1, Press the COOK pad.
2. Select food type 1 to 9. (See Cook
Guide at right.)
Snacks Guide
QUANTITYOR WEIGHT
to4
to 2
to 4
lto4
8to 40oz.
4to 16 oz.
[_oXa_1
3. Enter weight of food in ounces
4. Press the START pad.
Press and hold the COOK pad
during cooking to display the
remaining cook time.
Cook Guide
FOODTYPE
1Canned
Vegetables
(VEG t)
2 Frozen
Vegetables
(VEG2)
3Fresh
Vegetables
(VEG3)
4Potatoes
5 Fish
6 Chicken
Pieces
7 Ground
Meat
(beef, pork
turkey)
8 Bacon
9 £_zza
(frozen,
Miclc_aveable)
YEIGHT COMMENTS
Ito20oz. Use microwave-safe
Ito16oz. Jse microwave-safe
Ito 16oz. Jse microwave-safe
3to40 oz Pierceskin with fork.
]to 16oz Useoblong, square or
_fo40oz Useoblong, square
3to48oz Useroundcasserole
2to 10oz Layerstripsonaplate,4to
4to 16oz Followpackage
;asseroleor bowl,
_overwith lid or vented
Jlasticwrap.
.'asseroleor bowl.
:o!lowpackage
nstructionsfor adding
t_ater.Cover with lid or
_entedplastic wrap
.'asseroleor bowl. Add
2tablespoonswater for
eachserving.Cover
withlid or vented
plasticwrap.
Placepotatoes on the
turntable.
rounddish.Cover with
ventedplastic wrap or
waxpaper,
or rounddish.Covet
with lid or vented
plasticwrap,
dish.Crumble meatinto
dish.Cover with lid or
ventedplastic wrap.
alayer.Covereachlayer
withapapertowel
instructionsto prepare
)izzafor microwaving,
NOTE: You cannot enter a weight that
is more or less than the weight listed
in the Cook Guide above.
13
20P312-2 ENv01

OPERATION
OtherFeatures
Press the CLOCK pad to enter the
time of day or to check the time of
day while microwaving.
To Set the Clock:
1. Press the CLOCK pad.
2. Enter the time of day.
3. Press the START or CLOCK pad.
Press the KITCHEN TIMER MIN/SEC
pad to set the timer up to 99 minutes
and 99 seconds. Press the number
pads to set the time. Press the
KITCHEN TIMER MIN/SEC pad again
to start. Pressthe KITCHEN TIMER
MIN/SEC pad twice to clear the
display,
Using the Kitchen Timer does not turn
on the microwave energy.
The reminder feature can be used like
an alarm clock.
1. Press the REMINDER pad.
2. Enter the time of day you want the
oven to remind you. (Be sure the
microwave clock shows the correct
time of day.)
3. Press the START pad.
When the Reminder Signal occurs,
press the CLEAR/OFF pad to turn it
off. The Reminder time may be
displayed by pressing the
REMINDER pad.
NOTE: The REM indicator will remain
lit to show that the Reminder Feature
is set. To clear the Reminder before it
occurs, press the CLEAR/OFF pad.
The REM indicator light will go off.
Toturn the clock display on or off,
press and hold the 0 pad for about
3 seconds. The DISPLAY ON/OFF
feature cannot be used while the
cooking features are being used.
Delay Start allows you to set the
microwave to delay the start time of
cooking
1. Press the DELAY START pad.
2. Press the NUMBER pads to select
the time of day you want the oven
to turn on and start cooking. Make
sure the clock is showing the
correct time of day.
3. Select'liME DEFROST, AUTO
DEFROST or TIME COOK, Enter
the amount of defrost or cook time,
or weight of food for Auto Defrost.
4. Press the START pad.
The Delay Start time will be showing
in the display plus Start Time. The
oven will automatically start at the
delayed start time set. The time of day
may be displayed by pressing the
CLOCK pad.
Toturn the control sound on or off,
press and hold the NUMBER 8
SOUND ON/OFF pad for3 to 4
seconds, The display willflash "OFF"
and the display will return to the time
of day. "MUTE" will remain in the
display. To turn the sound back on,
press and hold the NUMBER 8
SOUND ON/OFF pad for 3 to 4
seconds. "ON" will flash in the
display, mute will disappear and the
display will return to the time of day.
14
20P312q ENv01
OPERATION
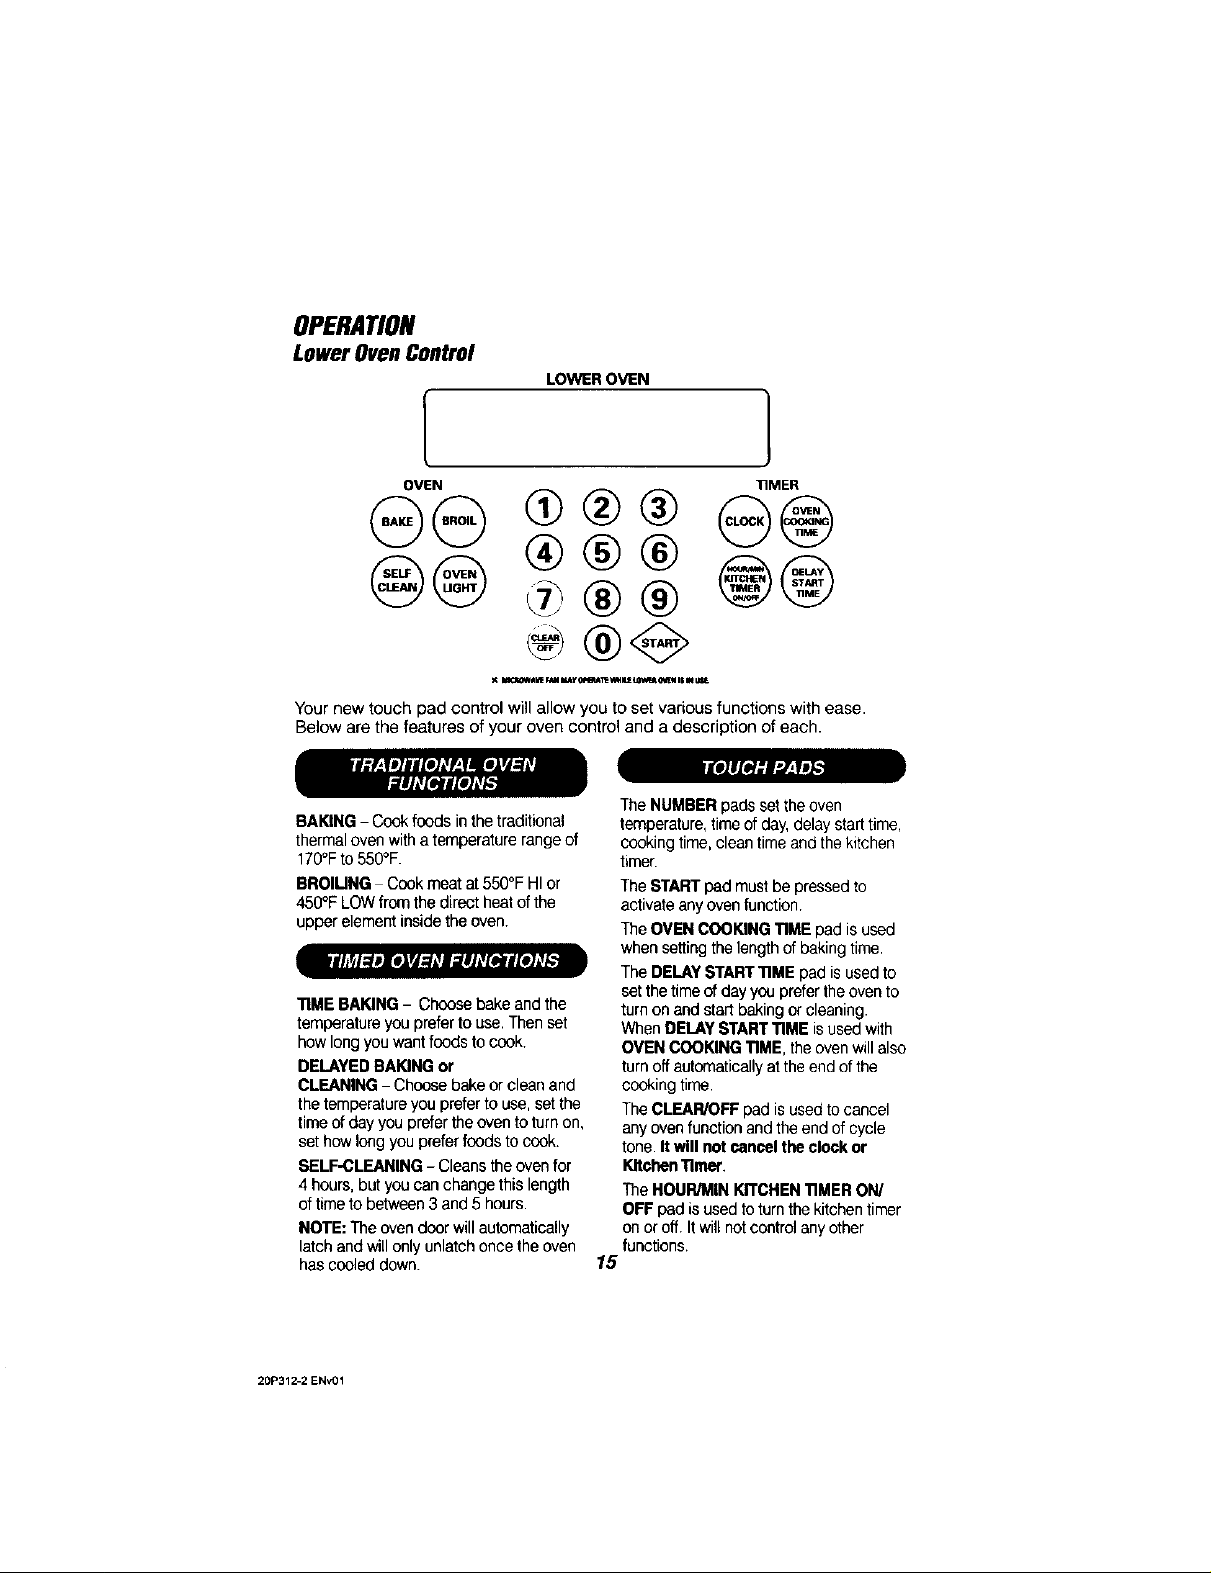
LowerOvenControl
OVEN llMER
LOWEROVEN
@@ ®®®
Your new touch pad control will allow you toset various functions with ease.
Below are the features of your oven control and a description of each.
BAKING - Cookfoods in the traditional
thermaloven witha temperaturerange of
170°Fto 550°F.
BROIMNG Cookmeat at 550°FHI or
450°FLOWfromthe direct heatofthe
upperelement insidethe oven.
TIME BAKING- Choosebake and the
temperatureyou preferto use.Thenset
howlongyou wantfoods to cook.
DELAYEDBAKINGor
CLEANING Choose bake or clean and
thetemperatureyoupreferto use, set the
timeof day you preferthe oventoturn on,
sethowlong youpreferfoodsto cook.
SELF-CLEANING- Cleanstheoven for
4hours, but youcan changethis length
oftime to between3 and 5 hours.
NOTE:The ovendoor will automatically
latch and will onlyunlatchonce theoven
has cooleddown.
®® ®@
The NUMBERpads settheoven
temperature,timeof day,delay starttime,
cookingtime,clean timeand thekitchen
timer
The STARTpadmust be pressedto
activateanyovenfunction.
TheOVENCOOKINGT1MEpad isused
whensettingthelength ofbaking time.
TheDELAYSTARTTIME pad isusedto
setthetimeofdayyou prefertheovento
turnonandstartbakingorcleaning.
WhenDELAYSTARTTIMEisusedwith
OVENCOOKINGTIME,theovenwillalso
turn offautomaticallyatthe end ofthe
cookingtime.
TheCLEAR/OFFpad isused tocancel
anyovenfunctionandthe end of cycle
tone. It will not cancelthe clock or
KitchenTImer.
TheHOUR/MINKITCHENT1MERON/
OFFpad isusedtoturnthekitchen timer
onor off. Itwiltnotcontrolanyother
functions.
15
20P312-2ENv01
OPERATION
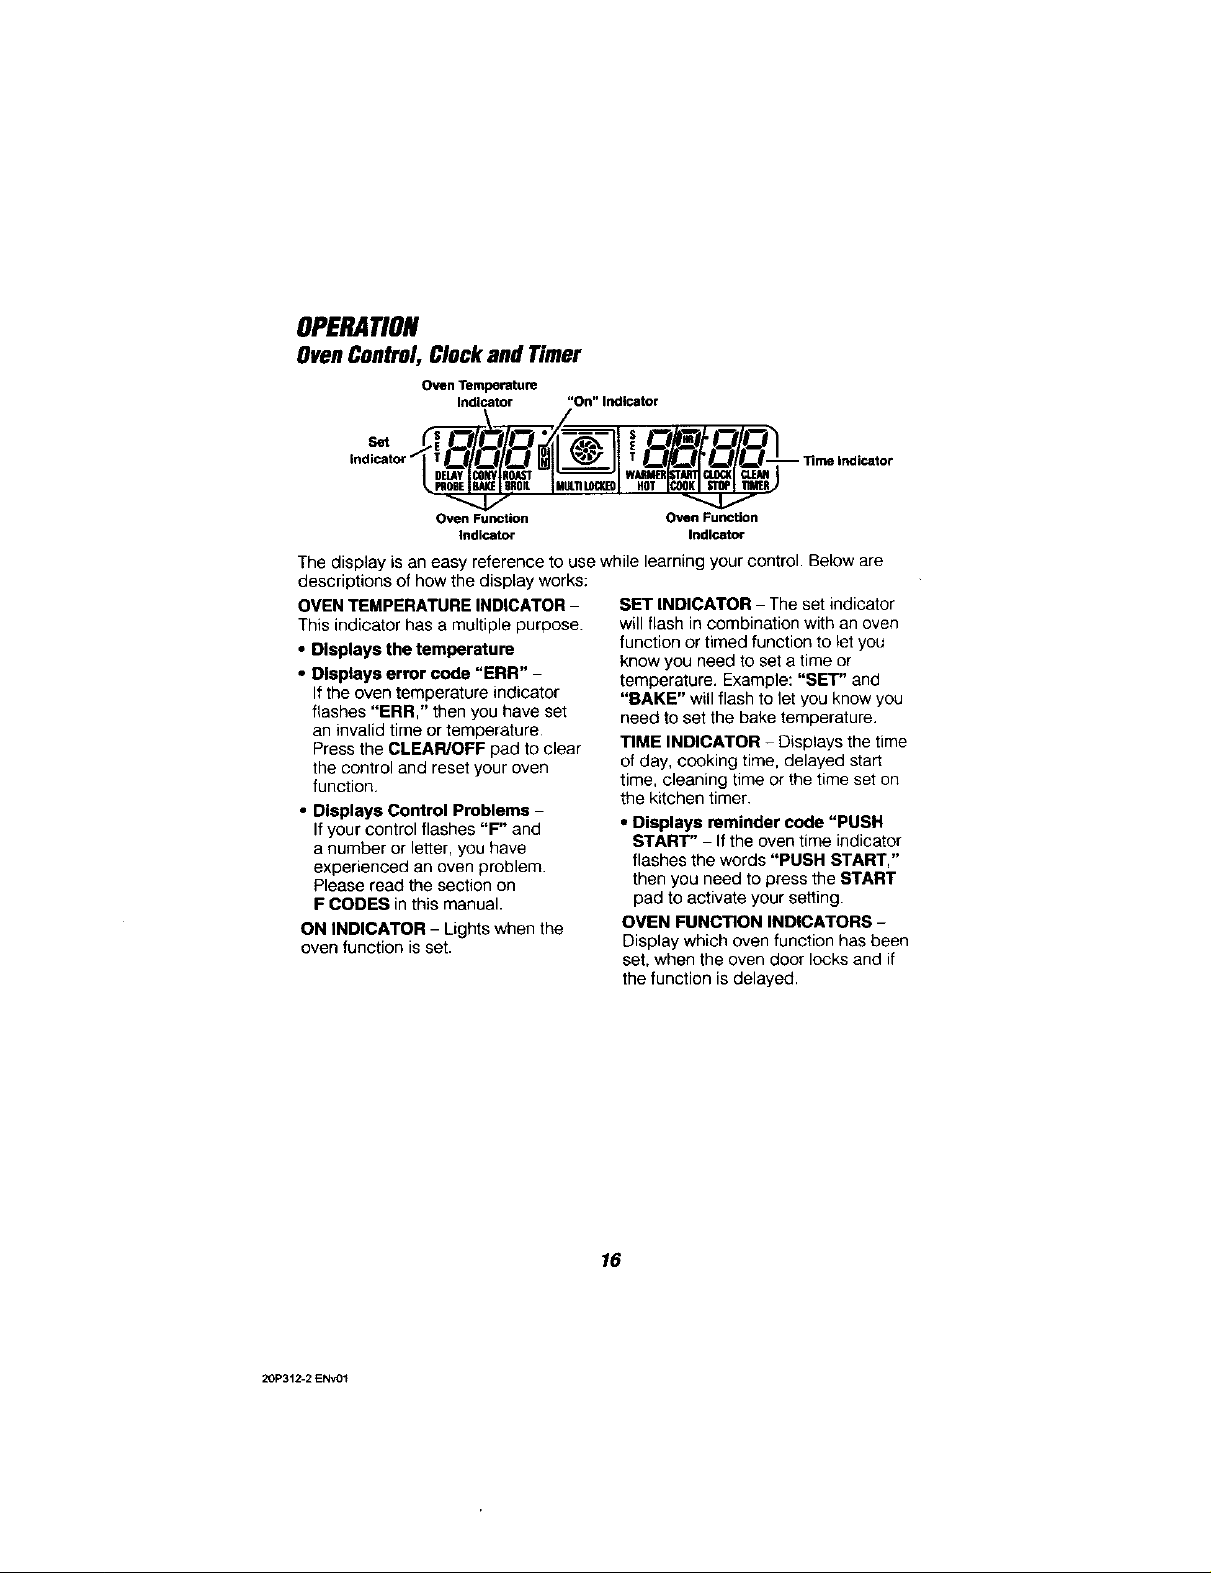
OvenControl,ClockandTimer
Oven Temperature
IndiCator "On" Indicator
Oven Function Oven Function
Indicator Indlcator
The display is an easy reference to use while learning your control. Below are
descriptions of how the display works:
OVENTEMPERATURE INDICATOR -
This indicator has a multiple purpose.
• Displays the temperature
• Displays error code "ERR"
If the oven temperature indicator
flashes "ERR," then you have set
an invalid time or temperature
Press the CLEAR/OFF pad to clear
the control and reset your oven
function,
• Displays Control Problems
If your control flashes "F" and
a number or letter, you have
experienced an oven problem.
Please read the section on
F CODES in this manual.
ON INDICATOR - Lights when the
oven function is set.
SET INDICATOR The set indicator
will flash in combination with an oven
function or timed function to let you
know you need to set a time or
temperature, Example: "SET" and
"BAKE" will flash to let you know you
need to set the bake temperature,
TIME INDICATOR - Displays the time
of day, cooking time, delayed start
time, cleaning time or the time set on
the kitchen timer.
• Displays reminder code "PUSH
START" If the oven time indicator
flashes the words "PUSH START,"
then you need to press the START
pad to activate your setting.
OVEN FUNCTION INDICATORS -
Display which oven function has been
set, when the oven door locks and if
the function is delayed.
20P312-2 ENVOI
16
OPERATION
ClockandTimer
The clock must be set for the correct
timeof day before a delayed oven
function can work properly. The time
of day cannot be changed during a
delayed oven function, but can be
changed during a bake or broil
function.
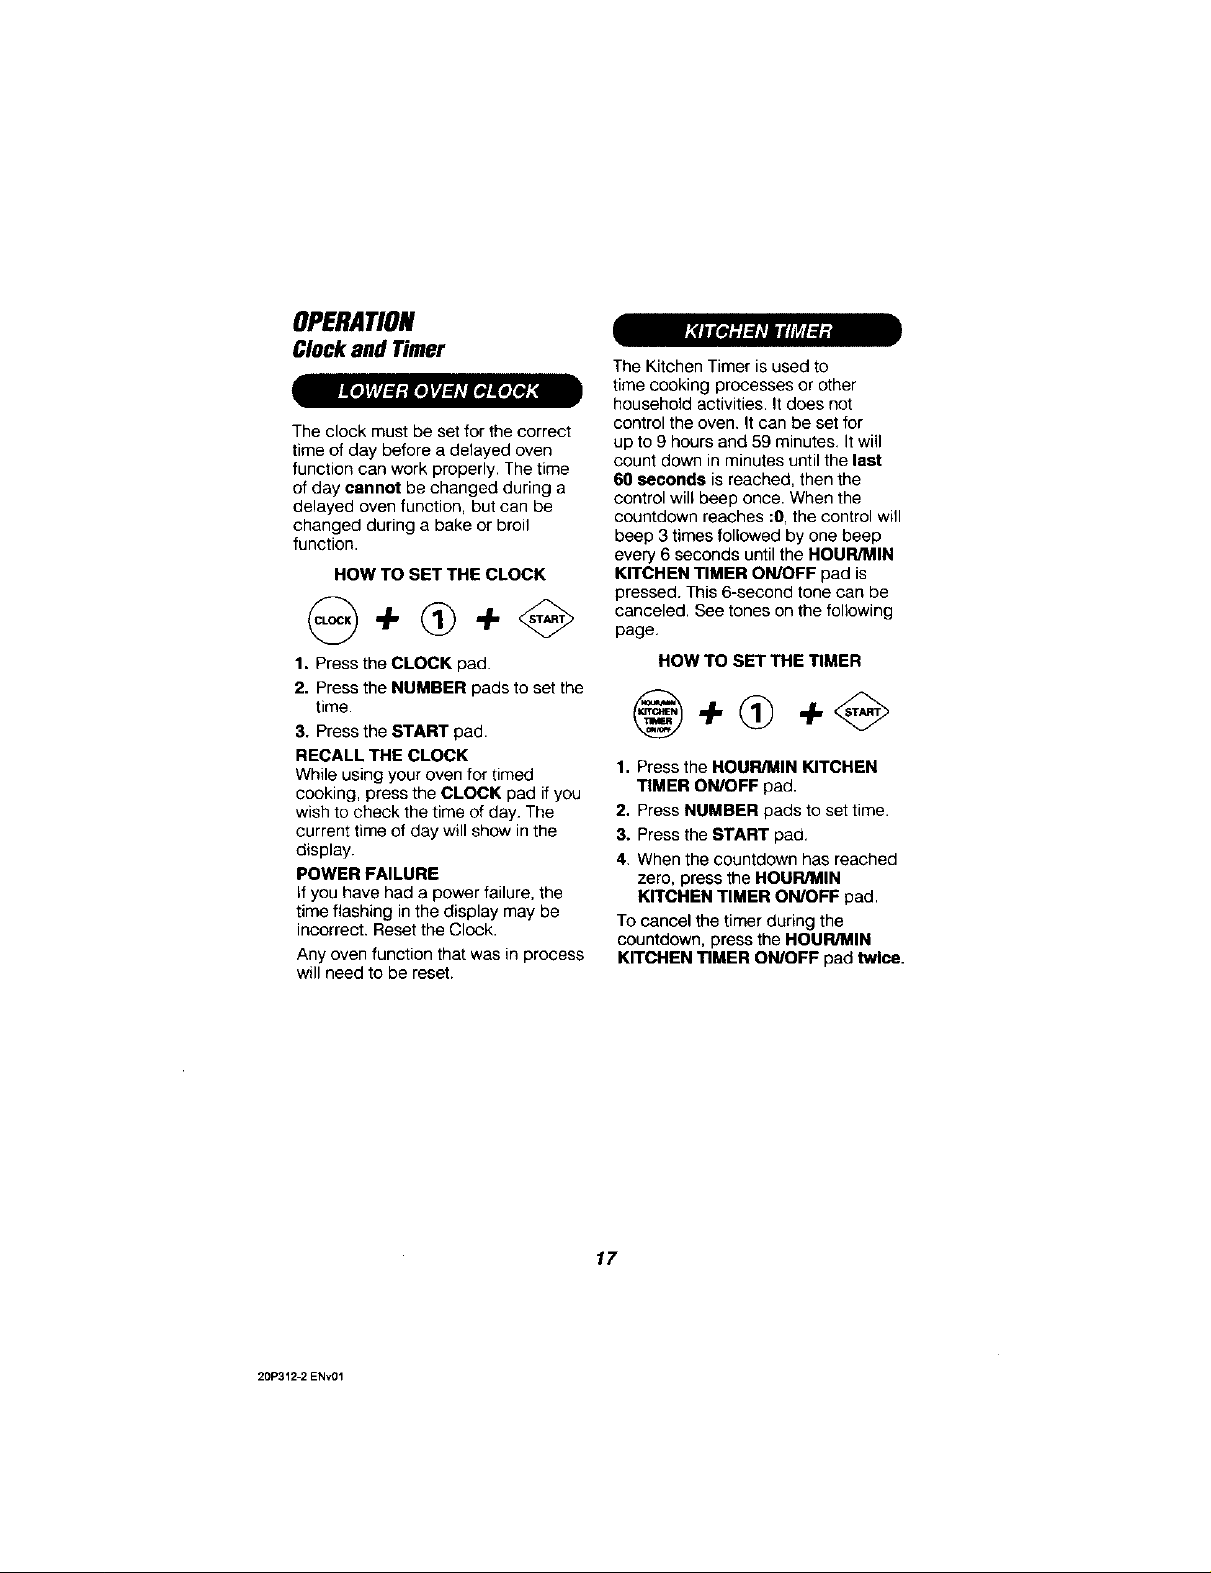
HOW TO SET THE CLOCK
1. Press the CLOCK pad.
2. Press the NUMBER pads to set the
time.
3. Press the START pad.
RECALL THE CLOCK
While using your oven for timed
cooking, press the CLOCK pad if you
wish to check the time of day. The
current time of day will show in the
display.
POWER FAILURE
If you have had a power failure, the
time flashing inthe display may be
incorrect. Reset the Clock.
Any oven function that was in process
will need to be reset.
The Kitchen Timer is used to
time cooking processes or other
household activities. It does not
control the oven. It can be set for
up to 9 hours and 59 minutes, It will
count down in minutes until the last
68 seconds is reached, then the
control will beep once. When the
countdown reaches :0, the control will
beep 3 times followed by one beep
every 6 seconds until the HOUR/MIN
KITCHEN TIMER ON/OFF pad is
pressed. This 6-seeend tone can be
canceled. See tones on the following
page,
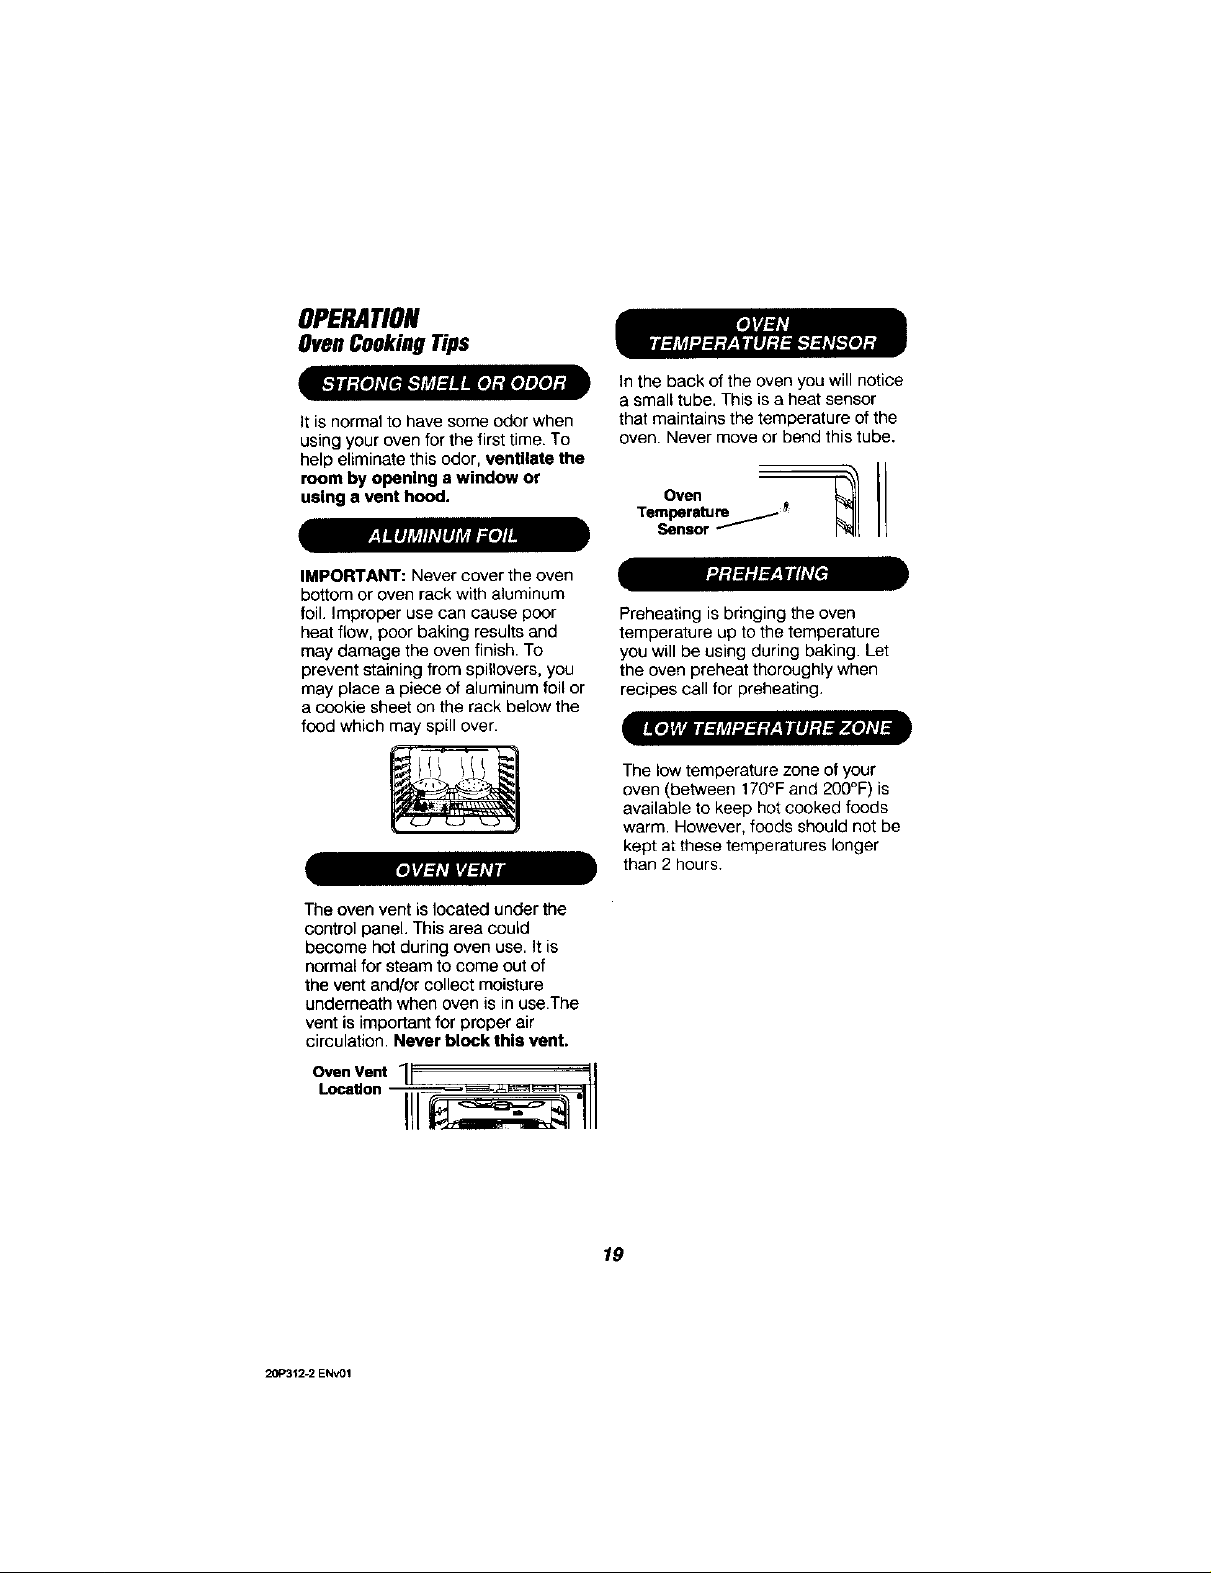
HOW TO SET THE TIMER
1. Press the HOUR/MIN KITCHEN
TIMER ON/OFF pad.
2. Press NUMBER pads to set time.
3. Press the START pad,
4. When the countdown has reached
zero, press the HOUR/MIN
KITCHEN TIMER ON/OFF pad.
To cancel the timer during the
countdown, press the HOUR/MIN
KITCHEN TIMER ON/OFF pad twice.
20P312-2 ENv01
17

OPERATION
OvenControl,ClockandTimer
Your new control has a series of tones
that will sound at different times.
These tones may sound while you set
the control for an oven function, or at
the end of the oven function. It will
also alert you that there may be a
problem with the functions. Below
are the types of tones and a brief
description of each.
TONES WHILE SETTING THE
CONTROL When you press a touch
pad, you will hear a beep. This beep
will let you know you have placed
enough pressure on the pad to
activate it.
END OF TIMED CYCLE TONE -
At the end of atimed cooking
function, you will hear 3 short beeps
followed by 1 beep every 6 seconds.
This 6-second beep will continue
to sound until the CLEAR/OFF
pad is pressed, or you may select
the special feature to cancel this
6-second beep from sounding at the
end of future cycles.
TO CANCEL THE 6-SECOND BEEP:
1. Press and hold the BAKE and
BROIL pads, at the same time, for
3seconds, until the display shows
"SF."
2. Press the HOUR/MIN KITCHEN
TIMER ON/OFF pad. The
display will show "CON BEEP"
(continuous beep).
3. Press the HOUR/MIN KITCHEN
TIMER ON/OFF pad again. The
display will show "BEEP" (beep
canceled).
4. Press the START pad
If youwould like to return the
6-second beep, repeat steps above
until the display shows your choice
and press the START pad.
A'rrENTION TONE This tone will
sound if you make an error or an
oversight is made while setting an
oven function.
Examples would be:
a. Setting a clean cycle and the oven
door is not properly closed.
b. Setting a function and not pressing
the START pad.
¢. Pressing an additional function pad
without first setting a temperature
or time.
d. "ERR" will flash if you set an
invalid temperature. Press the
CLEAR/OFF pad to clear the
control and reset your oven
function.
Any of these can be quickly identified
by watching the display.
PREHEAT TONE - Whenyou
selectacooking mode,set anoven
temperatureand presstheSTARTpad,
theovenstartsto heat.When the
temperature inside the oven reaches
the temperature you have set, a tone
will sound to let you know the oven is
ready for baking.
If you set an oven function and the
control beeps while the display is
flashing "F" and a number "F..4" or
letter "FI," there may be a problem
with the control or oven. Simply press
the CLEAR/OFF pad and wait about
an hour. Try setting the function
again. If the code repeats, write down
the code and call for service. Tell the
technician what code was flashing.
20P312_2 ENv01
18
OPERATION
OvenCookingTips
It is normal to have some odor when
using your oven for the first time. To
help eliminate this odor, ventilate the
room by opening awindow or
using a vent hood.
IMPORTANT: Never cover the oven
bottom or oven rack with aluminum
foil. Improper use can cause poor
heat flow, poor baking results and
may damage the oven finish. To
prevent staining from spillovers, you
may place a piece of aluminum foil or
a cookie sheet on the rack below the
food which may spill over.
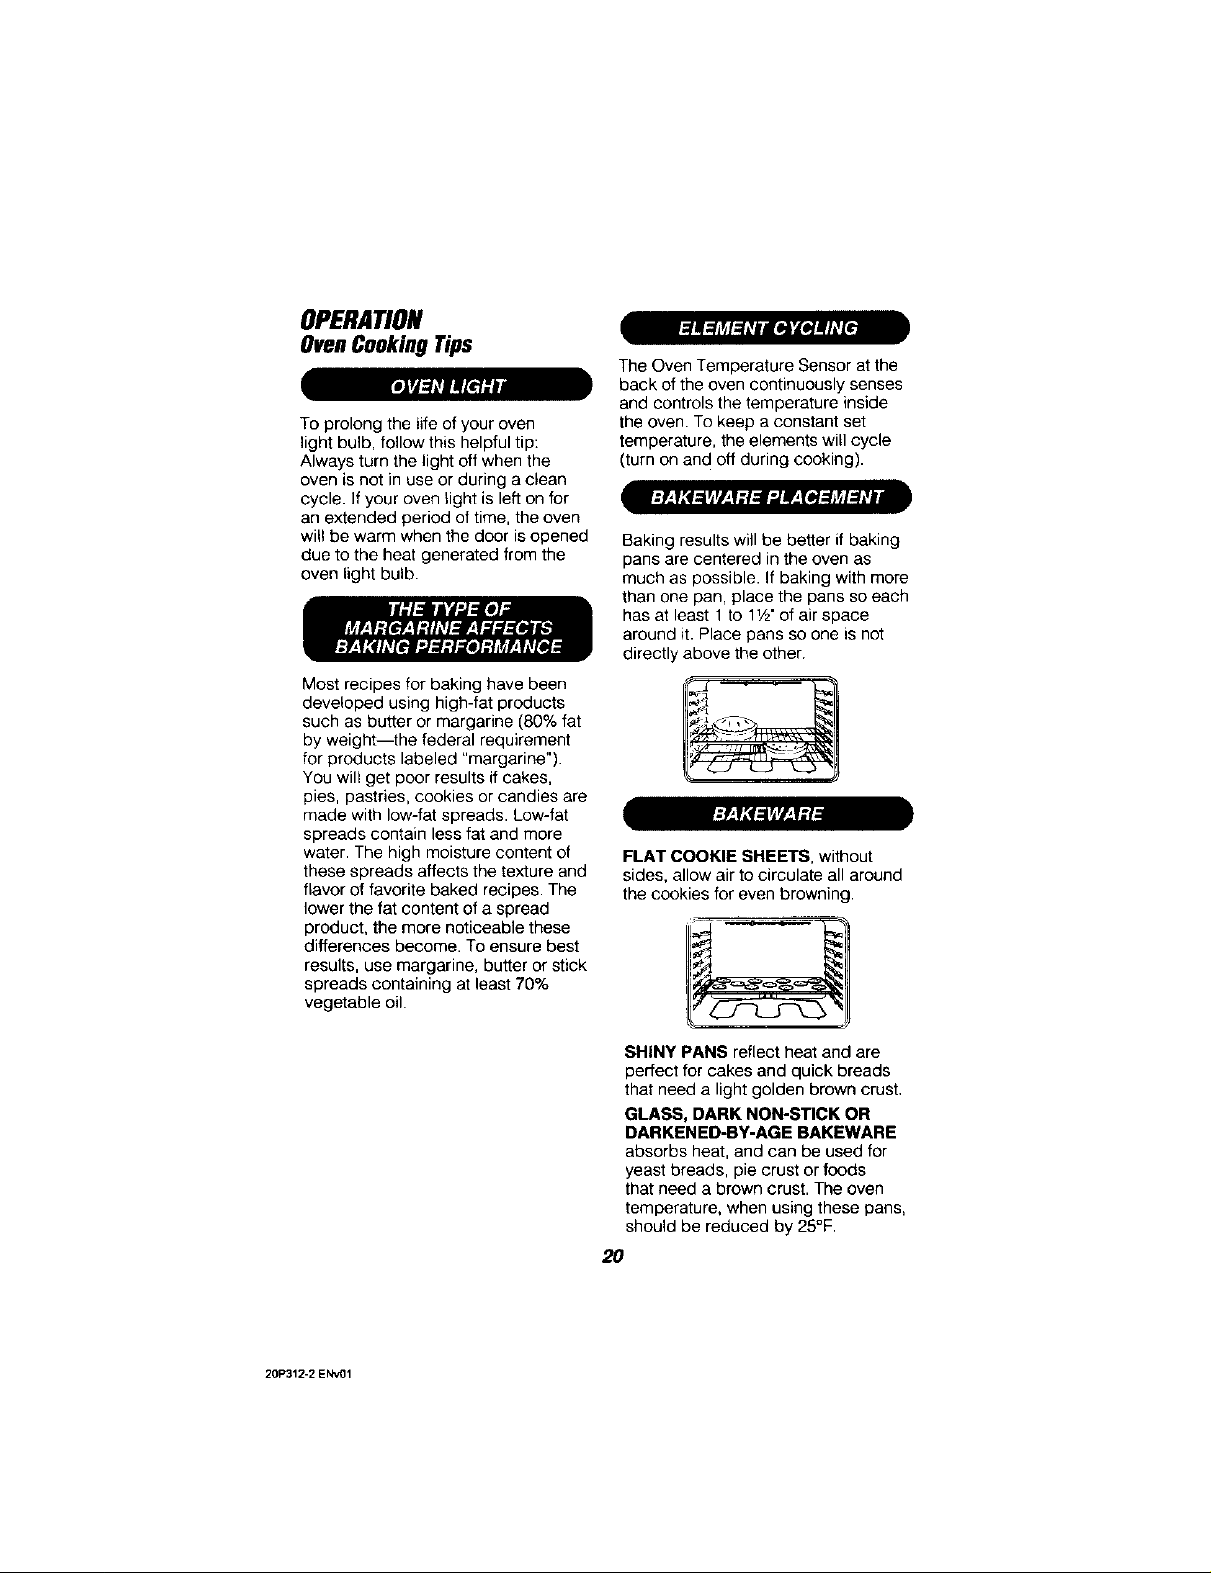
In the back of the oven you will notice
a small tube. This is a heat sensor
that maintains the temperature of the
oven. Never move or bend this tube.
OvenTemperature _e
Sensor _
Preheating is bringing the oven
temperature up to the temperature
you will be using during baking. Let
the oven preheat thoroughly when
recipes call for preheating.
The low temperature zone of your
oven (between 170°F and 200°F) is
available to keep hot cooked foods
warm. However, foods should not be
kept at these temperatures longer
than 2 hours.
The oven vent is located under the
control panel, This area could
become hot during oven use, it is
normal for steam to come out of
the vent and/or collect moisture
underneath when oven is in use,The
vent is important for proper air
circulation. Never block this vent.
OvenVent _ II
20P3";2-2 ENv01
19
OPERATION
OvenCookingTips
ro]_ rnE_,_iJI
To prolong the life of your oven
light bulb, follow this helpful tip:
Always turn the light off when the
oven is not in use or during a clean
cycle. If your oven light is left on for
an extended period of time, the oven
will be warm when the door isopened
due to the heat generated from the
oven light bulb.
Most recipes for baking have been
developed using high-fat products
such as butter or margarine (80% fat
by weight--the federal requirement
for products labeled "margarine").
You will get poor results if cakes,
pies, pastries, cookies orcandies are
made with low-fat spreads. Low-fat
spreads contain less fat and more
water. The high moisture content of
these spreads affects the texture and
flavor of favorite baked recipes. The
lower the fat content of a spread
product, the more noticeable these
differences become. To ensure best
results, use margarine, butter or stick
spreads containing at least 70%
vegetable oil.
The Oven Temperature Sensor at the
back of the oven continuously senses
and controls the temperature inside
the oven. To keep a constant set
temperature, the elements will cycle
(turn on and off during cooking).
Baking results will be better if baking
pans are centered in the oven as
much as possible. If baking with more
than one pan, place the pans so each
has at least 1to 1V2'of air space
around it. Place pans so one is not
directly above the other.
FLAT COOKIE SHEETS, without
sides, allow air to circulate all around
the cookies for even browning.
20P312-2 ENv01
SHINY PANS reflect heat and are
perfect for cakes and quick breads
that need a light golden brown crust,
GLASS, DARK NON-STICK OR
DARKENED-BY-AGE BAKEWARE
absorbs heat, and can be used for
yeast breads, pie crust or foods
that need a brown crust. The oven
temperature, when using these pans,
should be reduced by 25°F.
20
OPERATION
OvenCookingTips
The oven racks are designed with
stops, a convenience as well as a
safety precaution. The guides have a
bump to prevent the racks from
tilting when racks are pulled out of
the oven, This design allows the racks
to be inserted in only one way.
You may feel that your new oven
cooks differently than the oven it
replaced. We recommend that you
use your new oven a few weeks
to become more familiar with it,
following the times given in your
recipes as a guide. If you feel your
oven is too hot or too cool for your
cooking preference, see Do It
Yourself Temperature Adjustment
in the back of this manual to make
the adjustment.
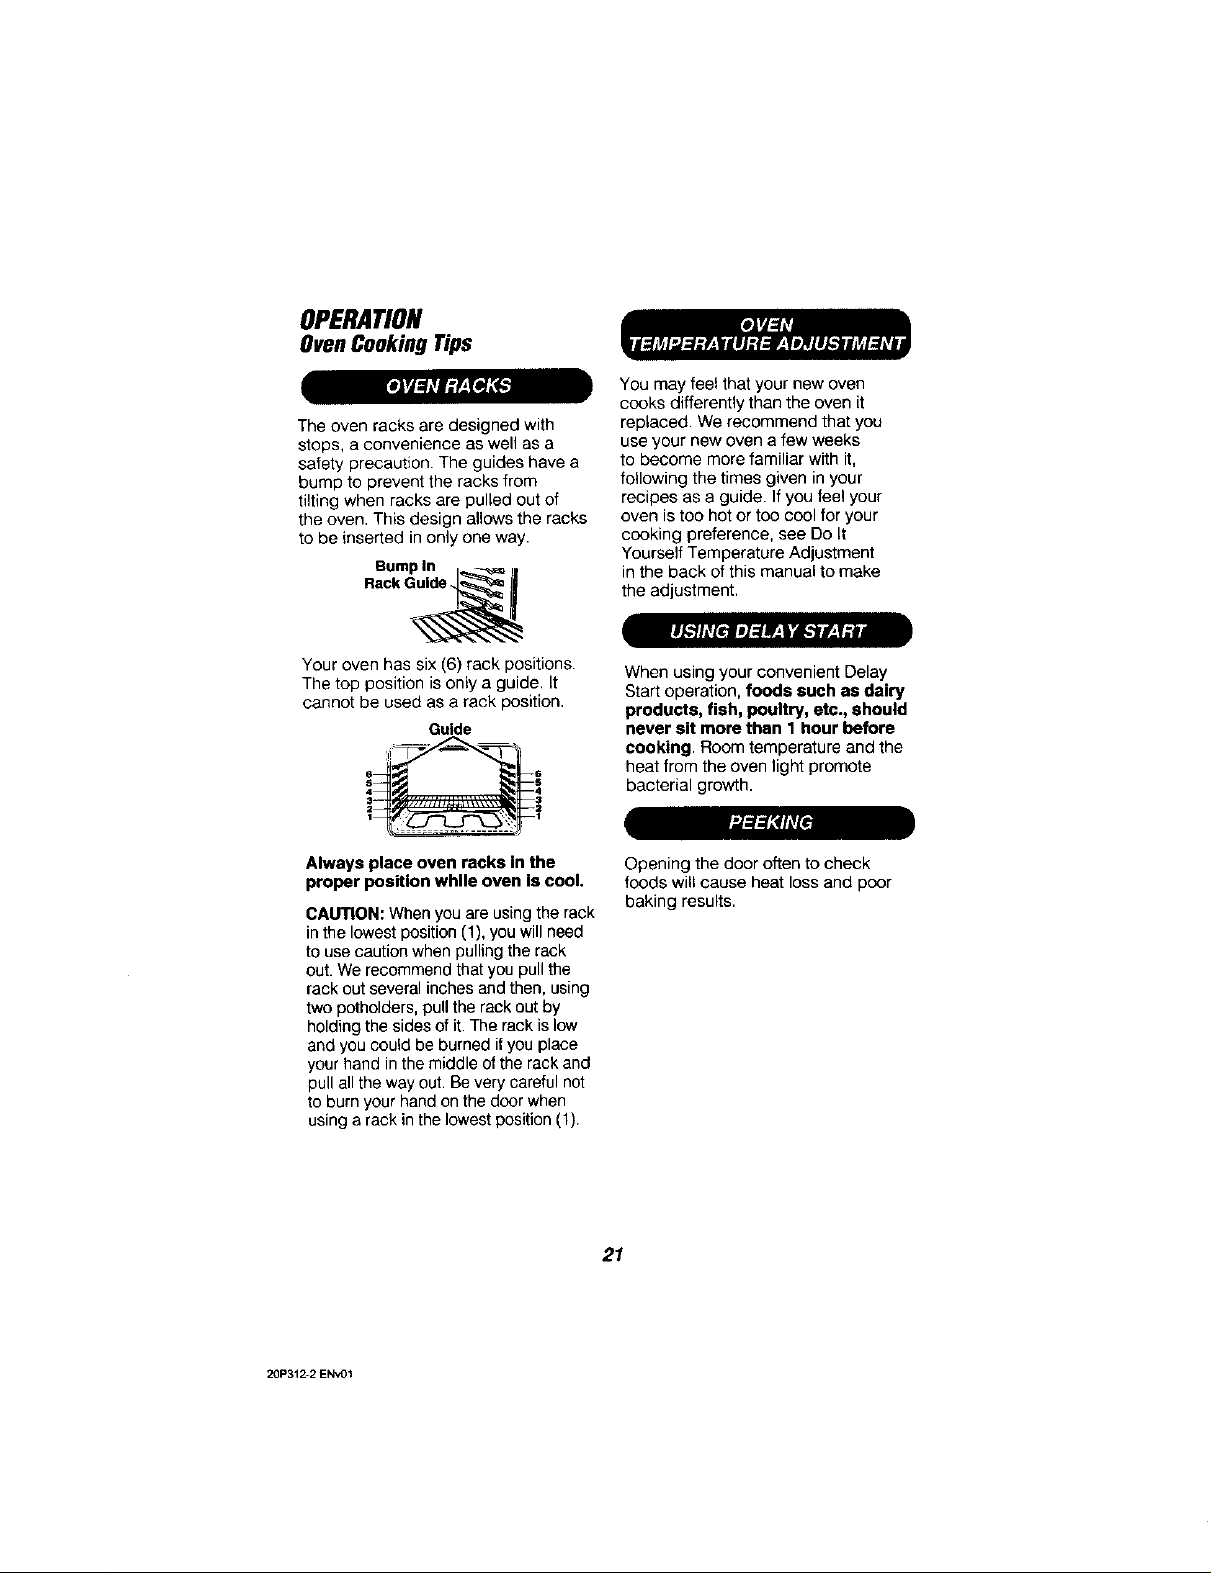
Your oven has six (6) rack positions.
The top position is onty a guide, It
cannot be used as a rack position.
Guide
Always place oven racks In the
proper position while oven is cool.
CAUTION: When you are using the rack
in the lowest position (1), you will need
to use caution when pulling the rack
out.We recommend that you pull the
rack out several inches and then, using
two potholders, pull the rackout by
holding the sides of it. The rack is low
and you could be burned if you place
your hand in the middle ofthe rack and
pull allthe way out, Bevery careful not
to burn your hand on the doorwhen
using arack in the lowest position (1).
When using your convenient Delay
Start operation, foods such as dairy
products, fish, poultry, etc., should
never sit more than 1 hour before
cooking Room temperature and the
heat from the oven light promote
bacterial growth.
f'J:l:l;#llt
Opening the door often to check
foods will cause heat loss and poor
baking results.
20P312-2 ENv01
21

OPERATION
Raking& Roasting
(_ 1. PresstheBAKEpad.
Toset the ovento turnon atalater time of
day, cook fora specific amountoftime,
andturn offautomatically:
(_ 2. PresstheNUMBER pads to
setthe oven temperature
you preferto use.
<_3. Pressthe STARTpad.
BAKING SHELF POSITION CHART
TYPE OF FOOD SHELF POSITION
Frozen pies (on 3 or 4
cookie sheet)
Angel food cake, 3 or 4
bundt or pound
cakes
Biscuits, muffins, 3 or 4
brownies, cookies,
cupcakes, _ayer
cakes, pies
Casseroles 3 or 4
Turkey or Roast 1
Toset theovento cook for aspecific time
andturn off automatically.
(_ I. Press the BAKE pad.
(_) 2. Press the NUMBER pads
to set the oven temperature
you prefer to use.
(_1. PresstheBAKEpad.
(_ 2. PresstheNUMBERpadsto
set theoven temperature
you preferto use.
TIME pad.
3. ressthe OVENCOOKING
(_) 4. Pressthe NUMBERpads to
setthe amountoftime you
preferyourfoods to cook.
TIME pad.
5. ressthe DELAYSTART
(_) 6. PresstheNUMBERpads
toset the time of dayyou
preferthe ovento turn on
<_7. PresstheSTART pad
The ovenwillturn off at theend ofthe
cooldngUmeunlessthe COOKAND
HOLDfeature has beenactivated.
(Seethe SettingSpecialFeatures
sectionformore Informationonthe
COOKAND HOLDfeature.)
COOKING TIME pad.
3. Press the OVEN
(_ 4. Pressthe NUMBERpads
to set the amountof time
you preferyour foodsto
cook.
<_ 5. PresstheSTART pad.
20P312-2 ENv01
22
OPERATION
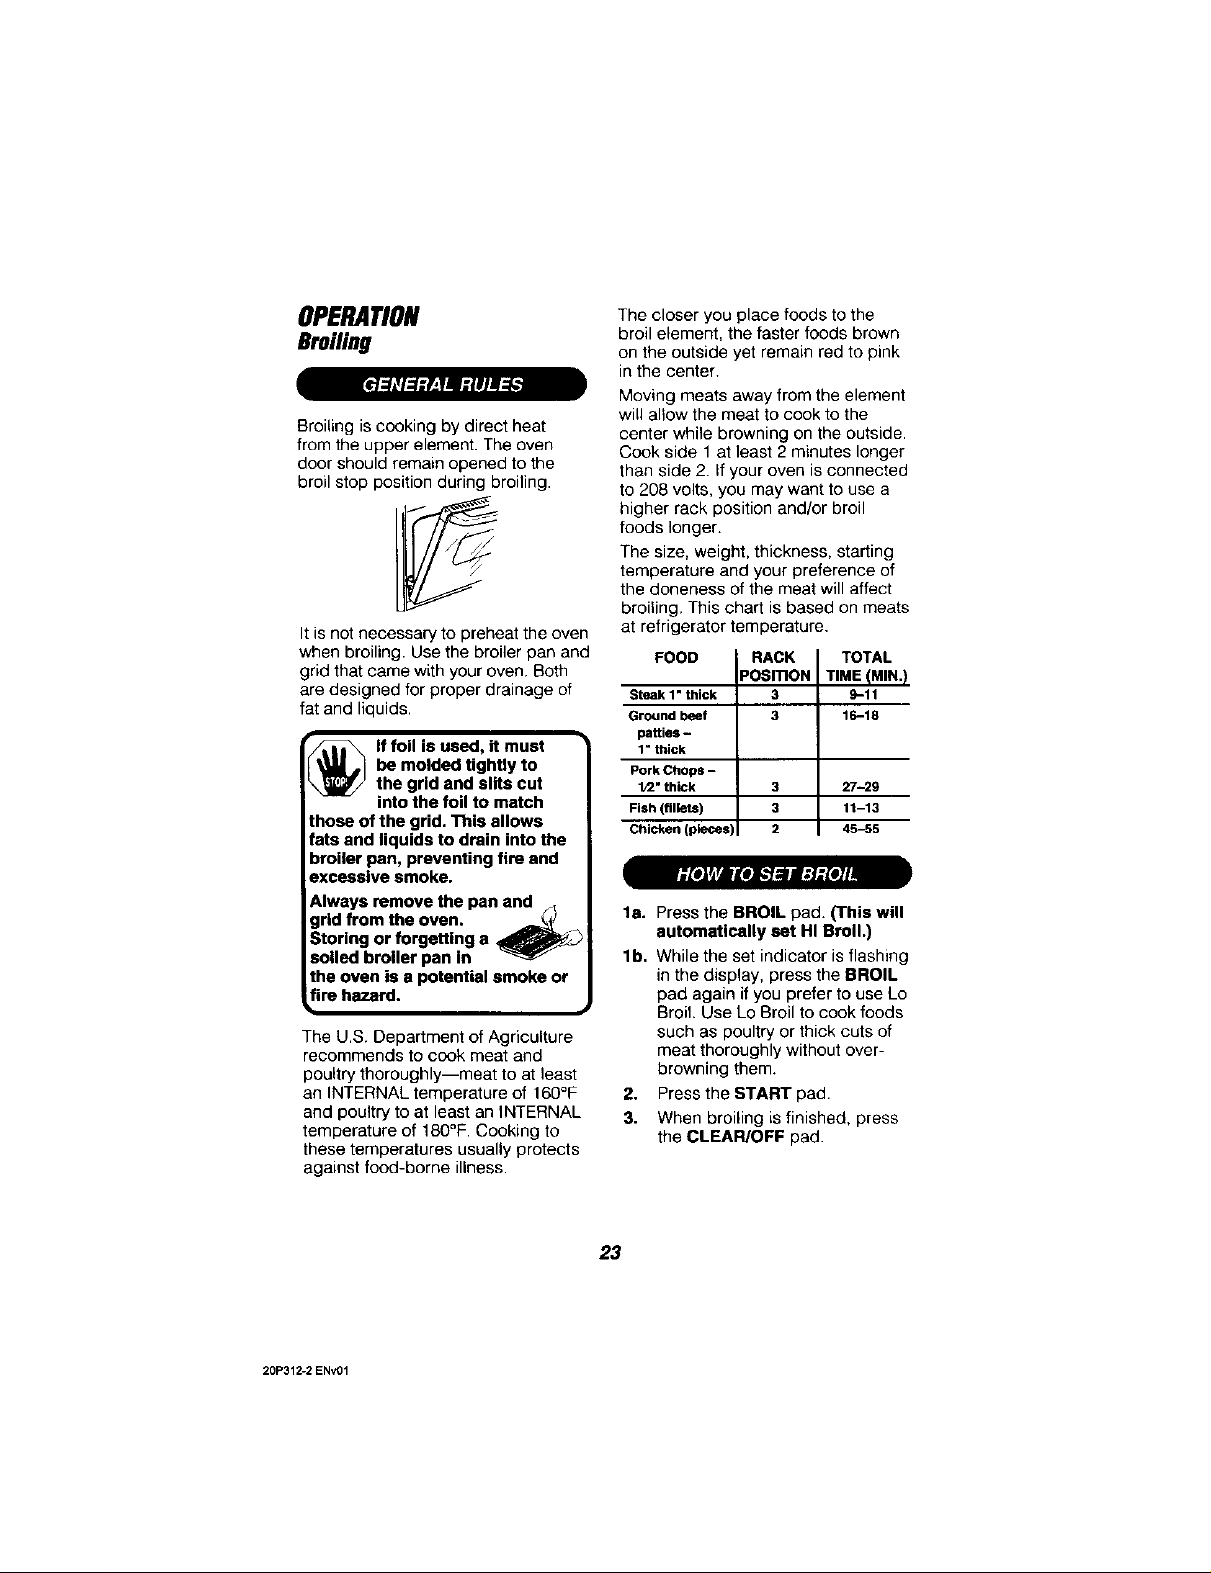
Broiling
Broiling iscooking by direct heat
from the upper element. The oven
door should remain opened to the
broil stop position during broiling.
Itis not necessary to preheat the oven
when broiling. Use the broiler pan and
grid that came with your oven. Both
are designed for proper drainage of
fat and liquids.
be molded tightly to
lf foil is used, it must
the grid and sirs cut
into the foil to match
those of the grid. This allows
fats and liquids to drain into the
broiler pan, preventing fire and
excessive smoke.
Always remove the pan and
grid from the oven. .._
Storing or forgetting a
soiled broiler pan In
the oven is a potential smoke or
fire hazard.
The U.S. Department of Agriculture
recommends to cook meat and
poultry thoroughly--meat to at least
an INTERNAL temperature of 160°F
and poultry to at least an INTERNAL
temperature of 180°F. Cooking to
these temperatures usually protects
against food-borne illness.
The closer you place foods to the
broil element, the faster foods brown
on the outside yet remain red to pink
in the center.
Moving meats away from the element
will allow the meat to cook to the
center while browning on the outside.
Cook side 1 at least 2 minutes longer
than side 2. If your oven is connected
to 208 volts, you may want to use a
higher rack position and/or broil
foods longer.
The size, weight, thickness, starting
temperature and your preference of
the aloneness of the meat will affect
broiling. This chart is based on meats
at refrigerator temperature.
FOOD RACK TOTAL
Steak 1" thick 3 9-11
Ground beef 3 16-18
patties -
1" thick
Pork Chops -
1
1/2" thick 3 27-29
Fish (fillets) 3 11-13
Chicken (pieces] 2 45-55
la. Press the BROIL pad. (This will
automatically set HI Broil.)
lb. While the set indicator is flashing
in the display, press the BROIL
pad again ifyou prefer to use Lo
Broil. Use Lo Broil to cook foods
such as poultry or thick cuts of
meat thoroughly without over-
browning them.
2. Press the START pad.
3. When broiling is finished, press
the CLEAR/OFF pad.
•OSmON TIME IMIN.)
20P312-2 ENV01
23
 Loading...