


91136665790
Kenmore 91136665790, 91136665791, 91136665892, 91136665893, 91136669790 Owner’s Manual
...
OWNER'S MANUAL
30" GAS SELF-
CLEANING
SLIDE-IN RANGE
MODEL NO.
911.36665
911,36669'
911.36765
911.36766
911.36769'
CAUTION:
Before using this range,
read this manual and
follow all its Safety Rules
and Operating
Instructions.
• Safety Instructions
° Operation
° Care and Cleaning
° Problem Solving
Sears, Roebuck and Co,, Hoffman Estates, IL 60179 U.S.A.
229C4020P166 (SR- 10371)
229C4020P_66 1/2 SIZE I
Tableof Contents
Range Safety ..................... 3-7
Power Failure ....................... 7
SLIDE-INRANGE
Self-Clean Cycle .18,19
Special Features ............. 20,21
Oven Shut-Off Valve ........... 7
Cooking Utensils and Woks .. 7
Removal of Packaging Tape .._8
Features of Your Range ....... 8
Cooktop Burners ............ 9
Control Settings .............. 9
Burner Ignition .......... 9
Simmer Flame ............... 9
Home Canning ................... 9
Oven Control .............. 10
Conlrol Display .................... 1t
To Set the Clock .................... 12
To Set the Timer ........... t2
Tones .................. t3
F-Code ................................. 13
Oven Cooking Tips ...... t4-15
Strong Smell or Odor ..... t4
Aluminum Foil .............. 14
Oven Vent ................. 14
Preheating ......................... 14
Oven Temperature Sensor . . t4
No Peeking ................... t4
Bakeware Placement ......... 14
Burner Cycling ............. 14
Oven Light .................. 15
Bakeware ............... 15
Oven Racks ............... t5
Oven Glow Bar .......... 15
Oven Temperature
Adjustment ........... t5, 30
To Set Bake ................... 16
Broiling ............................. 17
Control Panel .................. 22
Broiler Pan and Grid ....... 22
Painted Surfaces ....... 22
Glass Cooktop ........ 22
Porcelain Cooktop ..... 22
Burner Grates ............. 23
Burner Bowls, Caps,
and Heads ................ 23
Oven Bottom ......... 23
Control Knobs ......... 24
Oven Light Bulb .......... 24
Storage Drawer 25
Cooktop Burner Componenis 26
Oven Racks ............ 27
Oven Door ................ 27
Before Calling for Service ......
................................. 28-29
Temperature Adjustment 30
Warranty ......... 31
Consumer Service Numbers 32
For'your convenience and future reference, please write down
your model and serial numbers in the space provided. They are
located on the front frame behind the storage drawer.
MODEL NUMBER:
2
SERIAL NUMBER:
j lllllli i :,,,i
229C4020P166 1/2 SiZE 2 10/6/97 12:44 PM
IMPORTANTSAFETY
'INSTRUCTIONS
SAVE THESE INSTRUCTIONS
Read all instructions before using this appliance. When using gas or electri-
cal appliances, basic safety precautions should be followed, including the
following:
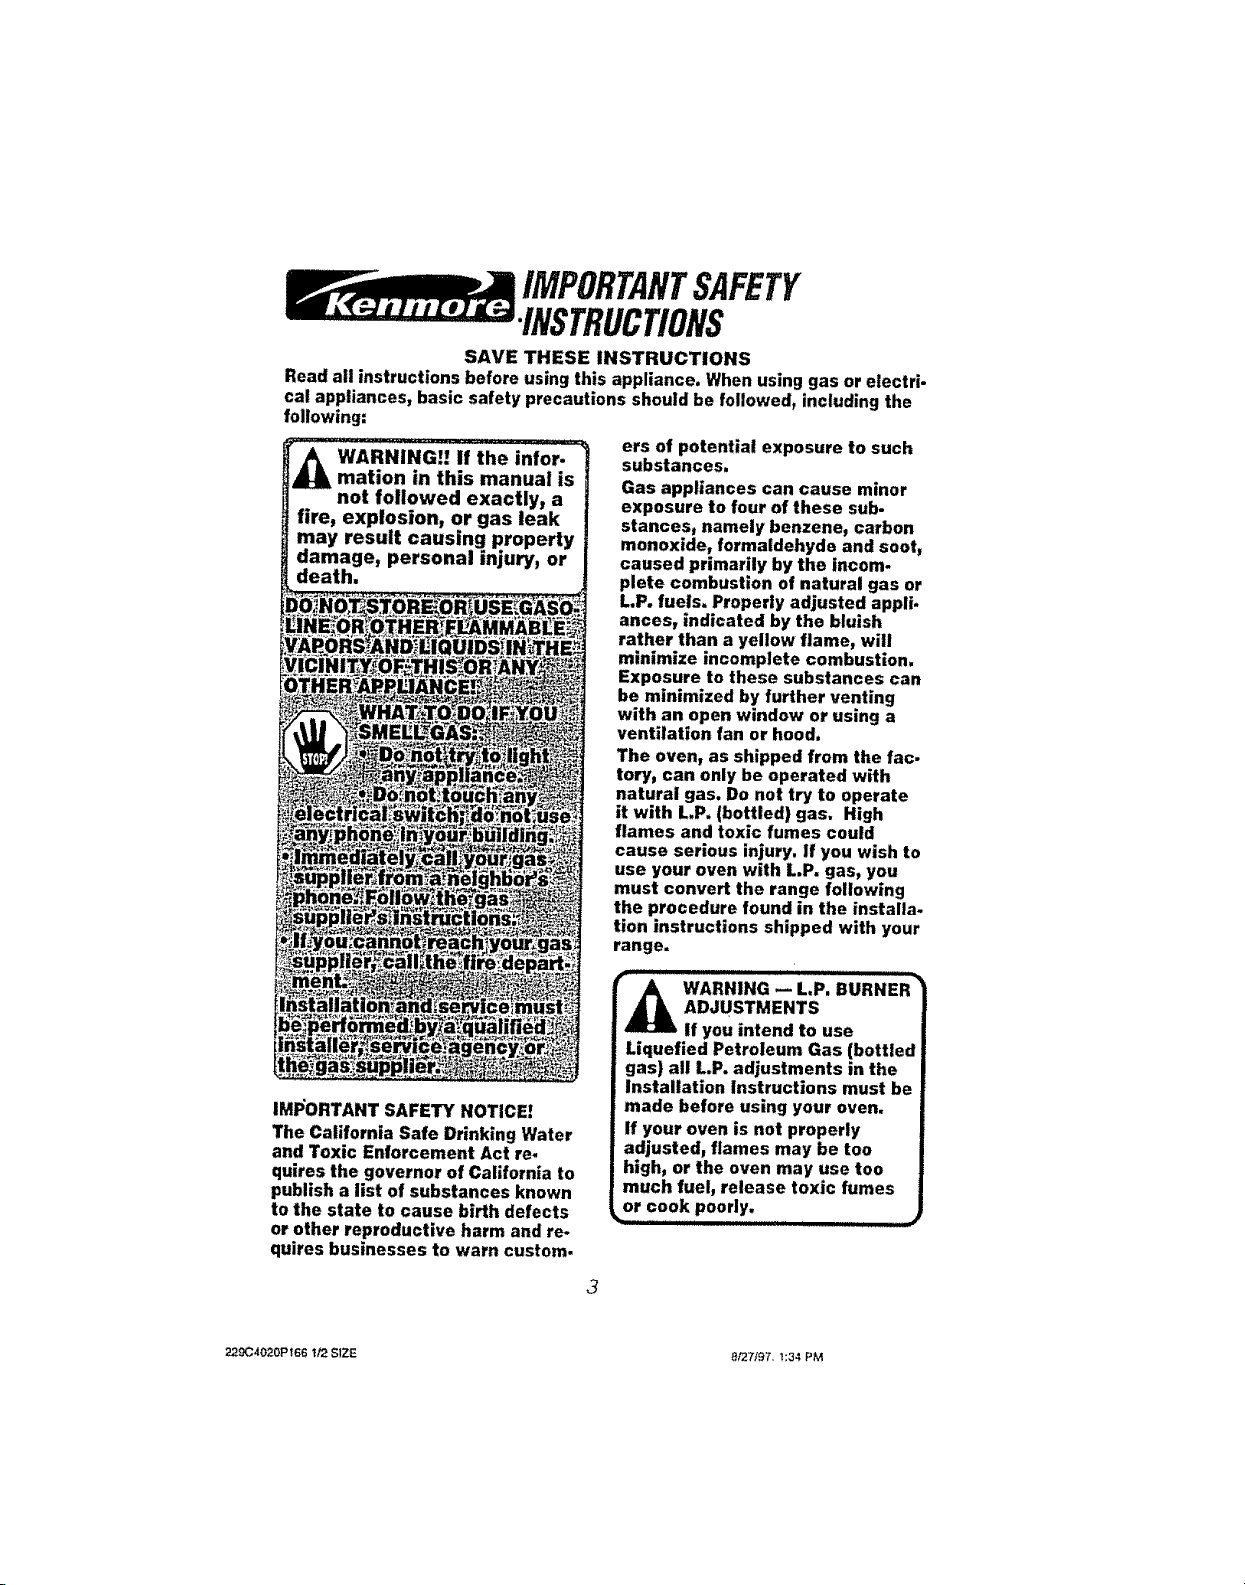
WARNING!! if the infor-
mation in this manual is
not followed exactly, a
fire, explosion, or gas leak
may result causing property
damage, personal injury, or
death.
IMPORTANT SAFETY NOTICE!
The California Safe Drinking Water
and Toxic Entorcement Act re*
quires the governor of California to
publish a list of substances known
to the state to cause birth defects
or other reproductive harm and re-
quires businesses to warn custom.
ers of potential exposure to such
substances,
Gas appliances can cause minor
exposure to four of these sub-
stances, namely benzene, carbon
monoxide, formaldehyde and soot,
caused primarily by the incom-
plete combustion of natural gas or
L,P. fuels. Properly adjusted appli-
ances, indicated by the bluish
rather than a yellow flame, will
minimize incomplete combustion,
Exposure to these substances can
be minimized by further venting
with an open window or using a
ventilation fan or hood,
The oven, as shipped from the fac.
tory, can only be operated with
natural gas. Do not try to operate
it with L,P, (bottled) gas. High
flames and toxic fumes could
cause serious injury. If you wish to
use your oven with L.P. gas, you
must convert the range following
the procedure found in the installa.
tion instructions shipped with your
range.
Lllllllll I I I I,lllll I llll
WARNING -- L,P. BURNER _
ADJUSTMENTS
If you intend to use
Liquefied Petroleum Gas (bottled
gas} all L.P. adjustments in the
Installation Instructions must be
made before using your oven.
if your oven is not properly
adjusted, flames may be too
high, or the oven may use too
much fuel, release toxic fumes
or cook poorly.
3
22904020PT66 'U2 SIZF- _/27f97, t:34 PM
IMPORTANTSAFETY
INSTRUCTIONS
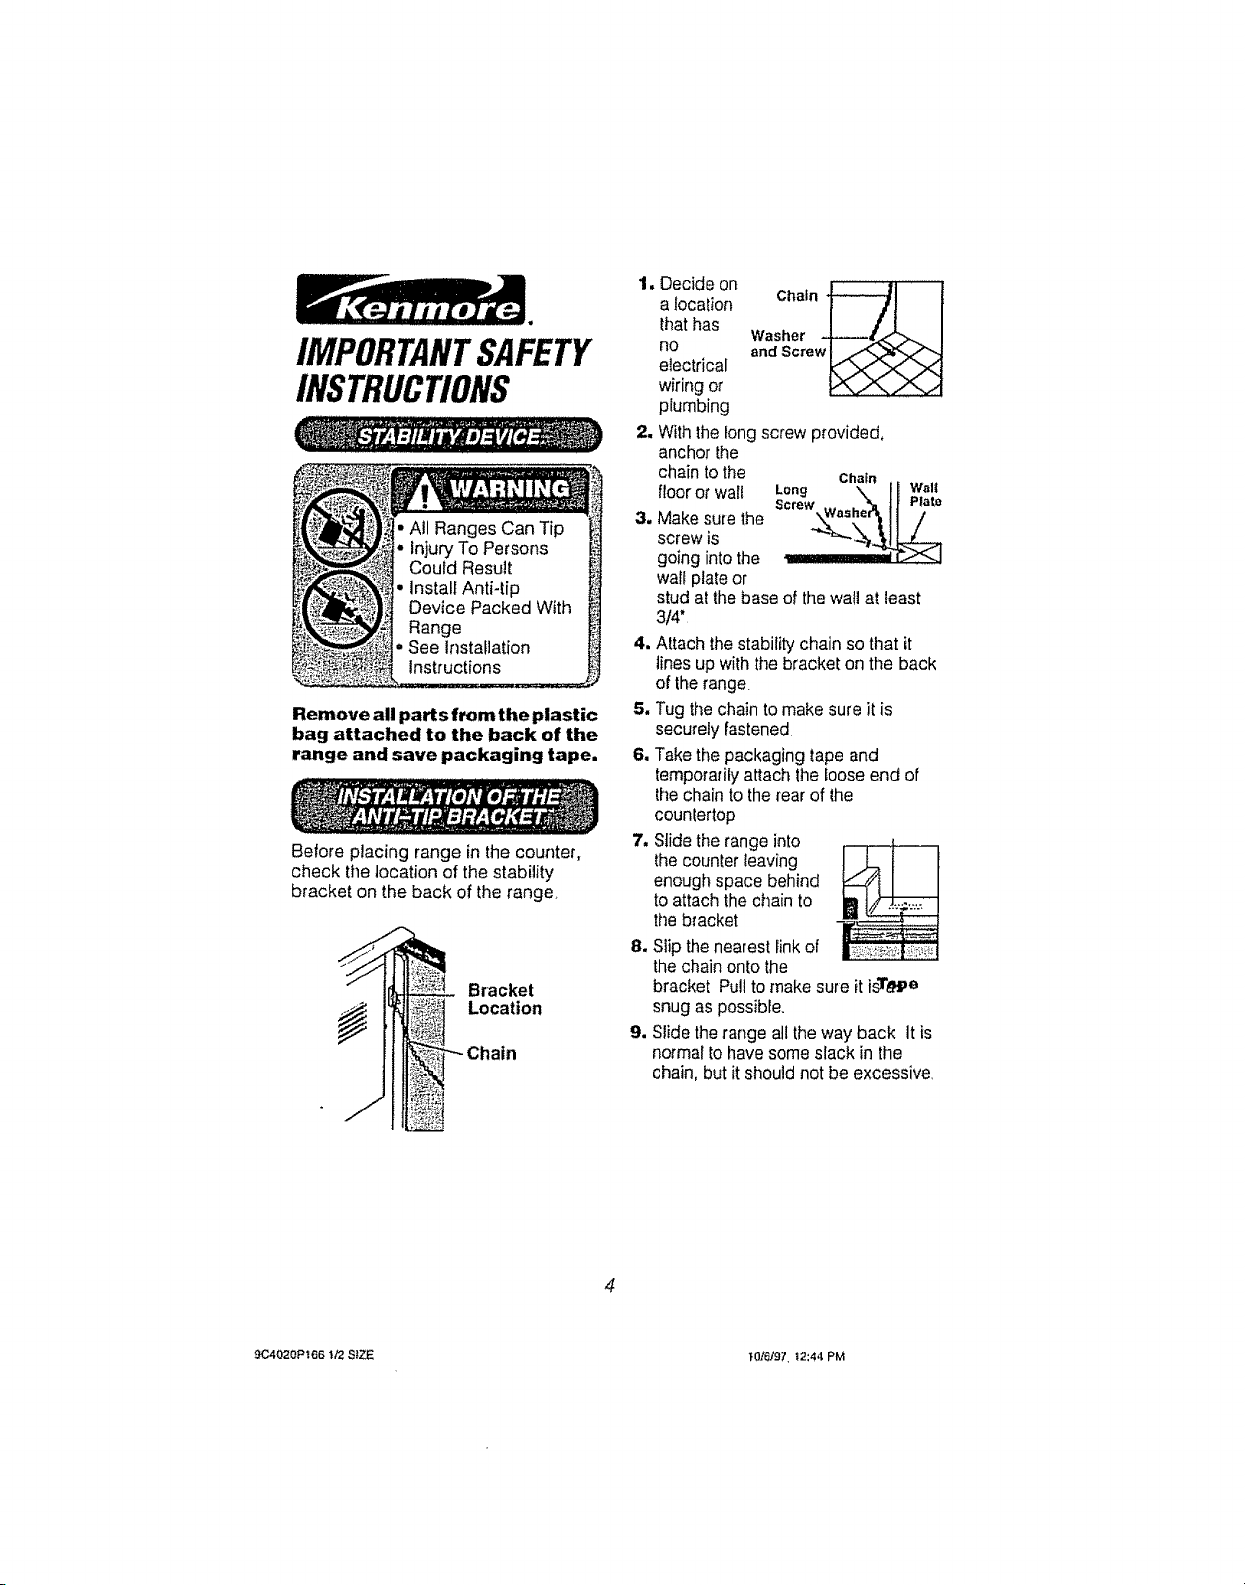
Remove all part s from the plastic
bag attached to the back of the
range and save packaging tape.
Before placing range in the counter,
check the location of the stability
bracket on the back of the range,
Bracket
Location
1. Decide on
alocation
that has
no
electrical
wiring or
plumbing
2. With the long screw provided,
31
anchor the
chain to the
floor or wall
Make sure the
screw is
going into the
wail plate or
Long Chain I J Wall
Screw Washe Plato
stud at the base of the wall at least
3/4"
4. Attach thestability chain so that it
lines up with the bracket on the back
of the range.
5. Tug the chain to make sure it is
securely fastened
6. Take the packaging tape and
temporarily attach the loose end of
the chain to the rear of the
countertop
7, Slide the range into
the counter leaving
enough space behind
to attach the chain to
the bracket
8.Slip the nearest link of
the chain onto the
bracket Pull to make sure it i_e
snug as possible.
9. Slide the range all the way back It is
normal to have some slack in the
chain, but it should not be excessive,
9C4020P_66 t/2 SiZE }016]97, t2:44 pM
IMPORTANTSAFETY
INSTRUCTIONS
WARNING ] To
prevent accidental
tipping of the range
from abnormal usage,
including excessive loading
of the oven door, attach the
range to the wall or floor by
installing the Anti-Tip
i device supplied. If the range
is moved for cleaning,
servicing or any reason, be
sure the Anti-Tip device is
ire-engaged properly when
the range is slid back in the
opening. Failure to do so
could result in the range
_.tjpping or personal injury. .
Important: To insure safety for yourself,
family and home, please read your
Owner's Manual carefully, Keep it handy
forreference Pay close attention to
SafetySections, BE SURE your
appliance is installed and grounded by a
qualified technician.
,,DO NOT leave children alone or
unattended near an appliance in use.
• TEACH CHILDREN not to play with
controls or any part of the appliance,
and not to sil, climb or stand on fhe
door, or any other part ol theappliance
CAUTION: NEVER STORE items
ol interestto children incabinets above
the appliance Children climbing on the
appliance could beseriously injured
• KEEP THIS book for later use
o NEVER USE your appliance for
warming or heating the room
• NEVER TRY to repair or replace any
part of the appliance unless instructions
are given inthismanual All other work
should be done by a qualified
technician.
• ALWAYS KEEP combustible watt
coverings, curtains, dish cloths, towels,
polholders, and other linens a safe
distance from the appliance
• NEVER HEAT unopened food
containers Pressure buildup can cause
the container to burst and cause iniury
• NEVER LEAVE jars or cans of fat or
drippings in your oven,
• ALWAYS KEEP theoven and surface
unit areas freefrom things that will
burn, Food, wooden utensils, and
grease buildup could catch fire Plastic
utensils could meltand canned foods
could explode Yourappliance should
never be used as a storage area,
° ALWAYS KEEP your appliance clear
of things that will burn (gasoline and
other flammable vapors or liquids)
• NEVER TRY to clean a hot surface.
Some cleaners produce noxious fumes,
and wet cloths or sponges could cause
steam burns
• NEVER WEAR loose fittingclothing
when using your appliance
• NEVER USE a towel or other bulky
cloth as apotholder, and make sure the
pothotder is dry, Moist potholders and
wet cloths orsponges could cause
steam burns. DO NOT let potholders
touch hot heating burners.
5
229C4020P168 !/2 SIZE 5 10/lt97_ 2:29 PM

IMPORTANTSAFETY
INSTRUCTIONS
"DO NOT touch cooktop burners,
surfaces near them, or interior oven
surfaces These may be hot enough to
cause burns even though they are
dark in color. During and after use, do
not touch or let clothing or flammable
material contact the burners or hot
surfaces until they have had time to
coo[ Other surfaces near the oven
vent openings, oven door, window,
and cooktop surfaces may also be hot
enough to cause burns
PLACE OVEN RACKS in the
desired position while the oven is
cool tf tacks must be moved while
oven is hot, do not let potholder
contact the hot oven burner
• AFTER BROILING, always take
the broiler pan and grid out of the
oven and clean them Leftover
grease in the broiler pan could catch
fire the next time you use your oven
• ALWAYS USE care when opening
the oven door, Let hot air and steam
escape before moving foods
• NEVER USE aluminum foil to line the
oven bottom Improper use of foil could
result in the risk of electric shock and
tire
• ONLY SOME kinds of glass or
ceramic cookware can be used for
cooktop cooking Make sure the
cookware you choose to use is
designed for cooktop cooking without
breaking due to the sudden
temperature change
, ALWAYS USE care when touching
cooktop burners They will retain heat
after the range has been turned off.
• NEVER BLOCK theoven airvent
behind the right rearburner
• COOKWARE USED for cooktop
cookingshouldbe flatonthebottom
and largeenoughtocoverlheheating
areabeingused Undersizedutensils
exposetheopen flameandmay result
in direct contact or ignitionof clothing.
. NEVER LEAVE cooktop burners
unattended at high settings Boitovers
result in smoking o_greasy spills which
could catch tire
• ALWAYS TURN utensil handles
inward and away fromother surface
burners to reduce the riskof burns,
ignition, unintended contact, and
spillage
• CLEAN ONLY the parts listed in this
manual, Follow all cleaning instructions.
Be sure to remove broiler pan and grid
before the self-clean cycle,
• NEVER TRY to clean utensils,
cookware, removable parts, or broiler
pan and grid in the self-clean cycle
• DO NOT USE oven cleaners - No
commercial oven cleaner, or protective
coating of any kind, should be used in
or around any part of the oven
229C4020P'_66 1_ SIZE 10/"1/97, 2:29 PM
IMPORTANTSAFETY
INSTRUCTIONS
READ AND UNDERSTAND
THIS INFORMATION NOW!
Be sure everyone in your home
knows what to do in case of fire,
Never use water on a grease fire;
it will only spread the flames,
COOKTOP GREASE FIRE;
Never pick up a flaming pan,,,
1. Turn off the surface burners
2. Smother the flame with a tightly fitting
lid Use baking soda or a dry
chemical, foam, or halon type
extinguisher
OVEN FIRE;
Do not try to move the pan!
1. Close the oven door and turn
controls off
2. If fire continues, carefully open the
door, throw baking soda on the fire,
or use a dry chemical, loam, or halon
type extinguisher
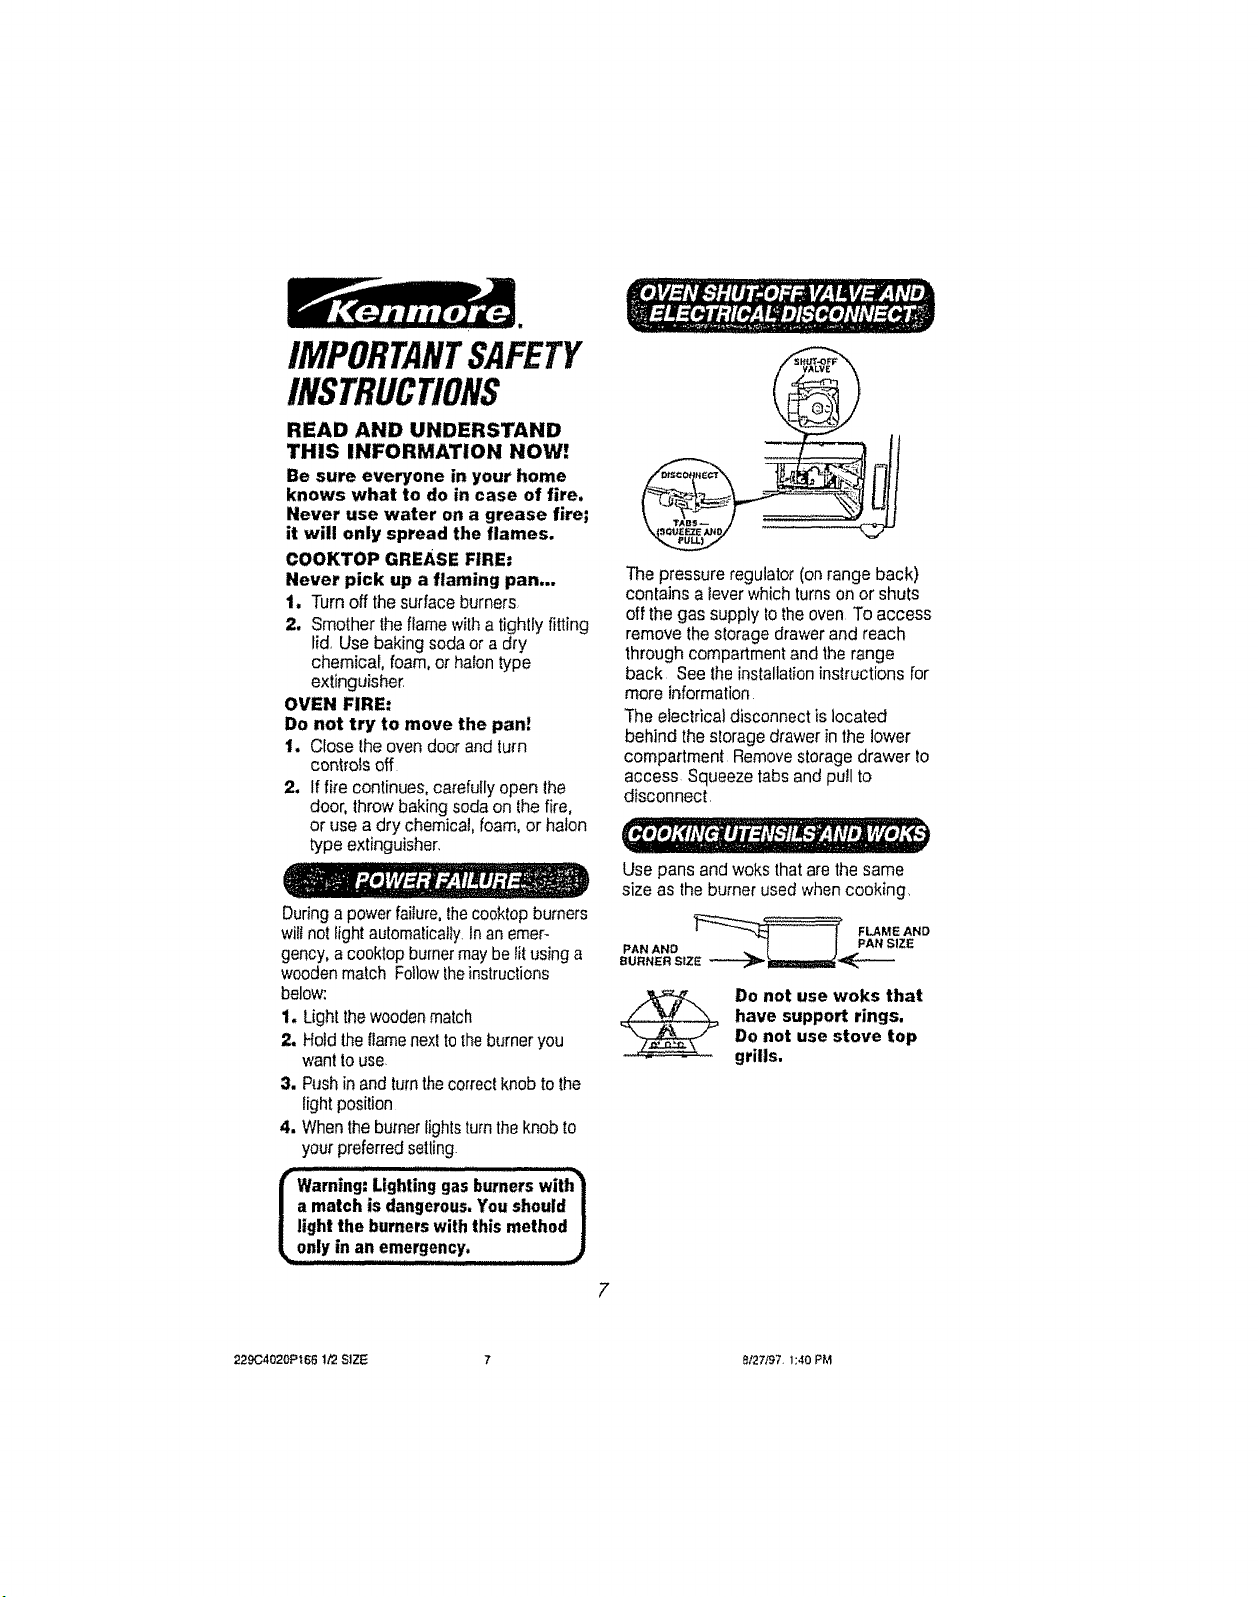
The pressure regulator (on range back)
contains a lever which turns on or shuts
off the gas supply tothe oven To access
remove the storage drawer and reach
through compartment and the range
back See the installation instructions for
more information
The electrical disconnect is located
behind the storage drawer in the lower
compartment Remove storage drawer to
access Squeeze tabs and pull to
disconnect
During a power failure,the cooktop burners
wi!l not light automatically In an emer-
gency, acooktop burner may be lit using a
wooden match Follow theinstructions
below:
1. Light the wooden match
2. Hold the flamenexl tothe burner you
want to use
3. Pushin andturn thecorrect knob to the
light position
4. When the burner lights turn the knob to
your preferred setting.
r ,i i ii ill , ,,,,,
Warning: Lighting gas burners with"I
a match is dangerous, You should |
light the burners with this method |
only in an emergency. J
L ............. illllHi
7
Use pans and woks that are the same
size as the burner used when cooking
Do not use woks that
have support rings.
Do not use stove top
grills,
229C402{}Pt66 t/2 S]ZE_ 7 8/27/97 1;40 PM
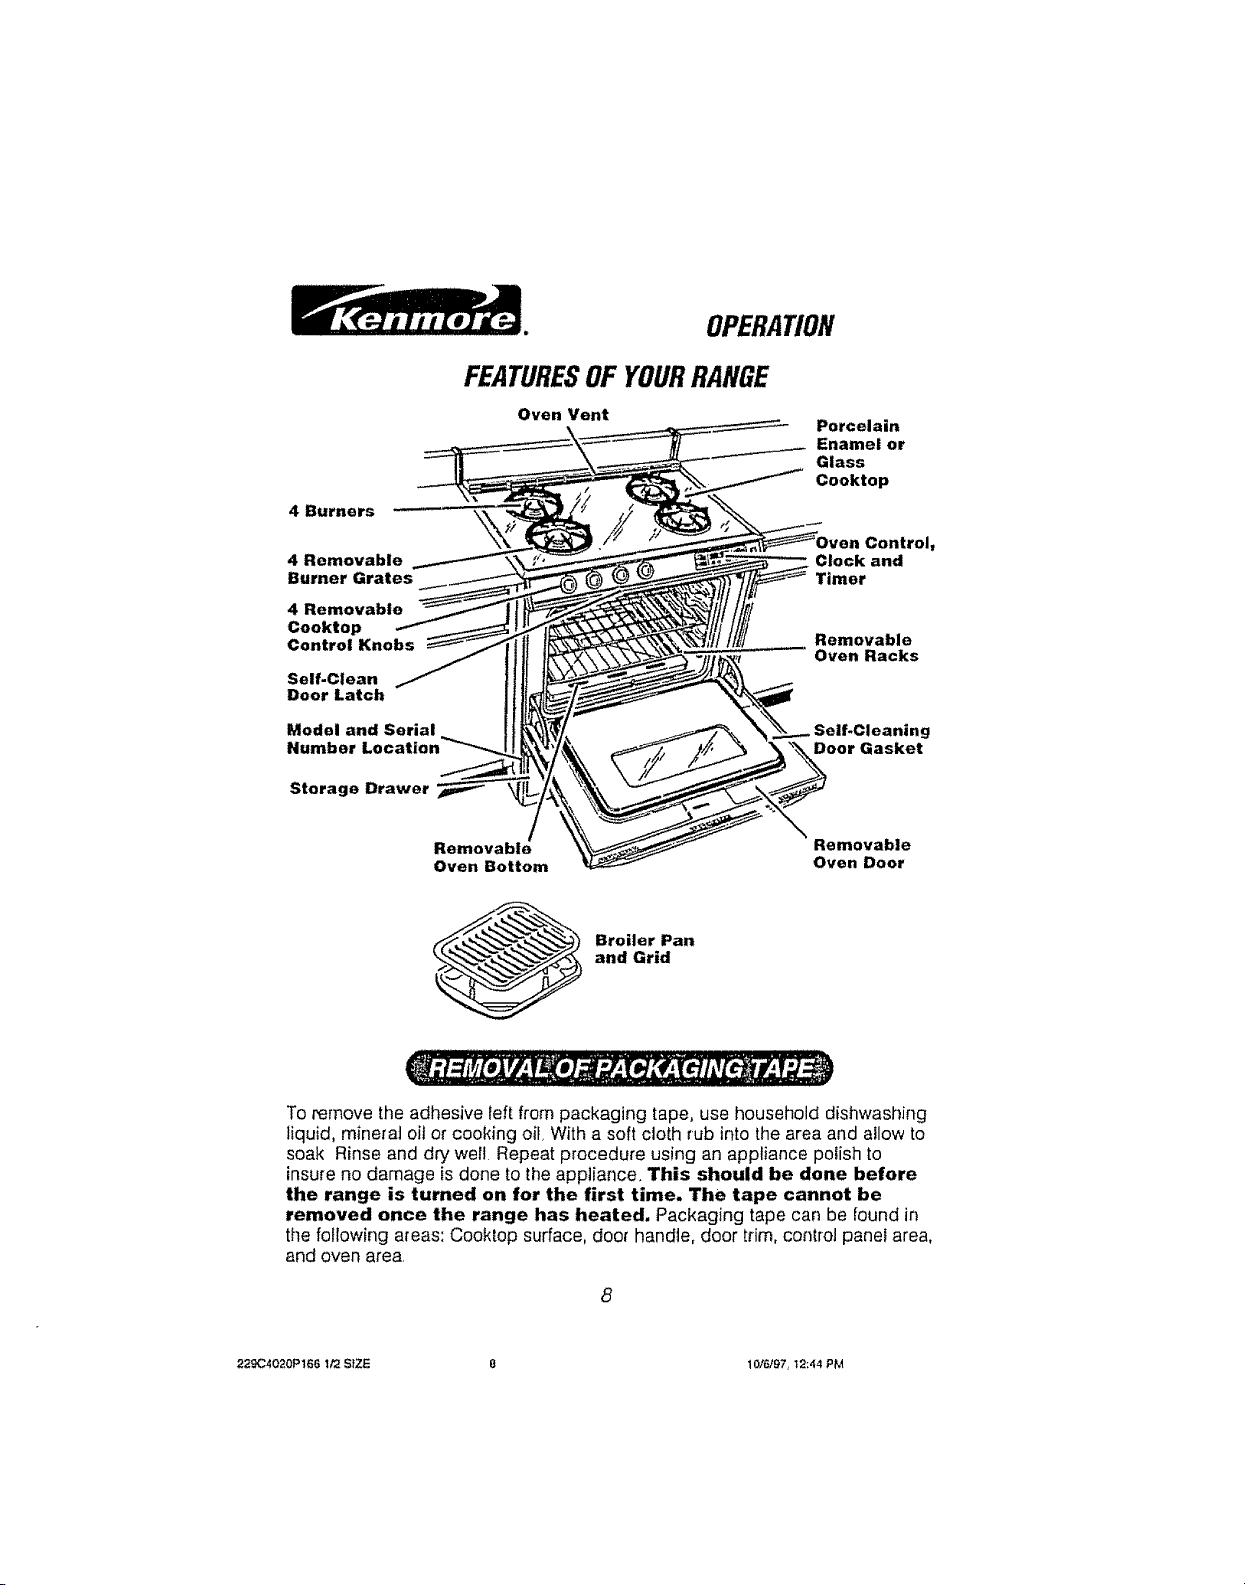
4 Burners
4 Removable
Burner Grates
4 Removable
Cooktop
Control Knobs
Self-Clean
Door Latch
Model and Serial
Number Location
Storage Drawer
OPERATION
FEATURESOF YOURRANGE
Oven Vent
Porcelain
Enamel or
Glass
Cooktop
1 Control,
Clock and
Timer
Removable
Oven Racks
g
Door Gasket
Removable Removable
Oven Bottom Oven Door
Broiler Pan
and Grid
To remove the adhesive left from packaging tape, use household dishwashing
liquid, mineral oil or cooking oil. With a soft cloth rub into the area and allow to
soak Rinse and dry welt. Repeat procedure using an appliance polish to
insure no damage is done to the appliance. This should be done before
the range is turned on for the first time. The tape cannot be
removed once the range has heated, Packaging tape can be found in
the following areas: Cooktop surface, door handle, door trim, control panel area,
and oven area.
8
229C4020P166 I/2 SiZE 0 10/6/97, 12;44 PM
OPERATION
CooktopCooking
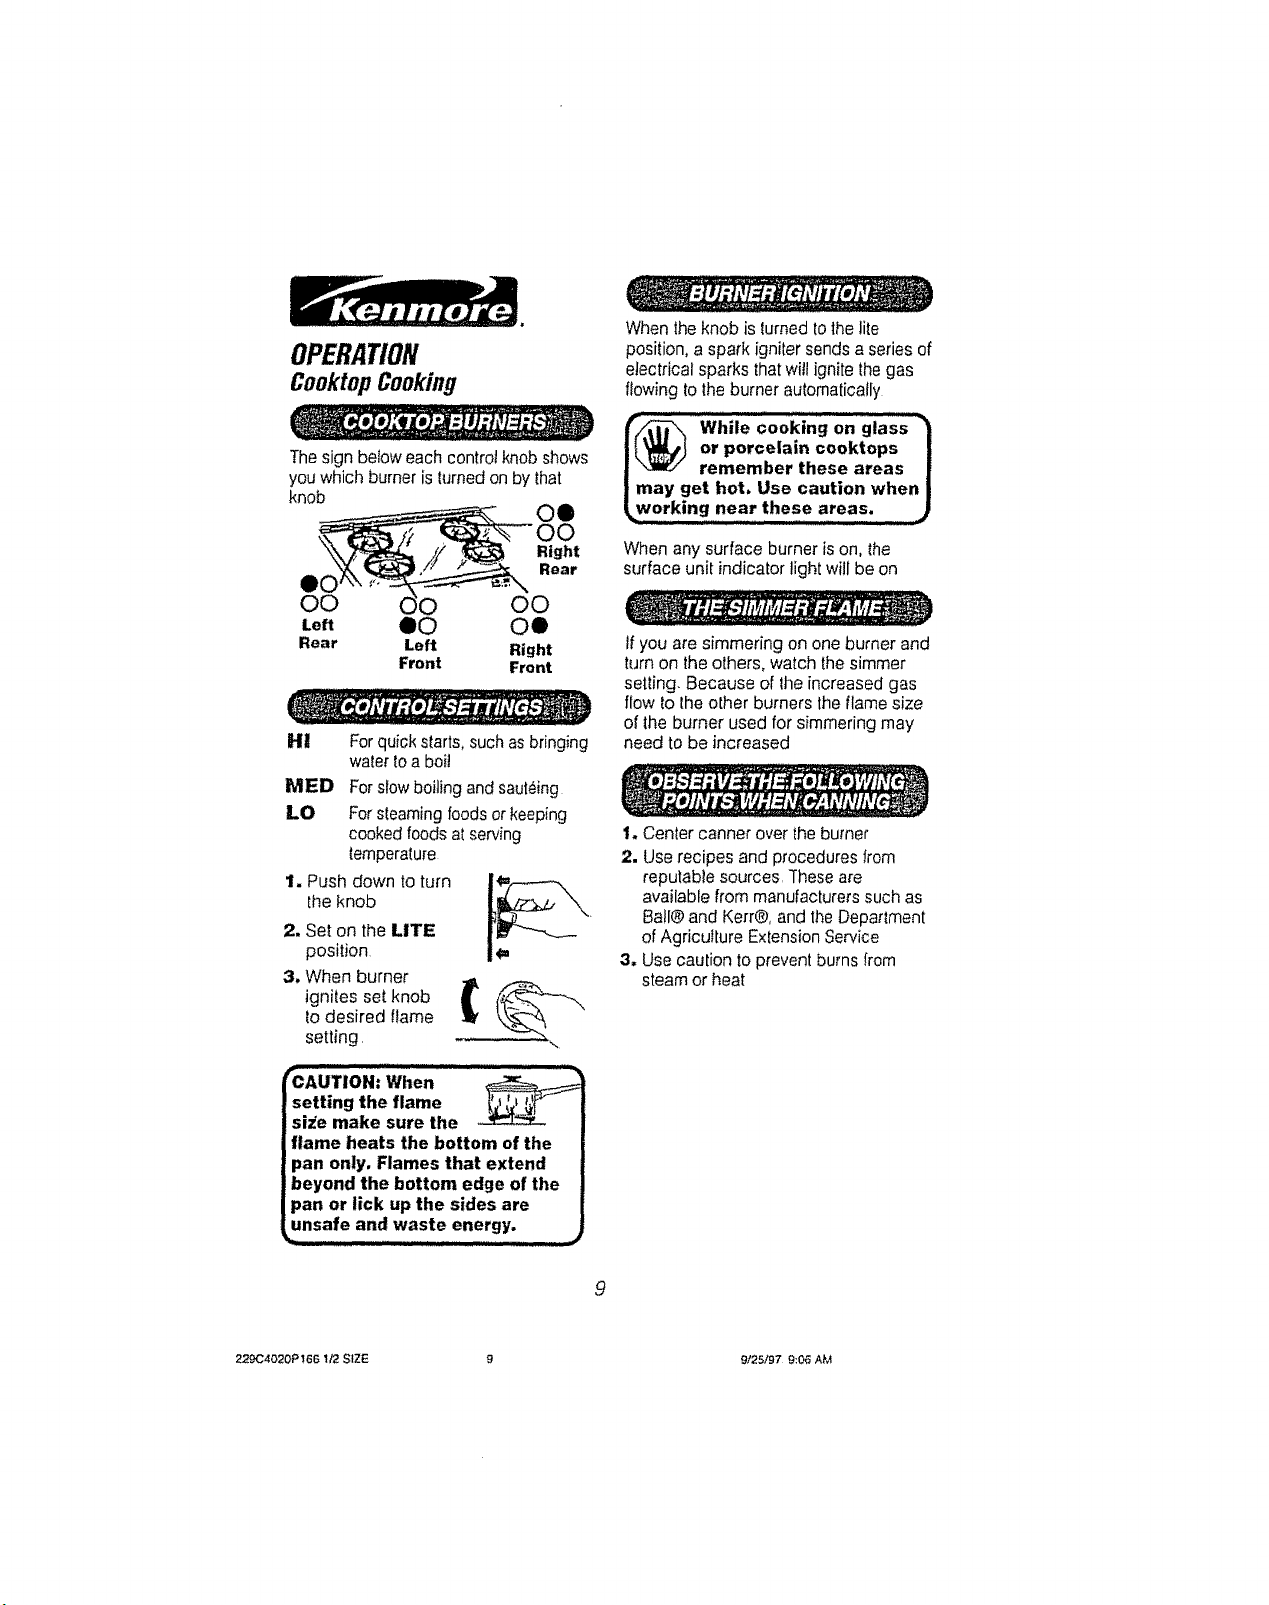
The sign below each control knob shows
you which burner is turned on by that
knob
When theknob is turned to the lite
position, a spark igniter sends a series of
electrical sparks thatwill ignite the gas
flowing to the burner automatically
@While cooki. o.glass"3
or porcelain ceektops |
| remember these areas |
| may get hot, Use caution when I
f_working near these areas, ...............)
When any surface burner is on, the
surface unit indicator light will be on
Left eO Oe
Rear Left Right
Front Front
Hi Forquick starts, such asbringing
water toa boi!
MED For slow boiling and sauteing
LO For steaming foods or keeping
cooked foods atserving
temperature
1. Push down to turn
the knob
2. Set on the LITE
position
3. When burner
ignites set knob
to desired flame
setting,
, i ,,i,,i L , I1,111,,,I
_AUTION: When
setting the flame
size make sure the
flame heats the bottom of the
pan only. Flames that extend
beyond the bottom edge of the
pan or lick up the sides are
unsafe and waste energy.
tfyou are simmering on one burner and
turnon the others, watch the simmer
setting. Because of the increased gas
flow to lhe other burners the flame size
of the burner used for simmering may
need to be increased
1,,Center canner over the burner
2. Userecipes and procedures from
reputable sources. These are
available from manufacturers such as
Ball@and Kerr@, and the Department
of Agriculture Extension Service
3. Use caution to prevent burns from
steam or heat
229C4020P166 1/2 SIZE 9 9/25/97 9:06 AM
OPERATION
Clock Timer and OvenControl
f
OVEN
TIME
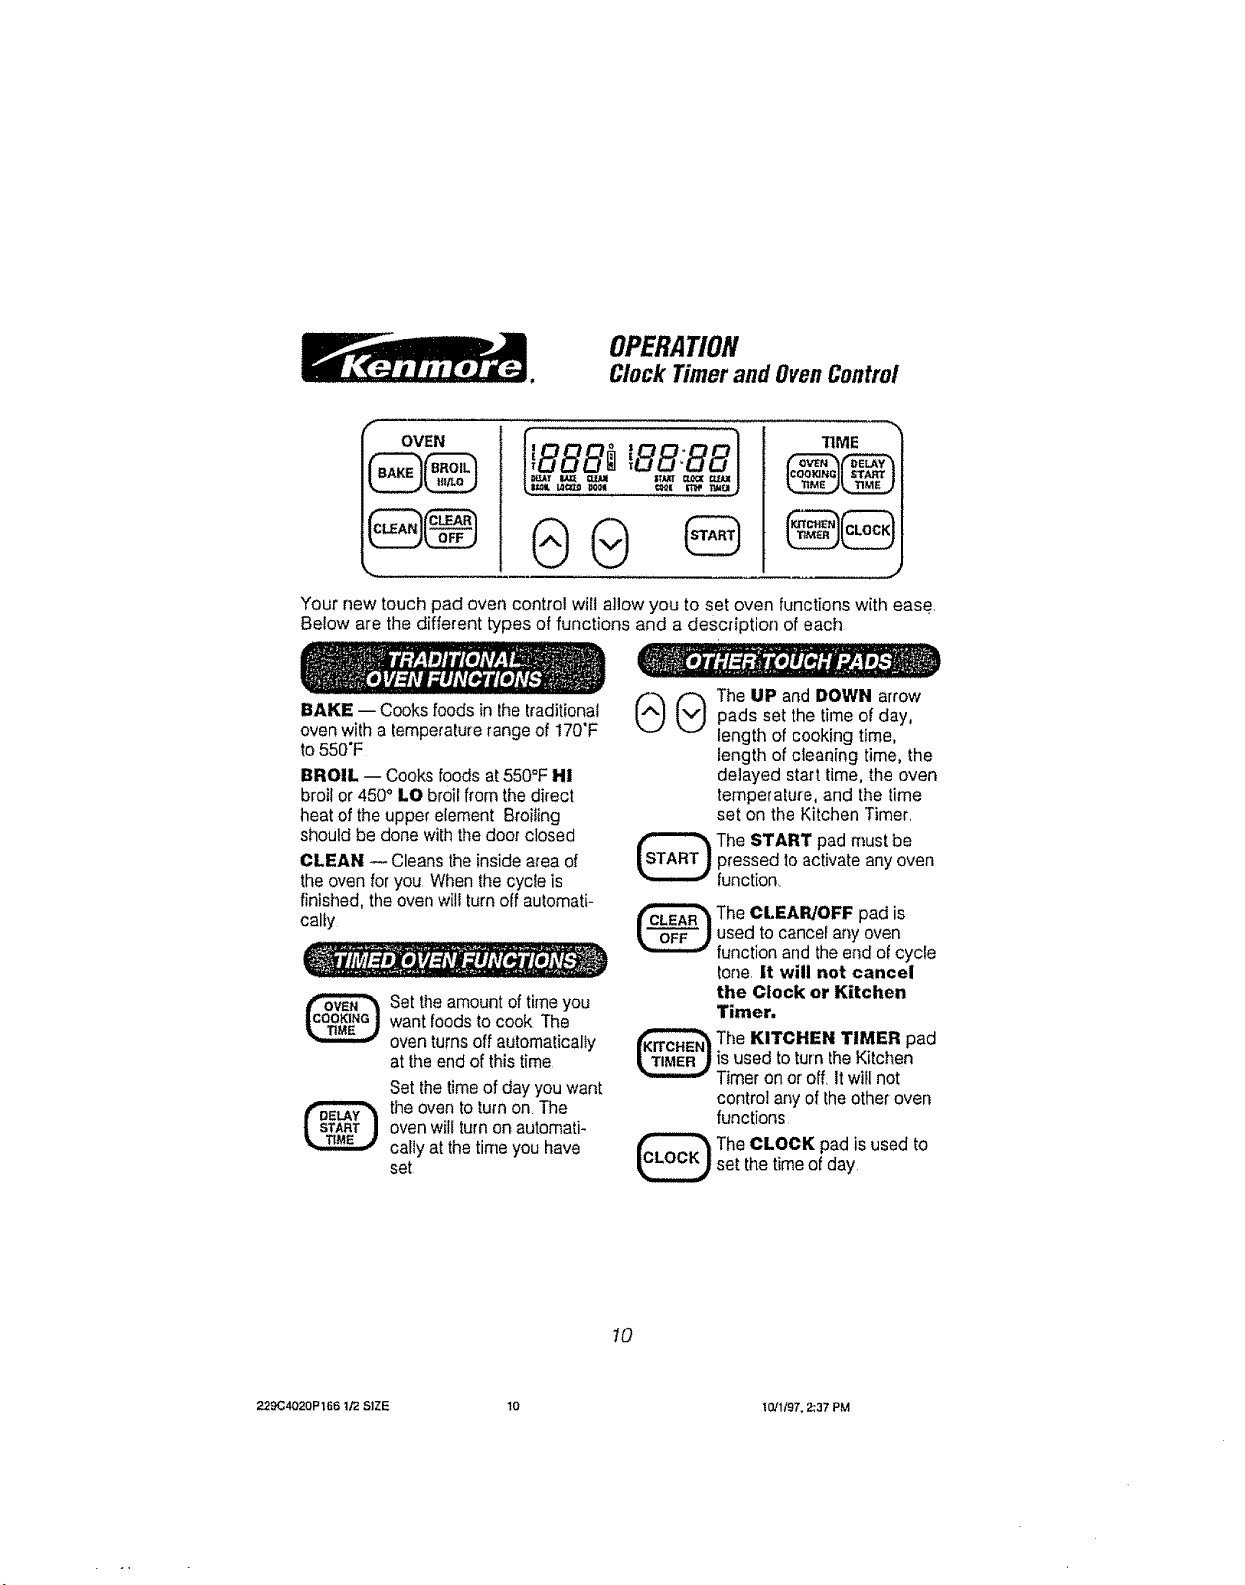
Your new touch pad oven control will allow you to set oven functions with ease,
Below are the different types of functions and a description of each
BAKE -- Cooks foods in the traditional
oven with a temperature range of 170"F
to 550"F
BROIL -- Cooks foods at 550°F HI
broil or 450° LO broil from the direct
heat of the upper element Broiting
should be done withthe door closed
CLEAN -- Cleans the inside area of
the oven foryou When the cycle is
finished, tile oven willturn off automati-
cally
Set the amount of time you
want foods to cook The
oven turnsoff automatically
at the end of this time
Set the time of day you want
the oven to turn on+The
oven will turn on automati-
cally at the time you have
set
0(_ he liP and DOWN arrowpads set the time of day,
length of cooking time,
fength of cleaning time, the
delayed start time, the oven
temperature, and the time
set on the Kitchen Timer,
The START pad must be
pressed to activate any oven
function,
The CLEAPJOFF pad is
used to cancel any oven
function and the end of cycle
tone It will not cancel
the Clock or Kitchen
Timer.
The KITCHEN TIMER pad
is used to turn the Kitchen
Timer on or off, it will not
control any of the other oven
functions
The CLOCK pad is used to
set the time of day
!0
229C4020P166 t12 SIZE 10 10/'1/97+ 2;37 PM
 Loading...