


91136655590
Kenmore 91136655590, 91136655792, 91136655793, 91136659590, 91136659791 Owner’s Manual
...
OWNER'S MANUAL
30" GAS SELF-
CLEANING
SLIDE-IN RANGE
MODEL NO.
911,36655
911.36659
911.36755
911.36756
911.36759
CAUTION:
Before using this range,
read this manual and
follow all its Safety Rules
and Operating
Instructions,
• Safety Instructions
- Operation
• Care and Cleaning
• Problem Solving
_=
Sears, RoebUck andCo',-Hoffman Estates, IL 60179 U.S.A.
229c4020P134 (SR 1o348)

Table of Contents
Range Safety .......................... 3-7
Power Failure ............................. 7
Oven Shut Off Valve .....................7
SLIDE-INRANGE
Cooking Utensils and Woks ..... 7
Removal of Packaging Tape .... 8
Features of Your Range .............8
Cooktop Burners ...................... 9
Control Settings .......................... 9
BurnerIginition..........................9
Simmer Flame .............................9
Home Canning ..........................9
Range Control .......................10
To SettheClock .....................11
To Set the Timer ..................... 11
To Reset The Timer ................. 11
To Cancel The Timer .............. 1't
Oven Cooking Tips ..............12-13
Strong Smell or Odor .............. 12
Aluminum Foil ...........................12
Oven Vent ...............................I2
Preheating .............................12
Oven Temperature Sensor ..... 12
No Peeking ...................................12
Bakeware Placement ..............12
Bakeware .................................. 13
Burner Cycling .......................... 13
Oven Racks ............................. 13
Oven Glow Bar ......................... 13
Oven Temperature
Adjustment ....................... 13, 26
To Set Bake .............................. 14
Broiling ................................... 15
Self-Clean Cycle ................ 16,17
Control Panel ........................... 18
Broiler Pan and Grid ................ 18
Painted Surfaces ..................... 18
Glass Cooktop ........................ 18
Porcelain Cooktop ................... 18
Burner Box Bottom ................... 19
Burner Grates ..........................19
Burner Bowls, Caps,
and Heads .............................. lg
Oven Bottom ............................ 19
Control Knobs ......................... 20
Oven Light Bulb ..........................20
Storage Drawer ....................... 21
Cooktop Burner Components. 22
Oven Racks ............................ 23
Oven Door ...............................23
Before Calling for Service ...........
............................................. 24-25
Temperature Adjustment ........26
Warranty .................................... 27
Consumer Service Numbers .r28
For your convenience and future reference, please write down
your model and serial numbers in the space provided. They are
located on the front frame behind the storage drawer.
MODEL NUMBER: SERIAL NUMBER:
2

IMPORTANTSAFETY
SAVE THESE INSTRUCTIONS
Read all instructions before using this appliance, When using gas or electri-
cal appliances, basic safety precautions should be followed, including the
following:
:_ WARNING!! if the infor-
;_ mation in this manual is
ii not followed exactly, a !i
LI fire, explosion, or gas leak _
,_ may result causing property i
da age p l'njurym , ersona ! , or
;I
ers of potential exposure to such
substances.
Gas appliances can cause minor
exposure to four of these sub-
stances, namely benzene, carbon
monoxide, formaldehyde and soot,
caused primarily by the incom-
plete combustion of natural gas or
L.P. fuels. Properly adjusted appli-
ances, indicated by the bluish
rather than a yellow flame, will
minimize incomplete combustion.
Exposure to these substances can
be minimized by further venting
with an open window or using a
ventilation fan or hood.
The oven, as shipped from the fac-
tory, can only be operated with
natural gas. Do not try to operate
it with L.P. (bottled) gas High
flames and toxic fumes could
cause serious injury. If you wish to
use your oven with L.P. gas, you
must convert the range following
the procedure found in the installa-
tion instructions shipped with your
range.
IMPORTANT SAFETY NOTICE]
The California Safe Drinking Water
and Toxic Enforcement Act re.
quires the governor of California to
publish a list of substances known
to the state to cause birth defects
or other reproductive harm and re-
quires businesses to warn custom-
,, , , , ,, ,, ,,,,,,,, ,,,,,,,,,,,,,,,i,
WARNING-L.P. BURNER
AJ_ ADJUSTMENTS . |
mlm if you intend to use Lique.n
fled Petroleum Gas (bottled gas)
all L.P. adjustments in the Instal-
lation Instructions must be
made before using your oven.
If your oven is not properly ad.
justed, flames may be too high,
or the oven may use too much
fuel, release toxic fumes or cook
poorly.
3
IMPORTANTSAFETY
INSTRUCTIONS
install Anti-tip }_:!!
Device Packed With !_i'
Range ;,1
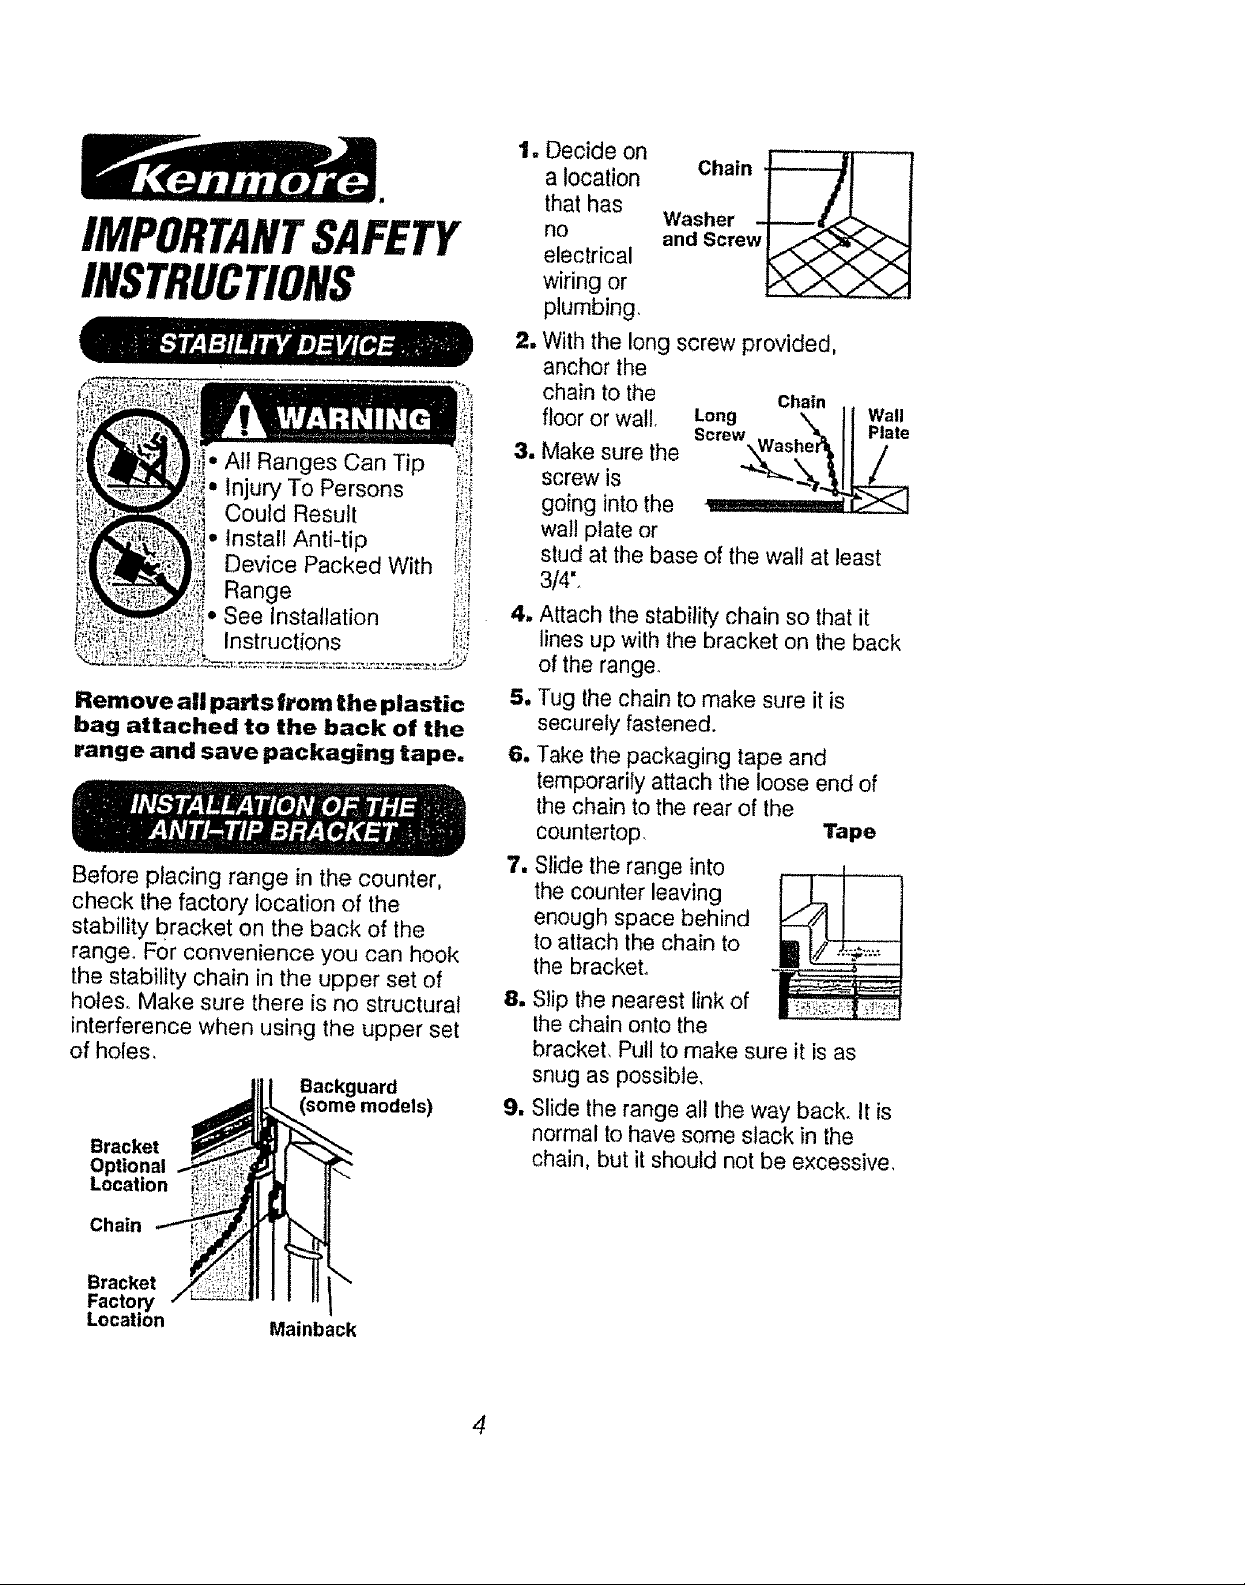
Remove all parts |torn the plastic
bag attached to the back of the
range and save packaging tape=
Before placing range in the counter,
chock the factory location of the
stability bracket on the back of the
range, For convenience you can hook
the stability chain in the upper set of
holes, Make sure there is no structural
interference when using the upper set
of holes,
Bracket
Optional
Location
Chain
1
1
Decide on
a location
that has
no
electrical
wiring or
plumbing,
.a;;:'°LlZ
and Screw
Make sure the
screw is
going into the
wall plate or
With the long screw provided.
anchor the
chain to the Chain
floor or wal!. Long \ II wall
Screw Wash& I_ Plate
stud at the base of the walt at least
3/4".
4, Attach the stability chain so that it
lines up with the bracket on the back
of the range,
.5. Tug the chain to make sure it is
securely fastened.
6. Take the packaging tape and
temporarily attach the loose end of
the chain to the rear of the
countertop, Tape
7. Slide the range into
the counter leaving
enough space behind
to attach the chain to
the bracket,
1
1
Slip the nearest link of
the chain onto the
bracket, Pull to make sure it is as
snug as possible,
Slide the range all the way back. It is
normal to have some slack in the
chain, but it should not be excessive,
Bracket
Factory
Location
Mainback
4
IMPORTANTSAFETY
INSTRUCTIONS
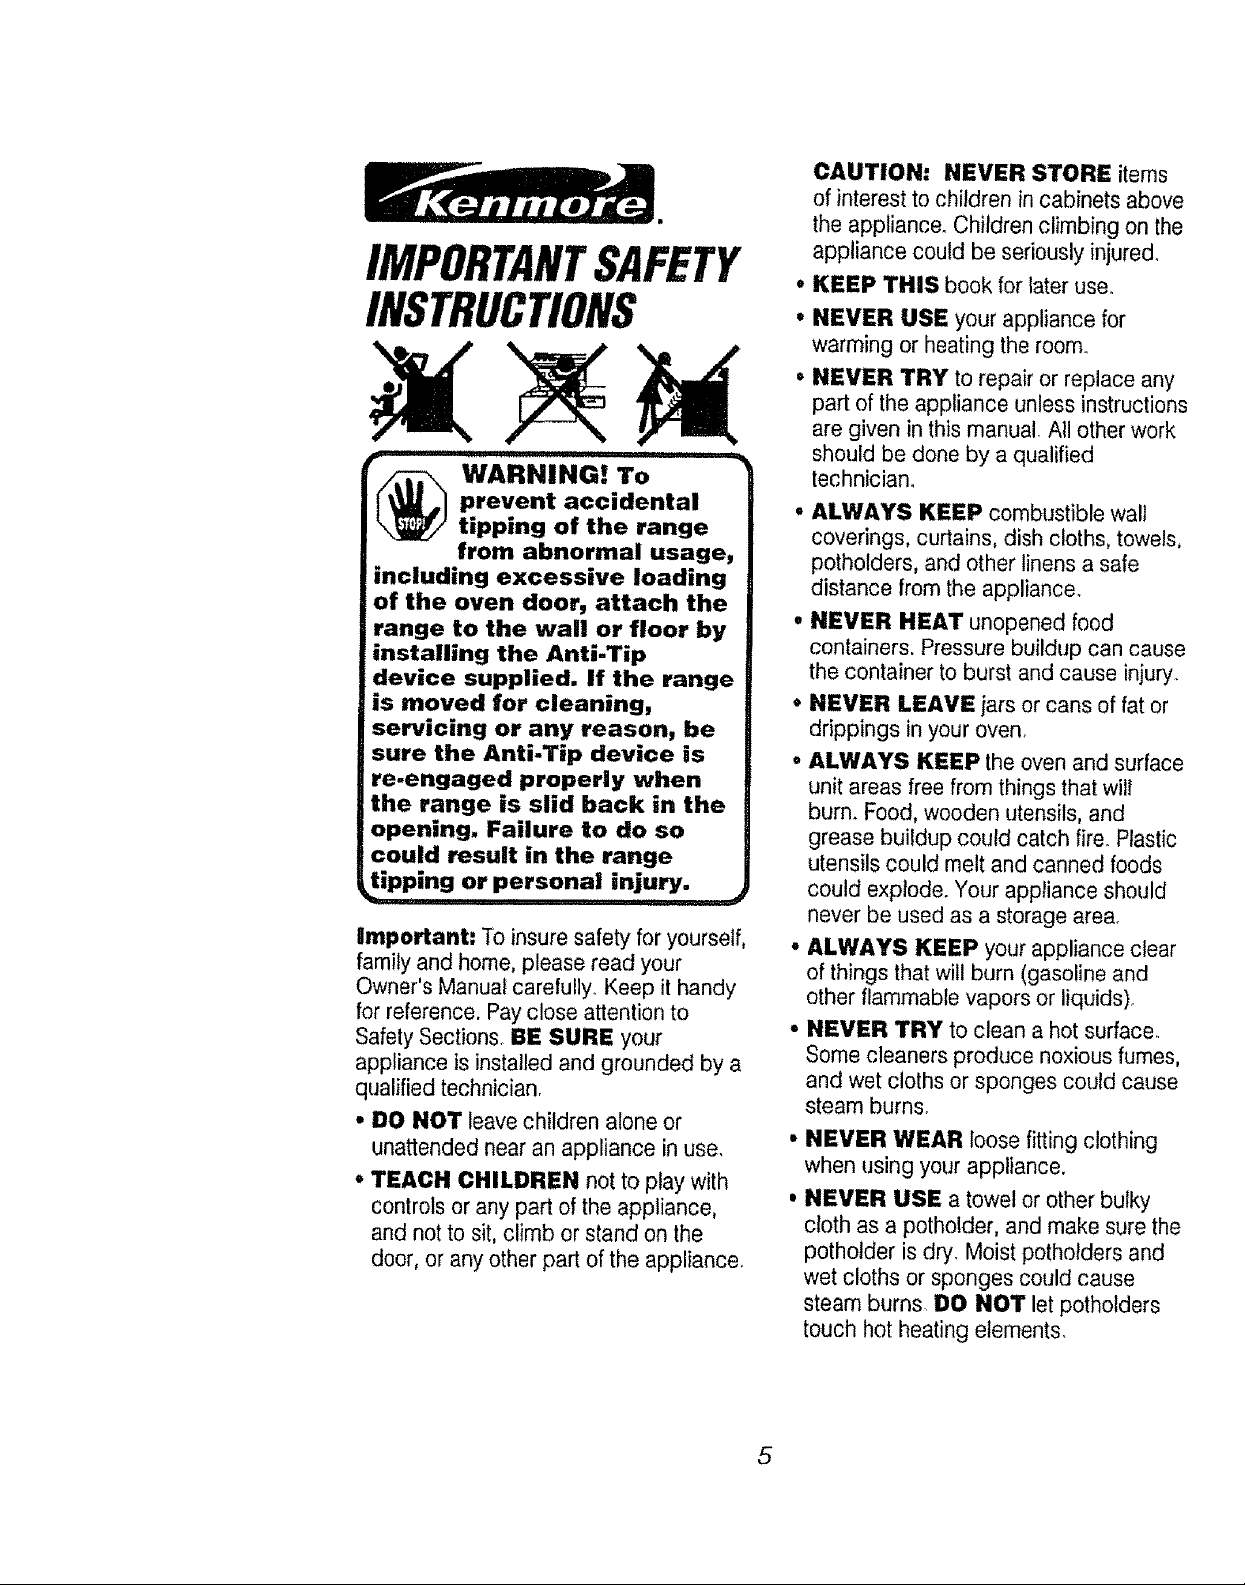
_ WARNING! To
prevent accidental
tipping of the range
from abnormal usage,
including excessive loading
of the oven door, attach the
range to the wall or floor by
installing the Anti-Tip
device supplied. If the range
is moved for cleaning,
servicing or any reason, be
sure the Anti-Tip device is
re-engaged properly when
the range is slid back in the
opening. Failure to do so
could result in the range
tipping or personal injury.
important: To insure safety foryourself,
family and home, please read your
Owner's Manual carefully Keep it handy
for reference. Pay close attention to
Safety Sections BE SURE your
appliance is installed and grounded by a
qualified technician
• DO NOT leave children alone or
unattended near an appliance in use
,_TEACH CHILDREN not to play with
controls or any part of the appliance,
and not to sit, climb or stand on the
door, or any other part of the appliance
CAUTION: NEVER STORE items
of interest to children in cabinets above
the appliance Children climbing on the
appliance could be seriously injured
• KEEP THiS book for later user
• NEVER USE your appliance for
warming or heating the room.
• NEVER TRY to repair or replace any
part of the appliance unless instructions
are given in this manual All other work
should be done by a qualified
technician
• ALWAYS KEEP combustible wall
coverings, curtains, dish cloths, towels,
potholders, and other linens a safe
distance from the appliance
• NEVER HEAT unopened food
containers Pressure buildup can cause
the container to burst and cause injury
• NEVER LEAVE jars or cans of fat or
drippings in your oven
° ALWAYS KEEP the oven and surface
unit areas free from things that will
burn. Food, wooden utensils, and
grease buildup could catch fire Plastic
utensils could melt and canned foods
could exptode. Your appliance should
never be used as a storage area
• ALWAYS KEEP your appliance clear
of things that will burn (gasoline and
other flammable vapors or liquids)°
• NEVER TRY to clean a hot surface.
Some cleaners produce noxious fumes,
and wet cloths or sponges could cause
steam burns°
• NEVER WEAR loose fitting clothing
when using your appliance.
, NEVER USE atowel or other bulky
cloth as a potholder, and make sure the
potholder is dry Moist potholders and
wet cloths or sponges could cause
steam burns DO NOT let pothotders
touch hot heating elements
5

IMPORTANTSAFETY
INSTRUCTIONS
• DO NOT touch cooktop burners,
surfaces near them, or interior oven
surfaces.. These may be hot enough to
cause burns even though they are
dark in color. During and after use, do
not touch or let clothing or flammable
material contact the burners or hot
surfaces until they have had time to
cool, Other surfaces near the oven
vent openings, oven door, window,
and cooktop surfaces may also be hot
enough to cause burns.
• PLACE OVEN RACKS in the
desired position while the oven is
cool. If racks must be moved while
oven is hot, do not let potholder
contact the hot oven element.
° AFTER BROILING always take
the broiler pan and grid out of the
oven and clean them Leftover
grease in the broiler pan could catch
fire the next time you use your oven.
- ALWAYS USE care when opening
the oven door. Let hot air and steam
escape before moving foods.
• NEVER USE aluminum foil to line the
oven bottom. Improper use of foil could
result in the risk of electric shock and
fire.
° ONLY SOME kinds of glass or
ceramic cookware can be used for
ceoktop cooking. Make sure the
cookware you choose to use is
designed for cooktop cooking without
breaking due to the sudden
temperature change.
• ALWAYS USE care when touching
cooktop burners. They will retain heat
after the range has been turned off.
oNEVER BLOCK the oven air vent
behind the right rear element
• COOKWARE USED for cooktop
cooking should be flat on the bottom
and large enough to cover the heating
area being used. Undersized utensils
expose the open flame and may result
in direct contact or ignition of clothing.
• NEVER LEAVE cooktop burners
unattended at high settings. Boilovers
result in smoking or greasy spills which
could catch fire.
• ALWAYS TURN utensil handles
inward and away from other surface
burners to reduce the risk of burns
ignition unintended contact and
spillage.
6
° CLEAN ONLY the parts listed in this
manual, Follow all cleaning instructions,
Be sure to remove broiler pan and grid
before the self-clean cycle,
° NEVER TRY to clean utensils,
cookware, removable parts, or broiler
pan and grid in the self-clean cycle,
• DO NOT USE oven cleaners - No
commercial oven cleaner, or protective
coating of any kind, should be used in
or around any part of the oven.
IMPORTANTSAFETY
INSTRUCTIONS
READ AND UNDERSTAND
THIS INFORMATION NOW!
Be sure everyone in your home
knows what to do in case of fire.
Never use water on a grease fire;
it will only spread the flames,
COOKTOP GREASE FIRE:
Never pick up a flaming pan.,,
1. Turn off the surface burners.
2. Smother the flame with a tightlyfitting
lid Use baking soda or a dry
chemical, foam, or halon type
extinguisher_
OVEN FIRE:
Do not try to move the pan!
1. Close the oven door and turn
controls off.
2. if fire continues, carefully open the
door, throw baking soda on the fire,
or use a dry chemical, foam, or halon
type extinguisher.
During a power failure, the cooktop burners
will not light automatically_In an emer-
gency, a cooktop burner may be lit using a
wooden match. Followthe instructions
below:
1. Light the wooden match.
2. Hold the flame next to the burner you
want to use,
3. Pushin and turn the correct knob to the
light position.
4. When the burner lights turn the knob to
your preferred setting.
.................................. I I '
r w.r.ing,ug.ti.gg.sbur.ers
| a match is dangerous. You should|
| light the burners with this method i
only in an emergency, )
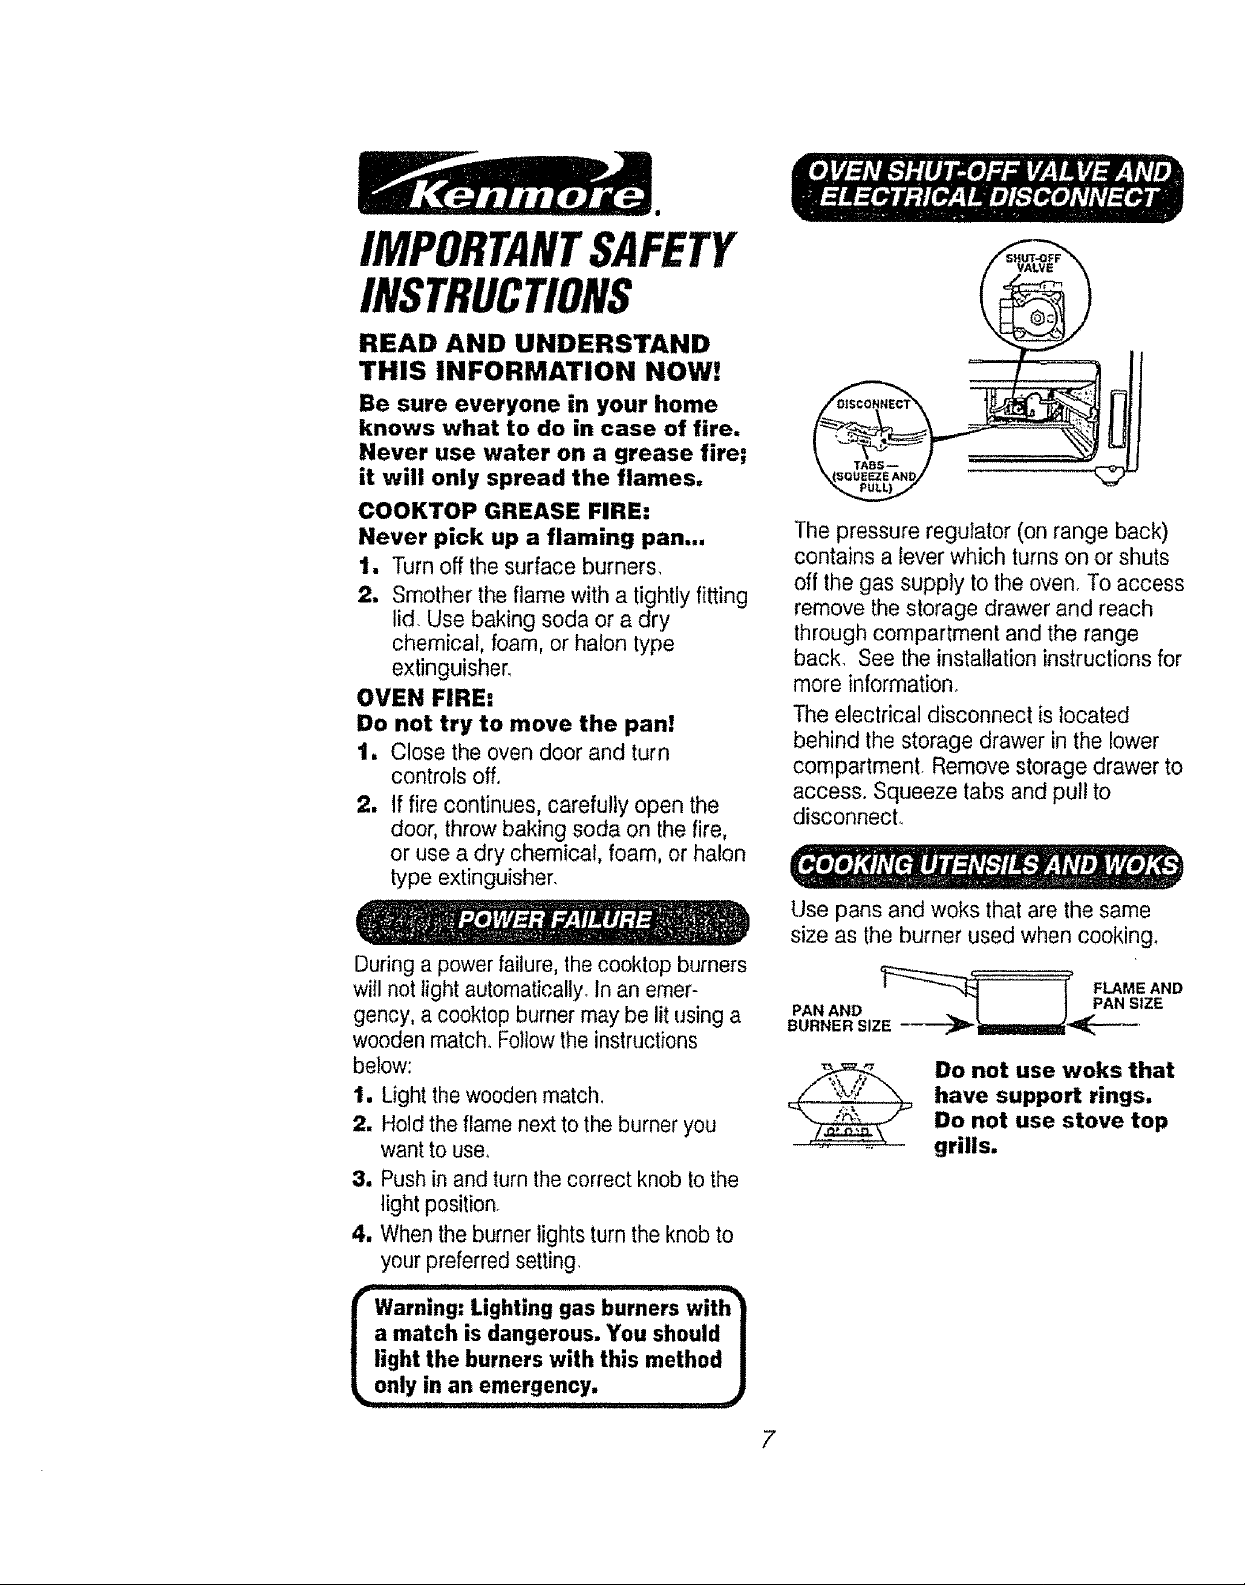
The pressure regulator (on range back)
contains a lever which turns on or shuts
off the gas supply to the oven. To access
remove the storage drawer and reach
through compartment and the range
back_ See the installation instructions for
more information.
The electrical disconnect is located
behind the storage drawer in the lower
compartment. Remove storage drawer to
access. Squeeze tabs and pul! to
disconnect.
Use pans and woks that are the same
size as the burner used when cooking.
PAN AND | _ PAN SIZE
BURNER SIZE ------_miml_-4_Z-_'
Do not use woks that
have support rings.
Do not use stove top
grills.
7
OPERATION
4 Burners
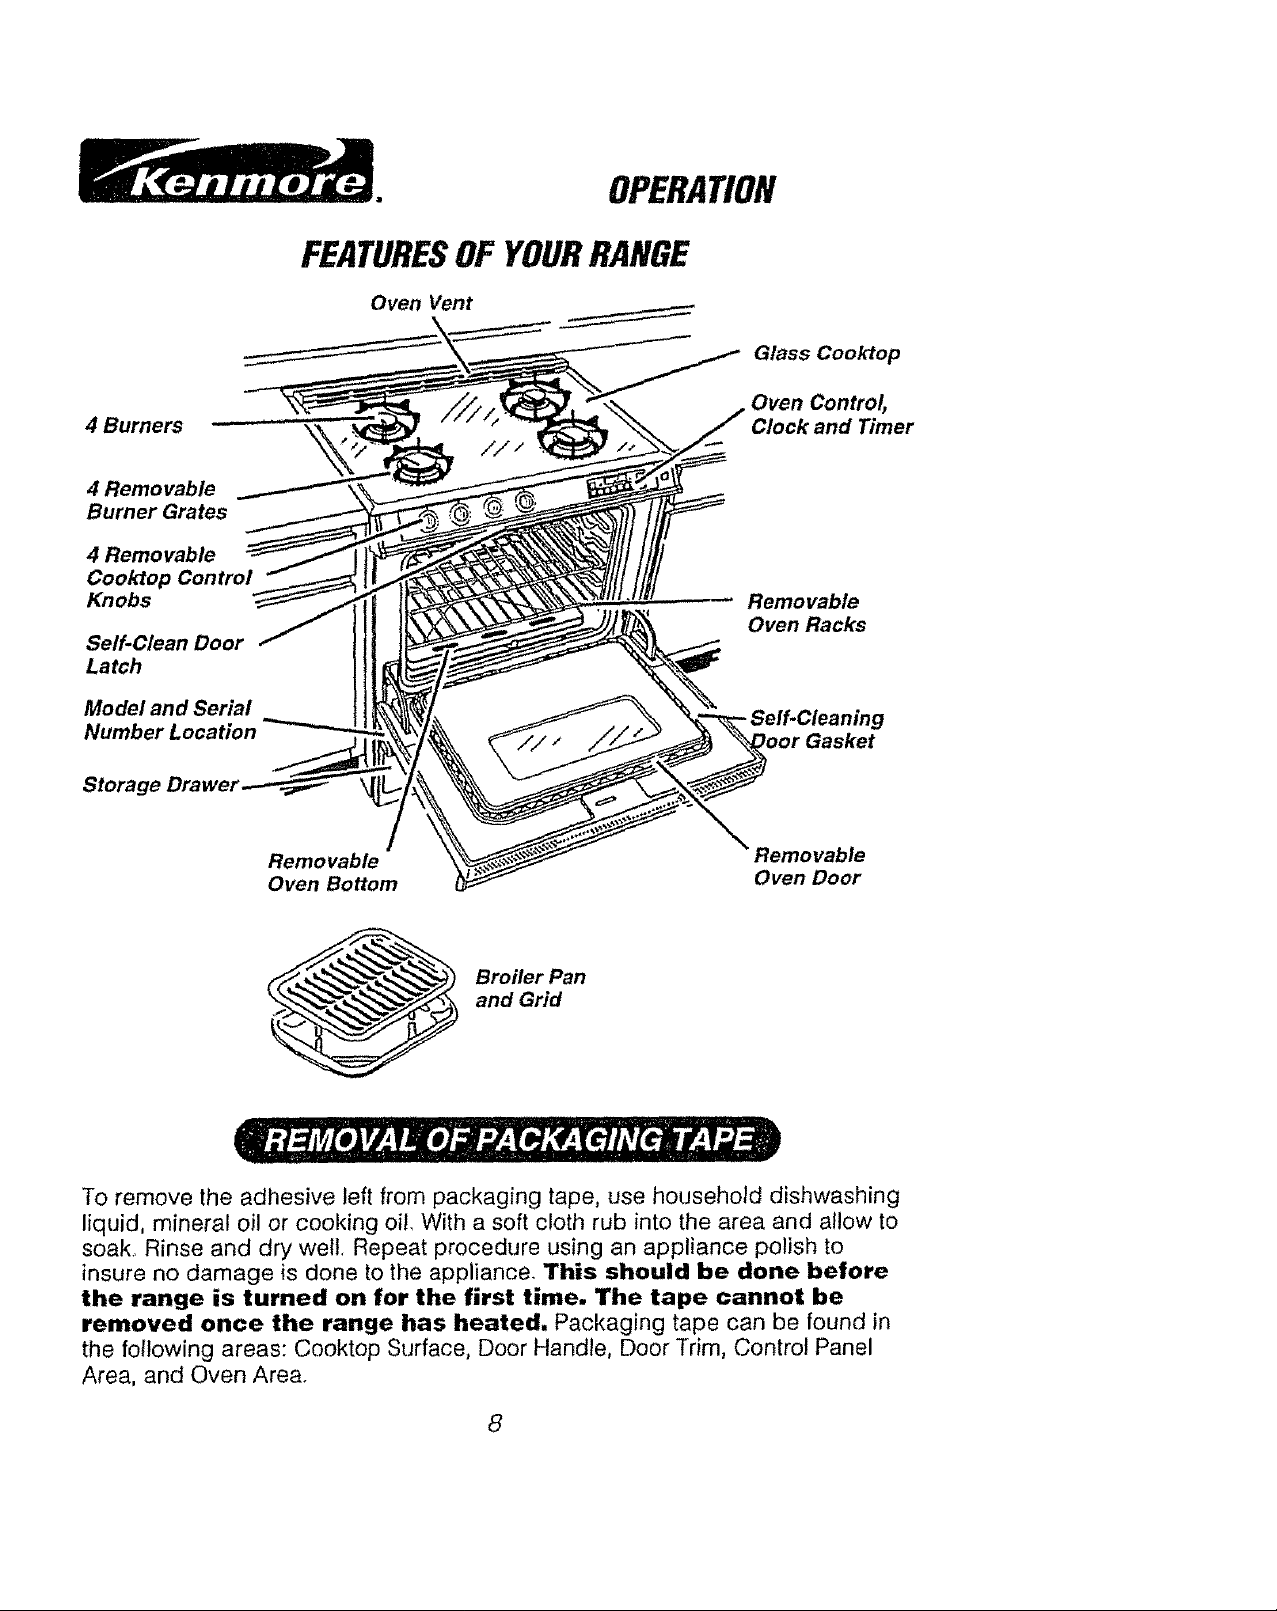
FEATURESOF YOURRANGE
Oven Vent
Glass Cooktop
Oven Control,
Clock and Timer
4 Removable
Burner Grates
4 Removable
Cooktop Control
Knobs
Self-Clean Door
Latch
Model and Serial
Number Location
Removable
Oven Racks
Storage
Removable
Oven Bottom
Removable
Oven Door
Broiler Pan
and Grid
To remove the adhesive left from packaging tape, use household dishwashing
liquid, mineral oil or cooking oi!. With a soft cloth rub into the area and allow to
soak° Rinse and dry well, Repeat procedure using an appliance polish to
insure no damage is done to the appliance. This should be done before
the range is turned on for the first time. The tape cannot be
removed once the range has heated. Packaging tape can be found in
the following areas: Cooktop Surface, Door Handle, Door Trim, Control Panel
Area, and Oven Area°
8
OPERATION
CooktopCooking
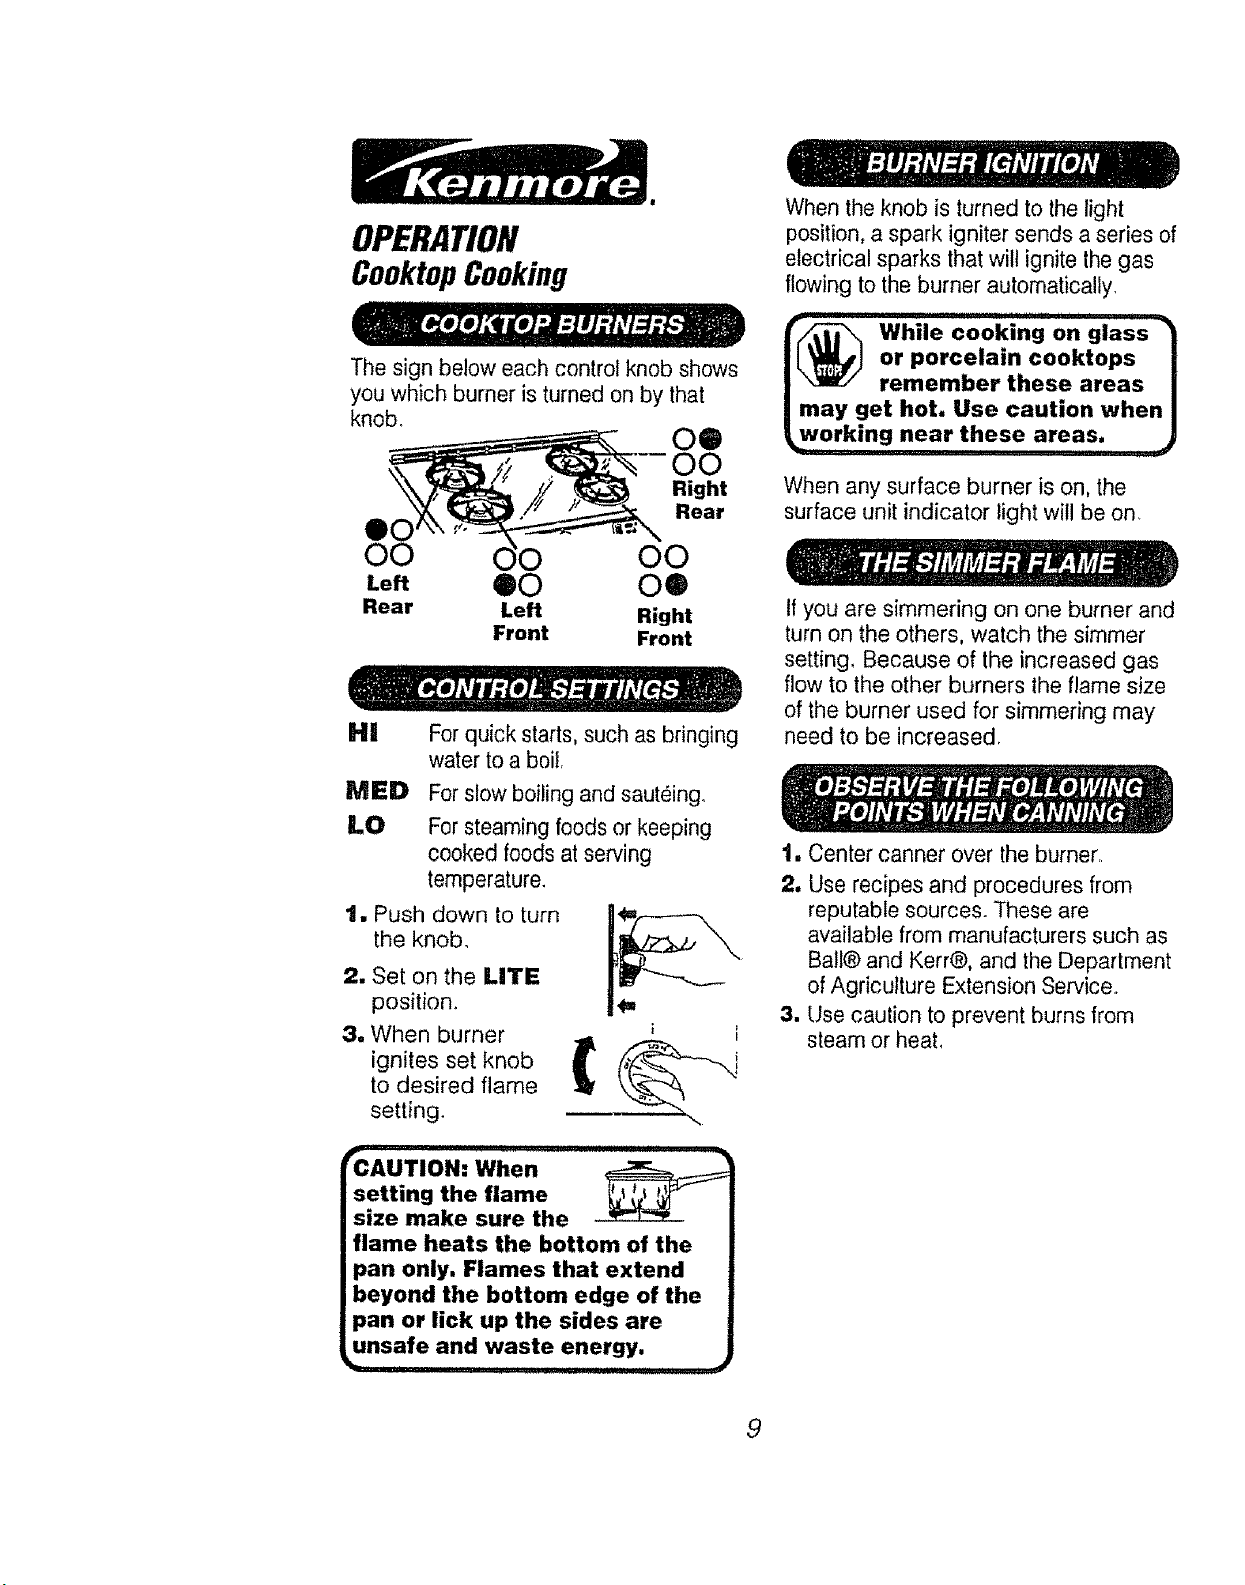
The sign below each control knob shows
you which burner is turned on by that
knob°
00
eo
O0 O0
Left 00 00
Rear Left Right
Front Front
Right
Rear
HI For quick starts, such as bringing
water to a boil,
MED
LO
For slow boiling and sauteing.
For steaming foods or keeping
cooked foods at serving
temperature.
1, Push down to turn
the knob.
2. Set on the LITE
position.
3. When burner
ignites set knob
to desired flame
setting.
FCAUTION: When
setting the flame _ _
size make sure the w--I-_-_
flame heats the bottom of the
pan only. Flames that extend
beyond the bottom edge of the
pan or lick up the sides are
unsafe and waste energy,
_k_ II1,1111 II I iiiil,,lu U_t I I ] I_
When the knob is turned to the light
position, a spark igniter sends a series of
electrical sparks that will ignite the gas
flowing to the burner automatically,
Wh.ecookingo.glass-/
IL_ orporcelamcooktops /
/ remember these areas i
|may get hot. Use caution whenl
_working near these areas. )
When any surface burner is on, the
surface unit indicator light will be on.
If you are simmering on one burner and
turn on the others, watch the simmer
setting, Because of the increased gas
flow to the other burners the flame size
of the burner used for simmering may
need to be increased,
t. Center canner over the burner,
2. Use recipes and procedures from
reputable sources. These are
available from manufacturers such as
Ball@and Kerr@, and the Department
of Agriculture Extension Service..
3, Use caution to prevent burns from
steam or heat,

OPERATION
Clock,TimerandOvenControl
PROGRAM CLOCK /
CANCELS BAKE, STMUS TIMER
BROIL OR DISPLAY DISPLAY
CLEAN OPERATION
TEMPERATURE FUNCTION UP ARROW PAD
DISPLAY DISPLAY (|NCRF-.ASESTIME
OR TEMPERATURE)
PRESS TO TURN SETAUTOMATIC
TIMER ON ANDOFF OVEN OPERATIONS
Your range is controlled with a touch. You
now have the ease of setting the following
operations:
CLOCK
BAKE
BROIL
DELAY CLEAN
TIMER
DELAY BAKE
CLEAN
The UP or DOWN arrow is used toset
an amount of time or change the tem-
perature you want to use. By pressing
and holding down either pad the num-
bering will change quickly. By pressing
and releasing either pad the numbering
will change slowly_
Once you have programmed your con-
trol for any operation, you can display
the setting by pressing the appropriate
pad. For example, if you are using the
TIMER and want to see the time of
day, press CLOCK° The display will
show the time of day
DOWN ARROW PAD
{DECREASES TIME
OR TEMP,_IATURE)
III ,,,_
You cannot set BAKE, 1
BROIL or COOK TIME
while the oven door is
in the locked position.
If you try, the word"DOOR" |
wdl appear in the dzsplay. The |
oven door lock is to be used |
for Self.Cleariing only. j
Theend-of-cycle tonewill soundat the end of
timer use and automatic oven functions. The
end-of-cycle tone is3 short beeps followed by
1beep every 6 seconds that repeat unlil you
press any pad except theUP or DOWN
arrow pad° If you would liketo eliminatethe
repeating beeps, push and hold CLEAR/
OFF for ten seconds. Toreturn lhe ! beep
every6 seconds,push and hold CLEAR/
OFF for 10 seconds.
If thetime display beeps continuously and
flashes an "F" followed by a number, you
have a function error code. Note the
number after the "F"_ Press CLEAR/
OFF. Allow oven to cool for 1 hour. If
problem repeats, disconnect all power to
the range and call for service. Advise your
service technician of the number following
the "F" in the display.
10
OPERATION
Clock and Timer
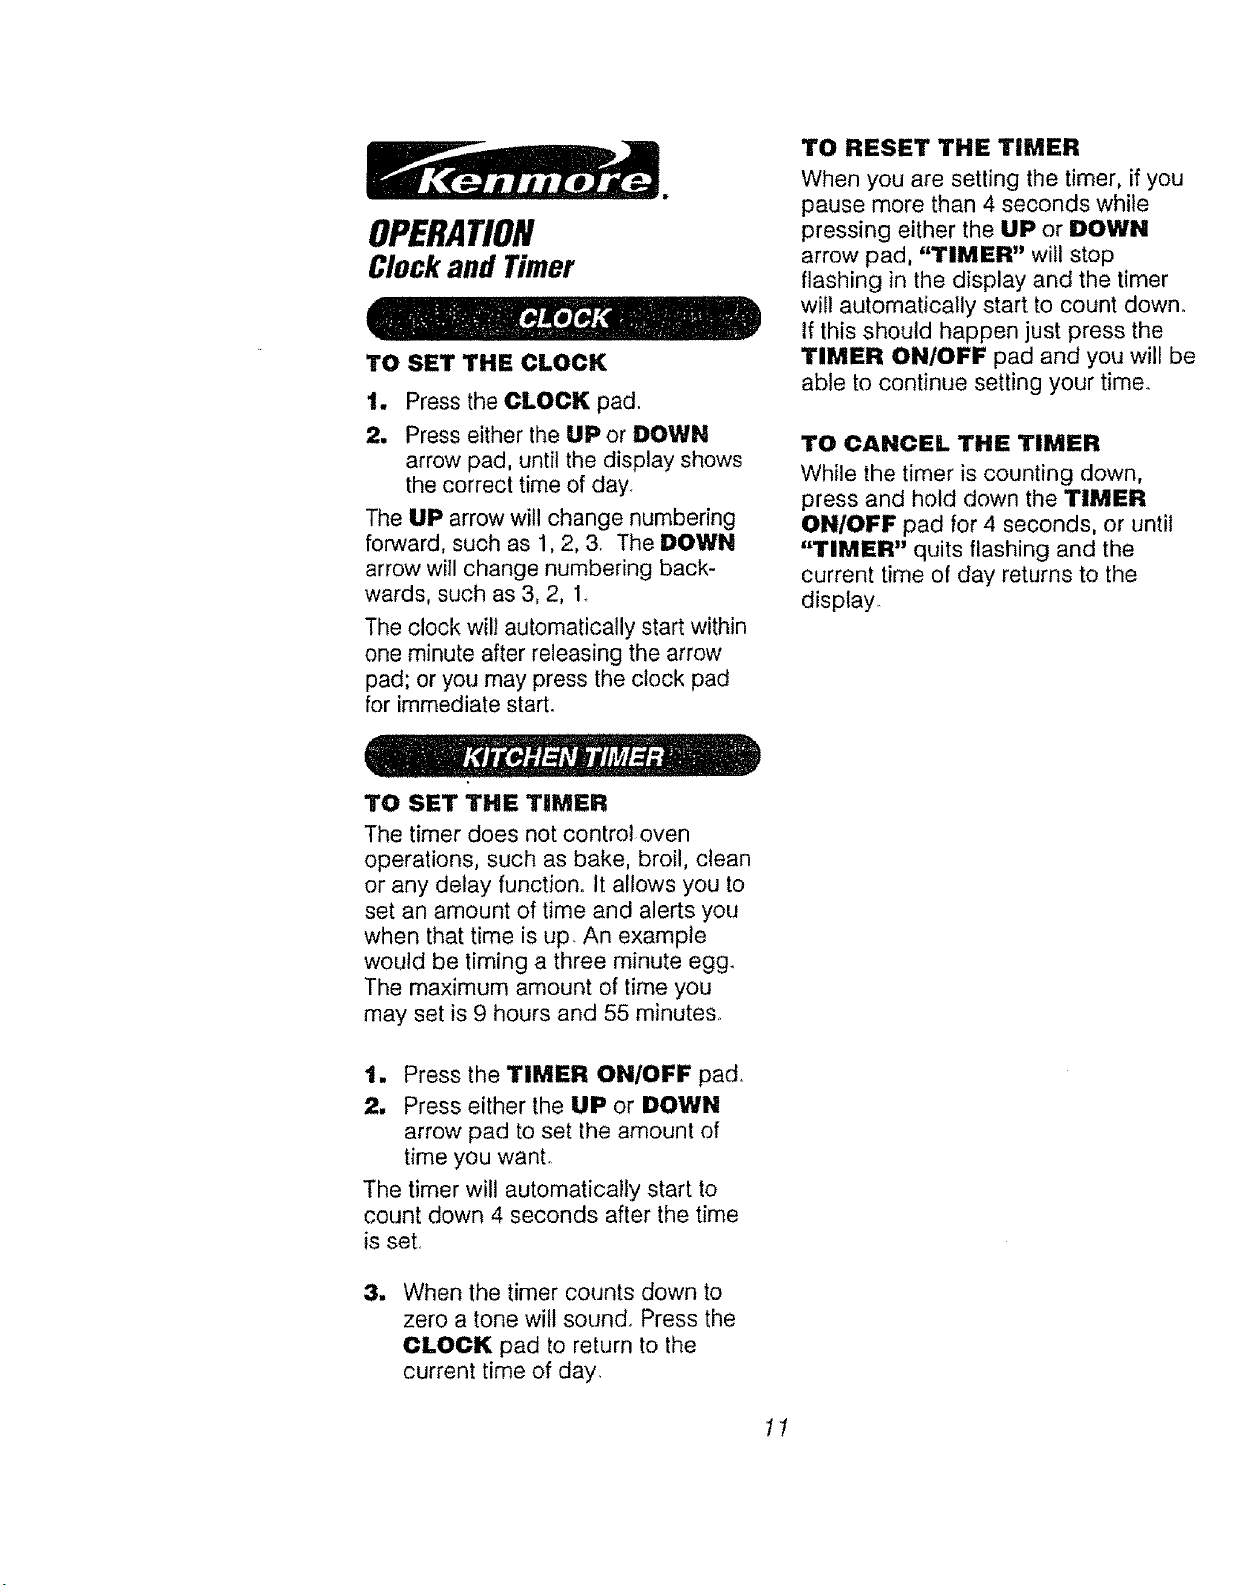
TO SET THE CLOCK
1, Press the CLOCK pad.
2. Press either the UP or DOWN
arrow pad, until the display shows
the correct time of day.
The UP arrow will change numbering
forward, such as 1,2, 3. The DOWN
arrow will change numbering back-
wards, such as 3, 2, 1..
The clock will automatically start within
one minute after releasing the arrow
pad; or you may press the clock pad
for immediate start,
TO RESET THE TIMER
When you are setting the timer, if you
pause more than 4 seconds while
pressing either the UP or DOWN
arrow pad, "TIMER" will stop
flashing in the display and the timer
will automatically start to count down°
tf this should happen just press the
TIMER ON/OFF pad and you will be
able to continue setting your time_
TO CANCEL THE TIMER
While the timer is counting down,
press and hold down the TIMER
ON/OFF pad for 4 seconds, or until
"TIMER'" quits flashing and the
current time of day returns to the
display.
TO SET THE TIMER
The timer does not control oven
operations, such as bake, broil, clean
or any delay function° It allows you to
set an amount of time and alerts you
when that time is up. An example
would be timing a three minute egg.
The maximum amount of time you
may set is 9 hours and 55 minutes_
1. Press the TIMER ON/OFF pad.
2. Press either the UP or DOWN
arrow pad to set the amount of
time you want.
The timer wil! automatically start to
count down 4 seconds after the time
is set.
1 When the timer counts down to
zero a tone will sound. Press the
CLOCK pad to return to the
current time of day.
11
OPERATION
OvenCooking Tips
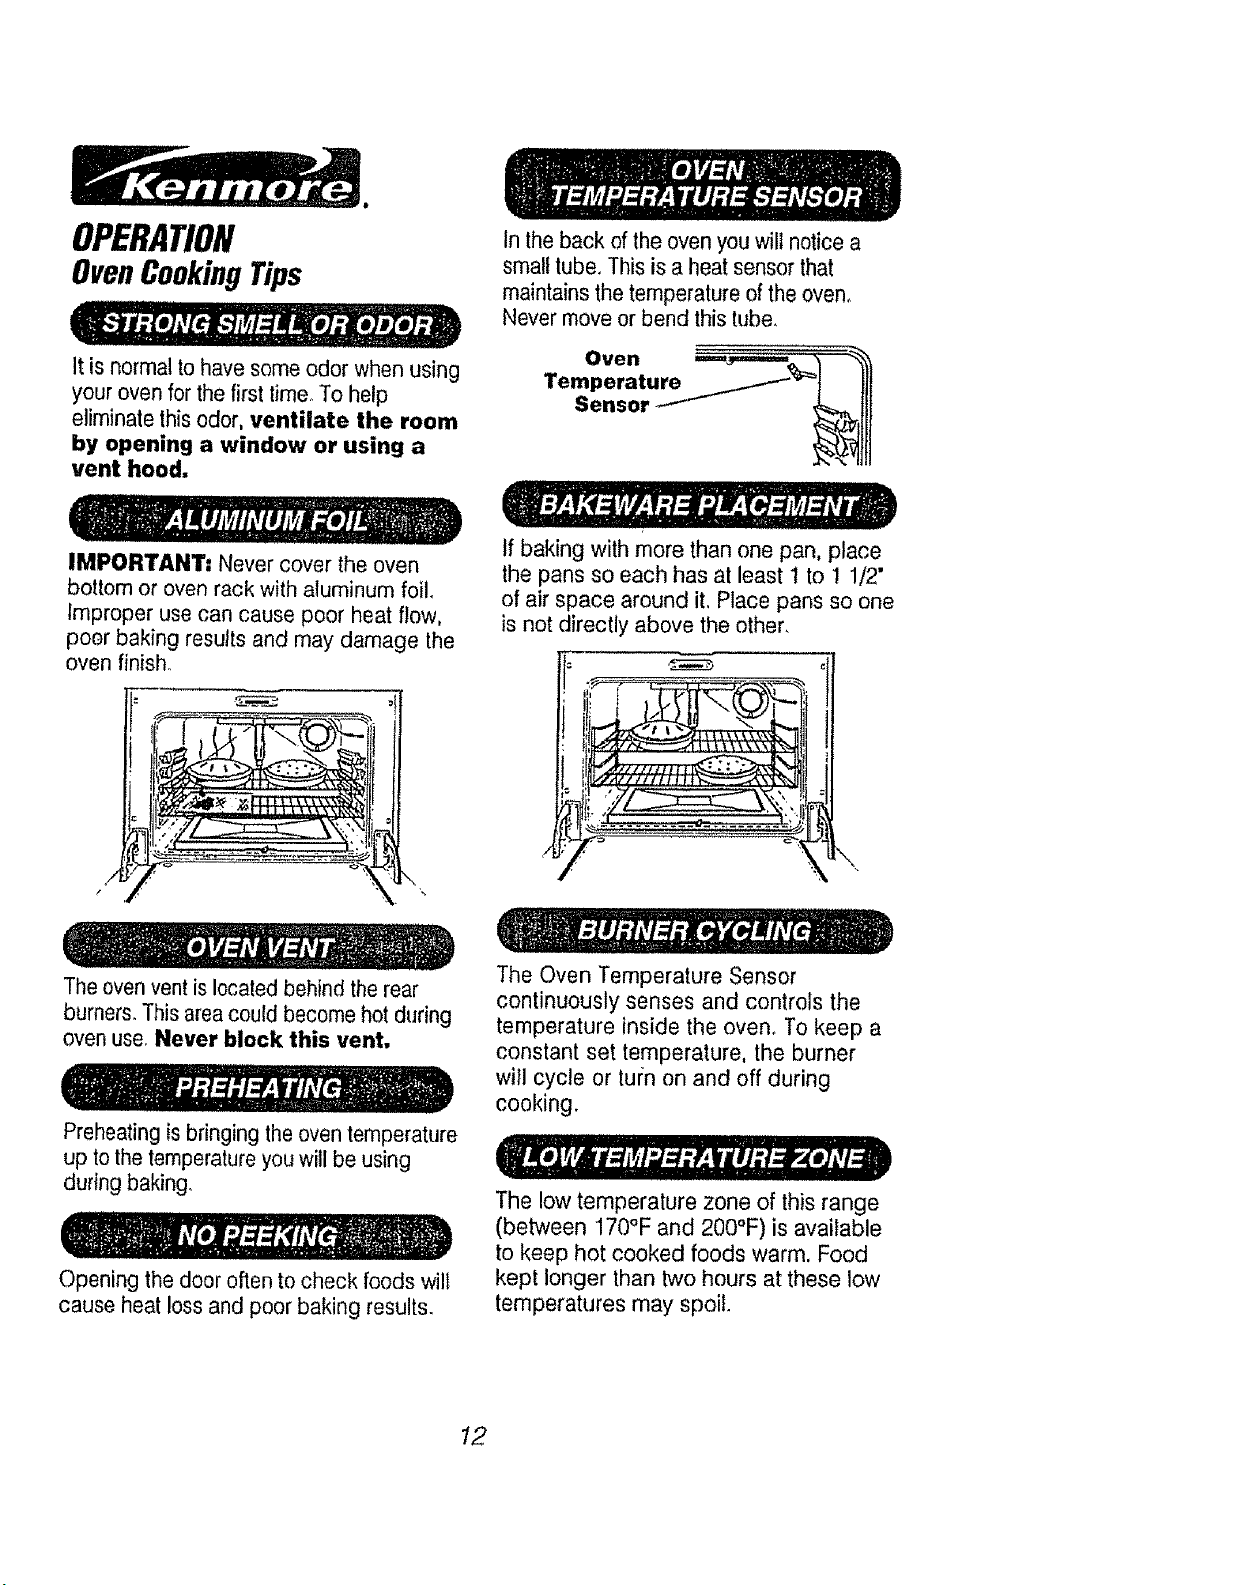
It is normal to have some odor when using
your oven for the first time,.To help
eliminate thisodor, ventilate the room
by opening a window or using a
vent hood.
In the back of the oven you will notice a
small tube. This is a heat sensor that
maintains thetemperature ofthe oven_
Never move or bend this tube.
IMPORTANT= Never cover the oven
bottom or oven rack with aluminum foil
Improper use can cause poor heat flow,
poer baking results and may damage the
oven finish.
/
If baking with more than one pan, place
the pans so each has at least I to 1 !/2"
of air space around it, Place pans so one
is not directly above the other.
The oven vent is located behind the rear
burners°This areacould become hot during
oven use_Never block this vent,
Preheating isbringing the oven temperature
up to thetemperature you will be using
during baking_
Opening the door often to check foods will
cause heat loss and poor baking results.
The Oven Temperature Sensor
continuously senses and controls the
temperature inside the oven. To keep a
constant set temperature, the burner
will cycle or turn on and off during
cooking.
The low temperature zone of this range
(between 170°F and 200°F) is available
to keep hot cooked foods warm, Food
kept longer than two hours at these low
temperatures may spoil.
12
OPERATION
OvenCookingTips
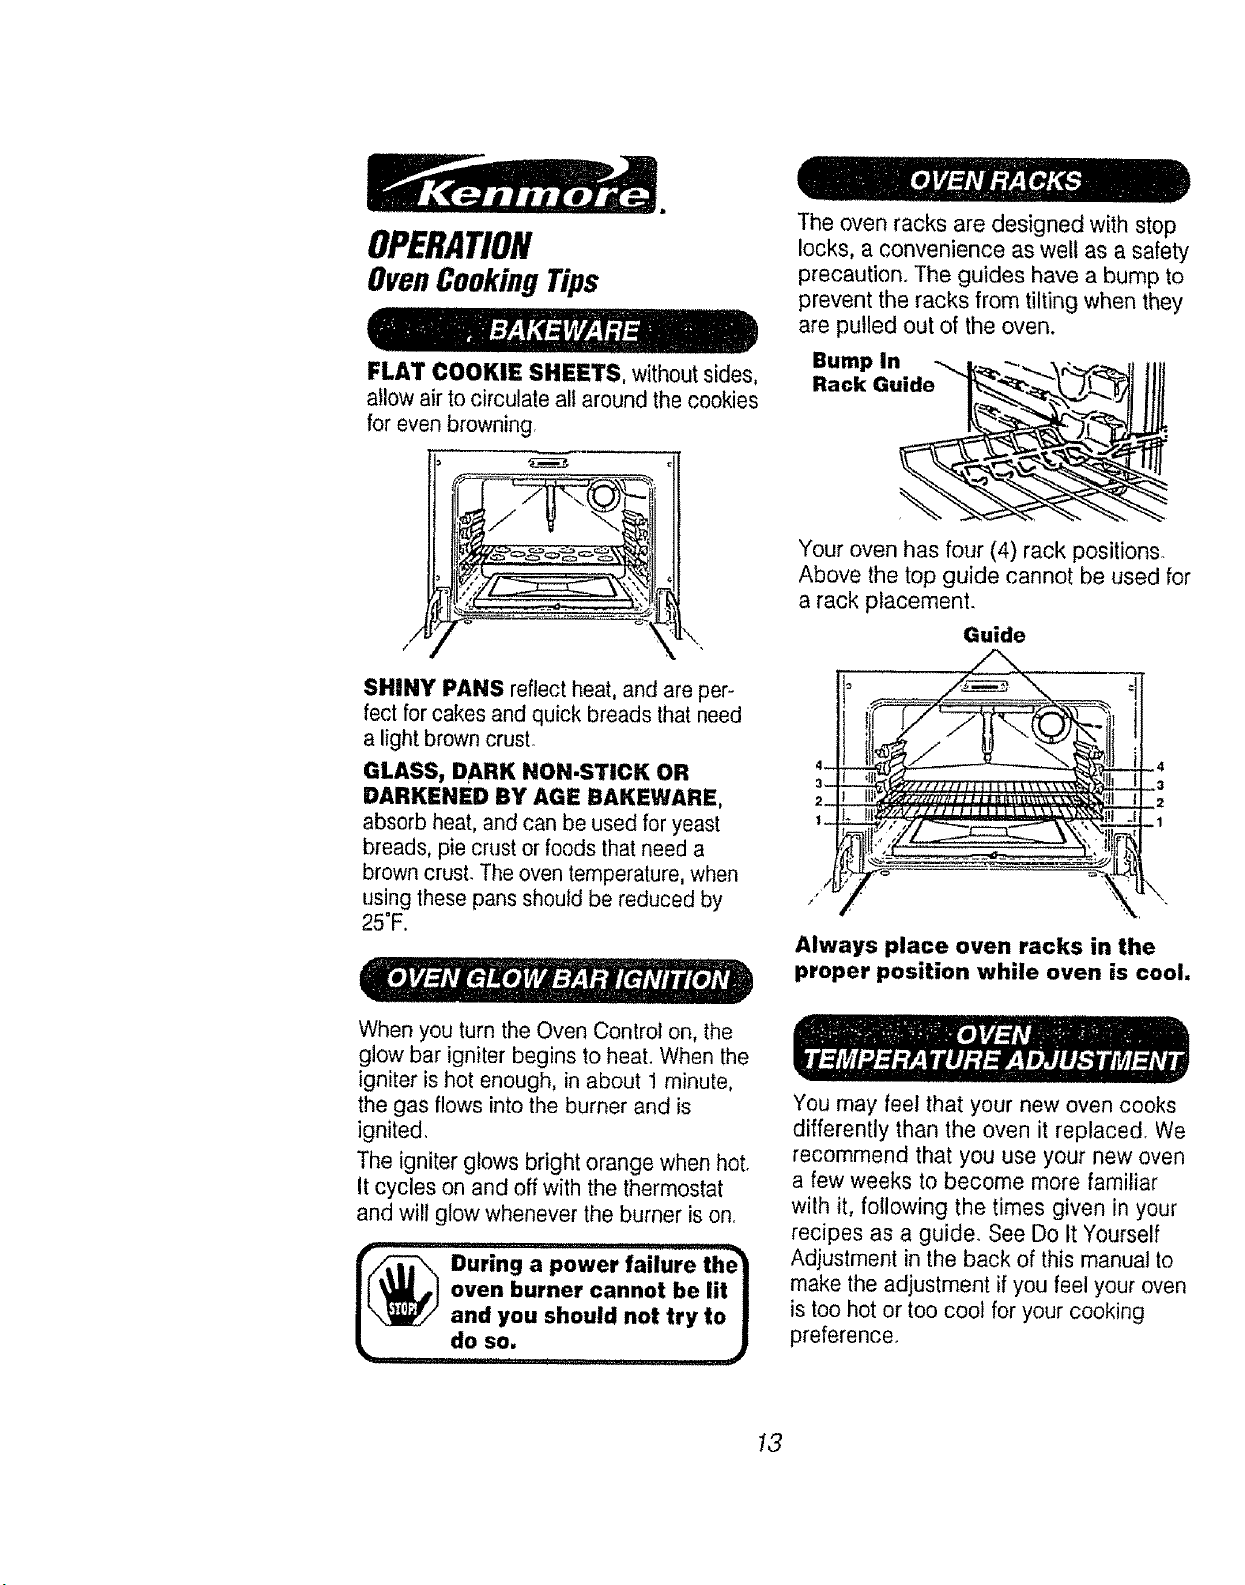
FLAT COOKIE SHEETS, without sides,
allow air to circulate all around the cookies
for even browning.
SHINY PANS reflect heat, and are per-
fect for cakes and quick breads thatneed
a light brown crust.
GLASS, DARK NON-STICK OR
DARKENED BY AGE BAKEWARE,
absorb heat, and can be used for yeast
breads, pie crust or foods that need a
brown crust. The oven temperature, when
using these pans should be reduced by
25"F.
When you turn the Oven Control on, the
glow bar igniter begins to heat. When the
igniter is hot enough, in about 1minute,
the gas flows into the burner and is
ignited,
The igniter glows bright orange when hot.
It cycles on and off with the thermostat
and will glow whenever the burner is on.
I[_ During a power"'failure the_
oven burner cannot be lit/
and you should not try to|
do so: ..... )
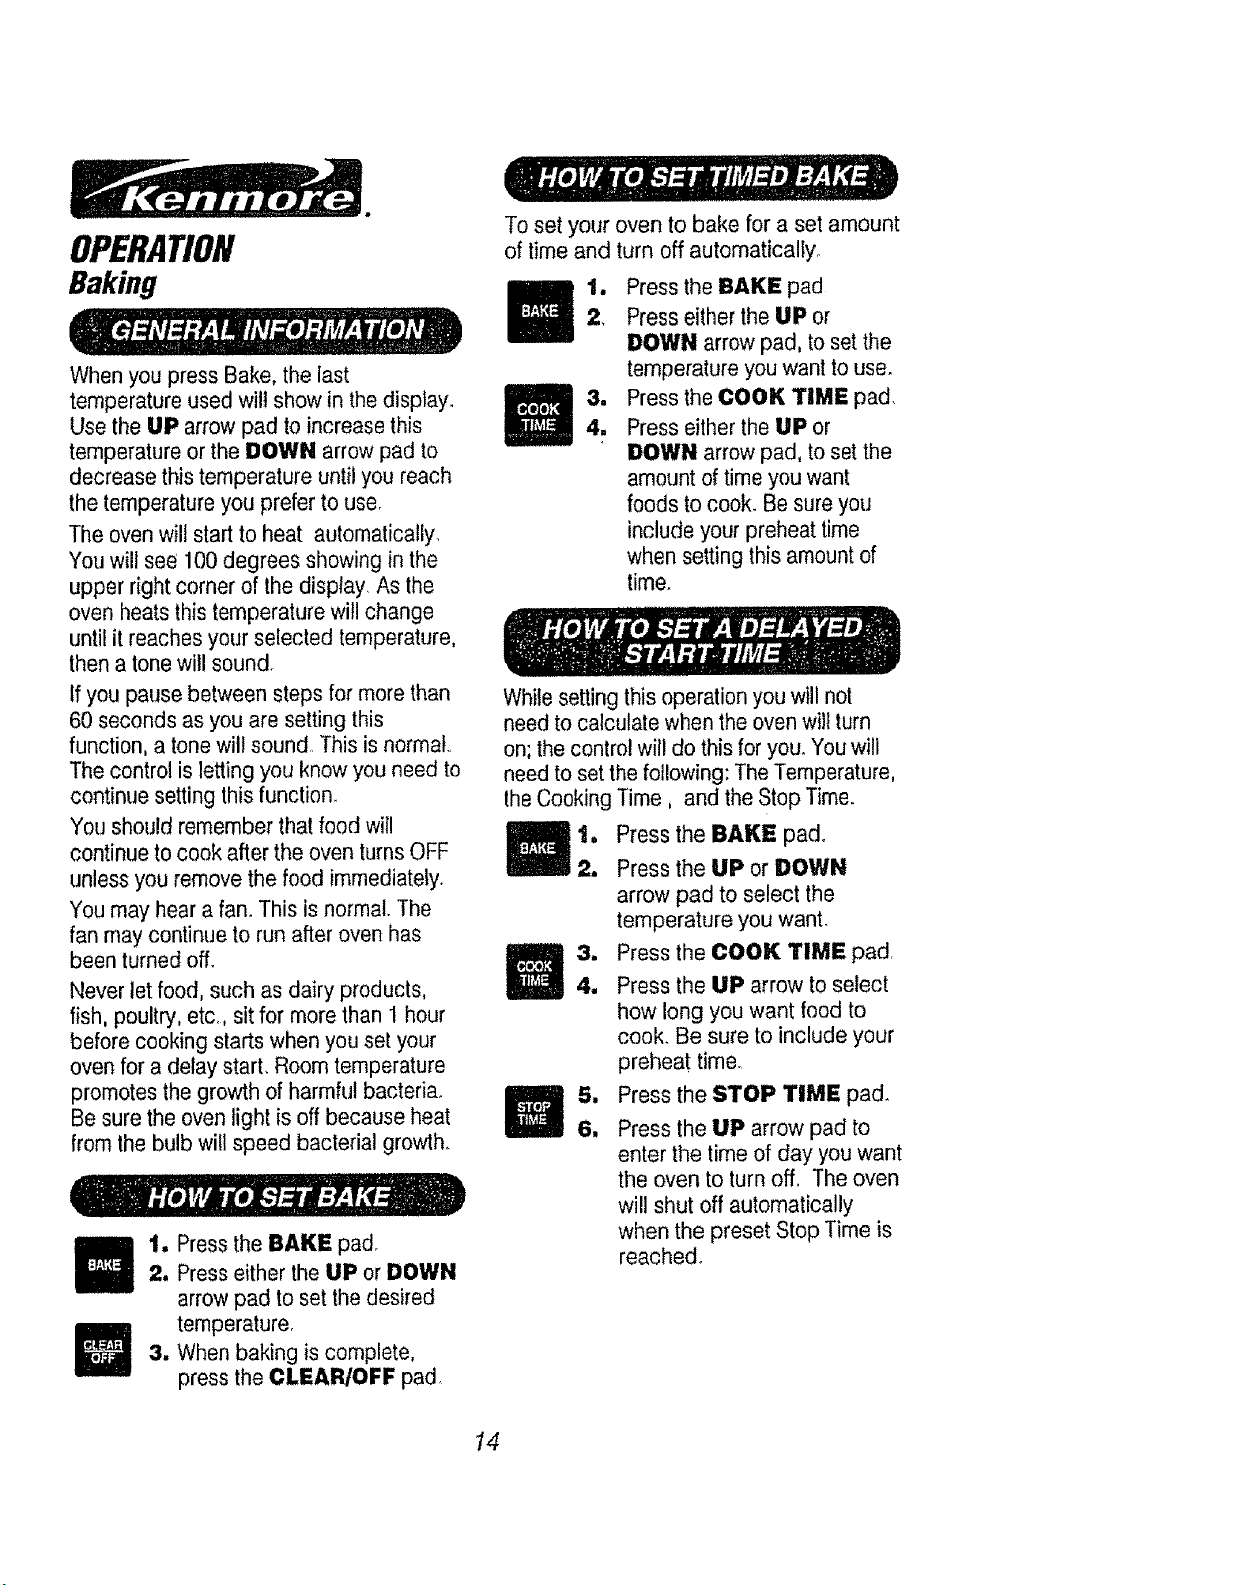
The oven racks are designed with stop
locks, a convenience as welt as a safety
precaution.r The guides have a bump to
prevent the racks from tilting when they
are pulled out of the oven.
Bump In
Rack Guide
Your oven has four (4) rack positions.
Above the top guide cannot be used for
a rack placement.
Guide
Always place oven racks in the
proper position while oven is cool.
You may feel that your new oven cooks
differently than the oven it replaced. We
recommend that you use your new oven
a few weeks to become more familiar
with it, following the times given in your
recipes as a guider See Do It Yourself
Adjustment in the back of this manual to
make the adjustment if you feel your oven
is too hot or too cool for your cooking
preference.
13
OPERATION
Baking
When you press Bake, the last
temperature used will show in the display.
Use the UP arrow pad to increase this
temperature or the DOWN arrow pad to
decrease this temperature until you reach
the temperature you prefer to use.
The oven will start to heat automatically.
You will see 100 degrees showing in the
upper right corner of the display, As the
oven heats this temperature will change
until it reaches your selected temperature,
then a tone will sound.
If you pause between steps for more than
60 seconds as you are setting this
function, a tone will sound This is normal.,
The control is letting you know you need to
continue setting this function.
You should remember that food will
continue to cook after the oven turns OFF
unless you remove the food immediately.
You may hear a fan. This is normal. The
fan may continue to run after oven has
been turned off.
Never let food, such as dairy products,
fish, poultry, etc,, sit for more than 1 hour
before cooking starts when you set your
oven for a delay start, Room temperature
promotes the growth of harmful bacteria.
Be sure the oven light is off because heat
from the bulb will speed bacterial growth.
1, Press the BAKE pad,
2. Press either the UP or DOWN
arrow pad to set the desired
temperature.
8. When baking is complete,
press the CLEAR/OFF pad.
To set your oven to bake for a set amount
of time and turn off automatically
t. Press the BAKE pad
2. Press either the UP or
DOWN arrow pad, to set the
temperature you want to use.
3. Press the COOK TIME pad,
4.. Press either the UP or
DOWN arrow pad, to set the
amount of time you want
foods to cook. Be sure you
include your preheat time
when setting this amount of
time.
While setting thisoperation youwill not
need to calculate when the oven will turn
on; the control will do this for you. You will
need to set the following: TheTemperature,
the Cooking Time, and the Stop Time.
1. Press the BAKE pad.
2, Press the UP or DOWN
arrow pad to select the
temperature you want.
8. Press the COOK TIME pad,
4. Press the UP arrow to select
how long you want food to
cook. Be sure to include your
preheat time.
5. Press the STOP TIME pad.
6. Press the UP arrow pad to
enter the time of day you want
the oven to turn off. The oven
will shut off automatically
when the preset Stop Time is
reached.
14
OPERATION
Broiling
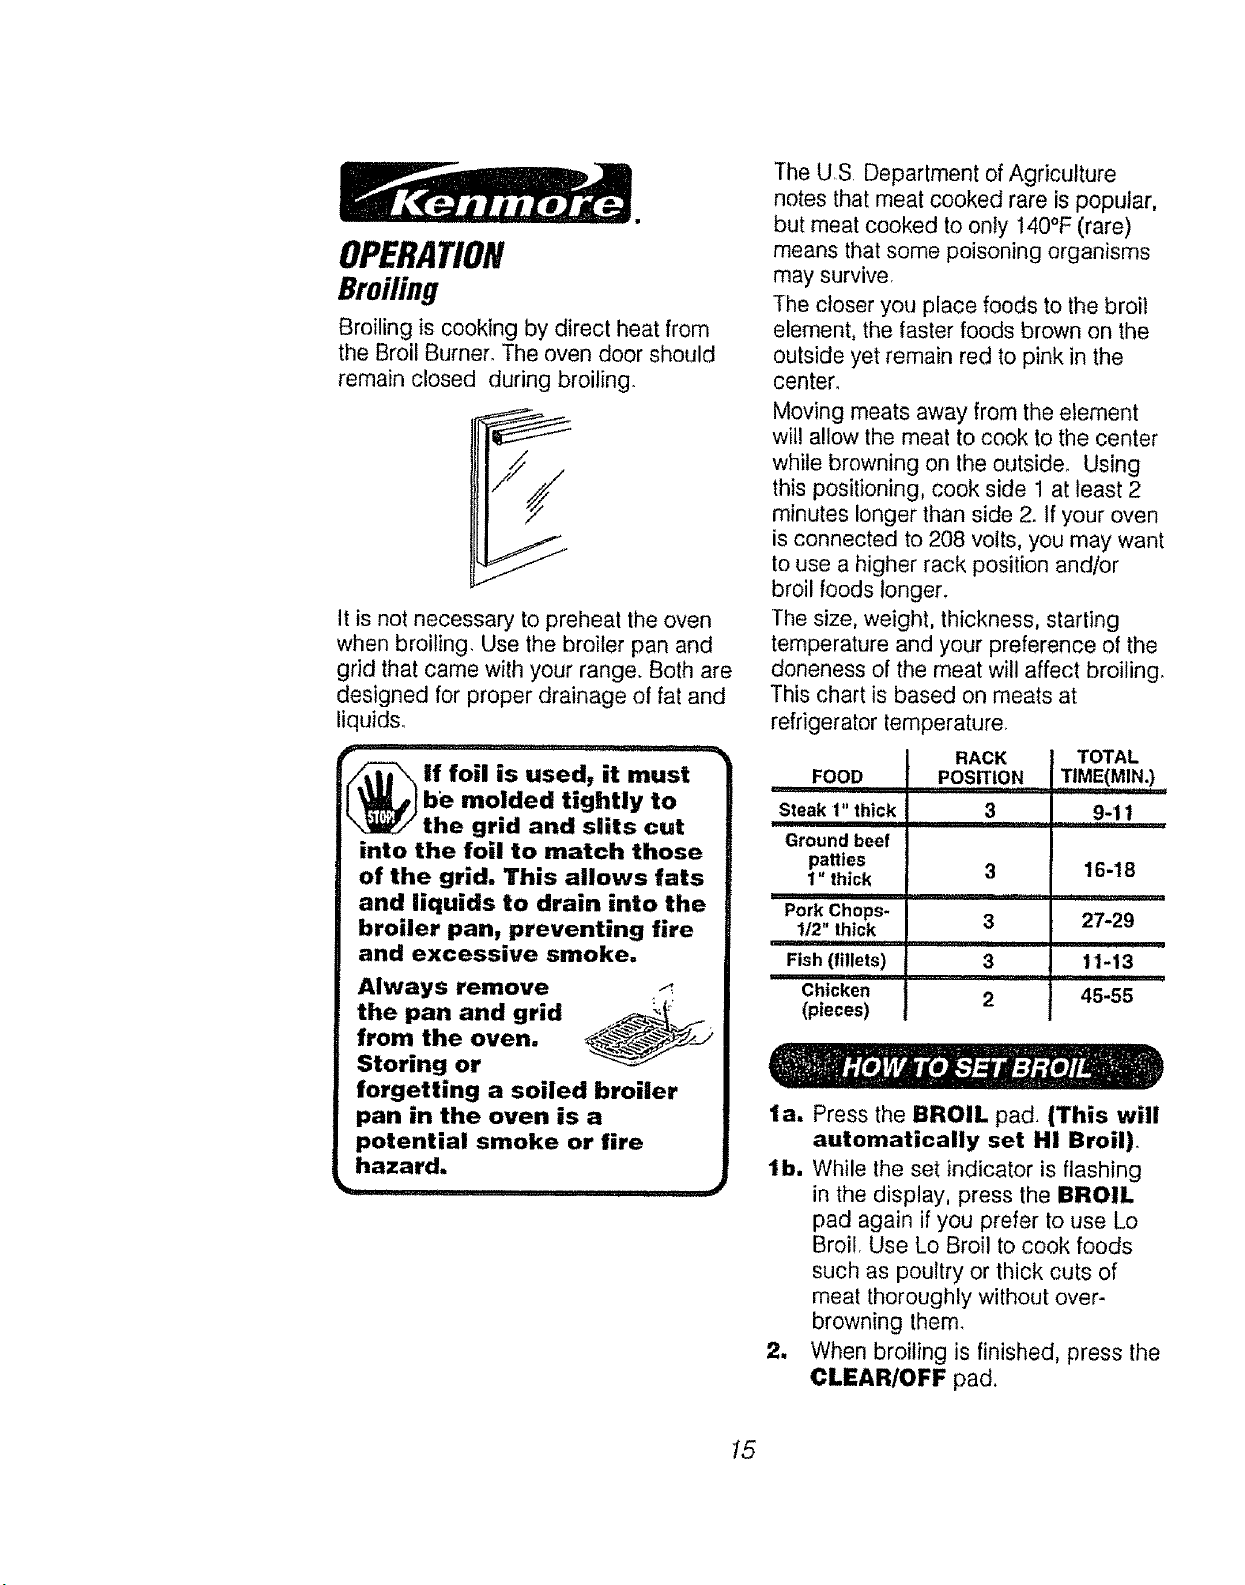
Broiling is cooking by direct heat from
the Broil Burner. The oven door should
remain closed during broiling.
It is not necessary to preheat the oven
when broiling. Use the broiler pan and
grid that came with your range. Both are
designed for proper drainage of fat and
liquids,
__ . ........... .............. ,_,;,_,_
/.l|l"'_ If foil ,s used, it must
[ _,l be molded t,ghtly to
_IE_/the gr,d and slits cut
into the foil to match those
of the grid. This allows fats
and liquids to drain into the
broiler pan, preventing fire
and excessive smoke.
Always remove
the pan and grid
from the oven.
Storing or
forgetting a soiled broiler
pan in the oven is a
potential smoke or fire
hazard.
The US Department of Agriculture
notes that meat cooked rare is popular,
but meat cooked to only 140°F (rare)
means that some poisoning organisms
may survive.
The closer you place foods to the broil
element, the faster foods brown on the
outside yet remain red to pink in the
center.
Moving meats away from the element
will allow the meat to cook to the center
while browning on the outside. Using
this positioning, cook side 1 at least 2
minutes longer than side 2. If your oven
is connected to 208 volts, you may want
to use a higher rack position and/or
broil foods longer.
The size, weight, thickness, starting
temperature and your preference of the
aloneness of the meat will affect broiling.
This chart is based on meats at
refrigerator temperature
FOOD
Steak 1" thick
Ground beef
patties
I" thick
I i
Pork Chops-
112" thick
Fish (fillets)
Chicken
(pieces)
RACK
POSITION
3
3
,_J_l,ll, i,iiii
3
3
2
TOTAL
TIME(MIN,)
,,!1111!1 /
..........9"! 1
16-18
i i
27-29
11-13
45-55
la, Press the BROIL pad. (This will
automatically set HI Broil).
lb. While the set indicator is flashing
in the display, press the BROIL
pad again if you prefer to use Lo
Broil. Use Lo Broil to cook foods
such as poultry or thick cuts of
meat thoroughly without over-
browning them.
2. When broiling is finished, press the
CLEAR/OFF pad,
15
Self-CleaningCycle
CAREANDCLEANING
1. Remove the broiler pan and grid,
oven racks, utensils and any foil
that may be in the oven.
2. Soil on the front frame,l" inside
the oven, and outside the door
gasket wilt need to be cleaned
by hand.
/.
Fr_ht Frame
Door Gasket
Door Liner
\\
Clean these areas with hot water,
soap-filled steel wool pads or
cleansers such as Soft Scrub® to
remove any soil. Rinse well with clean
water and dry.
3. Wipe up any heaw spillovers on
the oven bottom.
11
Do not clean the door gasket, The
fiberglass material of the oven
door gasket cannot withstand
abrasion. It is essential for the
gasket to remain intact, if you
notice it becoming worn, frayed or
displaced on the door, it should be
replaced,
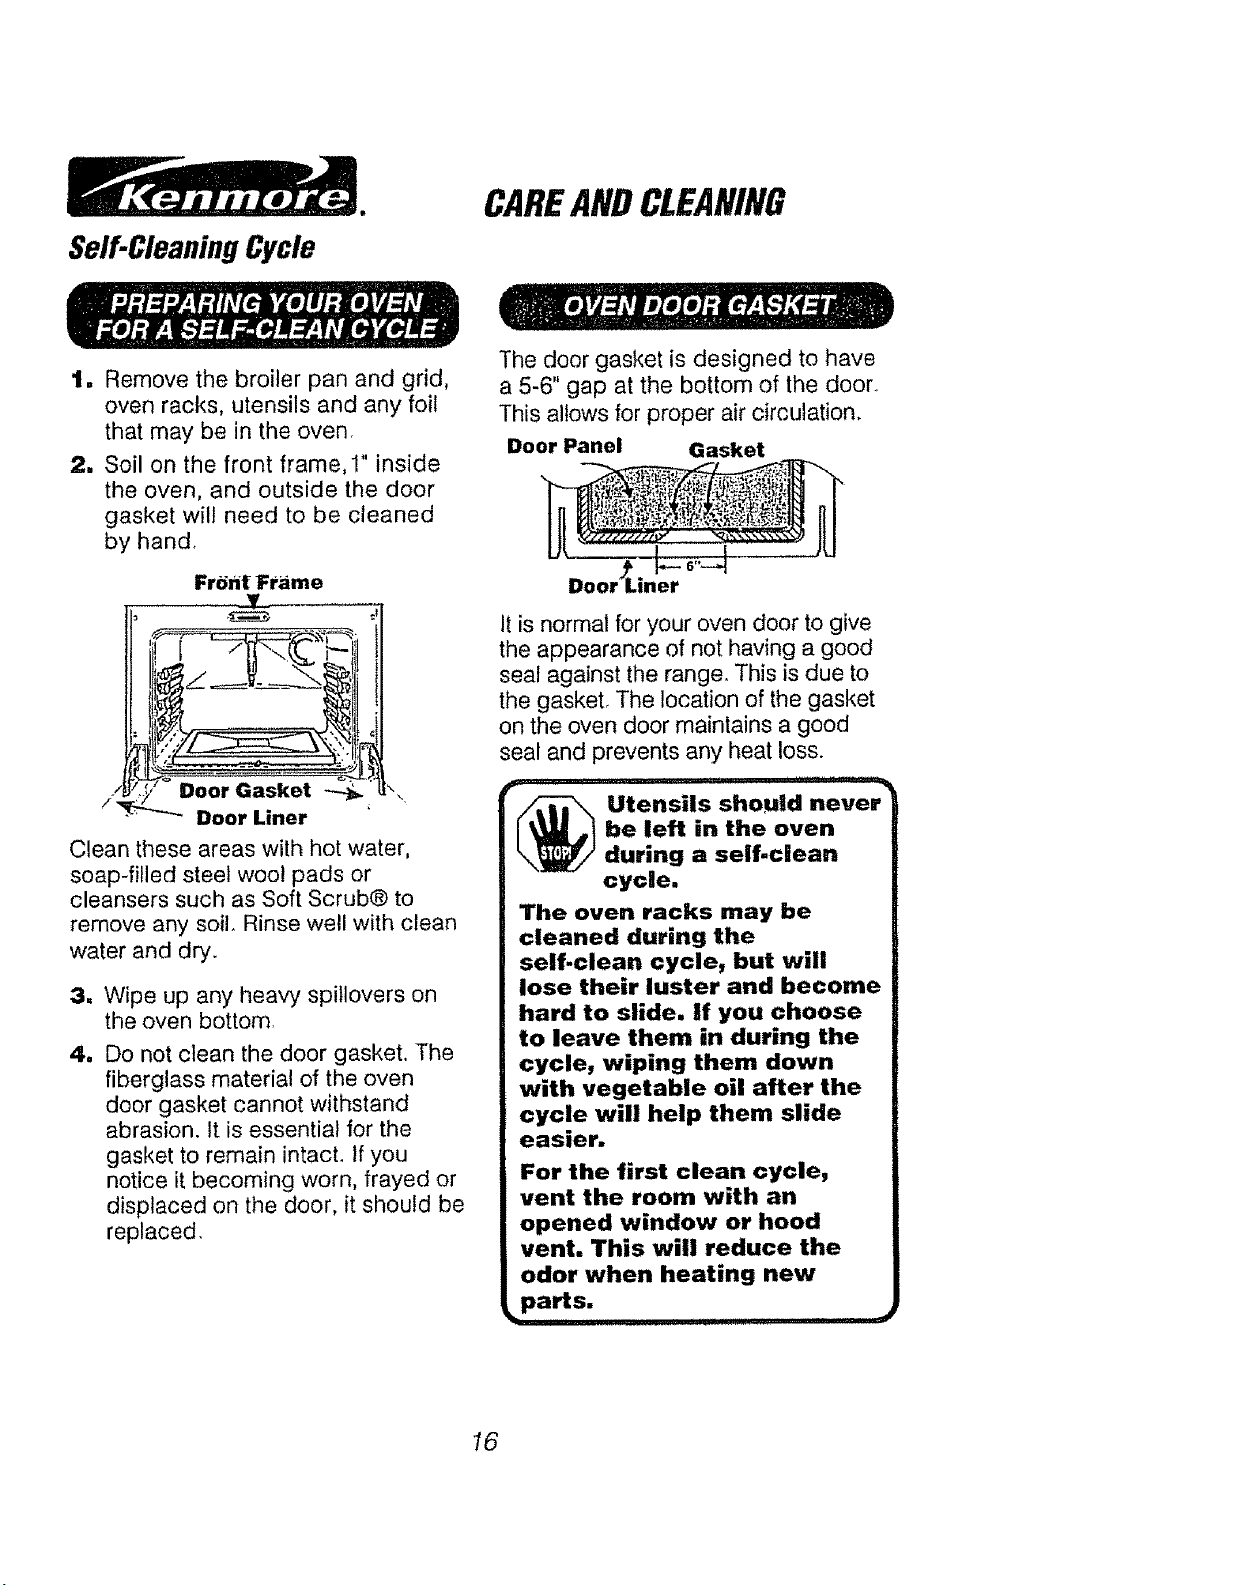
The door gasket is designed to have
a 5-6" gap at the bottom of the door_
This allows for proper air circulation.
Door Panel Gasket
±±
Door Liner
It is normal for your oven door to give
the appearance of not having a good
seal against the range. This is due to
the gasket, The location of the gasket
on the oven door maintains a good
seal and prevents any heat loss.
r
_ tensils should never
be left in the oven
during a self.clean
cycle.
The oven racks may be
cleaned during the
self-clean cycle, but will
lose their luster and become
hard to slide, if you choose
to leave them in during the
cycle, wiping them down
with vegetable oil after the
cycle will help them slide
easier.
For the first clean cycle,
vent the room with an
opened window or hood
vent. This will reduce the
odor when heating new
_parts.
ilUll iiii
16
CAREANDCLEANING
Self-CleaningCycle
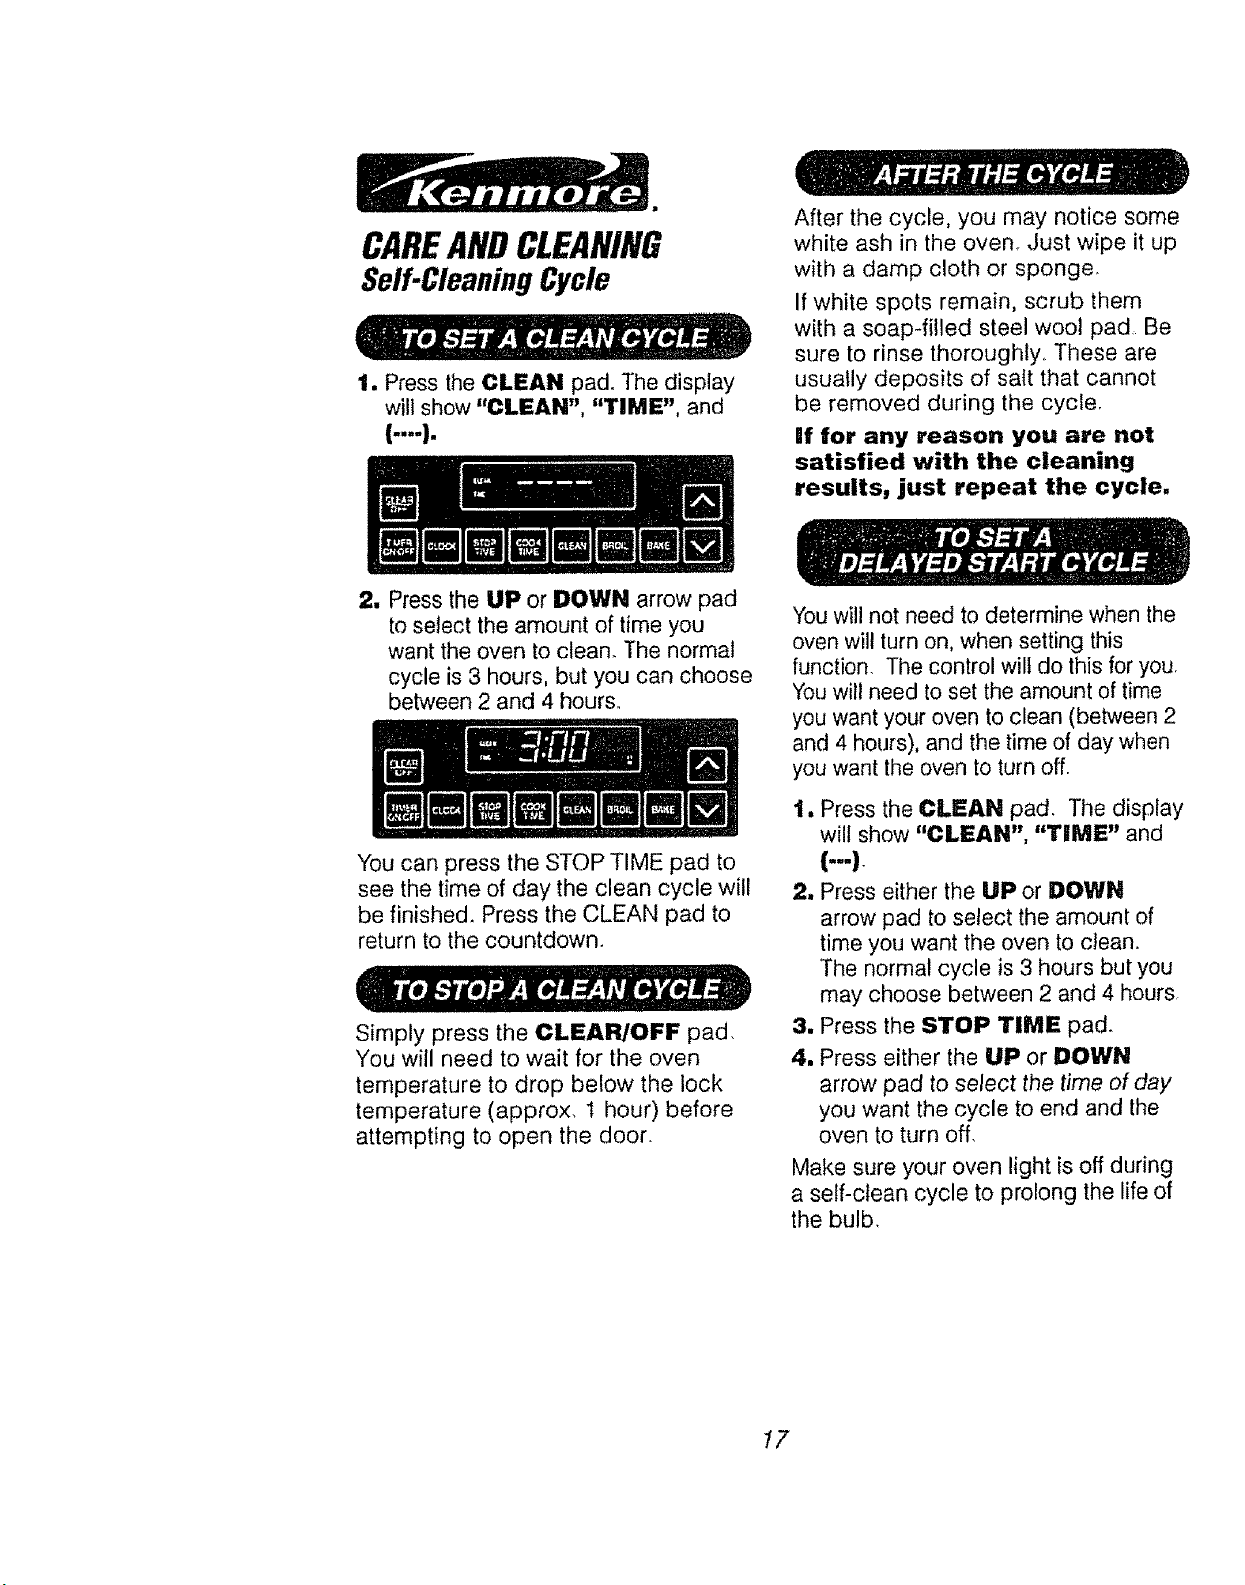
1. Press the CLEAN pad. The display
will show "CLEAN", "TIME", and
(....).
After the cycle, you may notice some
white ash in the oven..Just wipe it up
with a damp cloth or sponge.
If white spots remain, scrub them
with a soap-filled steel wool pad Be
sure to rinse thoroughly,, These are
usually deposits of salt that cannot
be removed during the cycle.
If for any reason you are not
satisfied with the cleaning
results, just repeat the cycle,
2. Press the UP or DOWN arrow pad
to select the amount of time you
want the oven to clean. The normal
cycle is 3 hours, but you can choose
between 2 and 4 hours,
You can press the STOP TIME pad to
see the time of day the clean cycle will
be finished. Press the CLEAN pad to
return to the countdown.
Simply press the CLEAR]OFF pad.
You will need to wait for the oven
temperature to drop below the lock
temperature (approx, 1 hour) before
attempting to open the door
You will not need to determine when the
oven will turnon, when setting this
function The control wilf do this for you
You will need to set the amount of time
you want your oven to clean (between 2
and 4 hours), and the time of day when
you want the oven to turn off
1. Press the CLEAN pad The display
will show "CLEAN", "TIME" and
I--I
2, Press either the UP or DOWN
arrow pad to select the amount of
time you want the oven to clean
The normal cycle is 3 hours but you
may choose between 2 and 4 hours
3. Press the STOP TIME pad.
4, Press either the UP or DOWN
arrow pad to select the time of day
you want the cycle to end and the
oven to turn off.
Make sure your oven light is off during
a self-clean cycle to prolong the life of
the bulb.
I7
 Loading...